Arduino - Capteur tactile - Moteur servo
Nous apprendrons à utiliser Arduino et un interrupteur à capteur tactile pour contrôler le servo-moteur. En détail :
- Si le capteur tactile est touché, l'Arduino fait tourner le moteur servo à 90 degrés
- Si le capteur tactile est touché à nouveau, l'Arduino fait tourner le moteur servo à 0 degré.
Ce processus est répété.
Préparation du matériel
Ou vous pouvez acheter les kits suivants:
| 1 | × | Kit de Démarrage DIYables STEM V3 (Arduino inclus) | |
| 1 | × | Kit de Capteurs DIYables (30 capteurs/écrans) | |
| 1 | × | Kit de Capteurs DIYables (18 capteurs/écrans) |
Divulgation : Certains des liens fournis dans cette section sont des liens affiliés Amazon. Nous pouvons recevoir une commission pour tout achat effectué via ces liens, sans coût supplémentaire pour vous. Nous vous remercions de votre soutien.
Sur le servo-moteur et le capteur tactile
Si vous ne connaissez pas le moteur servo et le capteur tactile (brochage, fonctionnement, programmation...), renseignez-vous à leur sujet dans les tutoriels suivants :
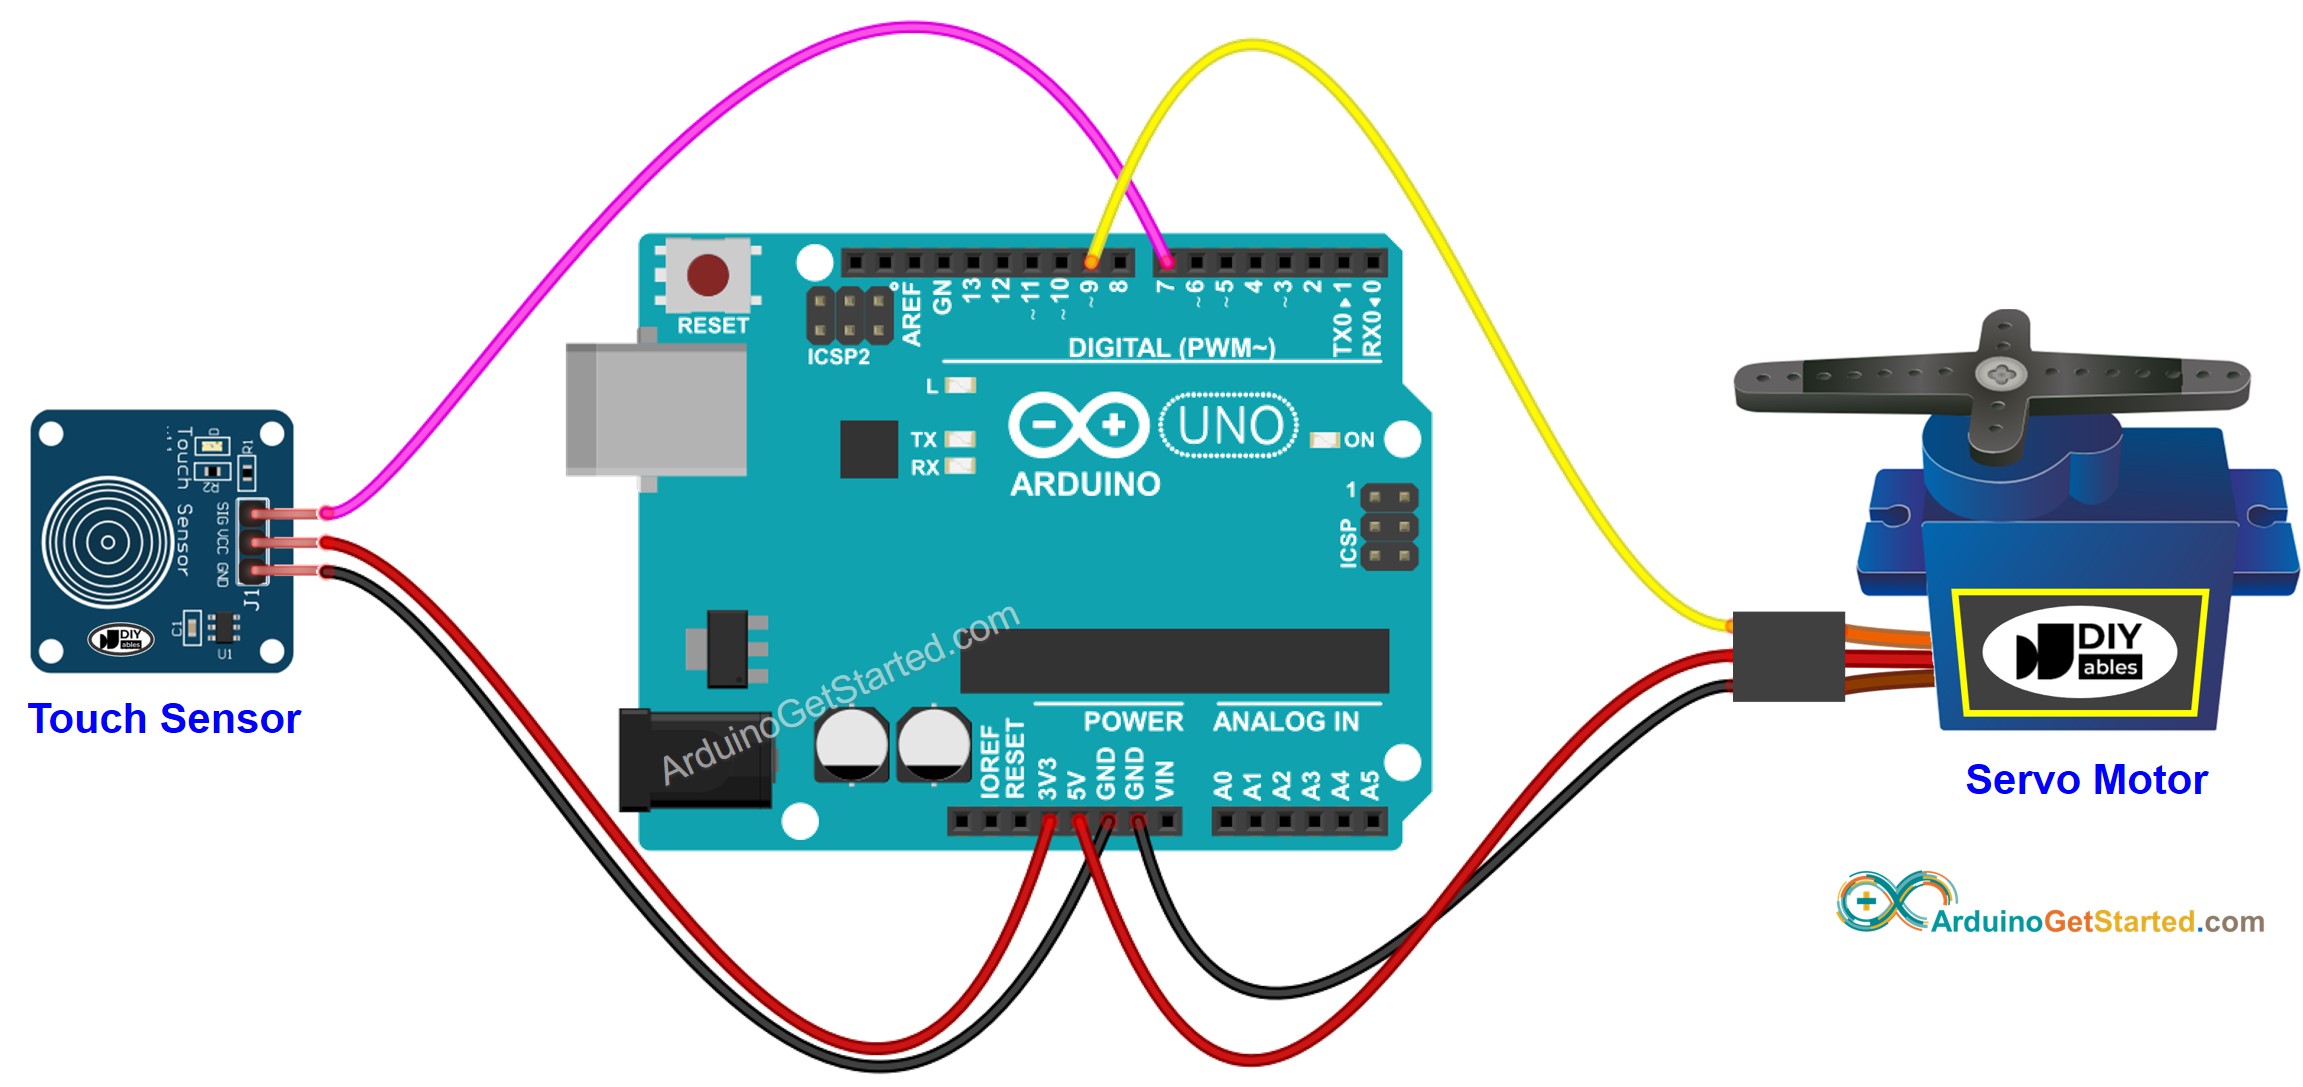
Diagramme de câblage

Cette image a été créée avec Fritzing. Cliquez pour agrandir l'image.
Code Arduino - Le capteur tactile contrôle le moteur servo
/*
* Ce code Arduino a été développé par newbiely.fr
* Ce code Arduino est mis à disposition du public sans aucune restriction.
* Pour des instructions complètes et des schémas de câblage, veuillez visiter:
* https://newbiely.fr/tutorials/arduino/arduino-touch-sensor-servo-motor
*/
#include <Servo.h>
// constants won't change
const int TOUCH_SENSOR_PIN = 7; // Arduino pin connected to touch sensor's pin
const int SERVO_PIN = 9; // Arduino pin connected to servo motor's pin
Servo servo; // create servo object to control a servo
// variables will change:
int angle = 0; // the current angle of servo motor
int lastTouchState; // the previous state of touch sensor
int currentTouchState; // the current state of touch sensor
void setup() {
Serial.begin(9600); // initialize serial
pinMode(TOUCH_SENSOR_PIN, INPUT); // set arduino pin to input mode
servo.attach(SERVO_PIN); // attaches the servo on pin 9 to the servo object
servo.write(angle);
currentTouchState = digitalRead(TOUCH_SENSOR_PIN);
}
void loop() {
lastTouchState = currentTouchState; // save the last state
currentTouchState = digitalRead(TOUCH_SENSOR_PIN); // read new state
if(lastTouchState == LOW && currentTouchState == HIGH) {
Serial.println("The sensor is touched");
// change angle of servo motor
if(angle == 0)
angle = 90;
else
if(angle == 90)
angle = 0;
// control servo motor arccoding to the angle
servo.write(angle);
}
}
Étapes rapides
- Connectez Arduino au PC via le câble USB
- Ouvrez l'IDE Arduino, sélectionnez la bonne carte et le bon port
- Copiez le code ci-dessus et ouvrez-le avec l'IDE Arduino
- Cliquez sur le bouton Upload de l'IDE Arduino pour téléverser le code sur Arduino
- Touchez plusieurs fois le capteur tactile.
- Observez le changement du moteur servo
