Dans ce tutoriel, nous allons apprendre à programmer un Arduino pour qu'il devienne un serveur web qui vous fournira la température via le web. Vous pouvez accéder à la page web fournie par l'Arduino pour vérifier la température à partir d'un capteur de température DS18B20. Voici comment cela fonctionne :
Arduino est programmé en tant que serveur web.
Vous saisissez l'adresse IP de l'Arduino dans un navigateur web sur votre smartphone ou PC.
Arduino répond à la requête du navigateur web avec une page web qui affiche la température relevée par le capteur DS18B20.
Nous passerons en revue deux exemples de code :
Code Arduino qui fournit une page web très simple affichant la température du capteur DS18B20. Cela vous permet de comprendre facilement son fonctionnement.
Code Arduino qui fournit une page web graphique affichant la température du capteur DS18B20.
Divulgation : Certains des liens fournis dans cette section sont des liens affiliés Amazon. Nous pouvons recevoir une commission pour tout achat effectué via ces liens, sans coût supplémentaire pour vous. Nous vous remercions de votre soutien.
Note d'achat: De nombreux capteurs DS18B20 sur le marché sont de faible qualité. Nous recommandons vivement d'acheter le capteur de la marque DIYables en utilisant le lien ci-dessus. Nous l'avons testé et il a bien fonctionné.
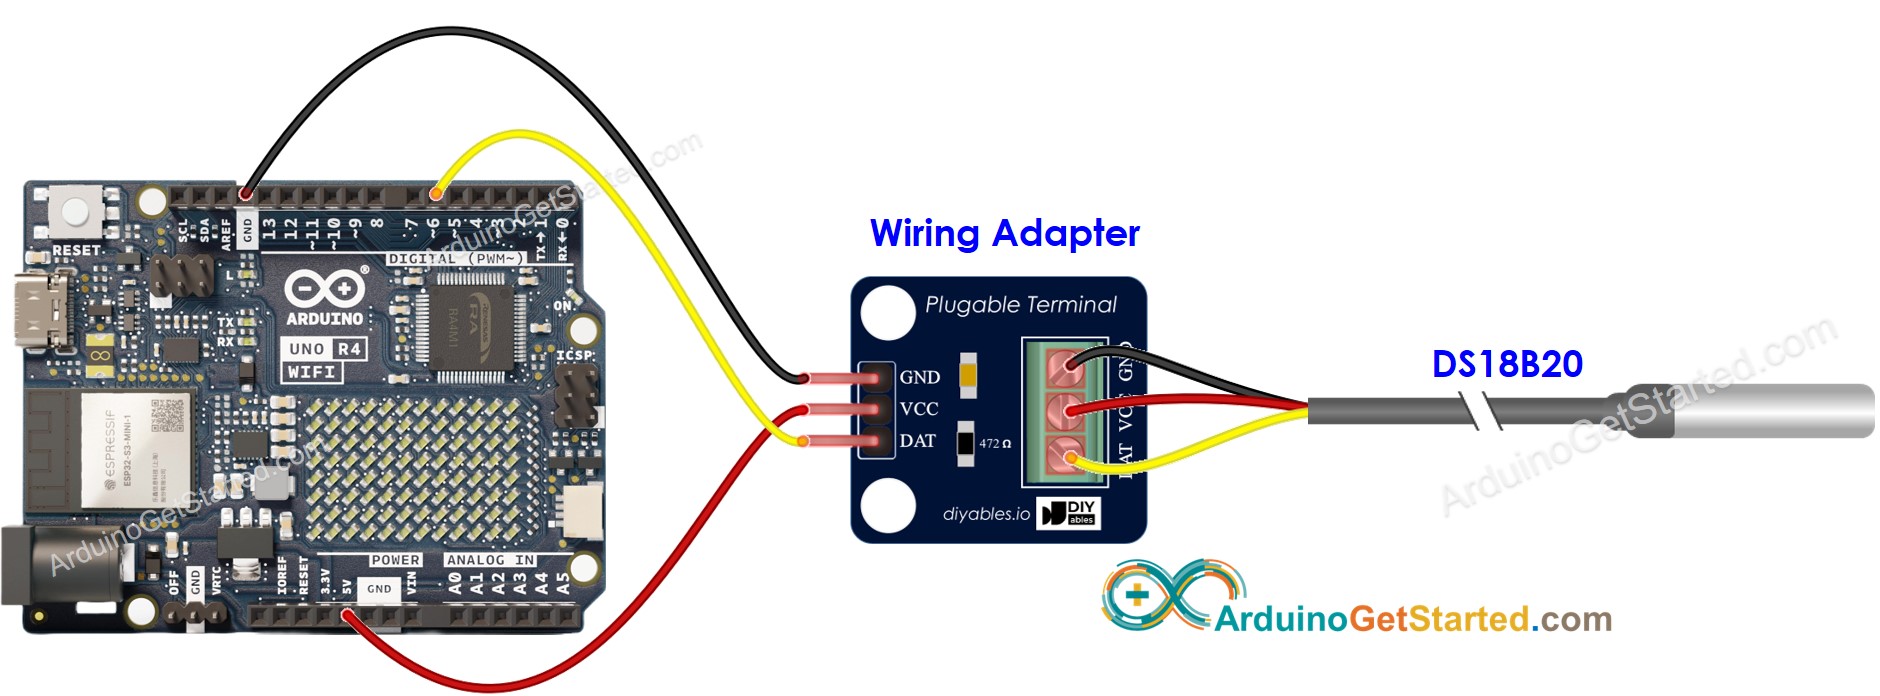
À propos de l'Arduino Uno R4 et du capteur de température DS18B20
Si vous ne connaissez pas l'Arduino Uno R4 et le capteur de température DS18B20 (brochage, fonctionnement, programmation...), renseignez-vous sur ces derniers dans les tutoriels suivants :
Cette image a été créée avec Fritzing. Cliquez pour agrandir l'image.
Code Arduino - Page Web Simple
/* * Ce code Arduino a été développé par newbiely.fr * Ce code Arduino est mis à disposition du public sans aucune restriction. * Pour des instructions complètes et des schémas de câblage, veuillez visiter: * https://newbiely.fr/tutorials/arduino/arduino-temperature-via-web*/#include <UnoR4WiFi_WebServer.h>#include <OneWire.h>#include <DallasTemperature.h>constchar HTML_CONTENT[] PROGMEM = R"rawliteral(<!DOCTYPE HTML><html><head><link rel="icon" href="data:,"></head><p>Temperature: <span style="color: red;">%TEMP_PLACE_HOLDER% °C</span></p></html>)rawliteral";constchar WIFI_SSID[] = "YOUR_WIFI_SSID"; // change your network SSID (name)constchar WIFI_PASSWORD[] = "YOUR_WIFI_PASSWORD"; // change your network passwordconstint SENSOR_PIN = 6; // Arduino pin connected to DS18B20 sensor's DQ pinOneWire oneWire(SENSOR_PIN); // setup a oneWire instanceDallasTemperature tempSensor(&oneWire); // pass oneWire to DallasTemperature libraryUnoR4WiFi_WebServer server;floatgetTemperature() { tempSensor.requestTemperatures(); // send the command to get temperaturesfloat tempCelsius = tempSensor.getTempCByIndex(0); // read temperature in Celsiusreturn tempCelsius;}void handleHome(WiFiClient& client, constString& method, constString& request, const QueryParams& params, constString& jsonData) {float tempC = getTemperature();String response = HTML_CONTENT; response.replace("%TEMP_PLACE_HOLDER%", String(tempC, 1)); server.sendResponse(client, response.c_str());}voidsetup() {Serial.begin(9600);delay(1000); tempSensor.begin(); // initialize the temperature sensorSerial.println("Arduino Uno R4 WiFi - Temperature via Web");// Connect to WiFiSerial.print("Connecting to ");Serial.println(WIFI_SSID);WiFi.begin(WIFI_SSID, WIFI_PASSWORD);while (WiFi.status() != WL_CONNECTED) {delay(500);Serial.print("."); }Serial.println("connected!");Serial.print("IP address: ");Serial.println(WiFi.localIP());// Configure routes server.addRoute("/", handleHome);// Start server server.begin();Serial.println("\n=== Web Server Ready! ===");Serial.print("Visit: http://");Serial.println(WiFi.localIP());}voidloop() { server.handleClient();}
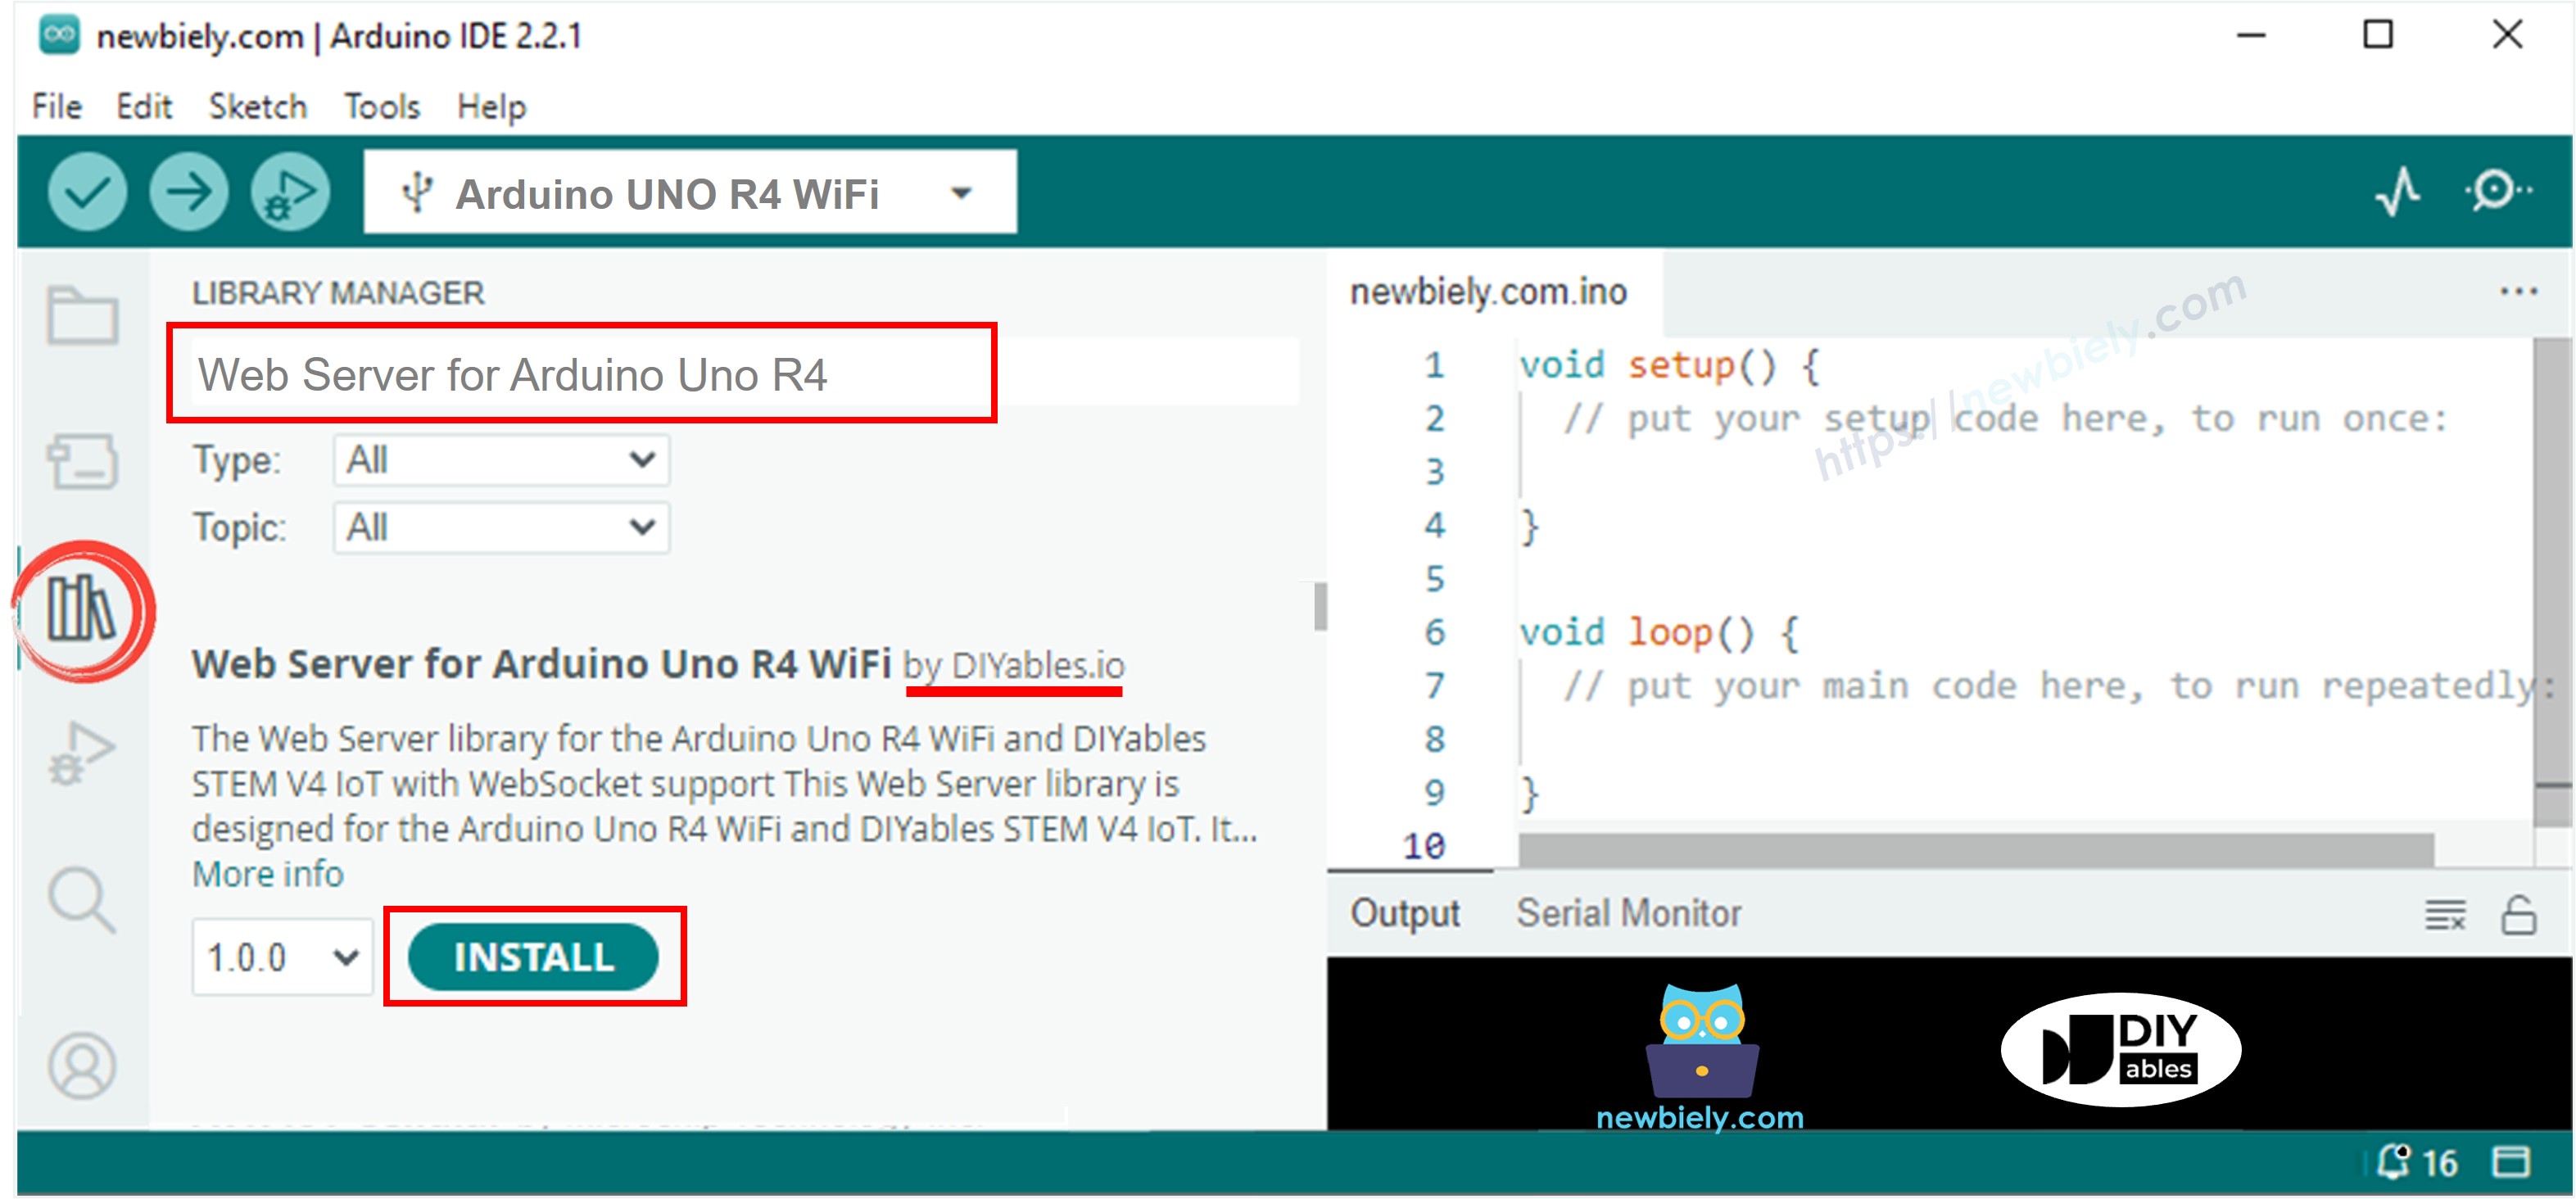
Open the Library Manager by clicking on the Library Manager icon on the left side of the Arduino IDE.
Search for Web Server for Arduino Uno R4 WiFi and locate the Web Server library created by DIYables.
Click on the Install button to add the Web Server library.
Copiez le code ci-dessus et ouvrez-le avec Arduino IDE
Modifiez les informations wifi (SSID et mot de passe) dans le code par les vôtres
Cliquez sur le bouton Upload de l'Arduino IDE pour téléverser le code sur Arduino
Ouvrez le moniteur série
Consultez le résultat sur le moniteur série.
Newbiely | Arduino IDE 2.3.8
──
☐
✕
File
Edit
Sketch
Tools
Help
Arduino Uno
Newbiely.ino
···
8Serial.println("Hello World!");
Output
Serial Monitor
Message (Enter to send message to 'Arduino Uno' on 'COM15')
New Line
9600 baud
Arduino Uno R4 WiFi - Temperature via Web
Connecting to YOUR_WIFI_SSID
connected!
IP address: 192.168.0.254
Starting web server on IP: 192.168.0.254
=== Web Server Ready! ===
Visit: http://192.168.0.254
Ln 11, Col 1
Arduino Uno on COM15
2
Vous trouverez une adresse IP. Saisissez cette adresse IP dans la barre d'adresse d'un navigateur web sur votre smartphone ou PC.
Vous verrez l'affichage suivant sur le moniteur série.
Newbiely | Arduino IDE 2.3.8
──
☐
✕
File
Edit
Sketch
Tools
Help
Arduino Uno
Newbiely.ino
···
8Serial.println("Hello World!");
Output
Serial Monitor
Message (Enter to send message to 'Arduino Uno' on 'COM15')
New Line
9600 baud
Arduino Uno R4 WiFi - Temperature via Web
Connecting to YOUR_WIFI_SSID
connected!
IP address: 192.168.0.254
Starting web server on IP: 192.168.0.254
=== Web Server Ready! ===
Visit: http://192.168.0.254
Method: GET
Requested path: /
Client disconnected
Ln 11, Col 1
Arduino Uno on COM15
2
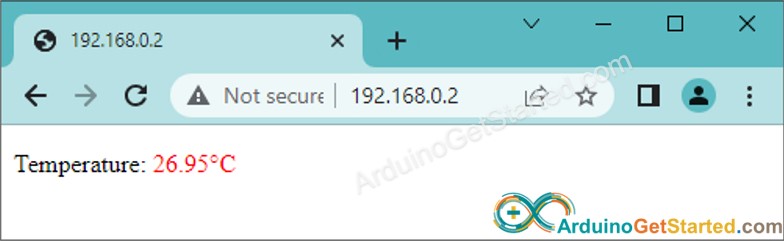
Vous verrez une page web très simple de la carte Arduino sur le navigateur web comme ci-dessous :
Code Arduino - Page Web Graphique
Étant donné qu'une page web graphique contient une grande quantité de contenu HTML, l'intégrer dans le code Arduino comme auparavant devient peu pratique. Pour résoudre cela, nous devons séparer le code Arduino et le code HTML dans différents fichiers :
Le code Arduino sera placé dans un fichier .ino.
Le code HTML (y compris HTML, CSS et Javascript) sera placé dans un fichier .h.
Étapes rapides
Ouvrez l'IDE Arduino et créez un nouveau sketch, donnez-lui un nom, par exemple ArduinoGetStarted.com.ino
Copiez le code ci-dessous et ouvrez-le avec l'IDE Arduino
/* * Ce code Arduino a été développé par newbiely.fr * Ce code Arduino est mis à disposition du public sans aucune restriction. * Pour des instructions complètes et des schémas de câblage, veuillez visiter: * https://newbiely.fr/tutorials/arduino/arduino-temperature-via-web*/#include <UnoR4WiFi_WebServer.h>#include"index.h"#include <OneWire.h>#include <DallasTemperature.h>constchar WIFI_SSID[] = "YOUR_WIFI_SSID"; // change your network SSID (name)constchar WIFI_PASSWORD[] = "YOUR_WIFI_PASSWORD"; // change your network passwordconstint SENSOR_PIN = 6; // Arduino pin connected to DS18B20 sensor's DQ pinOneWire oneWire(SENSOR_PIN); // setup a oneWire instanceDallasTemperature tempSensor(&oneWire); // pass oneWire to DallasTemperature libraryUnoR4WiFi_WebServer server;floatgetTemperature() { tempSensor.requestTemperatures(); // send the command to get temperaturesfloat tempCelsius = tempSensor.getTempCByIndex(0); // read temperature in Celsiusreturn tempCelsius;}void handleHome(WiFiClient& client, constString& method, constString& request, const QueryParams& params, constString& jsonData) {float tempC = getTemperature();String response = HTML_CONTENT; response.replace("TEMPERATURE_MARKER", String(tempC, 1)); server.sendResponse(client, response.c_str());}voidsetup() {Serial.begin(9600);delay(1000); tempSensor.begin(); // initialize the temperature sensorSerial.println("Arduino Uno R4 WiFi - Temperature via Web");// Connect to WiFiSerial.print("Connecting to ");Serial.println(WIFI_SSID);WiFi.begin(WIFI_SSID, WIFI_PASSWORD);while (WiFi.status() != WL_CONNECTED) {delay(500);Serial.print("."); }Serial.println("connected!");Serial.print("IP address: ");Serial.println(WiFi.localIP());// Configure routes server.addRoute("/", handleHome);// Start server server.begin();Serial.println("\n=== Web Server Ready! ===");Serial.print("Visit: http://");Serial.println(WiFi.localIP());}voidloop() { server.handleClient();}
Changez les informations WiFi (SSID et mot de passe) dans le code pour les vôtres
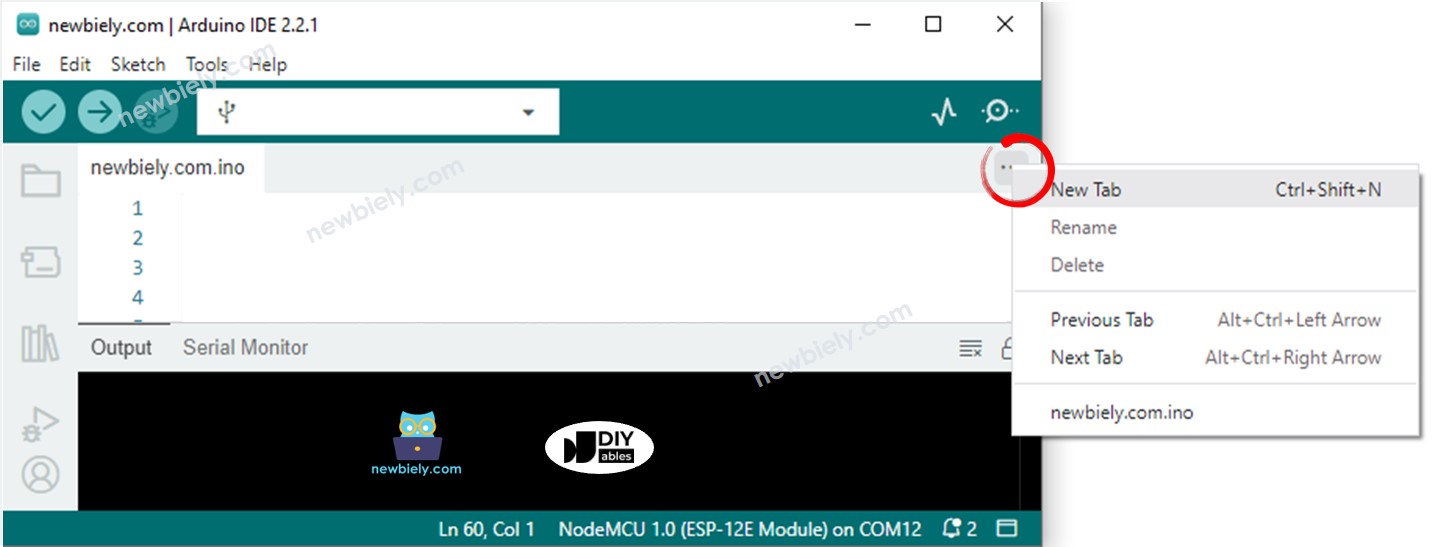
Créez le fichier index.h sur Arduino IDE en :
Cliquant soit sur le bouton juste en-dessous de l'icône de moniteur série et choisissez Nouvel Onglet, soit en utilisant les touches Ctrl+Shift+N.
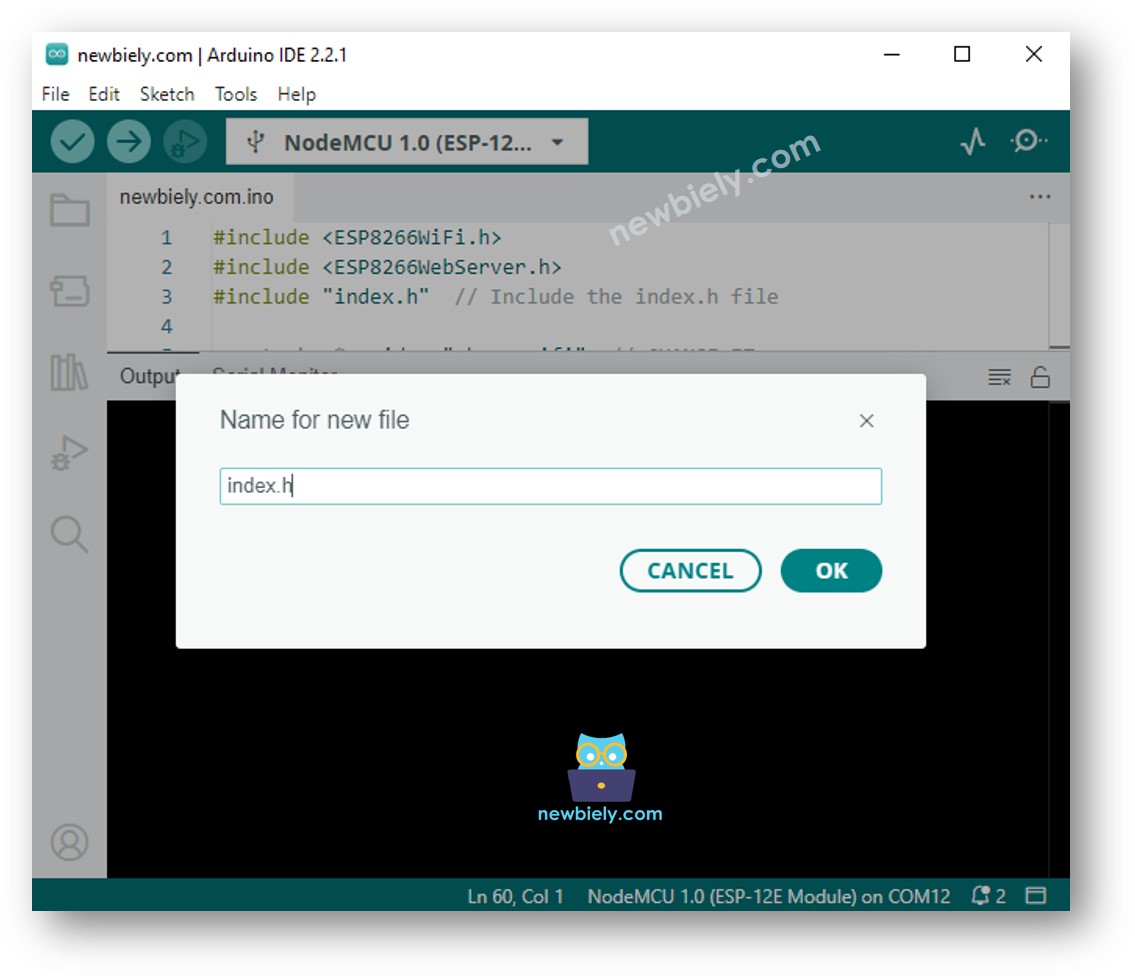
Donnez le nom de fichier index.h et cliquez sur le bouton OK.
Copiez le code ci-dessous et collez-le dans index.h.
/* * Ce code Arduino a été développé par newbiely.fr * Ce code Arduino est mis à disposition du public sans aucune restriction. * Pour des instructions complètes et des schémas de câblage, veuillez visiter: * https://newbiely.fr/tutorials/arduino/arduino-temperature-via-web*/constchar *HTML_CONTENT = R""""(<!DOCTYPE html><html><head><title>Arduino - Web Temperature</title><meta name="viewport" content="width=device-width, initial-scale=0.7, maximum-scale=0.7"><meta charset="utf-8"><link rel="icon" href="https://diyables.io/images/page/diyables.svg"><style>body { font-family: "Georgia"; text-align: center; font-size: width/2pt;}h1 { font-weight: bold; font-size: width/2pt;}h2 { font-weight: bold; font-size: width/2pt;}button { font-weight: bold; font-size: width/2pt;}</style><script>var cvs_width = 200, cvs_height = 450;function init() { var canvas = document.getElementById("cvs"); canvas.width = cvs_width; canvas.height = cvs_height + 50; var ctx = canvas.getContext("2d"); ctx.translate(cvs_width/2, cvs_height - 80); update_view(TEMPERATURE_MARKER);}function update_view(temp) { var canvas = document.getElementById("cvs"); var ctx = canvas.getContext("2d"); var radius = 70; var offset = 5; var width = 45; var height = 330; ctx.clearRect(-cvs_width/2, -350, cvs_width, cvs_height); ctx.strokeStyle="blue"; ctx.fillStyle="blue";//5-step Degree var x = -width/2; ctx.lineWidth=2;for (var i = 0; i <= 100; i+=5) { var y = -(height - radius)*i/100 - radius - 5; ctx.beginPath(); ctx.lineTo(x, y); ctx.lineTo(x - 20, y); ctx.stroke(); }//20-step Degree ctx.lineWidth=5;for (var i = 0; i <= 100; i+=20) { var y = -(height - radius)*i/100 - radius - 5; ctx.beginPath(); ctx.lineTo(x, y); ctx.lineTo(x - 25, y); ctx.stroke(); ctx.font="20px Georgia"; ctx.textBaseline="middle"; ctx.textAlign="right"; ctx.fillText(i.toString(), x - 35, y); }// shape ctx.lineWidth=16; ctx.beginPath(); ctx.arc(0, 0, radius, 0, 2 * Math.PI); ctx.stroke(); ctx.beginPath(); ctx.rect(-width/2, -height, width, height); ctx.stroke(); ctx.beginPath(); ctx.arc(0, -height, width/2, 0, 2 * Math.PI); ctx.stroke(); ctx.fillStyle="#e6e6ff"; ctx.beginPath(); ctx.arc(0, 0, radius, 0, 2 * Math.PI); ctx.fill(); ctx.beginPath(); ctx.rect(-width/2, -height, width, height); ctx.fill(); ctx.beginPath(); ctx.arc(0, -height, width/2, 0, 2 * Math.PI); ctx.fill(); ctx.fillStyle="#ff1a1a"; ctx.beginPath(); ctx.arc(0, 0, radius - offset, 0, 2 * Math.PI); ctx.fill(); temp = Math.round(temp * 100) / 100; var y = (height - radius)*temp/100.0 + radius + 5; ctx.beginPath(); ctx.rect(-width/2 + offset, -y, width - 2*offset, y); ctx.fill(); ctx.fillStyle="red"; ctx.font="bold 34px Georgia"; ctx.textBaseline="middle"; ctx.textAlign="center"; ctx.fillText(temp.toString() + "°C", 0, 100);}window.onload = init;</script></head><body><h1>Arduino - Web Temperature</h1><canvas id="cvs"></canvas></body></html>)"""";
Vous avez maintenant le code dans deux fichiers : ArduinoGetStarted.com.ino et index.h
Cliquez sur le bouton Upload dans l'IDE Arduino pour téléverser le code vers Arduino
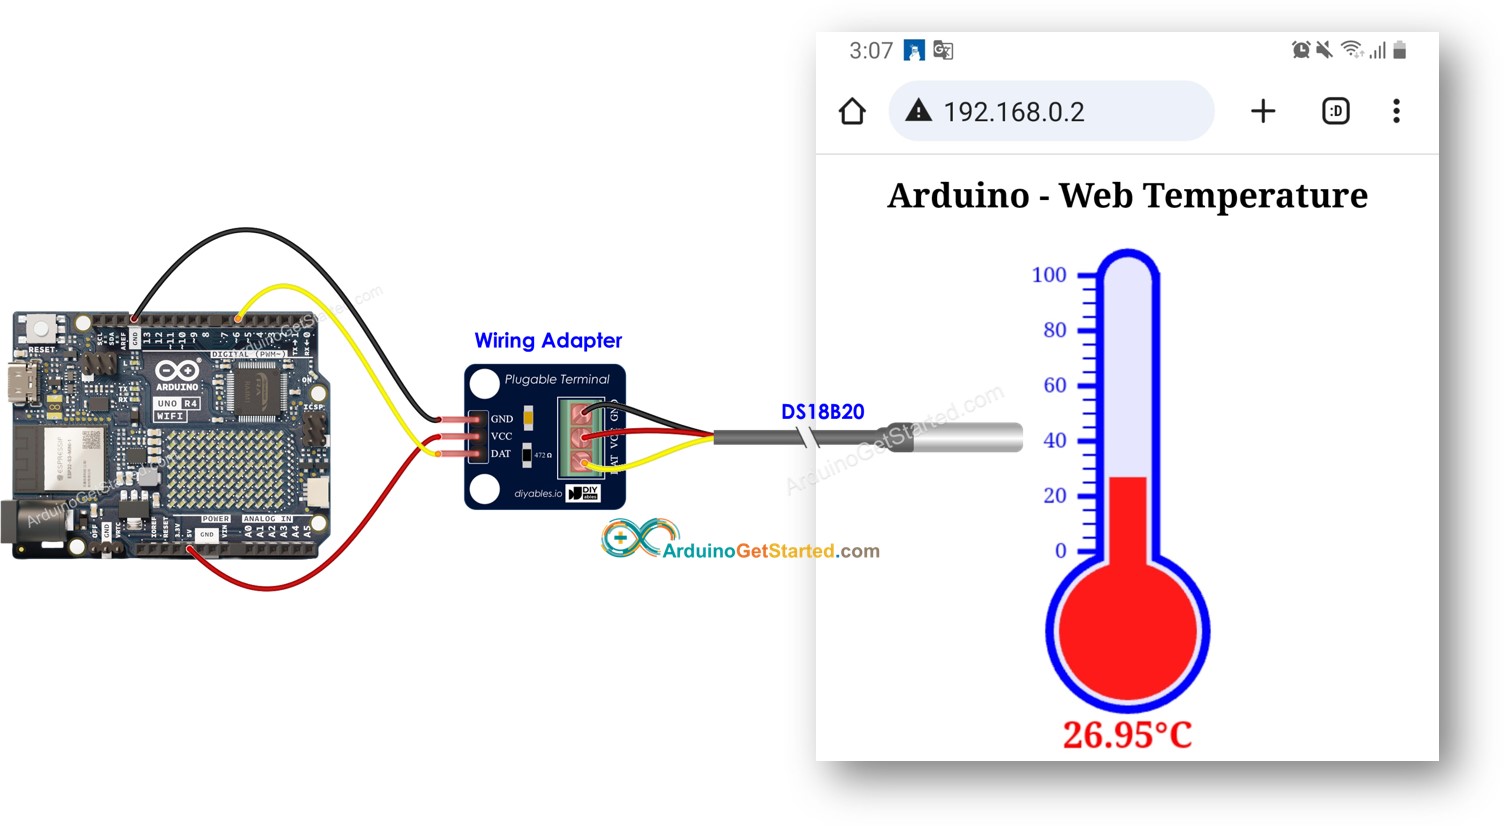
Accédez à la page web de la carte Arduino via un navigateur web comme auparavant. Vous le verrez comme ci-dessous :
※ Note:
Si vous apportez des modifications au contenu HTML dans le fichier index.h mais que vous ne modifiez rien dans le fichier ArduinoGetStarted.com.ino, l'IDE Arduino ne rafraîchira ni ne mettra à jour le contenu HTML lorsque vous compilerez et téléverserez le code sur l'ESP32. Pour forcer l'IDE Arduino à mettre à jour le contenu HTML dans cette situation, vous devez apporter une modification dans le fichier ArduinoGetStarted.com.ino. Par exemple, vous pouvez ajouter une ligne vide ou insérer un commentaire. Cette action déclenche l'IDE pour reconnaître qu'il y a eu des changements dans le projet, garantissant que votre contenu HTML mis à jour soit inclus dans le téléversement.
N'hésitez pas à partager le lien de ce tutoriel. Cependant, veuillez ne pas utiliser notre contenu sur d'autres sites web. Nous avons investi beaucoup d'efforts et de temps pour créer ce contenu, veuillez respecter notre travail !