Arduino - Horloge temps réel

Dans ce tutoriel, nous allons apprendre :

Préparation du matériel

1×Arduino Uno
1×USB 2.0 cable type A/B
1×Real-Time Clock DS3231 Module
1×CR2032 battery
1×Jumper Wires
1×(Optional) 9V Power Adapter for Arduino
1×(Recommended) Screw Terminal Block Shield for Arduino Uno
1×(Optional) Transparent Acrylic Enclosure For Arduino Uno

Or you can buy the following sensor kits:

1×DIYables Sensor Kit (30 sensors/displays)
1×DIYables Sensor Kit (18 sensors/displays)
Divulgation : Certains des liens fournis dans cette section sont des liens affiliés Amazon. Nous pouvons recevoir une commission pour tout achat effectué via ces liens, sans coût supplémentaire pour vous. Nous vous remercions de votre soutien.

À propos du module d'horloge en temps réel DS3231

Arduino possède en lui-même des fonctions liées au temps telles que millis(), micros(). Cependant, elles ne peuvent pas fournir la date et l'heure (secondes, minutes, heures, jour, date, mois et année). Pour obtenir la date et l'heure, nous devons utiliser un module d'horloge temps réel (RTC) tel que DS3231, DS1370. Le module DS3231 est plus précis que le DS1370. Voir DS3231 vs DS1307

Schéma des broches

Le module d'horloge en temps réel DS3231 comprend 10 broches :

  • Broche 32K : fournit une horloge de référence stable (compensée en température) et précise.
  • Broche SQW : génère une belle onde carrée à 1Hz, 4kHz, 8kHz ou 32kHz et peut être gérée par programmation. Ceci peut également être utilisé comme une interruption due à une condition d'alarme dans de nombreuses applications basées sur le temps.
  • Broche SCL : est une broche d'horloge série pour l'interface I2C.
  • Broche SDA : est une broche de données série pour l'interface I2C.
  • Broche VCC : alimente le module. Elle peut être comprise entre 3,3V et 5,5V.
  • Broche GND : est une broche de masse.

Pour une utilisation normale, il nécessite l'utilisation de 4 broches : VCC, GND, SDA, SCL.

Horloge temps réel module DS3231 Brochage

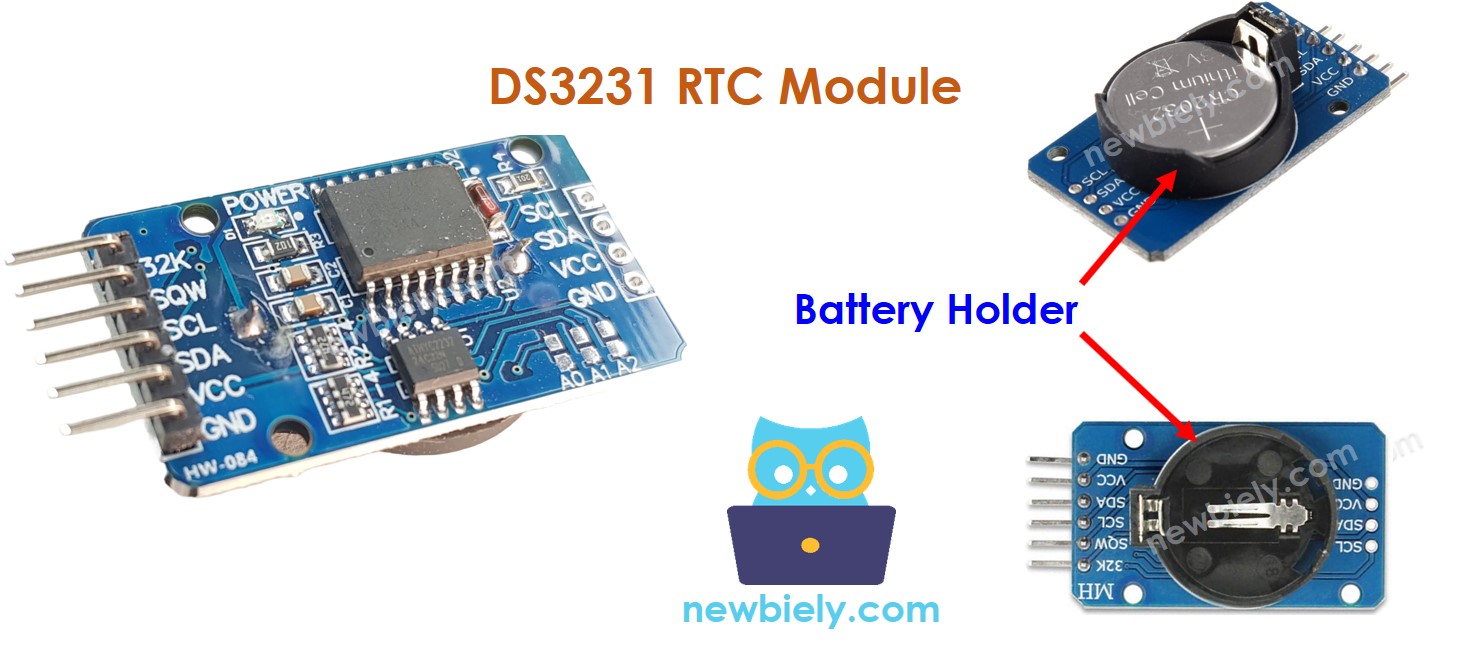
Le module DS3231 dispose également d'un support de batterie.

  • Si nous insérons une pile CR2032, cela permet de maintenir l'heure sur le module lorsque l'alimentation principale est coupée.
  • Si nous n'insérons pas la pile, les informations horaires sont perdues si l'alimentation principale est coupée et vous devez régler l'heure à nouveau.

Diagramme de câblage
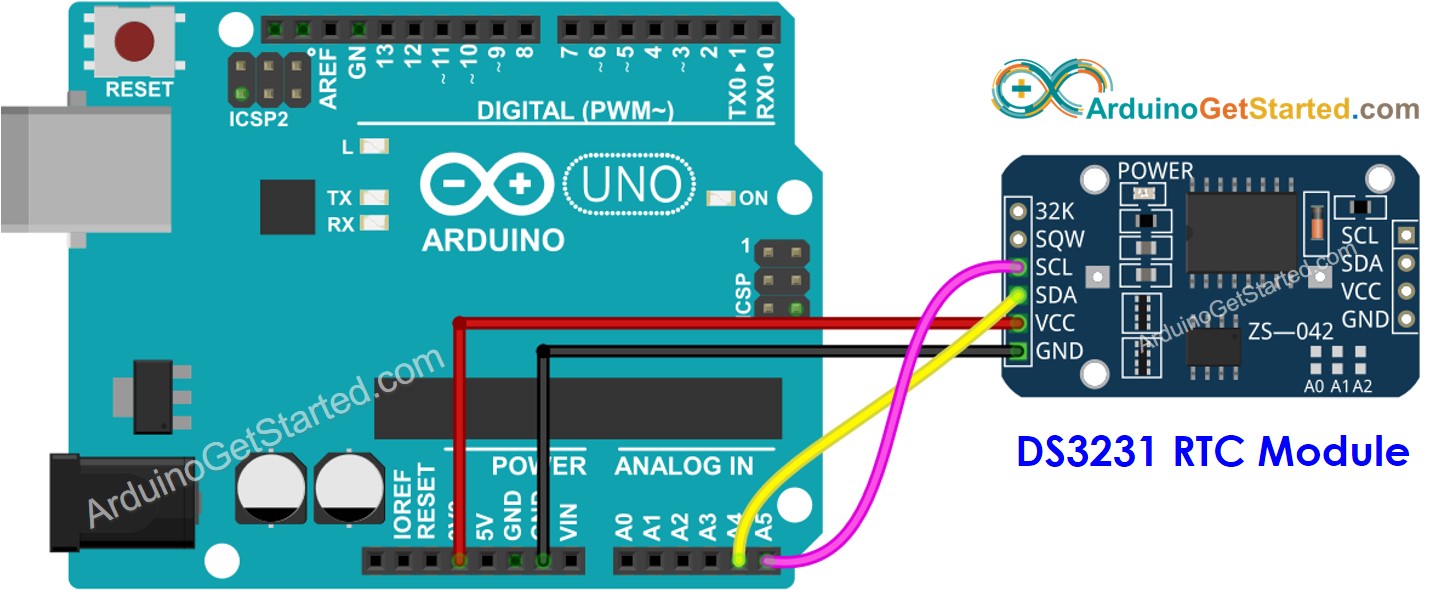
Schéma de câblage de l'horloge temps réel DS3231 Arduino

This image is created using Fritzing. Click to enlarge image

Arduino - Module RTC DS3231

DS3231 RTC Module Arduino Uno, Nano Arduino Mega
Vin 3.3V 3.3V
GND GND GND
SDA A4 20
SCL A5 21

Comment programmer le module RTC DS3231

  • Inclure la bibliothèque :
#include <RTClib.h>
  • Déclarez un objet RTC :
RTC_DS3231 rtc;
  • Initialiser le RTC :
if (! rtc.begin()) { Serial.println("Couldn't find RTC"); while (1); }
  • Pour la première fois, réglez la RTC à la date et à l'heure où le croquis a été compilé sur l'ordinateur.
rtc.adjust(DateTime(F(__DATE__), F(__TIME__)));
  • Lit les informations de date et d'heure à partir du module RTC
DateTime now = rtc.now(); Serial.print("Date & Time: "); Serial.print(now.year(), DEC); Serial.print('/'); Serial.print(now.month(), DEC); Serial.print('/'); Serial.print(now.day(), DEC); Serial.print(" ("); Serial.print(now.dayOfTheWeek()); Serial.print(") "); Serial.print(now.hour(), DEC); Serial.print(':'); Serial.print(now.minute(), DEC); Serial.print(':'); Serial.println(now.second(), DEC);

Code Arduino - Comment obtenir des données et l'heure

/* * Ce code Arduino a été développé par newbiely.fr * Ce code Arduino est mis à disposition du public sans aucune restriction. * Pour des instructions complètes et des schémas de câblage, veuillez visiter: * https://newbiely.fr/tutorials/arduino/arduino-rtc */ #include <RTClib.h> RTC_DS3231 rtc; char daysOfTheWeek[7][12] = { "Sunday", "Monday", "Tuesday", "Wednesday", "Thursday", "Friday", "Saturday" }; void setup () { Serial.begin(9600); // SETUP RTC MODULE if (! rtc.begin()) { Serial.println("Couldn't find RTC"); Serial.flush(); while (1); } // automatically sets the RTC to the date & time on PC this sketch was compiled rtc.adjust(DateTime(F(__DATE__), F(__TIME__))); // manually sets the RTC with an explicit date & time, for example to set // January 21, 2021 at 3am you would call: // rtc.adjust(DateTime(2021, 1, 21, 3, 0, 0)); } void loop () { DateTime now = rtc.now(); Serial.print("Date & Time: "); Serial.print(now.year(), DEC); Serial.print('/'); Serial.print(now.month(), DEC); Serial.print('/'); Serial.print(now.day(), DEC); Serial.print(" ("); Serial.print(daysOfTheWeek[now.dayOfTheWeek()]); Serial.print(") "); Serial.print(now.hour(), DEC); Serial.print(':'); Serial.print(now.minute(), DEC); Serial.print(':'); Serial.println(now.second(), DEC); delay(1000); // delay 1 seconds }

Étapes rapides

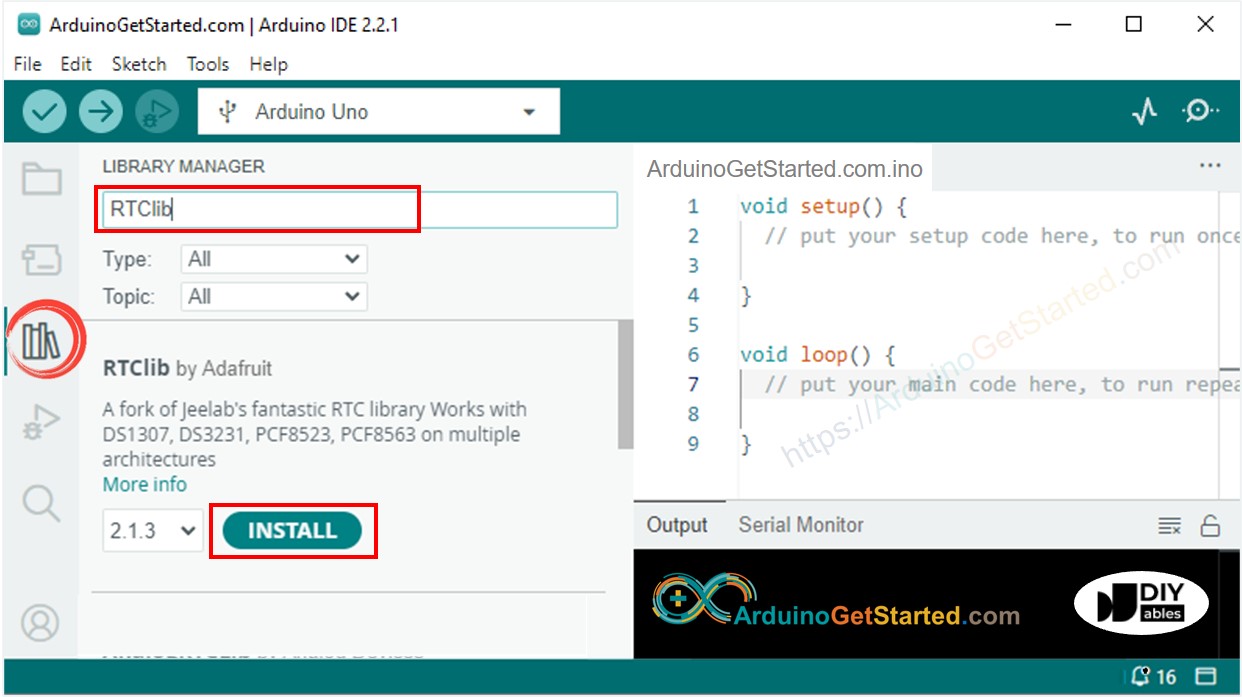
  • Naviguez jusqu'à l'icône Libraries sur la barre gauche de l'IDE Arduino.
  • Recherchez "RTClib", puis trouvez la bibliothèque RTC par Adafruit.
  • Cliquez sur le bouton Install pour installer la bibliothèque RTC.
Bibliothèque RTC Arduino
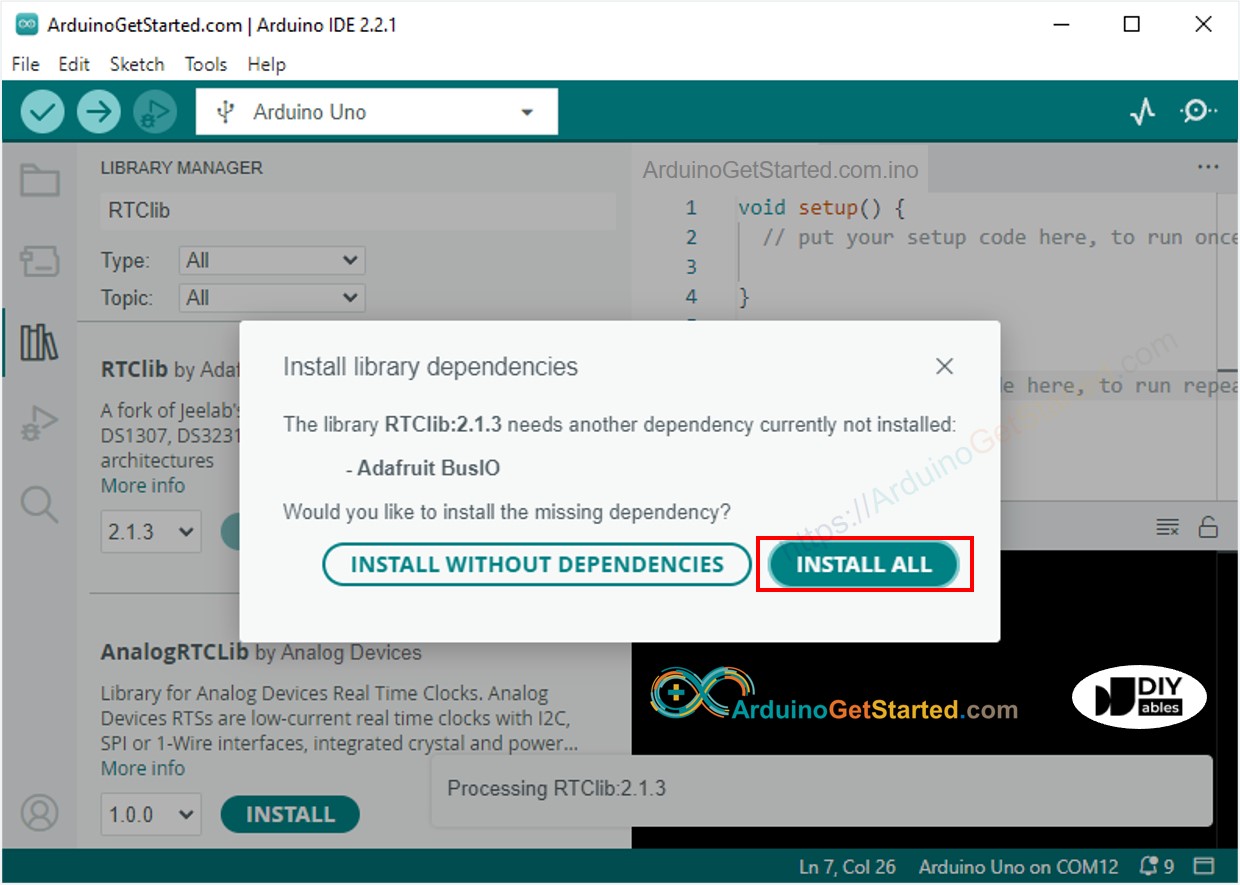
  • Il se peut qu'on vous demande d'installer d'autres dépendances de bibliothèques.
  • Cliquez sur le bouton Install All pour installer toutes les dépendances des bibliothèques.
Bibliothèque de dépendance pour RTC Arduino
  • Copiez le code ci-dessus et ouvrez-le avec Arduino IDE
  • Cliquez sur le bouton Upload dans l'Arduino IDE pour téléverser le code sur Arduino
  • Ouvrez le moniteur série
  • Voir le résultat sur le moniteur série.
COM6
Send
Date & Time: 2021/10/6 (Wednesday) 11:27:35 Date & Time: 2021/10/6 (Wednesday) 11:27:36 Date & Time: 2021/10/6 (Wednesday) 11:27:37 Date & Time: 2021/10/6 (Wednesday) 11:27:38 Date & Time: 2021/10/6 (Wednesday) 11:27:39 Date & Time: 2021/10/6 (Wednesday) 11:27:40 Date & Time: 2021/10/6 (Wednesday) 11:27:41 Date & Time: 2021/10/6 (Wednesday) 11:27:42 Date & Time: 2021/10/6 (Wednesday) 11:27:43 Date & Time: 2021/10/6 (Wednesday) 11:27:44
Autoscroll Show timestamp
Clear output
9600 baud  
Newline  

Code Arduino - Comment créer un planning quotidien avec Arduino

/* * Ce code Arduino a été développé par newbiely.fr * Ce code Arduino est mis à disposition du public sans aucune restriction. * Pour des instructions complètes et des schémas de câblage, veuillez visiter: * https://newbiely.fr/tutorials/arduino/arduino-rtc */ // Date and time functions using a DS3231 RTC connected via I2C and Wire lib #include <RTClib.h> // event from 13:50 to 14:10 uint8_t DAILY_EVENT_START_HH = 13; // event start time: hour uint8_t DAILY_EVENT_START_MM = 50; // event start time: minute uint8_t DAILY_EVENT_END_HH = 14; // event end time: hour uint8_t DAILY_EVENT_END_MM = 10; // event end time: minute RTC_DS3231 rtc; char daysOfTheWeek[7][12] = { "Sunday", "Monday", "Tuesday", "Wednesday", "Thursday", "Friday", "Saturday" }; void setup () { Serial.begin(9600); // SETUP RTC MODULE if (! rtc.begin()) { Serial.println("Couldn't find RTC"); while (1); } // sets the RTC to the date & time on PC this sketch was compiled rtc.adjust(DateTime(F(__DATE__), F(__TIME__))); // sets the RTC with an explicit date & time, for example to set // January 21, 2021 at 3am you would call: // rtc.adjust(DateTime(2021, 1, 21, 3, 0, 0)); } void loop () { DateTime now = rtc.now(); if (now.hour() >= DAILY_EVENT_START_HH && now.minute() >= DAILY_EVENT_START_MM && now.hour() < DAILY_EVENT_END_HH && now.minute() < DAILY_EVENT_END_MM) { Serial.println("It is on scheduled time"); // TODO: write your code" } else { Serial.println("It is NOT on scheduled time"); } printTime(now); } void printTime(DateTime time) { Serial.print("TIME: "); Serial.print(time.year(), DEC); Serial.print('/'); Serial.print(time.month(), DEC); Serial.print('/'); Serial.print(time.day(), DEC); Serial.print(" ("); Serial.print(daysOfTheWeek[time.dayOfTheWeek()]); Serial.print(") "); Serial.print(time.hour(), DEC); Serial.print(':'); Serial.print(time.minute(), DEC); Serial.print(':'); Serial.println(time.second(), DEC); }

Code Arduino - Comment créer un planning hebdomadaire avec Arduino

/* * Ce code Arduino a été développé par newbiely.fr * Ce code Arduino est mis à disposition du public sans aucune restriction. * Pour des instructions complètes et des schémas de câblage, veuillez visiter: * https://newbiely.fr/tutorials/arduino/arduino-rtc */ // Date and time functions using a DS3231 RTC connected via I2C and Wire lib #include <RTClib.h> // UNCHANGABLE PARAMATERS #define SUNDAY 0 #define MONDAY 1 #define TUESDAY 2 #define WEDNESDAY 3 #define THURSDAY 4 #define FRIDAY 5 #define SATURDAY 6 // event on Monday, from 13:50 to 14:10 uint8_t WEEKLY_EVENT_DAY = MONDAY; uint8_t WEEKLY_EVENT_START_HH = 13; // event start time: hour uint8_t WEEKLY_EVENT_START_MM = 50; // event start time: minute uint8_t WEEKLY_EVENT_END_HH = 14; // event end time: hour uint8_t WEEKLY_EVENT_END_MM = 10; // event end time: minute RTC_DS3231 rtc; char daysOfTheWeek[7][12] = { "Sunday", "Monday", "Tuesday", "Wednesday", "Thursday", "Friday", "Saturday" }; void setup () { Serial.begin(9600); // SETUP RTC MODULE if (! rtc.begin()) { Serial.println("Couldn't find RTC"); while (1); } // sets the RTC to the date & time on PC this sketch was compiled rtc.adjust(DateTime(F(__DATE__), F(__TIME__))); // sets the RTC with an explicit date & time, for example to set // January 21, 2021 at 3am you would call: // rtc.adjust(DateTime(2021, 1, 21, 3, 0, 0)); } void loop () { DateTime now = rtc.now(); if (now.dayOfTheWeek() == WEEKLY_EVENT_DAY && now.hour() >= WEEKLY_EVENT_START_HH && now.minute() >= WEEKLY_EVENT_START_MM && now.hour() < WEEKLY_EVENT_END_HH && now.minute() < WEEKLY_EVENT_END_MM) { Serial.println("It is on scheduled time"); // TODO: write your code" } else { Serial.println("It is NOT on scheduled time"); } printTime(now); } void printTime(DateTime time) { Serial.print("TIME: "); Serial.print(time.year(), DEC); Serial.print('/'); Serial.print(time.month(), DEC); Serial.print('/'); Serial.print(time.day(), DEC); Serial.print(" ("); Serial.print(daysOfTheWeek[time.dayOfTheWeek()]); Serial.print(") "); Serial.print(time.hour(), DEC); Serial.print(':'); Serial.print(time.minute(), DEC); Serial.print(':'); Serial.println(time.second(), DEC); }

Code Arduino - Comment programmer une tâche à une date spécifique avec Arduino

/* * Ce code Arduino a été développé par newbiely.fr * Ce code Arduino est mis à disposition du public sans aucune restriction. * Pour des instructions complètes et des schémas de câblage, veuillez visiter: * https://newbiely.fr/tutorials/arduino/arduino-rtc */ // Date and time functions using a DS3231 RTC connected via I2C and Wire lib #include <RTClib.h> // UNCHANGABLE PARAMATERS #define SUNDAY 0 #define MONDAY 1 #define TUESDAY 2 #define WEDNESDAY 3 #define THURSDAY 4 #define FRIDAY 5 #define SATURDAY 6 #define JANUARY 1 #define FEBRUARY 2 #define MARCH 3 #define APRIL 4 #define MAY 5 #define JUNE 6 #define JULY 7 #define AUGUST 8 #define SEPTEMBER 9 #define OCTOBER 10 #define NOVEMBER 11 #define DECEMBER 12 // event from 13:50 August 15, 2021 to 14:10 September 29, 2021 DateTime EVENT_START(2021, AUGUST, 15, 13, 50); DateTime EVENT_END(2021, SEPTEMBER, 29, 14, 10); RTC_DS3231 rtc; char daysOfTheWeek[7][12] = { "Sunday", "Monday", "Tuesday", "Wednesday", "Thursday", "Friday", "Saturday" }; void setup () { Serial.begin(9600); // SETUP RTC MODULE if (! rtc.begin()) { Serial.println("Couldn't find RTC"); Serial.flush(); while (1); } // sets the RTC to the date & time on PC this sketch was compiled rtc.adjust(DateTime(F(__DATE__), F(__TIME__))); // sets the RTC with an explicit date & time, for example to set // January 21, 2021 at 3am you would call: // rtc.adjust(DateTime(2021, 1, 21, 3, 0, 0)); } void loop () { DateTime now = rtc.now(); if (now.secondstime() >= EVENT_START.secondstime() && now.secondstime() < EVENT_END.secondstime()) { Serial.println("It is on scheduled time"); // TODO: write your code" } else { Serial.println("It is NOT on scheduled time"); } printTime(now); } void printTime(DateTime time) { Serial.print("TIME: "); Serial.print(time.year(), DEC); Serial.print('/'); Serial.print(time.month(), DEC); Serial.print('/'); Serial.print(time.day(), DEC); Serial.print(" ("); Serial.print(daysOfTheWeek[time.dayOfTheWeek()]); Serial.print(") "); Serial.print(time.hour(), DEC); Serial.print(':'); Serial.print(time.minute(), DEC); Serial.print(':'); Serial.println(time.second(), DEC); }

Vidéo

※ OUR MESSAGES

  • Please feel free to share the link of this tutorial. However, Please do not use our content on any other websites. We invested a lot of effort and time to create the content, please respect our work!