Arduino - Compteur de Bouton - OLED

Dans ce tutoriel, nous allons utiliser Arduino :

Dans ce tutoriel, le bouton est également déparasité sans utiliser la fonction delay(). Voir Pourquoi avons-nous besoin de déparasiter?

Préparation du matériel

1×Arduino Uno
1×USB 2.0 cable type A/B
1×Push Button
1×(Optional) Panel-mount Push Button
1×SSD1306 I2C OLED Display 128x64
1×Breadboard
1×Jumper Wires
1×(Optional) 9V Power Adapter for Arduino
1×(Recommended) Screw Terminal Block Shield for Arduino Uno
1×(Optional) Transparent Acrylic Enclosure For Arduino Uno

Or you can buy the following sensor kits:

1×DIYables Sensor Kit (30 sensors/displays)
1×DIYables Sensor Kit (18 sensors/displays)
Divulgation : Certains des liens fournis dans cette section sont des liens affiliés Amazon. Nous pouvons recevoir une commission pour tout achat effectué via ces liens, sans coût supplémentaire pour vous. Nous vous remercions de votre soutien.

À propos de l'OLED et du bouton

Si vous ne connaissez pas les OLED et les boutons (brochage, fonctionnement, programmation...), renseignez-vous à leur sujet dans les tutoriels suivants :

Diagramme de câblage
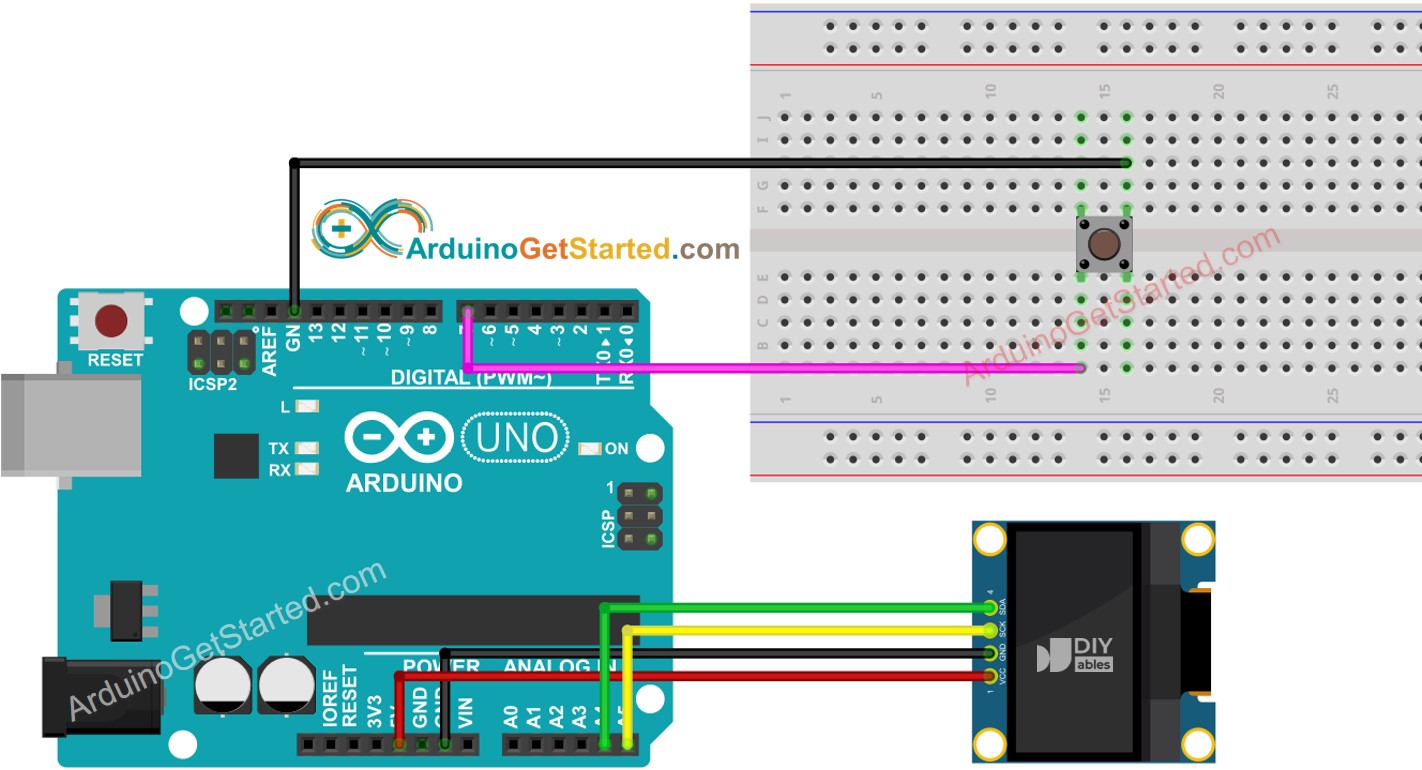
Schéma de câblage Arduino Bouton OLED

This image is created using Fritzing. Click to enlarge image

Code Arduino - affichage du nombre de clics sur l'OLED

/* * Ce code Arduino a été développé par newbiely.fr * Ce code Arduino est mis à disposition du public sans aucune restriction. * Pour des instructions complètes et des schémas de câblage, veuillez visiter: * https://newbiely.fr/tutorials/arduino/arduino-button-count-oled */ #include <Wire.h> #include <Adafruit_GFX.h> #include <Adafruit_SSD1306.h> #include <ezButton.h> #define SCREEN_WIDTH 128 // OLED display width, in pixels #define SCREEN_HEIGHT 64 // OLED display height, in pixels Adafruit_SSD1306 oled(SCREEN_WIDTH, SCREEN_HEIGHT, &Wire, -1); // create SSD1306 display object connected to I2C ezButton button(7); // create ezButton object that attach to pin 7; unsigned long lastCount = 0; void setup() { Serial.begin(9600); // initialize OLED display with address 0x3C for 128x64 if (!oled.begin(SSD1306_SWITCHCAPVCC, 0x3C)) { Serial.println(F("SSD1306 allocation failed")); while (true); } delay(2000); // wait for initializing oled.clearDisplay(); // clear display oled.setTextSize(2); // text size oled.setTextColor(WHITE); // text color oled.setCursor(0, 10); // position to display button.setDebounceTime(50); // set debounce time to 50 milliseconds button.setCountMode(COUNT_FALLING); } void loop() { button.loop(); // MUST call the loop() function first unsigned long count = button.getCount(); if (lastCount != count) { Serial.println(count); // print count to Serial Monitor oled.clearDisplay(); // clear display oled.println(count); // display count oled.display(); // show on OLED lastCount != count; } }

Étapes rapides

  • Naviguez vers l'icône Libraries sur la barre latérale gauche de l'IDE Arduino.
  • Recherchez "ezButton", puis trouvez la bibliothèque de boutons par ArduinoGetStarted
  • Cliquez sur le bouton Install pour installer la bibliothèque ezButton.
Bibliothèque de boutons Arduino
  • Recherchez "SSD1306", puis trouvez la bibliothèque SSD1306 par Adafruit.
  • Cliquez sur le bouton Install pour installer la bibliothèque.
Bibliothèque OLED Arduino
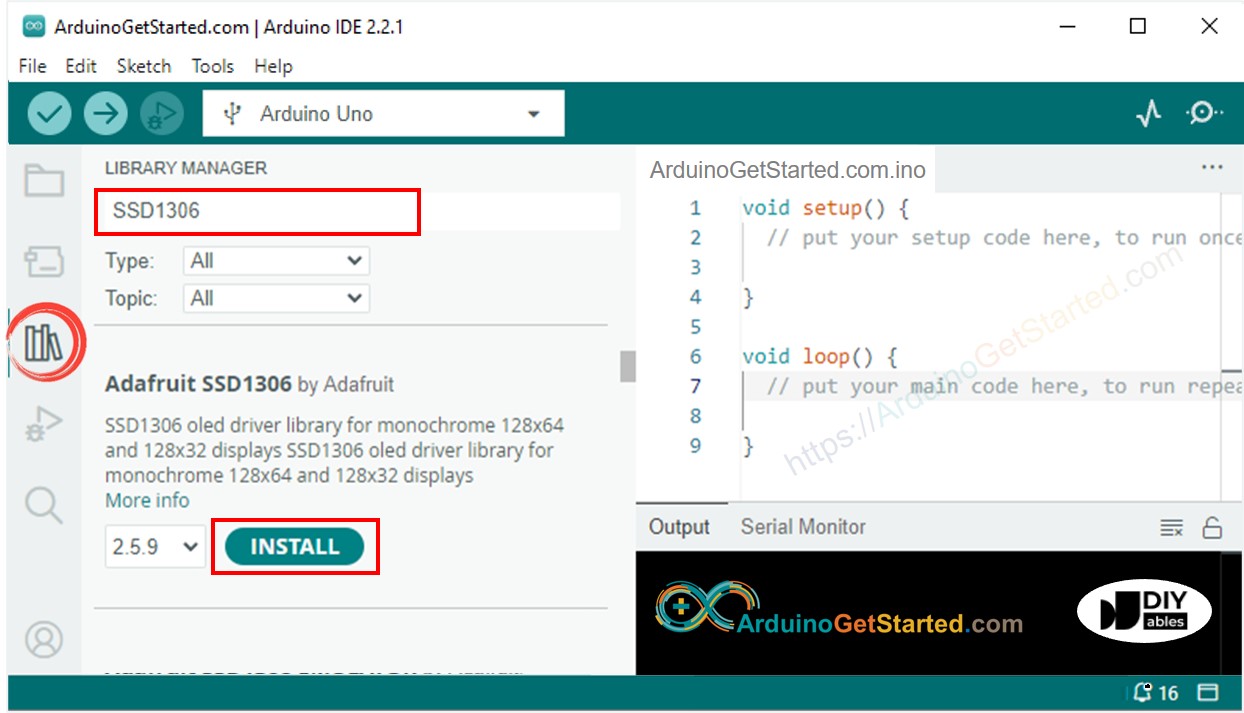
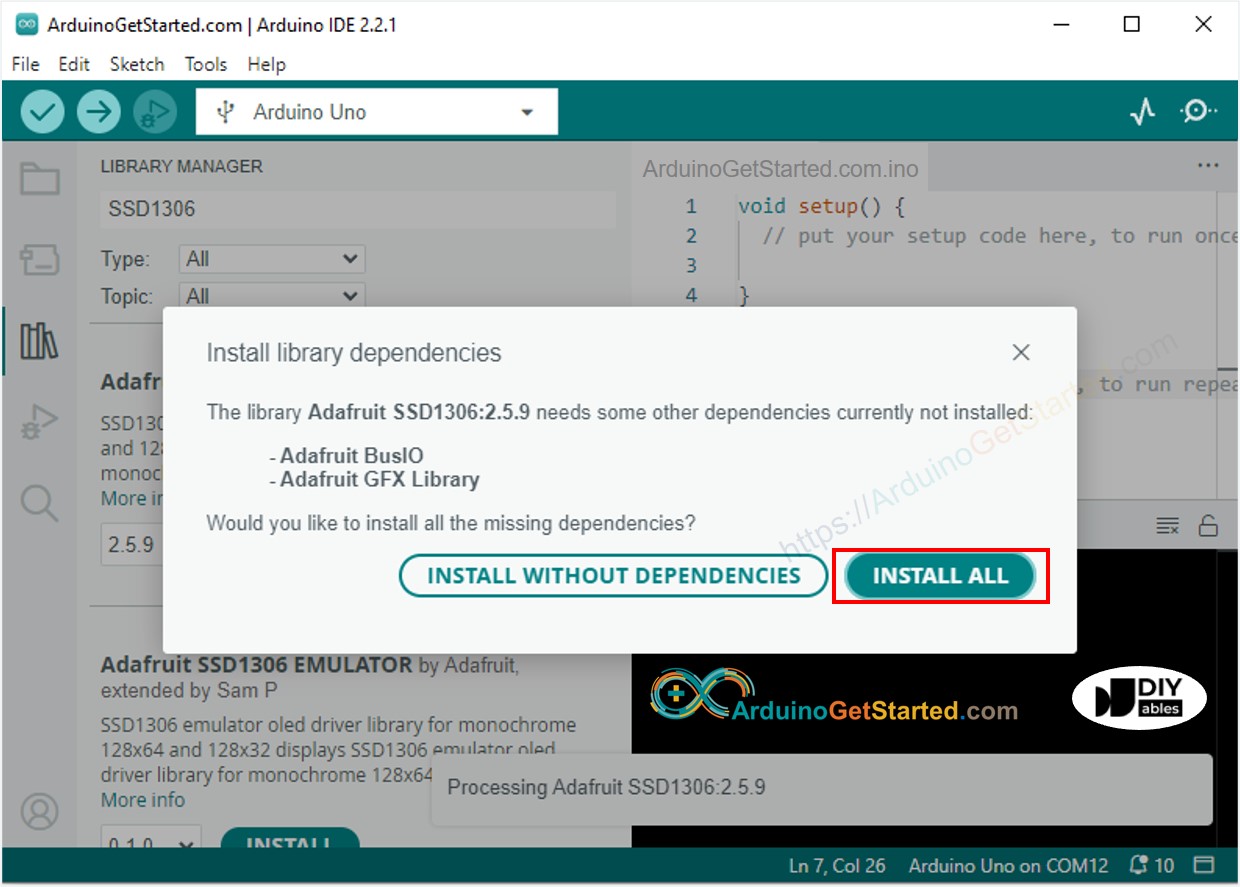
  • On vous demandera d'installer d'autres dépendances de bibliothèques
  • Cliquez sur le bouton Install All pour installer toutes les dépendances des bibliothèques.
Bibliothèque de capteurs Arduino Adafruit GFX
  • Copiez le code ci-dessus et ouvrez-le avec l'IDE Arduino
  • Cliquez sur le bouton Upload sur l'IDE Arduino pour téléverser le code sur l'Arduino
  • Appuyez plusieurs fois sur le bouton
  • Observez le changement du nombre de comptage sur l'OLED

Le code ci-dessus affiche simplement le compteur de pressions sur le bouton dans le coin supérieur gauche. Modifions le code pour le centraliser !

Code Arduino - Alignement vertical et horizontal au centre sur OLED

/* * Ce code Arduino a été développé par newbiely.fr * Ce code Arduino est mis à disposition du public sans aucune restriction. * Pour des instructions complètes et des schémas de câblage, veuillez visiter: * https://newbiely.fr/tutorials/arduino/arduino-button-count-oled */ #include <Wire.h> #include <Adafruit_GFX.h> #include <Adafruit_SSD1306.h> #include <ezButton.h> #define SCREEN_WIDTH 128 // OLED display width, in pixels #define SCREEN_HEIGHT 64 // OLED display height, in pixels Adafruit_SSD1306 oled(SCREEN_WIDTH, SCREEN_HEIGHT, &Wire, -1); // create SSD1306 display object connected to I2C ezButton button(7); // create ezButton object that attach to pin 7; unsigned long lastCount = 0; void setup() { Serial.begin(9600); // initialize OLED display with address 0x3C for 128x64 if (!oled.begin(SSD1306_SWITCHCAPVCC, 0x3C)) { Serial.println(F("SSD1306 allocation failed")); while (true); } delay(2000); // wait for initializing oled.clearDisplay(); // clear display oled.setTextSize(2); // text size oled.setTextColor(WHITE); // text color oled.setCursor(0, 10); // position to display button.setDebounceTime(50); // set debounce time to 50 milliseconds button.setCountMode(COUNT_FALLING); } void loop() { button.loop(); // MUST call the loop() function first unsigned long count = button.getCount(); if (lastCount != count) { Serial.println(count); // print count to Serial Monitor String text = String(count); oledDisplayCenter(text); lastCount != count; } } void oledDisplayCenter(String text) { int16_t x1; int16_t y1; uint16_t width; uint16_t height; oled.getTextBounds(text, 0, 0, &x1, &y1, &width, &height); // display on horizontal and vertical center oled.clearDisplay(); // clear display oled.setCursor((SCREEN_WIDTH - width) / 2, (SCREEN_HEIGHT - height) / 2); oled.println(text); // text to display oled.display(); }

※ NOTE THAT:

Le code ci-dessus permet de centrer automatiquement le texte horizontalement et verticalement sur l'affichage OLED. Consultez Comment centrer verticalement/horizontalement sur OLED pour plus de détails.

Vidéo

※ OUR MESSAGES

  • Please feel free to share the link of this tutorial. However, Please do not use our content on any other websites. We invested a lot of effort and time to create the content, please respect our work!