Arduino - matrice LED via le Web
Dans ce tutoriel, nous allons apprendre comment contrôler une matrice LED via une interface Web utilisant un navigateur sur un PC ou un smartphone, en utilisant l'Arduino Uno R4 WiFi. En détail, l'Arduino Uno R4 WiFi sera programmé pour fonctionner comme un serveur Web. Supposons que l'adresse IP de l'Arduino Uno R4 WiFi soit 192.168.0.2. Voici les détails de son fonctionnement :
- Lorsque vous entrez 192.168.0.2 dans le navigateur, le navigateur envoie une requête à l'Arduino, et l'Arduino répond par une page Web qui contient une zone de saisie de message.
- Vous tapez un message dans la zone de saisie et cliquez sur le bouton Envoyer. Le message est envoyé à l'Arduino.
- L'Arduino affiche le message sur la matrice LED.
Préparation du matériel
Ou vous pouvez acheter les kits suivants:
| 1 | × | Kit de Démarrage DIYables STEM V4 IoT (Arduino inclus) | |
| 1 | × | Kit de Capteurs DIYables (18 capteurs/écrans) |
Divulgation : Certains des liens fournis dans cette section sont des liens affiliés Amazon. Nous pouvons recevoir une commission pour tout achat effectué via ces liens, sans coût supplémentaire pour vous. Nous vous remercions de votre soutien.
À propos de la matrice LED et de l'Arduino Uno R4
Si vous ne connaissez pas la matrice LED et l'Arduino Uno R4 (brochage, fonctionnement, programmation...), apprenez-les dans les tutoriels suivants :
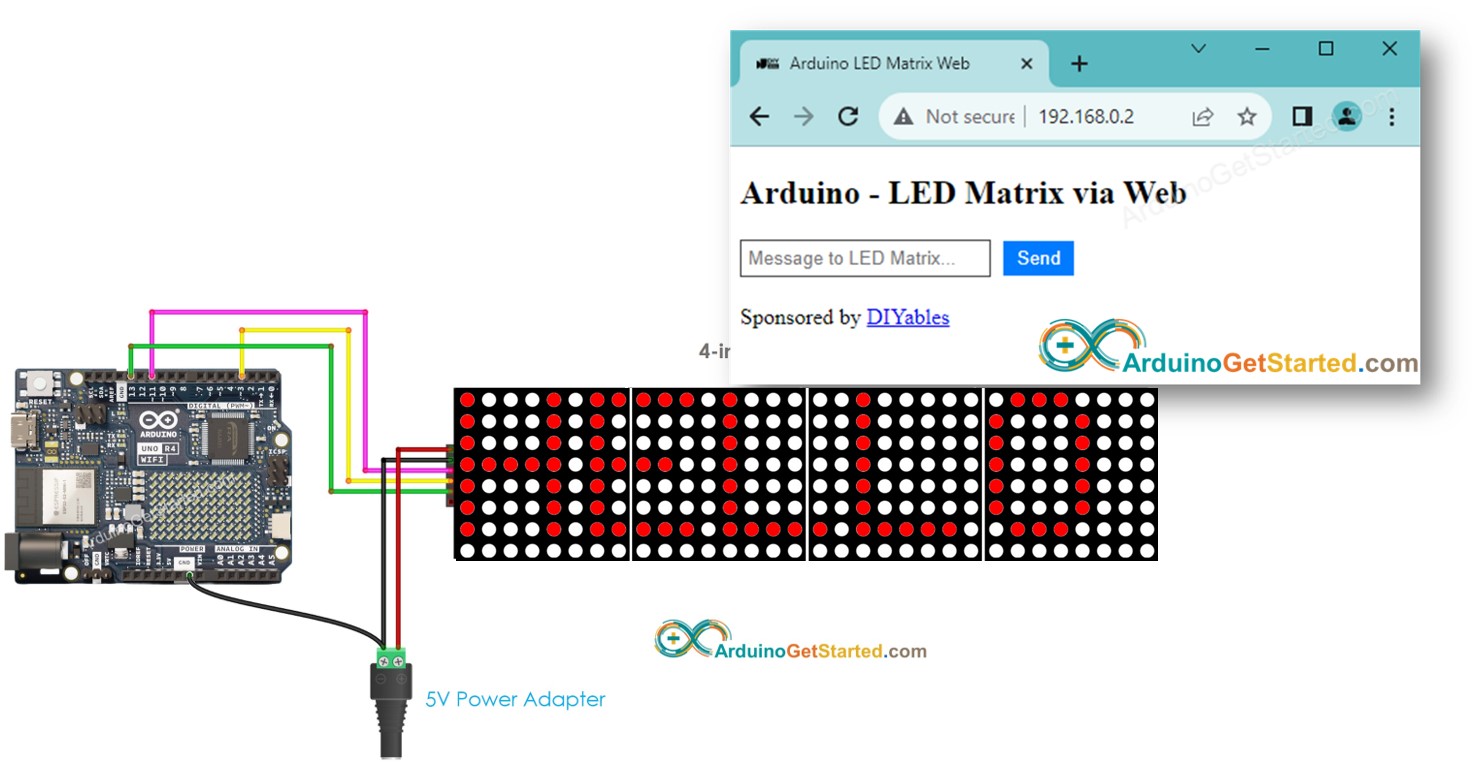
Diagramme de câblage
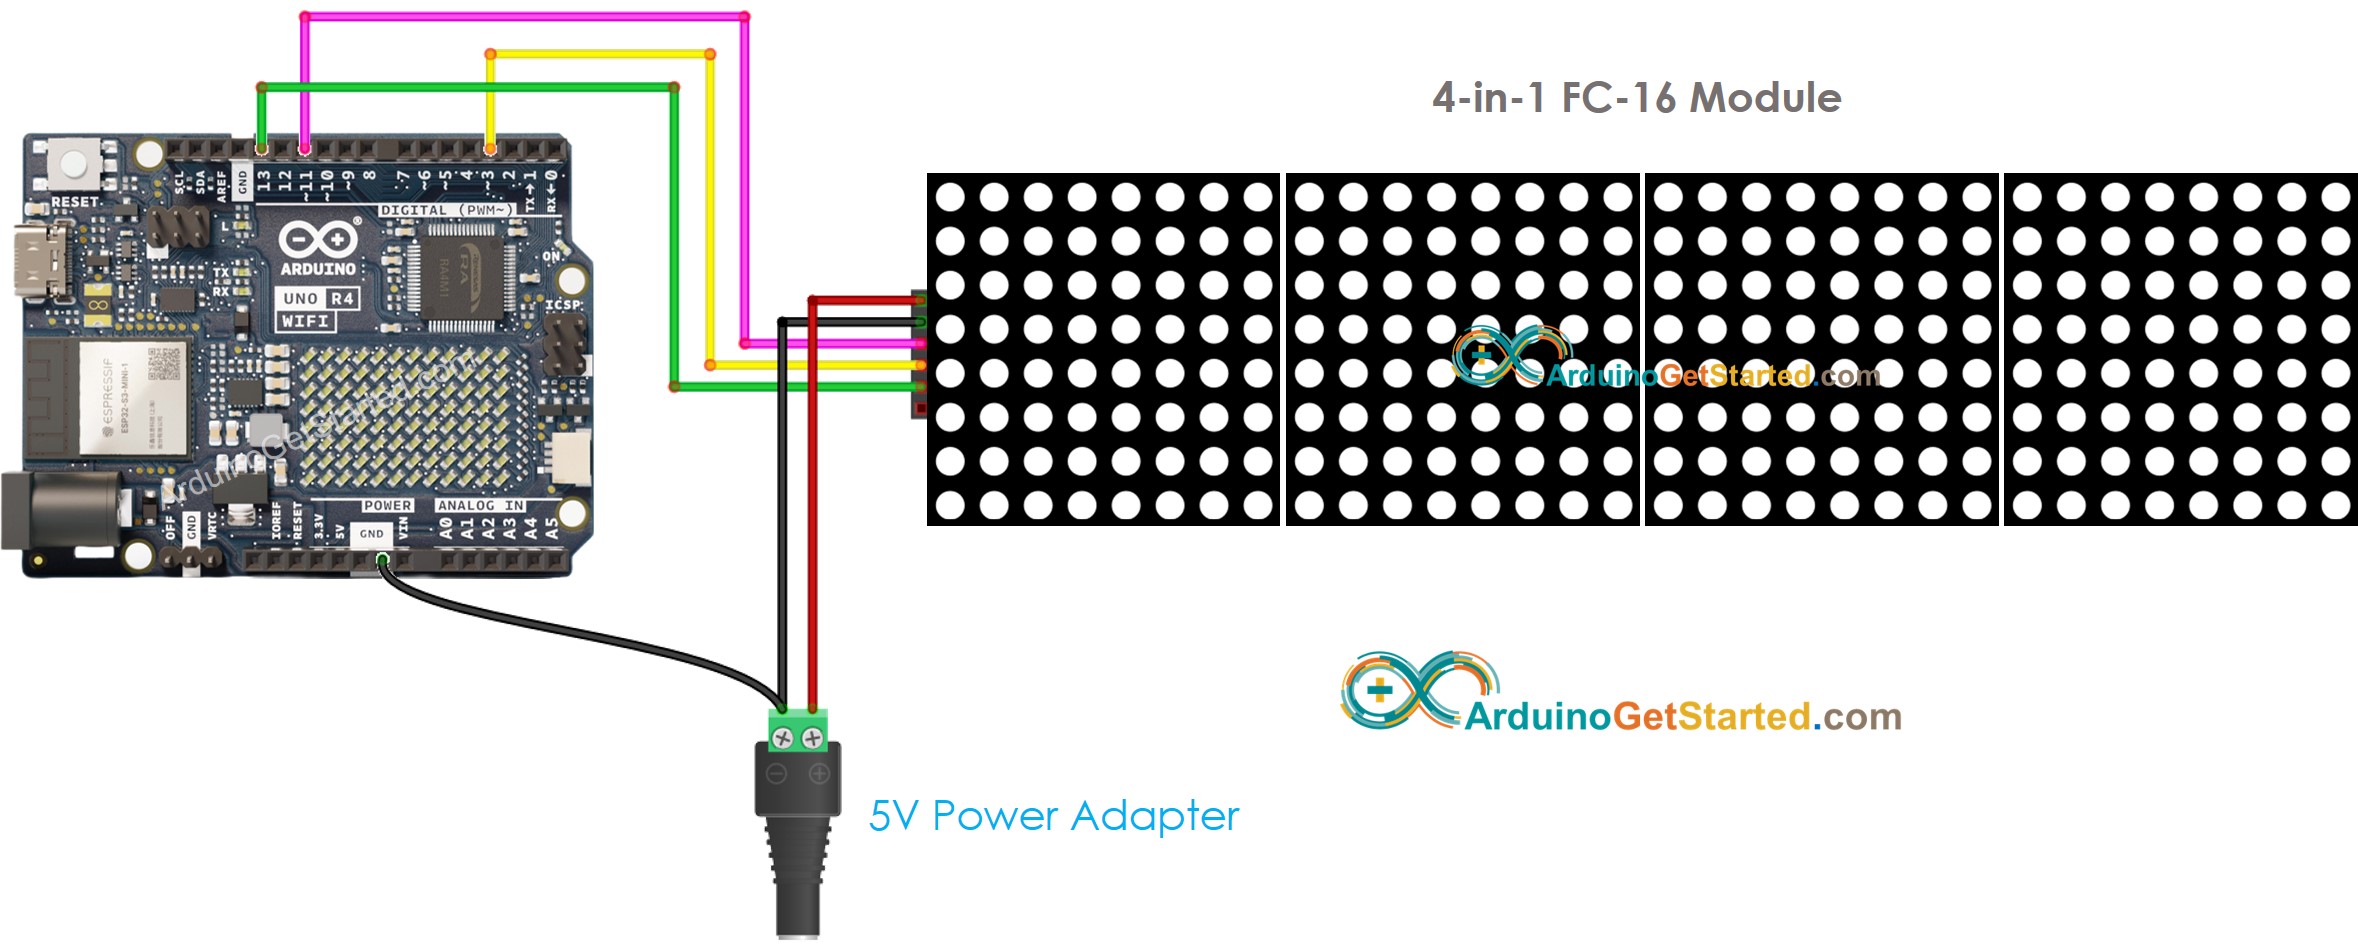
Cette image a été créée avec Fritzing. Cliquez pour agrandir l'image.
Code Arduino
Étapes rapides
- Si c'est la première fois que vous utilisez Arduino Uno R4, consultez Comment démarrer avec Arduino Uno R4..
- Ouvrez l'IDE Arduino.
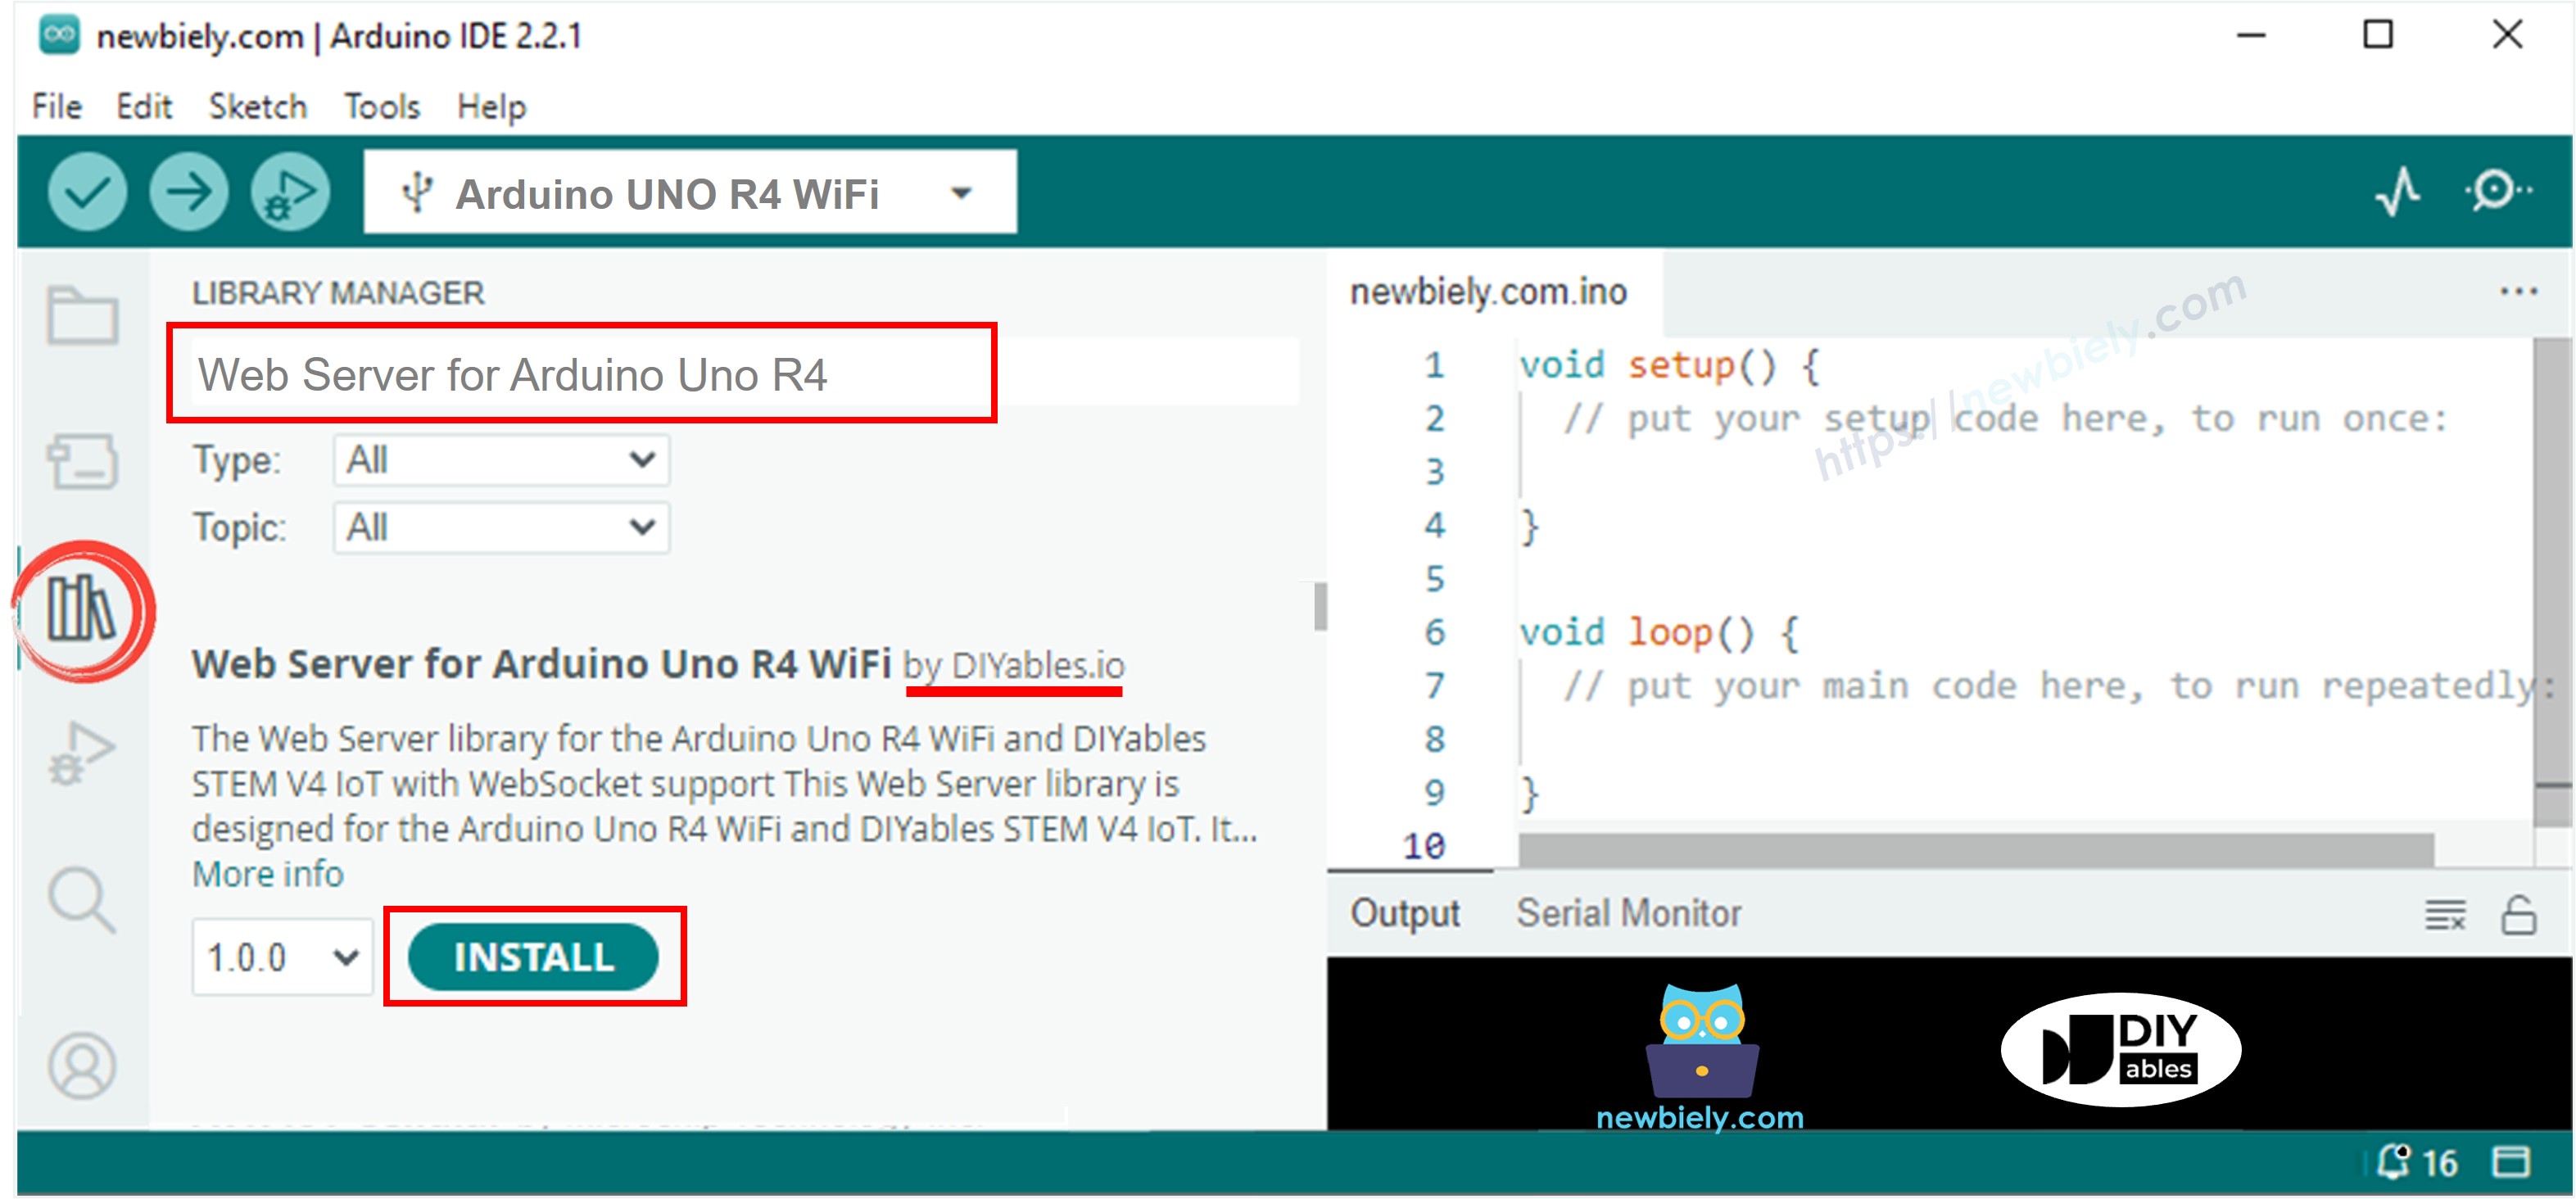
- Ouvrez le Gestionnaire de bibliothèques en cliquant sur l'icône située sur le côté gauche de l'IDE Arduino.
- Recherchez Web Server for Arduino Uno R4 WiFi et localisez la bibliothèque Web Server créée par DIYables.
- Cliquez sur le bouton Install pour ajouter la bibliothèque Web Server.
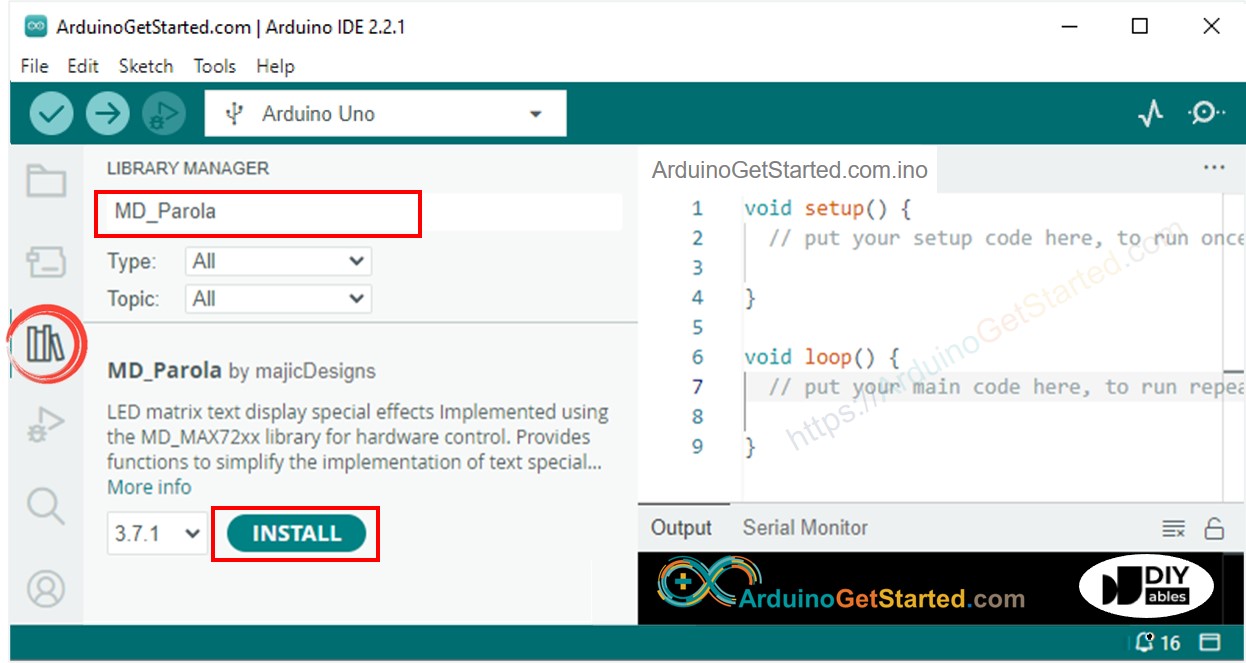
- Recherchez “MD_Parola”, puis trouvez la bibliothèque MD_Parola
- Cliquez sur le bouton Install.
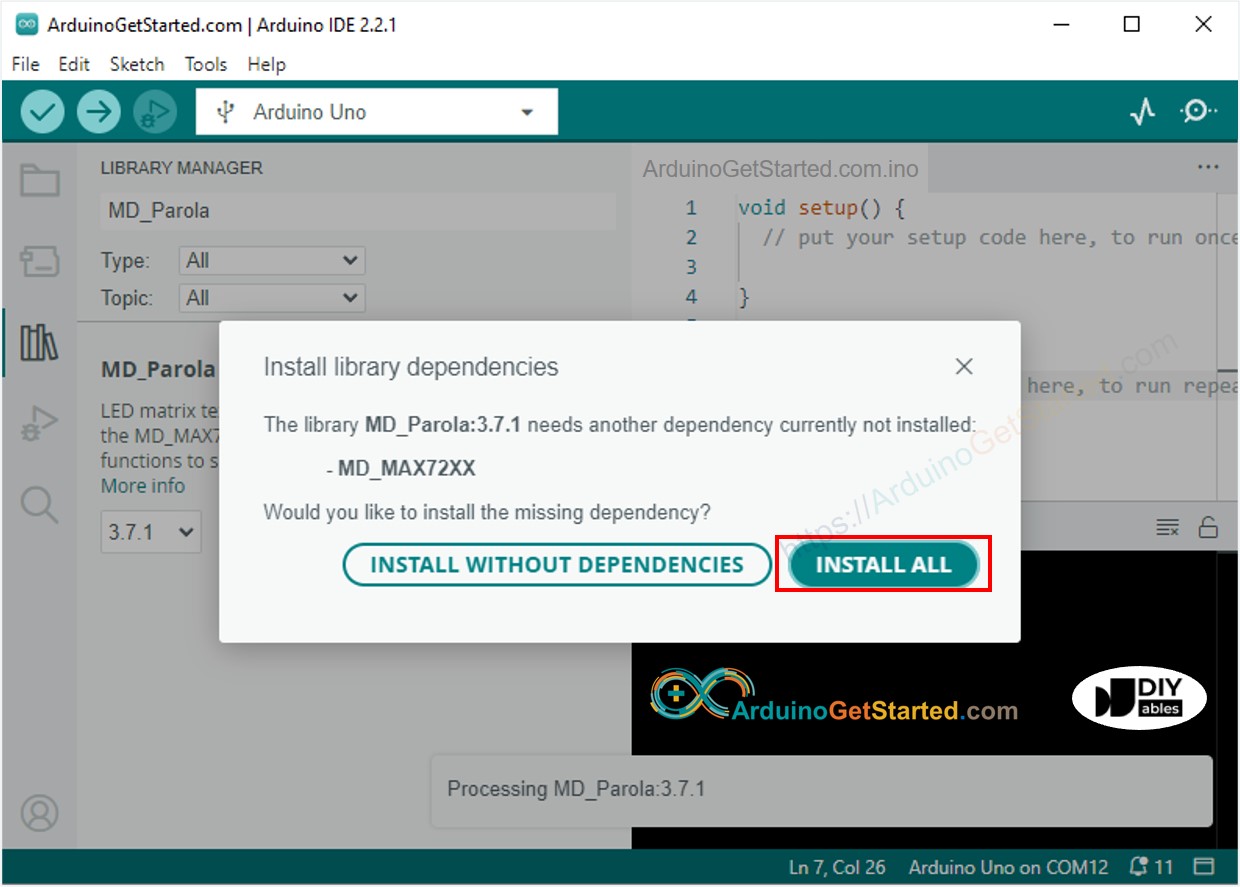
- Il vous sera demandé d'installer la bibliothèque MD_MAX72XX en tant que dépendance. Cliquez sur le bouton Tout installer.
- Créez un nouveau sketch. Donnez-lui un nom, par exemple, ArduinoGetStarted.com.ino.
- Copiez le code fourni ci-dessous et collez-le dans le fichier créé.
/*
* Ce code Arduino a été développé par newbiely.fr
* Ce code Arduino est mis à disposition du public sans aucune restriction.
* Pour des instructions complètes et des schémas de câblage, veuillez visiter:
* https://newbiely.fr/tutorials/arduino/arduino-led-matrix-via-web
*/
#include <UnoR4WiFi_WebServer.h>
#include <MD_Parola.h>
#include <MD_MAX72xx.h>
#include "index.h"
#define HARDWARE_TYPE MD_MAX72XX::FC16_HW
#define MAX_DEVICES 4 // 4 blocks
#define CS_PIN 3
// create an instance of the MD_Parola class
MD_Parola ledMatrix = MD_Parola(HARDWARE_TYPE, CS_PIN, MAX_DEVICES);
// WiFi credentials
const char WIFI_SSID[] = "YOUR_WIFI_SSID"; // change your network SSID (name)
const char WIFI_PASSWORD[] = "YOUR_WIFI_PASSWORD"; // change your network password
// Create web server instance
UnoR4WiFi_WebServer server;
// Handler for LED matrix control
void handleMatrix(WiFiClient& client, const String& method, const String& request, const QueryParams& params, const String& jsonData) {
// Check for message parameter in query string
for (int i = 0; i < params.count; i++) {
if (String(params.params[i].key) == "message") {
String message = params.params[i].value;
Serial.print("message: ");
Serial.println(message);
ledMatrix.displayClear(); // clear led matrix display
ledMatrix.displayScroll(message.c_str(), PA_CENTER, PA_SCROLL_LEFT, 100);
break;
}
}
String html = String(HTML_CONTENT);
server.sendResponse(client, html.c_str());
}
void setup() {
Serial.begin(9600);
delay(1000);
// Initialize LED matrix
ledMatrix.begin(); // initialize the object
ledMatrix.setIntensity(15); // set the brightness of the LED matrix display (from 0 to 15)
ledMatrix.displayClear(); // clear led matrix display
ledMatrix.displayScroll("Hello, DIYables", PA_CENTER, PA_SCROLL_LEFT, 100);
Serial.println("Arduino Uno R4 WiFi - LED Matrix Web Control");
// Connect to WiFi
Serial.print("Connecting to ");
Serial.println(WIFI_SSID);
WiFi.begin(WIFI_SSID, WIFI_PASSWORD);
while (WiFi.status() != WL_CONNECTED) {
delay(500);
Serial.print(".");
}
Serial.println(" connected!");
Serial.print("IP address: ");
Serial.println(WiFi.localIP());
// Configure routes
server.addRoute("/", handleMatrix);
// Start server
server.begin();
Serial.println("\n=== Web Server Ready! ===");
Serial.print("Visit: http://");
Serial.println(WiFi.localIP());
}
void loop() {
server.handleClient();
if (ledMatrix.displayAnimate()) {
ledMatrix.displayReset();
}
}
- Modifiez les informations WiFi (SSID et mot de passe) dans le code pour les remplacer par les vôtres
- Créez le fichier index.h dans l'IDE Arduino en suivant :
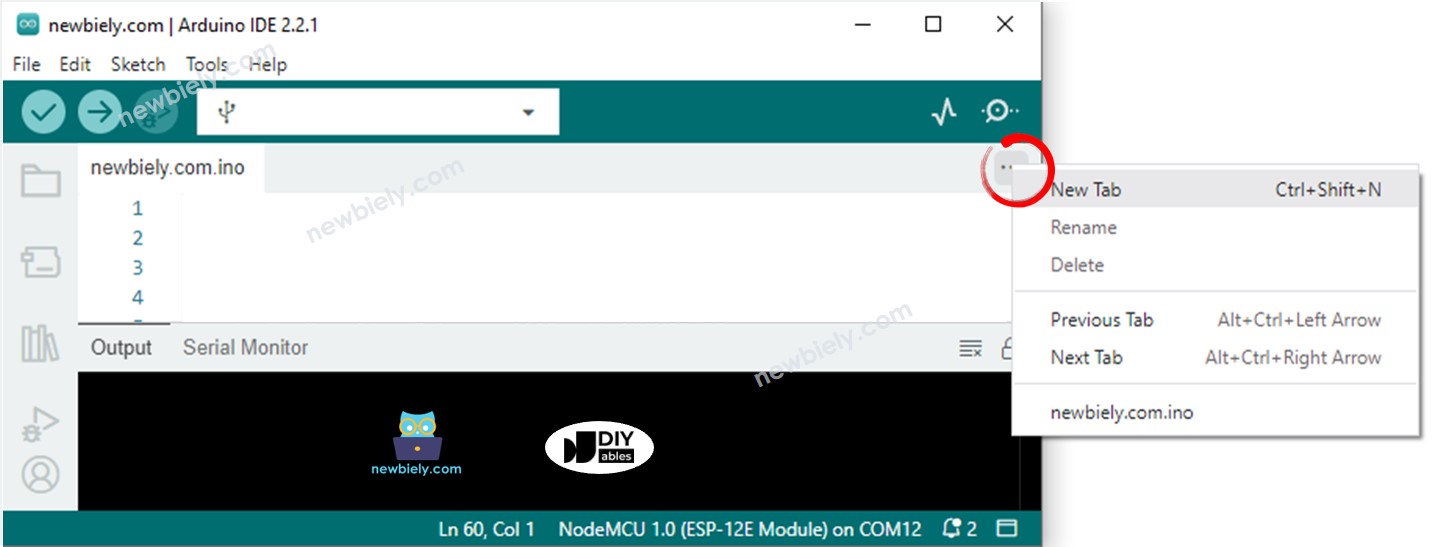
- Cliquez sur le bouton juste en dessous de l'icône du moniteur série et choisissez Nouvel onglet, ou utilisez les touches Ctrl+Shift+N.
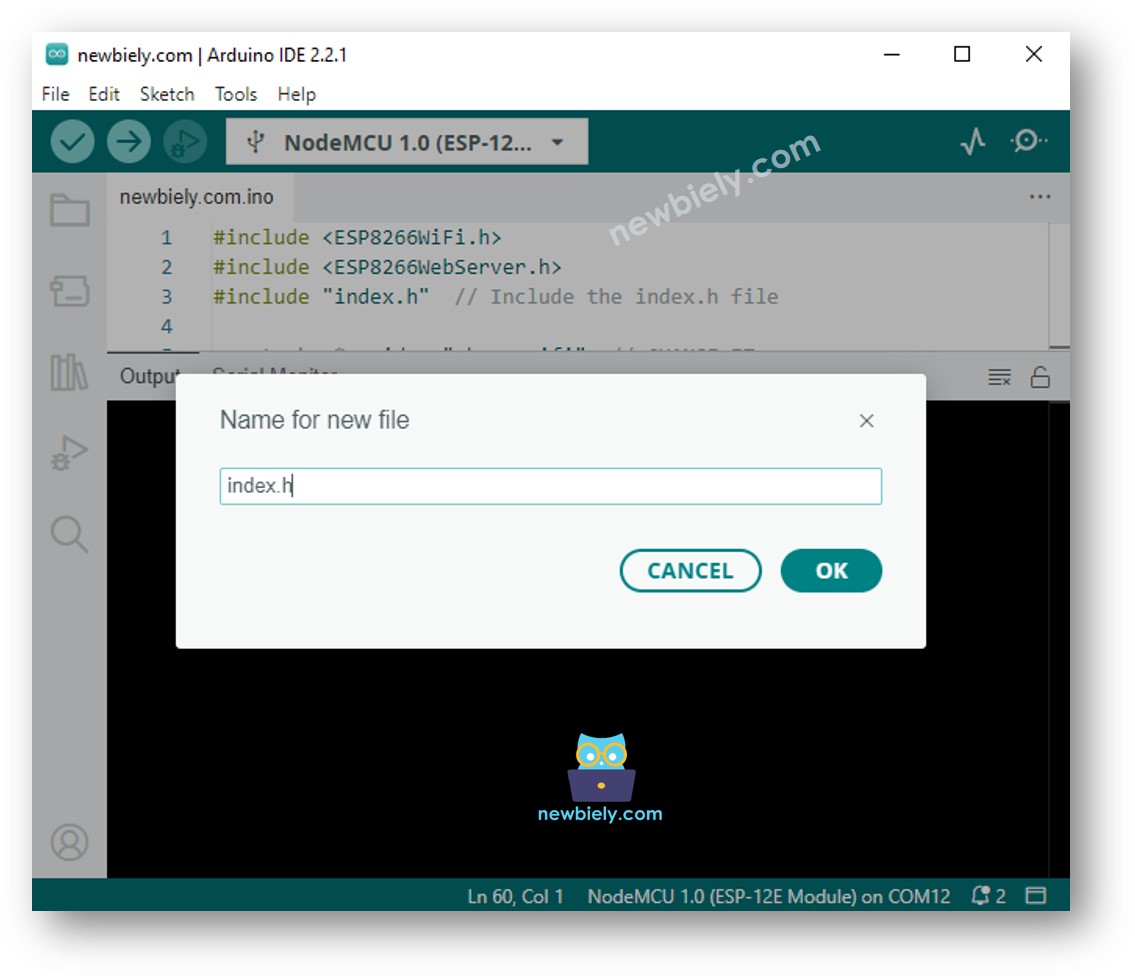
- Entrez le nom du fichier index.h et cliquez sur le bouton OK
- Copiez le code ci-dessous et collez-le dans le fichier index.h.
/*
* Ce code Arduino a été développé par newbiely.fr
* Ce code Arduino est mis à disposition du public sans aucune restriction.
* Pour des instructions complètes et des schémas de câblage, veuillez visiter:
* https://newbiely.fr/tutorials/arduino/arduino-led-matrix-via-web
*/
const char *HTML_CONTENT = R"=====(
<!DOCTYPE html>
<html>
<head>
<title>Arduino LED Matrix Web</title>
<meta name="viewport" content="width=device-width, initial-scale=0.7">
<link rel="icon" href="https://diyables.io/images/page/diyables.svg">
<style>
body {
font-size: 16px;
}
.user-input {
margin-bottom: 20px;
}
.user-input input {
flex: 1;
border: 1px solid #444;
padding: 5px;
}
.user-input input[type="submit"] {
margin-left: 5px;
background-color: #007bff;
color: #fff;
border: none;
padding: 5px 10px;
cursor: pointer;
}
</style>
</head>
<body>
<h2>Arduino - LED Matrix via Web</h2>
<form class="user-input" action="" method="GET">
<input type="text" id="message" name="message" placeholder="Message to LED Matrix...">
<input type="submit" value="Send">
</form>
<div class="sponsor">Sponsored by <a href="https://amazon.com/diyables">DIYables</a></div>
</body>
</html>
)=====";
- Maintenant, vous avez le code dans deux fichiers : ArduinoGetStarted.com.ino et index.h
- Cliquez sur le bouton Upload dans l'IDE Arduino pour téléverser le code sur l'Arduino
- Voir le résultat dans le moniteur série.
8
Serial.println("Hello World!");
Message (Enter to send message to 'Arduino Uno' on 'COM15')
New Line
9600 baud
Arduino Uno R4 WiFi - LED Matrix Web Control
Connecting to YOUR_WIFI_SSID
connected!
IP address: 192.168.0.254
Starting web server on IP: 192.168.0.254
=== Web Server Ready! ===
Visit: http://192.168.0.254
- Vous verrez une adresse IP, par exemple : 192.168.0.254. Il s'agit de l'adresse IP du serveur Web Arduino
- Ouvrez un navigateur web et saisissez l'une des adresses IP dans la barre d'adresse.
- Veuillez noter que l'adresse IP peut varier. Veuillez vérifier la valeur actuelle sur le Moniteur série.
- Vous verrez également la sortie ci-dessous dans le Moniteur série
8
Serial.println("Hello World!");
Message (Enter to send message to 'Arduino Uno' on 'COM15')
New Line
9600 baud
Arduino Uno R4 WiFi - LED Matrix Web Control
Connecting to YOUR_WIFI_SSID
connected!
IP address: 192.168.0.254
Starting web server on IP: 192.168.0.254
=== Web Server Ready! ===
Visit: http://192.168.0.254
Method: GET
Requested path: /
Query param: message=Hello
message: Hello
Client disconnected
- Vous verrez la page Web de la carte Arduino dans le navigateur comme ci-dessous
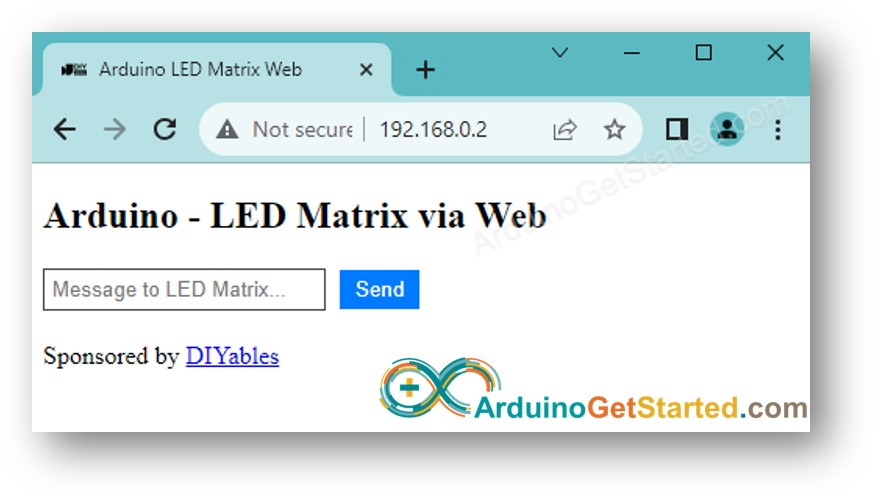
- Tapez un message et cliquez sur le bouton d'envoi pour envoyer le message à Arduino.
- Découvrez l'affichage de la matrice LED.
※ Note:
- Si des modifications sont apportées au contenu HTML dans le fichier index.h sans aucune modification du fichier ArduinoGetStarted.com.ino, l'IDE Arduino ne mettra pas automatiquement à jour le contenu HTML lors de la compilation et du téléversement du code vers l'ESP32.
- Pour forcer l'IDE Arduino à mettre à jour le contenu HTML dans un tel scénario, il est nécessaire d'apporter une modification dans le fichier ArduinoGetStarted.com.ino. Par exemple, vous pouvez ajouter une ligne vide ou insérer un commentaire. Cette action pousse l'IDE à prendre en compte les modifications dans le projet, garantissant que le contenu HTML révisé est inclus dans le téléversement.