Arduino - Encodeur rotatif LED
Dans ce tutoriel, nous allons apprendre à programmer un Arduino pour contrôler la luminosité d'une LED en fonction de la valeur de sortie d'un encodeur rotatif.
Préparation du matériel
Ou vous pouvez acheter les kits suivants:
| 1 | × | Kit de Démarrage DIYables STEM V3 (Arduino inclus) | |
| 1 | × | Kit de Capteurs DIYables (18 capteurs/écrans) |
Divulgation : Certains des liens fournis dans cette section sont des liens affiliés Amazon. Nous pouvons recevoir une commission pour tout achat effectué via ces liens, sans coût supplémentaire pour vous. Nous vous remercions de votre soutien.
Note d'achat: Pour simplifier le processus de câblage, nous recommandons d'utiliser le LED Module, qui est livré avec une résistance intégrée.
À propos des LED et des encodeurs rotatifs
Si vous ne connaissez pas les LED et les encodeurs rotatifs (brochage, fonctionnement, programmation...), renseignez-vous à leur sujet dans les tutoriels suivants :
Diagramme de câblage
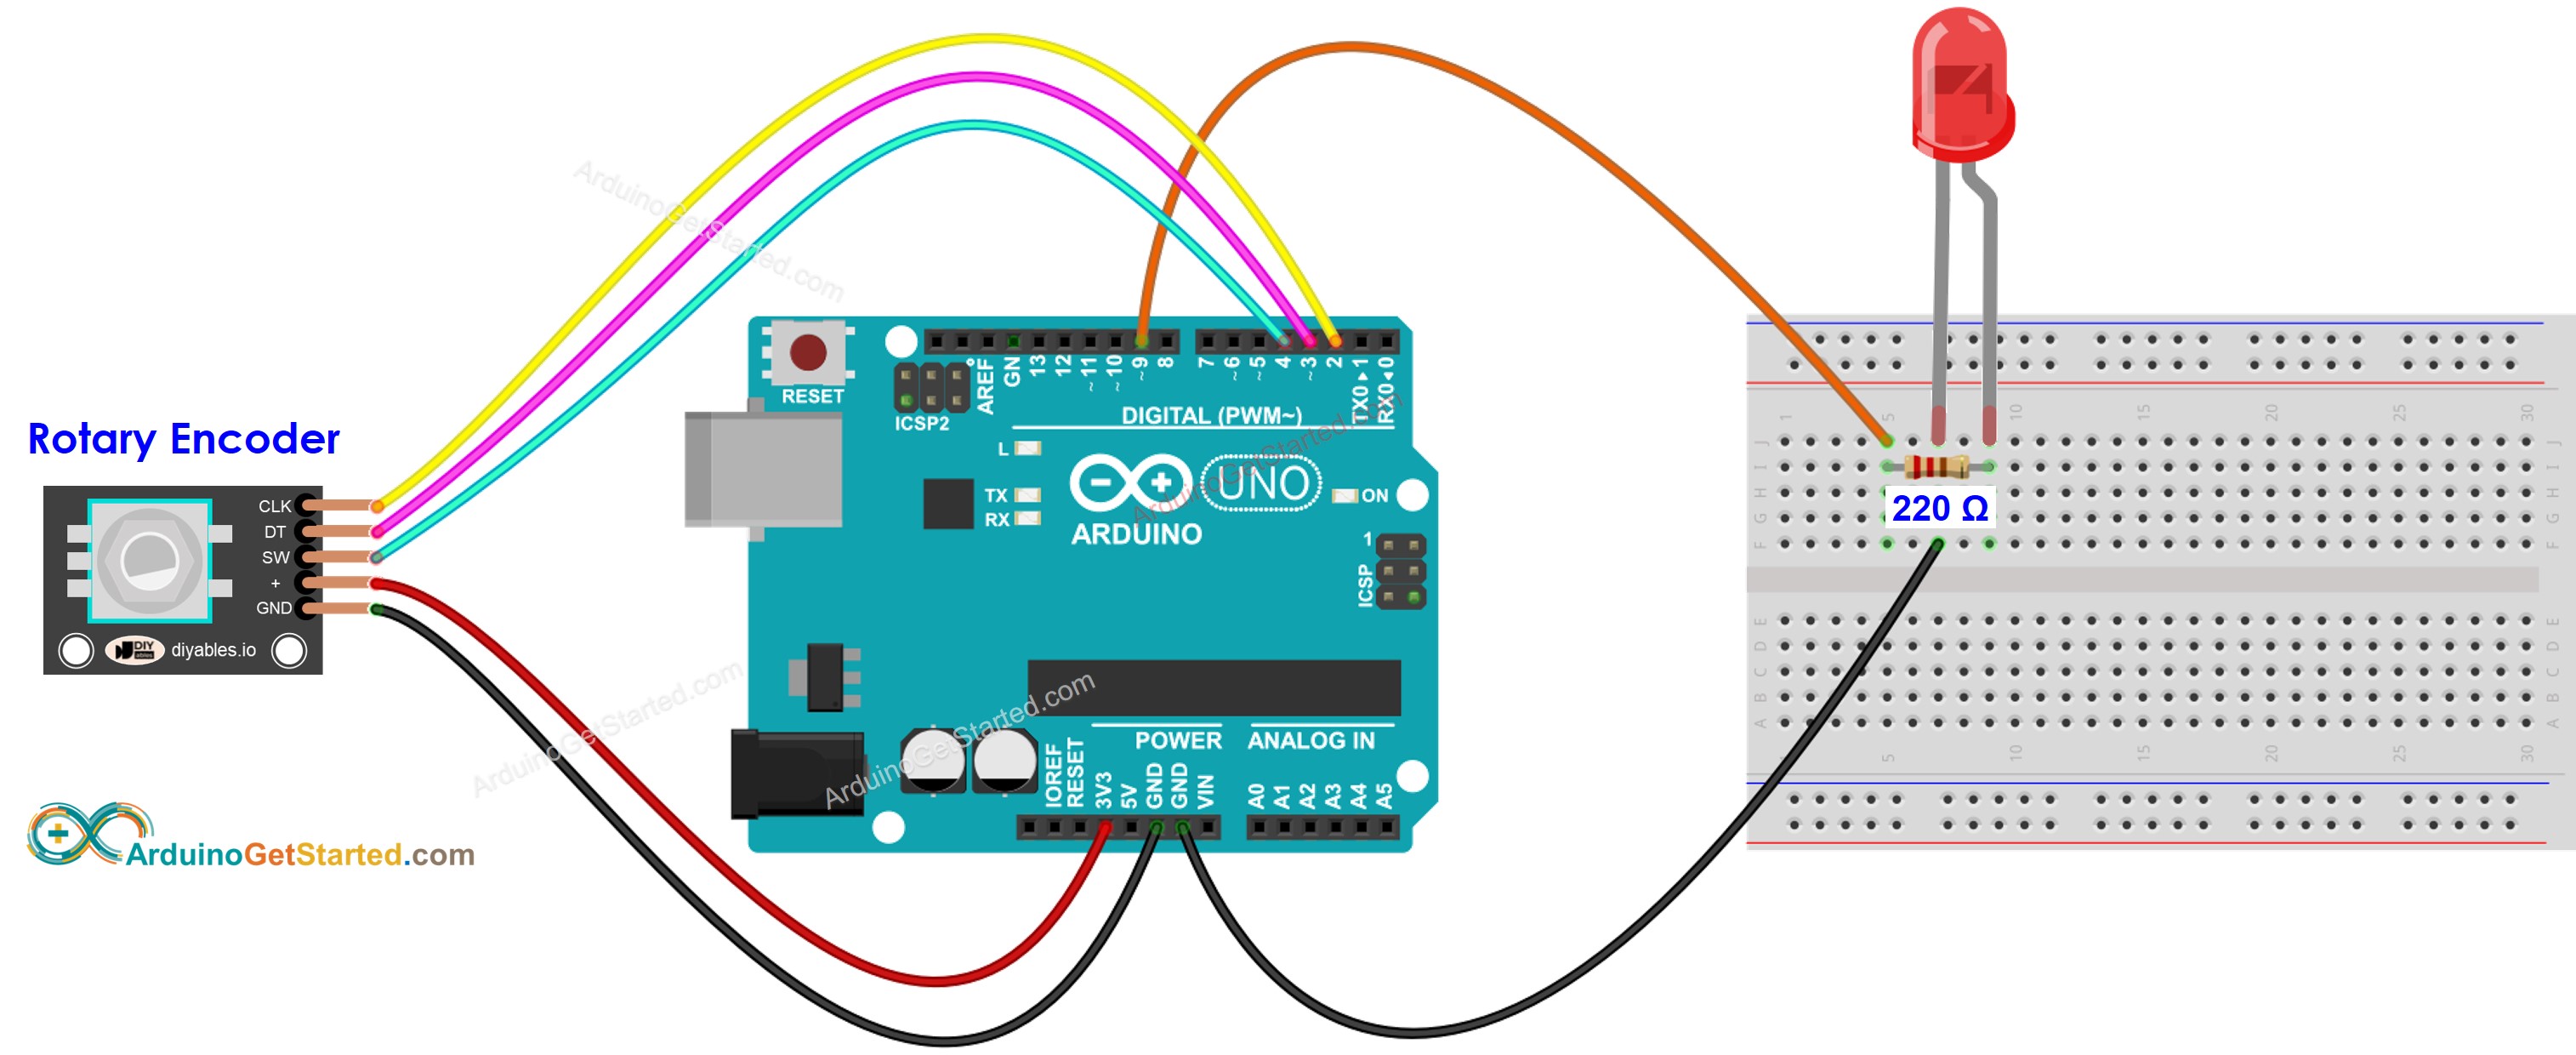
Cette image a été créée avec Fritzing. Cliquez pour agrandir l'image.
Code Arduino
/*
* Ce code Arduino a été développé par newbiely.fr
* Ce code Arduino est mis à disposition du public sans aucune restriction.
* Pour des instructions complètes et des schémas de câblage, veuillez visiter:
* https://newbiely.fr/tutorials/arduino/arduino-rotary-encoder-led
*/
#include <Servo.h>
#define CLK_PIN 2
#define DT_PIN 3
#define SW_PIN 4
#define LED_PIN 9
#define DIRECTION_CW 0 // clockwise direction
#define DIRECTION_CCW 1 // counter-clockwise direction
int counter = 0;
int direction = DIRECTION_CW;
int CLK_state;
int prev_CLK_state;
int brightness = 125; // middle value
void setup() {
Serial.begin(9600);
// configure encoder pins as inputs
pinMode(CLK_PIN, INPUT);
pinMode(DT_PIN, INPUT);
// read the initial state of the rotary encoder's CLK pin
prev_CLK_state = digitalRead(CLK_PIN);
pinMode(LED_PIN, OUTPUT);
}
void loop() {
// read the current state of the rotary encoder's CLK pin
CLK_state = digitalRead(CLK_PIN);
// If the state of CLK is changed, then pulse occurred
// React to only the rising edge (from LOW to HIGH) to avoid double count
if (CLK_state != prev_CLK_state && CLK_state == HIGH) {
// if the DT state is HIGH
// the encoder is rotating in counter-clockwise direction => decrease the counter
if (digitalRead(DT_PIN) == HIGH) {
direction = DIRECTION_CCW;
counter--;
brightness -= 10; // you can change this value
} else {
// the encoder is rotating in clockwise direction => increase the counter
direction = DIRECTION_CW;
counter++;
brightness += 10; // you can change this value
}
if (brightness < 0)
brightness = 0;
else if (brightness > 255)
brightness = 255;
// sets the brightness of LED according to the counter
analogWrite(LED_PIN, brightness);
Serial.print("COUNTER: ");
Serial.print(counter);
Serial.print(" | BRIGHTNESS: ");
Serial.println(brightness);
}
// save last CLK state
prev_CLK_state = CLK_state;
}
Étapes rapides
- Connectez l'Arduino au PC via le câble USB
- Ouvrez l'IDE Arduino, sélectionnez la bonne carte et le bon port
- Copiez le code ci-dessus et ouvrez-le avec l'IDE Arduino
- Cliquez sur le bouton Upload de l'IDE Arduino pour charger le code sur l'Arduino
- Ouvrez le moniteur série
- Tournez l'encodeur rotatif
- Observez la luminosité de la LED
- Consultez le résultat sur le moniteur série
8
Serial.println("Hello World!");
Message (Enter to send message to 'Arduino Uno' on 'COM15')
New Line
9600 baud
COUNTER: 1 | BRIGHTNESS: 135
COUNTER: 2 | BRIGHTNESS: 145
COUNTER: 3 | BRIGHTNESS: 155
COUNTER: 4 | BRIGHTNESS: 165
COUNTER: 5 | BRIGHTNESS: 175
COUNTER: 6 | BRIGHTNESS: 185
COUNTER: 7 | BRIGHTNESS: 195
Explication du code
Lisez l'explication ligne par ligne dans les commentaires du code source !