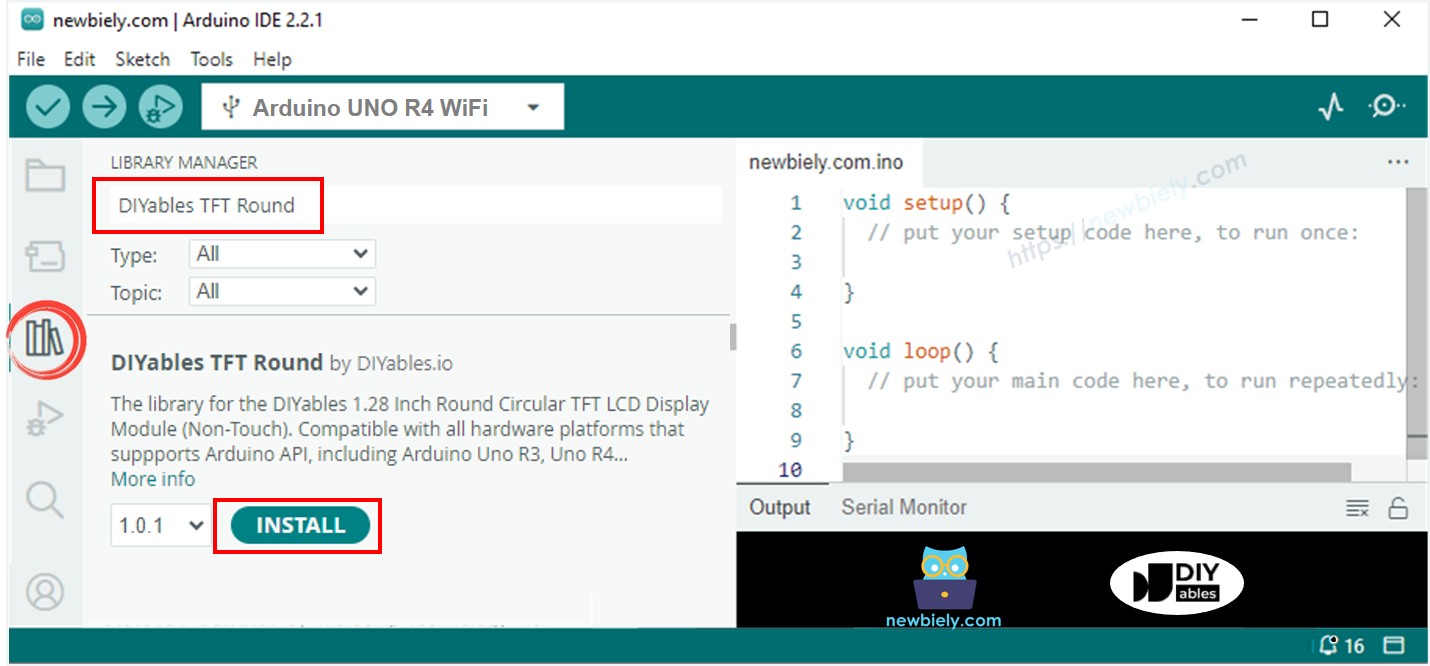
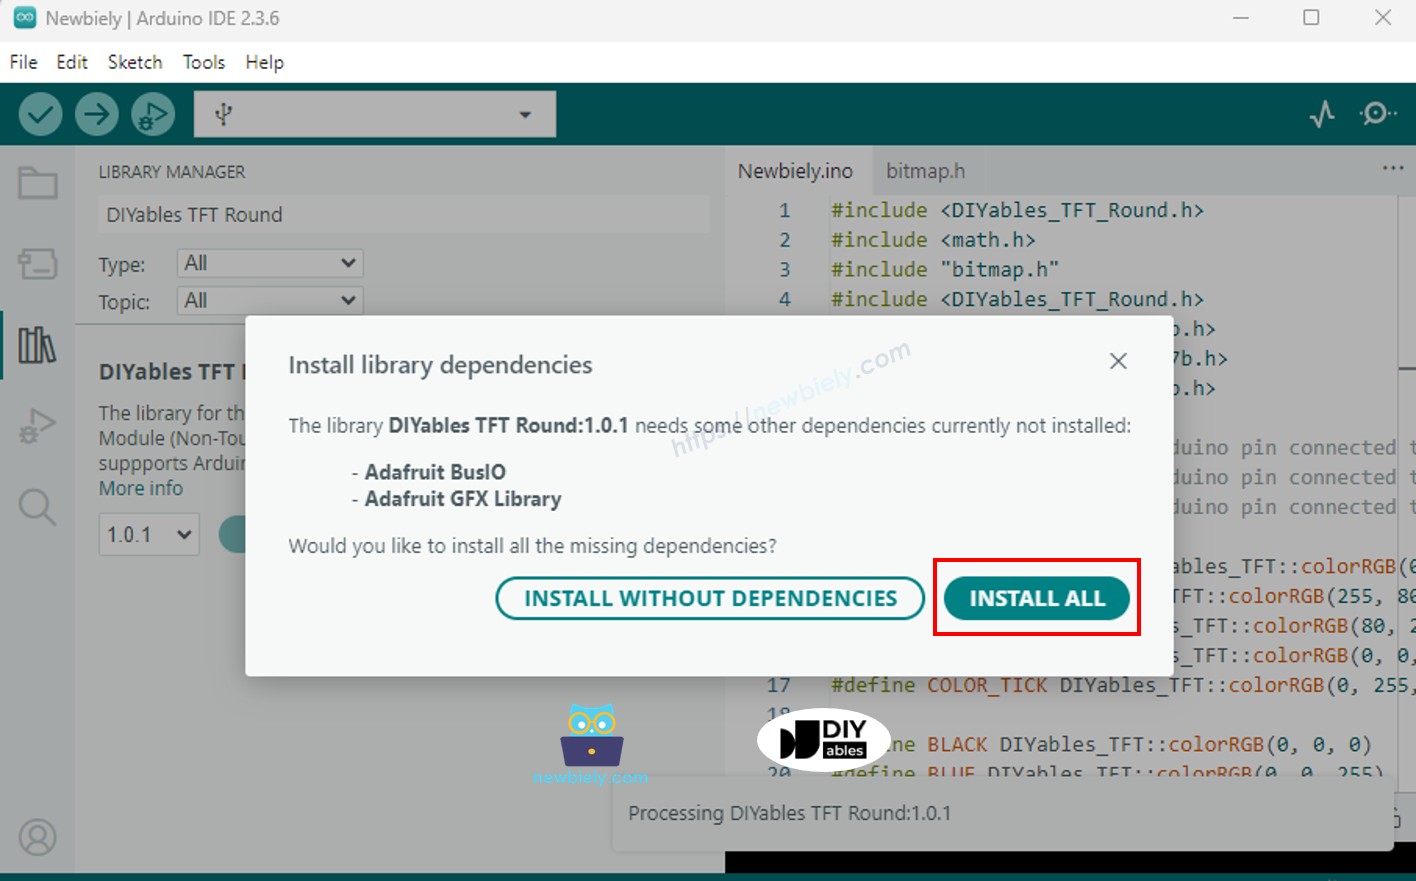
#include <WiFiS3.h>
#include <ArduinoHttpClient.h>
#include <ArduinoJson.h>
#include <DIYables_TFT_Round.h>
#include <ezButton.h>
#define WIFI_SSID "YOUR_WIFI_SSID"
#define WIFI_PASSWORD "YOUR_WIFI_PASSWORD"
#define LATITUDE 37.5665
#define LONGITUDE 126.9780
#define LOCATION_NAME "SEOUL"
#define TIMEZONE "Asia%2FSeoul"
const char API_HOST[] = "api.open-meteo.com";
const int API_PORT = 443;
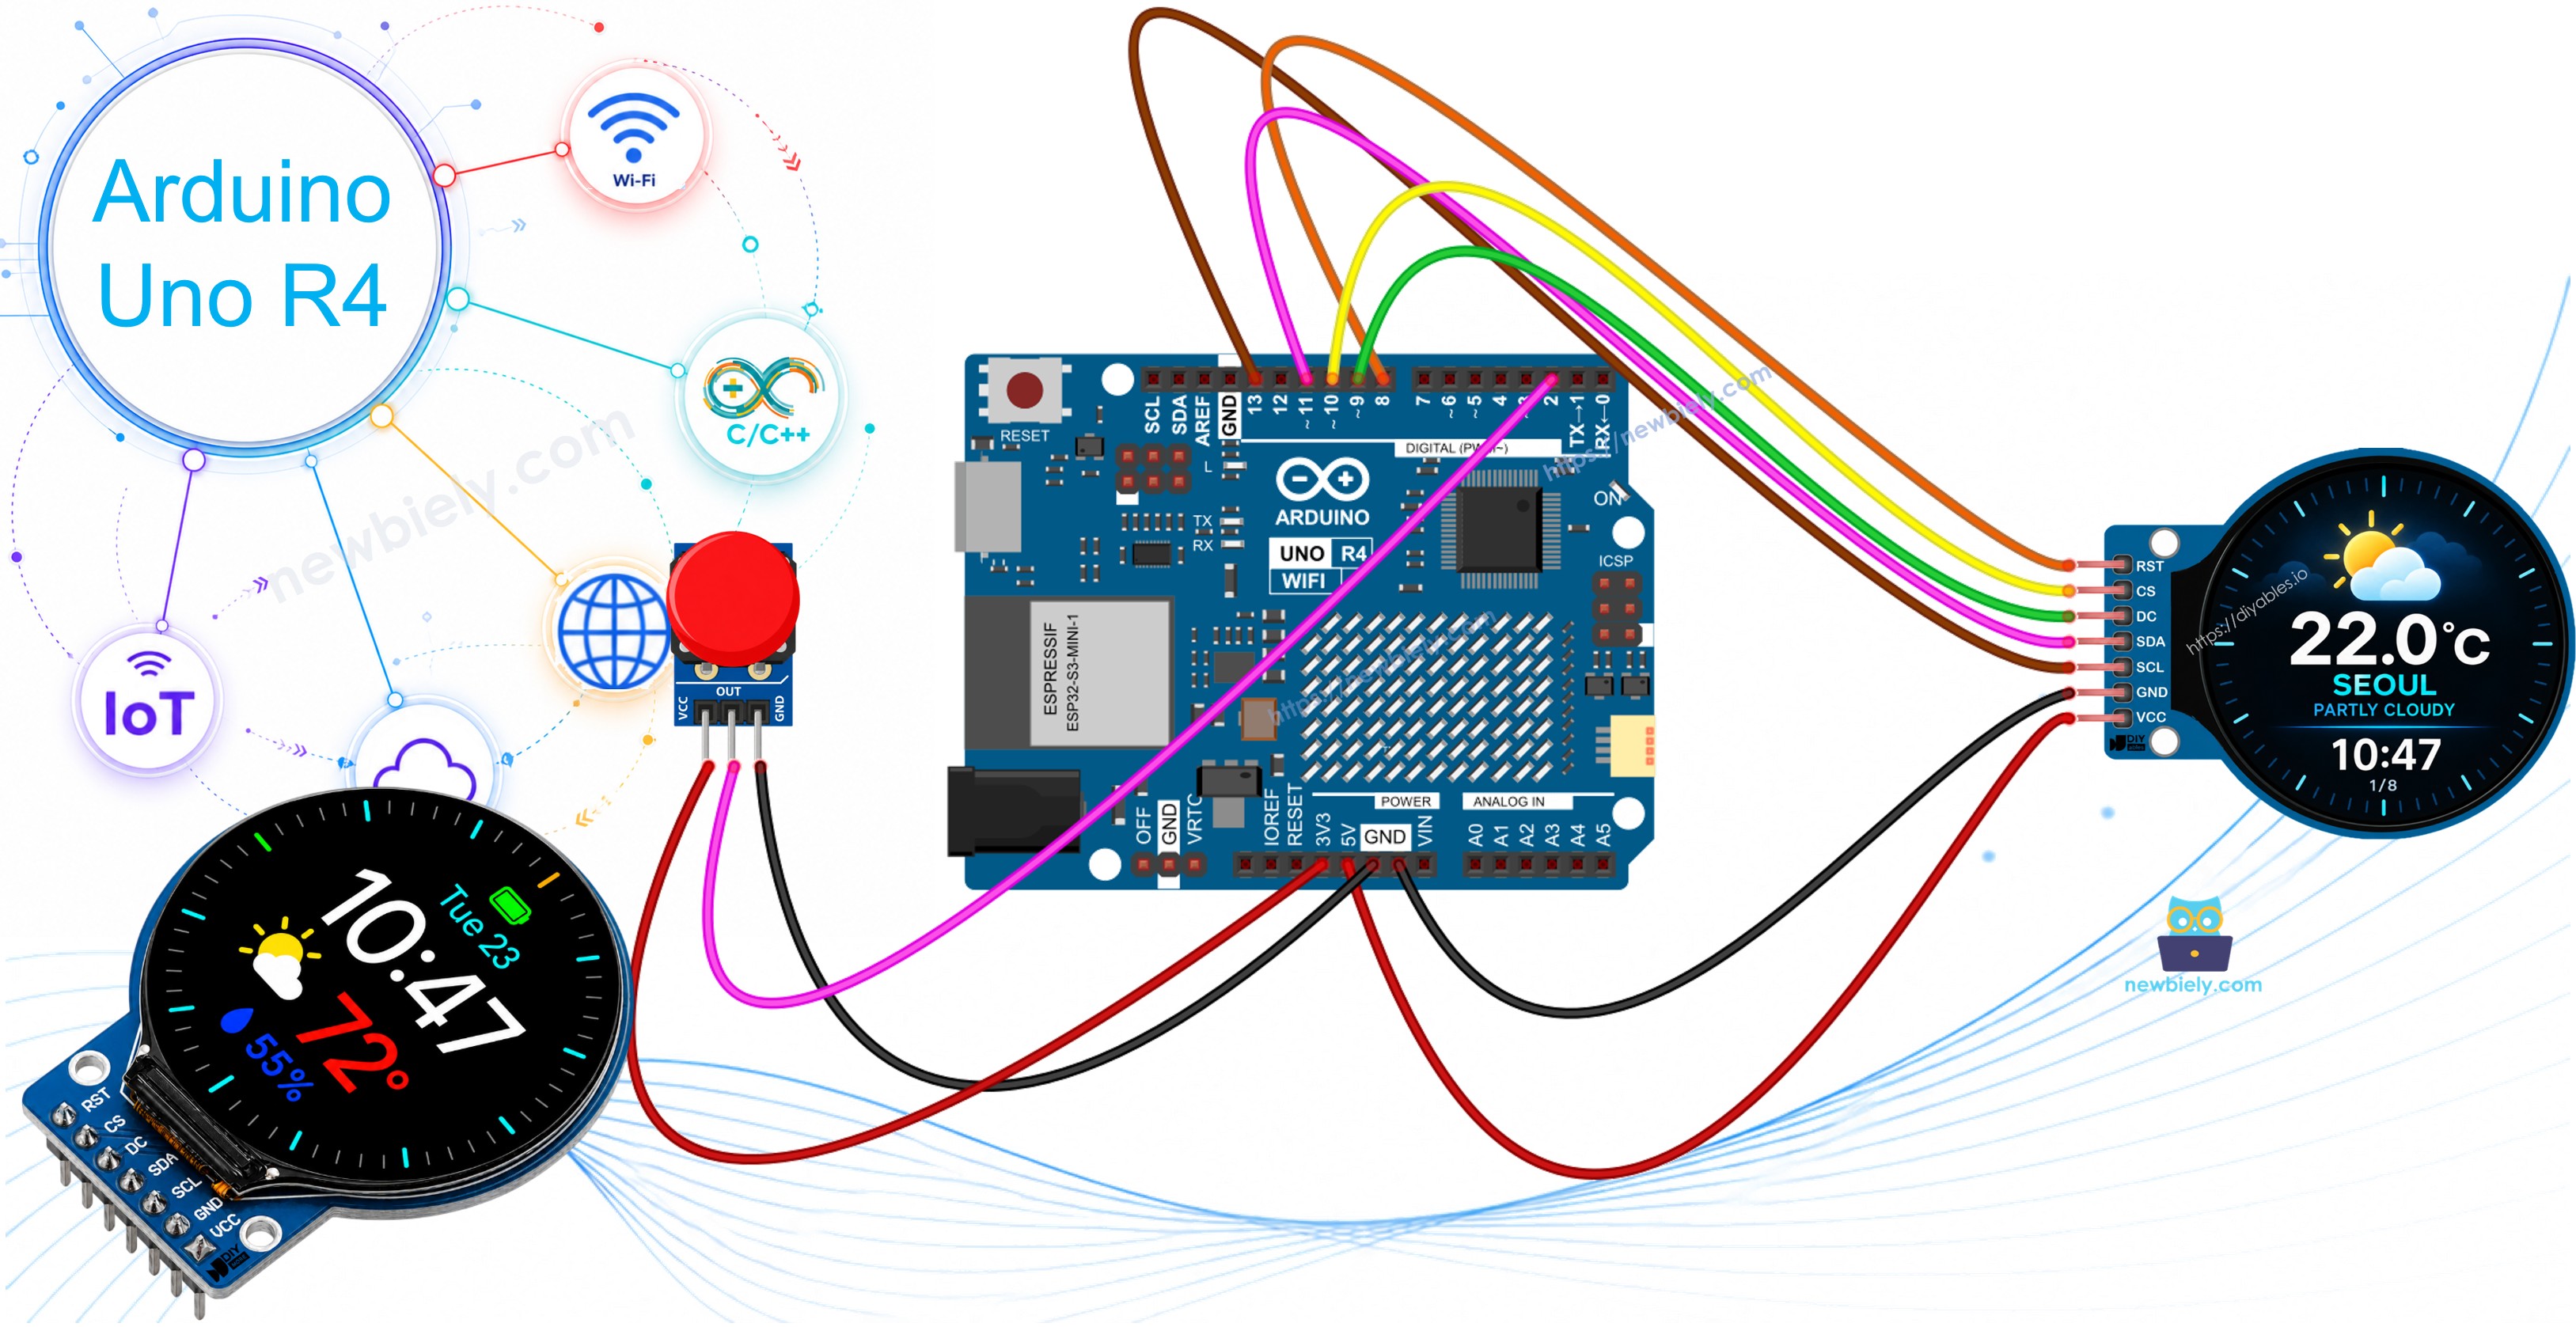
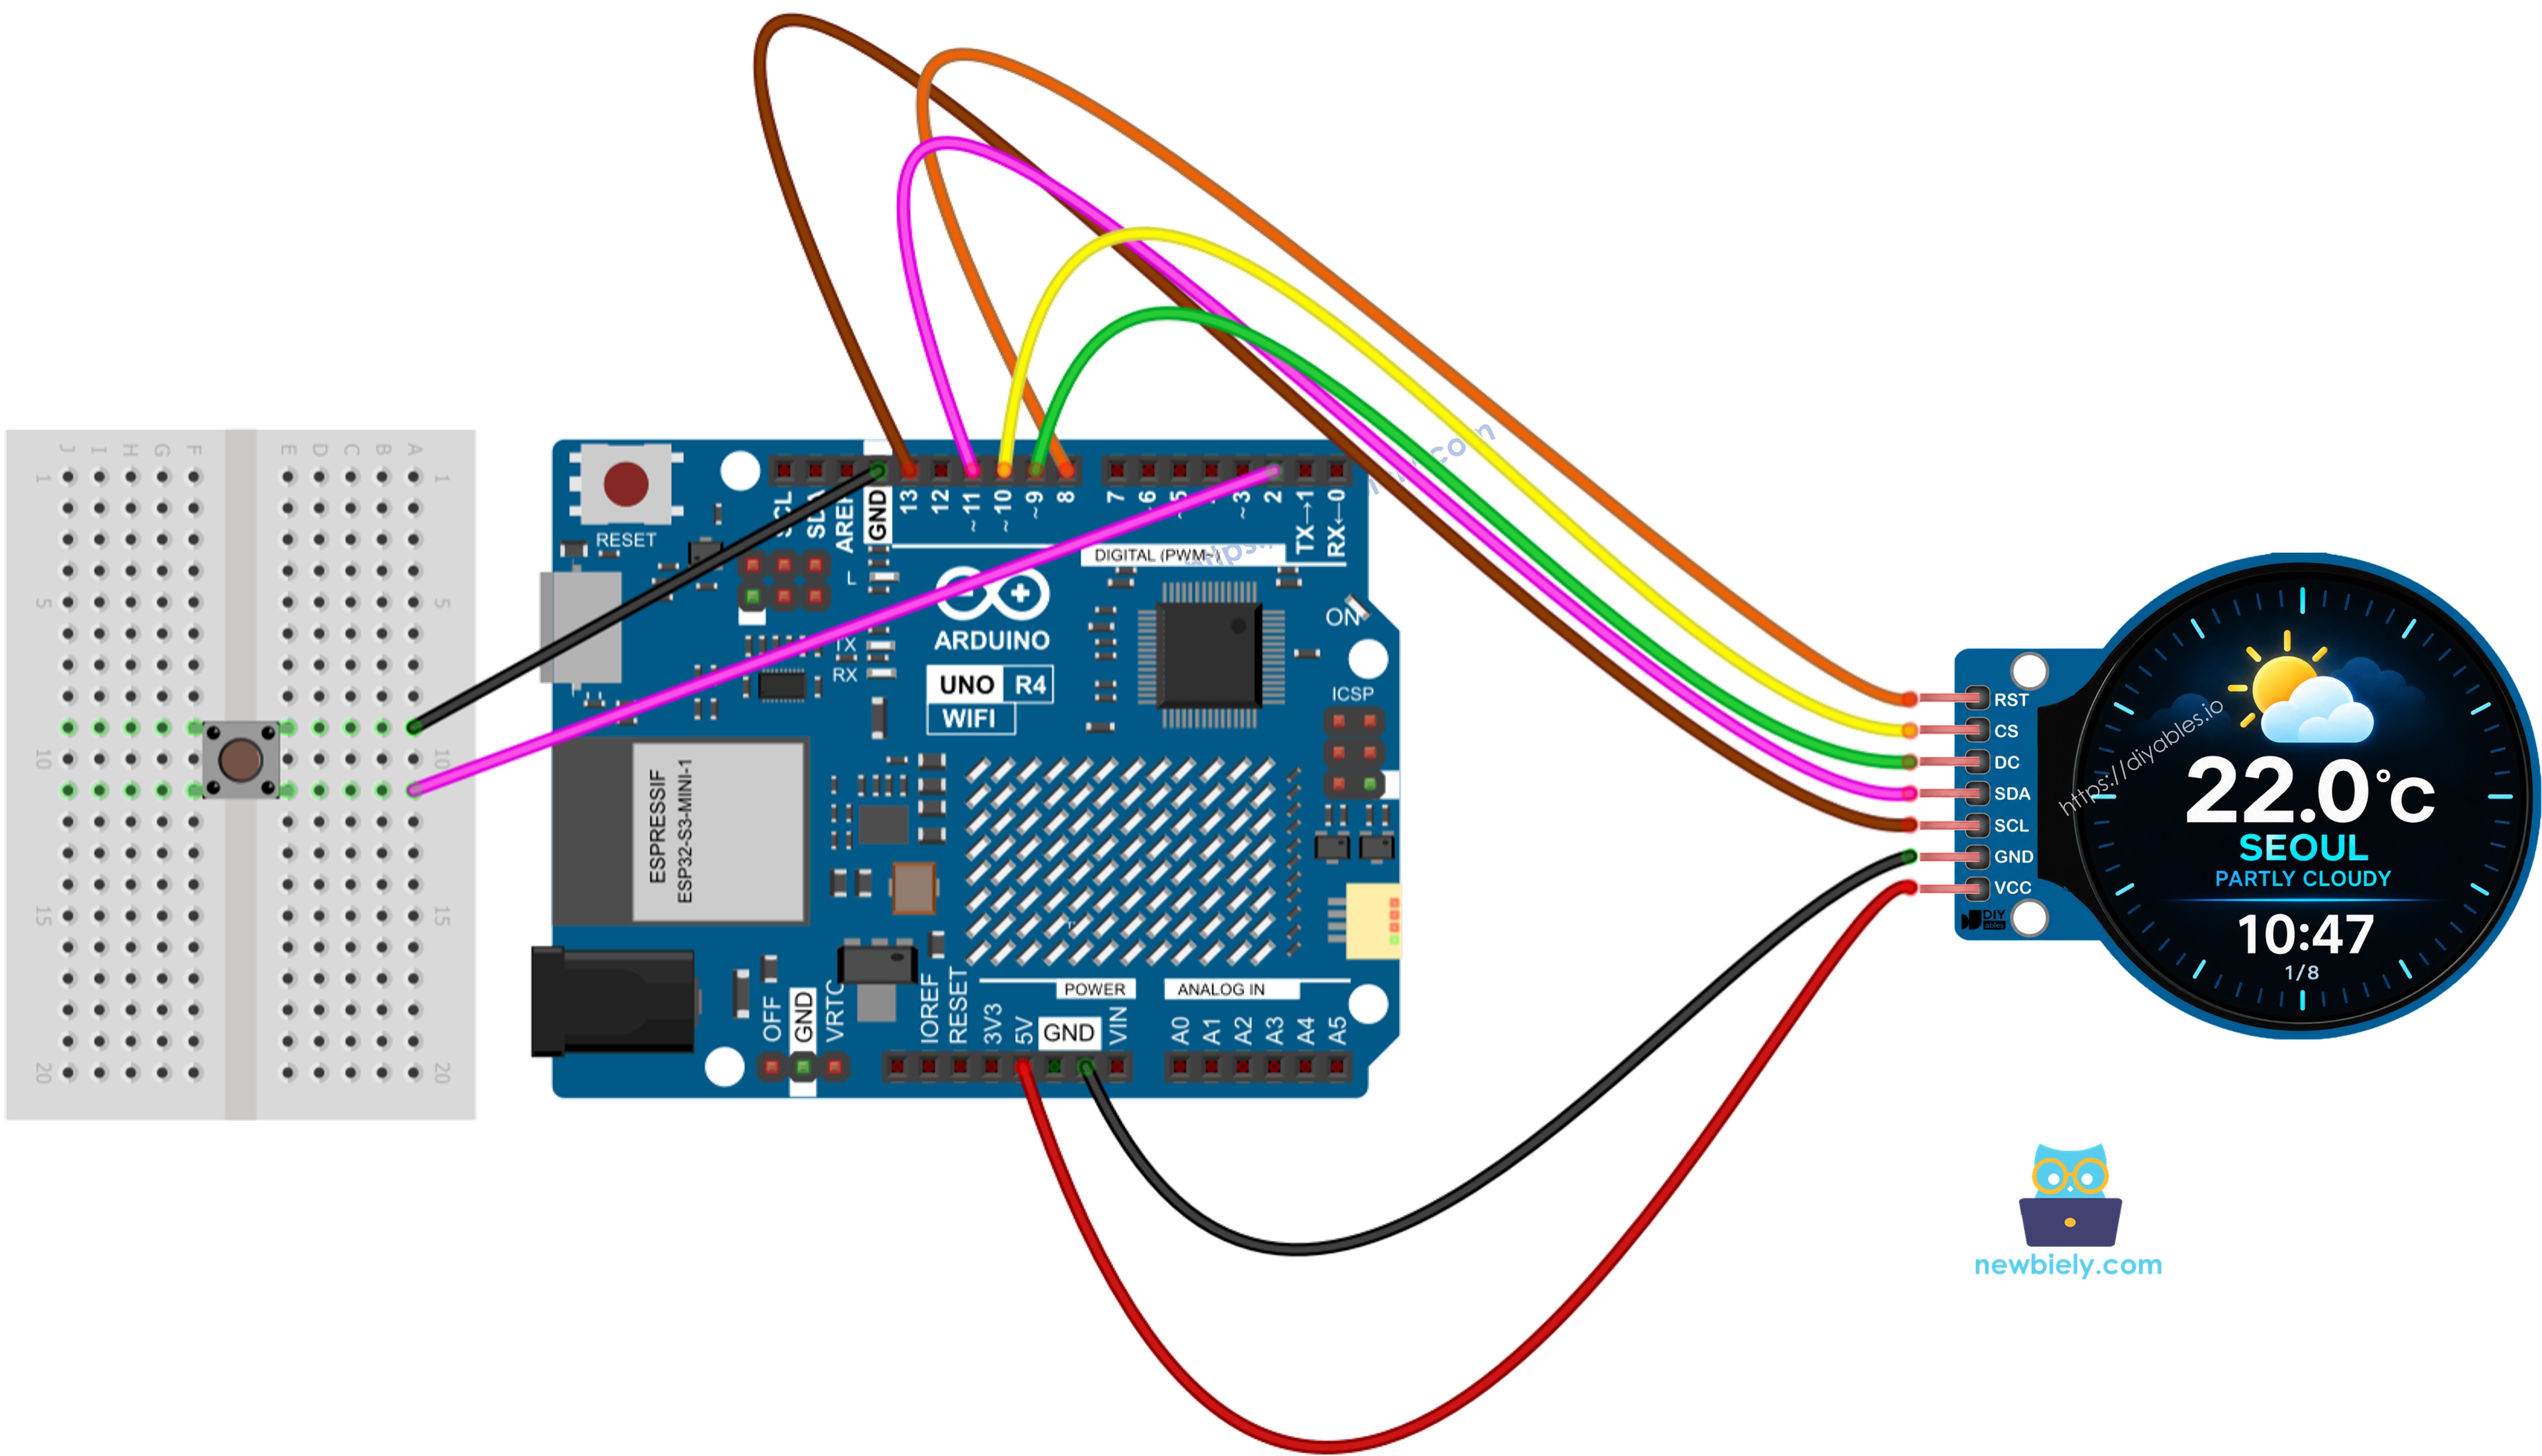
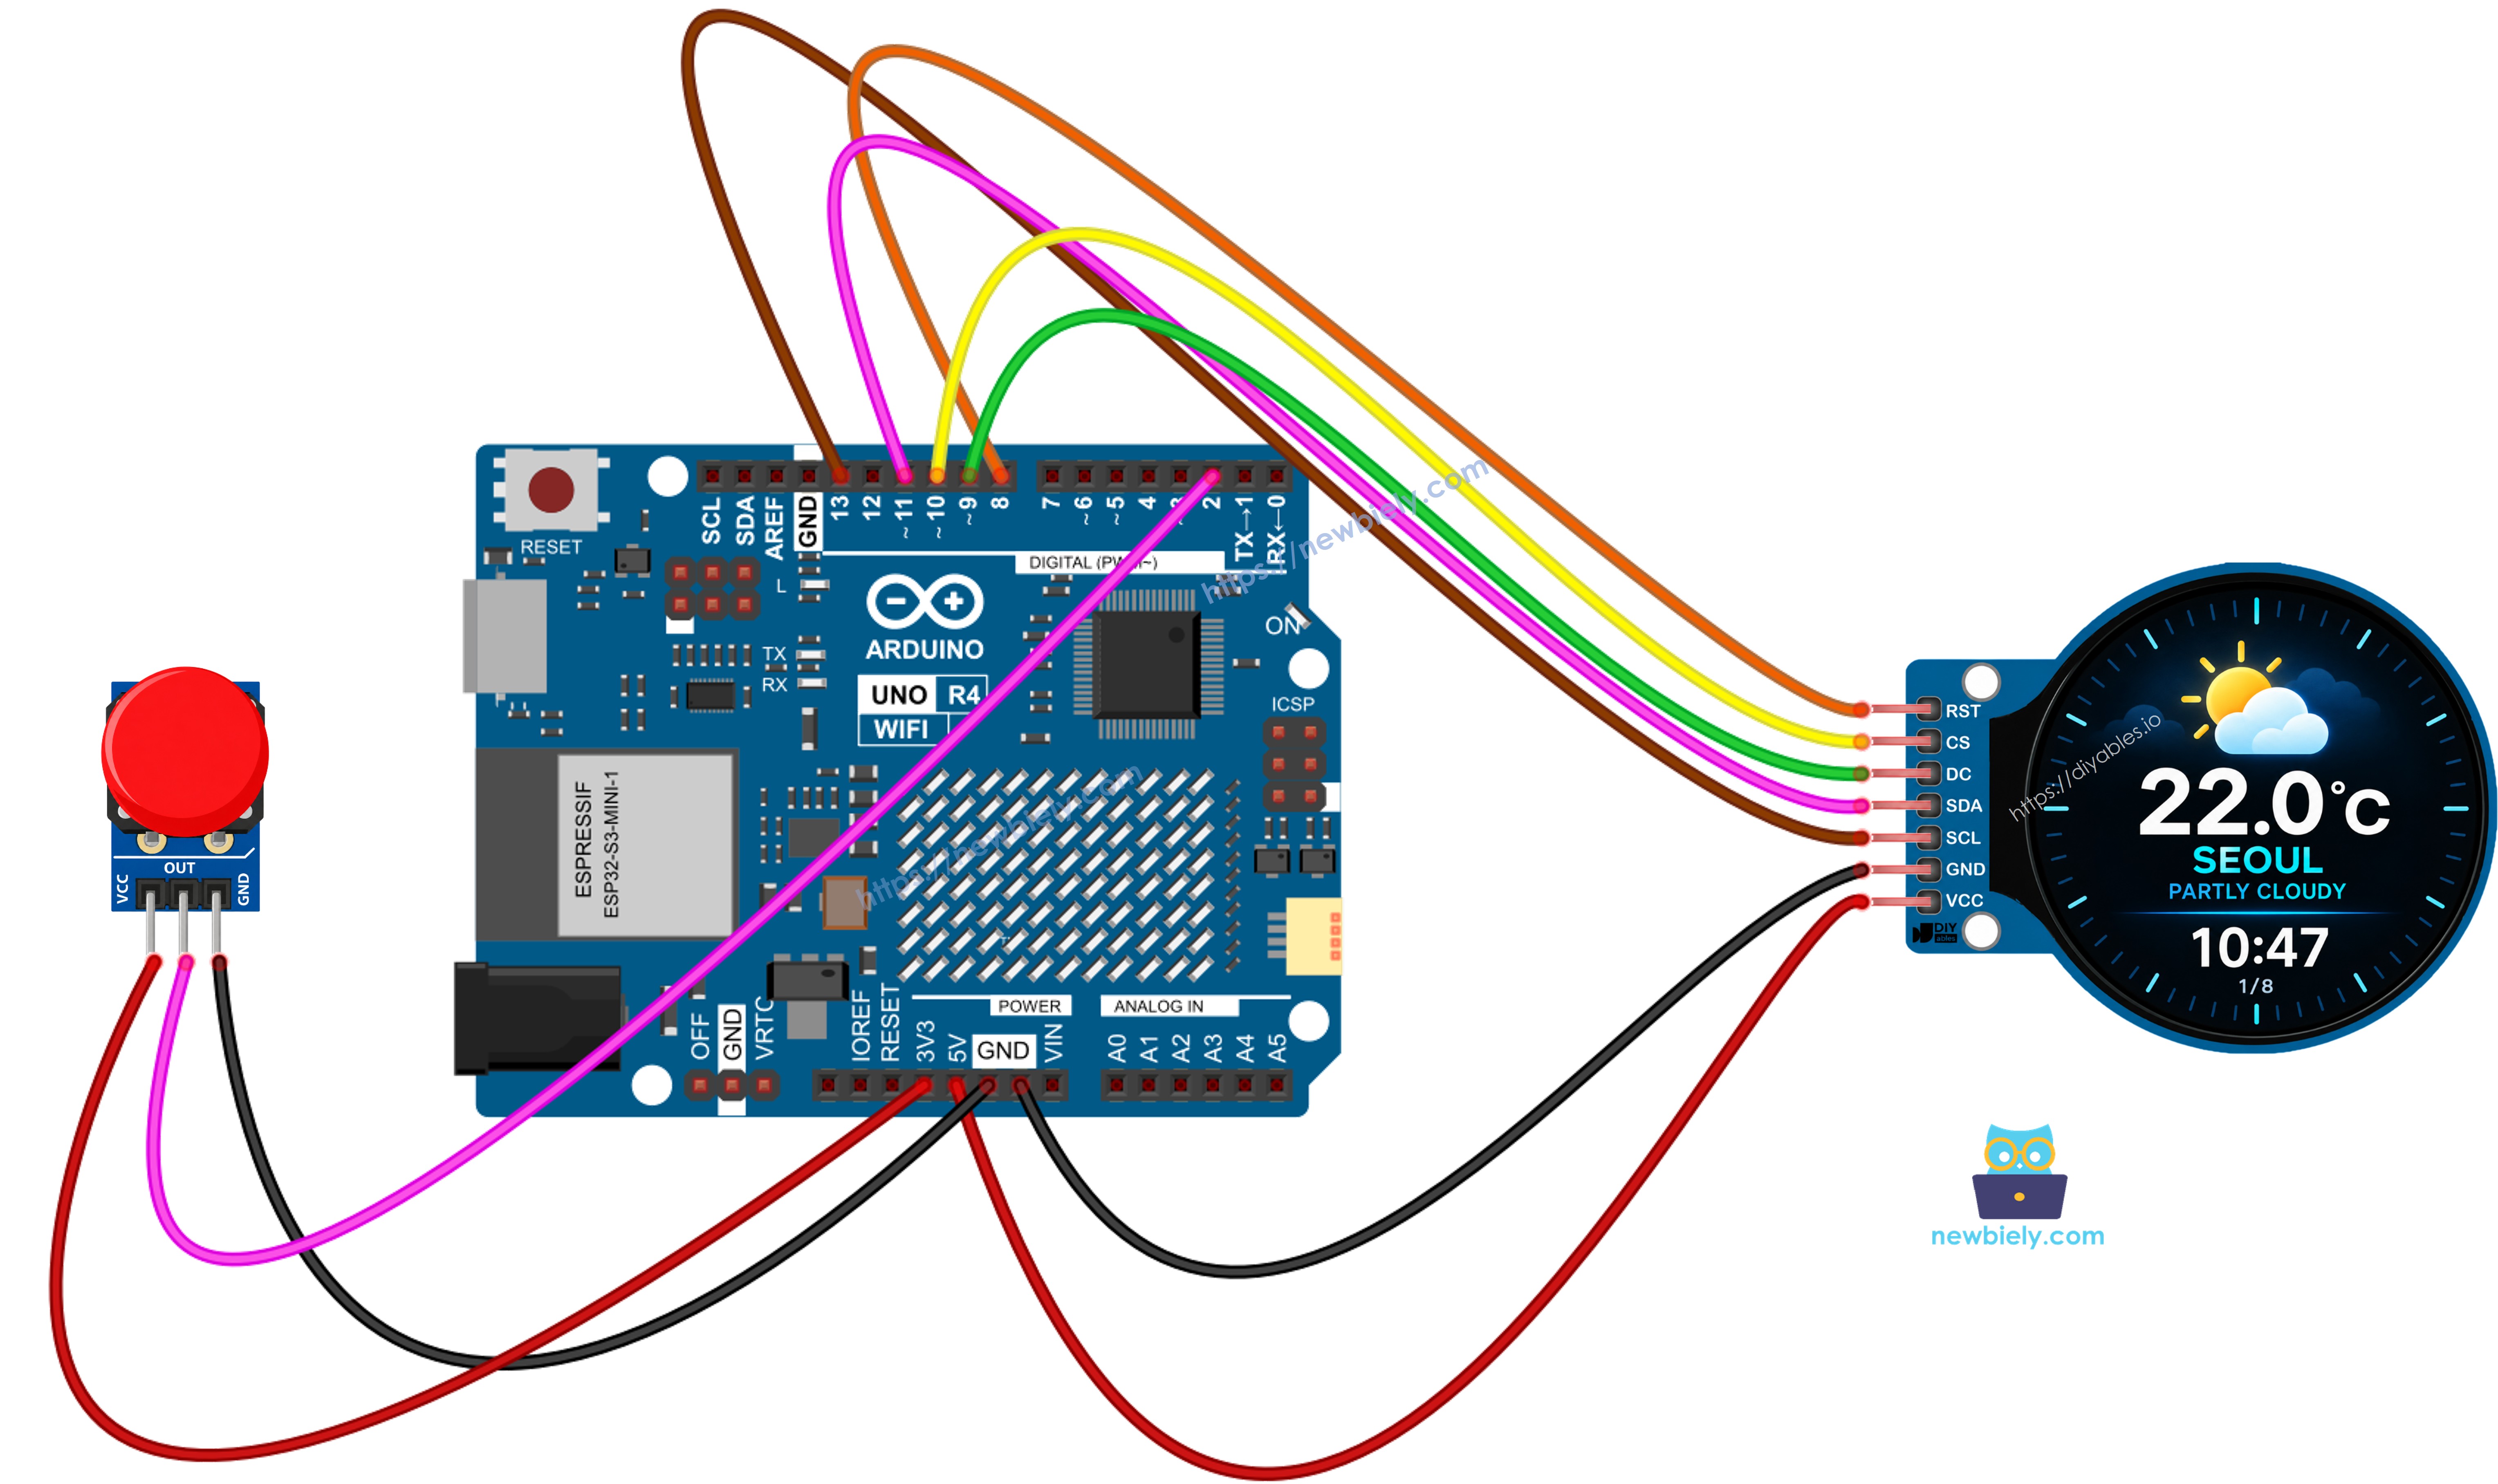
#define PIN_BUTTON 2
#define PIN_RST 8
#define PIN_DC 9
#define PIN_CS 10
const unsigned long API_UPDATE_INTERVAL = 10UL * 60UL * 1000UL;
const unsigned long WIFI_RETRY_INTERVAL = 10UL * 1000UL;
const unsigned long WIFI_CONNECT_TIMEOUT = 15UL * 1000UL;
const unsigned long BUTTON_DEBOUNCE = 40;
const unsigned long LONG_PRESS_TIME = 600;
const unsigned long VERY_LONG_PRESS_TIME = 2000;
const unsigned long RAIN_ANIMATION_INTERVAL = 90;
const unsigned long CLOCK_UPDATE_INTERVAL = 1000;
DIYables_TFT_GC9A01_Round tft(PIN_RST, PIN_DC, PIN_CS);
const int SCREEN_W = 240;
const int SCREEN_H = 240;
const int CENTER_X = 120;
const int CENTER_Y = 120;
#define BLACK DIYables_TFT::colorRGB(0, 0, 0)
#define WHITE DIYables_TFT::colorRGB(255, 255, 255)
#define CYAN DIYables_TFT::colorRGB(0, 220, 255)
#define BLUE DIYables_TFT::colorRGB(40, 120, 255)
#define LIGHT_BLUE DIYables_TFT::colorRGB(90, 190, 255)
#define GREEN DIYables_TFT::colorRGB(60, 230, 130)
#define YELLOW DIYables_TFT::colorRGB(255, 210, 60)
#define ORANGE DIYables_TFT::colorRGB(255, 150, 40)
#define RED DIYables_TFT::colorRGB(255, 70, 70)
#define PURPLE DIYables_TFT::colorRGB(180, 100, 255)
#define GRAY DIYables_TFT::colorRGB(125, 125, 135)
#define DARK_GRAY DIYables_TFT::colorRGB(42, 42, 52)
#define DARK_BLUE DIYables_TFT::colorRGB(12, 18, 48)
enum Page {
PAGE_HOME = 0,
PAGE_TEMP,
PAGE_HUMIDITY,
PAGE_WIND,
PAGE_RAIN,
PAGE_HOURLY,
PAGE_FORECAST,
PAGE_SYSTEM,
PAGE_COUNT
};
Page currentPage = PAGE_HOME;
struct WeatherData {
bool valid = false;
float temperature = 0;
float humidity = 0;
float feelsLike = 0;
float windSpeed = 0;
float windDirection = 0;
float pressure = 0;
int weatherCode = 0;
bool isDay = true;
int currentRainChance = 0;
float uvIndex = 0;
char sunrise[6] = "--:--";
char sunset[6] = "--:--";
float hourlyTemp[12];
int hourlyRainChance[12];
int hourlyWeatherCode[12];
char hourlyTime[12][6];
char dailyDate[3][11];
float dailyTempMax[3];
float dailyTempMin[3];
int dailyRainChance[3];
int dailyWeatherCode[3];
float dailyUV[3];
};
WeatherData weather;
long clockBaseSecond = -1;
unsigned long clockBaseMillis = 0;
bool apiOnline = false;
bool wifiOnline = false;
bool screenDirty = true;
bool isFetching = false;
bool pendingRefresh = false;
unsigned long lastApiUpdate = 0;
unsigned long lastWifiRetry = 0;
unsigned long wifiConnectStart = 0;
unsigned long lastRainAnimation = 0;
unsigned long lastClockUpdate = 0;
bool wifiConnecting = false;
ezButton button(PIN_BUTTON);
unsigned long buttonPressStart = 0;
const int RAIN_DROP_COUNT = 16;
int rainX[RAIN_DROP_COUNT];
int rainY[RAIN_DROP_COUNT];
bool rainInitialized = false;
const int RAIN_AREA_X = 30;
const int RAIN_AREA_Y = 125;
const int RAIN_AREA_W = 180;
const int RAIN_AREA_H = 78;
String weatherDescription(int code) {
switch (code) {
case 0:
return "CLEAR";
case 1:
return "MAINLY CLEAR";
case 2:
return "PARTLY CLOUDY";
case 3:
return "OVERCAST";
case 45:
case 48:
return "FOG";
case 51:
case 53:
case 55:
return "DRIZZLE";
case 56:
case 57:
return "FREEZING DRIZZLE";
case 61:
case 63:
case 65:
return "RAIN";
case 66:
case 67:
return "FREEZING RAIN";
case 71:
case 73:
case 75:
return "SNOW";
case 77:
return "SNOW GRAINS";
case 80:
case 81:
case 82:
return "SHOWERS";
case 85:
case 86:
return "SNOW SHOWERS";
case 95:
return "THUNDERSTORM";
case 96:
case 99:
return "STORM";
default:
return "UNKNOWN";
}
}
uint16_t weatherColor(int code) {
if (code == 0) return YELLOW;
if (code == 1 || code == 2) return CYAN;
if (code == 3) return GRAY;
if (code >= 51 && code <= 67) return BLUE;
if (code >= 80 && code <= 82) return LIGHT_BLUE;
if (code >= 95) return RED;
return WHITE;
}
String windDirectionText(float degrees) {
const char* directions[] = {
"N",
"NE",
"E",
"SE",
"S",
"SW",
"W",
"NW"
};
int index = (int)((degrees + 22.5) / 45.0);
index %= 8;
return directions[index];
}
void drawCenteredText(String text, int y, int size, uint16_t color) {
tft.setTextSize(size);
tft.setTextColor(color);
int width = text.length() * 6 * size;
int x = CENTER_X - width / 2;
if (x < 0) x = 0;
tft.setCursor(x, y);
tft.print(text);
}
void drawHeader(String title, uint16_t color) {
const float SAFE_RADIUS = 116.0;
int size = 2;
int width = title.length() * 6 * size;
int half = width / 2;
int y;
if (half >= SAFE_RADIUS) {
size = 1;
width = title.length() * 6 * size;
half = width / 2;
y = 14;
} else {
float insideSpan = sqrt((SAFE_RADIUS * SAFE_RADIUS) - ((float)half * (float)half));
int minY = (int)(120.0 - insideSpan);
y = (minY > 14) ? minY : 14;
}
drawCenteredText(title, y, size, color);
int lineY = y + (size == 2 ? 16 : 8) + 6;
tft.drawLine(45, lineY, 195, lineY, DARK_GRAY);
}
void drawFooter() {
tft.drawLine(55, 214, 185, 214, DARK_GRAY);
drawCenteredText(String(currentPage + 1) + "/" + String(PAGE_COUNT), 220, 1, GRAY);
}
void drawSun(int x, int y, int radius) {
tft.fillCircle(x, y, radius, YELLOW);
for (int i = 0; i < 8; i++) {
float angle = i * PI / 4.0;
int x1 = x + cos(angle) * (radius + 7);
int y1 = y + sin(angle) * (radius + 7);
int x2 = x + cos(angle) * (radius + 14);
int y2 = y + sin(angle) * (radius + 14);
tft.drawLine(x1, y1, x2, y2, YELLOW);
}
}
void drawCloud(int x, int y) {
tft.fillCircle(x - 20, y, 15, LIGHT_BLUE);
tft.fillCircle(x, y - 8, 20, LIGHT_BLUE);
tft.fillCircle(x + 20, y, 15, LIGHT_BLUE);
tft.fillRoundRect(x - 35, y, 70, 20, 10, LIGHT_BLUE);
}
void drawRainIcon(int x, int y) {
drawCloud(x, y);
for (int i = 0; i < 5; i++) {
int dx = -24 + i * 12;
int dy = 28;
tft.drawLine(x + dx, y + dy, x + dx - 4, y + dy + 10, BLUE);
}
}
void drawWeatherIcon(int code, int x, int y) {
if (code == 0) {
drawSun(x, y, 18);
}
else if (code <= 2) {
drawSun(x - 12, y - 7, 13);
drawCloud(x + 10, y + 10);
}
else if (code == 3) {
drawCloud(x, y);
}
else if ((code >= 51 && code <= 67) || (code >= 80 && code <= 82)) {
drawRainIcon(x, y);
}
else if (code >= 95) {
drawCloud(x, y);
tft.drawLine(x - 5, y + 28, x - 12, y + 43, YELLOW);
tft.drawLine(x + 10, y + 28, x + 3, y + 43, YELLOW);
} else {
drawCloud(x, y);
}
}
void drawWifiIcon(int cx, int cy, int level) {
const int radii[3] = { 14, 27, 40 };
for (int arc = 0; arc < 3; arc++) {
uint16_t color = (arc < level) ? CYAN : DARK_GRAY;
for (int deg = -150; deg <= -30; deg += 5) {
float angle = deg * PI / 180.0;
int x = cx + (int)(cos(angle) * radii[arc]);
int y = cy + (int)(sin(angle) * radii[arc]);
tft.fillCircle(x, y, 2, color);
}
}
tft.fillCircle(cx, cy, 5, CYAN);
}
void drawHome() {
uint16_t bg = weather.isDay ? BLACK : DARK_BLUE;
tft.fillScreen(bg);
if (!weather.valid) {
drawCenteredText("NO DATA", 90, 3, RED);
drawCenteredText("CHECK CONNECTION", 135, 1, WHITE);
drawFooter();
return;
}
drawWeatherIcon(weather.weatherCode, CENTER_X, 65);
drawCenteredText(String(weather.temperature, 1) + " C", 112, 3, WHITE);
drawCenteredText(LOCATION_NAME, 153, 2, CYAN);
drawCenteredText(weatherDescription(weather.weatherCode), 178, 1, weatherColor(weather.weatherCode));
drawHomeClock();
drawFooter();
}
void drawHomeClock() {
uint16_t bg = weather.isDay ? BLACK : DARK_BLUE;
tft.fillRect(82, 196, 76, 12, bg);
drawCenteredText(getTimeString(), 197, 1, GRAY);
}
void drawTemperature() {
tft.fillScreen(BLACK);
drawHeader("TEMPERATURE", ORANGE);
int cx = 120;
int cy = 125;
int radius = 68;
int value = constrain((int)weather.temperature, 0, 40);
int filled = map(value, 0, 40, 0, 240);
for (int i = 0; i < 240; i += 4) {
float angle = (-135.0 + i) * PI / 180.0;
int x = cx + cos(angle) * radius;
int y = cy + sin(angle) * radius;
uint16_t color = (i < filled) ? ORANGE : DARK_GRAY;
tft.fillCircle(x, y, 2, color);
}
drawCenteredText(String(weather.temperature, 1), 101, 3, WHITE);
drawCenteredText("C", 138, 2, ORANGE);
drawCenteredText("FEELS " + String(weather.feelsLike, 1) + " C", 168, 1, CYAN);
drawFooter();
}
void drawHumidity() {
tft.fillScreen(BLACK);
drawHeader("HUMIDITY", BLUE);
int cx = 120;
int cy = 125;
int radius = 68;
int progress = constrain((int)weather.humidity, 0, 100);
int filled = map(progress, 0, 100, 0, 270);
for (int i = 0; i < 270; i += 3) {
float angle = (-135.0 + i) * PI / 180.0;
int x = cx + cos(angle) * radius;
int y = cy + sin(angle) * radius;
uint16_t color = (i < filled) ? BLUE : DARK_GRAY;
tft.fillCircle(x, y, 3, color);
}
drawCenteredText(String((int)weather.humidity) + "%", 105, 3, WHITE);
String comfort;
if (weather.humidity < 40) comfort = "DRY";
else if (weather.humidity < 70) comfort = "COMFORTABLE";
else if (weather.humidity < 85) comfort = "HUMID";
else
comfort = "VERY HUMID";
drawCenteredText(comfort, 153, 1, CYAN);
drawFooter();
}
void drawWind() {
tft.fillScreen(BLACK);
drawHeader("WIND", GREEN);
int cx = 120;
int cy = 104;
int radius = 49;
tft.drawCircle(cx, cy, radius, DARK_GRAY);
drawCenteredText("N", 43, 1, WHITE);
drawCenteredText("S", 157, 1, WHITE);
tft.setCursor(62, 101);
tft.setTextSize(1);
tft.setTextColor(WHITE);
tft.print("W");
tft.setCursor(172, 101);
tft.print("E");
float angle = weather.windDirection * PI / 180.0;
int x2 = cx + sin(angle) * 38;
int y2 = cy - cos(angle) * 38;
tft.drawLine(cx, cy, x2, y2, GREEN);
tft.fillCircle(cx, cy, 5, GREEN);
drawCenteredText(String(weather.windSpeed, 1) + " km/h", 174, 2, WHITE);
drawCenteredText(windDirectionText(weather.windDirection), 198, 1, CYAN);
drawFooter();
}
void drawRain() {
tft.fillScreen(BLACK);
drawHeader("RAIN", LIGHT_BLUE);
int rain = weather.currentRainChance;
if (rain >= 60) {
drawRainIcon(CENTER_X, 68);
} else {
drawCloud(CENTER_X, 73);
}
drawCenteredText(String(rain) + "%", 105, 3, WHITE);
drawCenteredText("RAIN CHANCE", 140, 1, LIGHT_BLUE);
if (rain >= 60) {
drawCenteredText("HIGH", 158, 1, RED);
}
else if (rain >= 30) {
drawCenteredText("MODERATE", 158, 1, YELLOW);
} else {
drawCenteredText("LOW", 158, 1, GREEN);
}
if (rain >= 20) {
initializeRainAnimation();
}
drawFooter();
}
void initializeRainAnimation() {
for (int i = 0; i < RAIN_DROP_COUNT; i++) {
rainX[i] = RAIN_AREA_X + random(RAIN_AREA_W);
rainY[i] = RAIN_AREA_Y + random(RAIN_AREA_H);
}
rainInitialized = true;
}
void updateRainAnimation() {
if (currentPage != PAGE_RAIN) return;
if (weather.currentRainChance < 20) return;
if (millis() - lastRainAnimation < RAIN_ANIMATION_INTERVAL) {
return;
}
lastRainAnimation = millis();
uint16_t bg = BLACK;
for (int i = 0; i < RAIN_DROP_COUNT; i++) {
tft.drawLine(rainX[i], rainY[i], rainX[i] - 3, rainY[i] + 7, bg);
}
for (int i = 0; i < RAIN_DROP_COUNT; i++) {
rainY[i] += 5;
if (rainY[i] > RAIN_AREA_Y + RAIN_AREA_H) {
rainX[i] = RAIN_AREA_X + random(RAIN_AREA_W);
rainY[i] = RAIN_AREA_Y;
}
tft.drawLine(rainX[i], rainY[i], rainX[i] - 3, rainY[i] + 7, BLUE);
}
}
void drawHourly() {
tft.fillScreen(BLACK);
drawHeader("NEXT HOURS", PURPLE);
for (int i = 0; i < 5; i++) {
int y = 52 + i * 31;
if (i > 0) {
tft.drawLine(25, y - 8, 215, y - 8, DARK_GRAY);
}
tft.setCursor(25, y);
tft.setTextSize(1);
tft.setTextColor(WHITE);
tft.print(weather.hourlyTime[i]);
int code = weather.hourlyWeatherCode[i];
String condition;
if (code == 0) condition = "SUN";
else if (code <= 3) condition = "CLOUD";
else if (code >= 95) condition = "STORM";
else
condition = "RAIN";
tft.setCursor(75, y);
tft.setTextColor(weatherColor(code));
tft.print(condition);
tft.setCursor(142, y);
tft.setTextColor(WHITE);
tft.print(weather.hourlyTemp[i], 0);
tft.print("C");
tft.setCursor(180, y);
tft.setTextColor(LIGHT_BLUE);
tft.print(weather.hourlyRainChance[i]);
tft.print("%");
}
drawFooter();
}
void drawForecast() {
tft.fillScreen(BLACK);
drawHeader("3-DAY FORECAST", CYAN);
const char* labels[] = {
"TODAY",
"TOMORROW",
"DAY 3"
};
const int CARD_X = 25;
const int CARD_W = 190;
for (int i = 0; i < 3; i++) {
int y = 62 + i * 48;
tft.drawRoundRect(CARD_X, y - 5, CARD_W, 40, 8, DARK_GRAY);
tft.setCursor(CARD_X + 8, y + 4);
tft.setTextSize(1);
tft.setTextColor(WHITE);
tft.print(labels[i]);
tft.setCursor(CARD_X + 65, y + 4);
tft.print(weather.dailyTempMin[i], 0);
tft.print("/");
tft.print(weather.dailyTempMax[i], 0);
tft.print("C");
tft.setCursor(CARD_X + 120, y + 4);
tft.setTextColor(LIGHT_BLUE);
tft.print(weather.dailyRainChance[i]);
tft.print("%");
tft.setCursor(CARD_X + 155, y + 4);
tft.setTextColor(weatherColor(weather.dailyWeatherCode[i]));
int code = weather.dailyWeatherCode[i];
if (code == 0) tft.print("SUN");
else if (code <= 3) tft.print("CLD");
else if (code >= 95) tft.print("STM");
else
tft.print("RAIN");
}
drawFooter();
}
void drawSystem() {
tft.fillScreen(BLACK);
drawHeader("SYSTEM", CYAN);
tft.setCursor(25, 57);
tft.setTextSize(1);
tft.setTextColor(WHITE);
tft.print("WIFI");
tft.setCursor(125, 57);
if (WiFi.status() == WL_CONNECTED) {
tft.setTextColor(GREEN);
tft.print("ONLINE");
} else {
tft.setTextColor(RED);
tft.print("OFFLINE");
}
tft.setCursor(25, 82);
tft.setTextColor(WHITE);
tft.print("RSSI");
tft.setCursor(125, 82);
if (WiFi.status() == WL_CONNECTED) {
tft.setTextColor(CYAN);
tft.print(WiFi.RSSI());
tft.print(" dBm");
} else {
tft.print("--");
}
tft.setCursor(25, 107);
tft.setTextColor(WHITE);
tft.print("API");
tft.setCursor(125, 107);
if (apiOnline) {
tft.setTextColor(GREEN);
tft.print("ONLINE");
} else {
tft.setTextColor(RED);
tft.print("OFFLINE");
}
tft.setCursor(25, 132);
tft.setTextColor(WHITE);
tft.print("LOCATION");
tft.setCursor(125, 132);
tft.setTextColor(CYAN);
tft.print(LOCATION_NAME);
tft.setCursor(25, 157);
tft.setTextColor(WHITE);
tft.print("TEMP");
tft.setCursor(125, 157);
tft.print(weather.temperature, 1);
tft.print(" C");
tft.setCursor(25, 182);
tft.setTextColor(WHITE);
tft.print("STATUS");
tft.setCursor(125, 182);
if (weather.valid) {
tft.setTextColor(GREEN);
tft.print("READY");
} else {
tft.setTextColor(RED);
tft.print("NO DATA");
}
drawFooter();
}
void renderPage() {
rainInitialized = false;
switch (currentPage) {
case PAGE_HOME:
drawHome();
break;
case PAGE_TEMP:
drawTemperature();
break;
case PAGE_HUMIDITY:
drawHumidity();
break;
case PAGE_WIND:
drawWind();
break;
case PAGE_RAIN:
drawRain();
break;
case PAGE_HOURLY:
drawHourly();
break;
case PAGE_FORECAST:
drawForecast();
break;
case PAGE_SYSTEM:
drawSystem();
break;
}
}
String getWeatherPath() {
String path = "/v1/forecast";
path += "?latitude=" + String(LATITUDE, 4);
path += "&longitude=" + String(LONGITUDE, 4);
path +=
"¤t="
"temperature_2m,"
"relative_humidity_2m,"
"apparent_temperature,"
"weather_code,"
"wind_speed_10m,"
"wind_direction_10m,"
"pressure_msl,"
"is_day";
path +=
"&hourly="
"temperature_2m,"
"precipitation_probability,"
"weather_code";
path +=
"&daily="
"temperature_2m_max,"
"temperature_2m_min,"
"precipitation_probability_max,"
"weather_code,"
"sunrise,"
"sunset,"
"uv_index_max";
path += "&timezone=" TIMEZONE;
path += "&forecast_days=3";
path += "&forecast_hours=12";
path += "&temperature_unit=celsius";
path += "&wind_speed_unit=kmh";
return path;
}
void copyClockText(const char* isoTime, char* out) {
if (isoTime != NULL && strlen(isoTime) >= 16) {
out[0] = isoTime[11];
out[1] = isoTime[12];
out[2] = ':';
out[3] = isoTime[14];
out[4] = isoTime[15];
out[5] = '\0';
return;
}
strcpy(out, "--:--");
}
void setClockFrom(const char* isoTime) {
if (isoTime == NULL || strlen(isoTime) < 16) {
return;
}
int hour = (isoTime[11] - '0') * 10 + (isoTime[12] - '0');
int minute = (isoTime[14] - '0') * 10 + (isoTime[15] - '0');
if (hour < 0 || hour > 23 || minute < 0 || minute > 59) {
return;
}
clockBaseSecond = (long)hour * 3600L + (long)minute * 60L;
clockBaseMillis = millis();
}
bool parseWeather(const String& payload) {
JsonDocument filter;
filter["current"] = true;
filter["hourly"] = true;
filter["daily"] = true;
JsonDocument doc;
DeserializationError error = deserializeJson(doc, payload, DeserializationOption::Filter(filter));
if (error) {
Serial.print("JSON ERROR: ");
Serial.println(error.c_str());
return false;
}
JsonObject current = doc["current"];
if (current.isNull()) {
Serial.println("CURRENT DATA MISSING");
return false;
}
weather.temperature = current["temperature_2m"] | 0.0;
weather.humidity = current["relative_humidity_2m"] | 0.0;
weather.feelsLike = current["apparent_temperature"] | 0.0;
weather.weatherCode = current["weather_code"] | 0;
weather.windSpeed = current["wind_speed_10m"] | 0.0;
weather.windDirection = current["wind_direction_10m"] | 0.0;
weather.pressure = current["pressure_msl"] | 0.0;
int isDay = current["is_day"] | 1;
weather.isDay = (isDay == 1);
const char* currentTime = current["time"] | "";
setClockFrom(currentTime);
JsonArray hourlyTime = doc["hourly"]["time"];
JsonArray hourlyTemp = doc["hourly"]["temperature_2m"];
JsonArray hourlyRain = doc["hourly"]["precipitation_probability"];
JsonArray hourlyCode = doc["hourly"]["weather_code"];
for (int i = 0; i < 12; i++) {
if (i >= (int)hourlyTemp.size()) {
weather.hourlyTemp[i] = weather.temperature;
weather.hourlyRainChance[i] = 0;
weather.hourlyWeatherCode[i] = weather.weatherCode;
strcpy(weather.hourlyTime[i], "--:--");
continue;
}
weather.hourlyTemp[i] = hourlyTemp[i] | weather.temperature;
weather.hourlyRainChance[i] = hourlyRain[i] | 0;
weather.hourlyWeatherCode[i] = hourlyCode[i] | weather.weatherCode;
copyClockText(hourlyTime[i] | "", weather.hourlyTime[i]);
}
weather.currentRainChance = weather.hourlyRainChance[0];
JsonArray dailyMax = doc["daily"]["temperature_2m_max"];
JsonArray dailyMin = doc["daily"]["temperature_2m_min"];
JsonArray dailyRain = doc["daily"]["precipitation_probability_max"];
JsonArray dailyCode = doc["daily"]["weather_code"];
JsonArray dailyDate = doc["daily"]["time"];
JsonArray dailySunrise = doc["daily"]["sunrise"];
JsonArray dailySunset = doc["daily"]["sunset"];
JsonArray dailyUV = doc["daily"]["uv_index_max"];
for (int i = 0; i < 3; i++) {
weather.dailyTempMax[i] = dailyMax[i] | 0.0;
weather.dailyTempMin[i] = dailyMin[i] | 0.0;
weather.dailyRainChance[i] = dailyRain[i] | 0;
weather.dailyWeatherCode[i] = dailyCode[i] | 0;
weather.dailyUV[i] = dailyUV[i] | 0.0;
const char* dateText = dailyDate[i] | "";
strncpy(weather.dailyDate[i], dateText, 10);
weather.dailyDate[i][10] = '\0';
}
if (dailySunrise.size() > 0) {
copyClockText(dailySunrise[0] | "", weather.sunrise);
}
if (dailySunset.size() > 0) {
copyClockText(dailySunset[0] | "", weather.sunset);
}
if (dailyUV.size() > 0) {
weather.uvIndex = dailyUV[0] | 0.0;
}
weather.valid = true;
return true;
}
bool fetchWeather() {
if (WiFi.status() != WL_CONNECTED) {
Serial.println("WIFI NOT CONNECTED");
apiOnline = false;
screenDirty = true;
return false;
}
Serial.println();
Serial.println("================================");
Serial.println("FETCHING WEATHER");
Serial.println("================================");
isFetching = true;
drawLoadingScreen("FETCHING WEATHER...");
WiFiSSLClient sslClient;
HttpClient http(sslClient, API_HOST, API_PORT);
http.setTimeout(15000);
http.setHttpResponseTimeout(15000);
String path = getWeatherPath();
Serial.print("GET https://");
Serial.print(API_HOST);
Serial.println(path);
int error = http.get(path);
if (error != 0) {
Serial.print("HTTP REQUEST FAILED: ");
Serial.println(error);
http.stop();
isFetching = false;
apiOnline = false;
screenDirty = true;
return false;
}
int statusCode = http.responseStatusCode();
Serial.print("HTTP CODE: ");
Serial.println(statusCode);
if (statusCode != 200) {
Serial.println("API ERROR");
http.stop();
isFetching = false;
apiOnline = false;
screenDirty = true;
return false;
}
String payload = http.responseBody();
http.stop();
Serial.print("PAYLOAD SIZE: ");
Serial.println(payload.length());
bool result = parseWeather(payload);
payload = "";
isFetching = false;
if (result) {
apiOnline = true;
lastApiUpdate = millis();
Serial.println("WEATHER UPDATED");
Serial.print("Temperature: ");
Serial.println(weather.temperature);
Serial.print("Humidity: ");
Serial.println(weather.humidity);
Serial.print("Weather: ");
Serial.println(weatherDescription(weather.weatherCode));
Serial.print("Wind: ");
Serial.println(weather.windSpeed);
Serial.print("Rain Chance: ");
Serial.println(weather.currentRainChance);
screenDirty = true;
return true;
}
apiOnline = false;
screenDirty = true;
return false;
}
void drawLoadingScreen(String message) {
tft.fillScreen(BLACK);
drawCenteredText("SMART WEATHER", 48, 2, CYAN);
drawCenteredText("STATION", 73, 2, WHITE);
for (int i = 0; i < 12; i++) {
float angle = i * 2.0 * PI / 12.0;
int x = CENTER_X + cos(angle) * 42;
int y = CENTER_Y + sin(angle) * 42;
uint16_t color = (i == 0) ? CYAN : DARK_GRAY;
tft.fillCircle(x, y, 4, color);
}
drawCenteredText(message, 182, 1, WHITE);
}
bool connectWiFi() {
Serial.println();
Serial.println("CONNECTING TO WIFI...");
tft.fillScreen(BLACK);
drawCenteredText("CONNECTING", 26, 2, CYAN);
drawWifiIcon(CENTER_X, 95, 0);
drawCenteredText("WI-FI", 145, 2, WHITE);
drawCenteredText(WIFI_SSID, 178, 1, GRAY);
WiFi.begin(WIFI_SSID, WIFI_PASSWORD);
unsigned long start = millis();
int iconFrame = 0;
while (WiFi.status() != WL_CONNECTED && millis() - start < WIFI_CONNECT_TIMEOUT) {
drawWifiIcon(CENTER_X, 95, iconFrame % 4);
iconFrame++;
delay(250);
Serial.print(".");
}
Serial.println();
if (WiFi.status() == WL_CONNECTED) {
wifiOnline = true;
wifiConnecting = false;
drawWifiIcon(CENTER_X, 95, 3);
Serial.println("WIFI CONNECTED");
Serial.print("IP: ");
Serial.println(WiFi.localIP());
Serial.print("RSSI: ");
Serial.print(WiFi.RSSI());
Serial.println(" dBm");
return true;
}
wifiOnline = false;
Serial.println("WIFI CONNECTION FAILED");
return false;
}
void startWiFiReconnect() {
Serial.println("START WIFI RECONNECT");
WiFi.begin(WIFI_SSID, WIFI_PASSWORD);
wifiConnecting = true;
wifiConnectStart = millis();
}
void handleWiFi() {
int status = WiFi.status();
if (status == WL_CONNECTED) {
if (!wifiOnline) {
Serial.println("WIFI CONNECTED");
screenDirty = true;
}
wifiOnline = true;
wifiConnecting = false;
return;
}
wifiOnline = false;
if (wifiConnecting) {
if (millis() - wifiConnectStart > WIFI_CONNECT_TIMEOUT) {
Serial.println("WIFI CONNECT TIMEOUT");
WiFi.disconnect();
wifiConnecting = false;
lastWifiRetry = millis();
}
return;
}
if (millis() - lastWifiRetry >= WIFI_RETRY_INTERVAL) {
lastWifiRetry = millis();
startWiFiReconnect();
}
}
bool checkWiFiModule() {
if (WiFi.status() == WL_NO_MODULE) {
Serial.println("WIFI MODULE NOT FOUND");
Serial.println("Use an Arduino UNO R4 WiFi board.");
return false;
}
Serial.print("WIFI FIRMWARE: ");
Serial.println(WiFi.firmwareVersion());
return true;
}
void handleButton() {
button.loop();
if (button.isPressed())
buttonPressStart = millis();
if (button.isReleased()) {
unsigned long duration = millis() - buttonPressStart;
if (duration >= VERY_LONG_PRESS_TIME) {
currentPage = PAGE_HOME;
screenDirty = true;
Serial.println("VERY LONG PRESS -> HOME");
} else if (duration >= LONG_PRESS_TIME) {
pendingRefresh = true;
Serial.println("LONG PRESS -> REFRESH");
} else {
currentPage = (Page)((currentPage + 1) % PAGE_COUNT);
screenDirty = true;
Serial.print("SHORT PRESS -> PAGE ");
Serial.println(currentPage + 1);
}
}
}
void handleManualRefresh() {
if (!pendingRefresh) return;
pendingRefresh = false;
fetchWeather();
}
void handleApiUpdate() {
if (!weather.valid) {
return;
}
if (millis() - lastApiUpdate >= API_UPDATE_INTERVAL) {
fetchWeather();
}
}
String getTimeString() {
if (clockBaseSecond < 0) {
return "--:--";
}
unsigned long elapsed = (millis() - clockBaseMillis) / 1000UL;
long nowSecond = clockBaseSecond + (long)elapsed;
nowSecond %= 86400L;
int hour = nowSecond / 3600L;
int minute = (nowSecond % 3600L) / 60L;
char buffer[6];
sprintf(buffer, "%02d:%02d", hour, minute);
return String(buffer);
}
void handleClock() {
if (currentPage != PAGE_HOME) {
return;
}
if (millis() - lastClockUpdate < CLOCK_UPDATE_INTERVAL) {
return;
}
lastClockUpdate = millis();
if (weather.valid && !isFetching) {
drawHomeClock();
}
}
void setup() {
Serial.begin(9600);
delay(500);
Serial.println();
Serial.println("================================");
Serial.println("SMART WEATHER STATION");
Serial.println(LOCATION_NAME);
Serial.println("================================");
button.setDebounceTime(BUTTON_DEBOUNCE);
tft.begin();
tft.setRotation(2);
tft.fillScreen(BLACK);
drawCenteredText("SMART WEATHER", 65, 2, CYAN);
drawCenteredText("STATION", 92, 2, WHITE);
drawCenteredText(LOCATION_NAME, 135, 2, YELLOW);
delay(1500);
if (!checkWiFiModule()) {
tft.fillScreen(BLACK);
drawCenteredText("NO WIFI MODULE", 100, 2, RED);
drawCenteredText("NEED UNO R4 WIFI", 135, 1, WHITE);
while (true) {
delay(1000);
}
}
if (connectWiFi()) {
delay(500);
fetchWeather();
} else {
tft.fillScreen(BLACK);
drawCenteredText("WIFI ERROR", 82, 2, RED);
drawCenteredText("CHECK SETTINGS", 120, 1, WHITE);
drawCenteredText("RETRYING...", 150, 1, GRAY);
delay(1500);
}
screenDirty = true;
}
void loop() {
handleButton();
handleWiFi();
handleManualRefresh();
handleApiUpdate();
handleClock();
if (screenDirty && !isFetching) {
renderPage();
screenDirty = false;
}
updateRainAnimation();
}