Arduino UNO R4 WiFi Bluetooth Multiple Apps Example - Tutoriel BLE tout-en-un

Vue d'ensemble

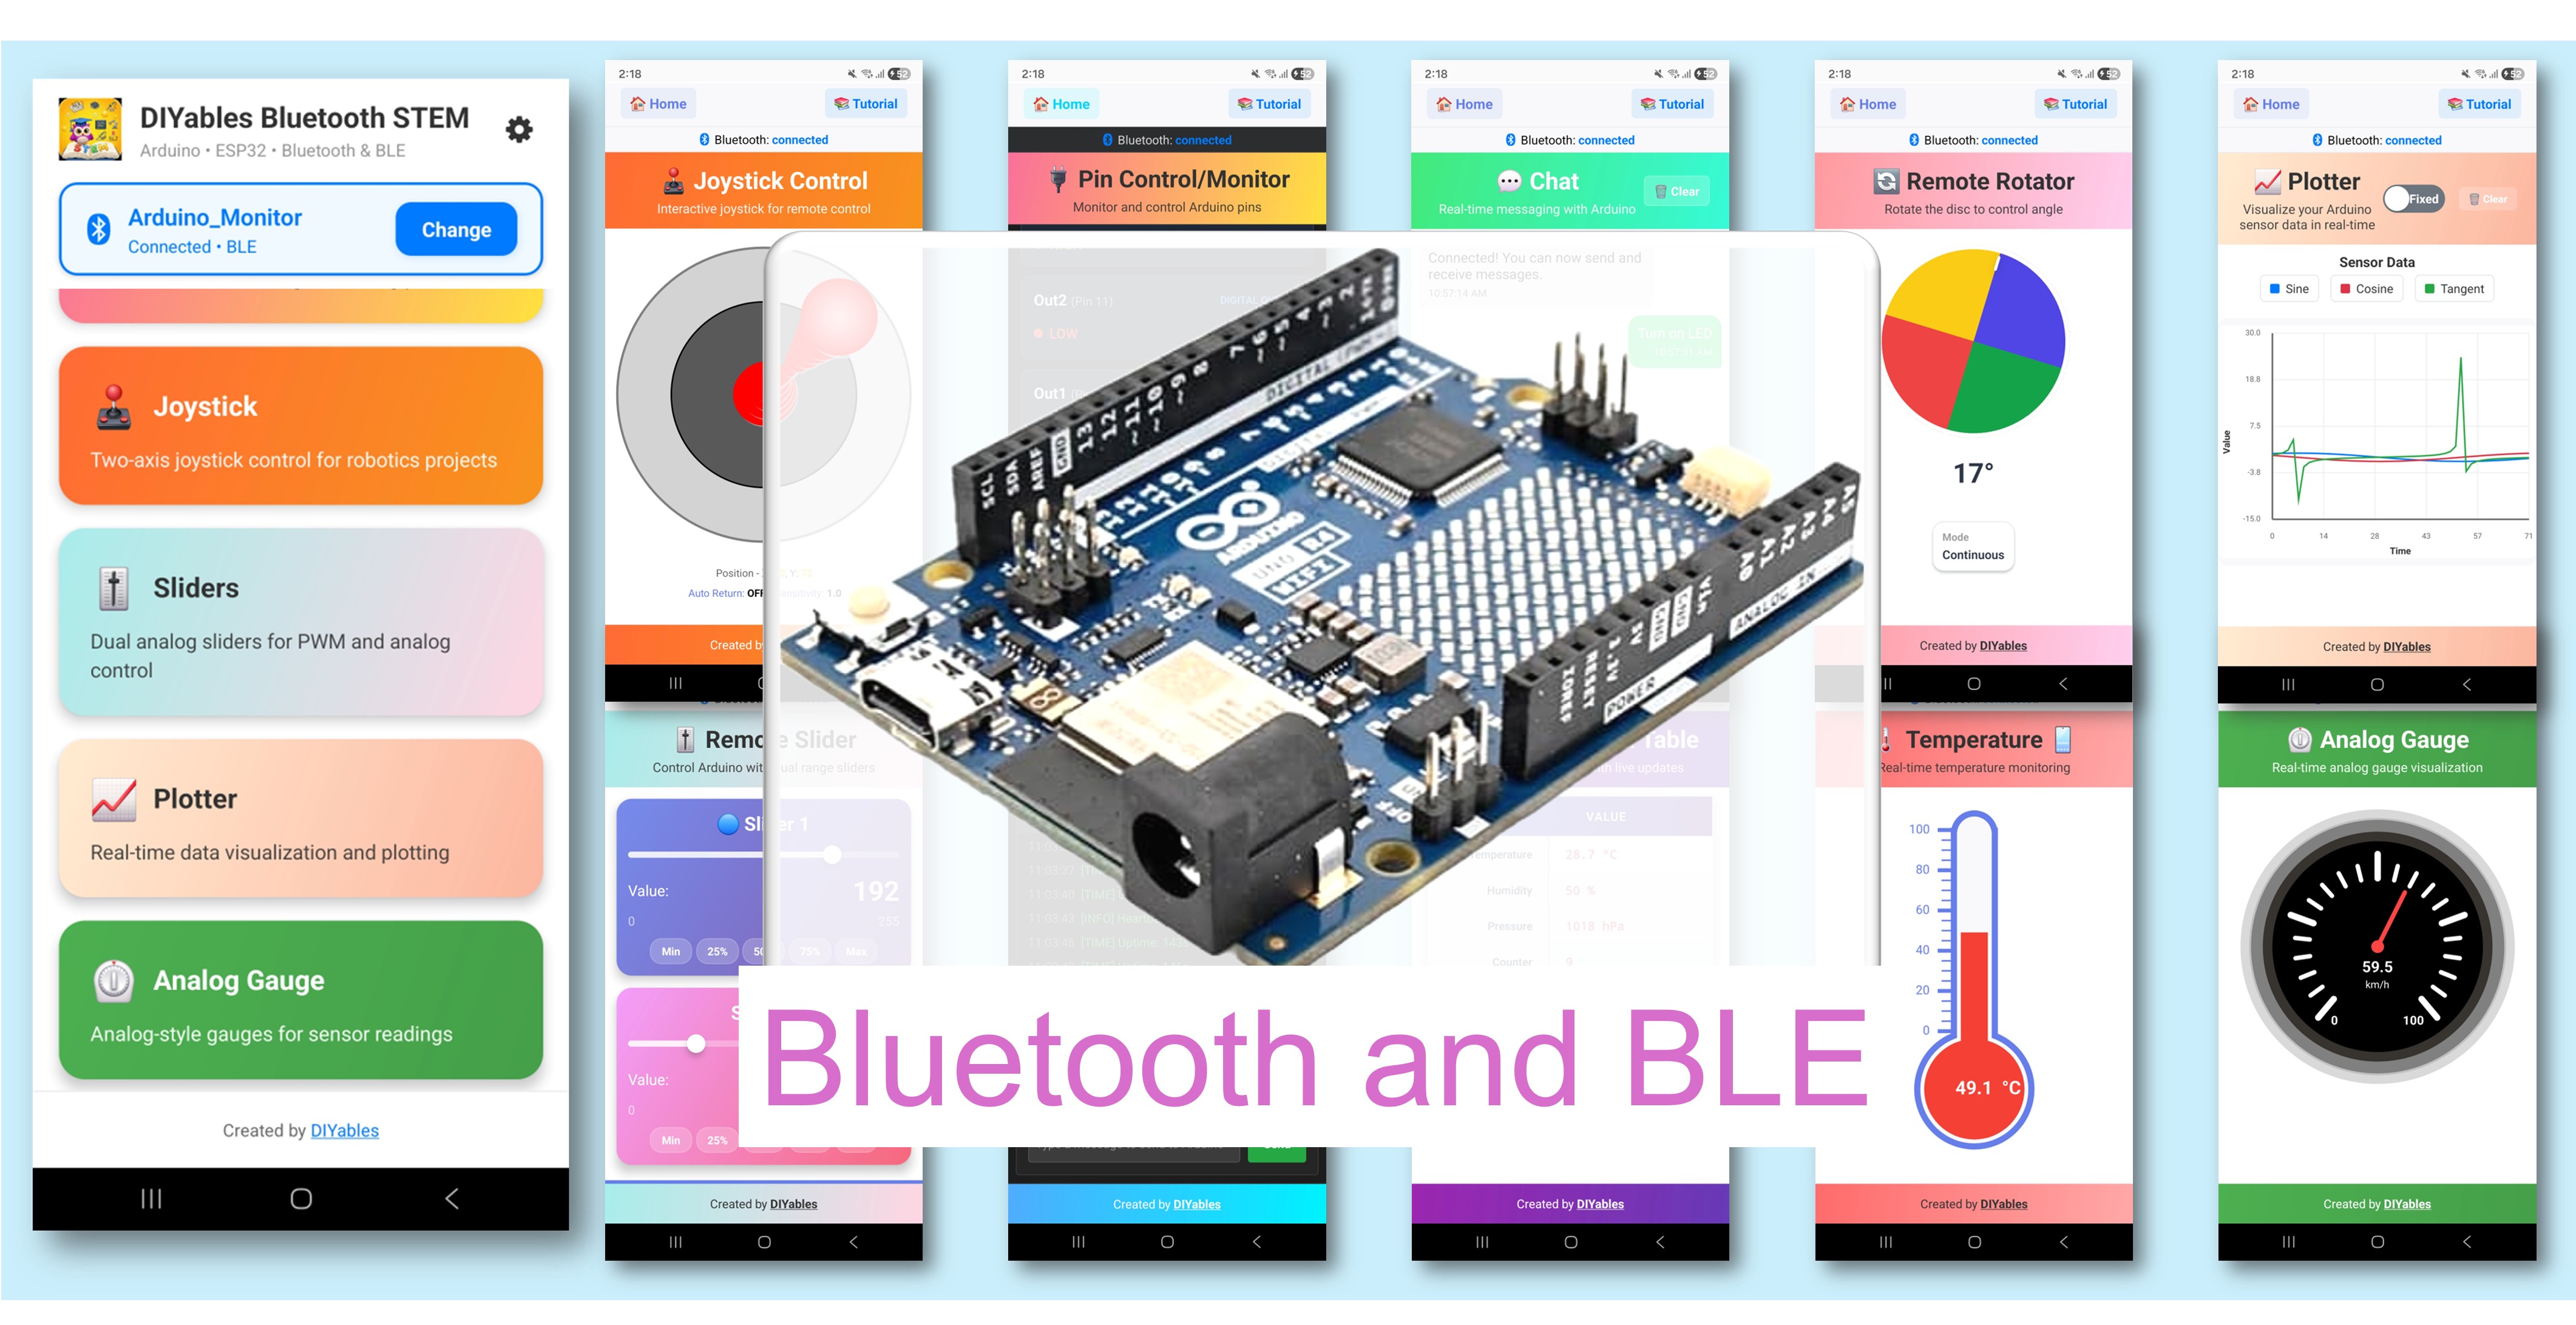
L'exemple Bluetooth Multiple Apps démontre l'exécution de 9 applications Bluetooth simultanément sur un seul Arduino UNO R4 WiFi en utilisant BLE. Conçu pour Arduino UNO R4 WiFi en utilisant BLE (Bluetooth Low Energy) pour combiner Monitor, Chat, Slider, Joystick, Temperature, Plotter, Table, Analog Gauge et Rotator en un seul sketch puissant. Toutes les applications partagent une seule connexion BLE et peuvent interagir entre elles. Parfait pour les tableaux de bord complets, les projets IoT complexes et l'apprentissage de plusieurs types d'applications à la fois.

Note : L'Arduino UNO R4 WiFi ne prend en charge que BLE (Bluetooth Low Energy). Il ne prend pas en charge le Bluetooth Classic. L'application DIYables Bluetooth prend en charge BLE et Bluetooth Classic sur Android, et BLE sur iOS. Puisque cette carte utilise BLE, l'application fonctionne sur Android et iOS.

Arduino UNO R4 WiFi Bluetooth Multiple Apps Example - Tutoriel BLE tout-en-un

Fonctionnalités

  • 9 applications en une : Monitor, Chat, Slider, Joystick, Temperature, Plotter, Table, Analog Gauge, Rotator
  • Interaction inter-applications : La valeur du slider met à jour la jauge et le tableau, le joystick met à jour le tableau, etc.
  • Connexion BLE unique : Toutes les applications partagent une connexion efficacement
  • Mises à jour en temps réel : Chaque application se met à jour à son propre intervalle
  • Tableau de bord complet : Visualisez toutes les données depuis un seul appareil
  • Fonctionne sur Android et iOS : BLE est pris en charge sur les deux plateformes
  • Aucun appairage requis : BLE se connecte automatiquement sans appairage manuel

Applications incluses

ApplicationDescriptionIntervalle de mise à jour
MonitorAffichage de statut basé sur du texte5 secondes
ChatMessagerie bidirectionnelleSur demande
SliderContrôle de valeur (0-255)Au changement
JoystickContrôle de position 2DAu changement
TemperatureJauge de température (-10 à 50°C)2 secondes
PlotterGraphique de données en temps réel100ms
TableDonnées structurées (10 lignes)5 secondes
Analog GaugeJauge de type cadran (0-100%)3 secondes
RotatorContrôle d'angle (continu)Au changement

Matériel requis

1×Arduino UNO R4 WiFi
1×Alternativement: DIYables STEM V4 IoT
1×Câble USB Type-C
1×Recommandé: Shield à bornier à vis pour Arduino Uno R4
1×Recommandé: Shield plaque d'essai pour Arduino Uno R4
1×Recommandé: Boîtier pour Arduino Uno R4
1×Recommandé: Répartiteur d'alimentation pour Arduino Uno R4
1×Recommandé: Kit plaque de base prototypage et plaque d'essai pour Arduino Uno

Ou vous pouvez acheter les kits suivants:

1×Kit de Démarrage DIYables STEM V4 IoT (Arduino inclus)
1×Kit de Capteurs DIYables (30 capteurs/écrans)
1×Kit de Capteurs DIYables (18 capteurs/écrans)
Divulgation : Certains des liens fournis dans cette section sont des liens affiliés Amazon. Nous pouvons recevoir une commission pour tout achat effectué via ces liens, sans coût supplémentaire pour vous. Nous vous remercions de votre soutien.

Code Arduino UNO R4 WiFi

Étapes rapides

Suivez ces instructions étape par étape :

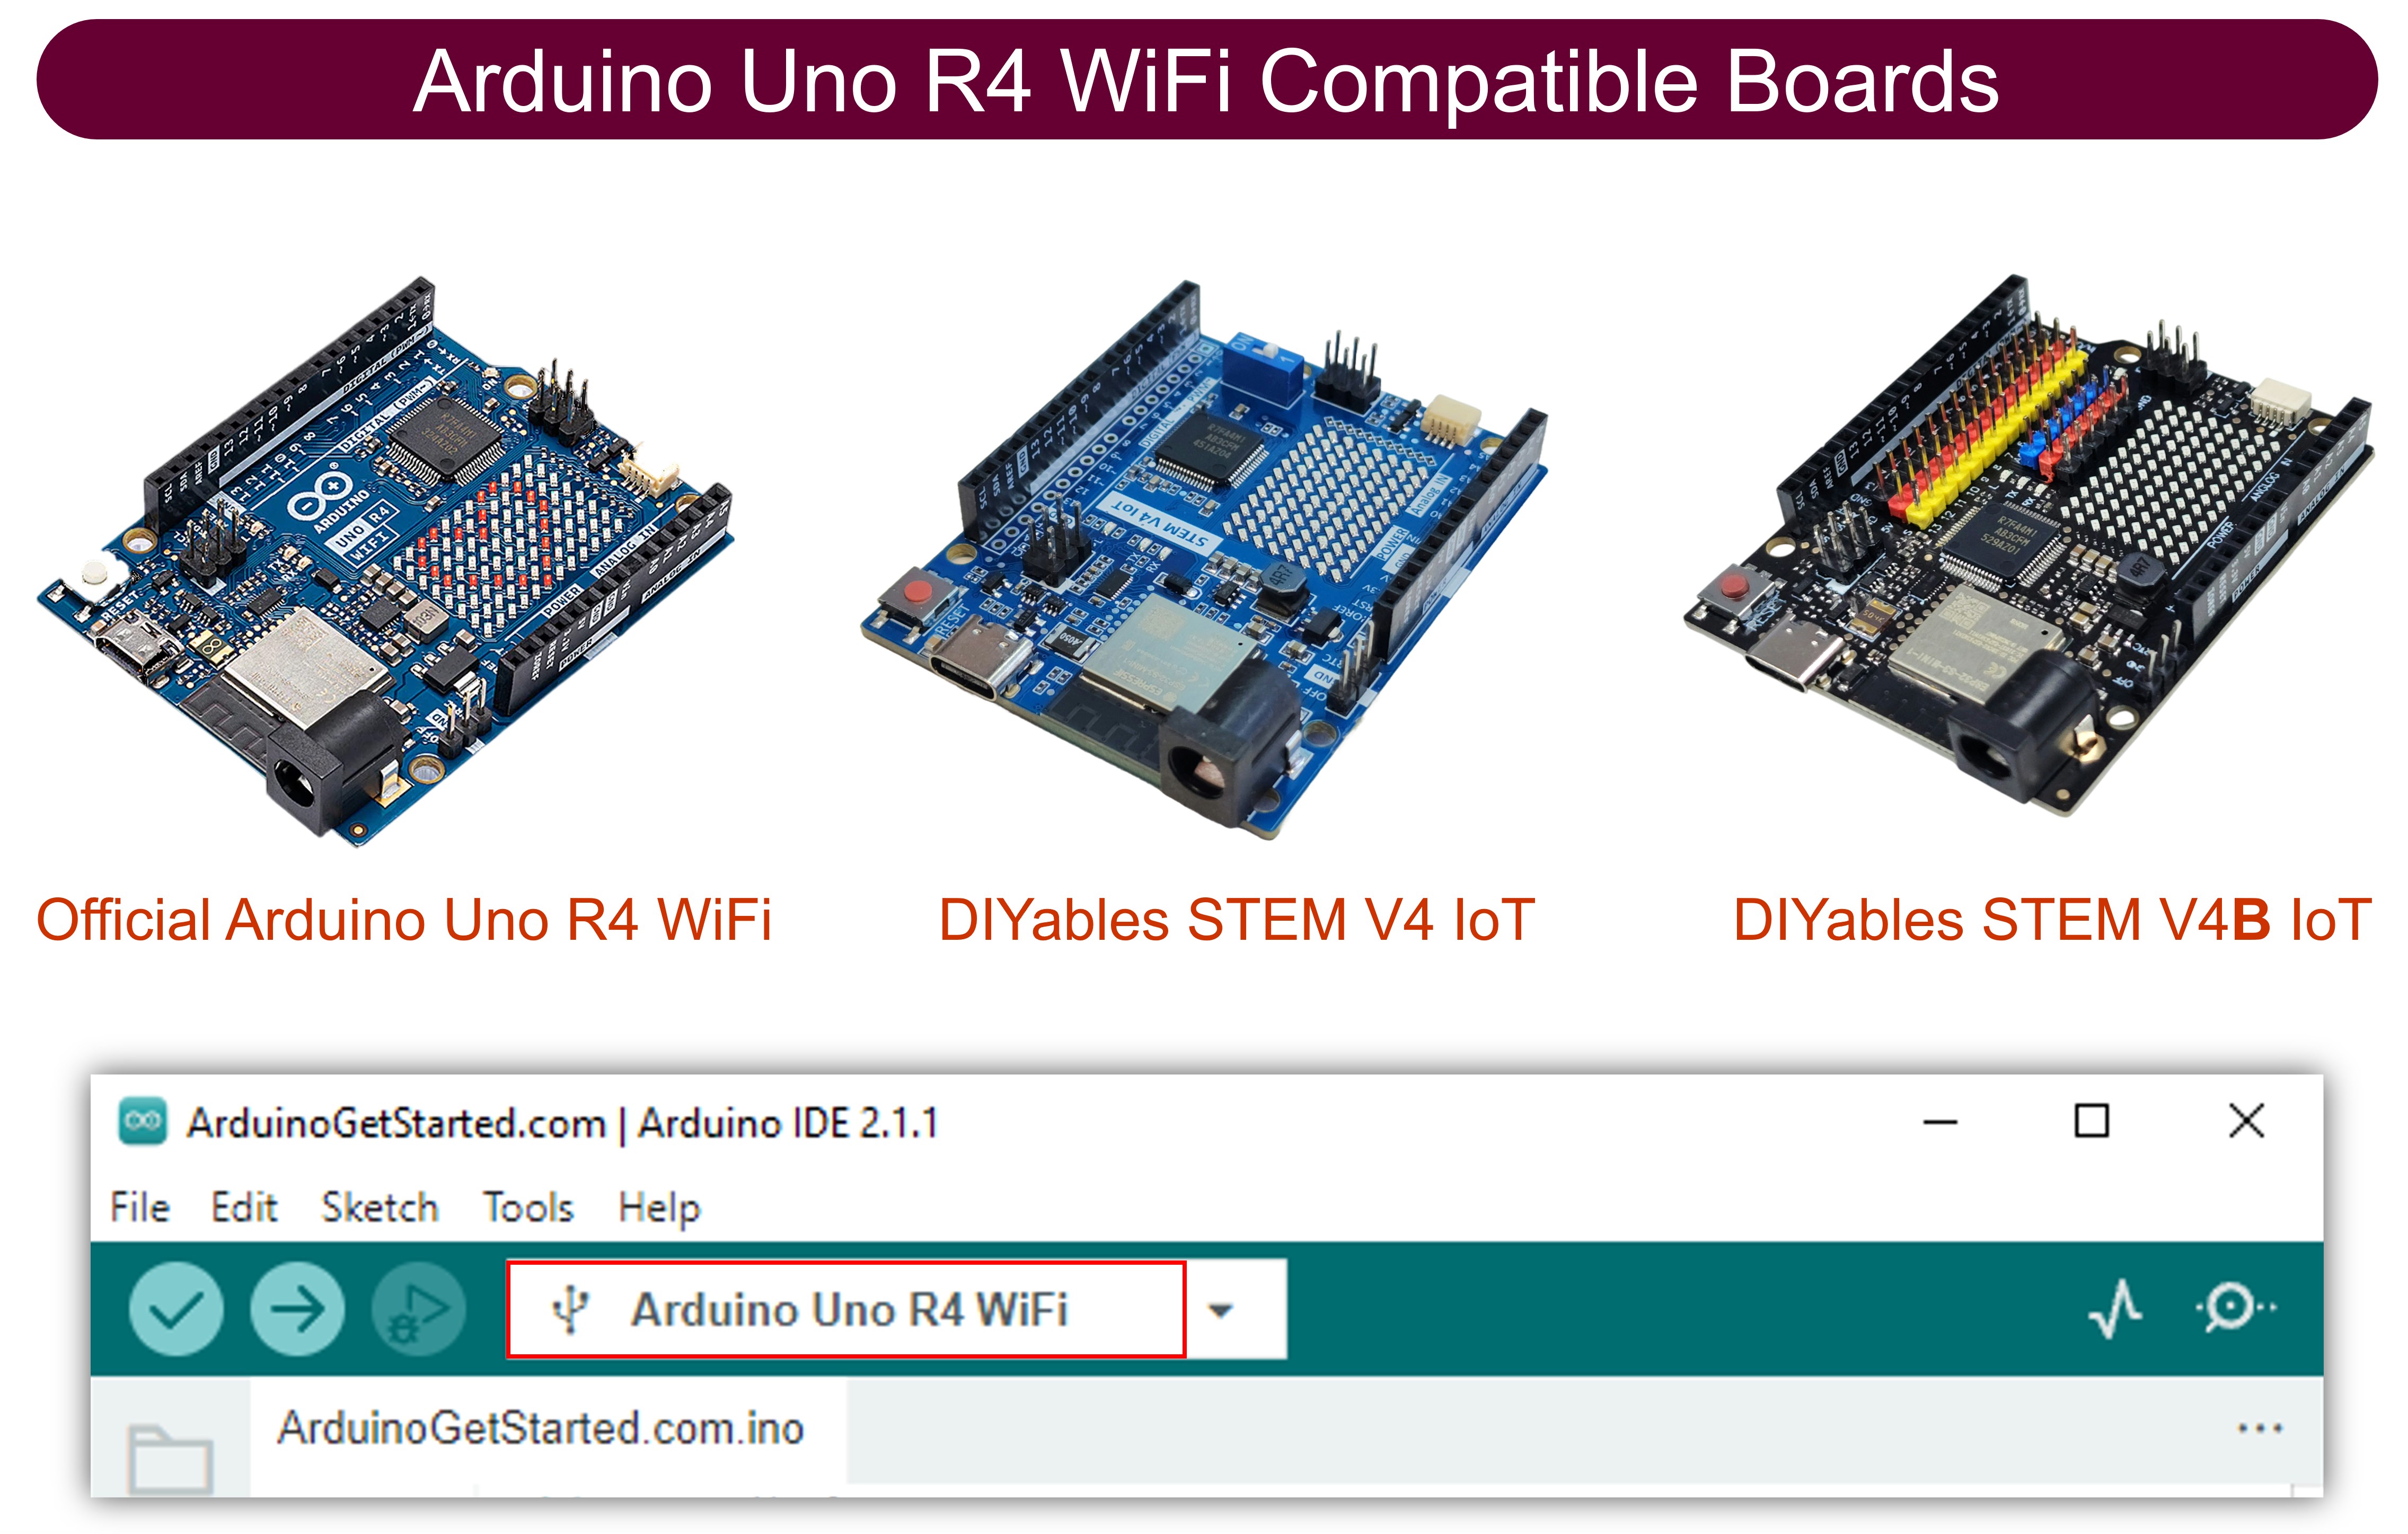
  • Si c'est votre première fois avec l'Arduino UNO R4 WiFi, consultez le Arduino UNO R4 - Installation du logiciel..
  • Connectez la carte Arduino UNO R4 WiFi à votre ordinateur à l'aide d'un câble USB.
  • Lancez l'IDE Arduino sur votre ordinateur.
  • Sélectionnez la carte Arduino UNO R4 WiFi et le port COM approprié.
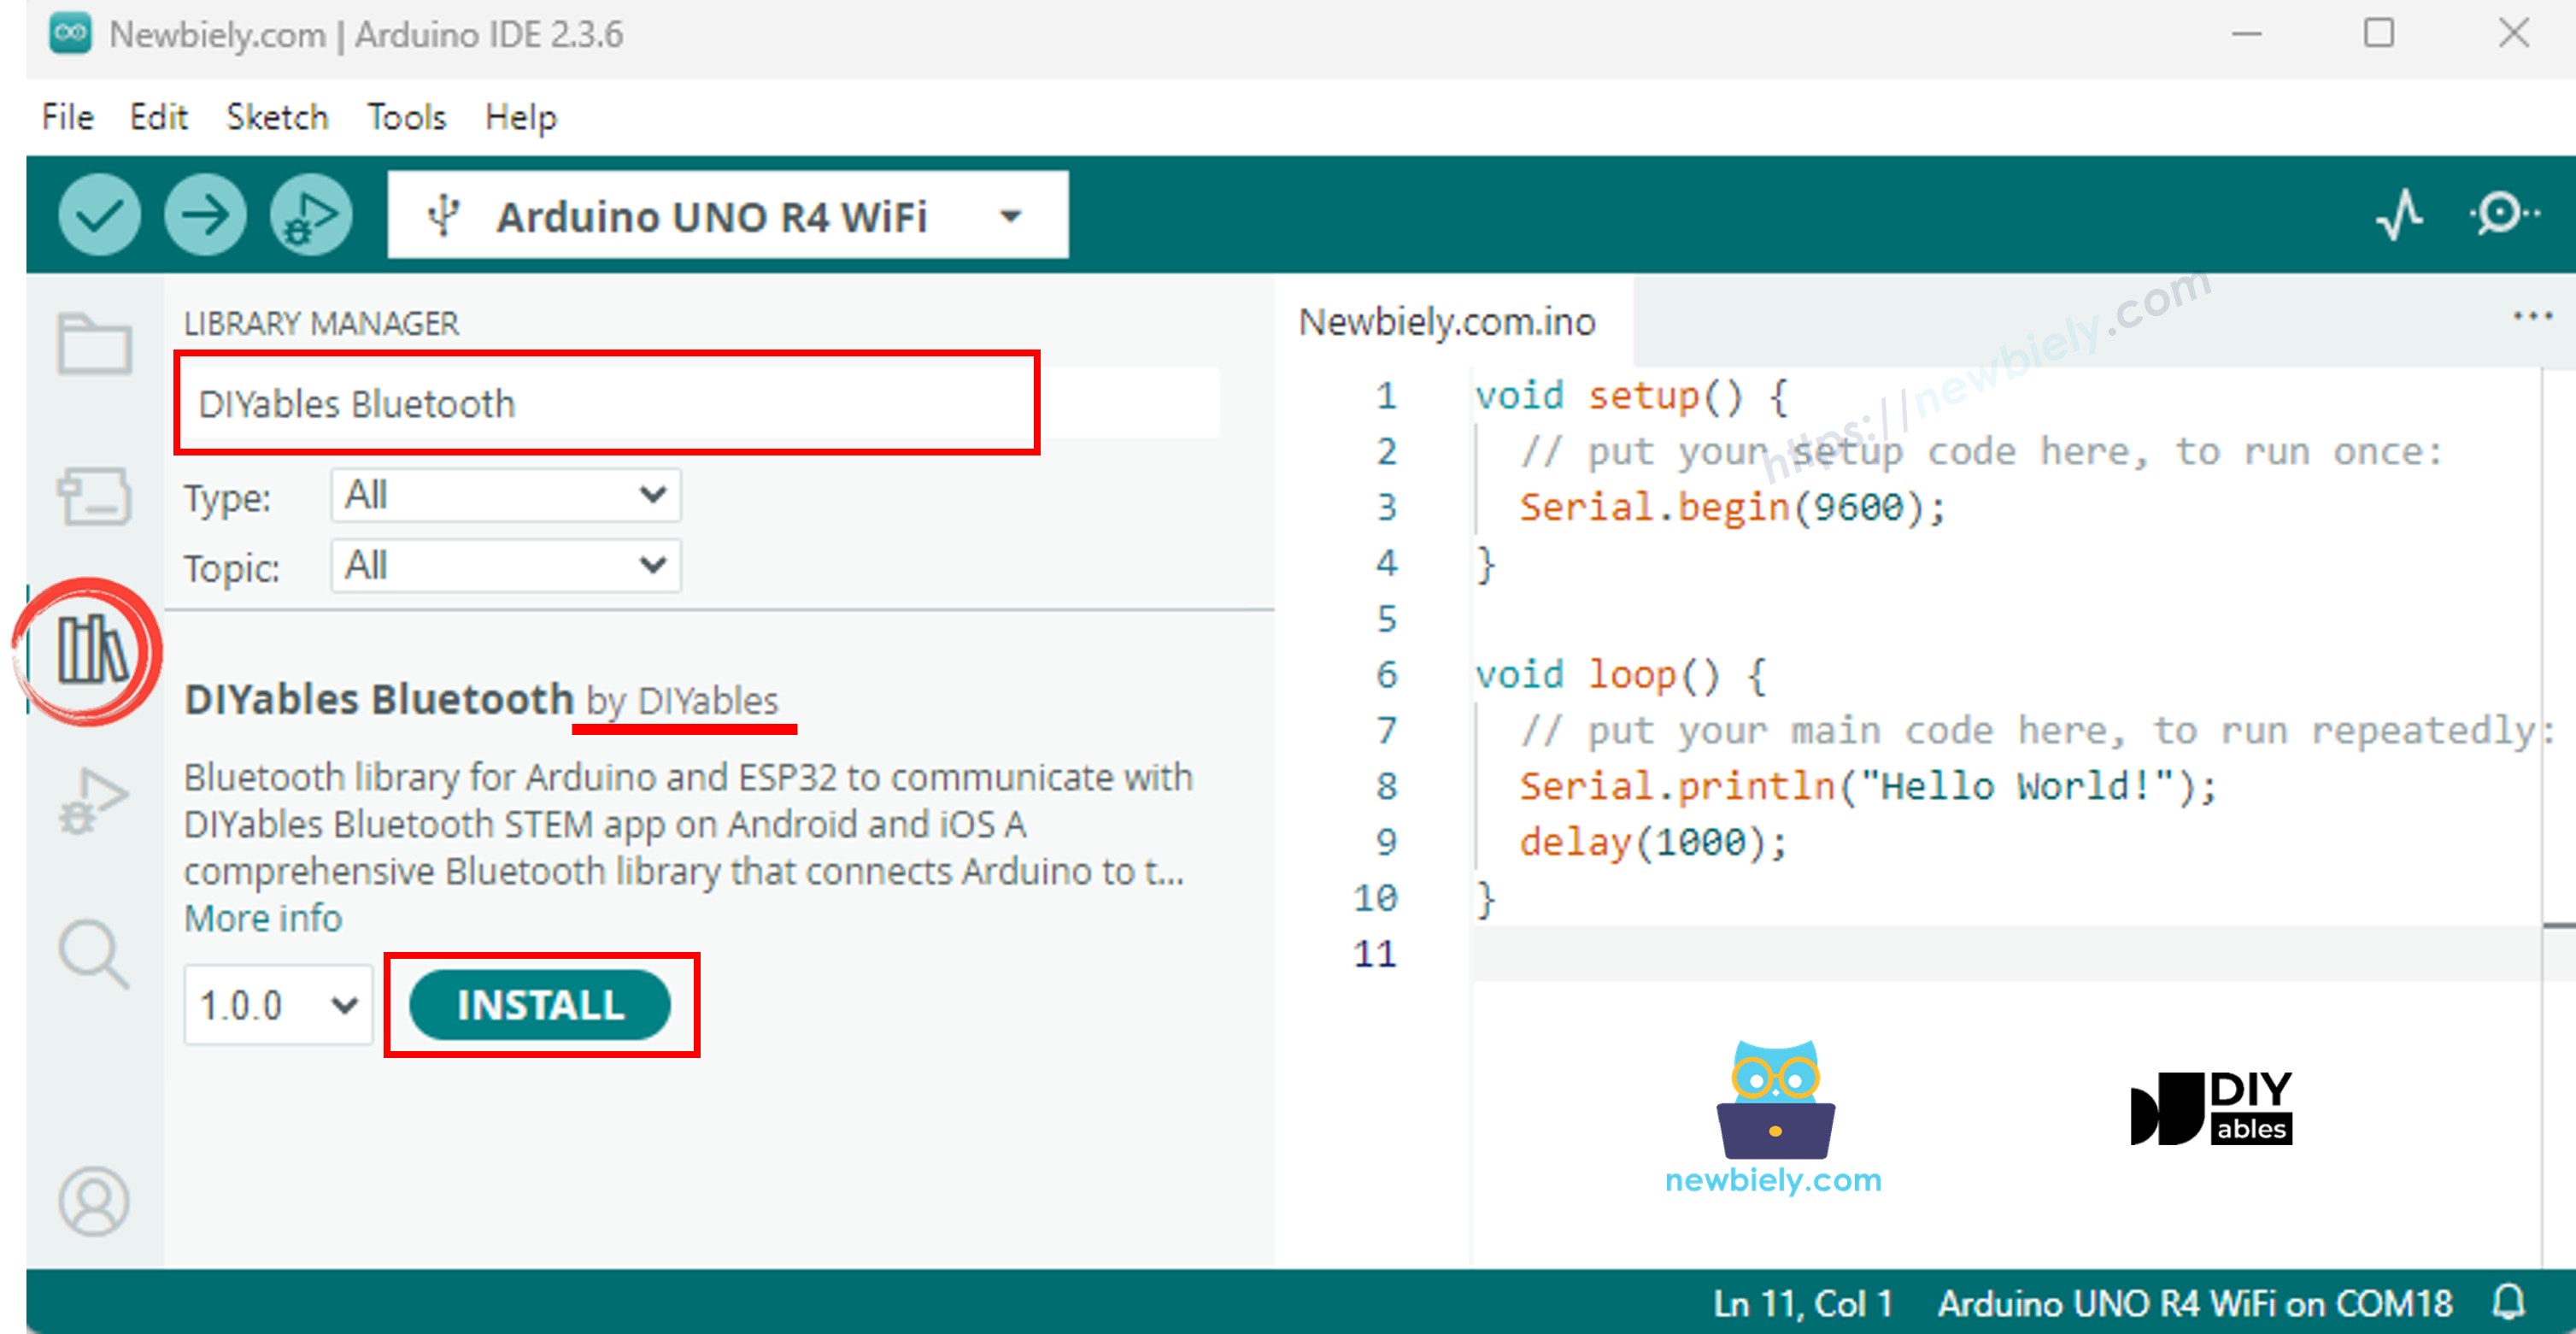
  • Naviguez vers l'icône Libraries dans la barre de gauche de l'IDE Arduino.
  • Recherchez "DIYables Bluetooth", puis trouvez la bibliothèque DIYables Bluetooth de DIYables
  • Cliquez sur le bouton Install pour installer la bibliothèque.
Arduino UNO R4 DIYables Bluetooth library
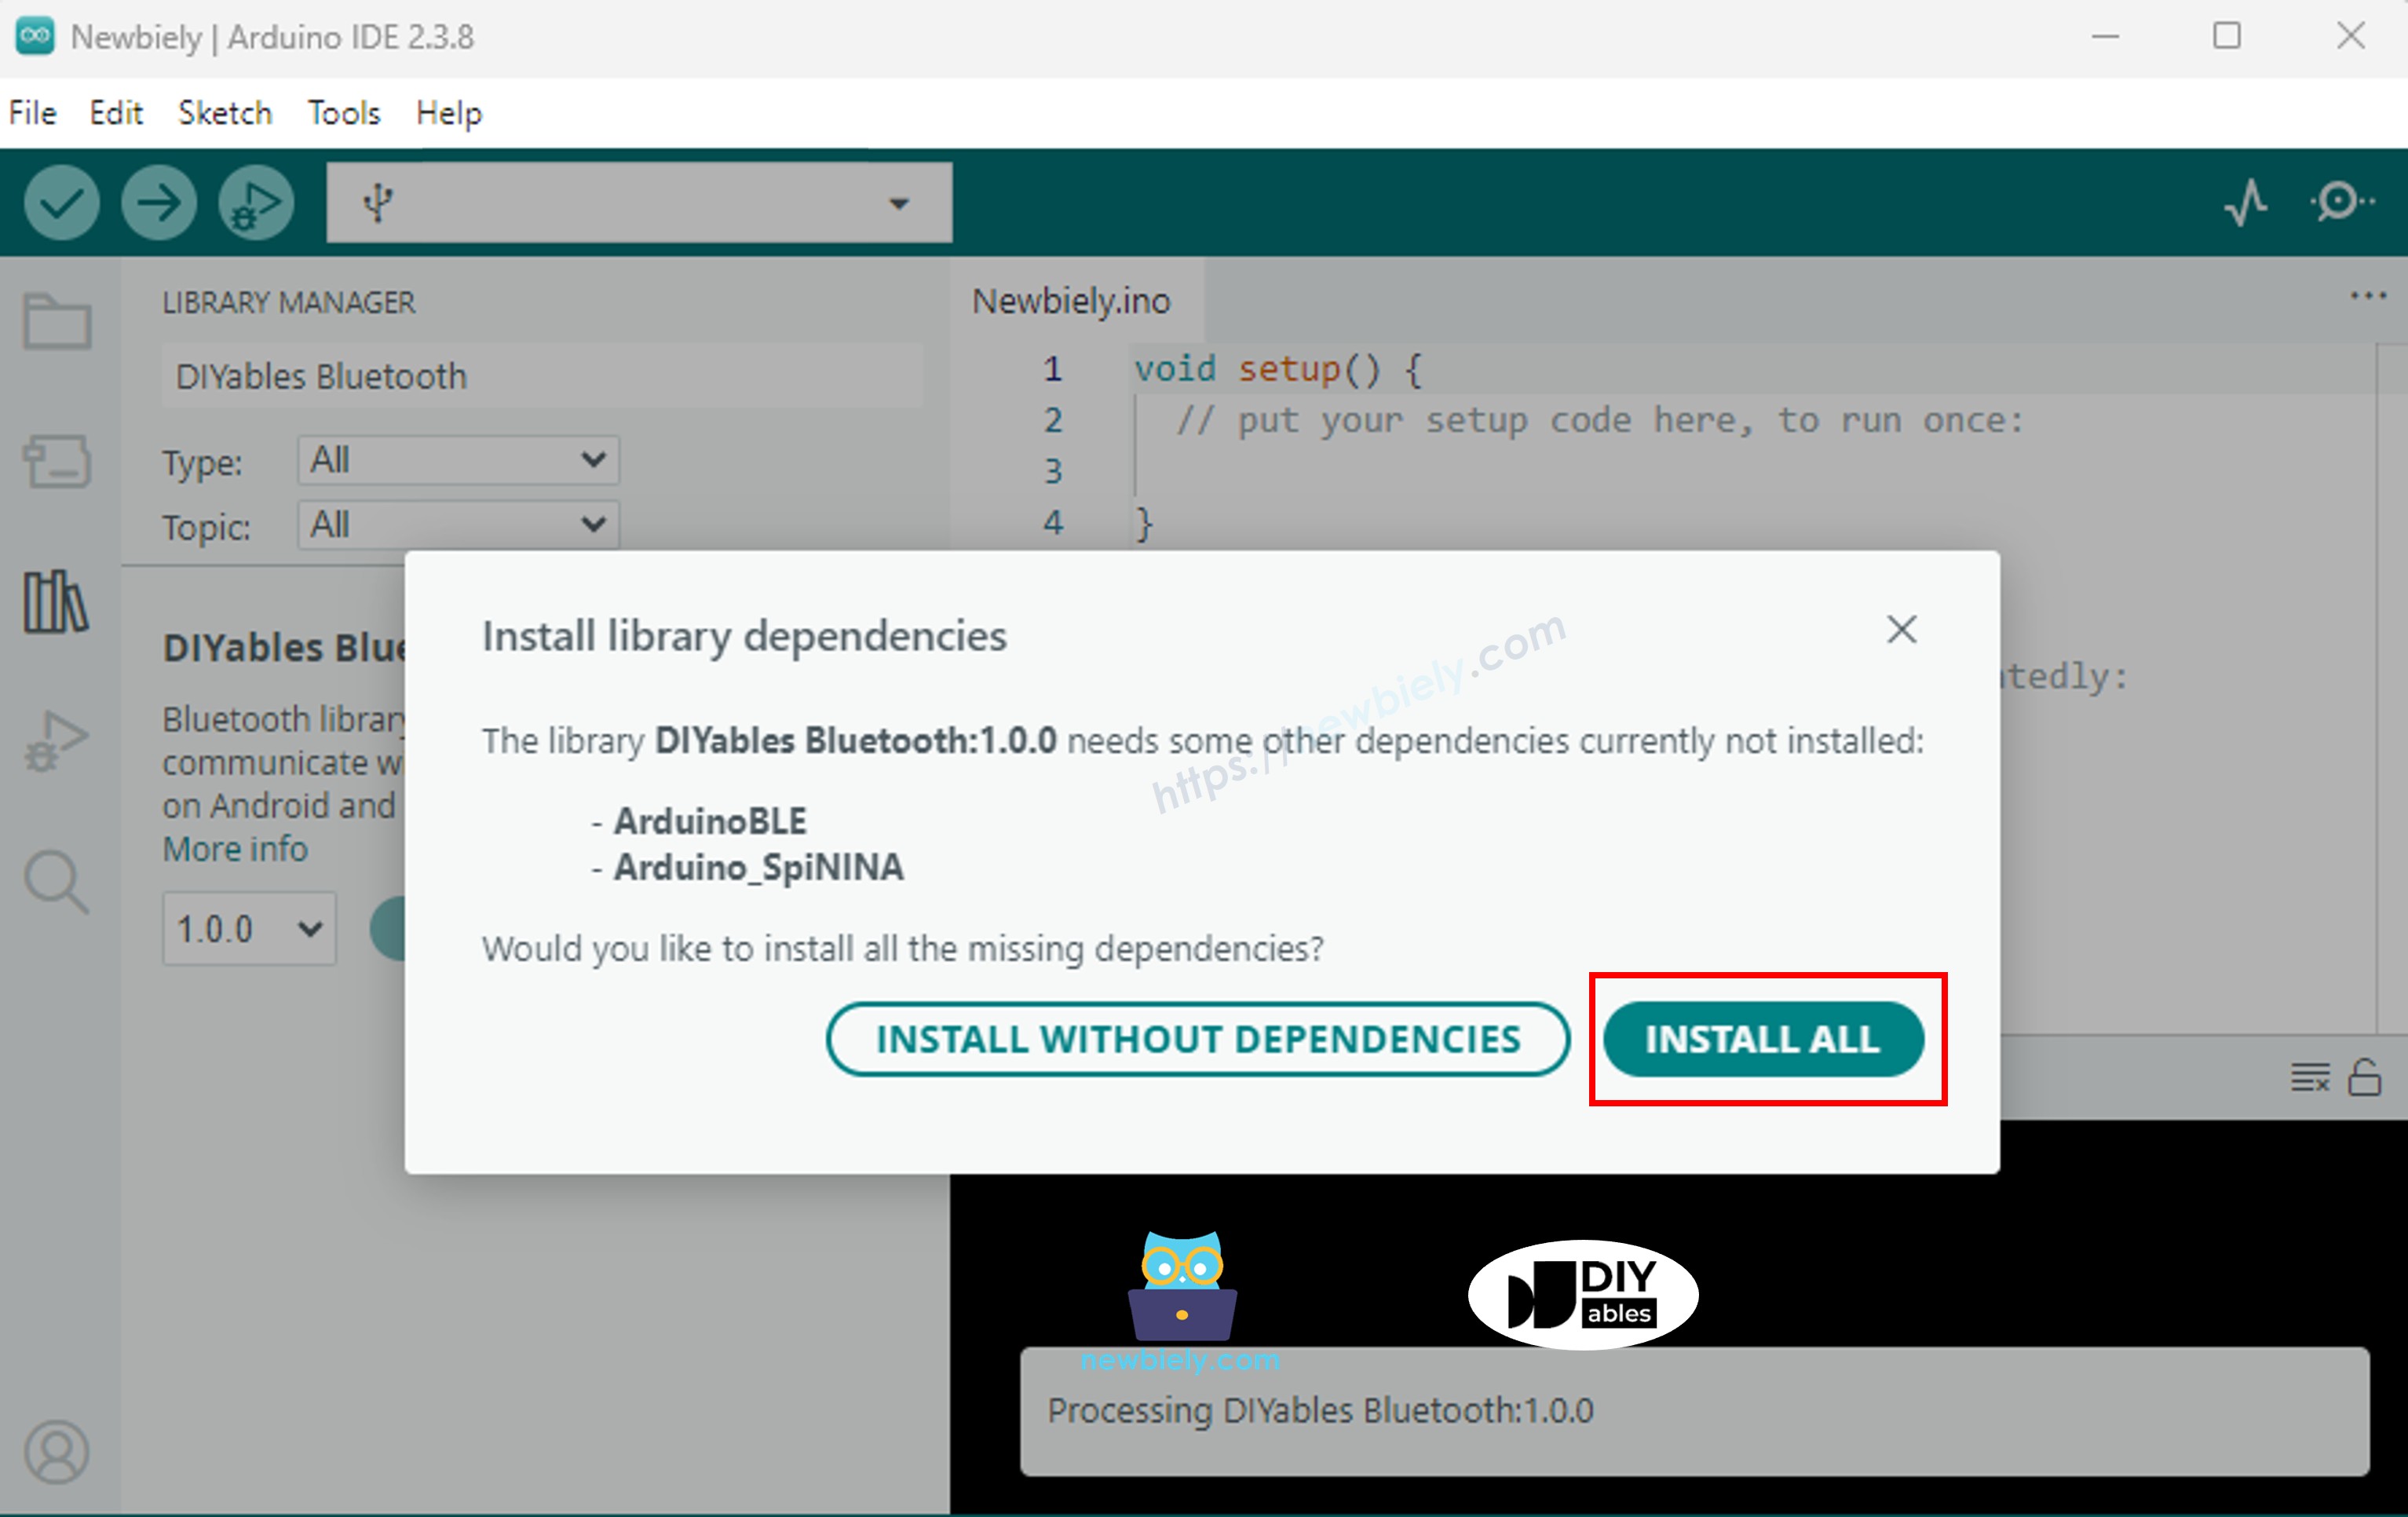
  • On vous demandera d'installer d'autres dépendances de bibliothèque
  • Cliquez sur le bouton Install All pour installer toutes les dépendances de bibliothèque.
Arduino UNO R4 DIYables Bluetooth dependency

Code BLE

  • Dans l'IDE Arduino, allez à File Examples DIYables Bluetooth ArduinoBLE_MultipleApps, ou copiez le code ci-dessus et collez-le dans l'éditeur de l'IDE Arduino
/* * DIYables Bluetooth Library - Multiple Apps Example (ArduinoBLE) * Works with DIYables Bluetooth STEM app on Android and iOS * * This example demonstrates how to use multiple Bluetooth apps simultaneously: * - Monitor: Real-time serial monitoring and logging * - Chat: Bi-directional text messaging * - Slider: Dual slider control (0-255 range) * - Joystick: Interactive joystick control (X, Y coordinates) * - Temperature: Temperature monitoring and display * - Plotter: Real-time data plotting (3 channels) * - Table: Two-column data table with real-time updates * - Analog Gauge: Circular gauge for sensor monitoring * - Rotator: Rotatable disc/knob control * - Pin Control: Digital pin control and monitoring * * Features: * - All apps run simultaneously on a single BLE connection * - Automatic message routing to appropriate app handlers * - Simplified callback system - no manual parsing needed * - All BLE protocol details handled by the library * - Compatible with DIYables Bluetooth Mobile App * * Compatible Boards: * - Arduino UNO R4 WiFi * - Arduino Nano 33 BLE / BLE Sense * - Arduino Nano 33 IoT * - Arduino MKR WiFi 1010 * - Arduino Nano RP2040 Connect * - Any board supporting the ArduinoBLE library * * Setup: * 1. Upload the sketch to your Arduino * 2. Open Serial Monitor (9600 baud) * 3. Open DIYables Bluetooth App on your phone * 4. Connect to "DIYables Multi-App" * 5. Navigate to different screens to test each app * * Tutorial: https://diyables.io/bluetooth-app * Author: DIYables */ #include <DIYables_BluetoothServer.h> #include <DIYables_BluetoothMonitor.h> #include <DIYables_BluetoothChat.h> #include <DIYables_BluetoothSlider.h> #include <DIYables_BluetoothJoystick.h> #include <DIYables_BluetoothTemperature.h> #include <DIYables_BluetoothPlotter.h> #include <DIYables_BluetoothTable.h> #include <DIYables_BluetoothAnalogGauge.h> #include <DIYables_BluetoothRotator.h> #include <platforms/DIYables_ArduinoBLE.h> // BLE Configuration const char* DEVICE_NAME = "DIYables Multi-App"; const char* SERVICE_UUID = "19B10000-E8F2-537E-4F6C-D104768A1214"; const char* TX_UUID = "19B10001-E8F2-537E-4F6C-D104768A1214"; const char* RX_UUID = "19B10002-E8F2-537E-4F6C-D104768A1214"; // Create Bluetooth instances DIYables_ArduinoBLE bluetooth(DEVICE_NAME, SERVICE_UUID, TX_UUID, RX_UUID); DIYables_BluetoothServer bluetoothServer(bluetooth); // Create app instances DIYables_BluetoothMonitor bluetoothMonitor; DIYables_BluetoothChat bluetoothChat; DIYables_BluetoothSlider bluetoothSlider(0, 255, 1); DIYables_BluetoothJoystick bluetoothJoystick(false, 5); DIYables_BluetoothTemperature bluetoothTemperature(-10.0, 50.0, "°C"); DIYables_BluetoothPlotter bluetoothPlotter; DIYables_BluetoothTable bluetoothTable; DIYables_BluetoothAnalogGauge bluetoothGauge(0.0, 100.0, "%"); DIYables_BluetoothRotator bluetoothRotator(ROTATOR_MODE_CONTINUOUS); // State variables int currentSlider1 = 128; int currentSlider2 = 64; int currentJoystickX = 0; int currentJoystickY = 0; float currentTemperature = 25.0; float currentGaugeValue = 50.0; float currentRotatorAngle = 0.0; int messageCount = 0; // Timing variables unsigned long lastMonitorUpdate = 0; unsigned long lastTempUpdate = 0; unsigned long lastPlotUpdate = 0; unsigned long lastTableUpdate = 0; unsigned long lastGaugeUpdate = 0; float plotPhase = 0; void setup() { Serial.begin(9600); delay(1000); Serial.println("DIYables Bluetooth - Multiple Apps Example"); // Initialize built-in LED pinMode(LED_BUILTIN, OUTPUT); digitalWrite(LED_BUILTIN, LOW); // Initialize Bluetooth server bluetoothServer.begin(); // Register all apps with the server bluetoothServer.addApp(&bluetoothMonitor); bluetoothServer.addApp(&bluetoothChat); bluetoothServer.addApp(&bluetoothSlider); bluetoothServer.addApp(&bluetoothJoystick); bluetoothServer.addApp(&bluetoothTemperature); bluetoothServer.addApp(&bluetoothPlotter); bluetoothServer.addApp(&bluetoothTable); bluetoothServer.addApp(&bluetoothGauge); bluetoothServer.addApp(&bluetoothRotator); Serial.print("Registered apps: "); Serial.println(bluetoothServer.getAppCount()); // Configure Plotter bluetoothPlotter.setPlotTitle("Sensor Data"); bluetoothPlotter.setAxisLabels("Time", "Value"); bluetoothPlotter.setYAxisRange(-1.5, 1.5); bluetoothPlotter.setMaxSamples(100); bluetoothPlotter.setLegendLabels("Sine", "Cosine", "Random"); // Configure Table rows bluetoothTable.addRow("Status"); bluetoothTable.addRow("Uptime"); bluetoothTable.addRow("Slider 1"); bluetoothTable.addRow("Slider 2"); bluetoothTable.addRow("Joystick X"); bluetoothTable.addRow("Joystick Y"); bluetoothTable.addRow("Temperature"); bluetoothTable.addRow("Gauge Value"); bluetoothTable.addRow("Rotator Angle"); bluetoothTable.addRow("Messages"); // Set up all callbacks setupCallbacks(); Serial.println("Waiting for Bluetooth connection..."); } void setupCallbacks() { // ---- Connection events ---- bluetoothServer.setOnConnected([]() { Serial.println("Bluetooth connected!"); digitalWrite(LED_BUILTIN, HIGH); bluetoothMonitor.send("=== DIYables Multi-App Connected ==="); bluetoothMonitor.send("All apps are ready!"); bluetoothChat.send("Hello! Arduino Multi-App is connected."); }); bluetoothServer.setOnDisconnected([]() { Serial.println("Bluetooth disconnected!"); digitalWrite(LED_BUILTIN, LOW); }); // ---- Monitor callbacks ---- bluetoothMonitor.onMonitorMessage([](const String& message) { Serial.println("Monitor cmd: " + message); if (message == "HELP") { bluetoothMonitor.send("Commands: STATUS, HELP, LED_ON, LED_OFF"); } else if (message == "STATUS") { bluetoothMonitor.send("Slider1=" + String(currentSlider1) + " Slider2=" + String(currentSlider2)); bluetoothMonitor.send("Joystick X=" + String(currentJoystickX) + " Y=" + String(currentJoystickY)); bluetoothMonitor.send("Temp=" + String(currentTemperature, 1) + "°C"); bluetoothMonitor.send("Gauge=" + String(currentGaugeValue, 1) + "%"); bluetoothMonitor.send("Rotator=" + String(currentRotatorAngle, 0) + "°"); } else if (message == "LED_ON") { digitalWrite(LED_BUILTIN, HIGH); bluetoothMonitor.send("LED turned ON"); } else if (message == "LED_OFF") { digitalWrite(LED_BUILTIN, LOW); bluetoothMonitor.send("LED turned OFF"); } else { bluetoothMonitor.send("Unknown: " + message + " (type HELP)"); } }); // ---- Chat callbacks ---- bluetoothChat.onChatMessage([](const String& message) { Serial.println("Chat: " + message); bluetoothChat.send("Echo: " + message); if (message.equalsIgnoreCase("ping")) { bluetoothChat.send("pong!"); } else if (message.equalsIgnoreCase("status")) { bluetoothChat.send("Uptime: " + String(millis() / 1000) + "s, Apps: " + String(bluetoothServer.getAppCount())); } }); // ---- Slider callbacks ---- bluetoothSlider.onSliderValue([](int slider1, int slider2) { currentSlider1 = slider1; currentSlider2 = slider2; Serial.print("Slider 1: "); Serial.print(slider1); Serial.print(", Slider 2: "); Serial.println(slider2); // Update gauge based on slider 1 currentGaugeValue = map(slider1, 0, 255, 0, 100); bluetoothGauge.send(currentGaugeValue); // Update table bluetoothTable.sendValueUpdate("Slider 1", String(slider1)); bluetoothTable.sendValueUpdate("Slider 2", String(slider2)); bluetoothTable.sendValueUpdate("Gauge Value", String(currentGaugeValue, 1) + "%"); }); bluetoothSlider.onGetConfig([]() { bluetoothSlider.send(currentSlider1, currentSlider2); }); // ---- Joystick callbacks ---- bluetoothJoystick.onJoystickValue([](int x, int y) { currentJoystickX = x; currentJoystickY = y; Serial.print("Joystick X: "); Serial.print(x); Serial.print(", Y: "); Serial.println(y); // Update table bluetoothTable.sendValueUpdate("Joystick X", String(x)); bluetoothTable.sendValueUpdate("Joystick Y", String(y)); }); bluetoothJoystick.onGetConfig([]() { bluetoothJoystick.send(currentJoystickX, currentJoystickY); }); // ---- Temperature callbacks ---- bluetoothTemperature.onTemperatureRequest([]() { bluetoothTemperature.send(currentTemperature); }); // ---- Plotter callbacks ---- bluetoothPlotter.onDataRequest([]() { Serial.println("Plotter data requested"); }); // ---- Table callbacks ---- bluetoothTable.onDataRequest([]() { Serial.println("Table data requested"); bluetoothTable.sendTableStructure(); updateAllTableValues(); }); // ---- Gauge callbacks ---- bluetoothGauge.onValueRequest([]() { bluetoothGauge.send(currentGaugeValue); }); // ---- Rotator callbacks ---- bluetoothRotator.onRotatorAngle([](float angle) { currentRotatorAngle = angle; Serial.print("Rotator: "); Serial.print(angle); Serial.println("°"); bluetoothTable.sendValueUpdate("Rotator Angle", String(angle, 0) + "°"); }); } void updateAllTableValues() { bluetoothTable.sendValueUpdate("Status", "Running"); unsigned long uptime = millis() / 1000; String uptimeStr; if (uptime >= 60) { uptimeStr = String(uptime / 60) + "m " + String(uptime % 60) + "s"; } else { uptimeStr = String(uptime) + "s"; } bluetoothTable.sendValueUpdate("Uptime", uptimeStr); bluetoothTable.sendValueUpdate("Slider 1", String(currentSlider1)); bluetoothTable.sendValueUpdate("Slider 2", String(currentSlider2)); bluetoothTable.sendValueUpdate("Joystick X", String(currentJoystickX)); bluetoothTable.sendValueUpdate("Joystick Y", String(currentJoystickY)); bluetoothTable.sendValueUpdate("Temperature", String(currentTemperature, 1) + " °C"); bluetoothTable.sendValueUpdate("Gauge Value", String(currentGaugeValue, 1) + "%"); bluetoothTable.sendValueUpdate("Rotator Angle", String(currentRotatorAngle, 0) + "°"); bluetoothTable.sendValueUpdate("Messages", String(messageCount)); } void loop() { bluetoothServer.loop(); if (!bluetooth.isConnected()) { delay(10); return; } // ---- Monitor: periodic status every 5 seconds ---- if (millis() - lastMonitorUpdate >= 5000) { lastMonitorUpdate = millis(); messageCount++; bluetoothMonitor.send("[INFO] Heartbeat #" + String(messageCount) + " - Uptime: " + String(millis() / 1000) + "s"); } // ---- Temperature: update every 2 seconds ---- if (millis() - lastTempUpdate >= 2000) { lastTempUpdate = millis(); // Simulate temperature with slight variation static float tempOffset = 0; tempOffset += random(-10, 11) / 10.0; if (tempOffset > 5.0) tempOffset = 5.0; if (tempOffset < -5.0) tempOffset = -5.0; currentTemperature = 25.0 + tempOffset; bluetoothTemperature.send(currentTemperature); bluetoothTable.sendValueUpdate("Temperature", String(currentTemperature, 1) + " °C"); } // ---- Plotter: update every 100ms ---- if (millis() - lastPlotUpdate >= 100) { lastPlotUpdate = millis(); float sine = sin(plotPhase); float cosine = cos(plotPhase); float noise = random(-50, 51) / 100.0; bluetoothPlotter.send(sine, cosine, noise); plotPhase += 0.1; if (plotPhase > 2 * PI) plotPhase = 0; } // ---- Table: update uptime every 5 seconds ---- if (millis() - lastTableUpdate >= 5000) { lastTableUpdate = millis(); unsigned long uptime = millis() / 1000; String uptimeStr; if (uptime >= 60) { uptimeStr = String(uptime / 60) + "m " + String(uptime % 60) + "s"; } else { uptimeStr = String(uptime) + "s"; } bluetoothTable.sendValueUpdate("Uptime", uptimeStr); bluetoothTable.sendValueUpdate("Messages", String(messageCount)); } // ---- Gauge: simulate sensor every 3 seconds ---- if (millis() - lastGaugeUpdate >= 3000) { lastGaugeUpdate = millis(); float sensorValue = 50.0 + 30.0 * sin(millis() / 10000.0); currentGaugeValue = sensorValue; bluetoothGauge.send(currentGaugeValue); bluetoothTable.sendValueUpdate("Gauge Value", String(currentGaugeValue, 1) + "%"); } delay(10); }
  • Cliquez sur le bouton Upload dans l'IDE Arduino pour télécharger le code vers l'Arduino UNO R4 WiFi
  • Ouvrez le Serial Monitor
  • Vérifiez le résultat sur le Serial Monitor. Il ressemble à ceci :
COM6
Send
DIYables Bluetooth - Multiple Apps Example Waiting for Bluetooth connection...
Autoscroll Show timestamp
Clear output
9600 baud  
Newline  

Application mobile

  • Installez l'application DIYables Bluetooth sur votre smartphone : Android | iOS

Note : L'application DIYables Bluetooth prend en charge BLE et Bluetooth Classic sur Android, et BLE sur iOS. Puisque l'Arduino UNO R4 WiFi utilise BLE, l'application fonctionne sur Android et iOS. Aucun appairage manuel n'est nécessaire pour BLE — il suffit de scanner et de se connecter.

  • Ouvrez l'application DIYables Bluetooth
  • Lors de la première ouverture de l'application, elle demandera des autorisations. Veuillez accorder les suivantes :
    • Permission Nearby Devices (Android 12+) / permission Bluetooth (iOS) - requise pour scanner et se connecter aux appareils Bluetooth
    • Permission Location (Android 11 et antérieur uniquement) - requise par les anciennes versions Android pour scanner les appareils BLE
  • Assurez-vous que Bluetooth est activé sur votre téléphone
  • Sur l'écran d'accueil, appuyez sur le bouton Connect. L'application scannera les appareils BLE.
DIYables Bluetooth App - Home Screen with Scan Button
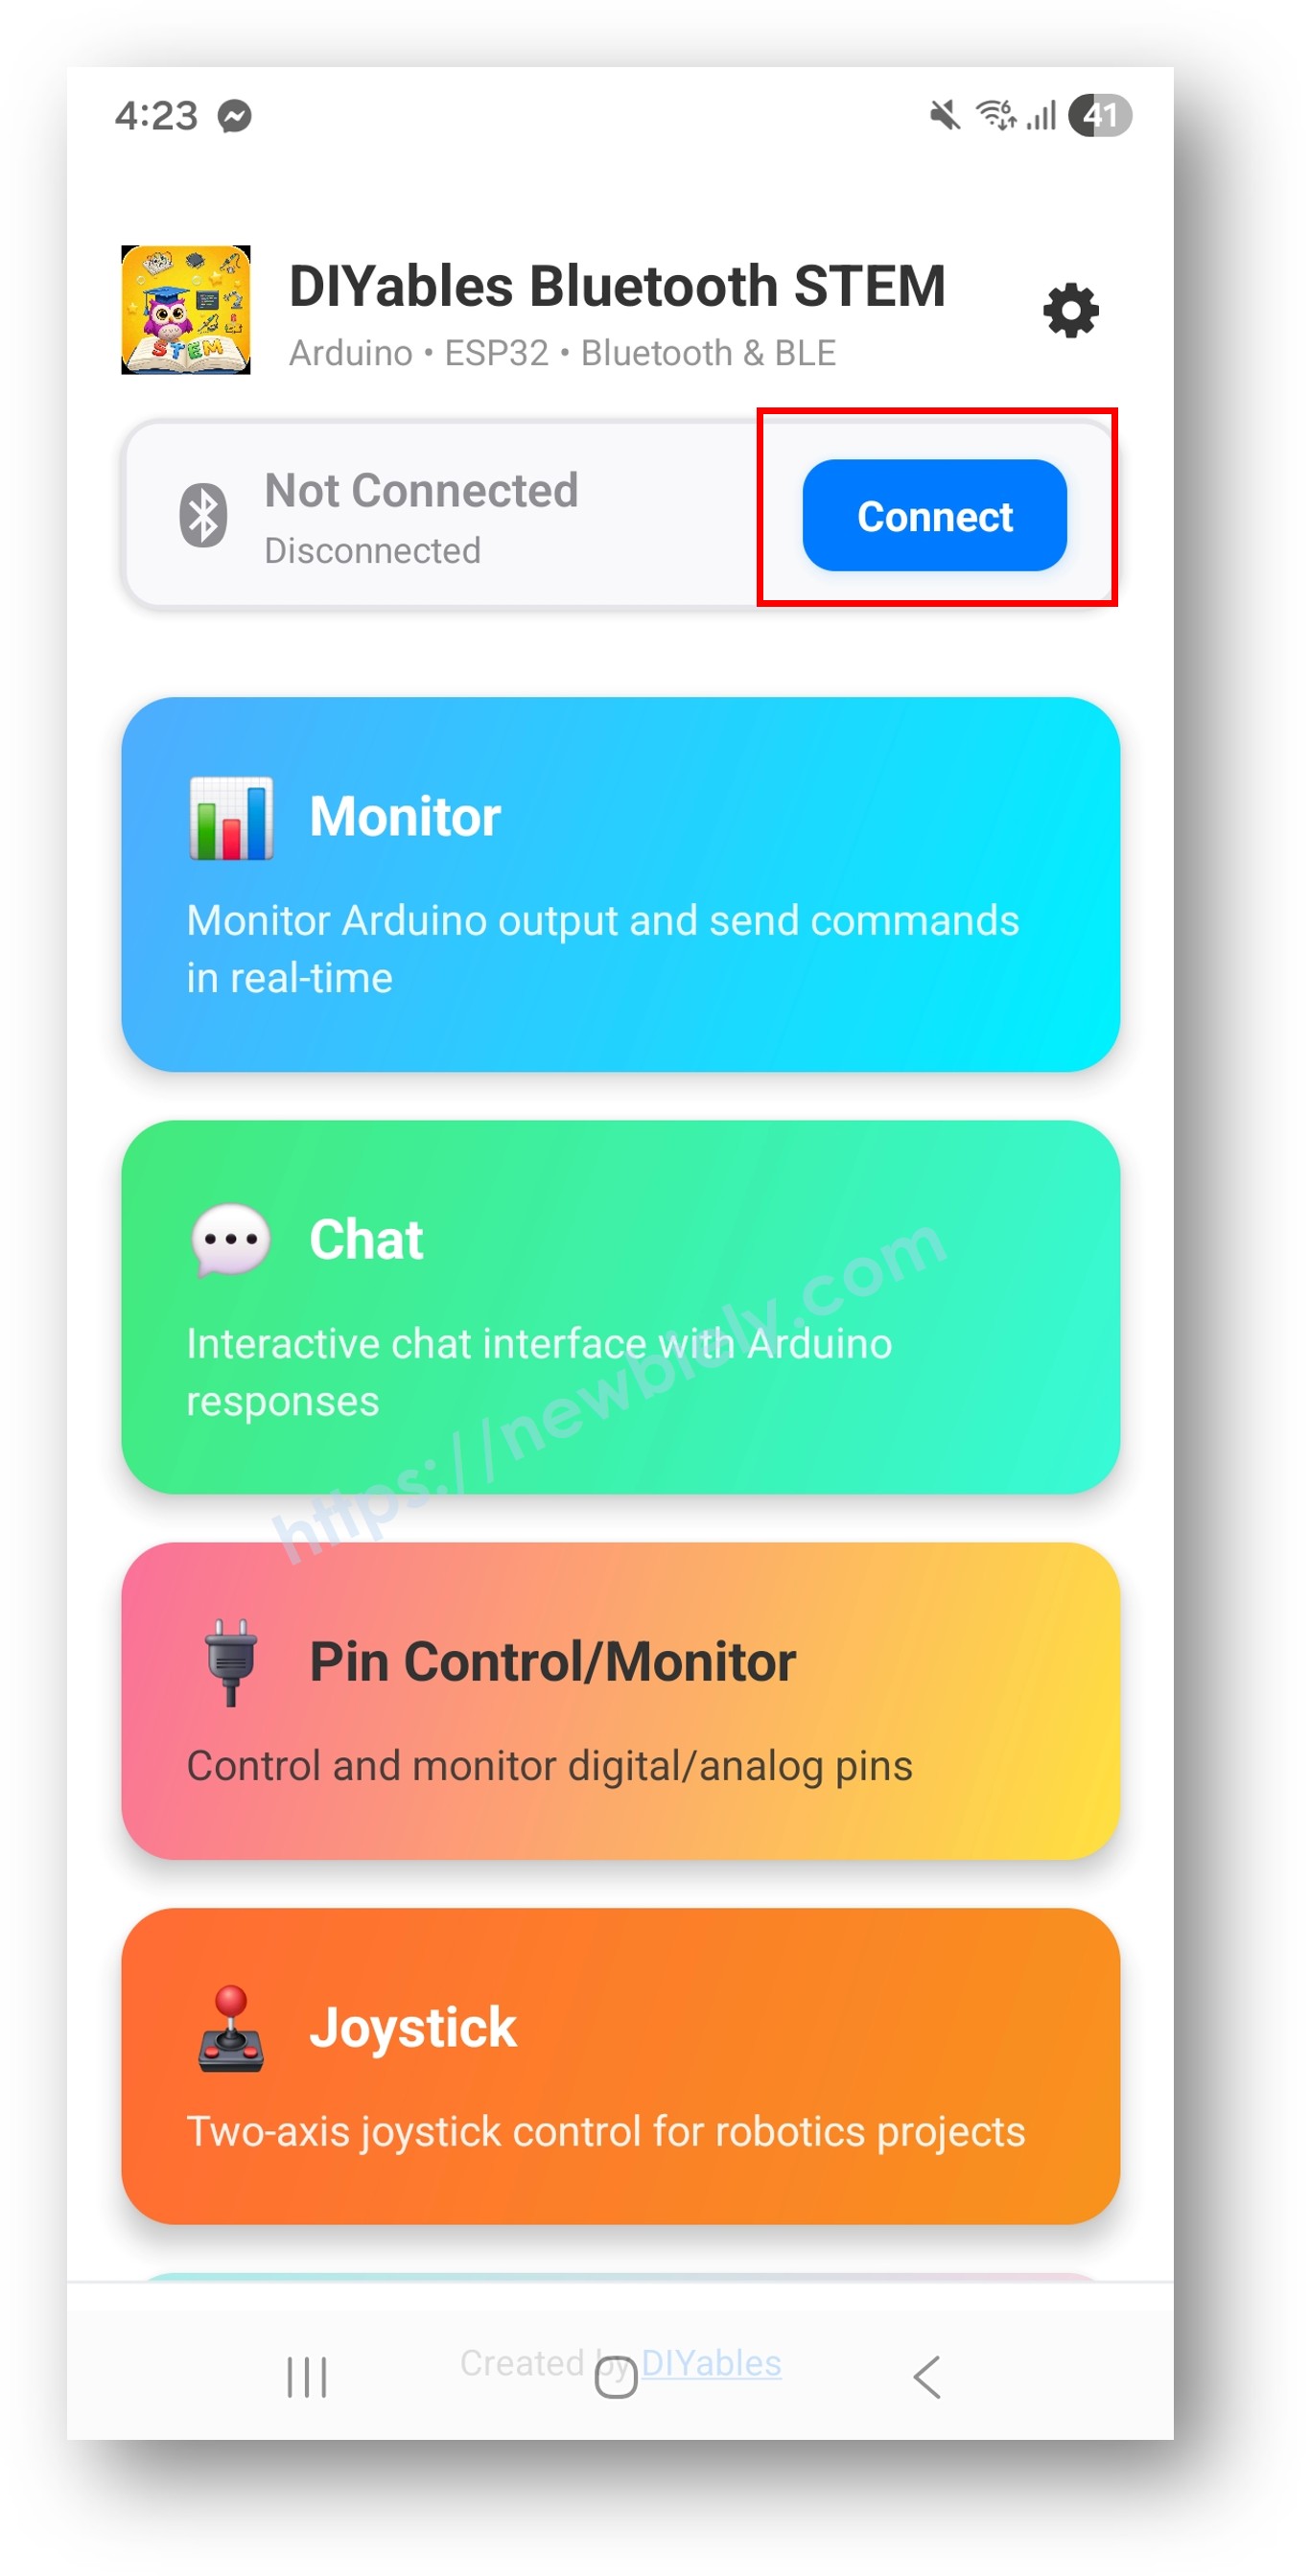
  • Trouvez et appuyez sur "DIYables Multi-App" dans les résultats de scan pour vous connecter.
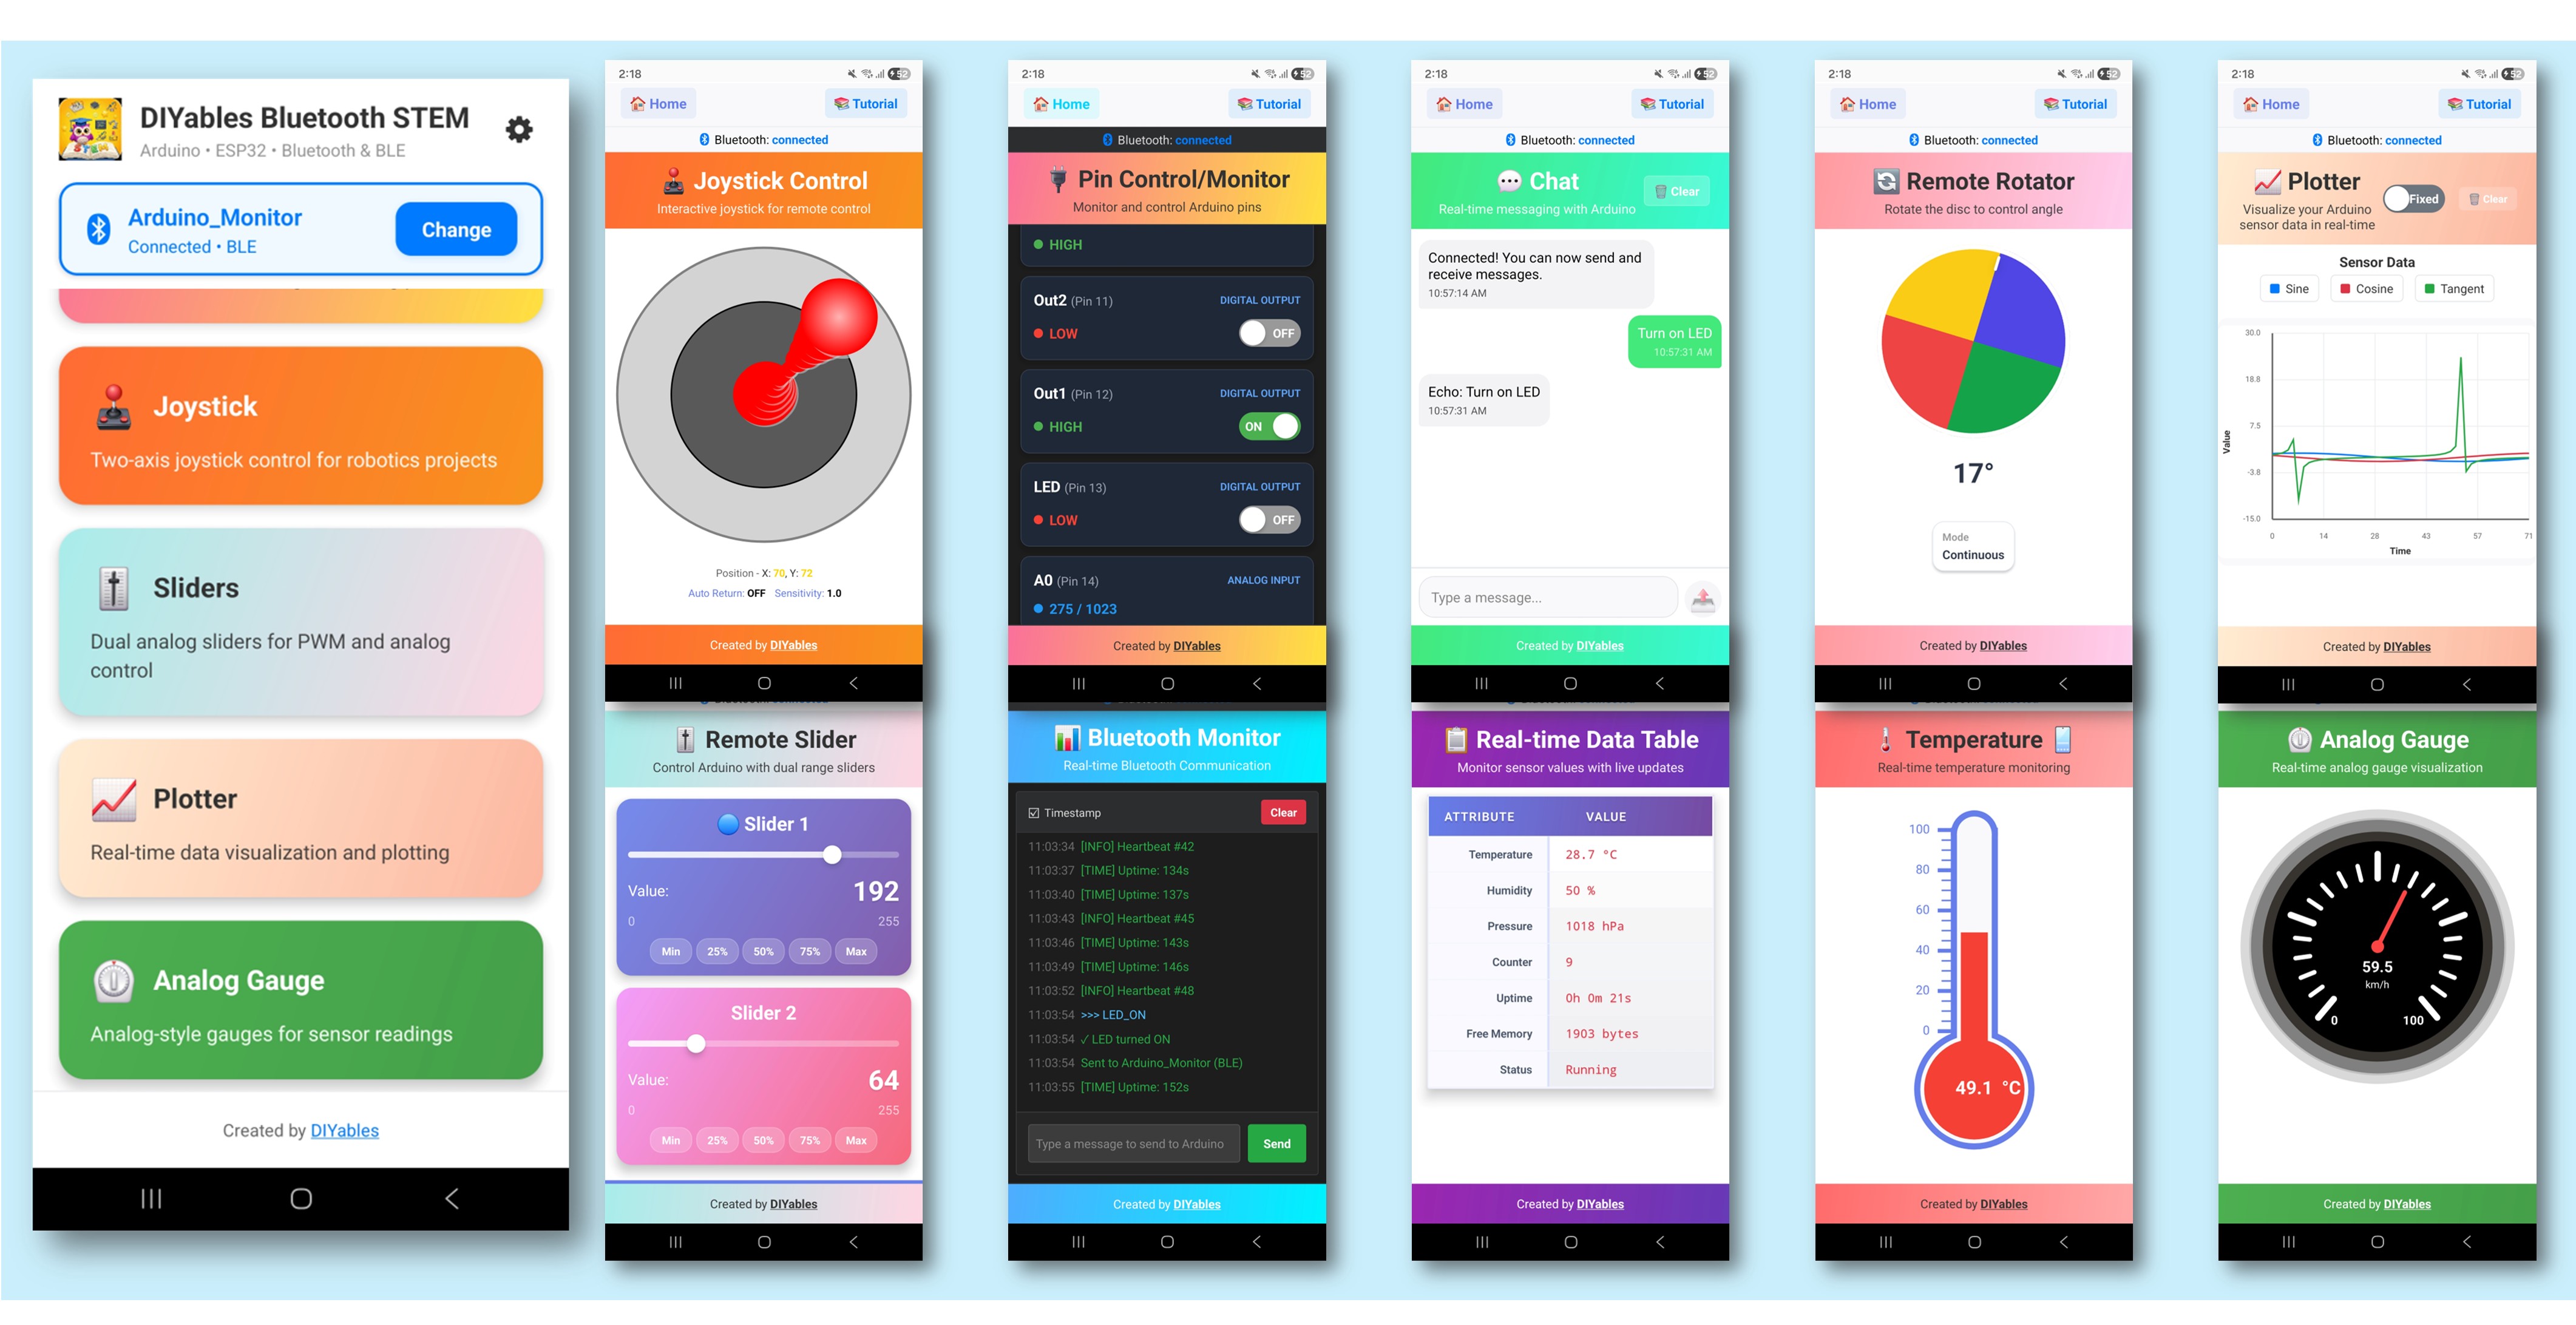
  • Une fois connectée, l'application retourne automatiquement à l'écran d'accueil. L'écran d'accueil montre toutes les applications disponibles. Les 9 applications initialisées dans le code Arduino répondront et fonctionneront — les autres applications sur l'écran d'accueil apparaîtront mais ne fonctionneront pas avec ce sketch.
DIYables Bluetooth App - Home Screen with Multiple Apps

Note : Vous pouvez appuyer sur l'icône des paramètres sur l'écran d'accueil pour masquer/afficher les applications sur l'écran d'accueil. Pour plus de détails, consultez le manuel utilisateur de l'application DIYables Bluetooth.

  • Appuyez sur certaines des applications suivantes pour les ouvrir et interagir avec l'Arduino : Monitor, Chat, Slider, Joystick, Temperature, Plotter, Table, Analog Gauge, Rotator
  • Naviguez librement entre les applications — elles partagent toutes la même connexion BLE

Maintenant regardez le Serial Monitor dans l'IDE Arduino. Vous verrez :

COM6
Send
Bluetooth connected! Monitor: System running, uptime: 5s Chat message: Hello Slider value: 128 Joystick: X=0.50, Y=-0.30 Temperature: 22.50 °C
Autoscroll Show timestamp
Clear output
9600 baud  
Newline  

Comment ça fonctionne

Initialisation des applications

Chaque application est créée avec sa propre configuration et callbacks :

// Toutes les applications partagent le même serveur Bluetooth DIYables_BluetoothServer bluetoothServer(bluetooth); // Créer les applications individuelles DIYables_BluetoothMonitor bluetoothMonitor(bluetoothServer); DIYables_BluetoothChat bluetoothChat(bluetoothServer); DIYables_BluetoothSlider bluetoothSlider(bluetoothServer, 0, 255, 1); DIYables_BluetoothJoystick bluetoothJoystick(bluetoothServer, false, 5); DIYables_BluetoothTemperature bluetoothTemp(bluetoothServer, -10.0, 50.0, "°C"); DIYables_BluetoothPlotter bluetoothPlotter(bluetoothServer); DIYables_BluetoothTable bluetoothTable(bluetoothServer); DIYables_BluetoothAnalogGauge bluetoothGauge(bluetoothServer, 0.0, 100.0, "%"); DIYables_BluetoothRotator bluetoothRotator(bluetoothServer, ROTATOR_MODE_CONTINUOUS);

Interaction inter-applications

Les applications peuvent interagir entre elles — quand une application reçoit une entrée, elle peut mettre à jour d'autres applications :

// Le slider met à jour la jauge et le tableau bluetoothSlider.onSliderValue([](int value) { float percent = value * 100.0 / 255.0; bluetoothGauge.send(percent); bluetoothTable.sendValueUpdate("Slider 1", String(value)); }); // Le joystick met à jour le tableau bluetoothJoystick.onJoystickValue([](float x, float y) { bluetoothTable.sendValueUpdate("Joystick X", String(x, 2)); bluetoothTable.sendValueUpdate("Joystick Y", String(y, 2)); }); // Le rotator met à jour le tableau bluetoothRotator.onRotatorAngle([](float angle) { bluetoothTable.sendValueUpdate("Rotator Angle", String(angle, 1) + "°"); });

Timing des mises à jour

Chaque application a son propre intervalle de mise à jour pour équilibrer réactivité et bande passante :

void loop() { bluetoothServer.loop(); unsigned long now = millis(); // Plotter : mises à jour les plus rapides (100ms) if (now - lastPlotterTime >= 100) { ... } // Temperature : toutes les 2 secondes if (now - lastTempTime >= 2000) { ... } // Gauge : toutes les 3 secondes if (now - lastGaugeTime >= 3000) { ... } // Monitor, Table : toutes les 5 secondes if (now - lastMonitorTime >= 5000) { ... } if (now - lastTableTime >= 5000) { ... } }

Structure du tableau

L'exemple crée un tableau avec 10 lignes montrant les données de toutes les applications :

LigneLabelDescription
0StatusStatut de connexion/fonctionnement
1UptimeTemps depuis le démarrage
2Slider 1Valeur actuelle du slider
3Slider 2Valeur du second slider
4Joystick XPosition X du joystick
5Joystick YPosition Y du joystick
6TemperatureTempérature actuelle
7Gauge ValuePourcentage actuel de la jauge
8Rotator AngleAngle de rotation actuel
9MessagesNombre de messages de chat

Personnalisation créative - Adaptez le code à votre projet

Ajouter ou supprimer des applications

Vous n'avez pas besoin des 9 applications. Incluez simplement celles dont vous avez besoin :

// Configuration minimale : juste Monitor et Slider DIYables_BluetoothMonitor bluetoothMonitor(bluetoothServer); DIYables_BluetoothSlider bluetoothSlider(bluetoothServer, 0, 100, 1); // C'est tout ! L'application n'affichera que ces deux-là

Logique personnalisée inter-applications

// Exemple : Alarme de température via Monitor void checkTemperatureAlarm(float temp) { if (temp > 40.0) { bluetoothMonitor.send("⚠️ ALERTE HAUTE TEMP : " + String(temp, 1) + "°C"); bluetoothChat.send("Alarme de température déclenchée !"); } }

Dépannage

Problèmes courants

1. Impossible de trouver l'appareil dans l'application

  • Assurez-vous que l'Arduino UNO R4 WiFi est allumé et le sketch téléchargé
  • Vérifiez que le Bluetooth de votre téléphone est activé
  • Sur Android 11 et antérieur, activez aussi les services de localisation

2. Certaines applications n'apparaissent pas dans le menu

  • Toutes les applications initialisées apparaîtront automatiquement
  • Vérifiez que chaque objet d'application est correctement créé
  • L'application découvre les applications disponibles depuis l'Arduino

3. Les mises à jour semblent lentes

  • Chaque application a des intervalles de mise à jour différents — c'est volontaire
  • BLE a une bande passante limitée ; trop de mises à jour rapides peuvent causer de la congestion
  • Réduisez la fréquence de mise à jour pour les applications qui n'ont pas besoin de données temps réel

4. Les mises à jour inter-applications ne fonctionnent pas

  • Vérifiez que les fonctions callback sont correctement configurées
  • Vérifiez que les noms des lignes du tableau correspondent exactement (sensible à la casse)
  • Assurez-vous que l'objet application cible est accessible dans la portée du callback

5. Problèmes de mémoire ou plantages

  • Exécuter 9 applications utilise beaucoup de mémoire
  • Supprimez les applications non utilisées pour libérer des ressources
  • Réduisez le nombre de lignes du tableau si nécessaire

6. Le téléchargement échoue ou la carte n'est pas reconnue

  • Installez le dernier package de carte Arduino UNO R4 via Board Manager
  • Essayez un câble USB ou port différent

Idées de projets

  • Tableau de bord IoT complet
  • Panneau de contrôle de robot (joystick + monitor + sliders)
  • Station météo (temperature + gauge + plotter + table)
  • Hub de domotique (sliders + pins + monitor + chat)
  • Plateforme d'apprentissage STEM (toutes les applications pour l'expérimentation)

Prochaines étapes

Après avoir maîtrisé l'exemple Multiple Apps, explorez les tutoriels d'applications individuelles pour une compréhension plus approfondie :

  1. Bluetooth Chat - Pour les détails de messagerie
  2. Bluetooth Slider - Pour les détails de contrôle de valeur
  3. Bluetooth Plotter - Pour les détails de visualisation de données
  4. Bluetooth RTC - Pour la synchronisation temporelle (utilise le RTC matériel intégré)

Support

Pour une aide supplémentaire :

  • Consultez la documentation de référence de l'API
  • Forums de la communauté Arduino

※ NOS MESSAGES

  • N'hésitez pas à partager le lien de ce tutoriel. Cependant, veuillez ne pas utiliser notre contenu sur d'autres sites web. Nous avons investi beaucoup d'efforts et de temps pour créer ce contenu, veuillez respecter notre travail !