Exemple Arduino UNO R4 WiFi Bluetooth RTC - Tutoriel de synchronisation de l'horloge en temps réel via BLE
Vue d'ensemble
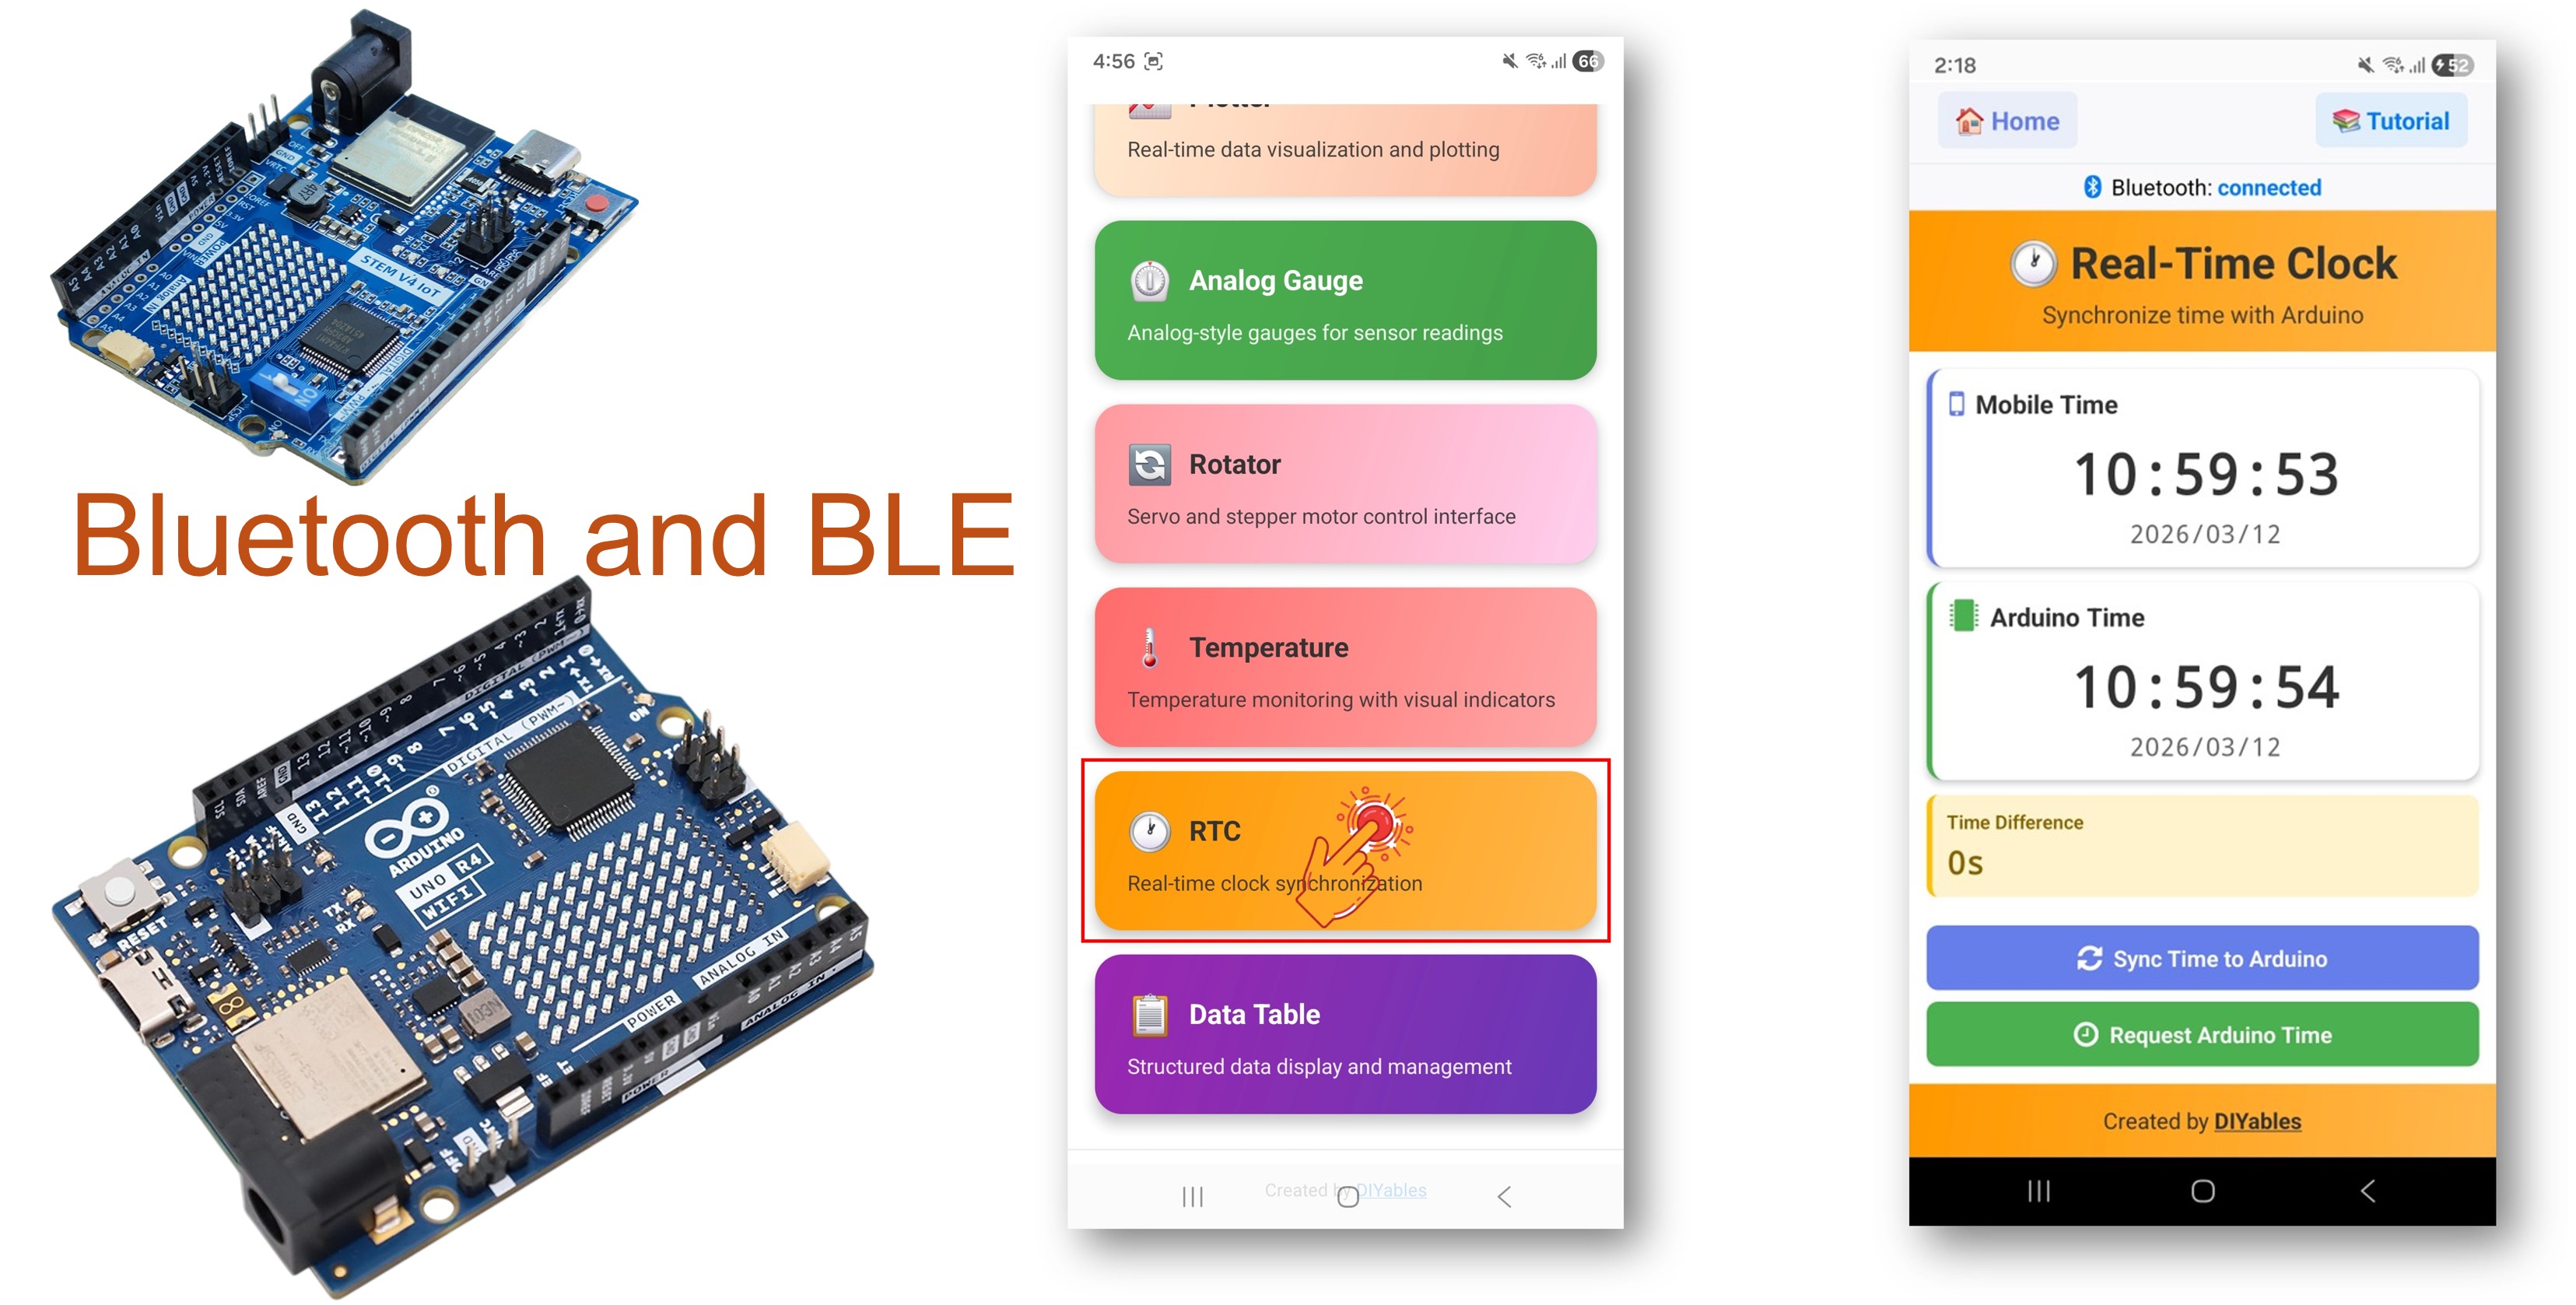
L'exemple Bluetooth RTC fournit la synchronisation de l'horloge en temps réel via l'application DIYables Bluetooth STEM. Conçu pour l'Arduino UNO R4 WiFi utilisant BLE (Bluetooth Low Energy) pour synchroniser le RTC matériel intégré de la carte avec l'horloge de votre smartphone et afficher l'heure. L'Arduino UNO R4 WiFi dispose d'un module RTC intégré, ce qui en fait une solution idéale pour des projets de chronométrage sans besoin d'un matériel RTC externe. Parfait pour les horloges, l'enregistrement de données avec des horodatages, l'automatisation planifiée et les projets basés sur le temps.
Remarque : L'Arduino UNO R4 WiFi ne prend en charge que le BLE (Bluetooth Low Energy). Il ne prend pas en charge le Bluetooth classique. L'application Bluetooth DIYables prend en charge à la fois le BLE et le Bluetooth classique sur Android, et le BLE sur iOS. Puisque cette carte utilise le BLE, l'application fonctionne sur Android et iOS.
Fonctionnalités
RTC matériel intégré: Utilise le RTC embarqué de l'Arduino UNO R4 WiFi — aucun module externe nécessaire
Synchronisation de l'heure depuis le smartphone: Synchroniser l'heure depuis le smartphone via un horodatage Unix ou des composants de l'heure locale
Affichage en temps réel: Afficher l'heure actuelle dans l'application, mise à jour toutes les secondes
Demande d'heure: L'application peut demander l'heure actuelle à la carte
Maintien du temps persistant: Le RTC garde l'heure tant que la carte est alimentée
Fonctionne sur Android et iOS: BLE est pris en charge sur les deux plateformes
Aucun appairage requis: BLE se connecte automatiquement sans appairage manuel
Divulgation : Certains des liens fournis dans cette section sont des liens affiliés Amazon. Nous pouvons recevoir une commission pour tout achat effectué via ces liens, sans coût supplémentaire pour vous. Nous vous remercions de votre soutien.
Remarque : Aucun module RTC externe n'est nécessaire ! L'Arduino UNO R4 WiFi dispose d'un RTC matériel intégré accessible via la bibliothèque RTC.h.
Connectez la carte Arduino UNO R4 WiFi à votre ordinateur à l'aide d'un câble USB.
Ouvrez l'IDE Arduino sur votre ordinateur.
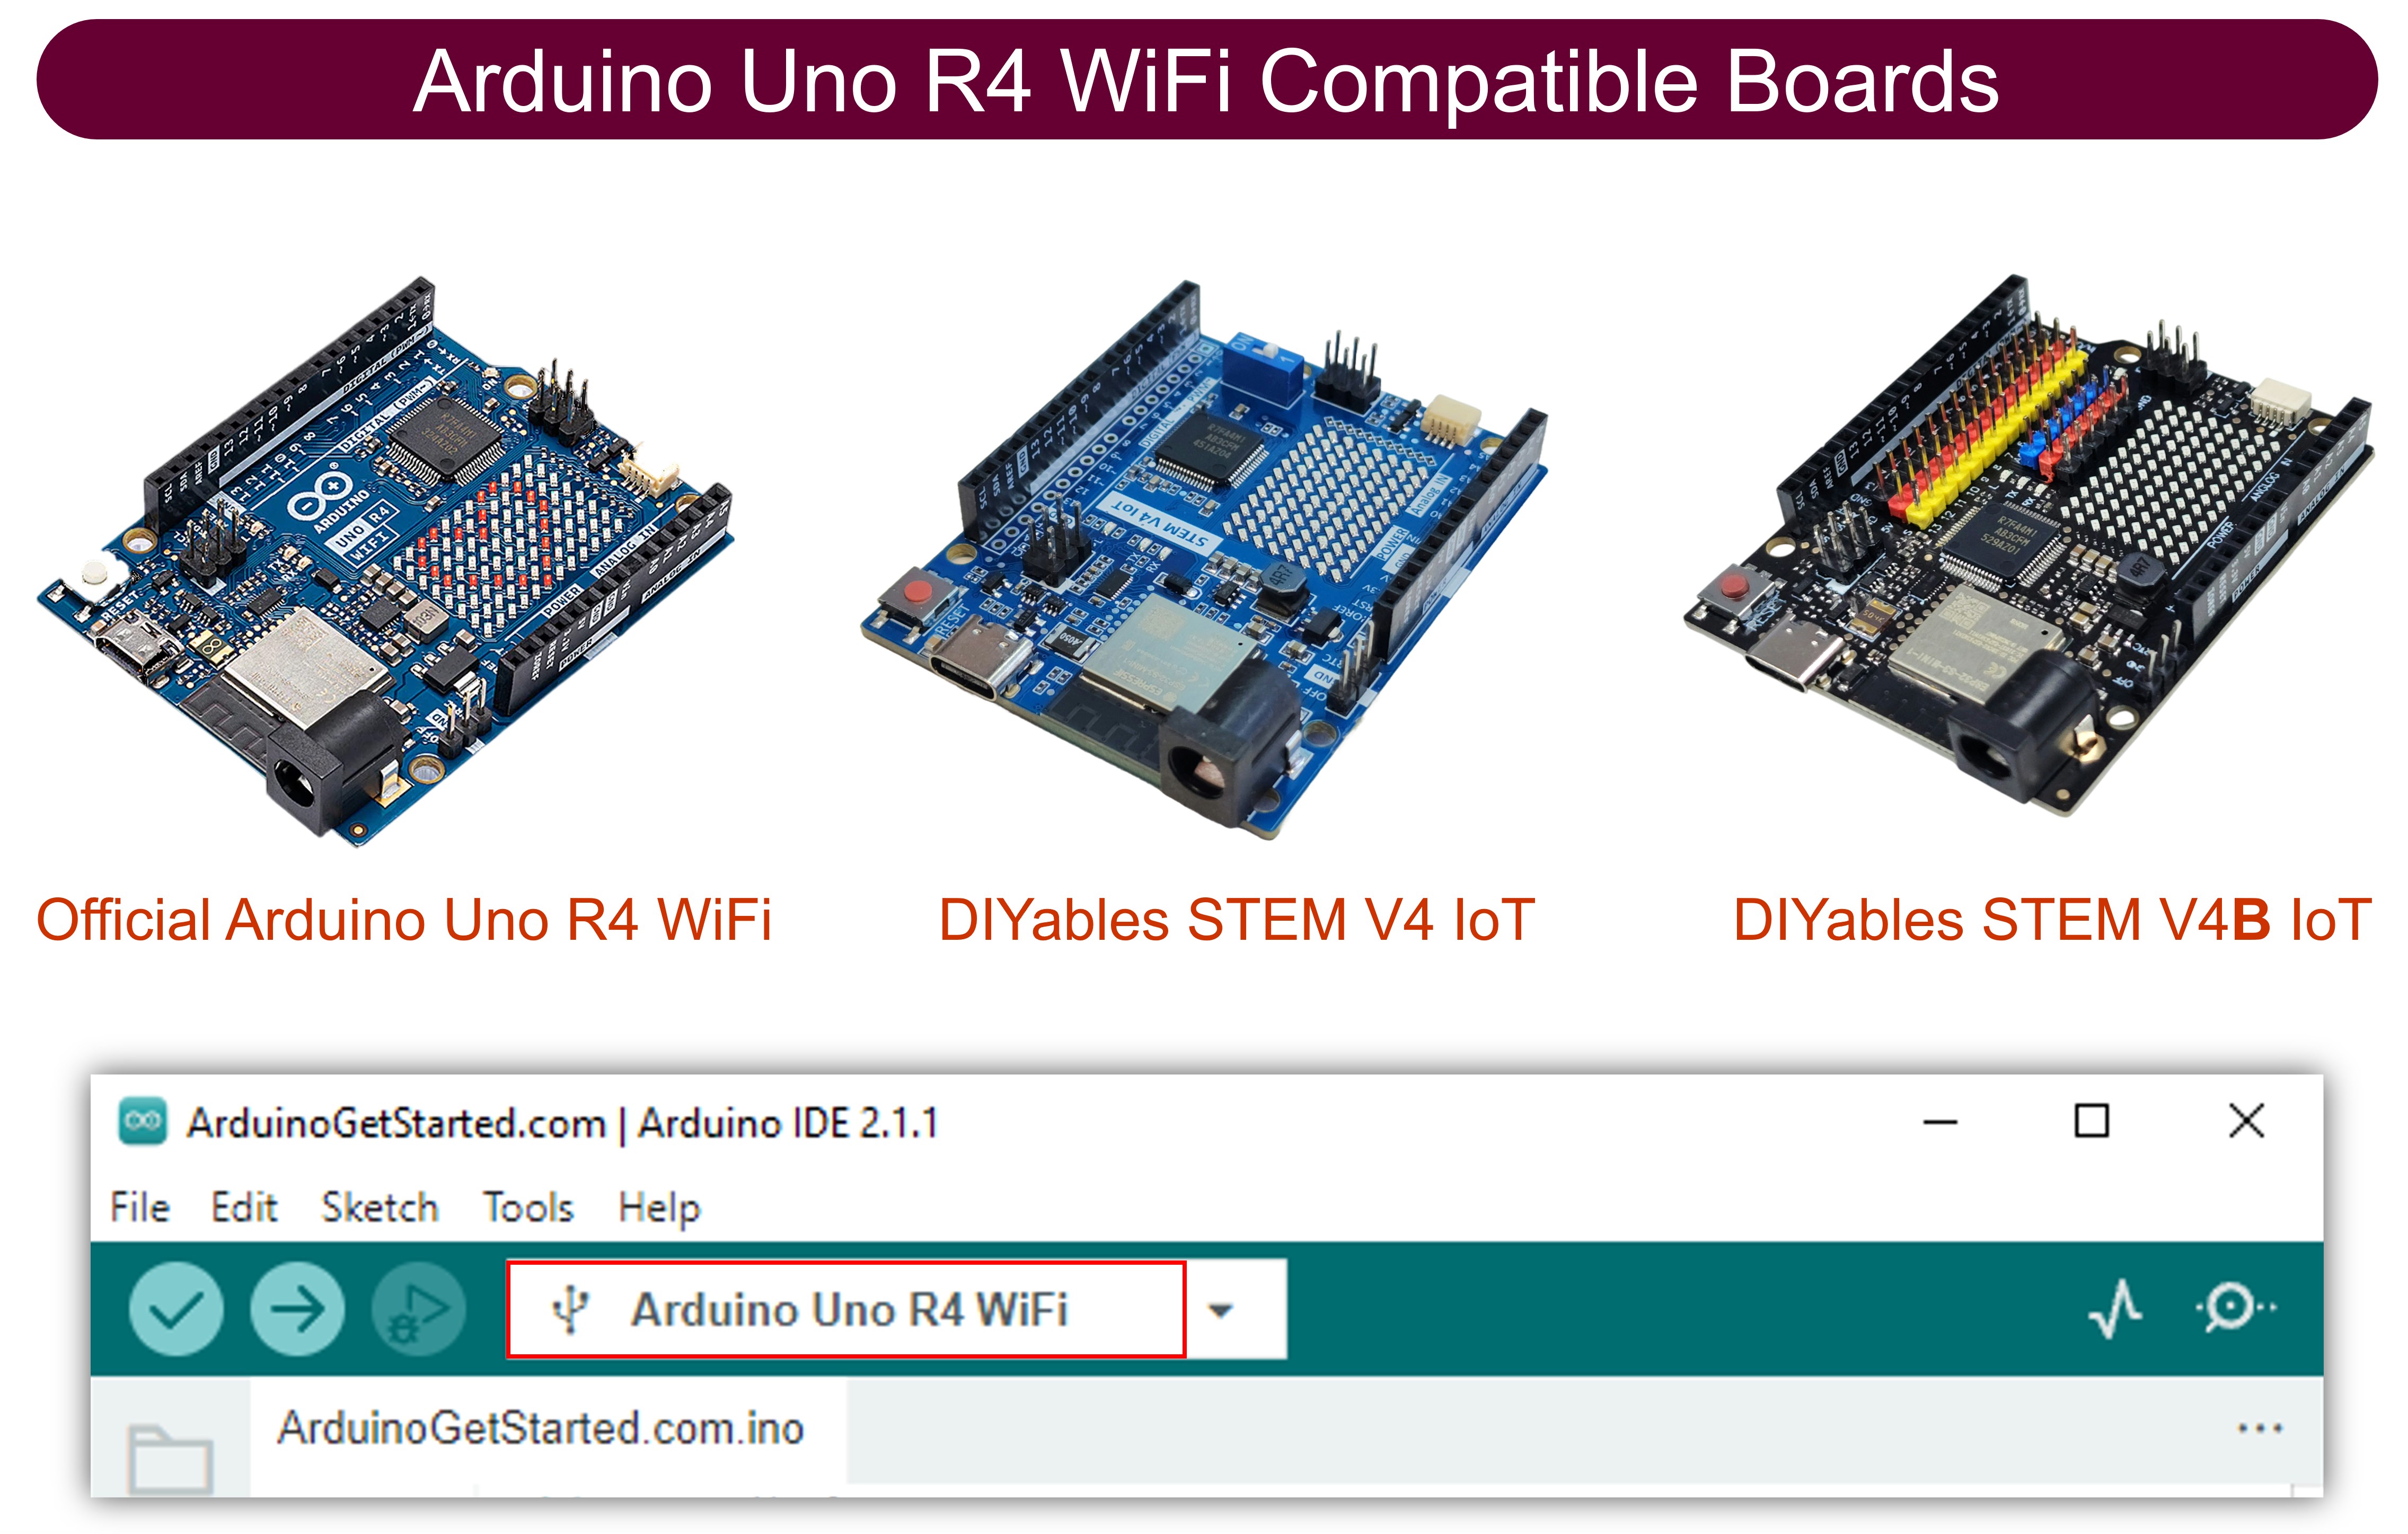
Sélectionnez la carte Arduino UNO R4 WiFi et le port COM approprié.
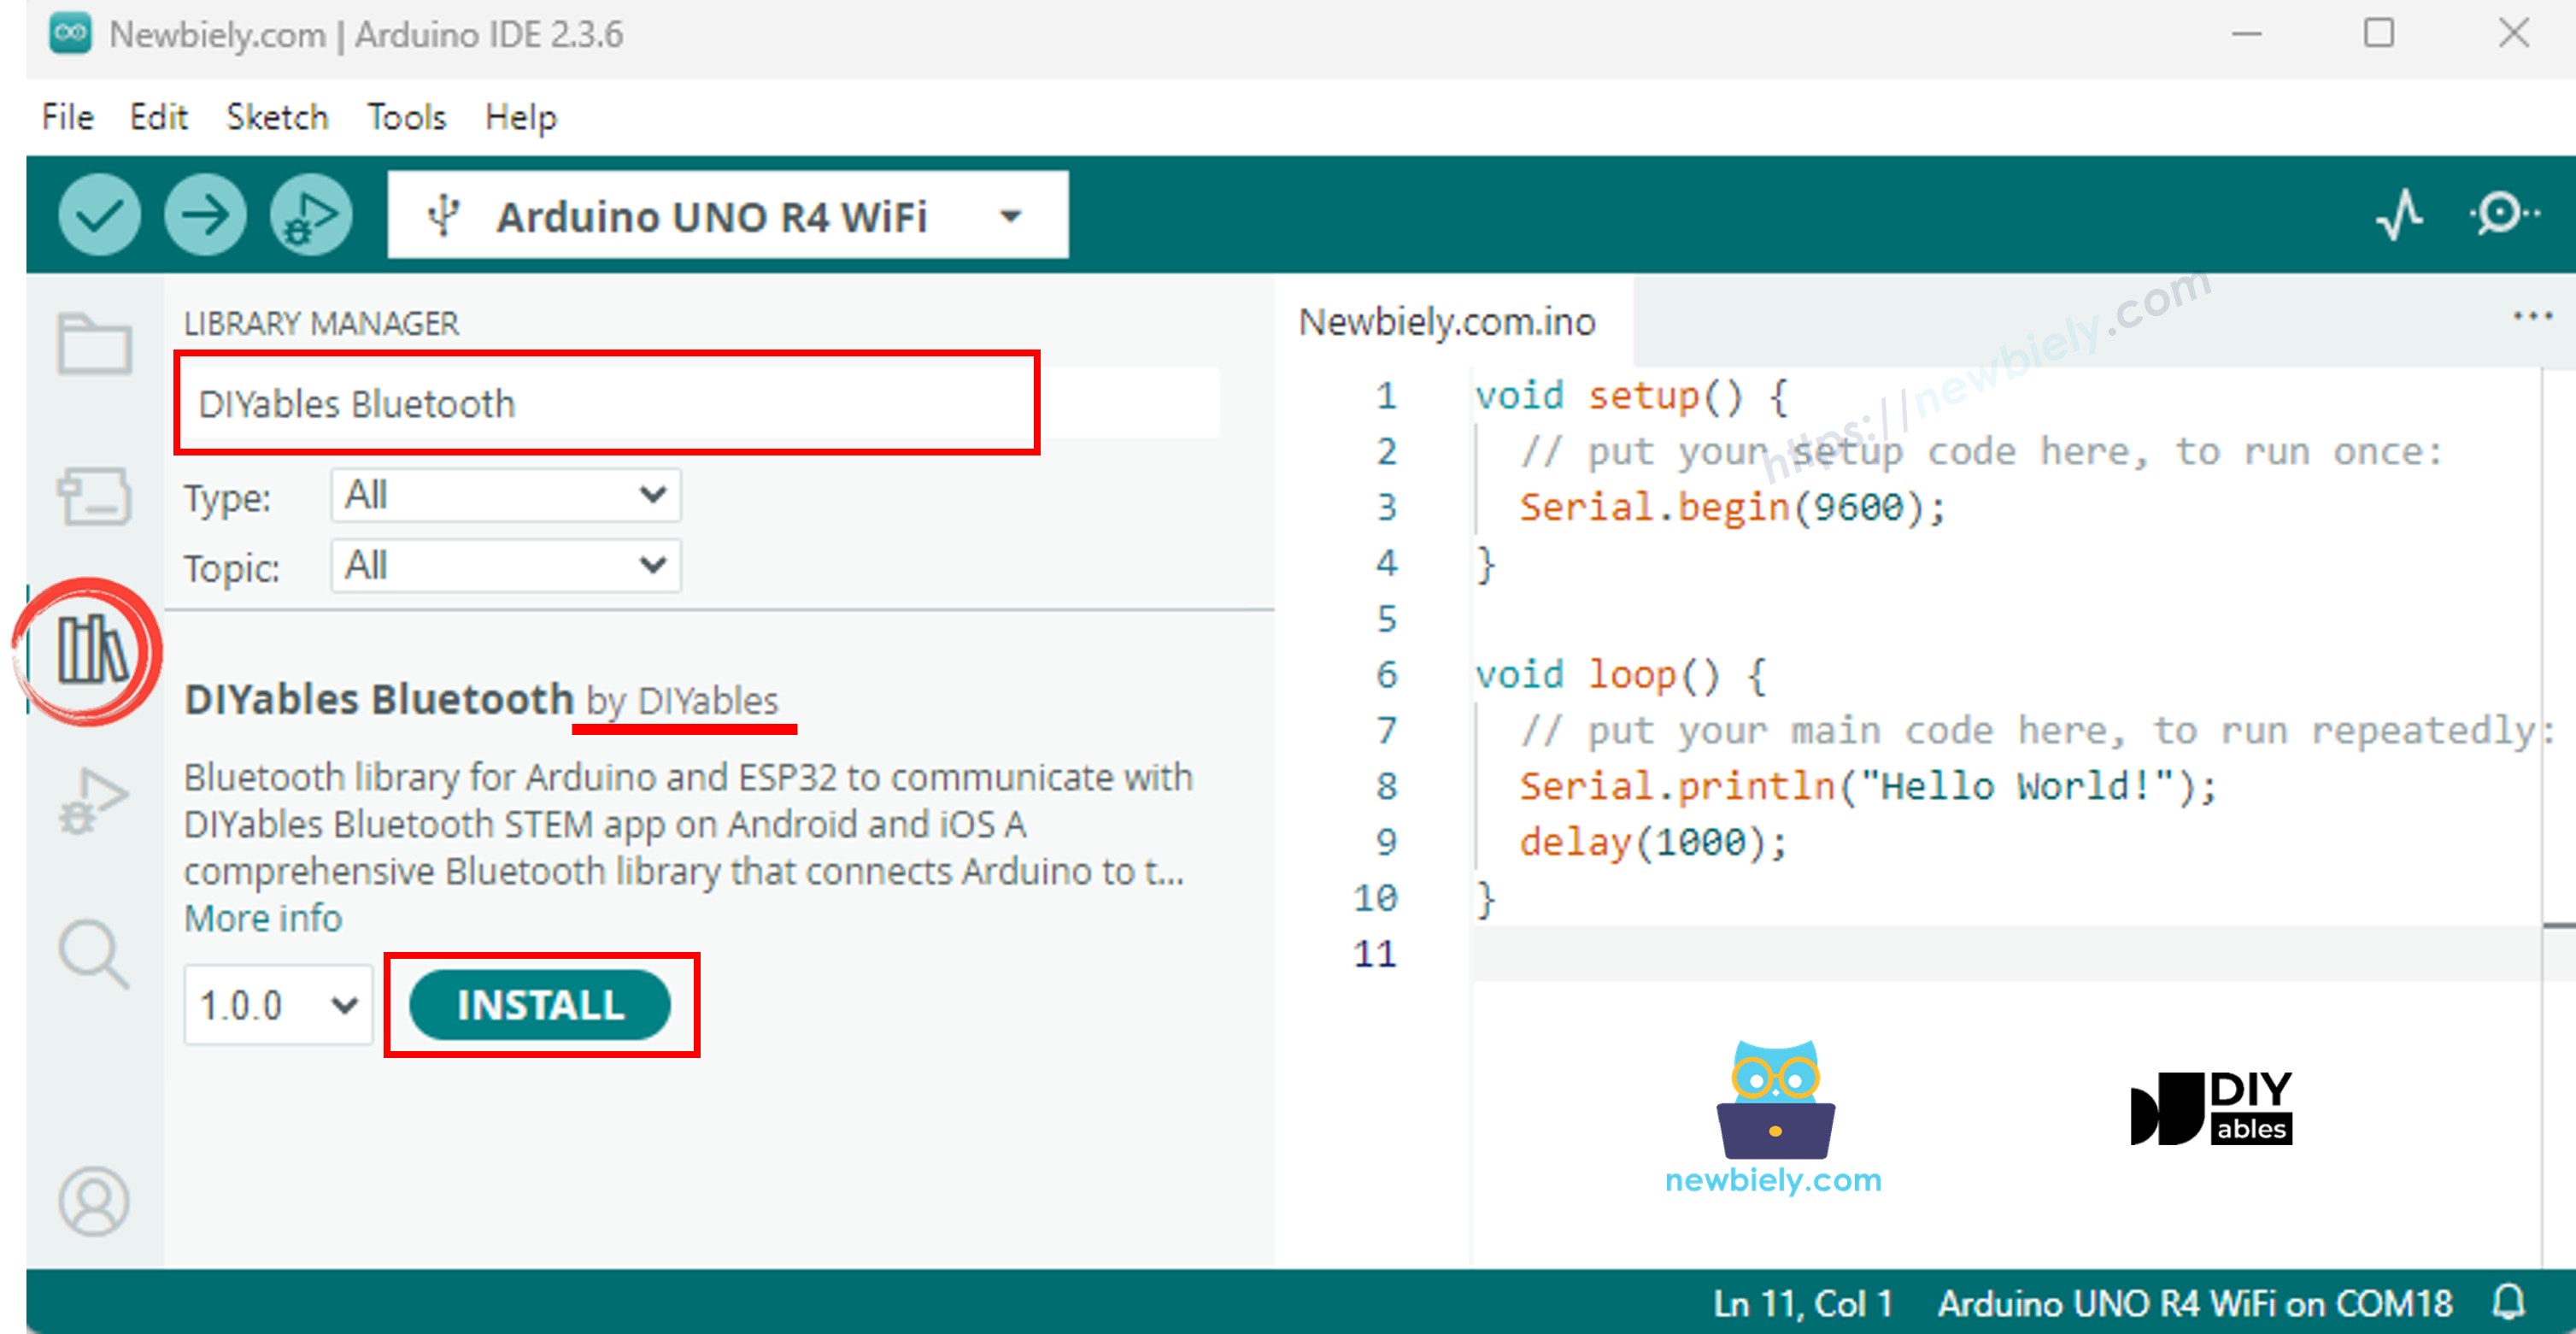
Accédez à l'icône Libraries dans la barre de gauche de l'IDE Arduino.
Recherchez "DIYables Bluetooth", puis trouvez la bibliothèque DIYables Bluetooth de DIYables.
Cliquez sur le bouton Install pour installer la bibliothèque.
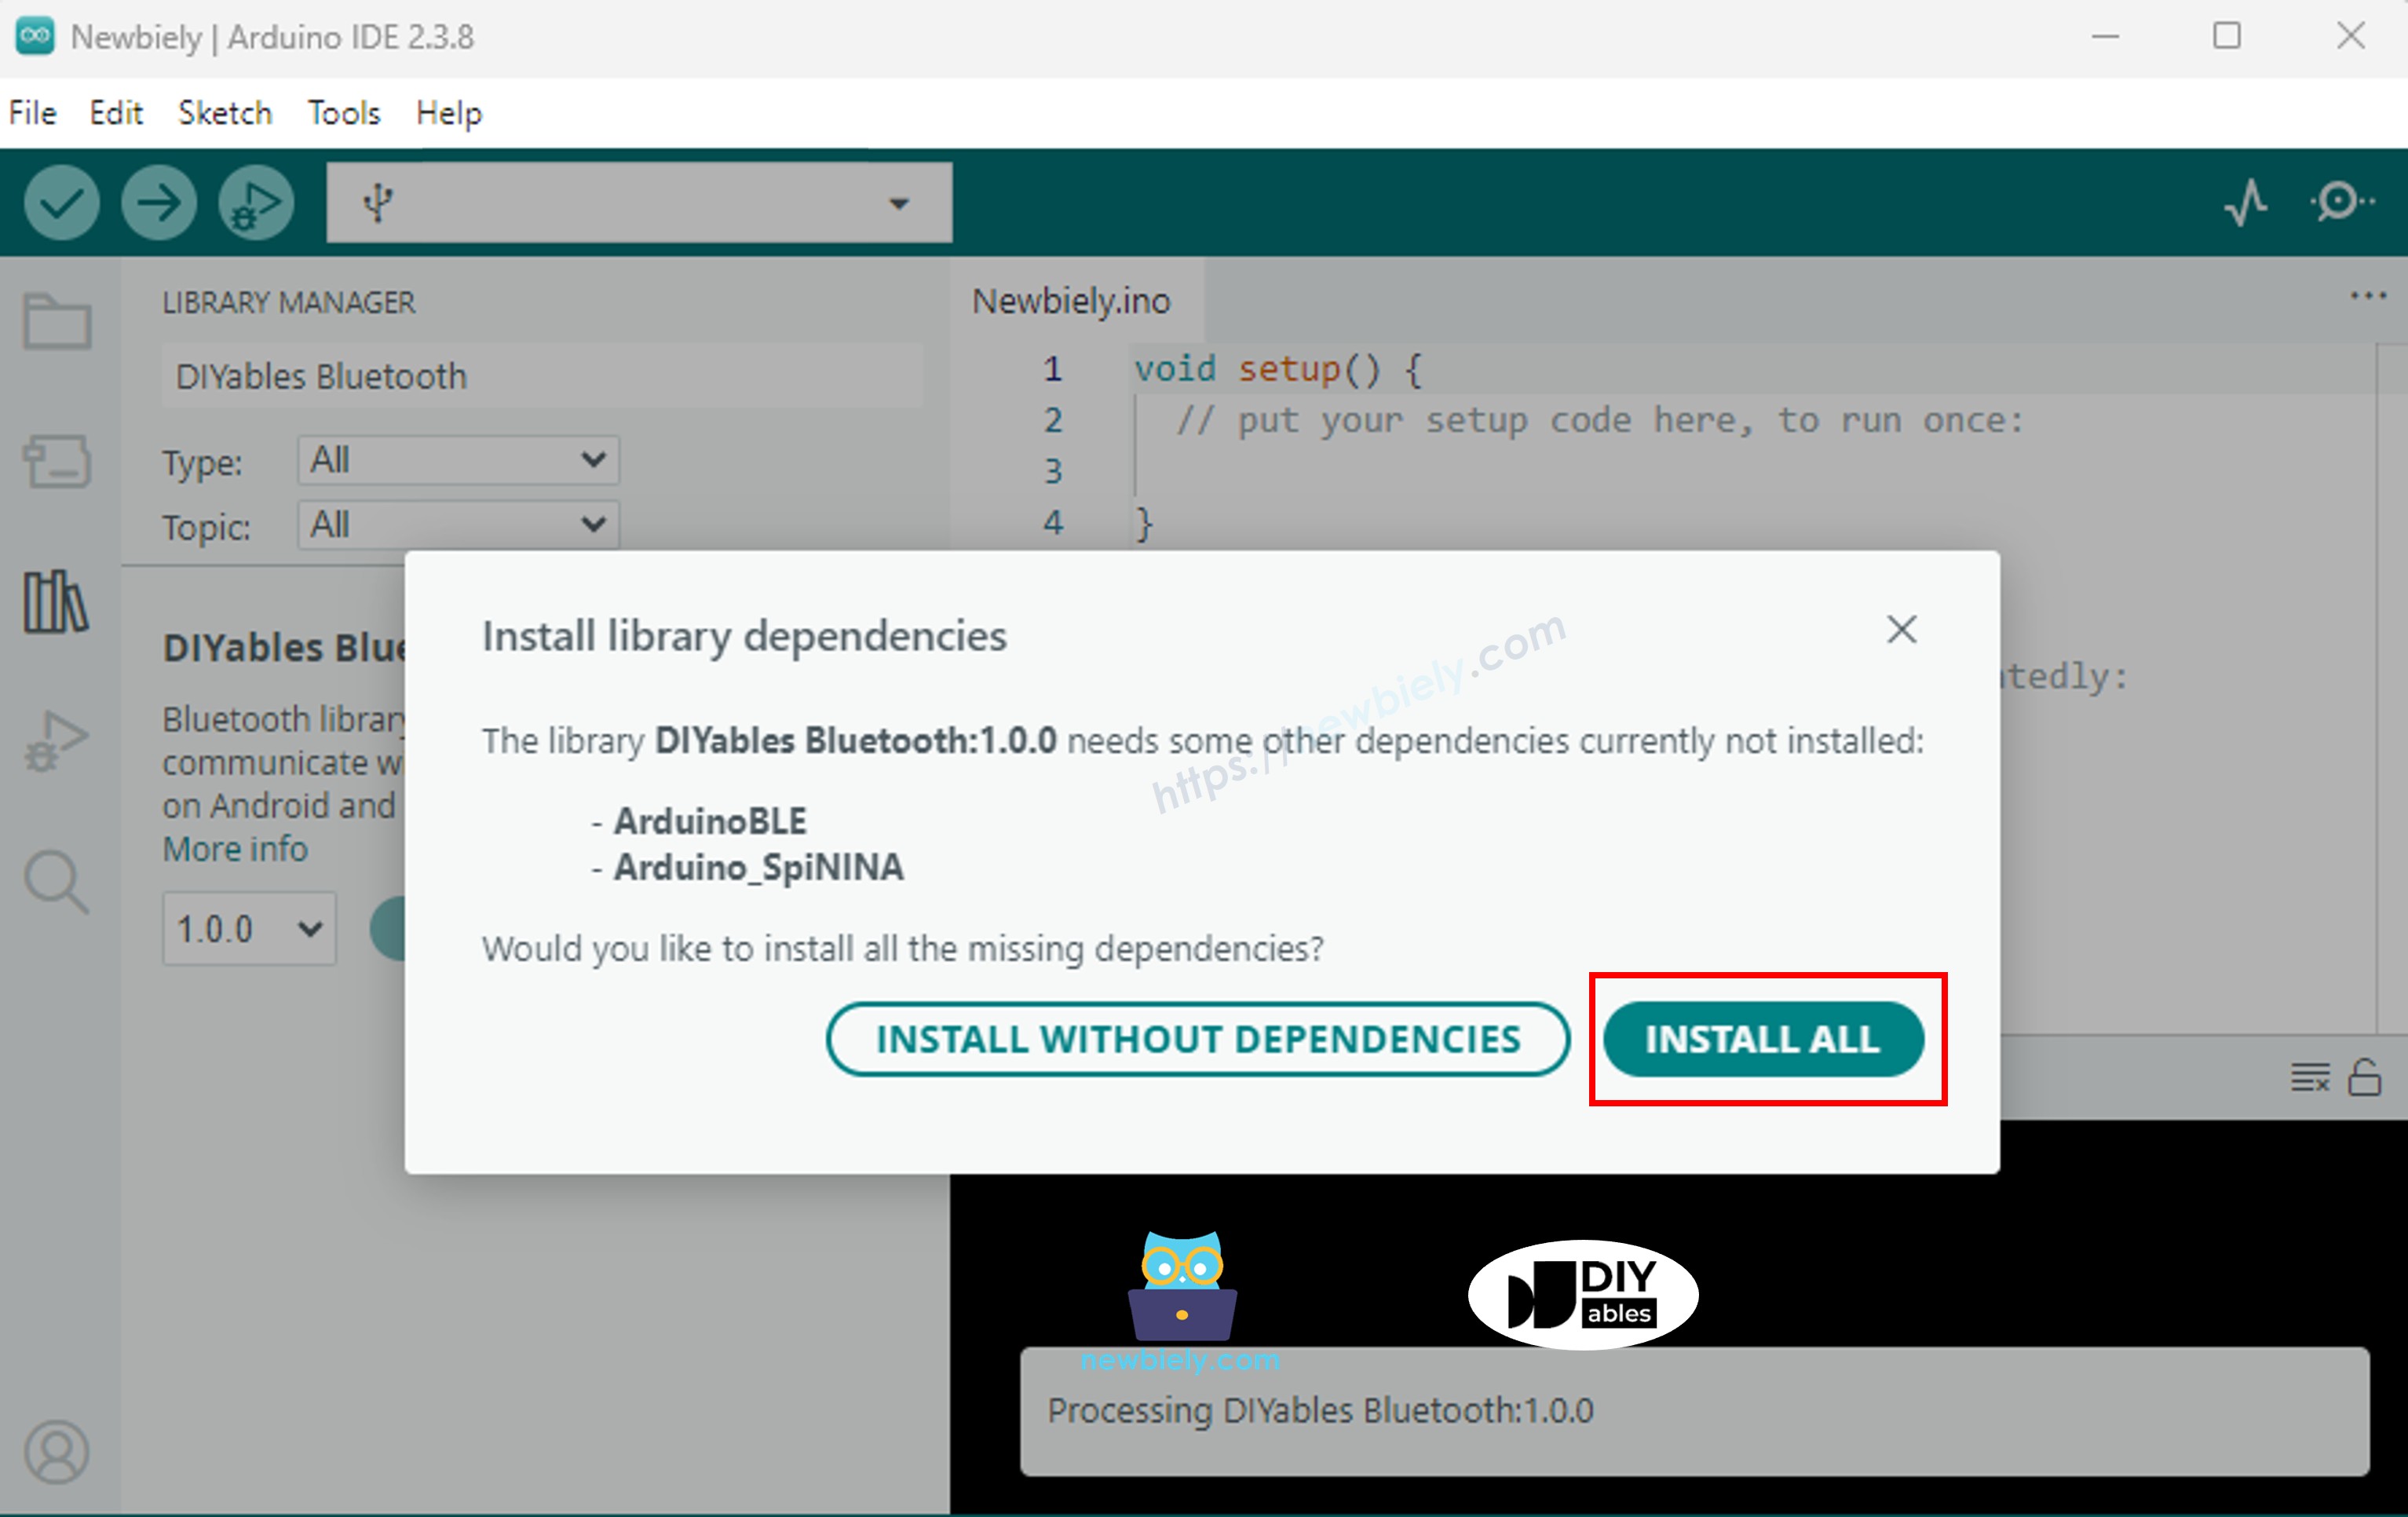
Il vous sera demandé d'installer d'autres dépendances de bibliothèques
Cliquez sur le bouton Tout installer pour installer toutes les dépendances des bibliothèques.
Code BLE
Dans l'IDE Arduino, allez dans Fichier Exemples DIYables Bluetooth ArduinoBLE_RTC exemple, ou copiez le code ci-dessus et collez-le dans l'éditeur de l'IDE Arduino
/* * DIYables Bluetooth Library - Bluetooth RTC Example * Works with DIYables Bluetooth STEM app on Android and iOS * * This example demonstrates the Bluetooth RTC (Real-Time Clock) feature: * - Real-time clock display for both Arduino and mobile app * - One-click time synchronization from mobile app to Arduino * - Hardware RTC integration for persistent timekeeping * - Visual time difference monitoring * * Compatible Boards: * - Arduino UNO R4 WiFi (with built-in RTC) * Note: This example requires a board with hardware RTC. * Other BLE boards can be used with an external RTC module (e.g., DS3231). * * Setup: * 1. Upload the sketch to your Arduino * 2. Open Serial Monitor to see connection status * 3. Use DIYables Bluetooth App to connect and sync time * * Tutorial: https://diyables.io/bluetooth-app * Author: DIYables */#include <DIYables_BluetoothServer.h>#include <DIYables_BluetoothRTC.h>#include <platforms/DIYables_ArduinoBLE.h>#include"RTC.h"// BLE Configurationconst char* DEVICE_NAME = "Arduino_RTC";const char* SERVICE_UUID = "19B10000-E8F2-537E-4F6C-D104768A1214";const char* TX_UUID = "19B10001-E8F2-537E-4F6C-D104768A1214";const char* RX_UUID = "19B10002-E8F2-537E-4F6C-D104768A1214";// Create Bluetooth instancesDIYables_ArduinoBLE bluetooth(DEVICE_NAME, SERVICE_UUID, TX_UUID, RX_UUID);DIYables_BluetoothServer bluetoothServer(bluetooth);// Create RTC app instanceDIYables_BluetoothRTC bluetoothRTC;voidsetup() {Serial.begin(9600);delay(1000);Serial.println("DIYables Bluetooth - RTC Example");// Initialize RTC RTC.begin();// Check if RTC is running and set initial time if needed RTCTime savedTime; RTC.getTime(savedTime);if (!RTC.isRunning() || savedTime.getYear() == 2000) {Serial.println("RTC is NOT running, setting initial time...");// Set a default time - you can modify this to match current time RTCTime startTime(28, Month::AUGUST, 2025, 12, 0, 0, DayOfWeek::THURSDAY, SaveLight::SAVING_TIME_ACTIVE); RTC.setTime(startTime);Serial.println("RTC initialized with default time"); } else {Serial.println("RTC is already running"); }// Print initial RTC time RTCTime initialTime; RTC.getTime(initialTime);Serial.print("Initial RTC Time: ");Serial.print(initialTime.getYear());Serial.print("/");Serial.print(Month2int(initialTime.getMonth()));Serial.print("/");Serial.print(initialTime.getDayOfMonth());Serial.print(" - ");if (initialTime.getHour() < 10) Serial.print("0");Serial.print(initialTime.getHour());Serial.print(":");if (initialTime.getMinutes() < 10) Serial.print("0");Serial.print(initialTime.getMinutes());Serial.print(":");if (initialTime.getSeconds() < 10) Serial.print("0");Serial.print(initialTime.getSeconds());Serial.println();// Initialize Bluetooth server with platform-specific implementation bluetoothServer.begin();// Add RTC app to server bluetoothServer.addApp(&bluetoothRTC);// Set up connection event callbacks bluetoothServer.setOnConnected([]() {Serial.println("Bluetooth connected!");// Send current time to app on connection sendCurrentTimeToApp(); }); bluetoothServer.setOnDisconnected([]() {Serial.println("Bluetooth disconnected!"); });// Set callback for time sync from mobile app (Unix timestamp) bluetoothRTC.onTimeSync(onTimeSyncReceived);// Set callback for local time sync from mobile app (date/time components) bluetoothRTC.onLocalTimeSync(onLocalTimeSyncReceived);// Set callback for time request from mobile app bluetoothRTC.onTimeRequest(onTimeRequested);Serial.println("Waiting for Bluetooth connection...");Serial.println("Connect via app to sync time");}voidloop() {// Handle Bluetooth server communications bluetoothServer.loop();// Send current time to mobile app and print to Serial every 1 secondstaticunsignedlong lastUpdate = 0;if (millis() - lastUpdate >= 1000) { lastUpdate = millis();// Get current RTC time RTCTime currentTime; RTC.getTime(currentTime);// Send time to mobile app in human readable format bluetoothRTC.sendTime(currentTime.getYear(), Month2int(currentTime.getMonth()), currentTime.getDayOfMonth(), currentTime.getHour(), currentTime.getMinutes(), currentTime.getSeconds());// Print time to Serial MonitorSerial.print("RTC Time: ");Serial.print(currentTime.getYear());Serial.print("/");Serial.print(Month2int(currentTime.getMonth()));Serial.print("/");Serial.print(currentTime.getDayOfMonth());Serial.print(" - ");if (currentTime.getHour() < 10) Serial.print("0");Serial.print(currentTime.getHour());Serial.print(":");if (currentTime.getMinutes() < 10) Serial.print("0");Serial.print(currentTime.getMinutes());Serial.print(":");if (currentTime.getSeconds() < 10) Serial.print("0");Serial.print(currentTime.getSeconds());Serial.println(); }delay(10);}// Callback function called when mobile app sends time sync commandvoid onTimeSyncReceived(unsignedlong unixTimestamp) {Serial.print("Time sync received (Unix): ");Serial.println(unixTimestamp);// Convert Unix timestamp to RTCTime RTCTime newTime; newTime.setUnixTime(unixTimestamp);// Set RTC time RTC.setTime(newTime);Serial.println("Arduino RTC synchronized from Unix timestamp!");}// Callback function called when mobile app sends local time sync with componentsvoid onLocalTimeSyncReceived(intyear, intmonth, intday, inthour, intminute, intsecond) {Serial.print("Local time sync received: ");Serial.print(year);Serial.print("/");Serial.print(month);Serial.print("/");Serial.print(day);Serial.print(" ");Serial.print(hour);Serial.print(":");Serial.print(minute);Serial.print(":");Serial.println(second);// Create RTCTime from components (local time)// Convert month integer to Month enum Month monthEnum;switch(month) {case 1: monthEnum = Month::JANUARY; break;case 2: monthEnum = Month::FEBRUARY; break;case 3: monthEnum = Month::MARCH; break;case 4: monthEnum = Month::APRIL; break;case 5: monthEnum = Month::MAY; break;case 6: monthEnum = Month::JUNE; break;case 7: monthEnum = Month::JULY; break;case 8: monthEnum = Month::AUGUST; break;case 9: monthEnum = Month::SEPTEMBER; break;case 10: monthEnum = Month::OCTOBER; break;case 11: monthEnum = Month::NOVEMBER; break;case 12: monthEnum = Month::DECEMBER; break;default: monthEnum = Month::JANUARY; break; } RTCTime newTime(day, monthEnum, year, hour, minute, second, DayOfWeek::MONDAY, SaveLight::SAVING_TIME_ACTIVE);// Set RTC time RTC.setTime(newTime);Serial.println("Arduino RTC synchronized from local time components!");}// Callback function called when mobile app requests current Arduino timevoid onTimeRequested() {Serial.println("Time requested by app"); sendCurrentTimeToApp();}// Helper function to send current time to mobile appvoid sendCurrentTimeToApp() {// Get current RTC time and send to app in human readable format RTCTime currentTime; RTC.getTime(currentTime); bluetoothRTC.sendTime(currentTime.getYear(), Month2int(currentTime.getMonth()), currentTime.getDayOfMonth(), currentTime.getHour(), currentTime.getMinutes(), currentTime.getSeconds());}
Cliquez sur le bouton Upload dans l'IDE Arduino pour téléverser le code sur l'Arduino UNO R4 WiFi
Ouvrez le Moniteur Série
Vérifiez le résultat dans le Moniteur Série. Voici à quoi il ressemble :
Newbiely | Arduino IDE 2.3.8
──
☐
✕
File
Edit
Sketch
Tools
Help
Arduino Uno R4 WiFi
Newbiely.ino
···
8Serial.println("Hello World!");
Output
Serial Monitor
Message (Enter to send message to 'Arduino Uno R4 WiFi' on 'COM15')
New Line
9600 baud
DIYables Bluetooth - RTC Example
Waiting for Bluetooth connection...
RTC not running or year is 2000, waiting for time sync...
Ln 11, Col 1
Arduino Uno R4 WiFi on COM15
2
Application mobile
Installez l'application Bluetooth DIYables sur votre smartphone : Android | iOS
Note : L'application Bluetooth DIYables prend en charge à la fois BLE et Bluetooth classique sur Android, et BLE sur iOS. Comme l'Arduino UNO R4 WiFi utilise BLE, l'application fonctionne sur à la fois Android et iOS. Aucun appairage manuel n'est nécessaire pour BLE — il suffit de scanner et de se connecter.
Ouvrez l'application Bluetooth DIYables
Lors de la première ouverture de l'application, elle vous demandera les autorisations. Veuillez accorder les autorisations suivantes :
Autorisation des appareils à proximité (Android 12+) / Autorisation Bluetooth (iOS) - nécessaire pour scanner et se connecter à des appareils Bluetooth
Autorisation de localisation (Android 11 et versions antérieures uniquement) - requise par les anciennes versions d'Android pour scanner les appareils BLE
Assurez-vous que le Bluetooth est activé sur votre téléphone
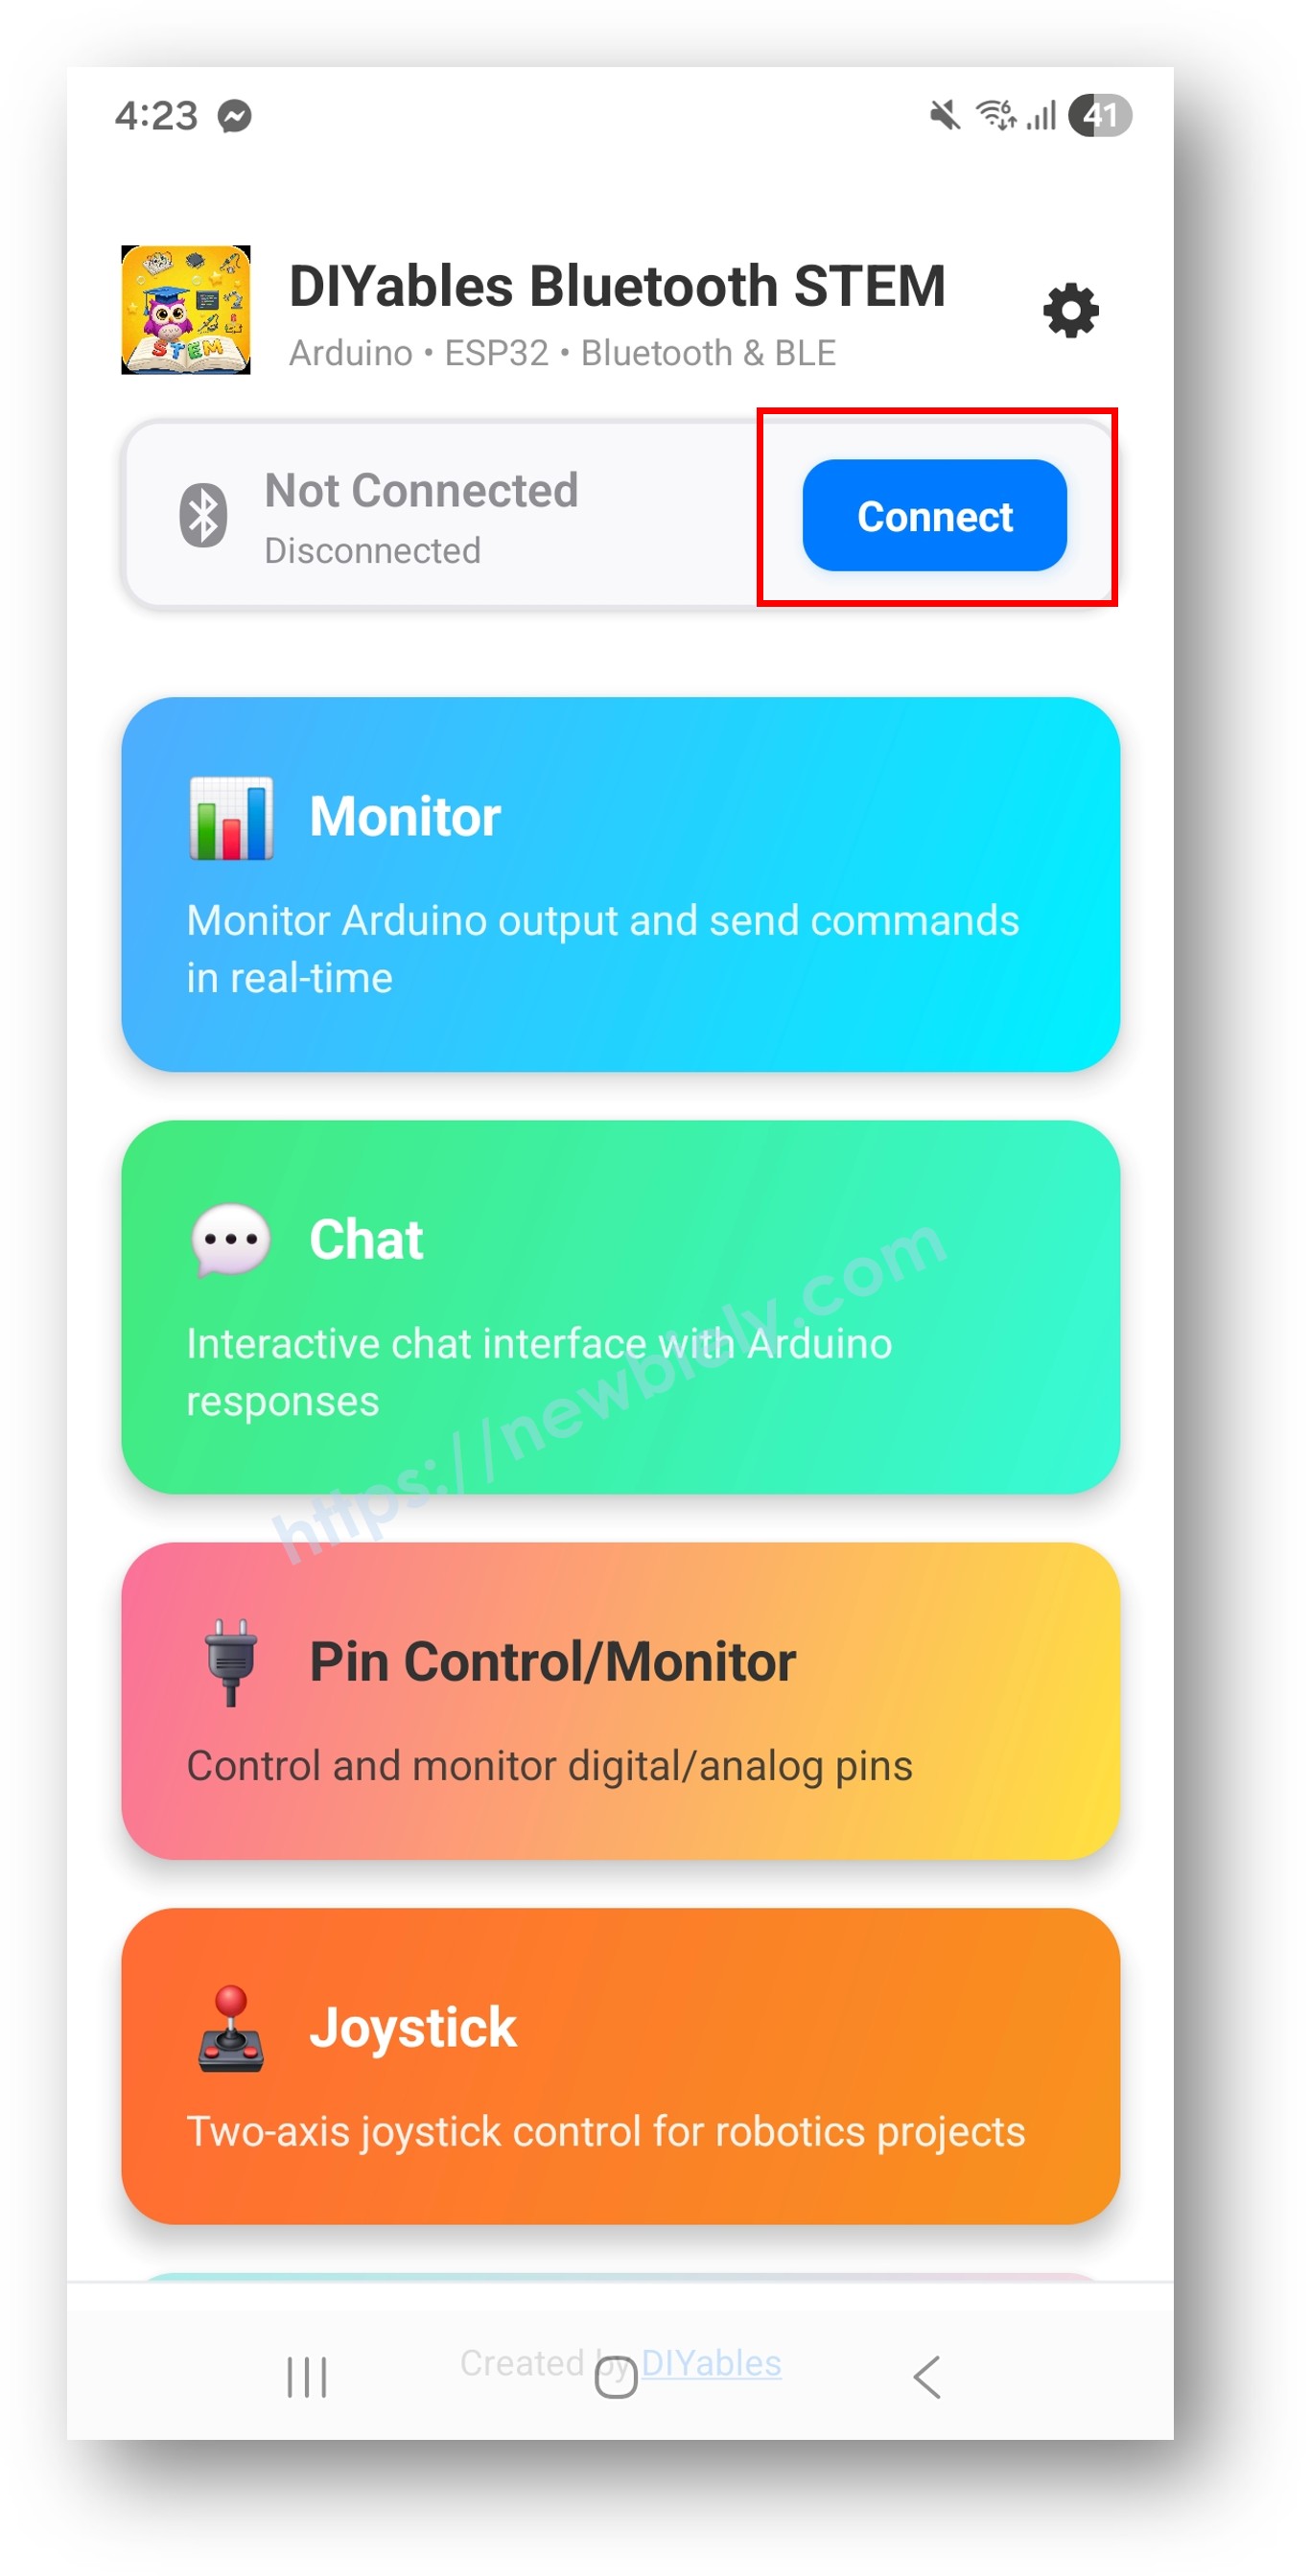
À l'écran d'accueil, appuyez sur le bouton Connect. L'application va scanner les appareils BLE.
Trouvez et appuyez sur "Arduino_RTC" dans les résultats du balayage pour vous connecter.
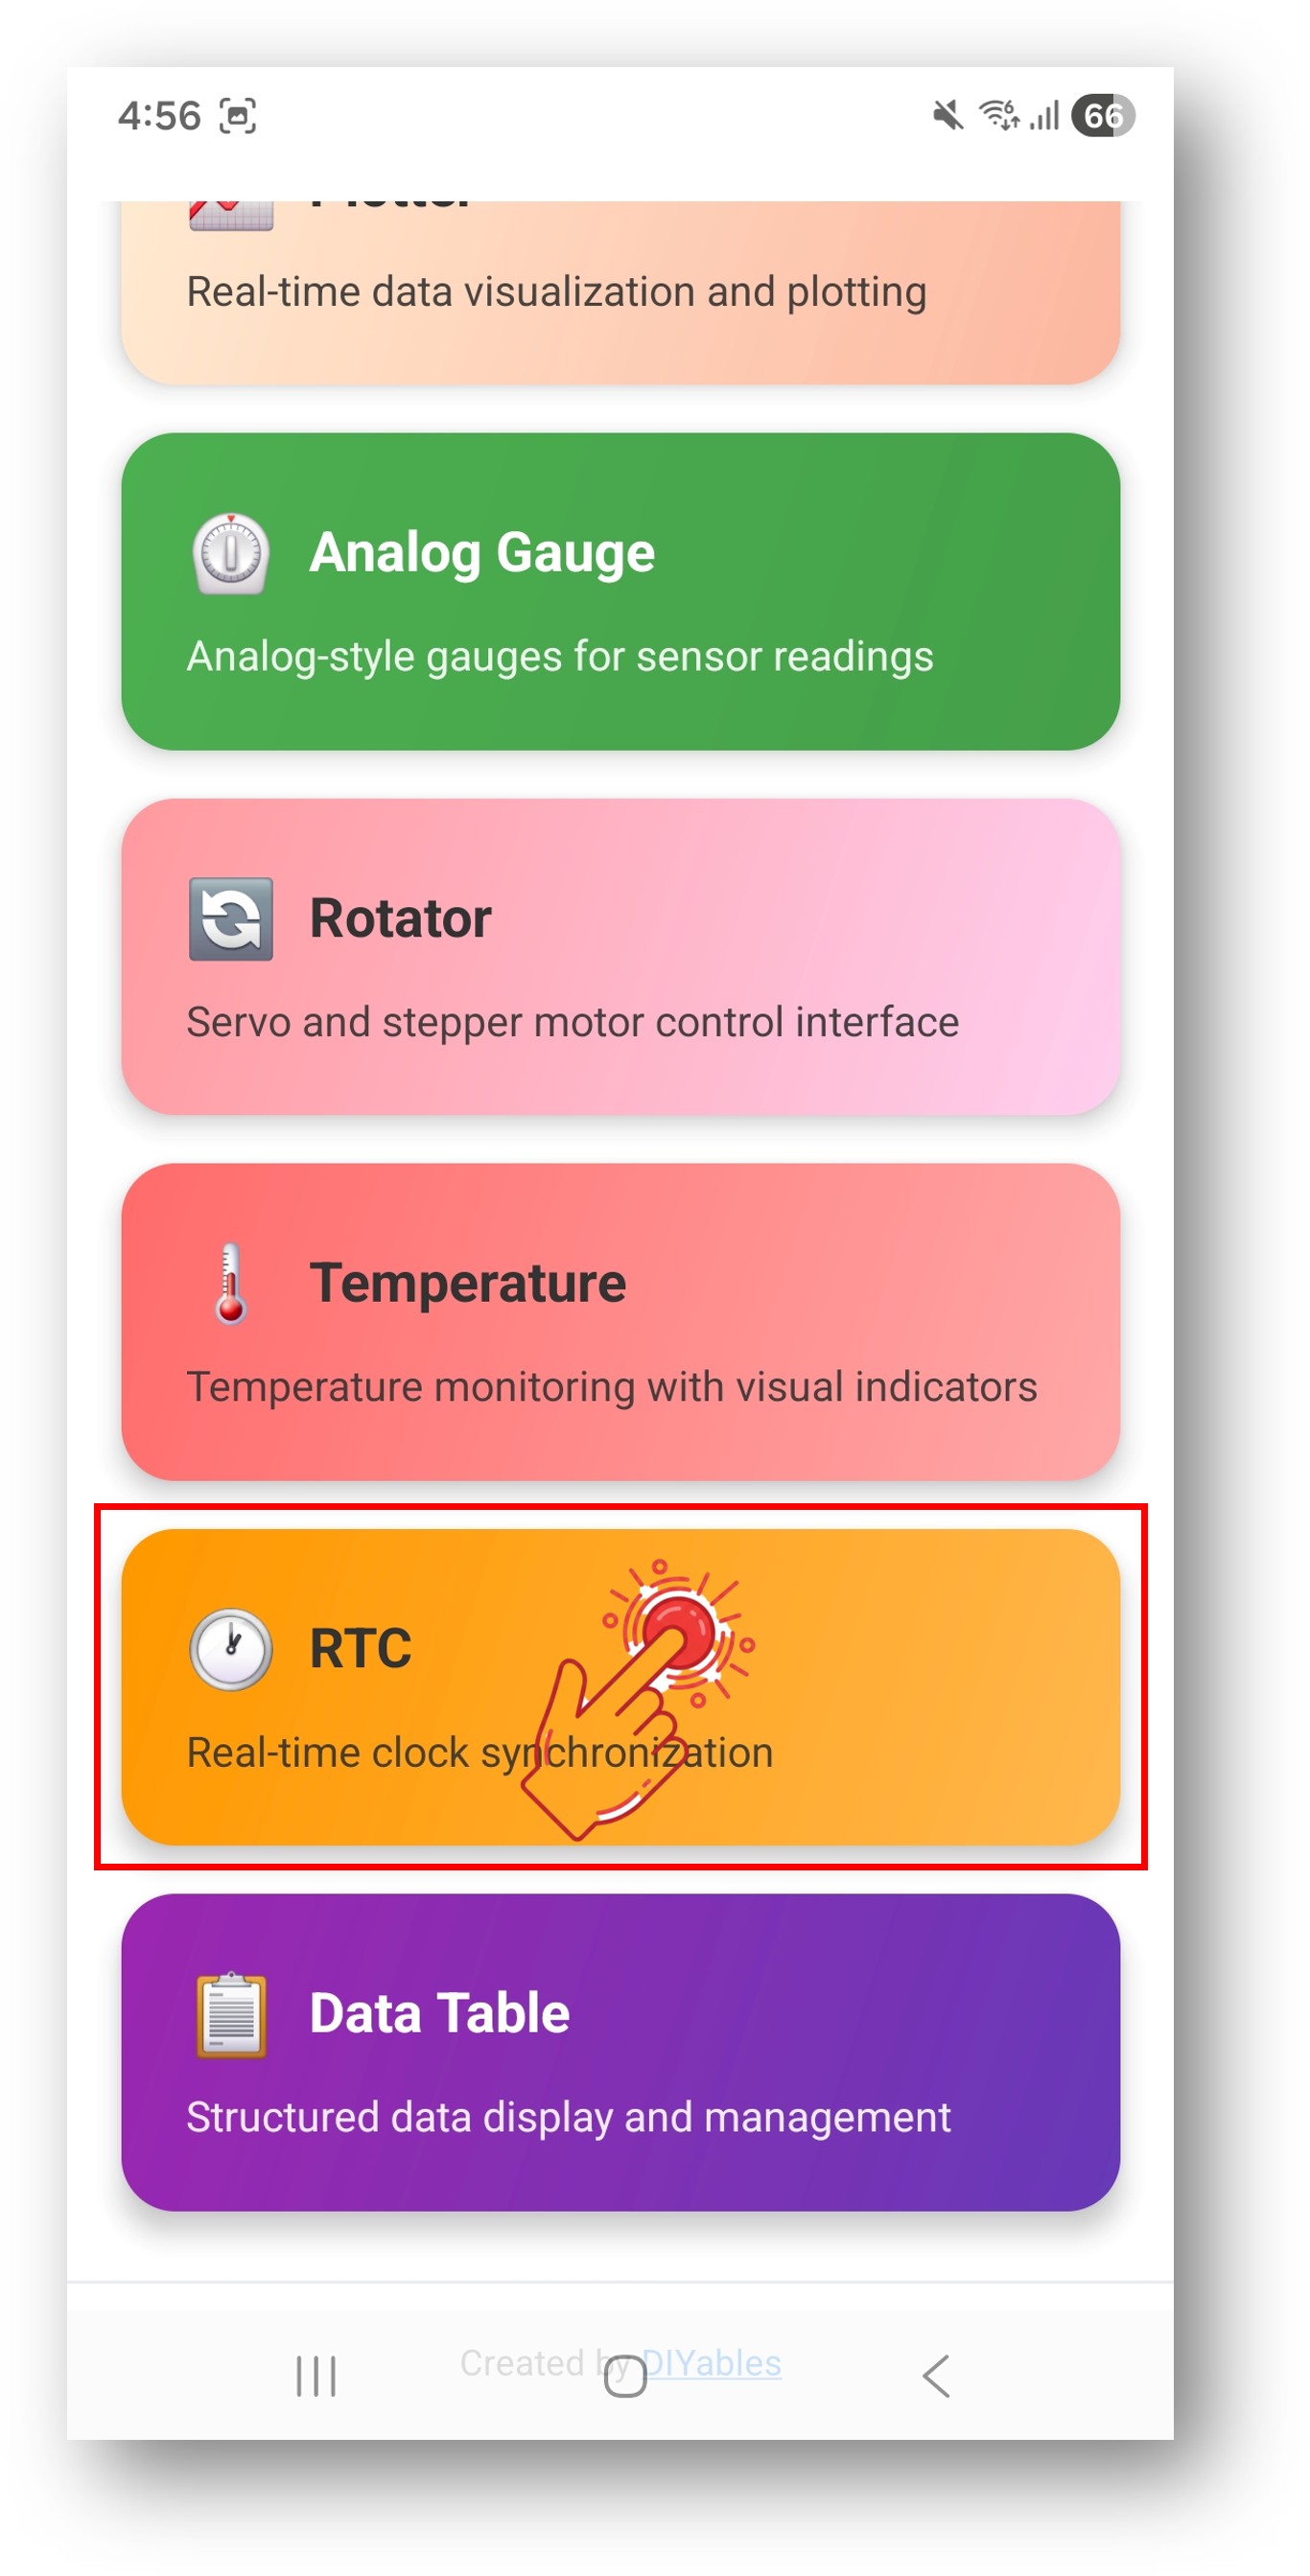
Une fois connecté, l'application revient automatiquement à l'écran d'accueil. Sélectionnez l'application RTC dans le menu des applications.
Note : Vous pouvez appuyer sur l’icône des paramètres de l’écran d’accueil pour masquer/afficher les applications sur l’écran d’accueil. Pour plus de détails, consultez le Manuel d’utilisation de l’application Bluetooth DIYables.
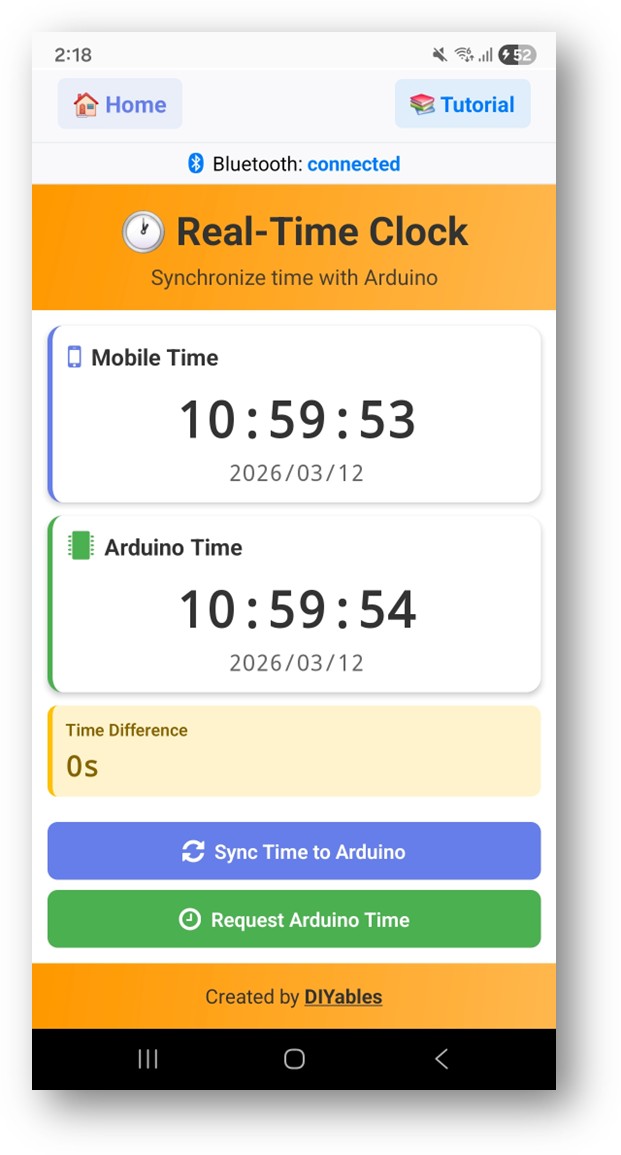
L'application affichera l'heure actuelle à partir du RTC de l'Arduino
Utilisez le bouton Sync pour synchroniser l'heure du téléphone avec l'Arduino
L'heure se met à jour chaque seconde
Revenez maintenant au moniteur série dans l'IDE Arduino. Vous verrez :
Newbiely | Arduino IDE 2.3.8
──
☐
✕
File
Edit
Sketch
Tools
Help
Arduino Uno R4 WiFi
Newbiely.ino
···
8Serial.println("Hello World!");
Output
Serial Monitor
Message (Enter to send message to 'Arduino Uno R4 WiFi' on 'COM15')
New Line
9600 baud
Bluetooth connected!
Time sync received (unix): 1719849600
RTC set to: 2025/07/01 12:00:00
Current time: 2025/07/01 12:00:01
Current time: 2025/07/01 12:00:02
Ln 11, Col 1
Arduino Uno R4 WiFi on COM15
2
Personnalisation créative - Adaptez le code à votre projet
Méthodes de synchronisation de l'heure
L'application peut synchroniser l'heure avec l'Arduino en utilisant deux méthodes :
// Method 1: Unix timestamp syncbluetoothRTC.onTimeSync([](unsignedlong unixTime) {// Convert Unix timestamp and set RTCSerial.print("Unix time: ");Serial.println(unixTime);});// Method 2: Local time components syncbluetoothRTC.onLocalTimeSync([](intyear, intmonth, intday, inthour, intminute, intsecond) {// Set RTC directly with componentsSerial.print("Local time: ");Serial.print(year);Serial.print("/");Serial.print(month);Serial.print("/");Serial.println(day);});
Envoyer l'heure à l'application
// Send current time to the appbluetoothRTC.sendTime(year, month, day, hour, minute, second);
Gestion des demandes de temps
bluetoothRTC.onTimeRequest([]() {// App is requesting the current time// Read RTC and send time back RTCTime currentTime; RTC.getTime(currentTime); bluetoothRTC.sendTime( currentTime.getYear(), Month2int(currentTime.getMonth()), currentTime.getDayOfMonth(), currentTime.getHour(), currentTime.getMinutes(), currentTime.getSeconds() );});
Utilisation du RTC intégré
Le RTC intégré de l'Arduino UNO R4 WiFi est accessible via la bibliothèque RTC.h :
#include"RTC.h"voidsetup() { RTC.begin(); // Initialize the hardware RTC}// Set time on the RTCRTCTime timeToSet;timeToSet.setYear(2025);timeToSet.setMonth(Month::JULY);timeToSet.setDayOfMonth(1);timeToSet.setHour(12);timeToSet.setMinute(0);timeToSet.setSecond(0);RTC.setTime(timeToSet);// Read time from the RTCRTCTime currentTime;RTC.getTime(currentTime);intyear = currentTime.getYear();intmonth = Month2int(currentTime.getMonth());intday = currentTime.getDayOfMonth();inthour = currentTime.getHour();intminute = currentTime.getMinutes();intsecond = currentTime.getSeconds();
La démo vidéo ci-dessous utilise le code ci-dessous :
/* * Ce code Arduino UNO R4 a été développé par newbiely.fr * Ce code Arduino UNO R4 est mis à disposition du public sans aucune restriction. * Pour des instructions complètes et des schémas de câblage, veuillez visiter: * https://newbiely.fr/tutorials/arduino-uno-r4/arduino-uno-r4-diyables-bluetooth-app-rtc*//* * DIYables Bluetooth Library - Bluetooth RTC Example * Works with DIYables Bluetooth STEM app on Android and iOS * * This example demonstrates the Bluetooth RTC (Real-Time Clock) feature: * - Real-time clock display for both Arduino and mobile app * - One-click time synchronization from mobile app to Arduino * - Hardware RTC integration for persistent timekeeping * - Visual time difference monitoring * * Compatible Boards: * - Arduino UNO R4 WiFi (with built-in RTC) * Note: This example requires a board with hardware RTC. * Other BLE boards can be used with an external RTC module (e.g., DS3231). * * Setup: * 1. Upload the sketch to your Arduino * 2. Open Serial Monitor to see connection status * 3. Use DIYables Bluetooth App to connect and sync time * * Tutorial: https://diyables.io/bluetooth-app * Author: DIYables */#include <DIYables_BluetoothServer.h>#include <DIYables_BluetoothRTC.h>#include <platforms/DIYables_ArduinoBLE.h>#include"RTC.h"#include <MD_Parola.h>#include <MD_MAX72xx.h>// BLE Configurationconst char* DEVICE_NAME = "Arduino_RTC";const char* SERVICE_UUID = "19B10000-E8F2-537E-4F6C-D104768A1214";const char* TX_UUID = "19B10001-E8F2-537E-4F6C-D104768A1214";const char* RX_UUID = "19B10002-E8F2-537E-4F6C-D104768A1214";// Create Bluetooth instancesDIYables_ArduinoBLE bluetooth(DEVICE_NAME, SERVICE_UUID, TX_UUID, RX_UUID);DIYables_BluetoothServer bluetoothServer(bluetooth);// Create RTC app instanceDIYables_BluetoothRTC bluetoothRTC;// --- DISPLAY SUBSYSTEM CONFIGURATION ---#define HARDWARE_TYPE MD_MAX72XX::FC16_HW// Hardware register layout variant for physical modules#define MAX_DEVICES 4 // Number of cascaded 8x8 matrix blocks#define CS_PIN 9 // SPI Chip Select active-low hardware pinMD_Parola ledMatrix = MD_Parola(HARDWARE_TYPE, CS_PIN, MAX_DEVICES);// --- ALARM SUBSYSTEM ARCHITECTURE ---constint BUZZER_PIN = 8;bool isAlarming = false; // State flag to prevent redundant re-initialization of display buffersstruct AlarmTime {inthour;intminute;};// Scheduled alarm matrices for daily medication dispatchconstint TOTAL_ALARMS = 3;AlarmTime medicationAlarms[TOTAL_ALARMS] = { {12, 53}, // Slot 1: Morning Dose {12, 54}, // Slot 2: Noon Dose {12, 55} // Slot 3: Evening Dose};// Fixed-size static allocation to prevent dangling pointers during stack deallocationchar AlertMsg[50] = ""; voidsetup() {Serial.begin(9600);delay(1000);// Configure GPIO peripheralspinMode(BUZZER_PIN, OUTPUT);digitalWrite(BUZZER_PIN, LOW);// Initialize SPI-driven LED Matrix ledMatrix.begin(); ledMatrix.setIntensity(3); // Brightness optimization register value to prevent camera sensor overexposure ledMatrix.displayClear();// Set initial boot token into display queue ledMatrix.displayText("Medicine Reminder System READY", PA_LEFT, 60, 2000, PA_SCROLL_LEFT, PA_SCROLL_LEFT);Serial.println("DIYables Bluetooth - RTC Example");// Initialize RTC RTC.begin();// Check if RTC is running and set initial time if needed RTCTime savedTime; RTC.getTime(savedTime);if (!RTC.isRunning() || savedTime.getYear() == 2000) {Serial.println("RTC is NOT running, setting initial time...");// Set a default time - you can modify this to match current time RTCTime startTime(25, Month::MAY, 2026, 8, 13, 0, DayOfWeek::THURSDAY, SaveLight::SAVING_TIME_ACTIVE); RTC.setTime(startTime);Serial.println("RTC initialized with default time"); } else {Serial.println("RTC is already running"); }// Print initial RTC time RTCTime initialTime; RTC.getTime(initialTime);Serial.print("Initial RTC Time: ");Serial.print(initialTime.getYear());Serial.print("/");Serial.print(Month2int(initialTime.getMonth()));Serial.print("/");Serial.print(initialTime.getDayOfMonth());Serial.print(" - ");if (initialTime.getHour() < 10) Serial.print("0");Serial.print(initialTime.getHour());Serial.print(":");if (initialTime.getMinutes() < 10) Serial.print("0");Serial.print(initialTime.getMinutes());Serial.print(":");if (initialTime.getSeconds() < 10) Serial.print("0");Serial.print(initialTime.getSeconds());Serial.println();// Initialize Bluetooth server with platform-specific implementation bluetoothServer.begin();// Add RTC app to server bluetoothServer.addApp(&bluetoothRTC);// Set up connection event callbacks bluetoothServer.setOnConnected([]() {Serial.println("Bluetooth connected!");// Send current time to app on connection sendCurrentTimeToApp(); }); bluetoothServer.setOnDisconnected([]() {Serial.println("Bluetooth disconnected!"); });// Set callback for time sync from mobile app (Unix timestamp) bluetoothRTC.onTimeSync(onTimeSyncReceived);// Set callback for local time sync from mobile app (date/time components) bluetoothRTC.onLocalTimeSync(onLocalTimeSyncReceived);// Set callback for time request from mobile app bluetoothRTC.onTimeRequest(onTimeRequested);Serial.println("Waiting for Bluetooth connection...");Serial.println("Connect via app to sync time");}voidloop() {// Handle Bluetooth server communications bluetoothServer.loop();// Non-blocking shift engine: Calculates next step pixel translations on every passif (ledMatrix.displayAnimate()) { ledMatrix.displayReset(); }// Send current time to mobile app and print to Serial every 1 secondstaticunsignedlong lastUpdate = 0;if (millis() - lastUpdate >= 1000) { lastUpdate = millis();// Get current RTC time RTCTime currentTime; RTC.getTime(currentTime);int currentH = currentTime.getHour();int currentM = currentTime.getMinutes();int currentS = currentTime.getSeconds();// Send time to mobile app in human readable format bluetoothRTC.sendTime(currentTime.getYear(), Month2int(currentTime.getMonth()), currentTime.getDayOfMonth(), currentTime.getHour(), currentTime.getMinutes(), currentTime.getSeconds());// Print time to Serial MonitorSerial.print("RTC Time: ");Serial.print(currentTime.getYear());Serial.print("/");Serial.print(Month2int(currentTime.getMonth()));Serial.print("/");Serial.print(currentTime.getDayOfMonth());Serial.print(" - ");if (currentTime.getHour() < 10) Serial.print("0");Serial.print(currentTime.getHour());Serial.print(":");if (currentTime.getMinutes() < 10) Serial.print("0");Serial.print(currentTime.getMinutes());Serial.print(":");if (currentTime.getSeconds() < 10) Serial.print("0");Serial.print(currentTime.getSeconds());Serial.println();// Sequential search scan across active alarm vectorsfor (int i = 0; i < TOTAL_ALARMS; i++) {if (currentH == medicationAlarms[i].hour && currentM == medicationAlarms[i].minute && currentS == 0) {// Conditional gate to prevent continuous buffer overwrites within the same secondif (!isAlarming) { isAlarming = true;// Low-level buffer formatting to map runtime integers into locked memory space// %02d pads leading zeros to preserve fixed structural layout formatting [HH:MM] sprintf(AlertMsg, "TAKE MEDICATION ! [%02d:%02d] ", currentH, currentM); ledMatrix.displayClear(); // Link the safe static memory pointer directly into the display rendering core ledMatrix.displayText(AlertMsg, PA_LEFT, 60, 0, PA_SCROLL_LEFT, PA_SCROLL_LEFT);Serial.print("[ALARM] Array index match detected at slot ID: ");Serial.println(i + 1); } } }// Auto-timeout block: Clears state metrics after 30 elapsed duty secondsif (currentS >= 20 && isAlarming) { isAlarming = false; ledMatrix.displayClear(); ledMatrix.displayText("Medicine Reminder System With APP RTC", PA_LEFT, 60, 0, PA_SCROLL_LEFT, PA_SCROLL_LEFT);Serial.println("[ALARM] Trigger window expired. Display registers reset to default state."); } }// Asynchronous Active Buzzer Duty Cycle Control (50% duty cycle, 1Hz rate square-wave generator)if (isAlarming) {staticunsignedlong lastBuzzerToggle = 0;if (millis() - lastBuzzerToggle >= 500) { lastBuzzerToggle = millis();digitalWrite(BUZZER_PIN, !digitalRead(BUZZER_PIN)); // Invert state logic } } else {digitalWrite(BUZZER_PIN, LOW); // Enforce noise suppression when system state is idle }delay(10);}// Callback function called when mobile app sends time sync commandvoid onTimeSyncReceived(unsignedlong unixTimestamp) {Serial.print("Time sync received (Unix): ");Serial.println(unixTimestamp);// Convert Unix timestamp to RTCTime RTCTime newTime; newTime.setUnixTime(unixTimestamp);// Set RTC time RTC.setTime(newTime);Serial.println("Arduino RTC synchronized from Unix timestamp!");}// Callback function called when mobile app sends local time sync with componentsvoid onLocalTimeSyncReceived(intyear, intmonth, intday, inthour, intminute, intsecond) {Serial.print("Local time sync received: ");Serial.print(year);Serial.print("/");Serial.print(month);Serial.print("/");Serial.print(day);Serial.print(" ");Serial.print(hour);Serial.print(":");Serial.print(minute);Serial.print(":");Serial.println(second);// Create RTCTime from components (local time)// Convert month integer to Month enum Month monthEnum;switch(month) {case 1: monthEnum = Month::JANUARY; break;case 2: monthEnum = Month::FEBRUARY; break;case 3: monthEnum = Month::MARCH; break;case 4: monthEnum = Month::APRIL; break;case 5: monthEnum = Month::MAY; break;case 6: monthEnum = Month::JUNE; break;case 7: monthEnum = Month::JULY; break;case 8: monthEnum = Month::AUGUST; break;case 9: monthEnum = Month::SEPTEMBER; break;case 10: monthEnum = Month::OCTOBER; break;case 11: monthEnum = Month::NOVEMBER; break;case 12: monthEnum = Month::DECEMBER; break;default: monthEnum = Month::JANUARY; break; } RTCTime newTime(day, monthEnum, year, hour, minute, second, DayOfWeek::MONDAY, SaveLight::SAVING_TIME_ACTIVE);// Set RTC time RTC.setTime(newTime);Serial.println("Arduino RTC synchronized from local time components!");}// Callback function called when mobile app requests current Arduino timevoid onTimeRequested() {Serial.println("Time requested by app"); sendCurrentTimeToApp();}// Helper function to send current time to mobile appvoid sendCurrentTimeToApp() {// Get current RTC time and send to app in human readable format RTCTime currentTime; RTC.getTime(currentTime); bluetoothRTC.sendTime(currentTime.getYear(), Month2int(currentTime.getMonth()), currentTime.getDayOfMonth(), currentTime.getHour(), currentTime.getMinutes(), currentTime.getSeconds());}
Dépannage
Problèmes courants
Impossible de trouver l'appareil dans l'application
Assurez-vous que l'Arduino UNO R4 WiFi est alimenté et que le sketch est téléversé
Assurez-vous que le Bluetooth de votre téléphone est activé
Sur Android 11 et les versions antérieures, activez également les services de localisation
2. L'heure affichée est 2000/01/01 ou incorrecte
La RTC doit être synchronisée au moins une fois après la mise sous tension.
Utilisez le bouton de synchronisation dans l'application pour régler l'heure.
La RTC perd du temps lorsque la carte est mise hors tension (pas de batterie de secours).
3. L'heure ne se synchronise pas depuis l'application
Vérifiez que les callbacks onTimeSync et onLocalTimeSync sont configurés
Vérifiez le moniteur série pour les messages de synchronisation
Assurez-vous que la connexion BLE est stable
L'horloge en temps réel dérive au fil du temps.
Le cristal RTC intégré présente une précision limitée.
Résynchroniser périodiquement via l'application.
Pour les horodatages critiques, envisagez également d'utiliser NTP via le Wi‑Fi.
Problèmes de conversion des mois
L'Arduino UNO R4 WiFi RTC utilise une énumération Month, et non un entier
Utilisez une fonction de conversion (comme Month2int() dans l'exemple) pour les mois sous forme d'entiers
Les mois sont indexés à partir de 1 (janvier = 1)
Échec du téléversement ou carte non reconnue
Installer le dernier paquet de cartes Arduino UNO R4 via le Gestionnaire de cartes
Essayez un autre câble USB ou un autre port
Idées de projets
Horloge numérique avec synchronisation de l'heure BLE
Enregistreur de données avec des horodatages précis
Automatisation des tâches planifiées (allumer et éteindre à des heures spécifiques)
Réveil avec contrôle par smartphone
Enregistreur d'événements horodatés
Prochaines étapes
Après avoir maîtrisé l'exemple Bluetooth RTC, essayez :
Moniteur Bluetooth - Pour l'affichage de l'état en texte avec des horodatages
Tableau Bluetooth - Pour des données structurées avec des champs temporels
Chat Bluetooth - Pour une communication bidirectionnelle
Plusieurs Applications Bluetooth - En combinant RTC avec d'autres applications
N'hésitez pas à partager le lien de ce tutoriel. Cependant, veuillez ne pas utiliser notre contenu sur d'autres sites web. Nous avons investi beaucoup d'efforts et de temps pour créer ce contenu, veuillez respecter notre travail !