Arduino UNO R4 - LED - Clignoter sans délai

Imaginez que l'Arduino UNO R4 doit effectuer deux tâches : faire clignoter une LED et détecter quand un bouton est pressé. Si nous utilisons la fonction delay(), l'Arduino UNO R4 pourrait manquer certains appuis sur le bouton. Dans ce tutoriel, nous apprendrons comment faire clignoter une LED sur l'Arduino UNO R4 et surveiller un bouton pour s'assurer qu'il détecte chaque appui.

Nous examinerons trois exemples ci-dessous et comparerons leurs différences.

Arduino UNO R4 LED clignotante

※ Note:

  • Cette méthode fait bien plus que faire clignoter la LED et vérifier l'état du bouton. Elle permet à l'Arduino UNO R4 d'exécuter plusieurs tâches simultanément sans interruption.
  • Ce tutoriel fournit des informations détaillées pour vous aider à comprendre son fonctionnement. Pour simplifier, vous pouvez utiliser Arduino UNO R4 - LED library.

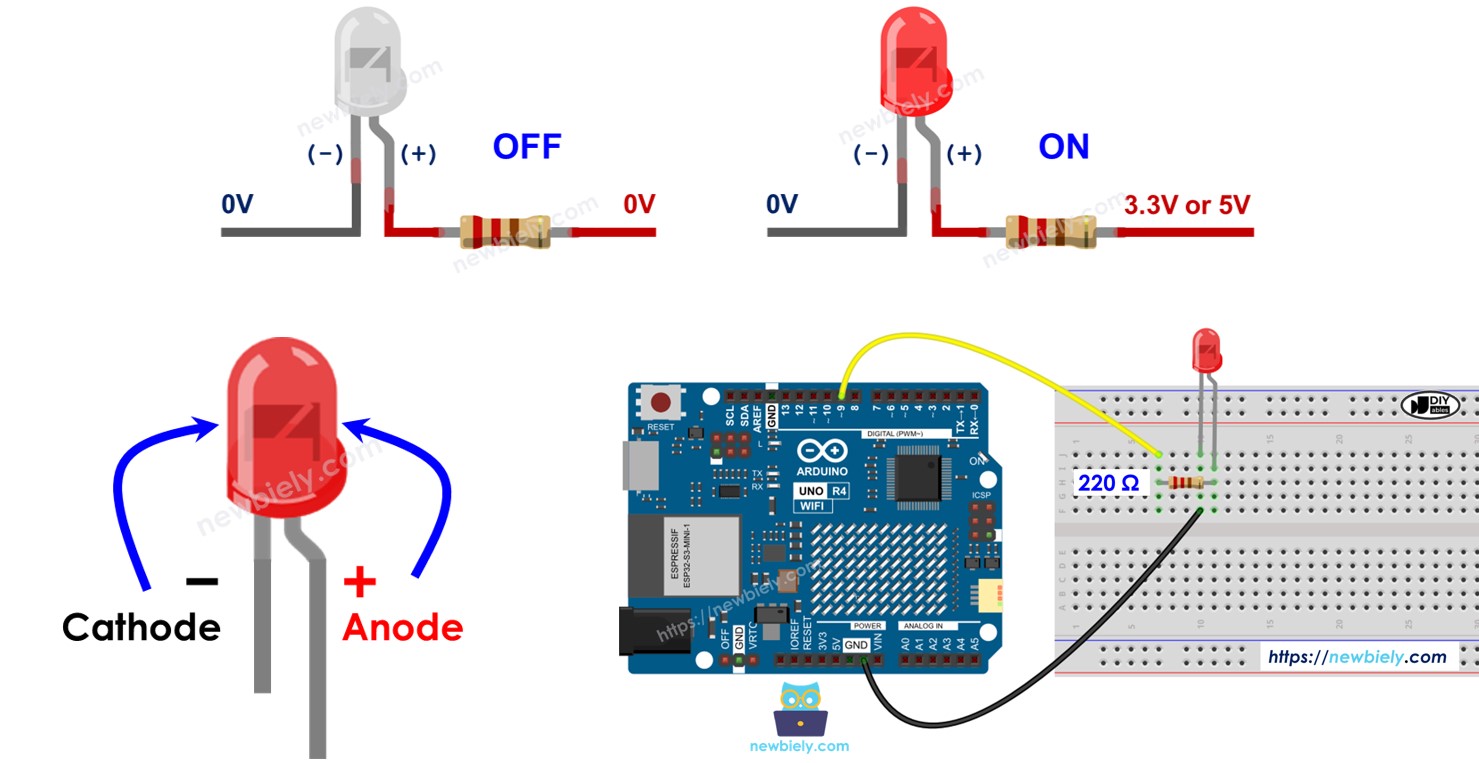
À propos de la LED et du bouton

Découvrez les LED et les boutons (emplacement des broches, comment ils fonctionnent, comment les programmer, etc.) dans ces tutoriels :

Diagramme de câblage

Schéma de câblage LED pour Arduino UNO R4

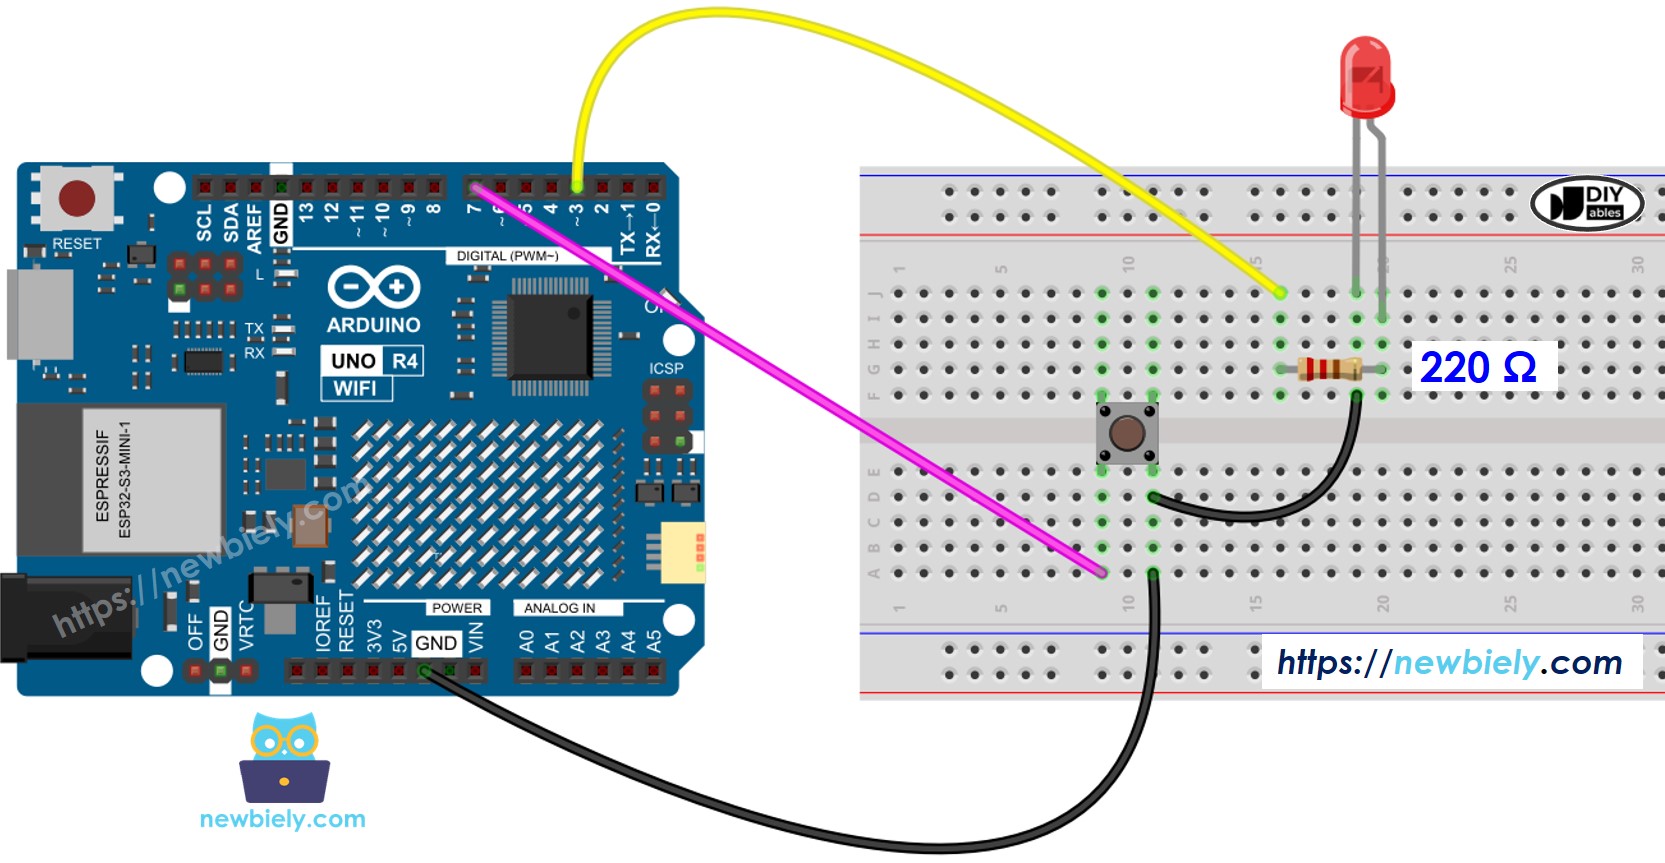
Cette image a été créée avec Fritzing. Cliquez pour agrandir l'image.

Voir Comment alimenter l'Arduino UNO R4..

Code Arduino UNO R4 - Avec délai

/* * Ce code Arduino UNO R4 a été développé par newbiely.fr * Ce code Arduino UNO R4 est mis à disposition du public sans aucune restriction. * Pour des instructions complètes et des schémas de câblage, veuillez visiter: * https://newbiely.fr/tutorials/arduino-uno-r4/arduino-uno-r4-blink-led-without-delay */ #define LED_PIN 3 // The Arduino UNO R4 pin connected to the LED #define BUTTON_PIN 7 // The Arduino UNO R4 pin connected to the button #define BLINK_INTERVAL 1000 // interval at which to blink LED (milliseconds) int led_state = LOW; // led_state used to set the LED int prev_button_state = LOW; // will store last time button was updated void setup() { Serial.begin(9600); // set the digital pin as output pinMode(LED_PIN, OUTPUT); // set the digital pin as an input pinMode(BUTTON_PIN, INPUT_PULLUP); } void loop() { // if the LED is off turn it on and vice-versa led_state = (led_state == LOW) ? HIGH : LOW; // set the LED with the led_state of the variable digitalWrite(LED_PIN, led_state); delay(BLINK_INTERVAL); // If button is pressed during this time, Arduino CANNOT detect int button_state = digitalRead(BUTTON_PIN); if (button_state != prev_button_state) { // print out the state of the button: Serial.println(button_state); // save the last state of button prev_button_state = button_state; } // DO OTHER WORKS HERE }

Étapes rapides

Suivez ces instructions étape par étape :

  • Si c'est la première fois que vous utilisez l'Arduino Uno R4 WiFi/Minima, consultez le tutoriel sur Arduino UNO R4 - Installation du logiciel..
  • Branchez les composants selon le schéma fourni.
  • Connectez la carte Arduino Uno R4 à votre ordinateur à l'aide d'un câble USB.
  • Lancez l'IDE Arduino sur votre ordinateur.
  • Sélectionnez la carte Arduino Uno R4 appropriée (par exemple, Arduino Uno R4 WiFi) et le port COM.
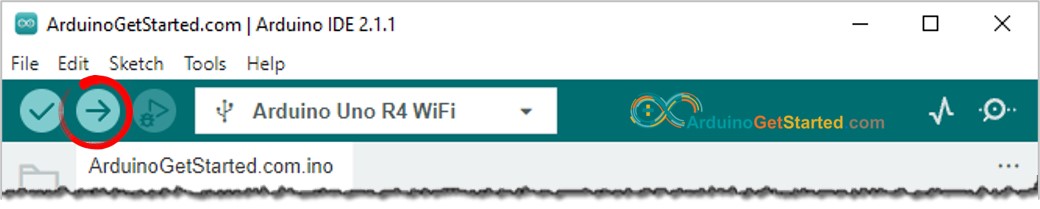
  • Copiez le code fourni et collez-le dans l'IDE Arduino.
  • Cliquez sur le bouton Upload dans l'IDE Arduino pour transférer le code vers l'Arduino UNR R4.
Arduino IDE - Comment téléverser du code
  • Ouvrez le moniteur série.
  • Appuyez sur le bouton quatre fois.
  • Observez la DEL : elle s'allume et s'éteint toutes les secondes.
  • Vérifiez l'affichage dans le moniteur série.
COM6
Send
1 0
Autoscroll Show timestamp
Clear output
9600 baud  
Newline  
  • Certains appuis sur les boutons n'étaient pas affichés dans le Moniteur Série, car l'Arduino UNO R4 ne peut pas effectuer de tâches pendant un délai. En conséquence, il ne parvient pas à détecter ces appuis.

Code Arduino UNO R4 - Sans délai

/* * Ce code Arduino UNO R4 a été développé par newbiely.fr * Ce code Arduino UNO R4 est mis à disposition du public sans aucune restriction. * Pour des instructions complètes et des schémas de câblage, veuillez visiter: * https://newbiely.fr/tutorials/arduino-uno-r4/arduino-uno-r4-blink-led-without-delay */ #define LED_PIN 3 // The Arduino UNO R4 pin connected to the LED #define BUTTON_PIN 7 // The Arduino UNO R4 pin connected to the button #define BLINK_INTERVAL 1000 // interval at which to blink LED (milliseconds) int led_state = LOW; // led_state used to set the LED int prev_button_state = LOW; // will store last time button was updated unsigned long prev_millis = 0; // will store last time LED 1 was updated void setup() { Serial.begin(9600); // set the digital pin as output: pinMode(LED_PIN, OUTPUT); // set the digital pin as an input: pinMode(BUTTON_PIN, INPUT_PULLUP); } void loop() { unsigned long current_millis = millis(); // check to see if it's time to blink the LED 1 if (current_millis - prev_millis >= BLINK_INTERVAL) { // if the LED is off turn it on and vice-versa: led_state = (led_state == LOW) ? HIGH : LOW; // set the LED with the led_state of the variable: digitalWrite(LED_PIN, led_state); // save the last time you blinked the LED prev_millis = current_millis; } // check button state's change int button_state = digitalRead(BUTTON_PIN); if (button_state != prev_button_state) { // print out the state of the button: Serial.println(button_state); // save the last state of button prev_button_state = button_state; } // DO OTHER WORKS HERE }

Étapes rapides

Suivez ces instructions étape par étape :

  • Téléversez le code fourni sur l'Arduino Uno R4
  • Appuyez sur le bouton quatre fois.
  • Observez la LED : elle s'allume et s'éteint toutes les secondes.
  • Vérifiez la sortie dans le Moniteur série.
COM6
Send
1 0 1 0 1 0 1 0
Autoscroll Show timestamp
Clear output
9600 baud  
Newline  
  • Tous les appuis sur les boutons ont été détectés.

Explication du code

L'explication se trouve dans la section des commentaires du code Arduino ci-dessus.

Ajouter plus de tâches

Ce code fait clignoter deux DEL à des moments différents et vérifie aussi si un bouton est appuyé.

/* * Ce code Arduino UNO R4 a été développé par newbiely.fr * Ce code Arduino UNO R4 est mis à disposition du public sans aucune restriction. * Pour des instructions complètes et des schémas de câblage, veuillez visiter: * https://newbiely.fr/tutorials/arduino-uno-r4/arduino-uno-r4-blink-led-without-delay */ #define LED_PIN_1 3 // The Arduino UNO R4 pin connected to the LED 1 #define LED_PIN_2 4 // The Arduino UNO R4 pin connected to the LED 2 #define BUTTON_PIN 7 // The Arduino UNO R4 pin connected to the button #define BLINK_INTERVAL_1 1000 // interval at which to blink LED 1 (milliseconds) #define BLINK_INTERVAL_2 500 // interval at which to blink LED 2 (milliseconds) int led_state_1 = LOW; // led_state used to set the LED 1 int led_state_2 = LOW; // led_state used to set the LED 2 int prev_button_state = LOW; // will store last time button was updated unsigned long prev_millis_1 = 0; // will store last time LED 1 was updated unsigned long prev_millis_2 = 0; // will store last time LED 2 was updated void setup() { Serial.begin(9600); // set the digital pin as output: pinMode(LED_PIN_1, OUTPUT); pinMode(LED_PIN_2, OUTPUT); // set the digital pin as an input: pinMode(BUTTON_PIN, INPUT_PULLUP); } void loop() { unsigned long current_millis = millis(); // check to see if it's time to blink the LED 1 if (current_millis - prev_millis_1 >= BLINK_INTERVAL_1) { // if the LED is off turn it on and vice-versa: led_state_1 = (led_state_1 == LOW) ? HIGH : LOW; // set the LED with the led_state of the variable: digitalWrite(LED_PIN_1, led_state_1); // save the last time you blinked the LED prev_millis_1 = current_millis; } // check to see if it's time to blink the LED 2 if (current_millis - prev_millis_2 >= BLINK_INTERVAL_2) { // if the LED is off turn it on and vice-versa: led_state_2 = (led_state_2 == LOW) ? HIGH : LOW; // set the LED with the led_state of the variable: digitalWrite(LED_PIN_2, led_state_2); // save the last time you blinked the LED prev_millis_2 = current_millis; } // check button state's change int button_state = digitalRead(BUTTON_PIN); if (button_state != prev_button_state) { // print out the state of the button: Serial.println(button_state); // save the last state of button prev_button_state = button_state; } // DO OTHER WORKS HERE }

Vidéo

※ NOS MESSAGES

  • N'hésitez pas à partager le lien de ce tutoriel. Cependant, veuillez ne pas utiliser notre contenu sur d'autres sites web. Nous avons investi beaucoup d'efforts et de temps pour créer ce contenu, veuillez respecter notre travail !