Arduino UNO R4 - OLED 128x32
Ce tutoriel vous montrera comment utiliser un Arduino UNO R4 avec un écran OLED I2C 128x32. Vous apprendrez :
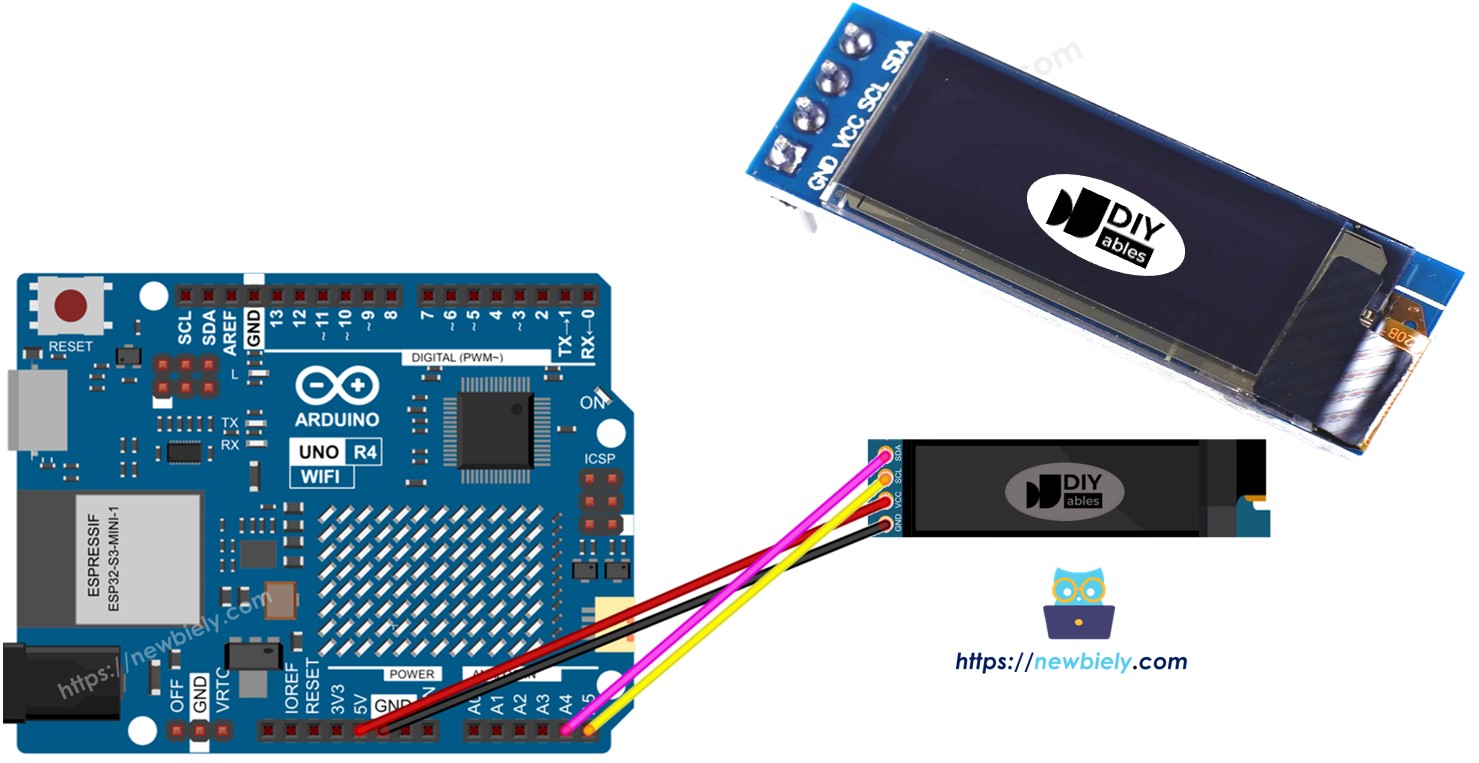
- Comment connecter un écran OLED 128x32 à l'Arduino UNO R4.
- Comment programmer l'Arduino UNO R4 pour afficher du texte et des chiffres sur l'écran OLED 128x32.
- Comment créer des dessins sur l'écran OLED 128x32 avec l'Arduino UNO R4.
- Comment afficher des images sur l'écran OLED 128x32 avec l'Arduino UNO R4.
- Comment centrer le texte et les chiffres à la fois verticalement et horizontalement sur l'écran OLED 128x32.
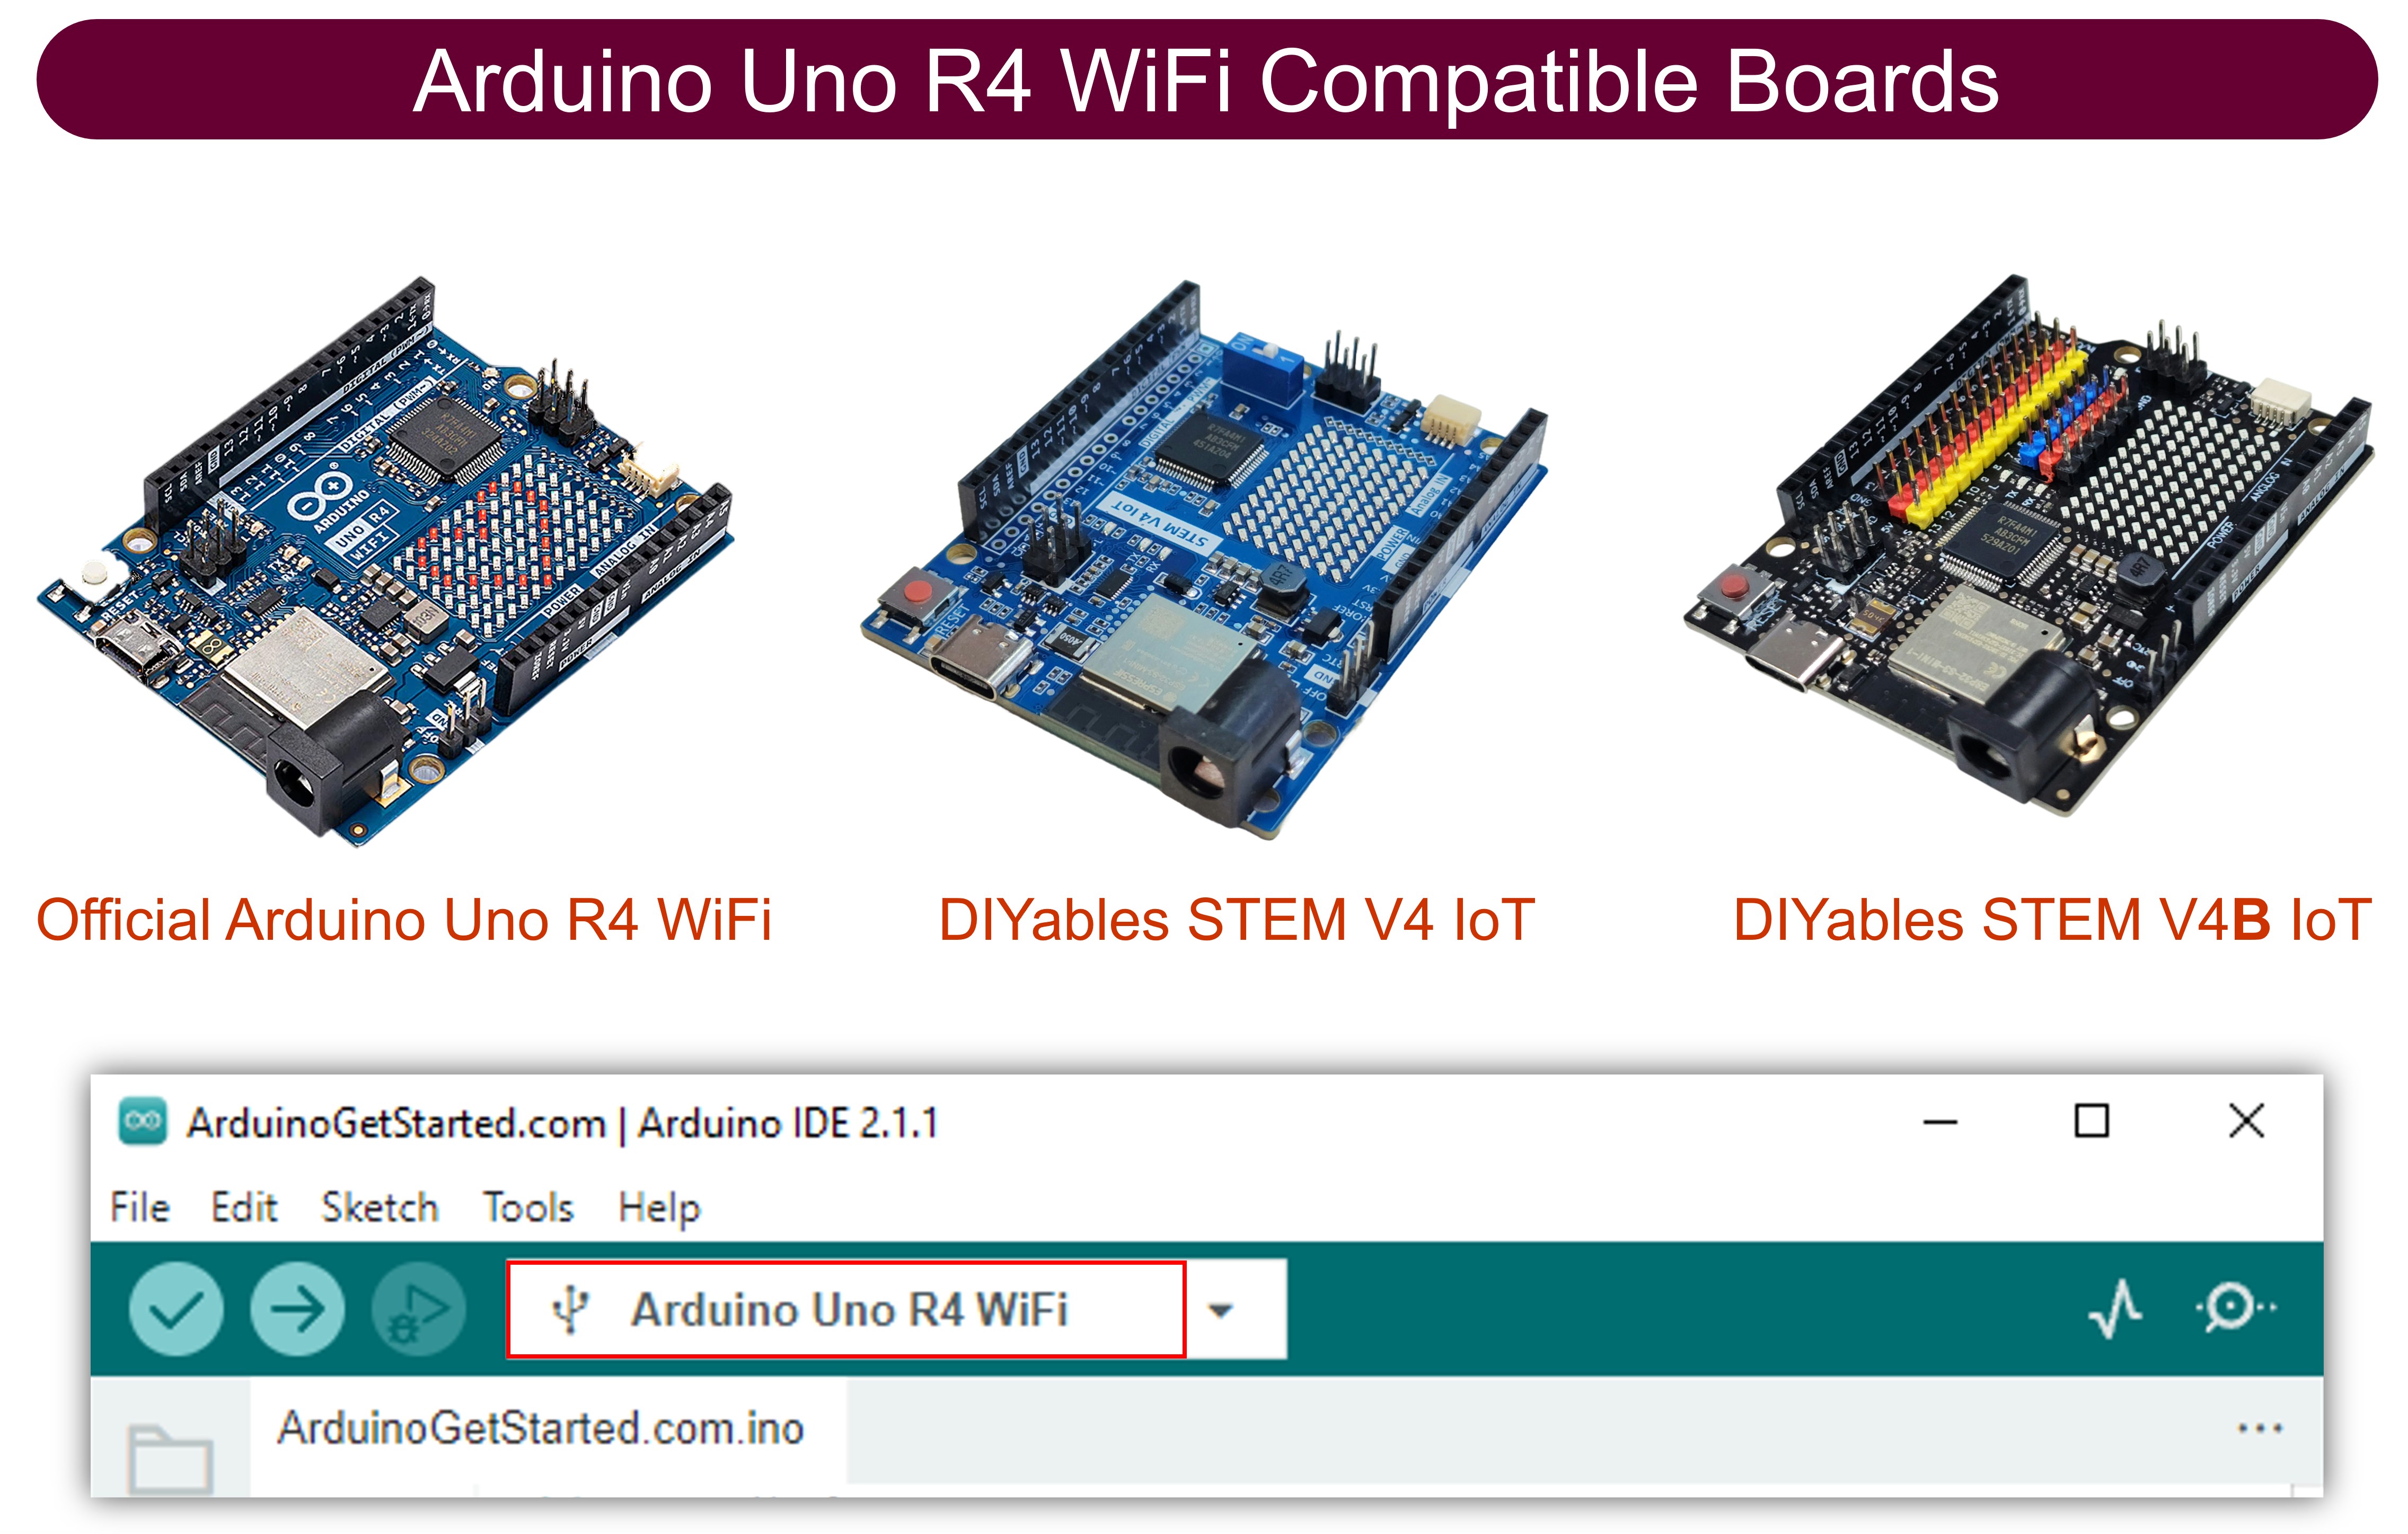
Préparation du matériel
Ou vous pouvez acheter les kits suivants:
| 1 | × | Kit de Démarrage DIYables STEM V4 IoT (Arduino inclus) | |
| 1 | × | Kit de Capteurs DIYables (18 capteurs/écrans) |
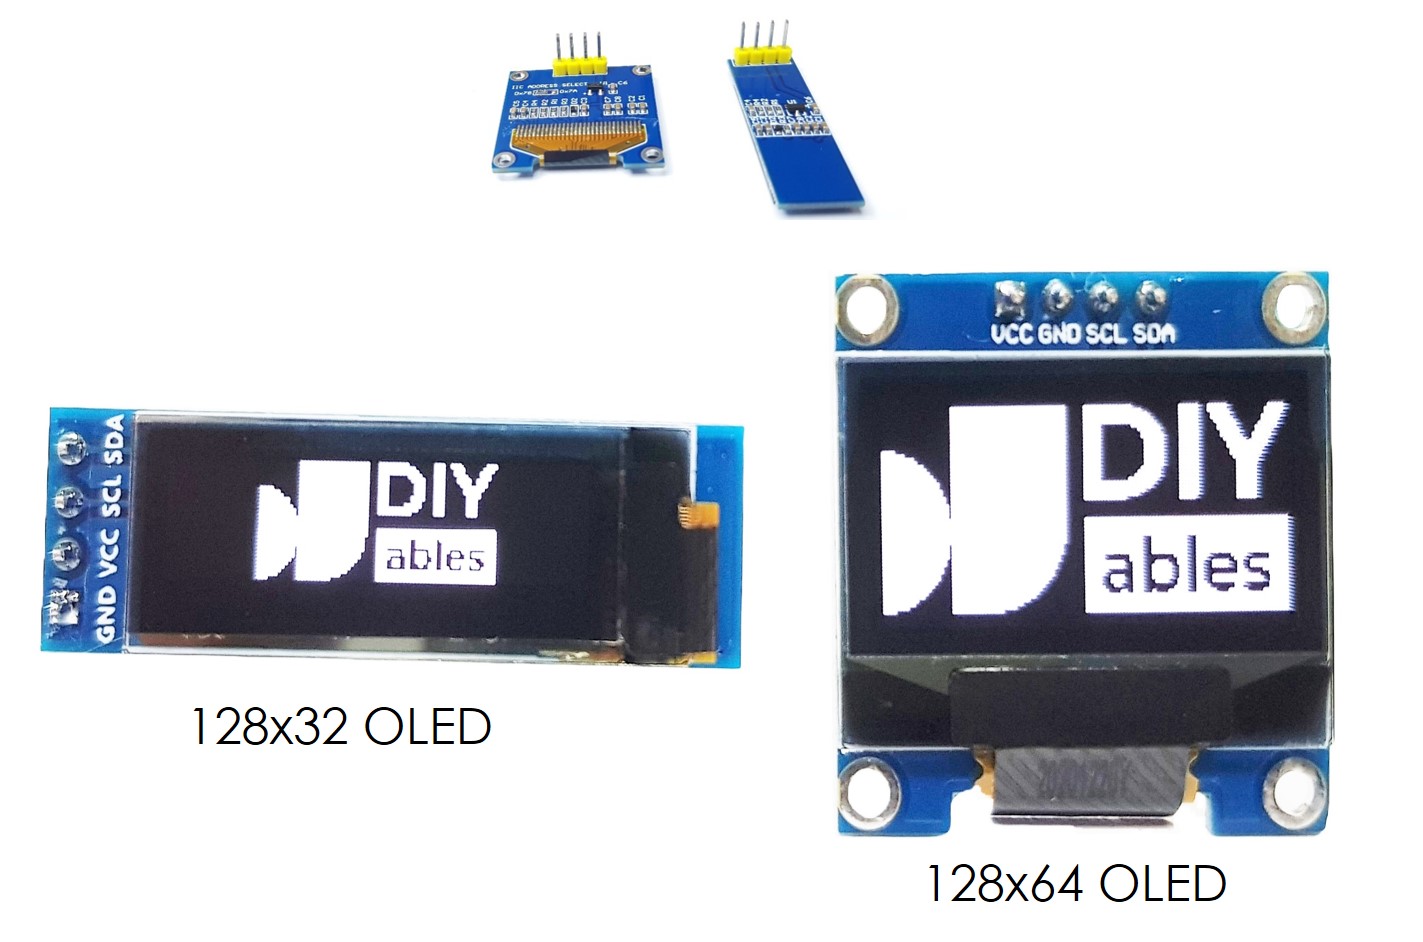
À propos de l'écran OLED
Pinout d'affichage OLED I2C
- Broche GND : doit être connectée à la masse de l'Arduino UNO R4
- Broche VCC : est l'alimentation du module d'affichage à laquelle nous connectons la broche 5 V de l'Arduino UNO R4.
- Broche SCL : est la ligne d'horloge série de l'interface I2C.
- Broche SDA : est la ligne de données série de l'interface I2C.
※ Note:
L'arrangement des broches sur un module OLED peut différer selon le fabricant et le modèle du module. Vérifiez toujours et suivez les étiquettes sur le module OLED. Soyez attentif !
Ce guide concerne un écran OLED qui utilise le pilote I2C SSD1306. Nous l'avons testé avec un écran OLED de DIYables. Il fonctionne parfaitement sans aucun problème.
Diagramme de câblage
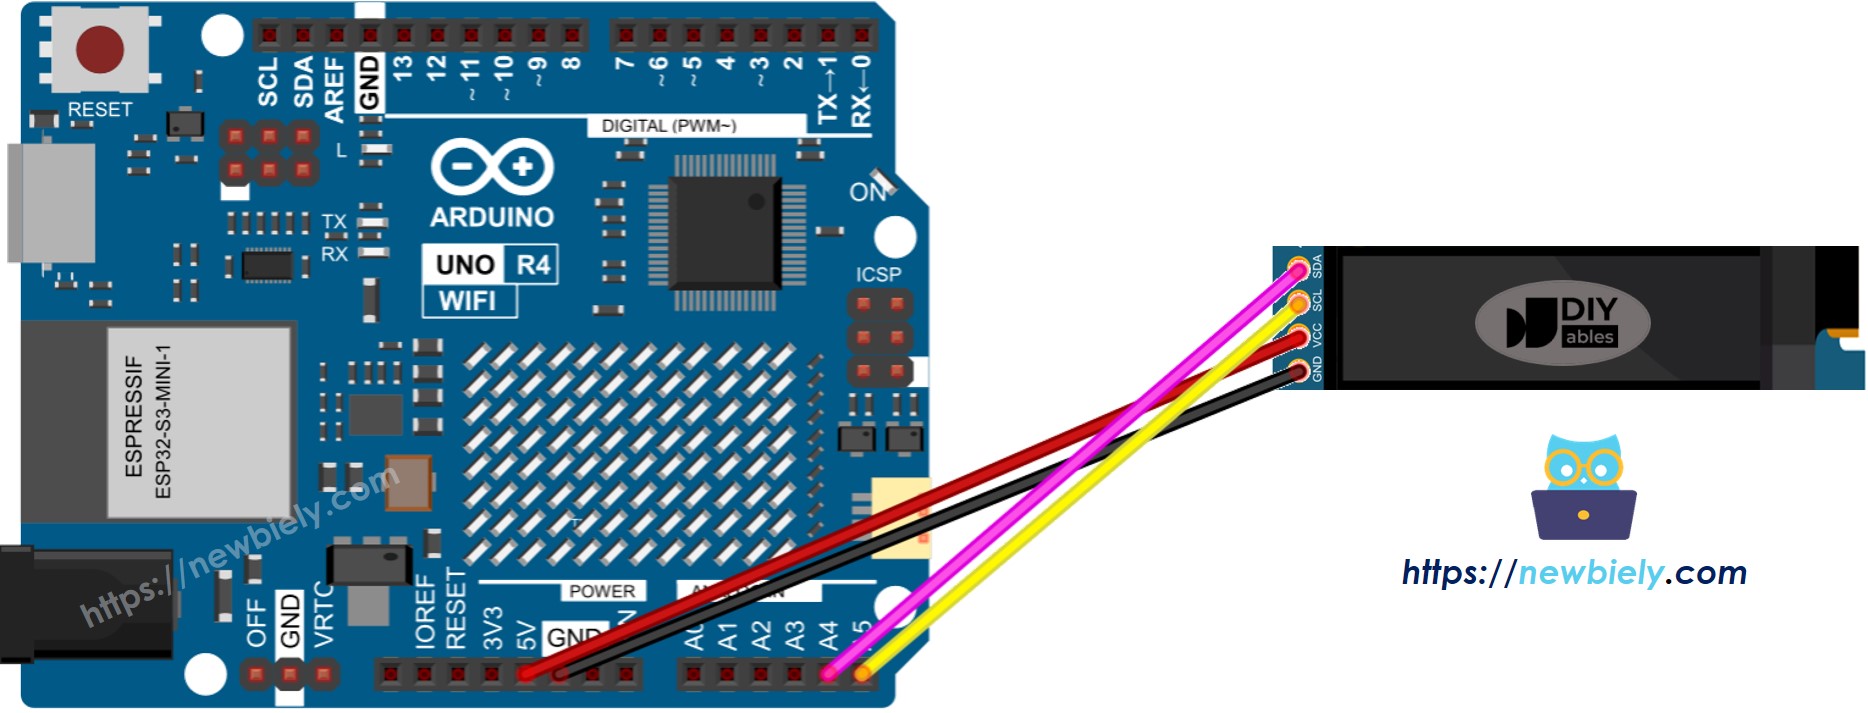
Cette image a été créée avec Fritzing. Cliquez pour agrandir l'image.
Voir Comment alimenter l'Arduino UNO R4..
Si vous utilisez un autre type d'Arduino UNO R4, la disposition des broches ne sera pas la même que celle de l'UNO. Consultez le tableau ci-dessous pour obtenir des informations sur les autres modèles Arduino UNO R4.
| 128x32 OLED Module | Arduino UNO R4 |
|---|---|
| Vin | 5V |
| GND | GND |
| SDA | A4 |
| SCL | A5 |
Comment utiliser l'OLED avec Arduino UNO R4
Installer la bibliothèque OLED SSD1306
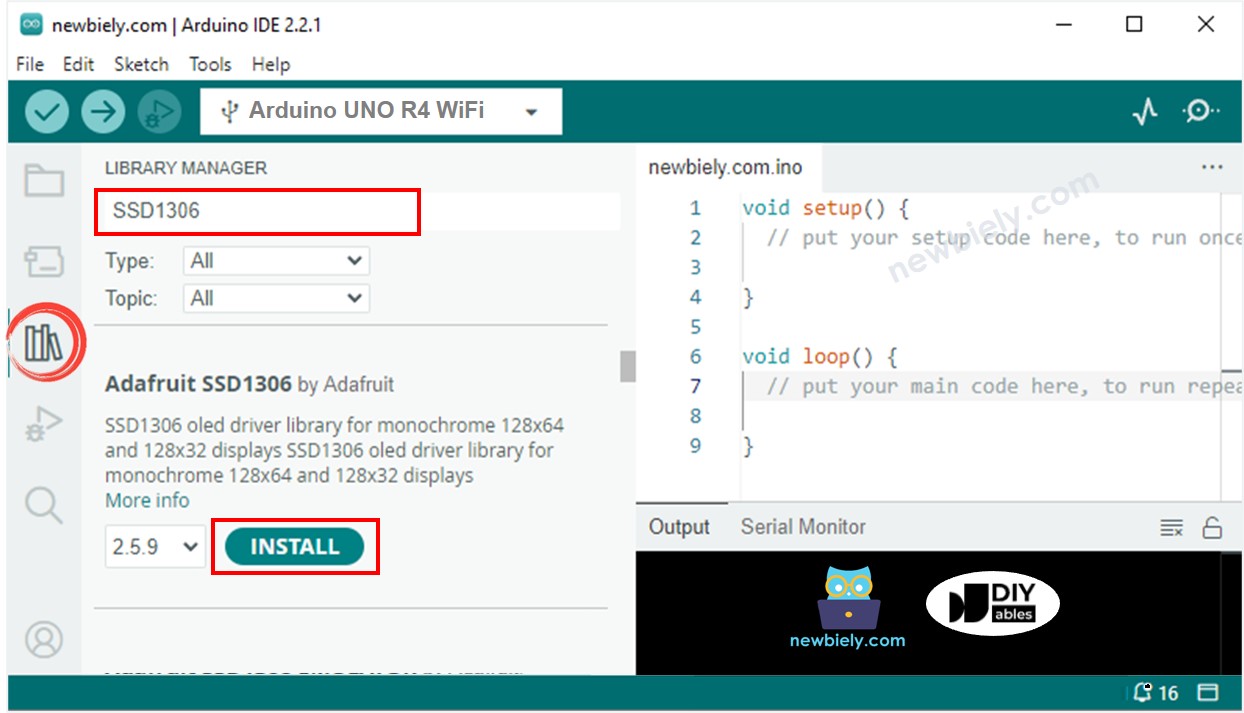
- Accédez à l'icône Libraries sur le côté gauche de l'IDE Arduino.
- Tapez "SSD1306" dans la zone de recherche et recherchez la bibliothèque SSD1306 créée par Adafruit.
- Appuyez sur le bouton Install pour ajouter la bibliothèque.
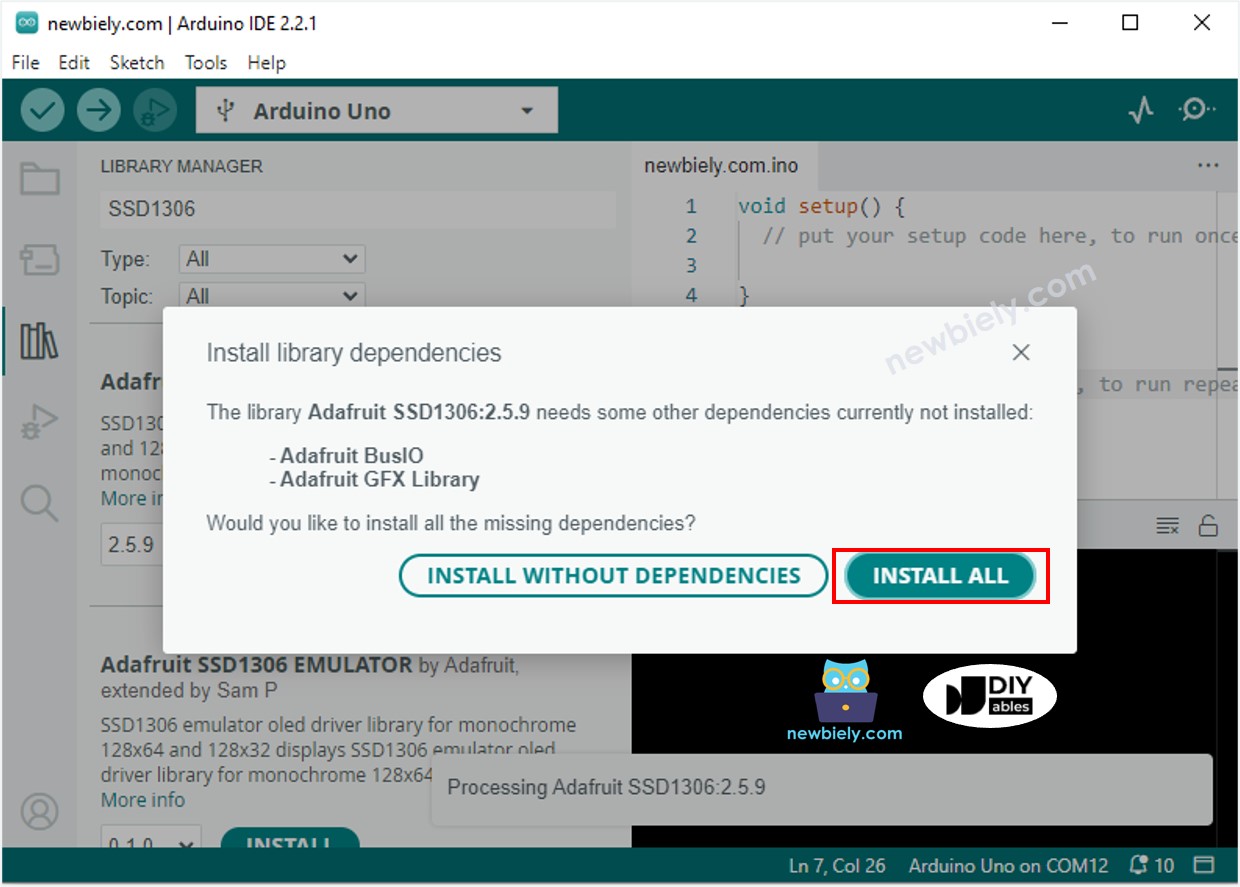
- Vous devrez installer certaines bibliothèques supplémentaires.
- Cliquez sur le bouton Tout installer pour installer toutes les bibliothèques requises.
Comment programmer pour un écran OLED
- Inclure une bibliothèque.
- Définir la taille de l'écran sur OLED 123x32.
- Créer un élément OLED SSD1306.
- Dans la fonction setup(), configurez l'écran OLED.
- Ensuite, vous pouvez afficher du texte, des images et tracer des lignes.
Code Arduino UNO R4 - Afficher du texte sur OLED
Voici quelques fonctions que vous pouvez utiliser pour afficher du texte sur l'OLED :
- oled.clearDisplay(): éteint tous les pixels.
- oled.drawPixel(x, y, color): dessine un pixel aux coordonnées x, y.
- oled.setTextSize(n): modifie la taille du texte, avec des valeurs possibles de 1 à 8.
- oled.setCursor(x, y): définit le point de départ du texte.
- oled.setTextColor(WHITE): met le texte en blanc.
- oled.setTextColor(BLACK, WHITE): met le texte en noir et l'arrière-plan en blanc.
- oled.println("message"): affiche le texte.
- oled.println(number): affiche un nombre.
- oled.println(number, HEX): affiche un nombre en format hexadécimal.
- oled.display(): met à jour l'affichage avec les modifications.
- oled.startscrollright(start, stop): déplace le texte de gauche à droite.
- oled.startscrollleft(start, stop): déplace le texte de droite à gauche.
- oled.startscrolldiagright(start, stop): déplace le texte en diagonale du coin inférieur gauche vers le coin supérieur droit.
- oled.startscrolldiagleft(start, stop): déplace le texte en diagonale du coin inférieur droit vers le coin supérieur gauche.
- oled.stopscroll(): arrête tout défilement du texte.
Code Arduino UNO R4 - Dessiner sur OLED
Arduino UNO R4 Code – Afficher l'image
Pour afficher une image sur un écran OLED, commencez par convertir l'image, quel que soit son format, en un tableau bitmap. Vous pouvez utiliser cet outil en ligne (https://newbiely.com/online-tool/image-to-bitmap-converter) pour le convertir. Regardez l'image ci-dessous pour voir comment transformer une image en un tableau bitmap. J'ai converti l'icône Arduino en un tableau bitmap.
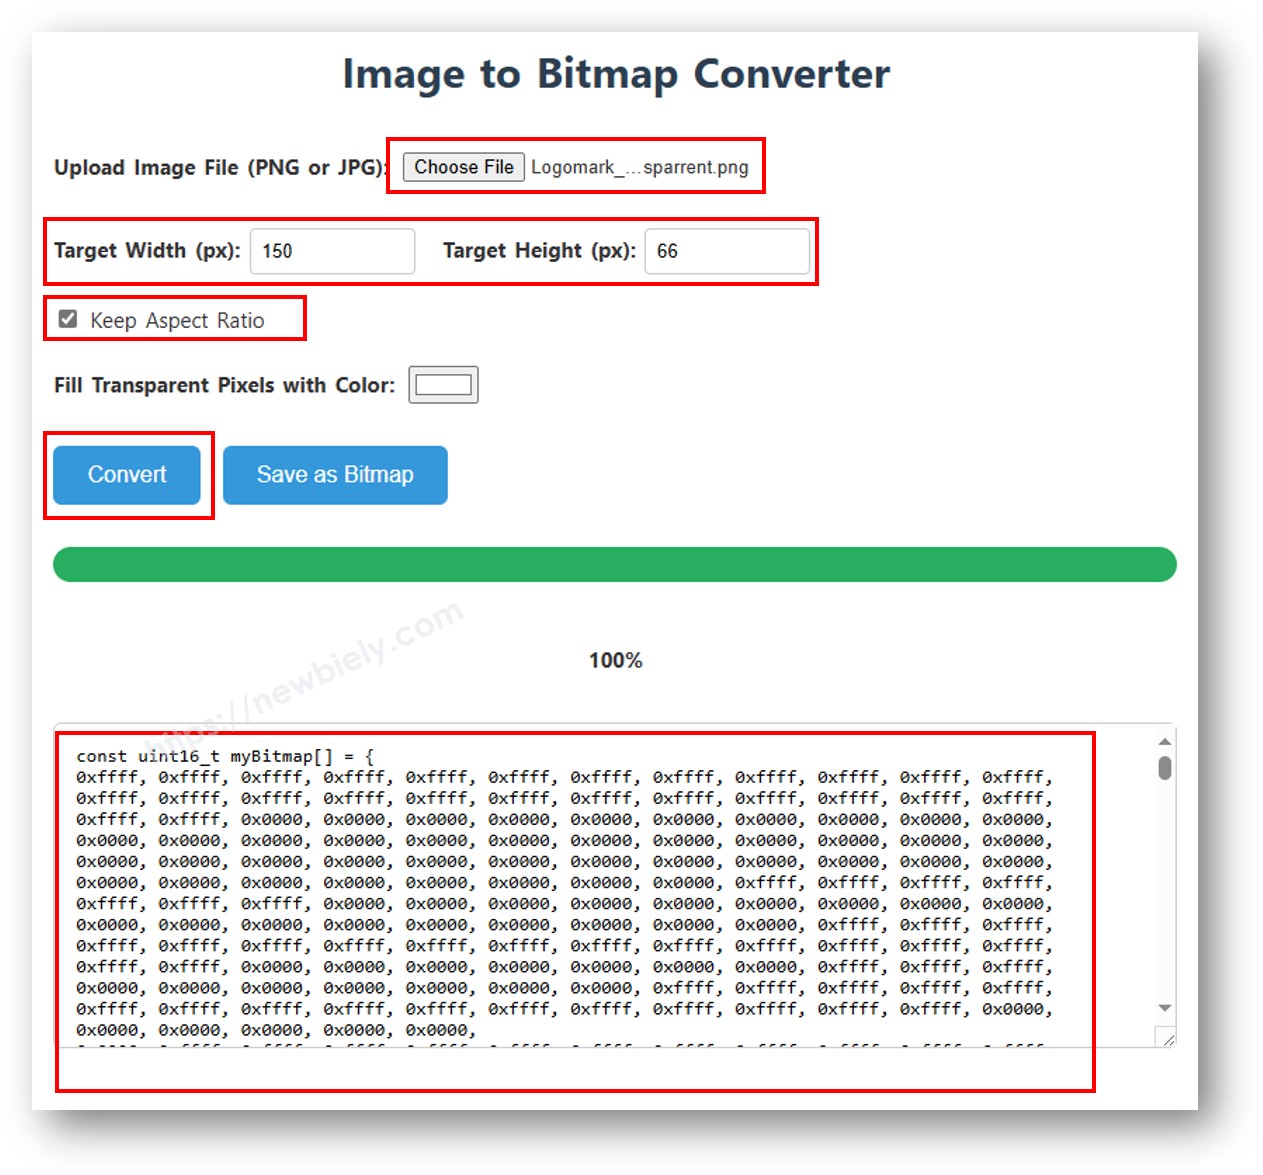
Copiez le code du nouveau tableau et mettez-le à jour dans le tableau d'icônes Arduino dans le code ci-dessous.
La vidéo ci-dessous montre comment le faire avec l'écran OLED 128x64 et Arduino Uno et l'icône Arduino.
Nous pouvons faire de même pour le faire fonctionner avec l'Arduino Uno R4 et l'OLED 128x32. Le code ci-dessous affiche l'icône DIYables sur l'OLED 128x32.
※ Note:
- La taille de l'image doit être aussi petite que possible ou inférieure à la taille de l'écran.
- Pour utiliser le code donné pour un OLED 128x32, vous devez redimensionner l'image et ajuster la largeur et la hauteur dans la fonction oled.drawBitmap();.
Comment centrer verticalement et horizontalement le texte et le nombre sur un écran OLED
Dépannage des écrans OLED
Si l'écran OLED n'affiche rien, veuillez suivre ces étapes :
- Assurez-vous que le câblage est correctement réalisé.
- Confirmez que votre OLED I2C est équipé d'un pilote SSD1306.
- Vérifiez l'adresse I2C de votre OLED en utilisant le code suivant du scanner d'adresses I2C sur Arduino UNO R4.
La sortie sur le moniteur série :