Arduino UNO R4 plusieurs boutons

Arduino UNO R4 avec plusieurs boutons

Ce guide vous montre comment utiliser un Arduino UNO R4 avec plusieurs boutons en même temps sans la fonction delay() pour l’anti-rebond. Le guide propose du code selon deux méthodes différentes :

Nous utiliserons cinq boutons comme exemples. Vous pouvez facilement changer cela pour deux boutons, quatre boutons ou même plus.

Bouton À propos

Nous proposons un guide détaillé sur les boutons, couvrant les connexions matérielles, leur fonctionnement, le câblage avec Arduino UNO R4 et la manière d’écrire le code. En savoir plus ici :

Diagramme de câblage

Schéma de câblage Arduino UNO R4 avec plusieurs boutons

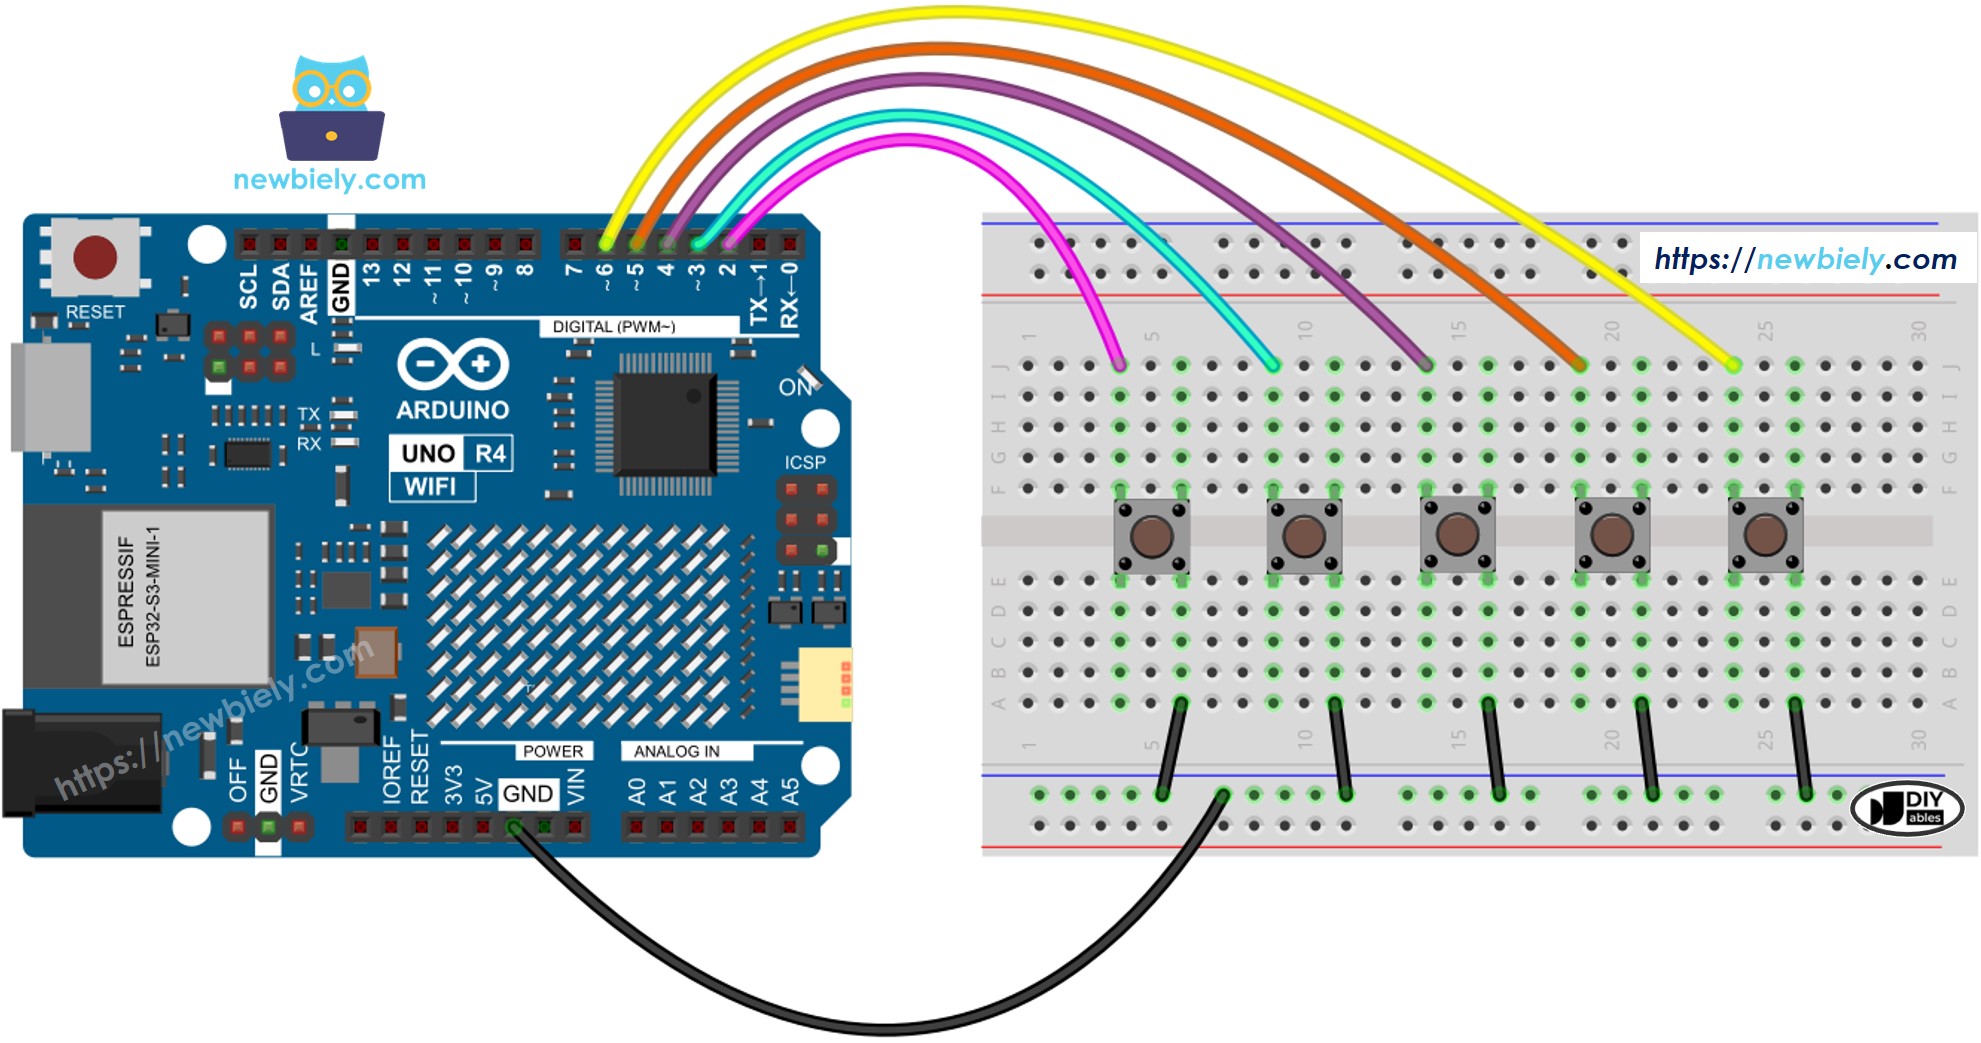
Cette image a été créée avec Fritzing. Cliquez pour agrandir l'image.

Voir Comment alimenter l'Arduino UNO R4..

Code Arduino UNO R4 - Plusieurs boutons avec anti-rebond

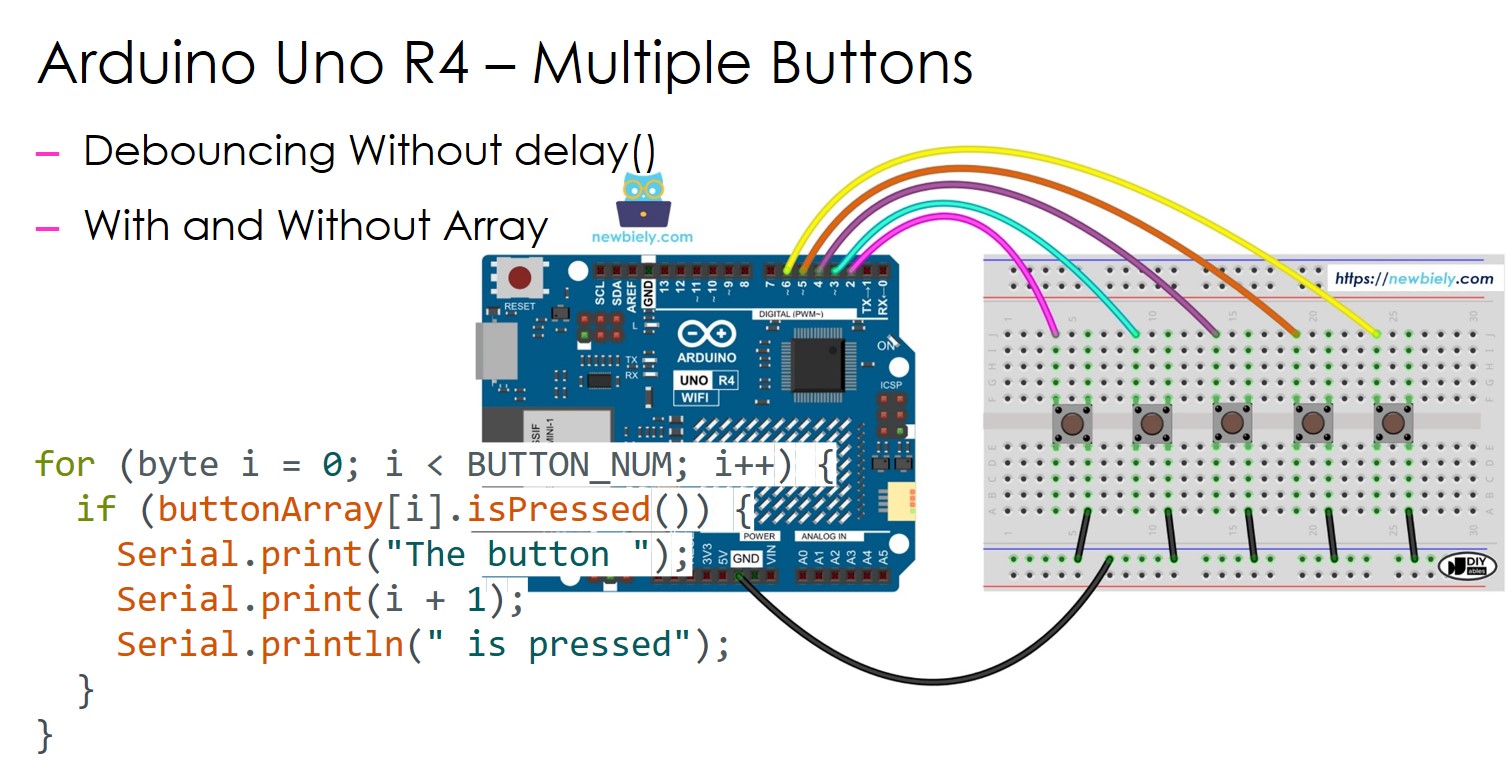
Lorsque l'on utilise plusieurs boutons, les situations peuvent devenir complexes.

*Applications qui nécessitent un anti-rebond des boutons

*Applications qui doivent identifier quand les boutons sont pressés ou relâchés

La bibliothèque ezButton simplifie le travail avec les boutons en gérant l'anti-rebond et les événements des boutons en interne. Les utilisateurs n'ont pas à se soucier de la gestion des horodatages et des variables lors de l'utilisation de cette bibliothèque. De plus, l'utilisation de plusieurs boutons peut rendre le code plus clair et plus court.

/* * Ce code Arduino UNO R4 a été développé par newbiely.fr * Ce code Arduino UNO R4 est mis à disposition du public sans aucune restriction. * Pour des instructions complètes et des schémas de câblage, veuillez visiter: * https://newbiely.fr/tutorials/arduino-uno-r4/arduino-uno-r4-multiple-button */ #include <ezButton.h> #define BUTTON_NUM 5 // the number of buttons #define BUTTON_PIN_1 2 // The Arduino UNO R4 pin connected to the button 1 #define BUTTON_PIN_2 3 // The Arduino UNO R4 pin connected to the button 2 #define BUTTON_PIN_3 4 // The Arduino UNO R4 pin connected to the button 3 #define BUTTON_PIN_4 5 // The Arduino UNO R4 pin connected to the button 4 #define BUTTON_PIN_5 6 // The Arduino UNO R4 pin connected to the button 5 ezButton button1(BUTTON_PIN_1); // create ezButton object for button 1 ezButton button2(BUTTON_PIN_2); // create ezButton object for button 2 ezButton button3(BUTTON_PIN_3); // create ezButton object for button 3 ezButton button4(BUTTON_PIN_4); // create ezButton object for button 4 ezButton button5(BUTTON_PIN_5); // create ezButton object for button 5 void setup() { Serial.begin(9600); button1.setDebounceTime(100); // set debounce time to 100 milliseconds button2.setDebounceTime(100); // set debounce time to 100 milliseconds button3.setDebounceTime(100); // set debounce time to 100 milliseconds button4.setDebounceTime(100); // set debounce time to 100 milliseconds button5.setDebounceTime(100); // set debounce time to 100 milliseconds } void loop() { button1.loop(); // MUST call the loop() function first button2.loop(); // MUST call the loop() function first button3.loop(); // MUST call the loop() function first button4.loop(); // MUST call the loop() function first button5.loop(); // MUST call the loop() function first // get button state after debounce int button1_state = button1.getState(); // the state after debounce int button2_state = button2.getState(); // the state after debounce int button3_state = button3.getState(); // the state after debounce int button4_state = button4.getState(); // the state after debounce int button5_state = button5.getState(); // the state after debounce /* Serial.print("The button 1 state: "); Serial.println(button1_state); Serial.print("The button 2 state: "); Serial.println(button2_state); Serial.print("The button 3 state: "); Serial.println(button3_state); Serial.print("The button 4 state: "); Serial.println(button4_state); Serial.print("The button 5 state: "); Serial.println(button5_state); */ if (button1.isPressed()) Serial.println("The button 1 is pressed"); if (button1.isReleased()) Serial.println("The button 1 is released"); if (button2.isPressed()) Serial.println("The button 2 is pressed"); if (button2.isReleased()) Serial.println("The button 2 is released"); if (button3.isPressed()) Serial.println("The button 3 is pressed"); if (button3.isReleased()) Serial.println("The button 3 is released"); if (button4.isPressed()) Serial.println("The button 4 is pressed"); if (button4.isReleased()) Serial.println("The button 4 is released"); if (button5.isPressed()) Serial.println("The button 5 is pressed"); if (button5.isReleased()) Serial.println("The button 5 is released"); }

Étapes rapides

Suivez ces instructions étape par étape :

  • Si c’est la première fois que vous utilisez l'Arduino Uno R4 WiFi/Minima, reportez-vous au tutoriel sur Arduino UNO R4 - Installation du logiciel..
  • Connectez l'Arduino Uno R4 aux boutons conformément au schéma fourni.
  • Connectez la carte Arduino Uno R4 à votre ordinateur à l’aide d’un câble USB.
  • Ouvrez l’IDE Arduino sur votre ordinateur.
  • Sélectionnez la carte Arduino Uno R4 appropriée (par exemple, Arduino Uno R4 WiFi) et le port COM.
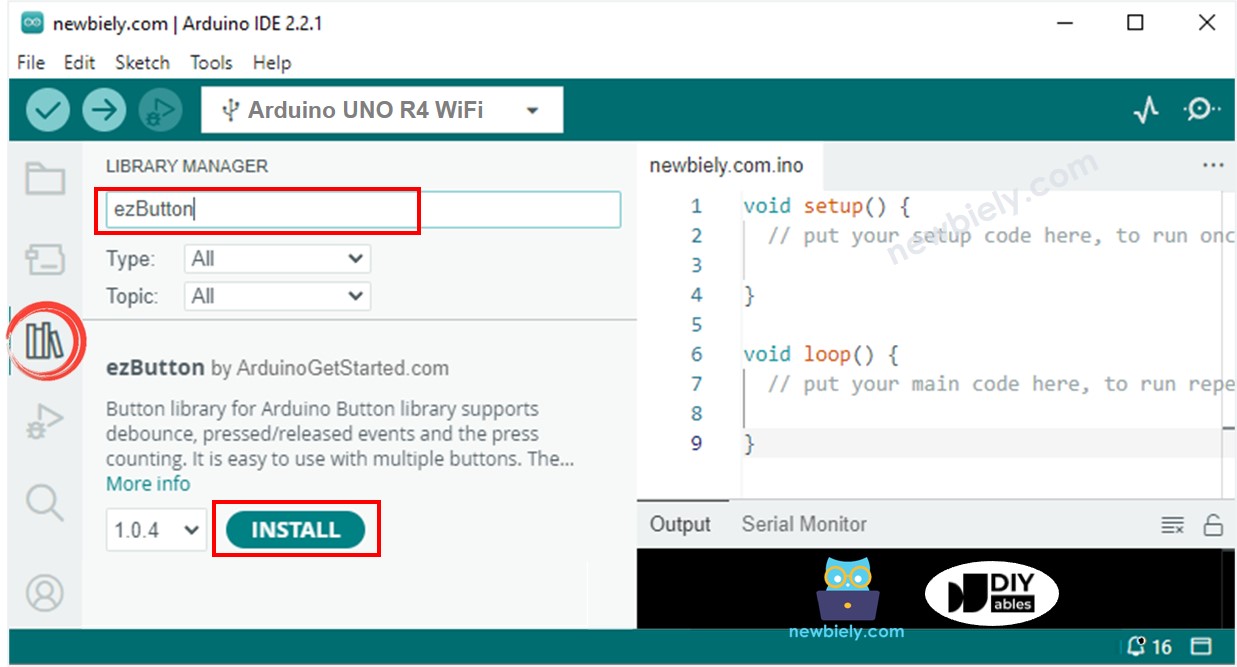
  • Cliquez sur l’icône Libraries sur le côté gauche de l’IDE Arduino.
  • Recherchez ezButton et localisez la bibliothèque de boutons créée par ArduinoGetStarted.com.
  • Cliquez sur le bouton Install pour installer la bibliothèque ezButton.
Bibliothèque de boutons pour Arduino UNO R4
  • Copiez le code et collez-le dans l'IDE Arduino.
  • Cliquez sur le bouton Upload dans l'IDE Arduino pour compiler et téléverser le code sur la carte Arduino UNO R4.
Comment téléverser le code Arduino UNO R4 dans l'IDE Arduino
  • Ouvrez le moniteur série dans l'IDE Arduino.
  • Appuyez sur chaque bouton et relâchez-le, l'un après l'autre.
COM6
Send
The button 1 is pressed The button 1 is released The button 2 is pressed The button 2 is released The button 3 is pressed The button 3 is released The button 4 is pressed The button 4 is released The button 5 is pressed The button 5 is released
Autoscroll Show timestamp
Clear output
9600 baud  
Newline  

Arduino UNO R4 Code - Plusieurs boutons utilisant un tableau

Nous pouvons améliorer le code ci-dessus en utilisant un tableau de boutons.

/* * Ce code Arduino UNO R4 a été développé par newbiely.fr * Ce code Arduino UNO R4 est mis à disposition du public sans aucune restriction. * Pour des instructions complètes et des schémas de câblage, veuillez visiter: * https://newbiely.fr/tutorials/arduino-uno-r4/arduino-uno-r4-multiple-button */ #include <ezButton.h> #define BUTTON_NUM 5 // the number of buttons #define BUTTON_PIN_1 2 // The Arduino UNO R4 pin connected to the button 1 #define BUTTON_PIN_2 3 // The Arduino UNO R4 pin connected to the button 2 #define BUTTON_PIN_3 4 // The Arduino UNO R4 pin connected to the button 3 #define BUTTON_PIN_4 5 // The Arduino UNO R4 pin connected to the button 4 #define BUTTON_PIN_5 6 // The Arduino UNO R4 pin connected to the button 5 ezButton buttonArray[] = { ezButton(BUTTON_PIN_1), ezButton(BUTTON_PIN_2), ezButton(BUTTON_PIN_3), ezButton(BUTTON_PIN_4), ezButton(BUTTON_PIN_5) }; void setup() { Serial.begin(9600); for (byte i = 0; i < BUTTON_NUM; i++) { buttonArray[i].setDebounceTime(100); // set debounce time to 100 milliseconds } } void loop() { for (byte i = 0; i < BUTTON_NUM; i++) buttonArray[i].loop(); // MUST call the loop() function first for (byte i = 0; i < BUTTON_NUM; i++) { // get button state after debounce int button_state = buttonArray[i].getState(); // the state after debounce /* Serial.print("The button "); Serial.print(i + 1); Serial.print(": "); Serial.println(button_state); */ if (buttonArray[i].isPressed()) { Serial.print("The button "); Serial.print(i + 1); Serial.println(" is pressed"); } if (buttonArray[i].isReleased()) { Serial.print("The button "); Serial.print(i + 1); Serial.println(" is released"); } } }

Vidéo

※ NOS MESSAGES

  • N'hésitez pas à partager le lien de ce tutoriel. Cependant, veuillez ne pas utiliser notre contenu sur d'autres sites web. Nous avons investi beaucoup d'efforts et de temps pour créer ce contenu, veuillez respecter notre travail !