Exemple Arduino MultipleWebApps - Tutoriel complet du tableau de bord IoT
Vue d'ensemble
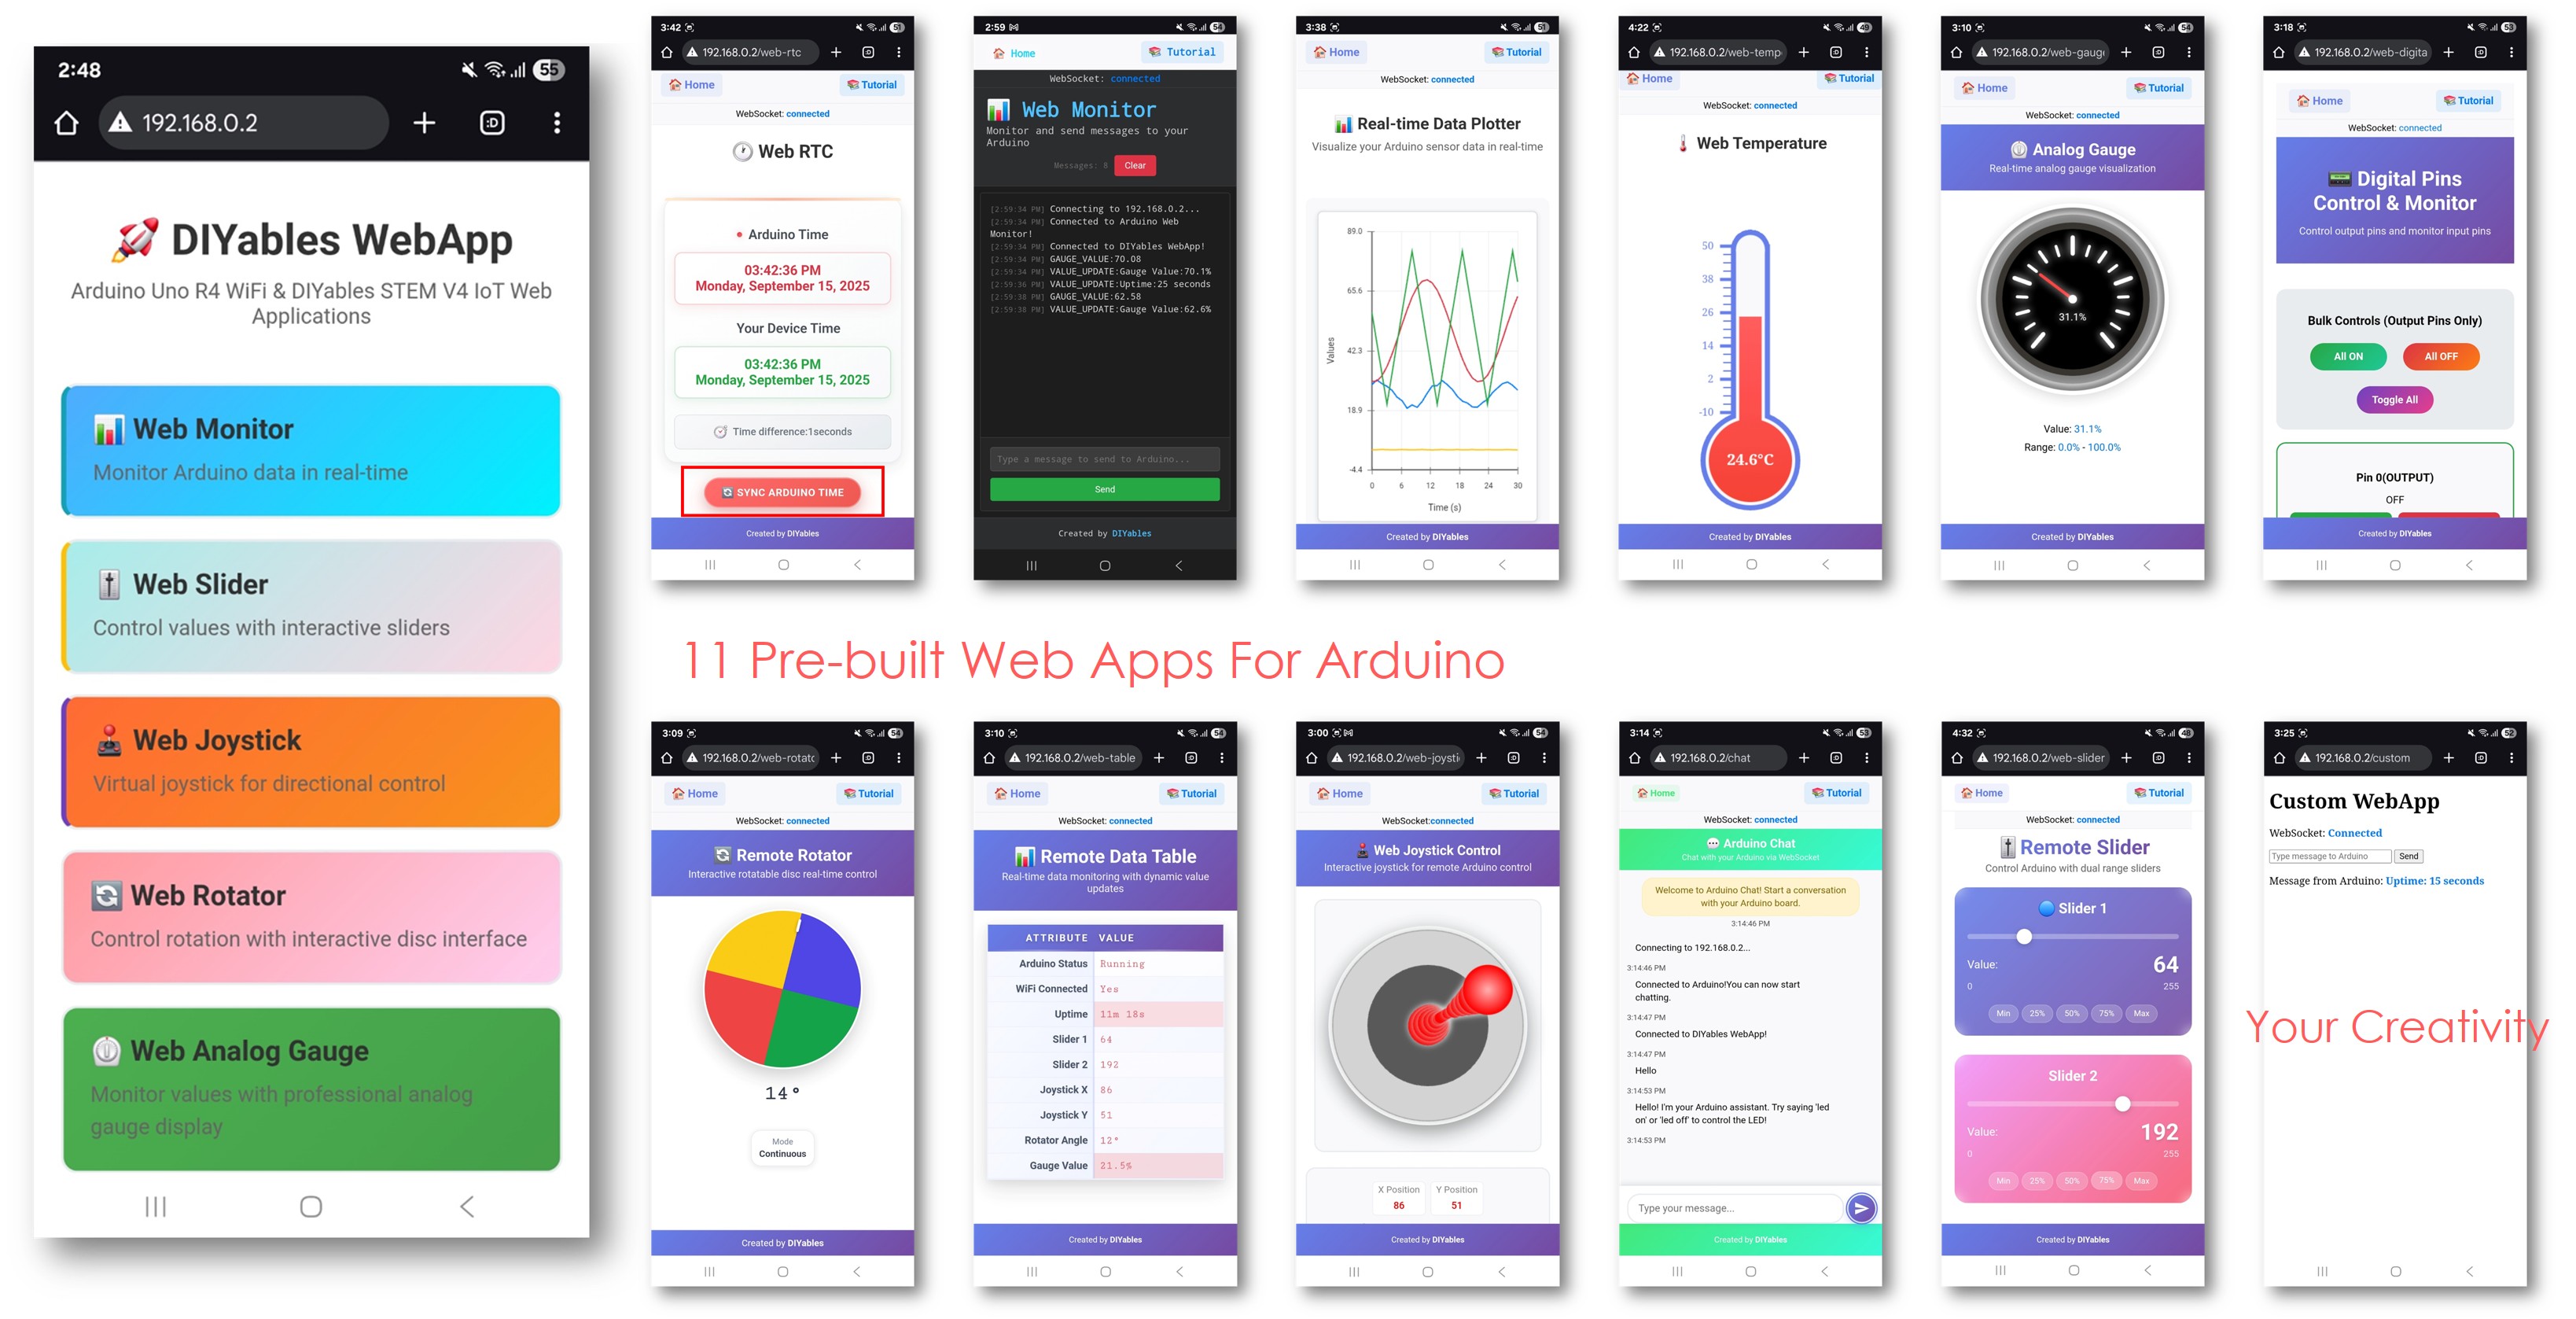
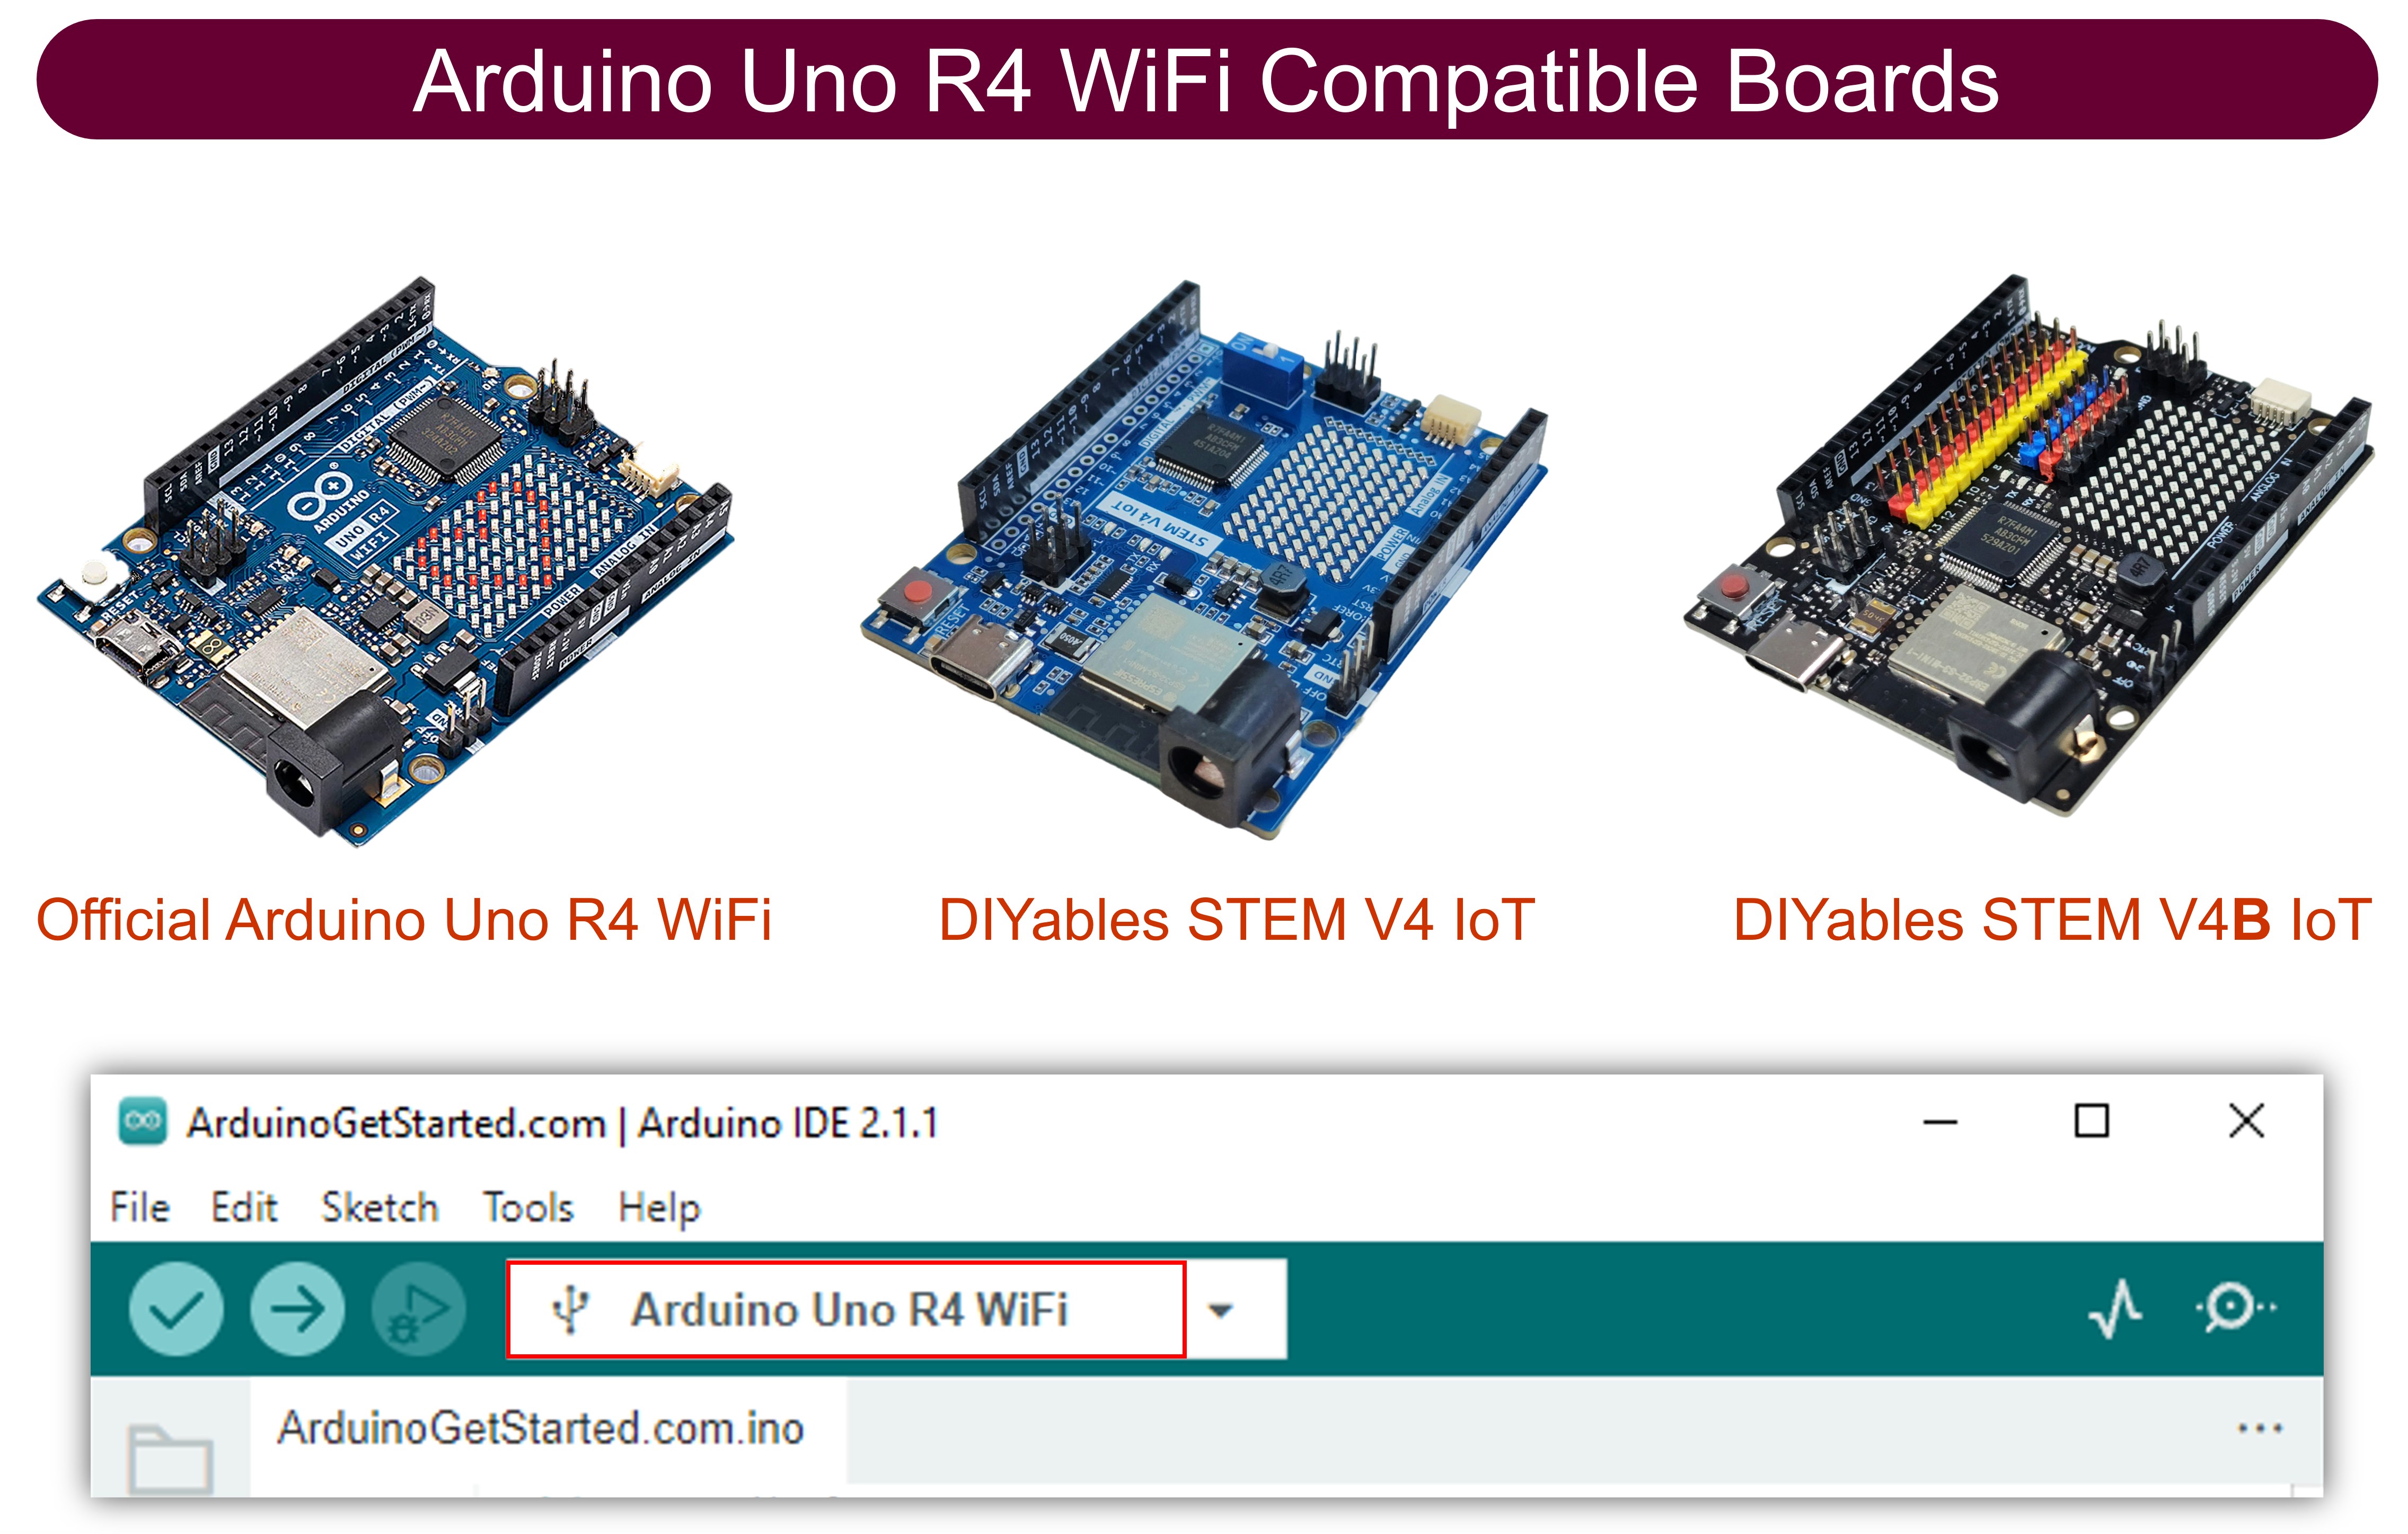
Cet exemple montre comment utiliser plusieurs applications web simultanément avec la bibliothèque WebApps de DIYables. Il illustre l'intégration de plusieurs interfaces web interactives — telles que la surveillance, le contrôle et la communication — au sein d'un seul projet. Conçu pour l'Arduino Uno R4 WiFi et la plateforme IoT STEM V4 de DIYables, cet exemple est idéal pour apprendre à combiner et à gérer plusieurs fonctionnalités basées sur le Web en même temps, fournissant une base solide pour des projets IoT avancés.
Fonctionnalités
Page d'accueil: Centre de navigation central avec des liens vers toutes les applications web
Moniteur Web: Communication série en temps réel et interface de débogage
Interface de chat: Système de chat interactif avec capacités de réponse Arduino
Contrôle des broches numériques: Contrôle et surveillance basés sur le Web de toutes les broches numériques
Contrôle à deux curseurs: Deux curseurs indépendants pour le contrôle des valeurs analogiques
Joystick virtuel: Contrôle de position en 2D pour des applications directionnelles
Gestion d'état unifiée: Toutes les interfaces partagent des informations d'état synchronisées
Mises à jour en temps réel: Communication WebSocket pour une réponse instantanée
Structure de modèle: Fondement prêt à être personnalisé pour des projets complexes
Plateforme extensible: Actuellement implémentée pour Arduino Uno R4 WiFi, mais peut être étendue à d'autres plates-formes matérielles. Voir DIYables_WebApps_ESP32
Divulgation : Certains des liens fournis dans cette section sont des liens affiliés Amazon. Nous pouvons recevoir une commission pour tout achat effectué via ces liens, sans coût supplémentaire pour vous. Nous vous remercions de votre soutien.
Connectez la carte Arduino Uno R4/DIYables STEM V4 IoT à votre ordinateur à l'aide d'un câble USB.
Ouvrez l'IDE Arduino sur votre ordinateur.
Sélectionnez la carte Arduino Uno R4 appropriée (par exemple, Arduino Uno R4 WiFi) et le port COM.
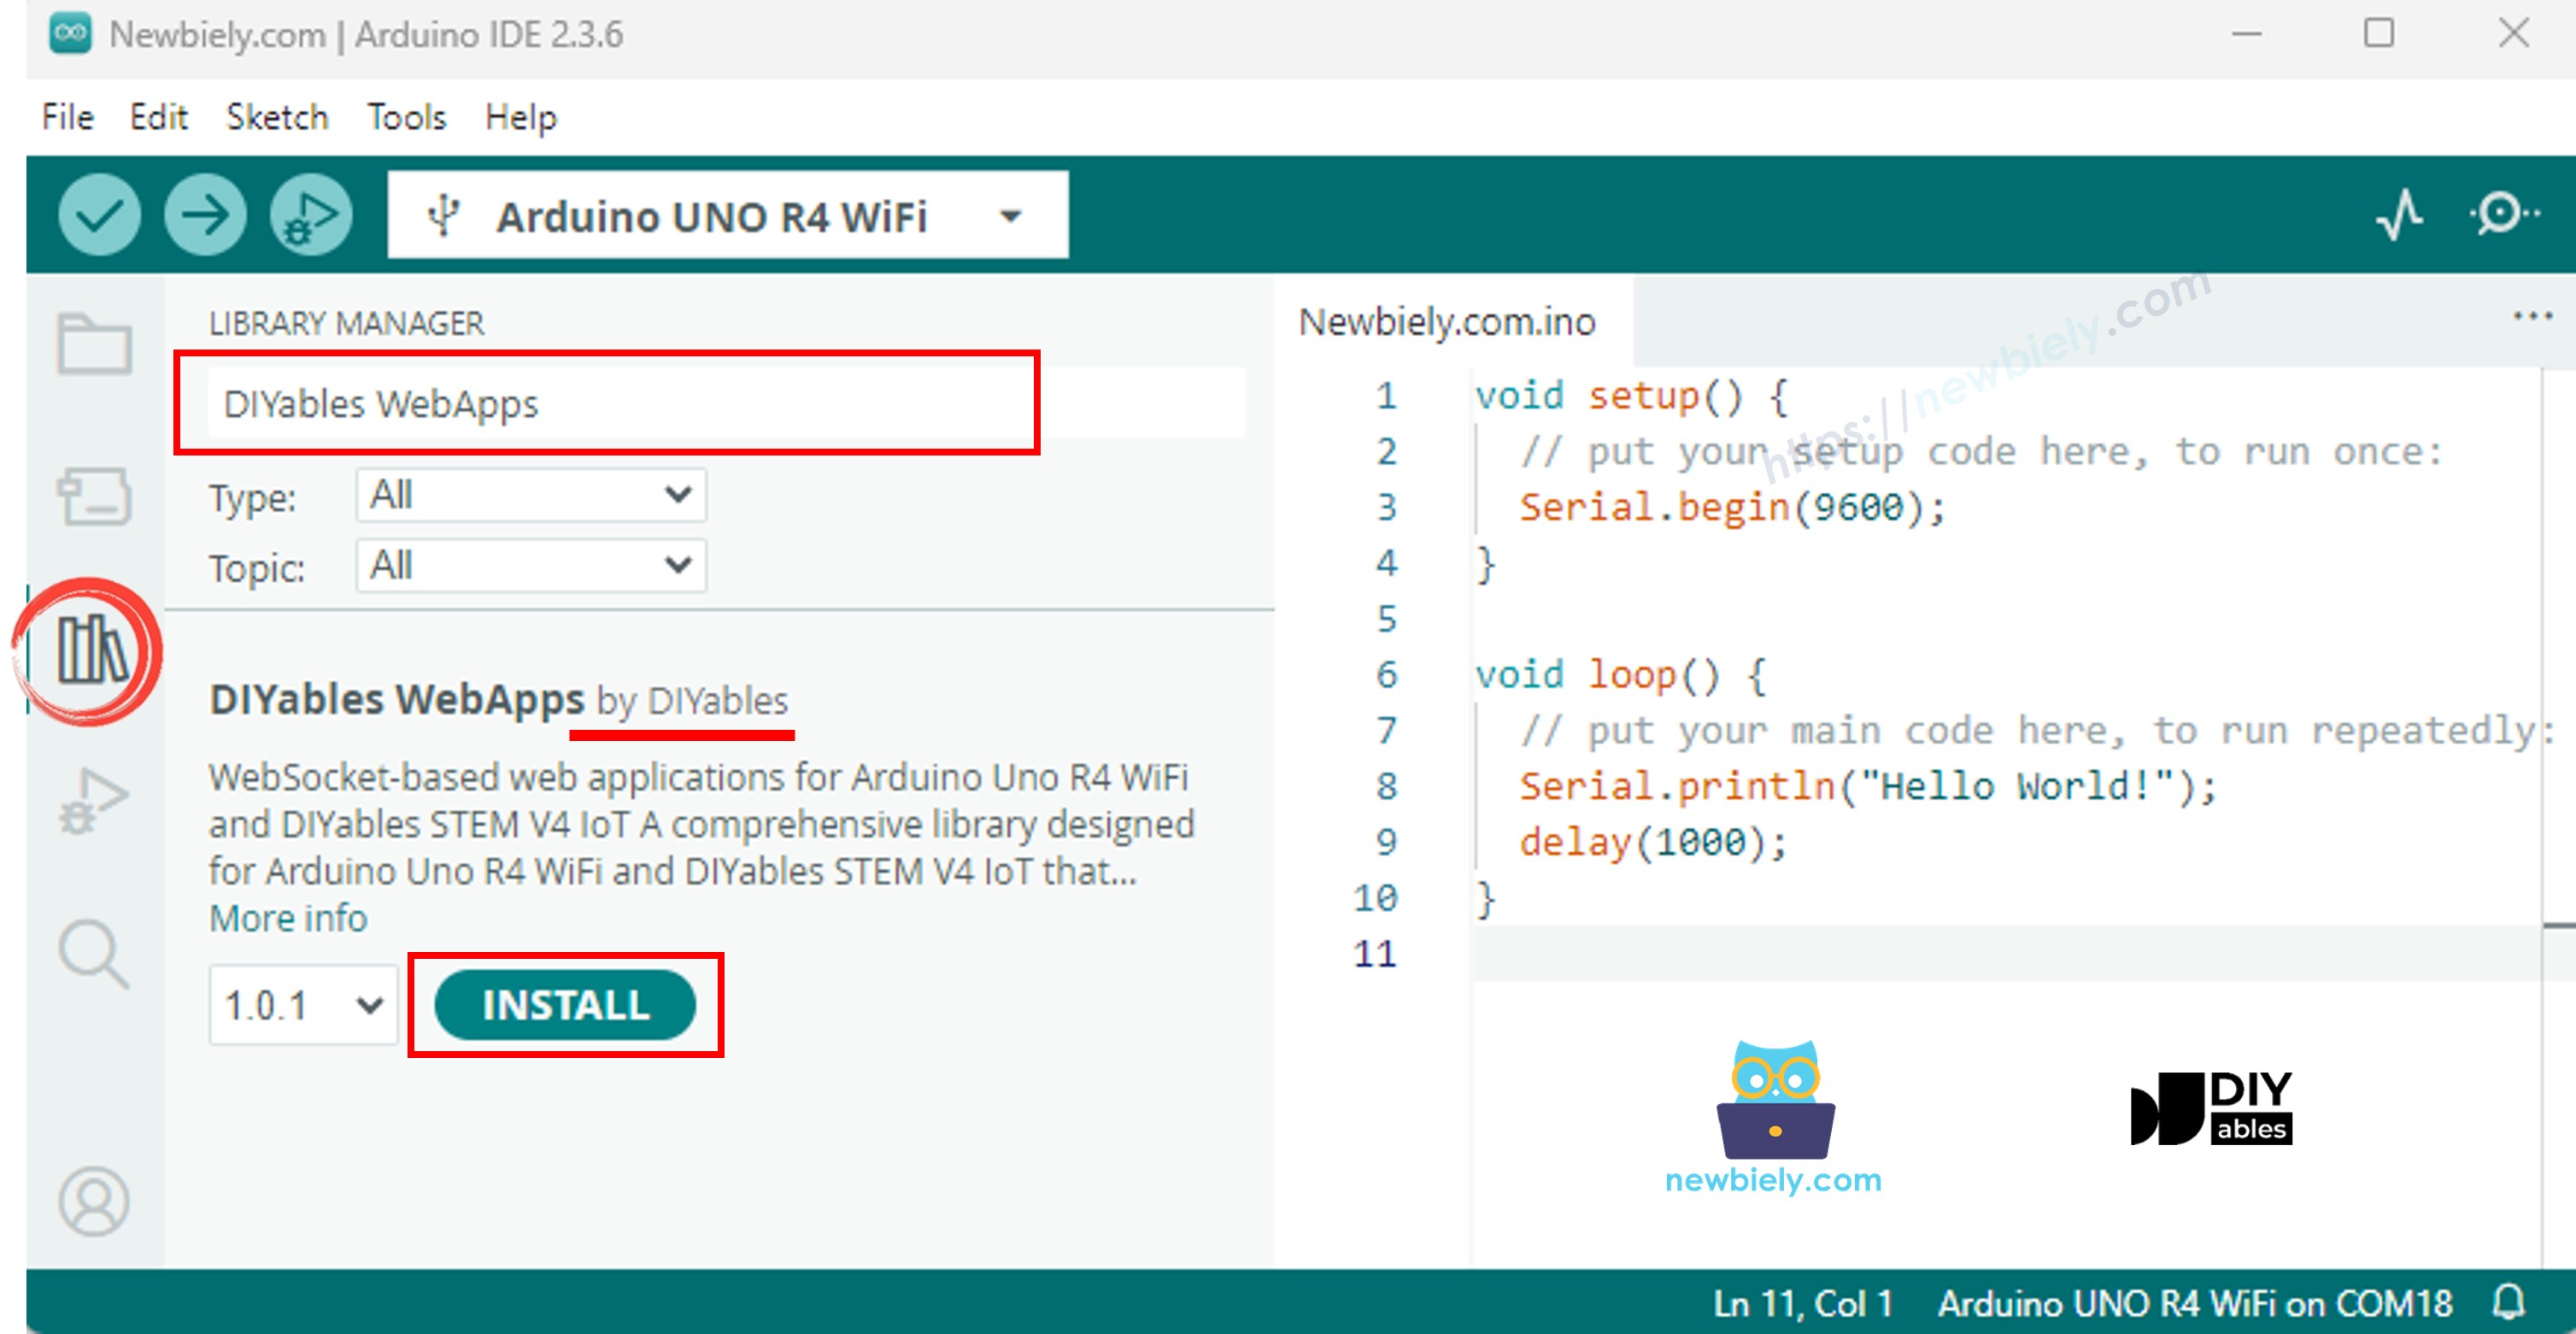
Accédez à l'icône Libraries dans la barre latérale gauche de l'IDE Arduino.
Recherchez "DIYables WebApps", puis trouvez la bibliothèque DIYables WebApps par DIYables.
Cliquez sur le bouton Install pour installer la bibliothèque.
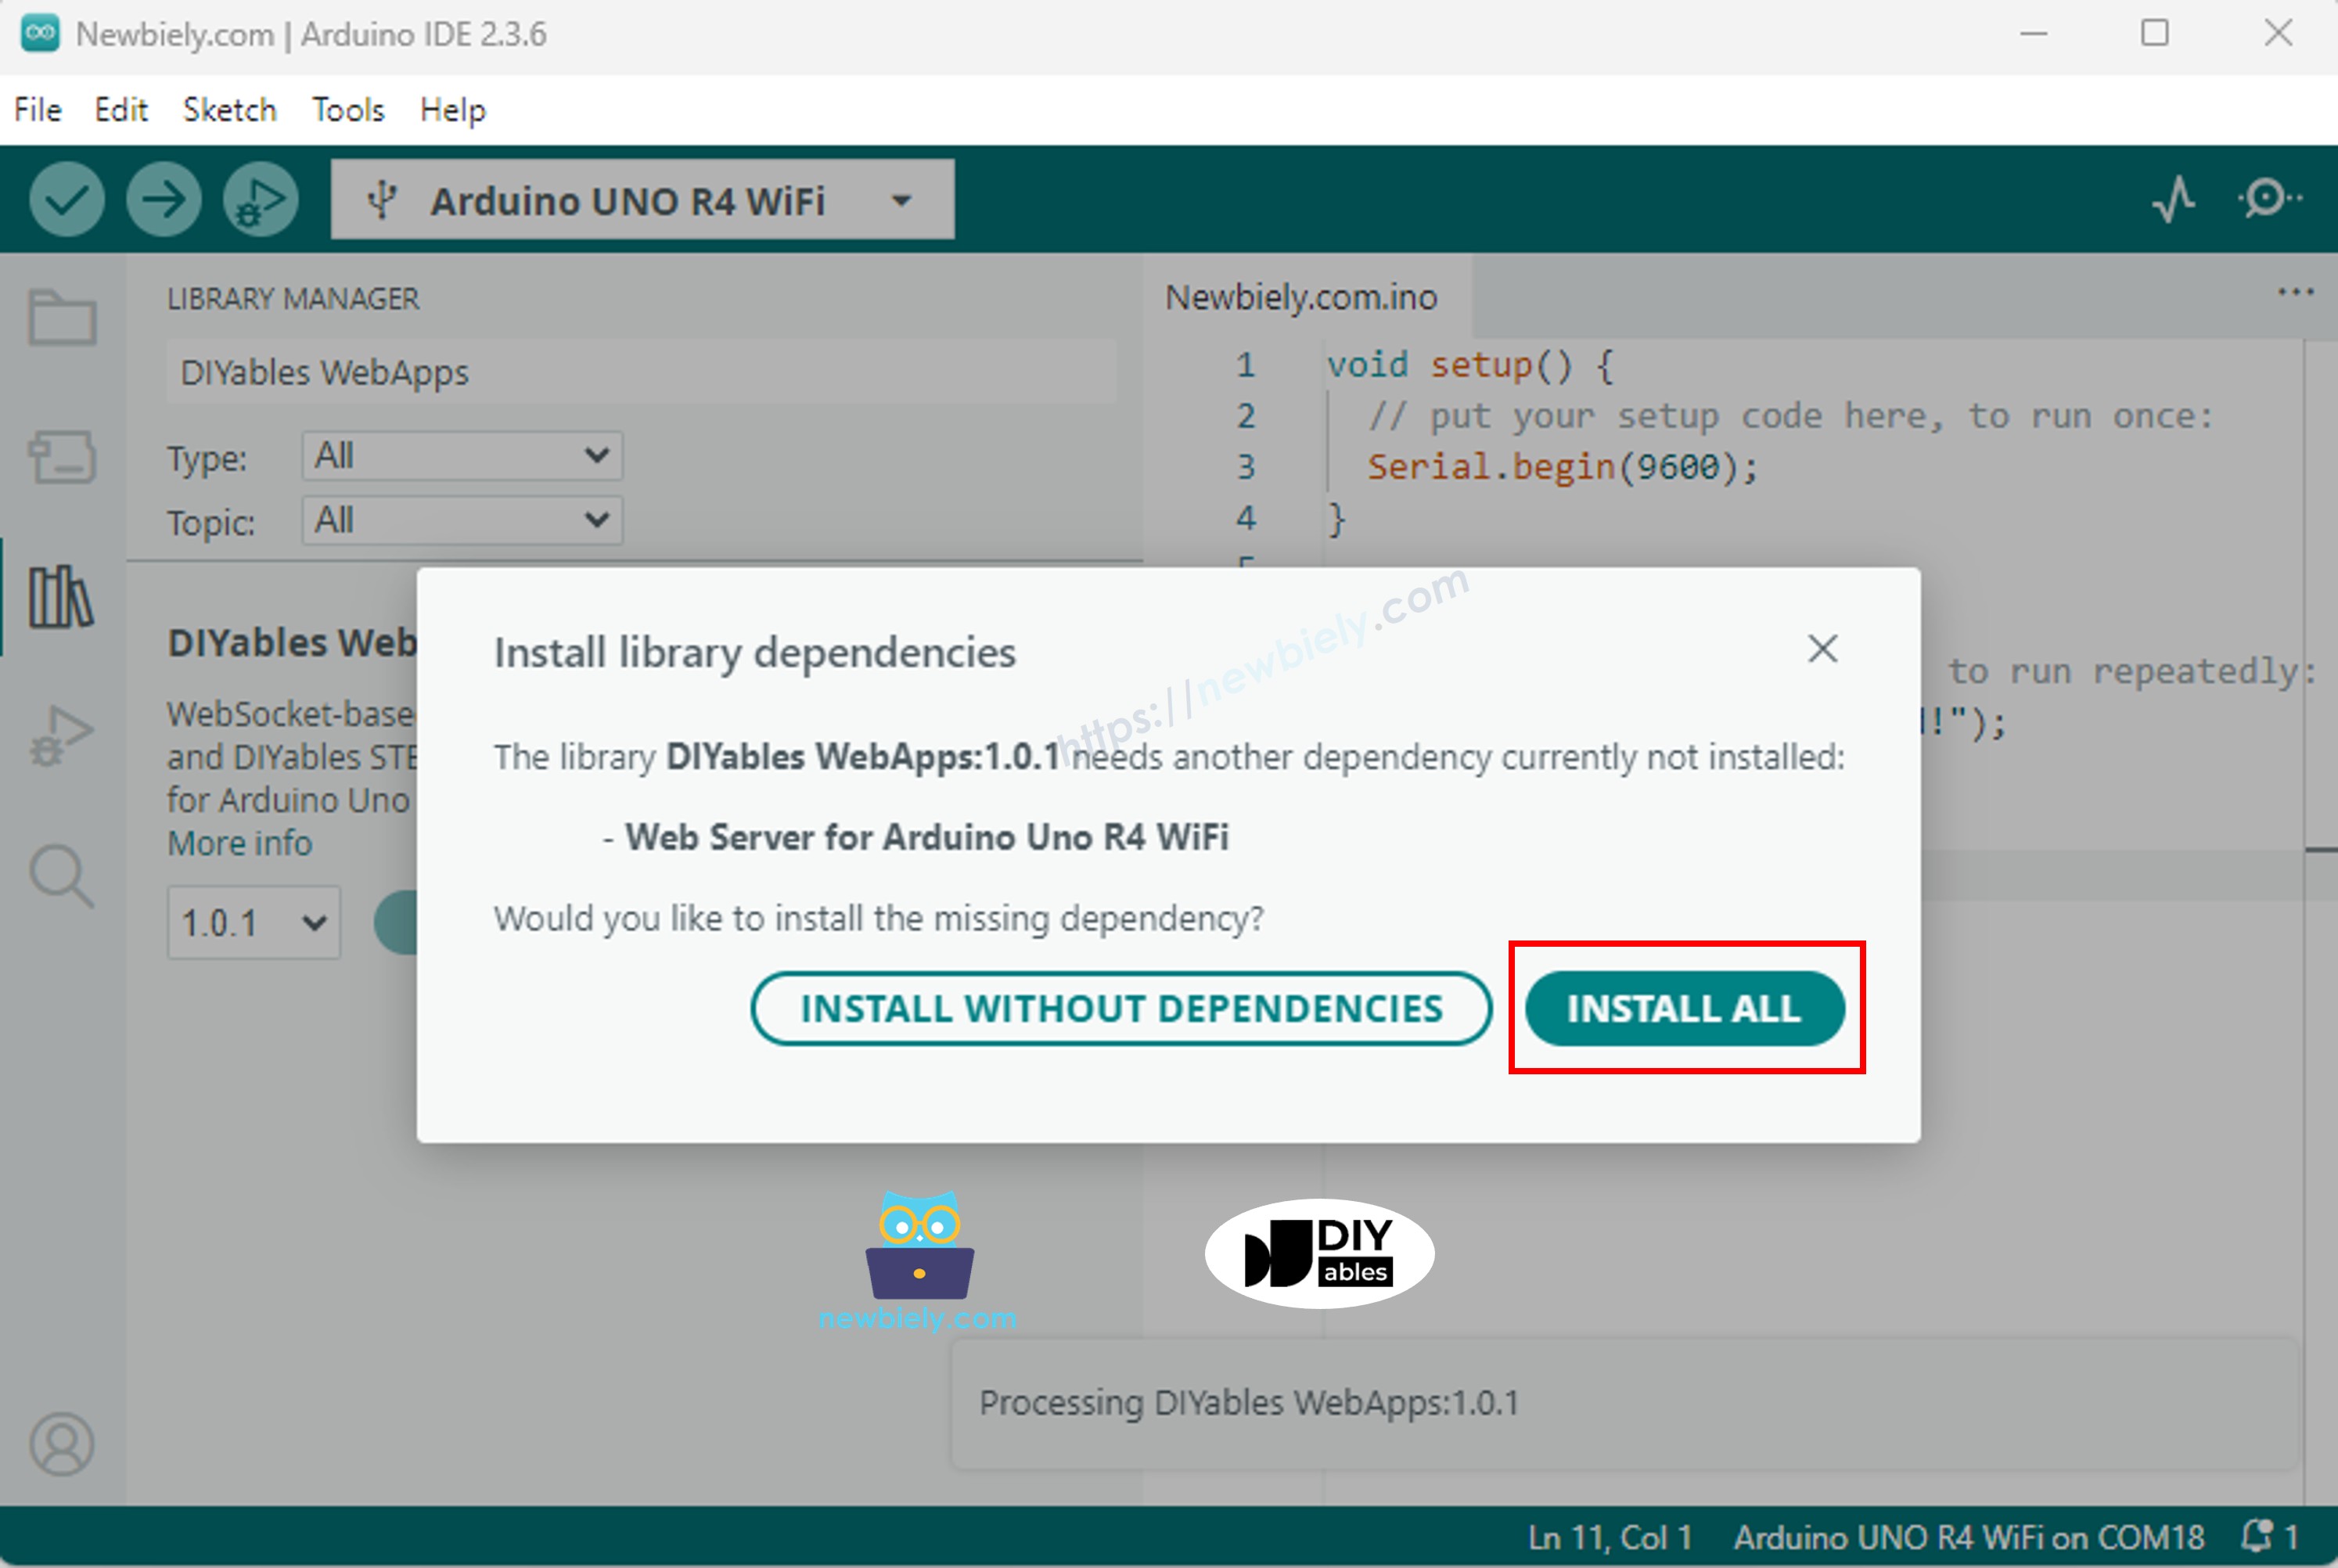
Il vous sera demandé d'installer d'autres dépendances de bibliothèque
Cliquez sur le bouton Tout installer pour installer toutes les dépendances de la bibliothèque.
Dans l'IDE Arduino, allez dans Fichier Exemples DIYables WebApps MultipleWebApps exemple, ou copiez le code ci-dessus et collez-le dans l'éditeur de l'IDE Arduino
/* * DIYables WebApp Library - Multiple WebApps Example * * This example demonstrates multiple web apps of the DIYables WebApp library: * - Home page with links to multiple web apps * - Web Monitor: Real-time serial monitoring via WebSocket * - Web Slider: Dual slider control * - Web Joystick: Interactive joystick control * - Web Rotator: Interactive rotatable disc control * - Web Analog Gauge: Professional circular gauge for sensor monitoring * - Web Table: Two-column data table with real-time updates * - Web Plotter: See WebPlotter example for real-time data visualization * * Features: * - Simplified callback system - no manual command parsing needed * - Automatic state synchronization and JSON handling * - All protocol details handled by the library * - Template for hardware control * * Hardware: Arduino Uno R4 WiFi or DIYables STEM V4 IoT * * Setup: * 1. Update WiFi credentials below * 2. Upload the sketch to your Arduino * 3. Open Serial Monitor to see the IP address * 4. Navigate to the IP address in your web browser */#include <DIYablesWebApps.h>// WiFi credentials - UPDATE THESE WITH YOUR NETWORKconstchar WIFI_SSID[] = "YOUR_WIFI_SSID";constchar WIFI_PASSWORD[] = "YOUR_WIFI_PASSWORD";// Create WebApp server and page instancesUnoR4ServerFactory factory;DIYablesWebAppServerwebAppsServer(factory, 80, 81);DIYablesHomePage homePage;DIYablesWebMonitorPage webMonitorPage;DIYablesWebSliderPage webSliderPage;DIYablesWebJoystickPage webJoystickPage(false, 5); // autoReturn=false, sensitivity=5DIYablesWebRotatorPage webRotatorPage(ROTATOR_MODE_CONTINUOUS); // Continuous rotation mode (0-360°)DIYablesWebAnalogGaugePage webAnalogGaugePage(0.0, 100.0, "%"); // Range: 0-100%, units: %DIYablesWebTablePage webTablePage;// Variables to track statesint currentSlider1 = 64; // Slider 1 value (0-255)int currentSlider2 = 128; // Slider 2 value (0-255)int currentJoystickX = 0; // Current joystick X value (-100 to 100)int currentJoystickY = 0; // Current joystick Y value (-100 to 100)int currentRotatorAngle = 0; // Current rotator angle (0-360°)float currentGaugeValue = 50.0; // Current gauge value (0.0-100.0)voidsetup() {Serial.begin(9600);delay(1000);// TODO: Initialize your hardware pins hereSerial.println("DIYables WebApp - Multiple Apps Example");// Add all web applications to the serverwebAppsServer.addApp(&homePage);webAppsServer.addApp(&webMonitorPage);webAppsServer.addApp(&webSliderPage);webAppsServer.addApp(&webJoystickPage);webAppsServer.addApp(&webRotatorPage);webAppsServer.addApp(&webAnalogGaugePage);webAppsServer.addApp(&webTablePage);// Add more web apps here (e.g., WebPlotter)// Set 404 Not Found page (optional - for better user experience)webAppsServer.setNotFoundPage(DIYablesNotFoundPage());// Configure table structure (only attribute names, values will be updated dynamically) webTablePage.addRow("Arduino Status"); webTablePage.addRow("WiFi Connected"); webTablePage.addRow("Uptime"); webTablePage.addRow("Slider 1"); webTablePage.addRow("Slider 2"); webTablePage.addRow("Joystick X"); webTablePage.addRow("Joystick Y"); webTablePage.addRow("Rotator Angle"); webTablePage.addRow("Gauge Value");// Start the WebApp serverif (!webAppsServer.begin(WIFI_SSID, WIFI_PASSWORD)) {while (1) {Serial.println("Failed to start WebApp server!");delay(1000); } } setupCallbacks();}void setupCallbacks() {// Web Monitor callback - echo messages back webMonitorPage.onWebMonitorMessage([](const String& message) {Serial.println("Web Monitor: " + message); webMonitorPage.sendToWebMonitor("Arduino received: " + message); });// Web Slider callback - handle slider values webSliderPage.onSliderValueFromWeb([](int slider1, int slider2) {// Store the received values currentSlider1 = slider1; currentSlider2 = slider2;// Print slider values (0-255) without String concatenationSerial.print("Slider 1: ");Serial.print(slider1);Serial.print(", Slider 2: ");Serial.println(slider2);// Update table with new slider values using String() conversion webTablePage.sendValueUpdate("Slider 1", String(slider1)); webTablePage.sendValueUpdate("Slider 2", String(slider2));// TODO: Add your control logic here based on slider values// Examples:// - Control PWM: analogWrite(LED_PIN, slider1);// - Control servos: servo.write(map(slider1, 0, 255, 0, 180));// - Control motor speed: analogWrite(MOTOR_PIN, slider2);// Update gauge based on slider1 value (map 0-255 to 0-100) currentGaugeValue = map(slider1, 0, 255, 0, 100); webAnalogGaugePage.sendToWebAnalogGauge(currentGaugeValue);char gaugeStr[16]; snprintf(gaugeStr, sizeof(gaugeStr), "%.1f%%", currentGaugeValue); webTablePage.sendValueUpdate("Gauge Value", String(gaugeStr)); });// Handle slider value requests webSliderPage.onSliderValueToWeb([]() { webSliderPage.sendToWebSlider(currentSlider1, currentSlider2); });// Web Joystick callback - handle joystick movement webJoystickPage.onJoystickValueFromWeb([](int x, int y) {// Store the received values currentJoystickX = x; currentJoystickY = y;// Print joystick position values (-100 to +100)Serial.print("Joystick - X: ");Serial.print(x);Serial.print(", Y: ");Serial.println(y);Serial.print(x);Serial.print(", Y: ");Serial.println(y);// Update table with new joystick values webTablePage.sendValueUpdate("Joystick X", String(x)); webTablePage.sendValueUpdate("Joystick Y", String(y));// TODO: Add your control logic here based on joystick position// Examples:// - Control motors: if (x > 50) { /* move right */ }// - Control servos: servo.write(map(y, -100, 100, 0, 180));// - Control LEDs: analogWrite(LED_PIN, map(abs(x), 0, 100, 0, 255)); });// Handle joystick values requests (when web page loads/reconnects) webJoystickPage.onJoystickValueToWeb([]() { webJoystickPage.sendToWebJoystick(currentJoystickX, currentJoystickY); });// Web Rotator callback - handle rotation angle changes webRotatorPage.onRotatorAngleFromWeb([](float angle) {// Store the received angle currentRotatorAngle = (int)angle;// Print rotator angle (0-360°)Serial.println("Rotator angle: " + String(angle) + "°");// Update table with new rotator angle webTablePage.sendValueUpdate("Rotator Angle", String(angle, 0) + "°");// TODO: Add your control logic here based on rotator angle// Examples:// - Control servo: servo.write(map(angle, 0, 360, 0, 180));// - Control stepper motor: stepper.moveTo(angle);// - Control directional LED strip: setLEDDirection(angle); });// Handle analog gauge value requests (when web page loads/reconnects) webAnalogGaugePage.onGaugeValueRequest([]() { webAnalogGaugePage.sendToWebAnalogGauge(currentGaugeValue); });// Handle table data requests (when web page loads/reconnects) webTablePage.onTableValueRequest([]() {// Send initial values to the table webTablePage.sendValueUpdate("Arduino Status", "Running"); webTablePage.sendValueUpdate("WiFi Connected", "Yes"); webTablePage.sendValueUpdate("Uptime", "0 seconds"); webTablePage.sendValueUpdate("Slider 1", String(currentSlider1)); webTablePage.sendValueUpdate("Slider 2", String(currentSlider2)); webTablePage.sendValueUpdate("Joystick X", String(currentJoystickX)); webTablePage.sendValueUpdate("Joystick Y", String(currentJoystickY)); webTablePage.sendValueUpdate("Rotator Angle", String(currentRotatorAngle) + "°"); webTablePage.sendValueUpdate("Gauge Value", String(currentGaugeValue, 1) + "%"); });}voidloop() {// Handle WebApp server communicationswebAppsServer.loop();// Update table with current uptime every 5 secondsstaticunsignedlong lastUptimeUpdate = 0;if (millis() - lastUptimeUpdate > 5000) { lastUptimeUpdate = millis();unsignedlong uptimeSeconds = millis() / 1000;String uptimeStr = String(uptimeSeconds) + " seconds";if (uptimeSeconds >= 60) { uptimeStr = String(uptimeSeconds / 60) + "m " + String(uptimeSeconds % 60) + "s"; } webTablePage.sendValueUpdate("Uptime", uptimeStr); }// Simulate sensor data updates every 3 secondsstaticunsignedlong lastSensorUpdate = 0;if (millis() - lastSensorUpdate > 3000) { lastSensorUpdate = millis();// Simulate a sensor reading that varies over timefloat sensorValue = 50.0 + 30.0 * sin(millis() / 10000.0); // Oscillates between 20-80 currentGaugeValue = sensorValue;// Update gauge and table webAnalogGaugePage.sendToWebAnalogGauge(currentGaugeValue); webTablePage.sendValueUpdate("Gauge Value", String(currentGaugeValue, 1) + "%"); }// TODO: Add your main application code heredelay(10);}
Configurez les identifiants WiFi dans le code en mettant à jour ces lignes :
Cliquez sur le bouton Upload dans l'IDE Arduino pour téléverser le code sur l'Arduino UNO R4/DIYables STEM V4 IoT
Ouvrez le moniteur série
Consultez le résultat sur le moniteur série. Il ressemble à ce qui suit
Newbiely | Arduino IDE 2.3.8
──
☐
✕
File
Edit
Sketch
Tools
Help
Arduino Uno R4 WiFi
Newbiely.ino
···
8Serial.println("Hello World!");
Output
Serial Monitor
Message (Enter to send message to 'Arduino Uno R4 WiFi' on 'COM15')
New Line
9600 baud
DIYables WebApp - Multiple Apps Example
INFO: Added app /
INFO: Added app /web-monitor
INFO: Added app /web-slider
INFO: Added app /web-joystick
INFO: Added app /web-rotator
INFO: Added app /web-gauge
INFO: Added app /web-table
DIYables WebApp Library
Platform: Arduino Uno R4 WiFi
Network connected!
IP address: 192.168.0.2
HTTP server started on port 80
Configuring WebSocket server callbacks...
WebSocket server started on port 81
WebSocket URL: ws://192.168.0.2:81
WebSocket server started on port 81
==========================================
DIYables WebApp Ready!
==========================================
📱 Web Interface: http://192.168.0.2
🔗 WebSocket: ws://192.168.0.2:81
📋 Available Applications:
🏠 Home Page: http://192.168.0.2/
📊 Web Monitor: http://192.168.0.2/web-monitor
🎚️ Web Slider: http://192.168.0.2/web-slider
🕹️ Web Joystick: http://192.168.0.2/web-joystick
🔄 Web Rotator: http://192.168.0.2/web-rotator
⏲️ Web Analog Gauge: http://192.168.0.2/web-gauge
📊 Web Table: http://192.168.0.2/web-table
==========================================
Ln 11, Col 1
Arduino Uno R4 WiFi on COM15
2
Si vous ne voyez rien, redémarrez la carte Arduino.
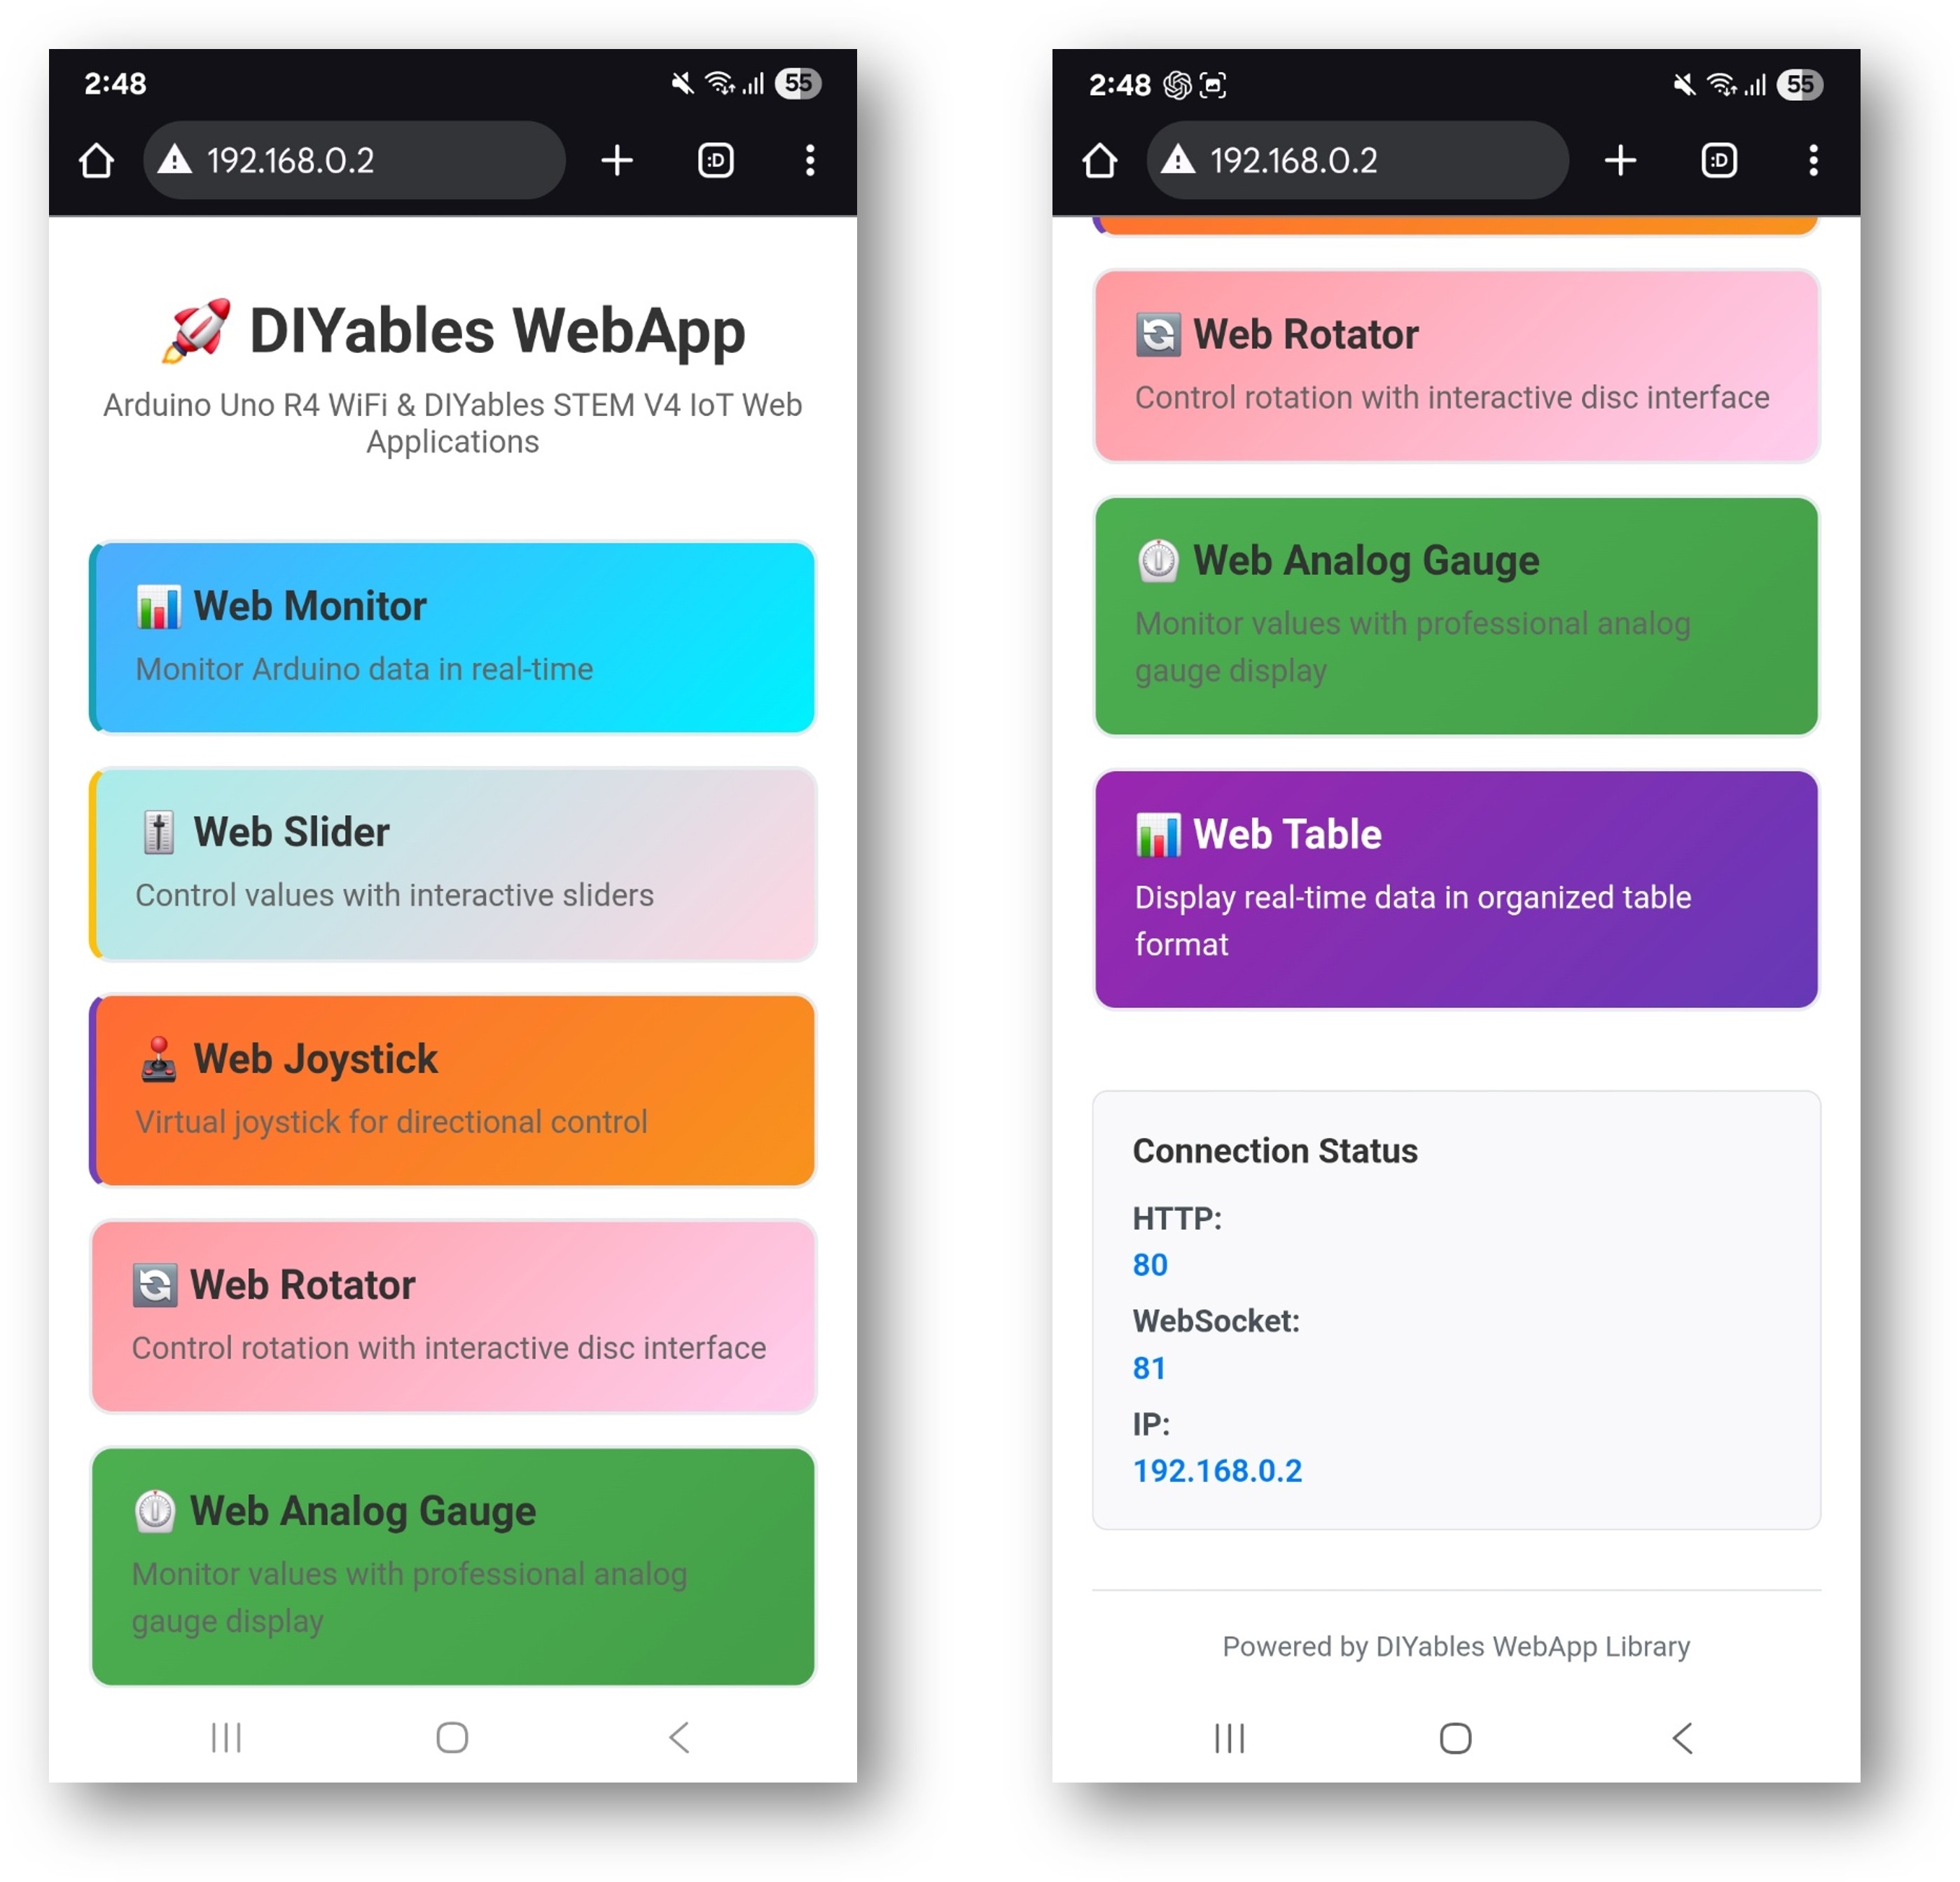
Prenez note de l'adresse IP affichée et saisissez cette adresse dans la barre d'adresse d'un navigateur web sur votre smartphone ou sur votre PC.
Exemple : http://192.168.0.2
Vous verrez la page d'accueil avec toutes les applications web comme sur l'image ci-dessous.
Cliquez sur n'importe quel lien d'une application web (Chat, Web Monitor, Web Digital Pins, Web Slider, Web Joystick, etc.), vous verrez l'interface utilisateur de l'application web correspondante.
Ou vous pouvez également accéder directement à chaque page en utilisant l'adresse IP suivie du chemin de l'application. Par exemple : http://192.168.0.2/chat, http://192.168.0.2/web-monitor, etc.
Explorez toutes les applications web : essayez de discuter avec Arduino, surveillez la sortie série, contrôlez les broches numériques, ajustez les curseurs et utilisez le joystick virtuel pour découvrir toutes les capacités de l'interface web intégrée.
Navigation de l'interface Web
Tableau de bord de la page d'accueil
La page d'accueil sert de centre de contrôle avec des liens vers toutes les applications :
Moniteur Web: /webmonitor - Interface de communication série
Chat: /chat - Messagerie interactive avec Arduino
Broches numériques: /digital-pins - Contrôle et surveillance des broches
Curseur Web: /webslider - Deux curseurs de contrôle analogiques
Joystick Web: /webjoystick - Interface de contrôle de position en 2D
URLs d'applications
Accédez directement à chaque interface :
http://[ARDUINO_IP]/ # Home pagehttp://[ARDUINO_IP]/webmonitor # Serialmonitor interfacehttp://[ARDUINO_IP]/chat # Chat interfacehttp://[ARDUINO_IP]/digital-pins # Pin controlhttp://[ARDUINO_IP]/webslider # Slider controlshttp://[ARDUINO_IP]/webjoystick # Joystick control
Cet exemple exhaustif offre une base pour vos projets créatifs. Modifiez et adaptez les configurations ci-dessous pour créer des applications IoT incroyables qui correspondent à votre vision unique.
Configuration des broches numériques
L'exemple préconfigure des broches spécifiques pour différentes utilisations :
Broches de sortie (contrôlables via le Web)
webDigitalPinsPage.enablePin(2, WEB_PIN_OUTPUT); // General purpose outputwebDigitalPinsPage.enablePin(3, WEB_PIN_OUTPUT); // General purpose outputwebDigitalPinsPage.enablePin(4, WEB_PIN_OUTPUT); // General purpose outputwebDigitalPinsPage.enablePin(13, WEB_PIN_OUTPUT); // Built-in LED
// Create joystick with custom settings// autoReturn=false: Joystick stays at last position when released// sensitivity=5: Only send updates when movement > 5%DIYablesWebJoystickPage webJoystickPage(false, 5);
Variables d'État
L'exemple maintient un état synchronisé à travers toutes les interfaces :
int pinStates[16] = { LOW }; // Track pin states (pins 0-13)int currentSlider1 = 64; // Slider 1 value (0-255) - 25%int currentSlider2 = 128; // Slider 2 value (0-255) - 50%int currentJoystickX = 0; // Joystick X value (-100 to 100)int currentJoystickY = 0; // Joystick Y value (-100 to 100)
Commandes de chat intégrées
L'interface de chat comprend plusieurs commandes préprogrammées :
Commandes de base
hello - Réponse de salutation amicale
time - Affiche le temps de fonctionnement d'Arduino en secondes
status - Rapporte l'état d'Arduino et l'état de la LED
help - Liste les commandes disponibles
Commandes de contrôle
LED allumée - Allume la LED intégrée
LED éteinte - Éteint la LED intégrée
Exemple de session de chat
User: helloArduino: Hello! I'm your Arduino. How can I help you?User: led onArduino: Built-in LED is now ON!User: timeArduino: I've been runningfor 1245 seconds.User: statusArduino: Status: Running smoothly! LED is ON
// Science experiment control systemconstint HEATING_ELEMENT = 9;constint COOLING_FAN = 10;constint STIRRER_MOTOR = 11;constint TEMP_SENSOR_PIN = A0;constint PH_SENSOR_PIN = A1;void setupScienceExperiment() {// Sliders for temperature and stirring control webSliderPage.onSliderValueFromWeb([](int slider1, int slider2) {// Slider 1 controls target temperature (mapped to heating/cooling)int targetTemp = map(slider1, 0, 255, 20, 80); // 20-80°C range// Slider 2 controls stirrer speedanalogWrite(STIRRER_MOTOR, slider2);// Simple temperature control logicint currentTemp = readTemperature();if (currentTemp < targetTemp) {analogWrite(HEATING_ELEMENT, 200); // Heat onanalogWrite(COOLING_FAN, 0); // Fan off } elseif (currentTemp > targetTemp + 2) {analogWrite(HEATING_ELEMENT, 0); // Heat offanalogWrite(COOLING_FAN, 255); // Fan on } else {analogWrite(HEATING_ELEMENT, 0); // Both off (maintain)analogWrite(COOLING_FAN, 0); }Serial.println("Target: " + String(targetTemp) + "°C, Current: " + String(currentTemp) + "°C"); });// Chat interface for experiment control and data chatPage.onChatMessage([](constString& message) {String msg = message; msg.toLowerCase();if (msg.indexOf("data") >= 0) {int temp = readTemperature();float ph = readPH();String data = "Temperature: " + String(temp) + "°C, pH: " + String(ph, 2); chatPage.sendToChat(data);return; }if (msg.indexOf("start") >= 0) {// Begin experiment sequence chatPage.sendToChat("🔬 Experiment started! Monitoring conditions...");return; }if (msg.indexOf("stop") >= 0) {// Emergency stopanalogWrite(HEATING_ELEMENT, 0);analogWrite(COOLING_FAN, 0);analogWrite(STIRRER_MOTOR, 0); chatPage.sendToChat("⚠️ Experiment stopped - all systems OFF");return; } chatPage.sendToChat("Science commands: data, start, stop"); });// Monitor for automatic data logging webMonitorPage.onWebMonitorMessage([](const String& message) {if (message == "log") {int temp = readTemperature();float ph = readPH();String logEntry = String(millis()) + "," + String(temp) + "," + String(ph, 2); webMonitorPage.sendToWebMonitor(logEntry); } });}intreadTemperature() {// Read temperature sensor (example implementation)int sensorValue = analogRead(TEMP_SENSOR_PIN);returnmap(sensorValue, 0, 1023, 0, 100); // Convert to temperature}float readPH() {// Read pH sensor (example implementation)int sensorValue = analogRead(PH_SENSOR_PIN);returnmap(sensorValue, 0, 1023, 0, 14) / 10.0; // Convert to pH}
Techniques d’intégration avancées
Synchronisation d'État
void synchronizeAllStates() {// Ensure all interfaces show current state webSliderPage.sendToWebSlider(currentSlider1, currentSlider2); webJoystickPage.sendToWebJoystick(currentJoystickX, currentJoystickY);// Update all pin statesfor (int pin = 0; pin <= 13; pin++) {if (webDigitalPinsPage.isPinEnabled(pin)) { webDigitalPinsPage.updatePinState(pin, pinStates[pin]); } }Serial.println("All interface states synchronized");}
Communication entre interfaces
void setupCrossInterfaceCommunication() {// Joystick position affects slider maximum values webJoystickPage.onJoystickValueFromWeb([](int x, int y) {// Calculate distance from centerfloat distance = sqrt(x*x + y*y);// Limit slider maximum based on joystick distanceif (distance > 50) {// Reduce maximum slider values when joystick is far from centerint maxValue = map(distance, 50, 100, 255, 128);// You could implement dynamic slider limiting here } });// Pin states affect available chat commands webDigitalPinsPage.onPinWrite([](int pin, int state) {if (pin == 2 && state == HIGH) { chatPage.sendToChat("📢 System armed - additional commands available"); } elseif (pin == 2 && state == LOW) { chatPage.sendToChat("📢 System disarmed - limited commands only"); } });}
Dépannage
Problèmes courants
1. Certaines interfaces ne se chargent pas
Vérifiez que toutes les applications sont ajoutées au serveur dans setup()
Vérifiez les connexions WebSocket dans la console du navigateur
Assurez-vous d'avoir suffisamment de mémoire pour toutes les interfaces
2. Énoncez les incohérences entre les interfaces
Implémentez les fonctions de rappel de synchronisation d'état
Utilisez des variables globales partagées pour le suivi de l'état
Appelez les fonctions de synchronisation après des changements d'état majeurs
3. Problèmes de performance avec plusieurs interfaces
Réduire les fréquences de mise à jour pour les interfaces non critiques
Implémenter des mises à jour sélectives en fonction de l'interface active
Envisager la désactivation des interfaces inutilisées pour des projets spécifiques
4. Limites de mémoire
Surveillez la mémoire RAM disponible avec Serial.print(freeMemory())
Désactivez les interfaces inutilisées si la mémoire est insuffisante
Optimisez les fonctions de rappel pour minimiser l'utilisation de mémoire
Curseurs pour le contrôle de la vitesse et de la température
Joystick pour les systèmes de positionnement
Chat pour les rapports d'état et les commandes
Moniteur pour l'enregistrement des données
Modèle de laboratoire pédagogique
Curseurs pour les paramètres d'expérience
Broches numériques pour le contrôle des équipements
Chat pour l'interaction avec les étudiants
Moniteur pour la collecte de données
Surveillance en temps réel des capteurs
Modèle d'automatisation domestique
Broches numériques pour le contrôle de l'éclairage et des appareils
Curseurs pour le réglage de l'éclairage et du climat
Surveillance de la sécurité via des broches d'entrée
Chat pour des commandes vocales
Moniteur pour la journalisation de l'état du système
Modèle de développement en robotique
Joystick pour le contrôle du déplacement
Curseurs pour la vitesse et le positionnement du servomoteur
Broches numériques pour les entrées des capteurs
Chat pour l'interface de commande
Moniteur pour le débogage et la télémétrie
Optimisation des performances
Gestion de la mémoire
void optimizeMemoryUsage() {// Disable unused interfaces to save memory// server.addApp(&homePage); // Always keep home page// server.addApp(&webMonitorPage); // Keep for debugging// server.addApp(&chatPage); // Optional// server.addApp(&webDigitalPinsPage); // Based on project needs// server.addApp(&webSliderPage); // Based on project needs// server.addApp(&webJoystickPage); // Based on project needs}
Contrôle de la fréquence de mise à jour
void controlUpdateFrequency() {staticunsignedlong lastSlowUpdate = 0;staticunsignedlong lastFastUpdate = 0;// Fast updates for critical controls (10ms)if (millis() - lastFastUpdate > 10) {// Update joystick and emergency controls lastFastUpdate = millis(); }// Slow updates for monitoring (1000ms)if (millis() - lastSlowUpdate > 1000) {// Update sensor readings and status lastSlowUpdate = millis(); }}
Étapes suivantes
Après avoir maîtrisé l'exemple MultipleWebApps :
Personnalisez votre projet: Supprimez les interfaces inutilisées et ajoutez une logique spécifique au projet
Ajouter des capteurs: Intégrez de vraies lectures de capteurs pour la surveillance des entrées
Implémenter la sécurité: Ajouter des arrêts d'urgence et des dispositifs d'interverrouillage de sécurité
Créer des commandes personnalisées: Étendre l’interface de chat avec des commandes spécifiques au projet
Ajouter la journalisation des données: Utiliser le moniteur Web pour le stockage permanent des données
Optimisation mobile: Tester et optimiser l'utilisation sur les appareils mobiles
Assistance
Pour obtenir de l'aide supplémentaire :
Consultez la documentation des exemples individuels (Chat_Example.txt, WebMonitor_Example.txt, etc.)
Consultez la documentation de référence de l'API
Consultez les tutoriels DIYables : https://newbiely.com/tutorials/arduino-uno-r4/arduino-uno-r4-diyables-webapps
Forums de la communauté Arduino
Cet exemple complet constitue la base de pratiquement n'importe quel projet Arduino contrôlé via le Web. Commencez avec ce modèle et adaptez-le à vos besoins spécifiques !
N'hésitez pas à partager le lien de ce tutoriel. Cependant, veuillez ne pas utiliser notre contenu sur d'autres sites web. Nous avons investi beaucoup d'efforts et de temps pour créer ce contenu, veuillez respecter notre travail !