ESP32 - Compteur de bouton - OLED

Dans ce tutoriel, nous allons explorer l'ESP32 pour atteindre les objectifs suivants :

De plus, le tutoriel aborde le debounce du bouton sans utiliser la fonction delay(). Pour comprendre pourquoi le debounce est essentiel, référez-vous à l'explication fournie dans Pourquoi avons-nous besoin de debounce?.

Ce guide complet vous aidera à intégrer le comptage des pressions sur un bouton, les fonctionnalités d'affichage OLED et les techniques de debouncing de manière transparente avec votre projet ESP32.

Préparation du matériel

1×ESP-WROOM-32 Dev Module
1×USB Cable Type-C
1×Push Button
1×(Optional) Panel-mount Push Button
1×SSD1306 I2C OLED Display 128x64
1×Breadboard
1×Jumper Wires
1×(Recommended) ESP32 Screw Terminal Adapter

Or you can buy the following sensor kits:

1×DIYables Sensor Kit (30 sensors/displays)
1×DIYables Sensor Kit (18 sensors/displays)
Divulgation : Certains des liens fournis dans cette section sont des liens affiliés Amazon. Nous pouvons recevoir une commission pour tout achat effectué via ces liens, sans coût supplémentaire pour vous. Nous vous remercions de votre soutien.

À propos d'OLED et de bouton

Non familiarisé avec les OLED et les boutons, y compris leurs brochages, fonctionnalités et programmation ? Explorez des tutoriels complets sur ces sujets ci-dessous :

Diagramme de câblage
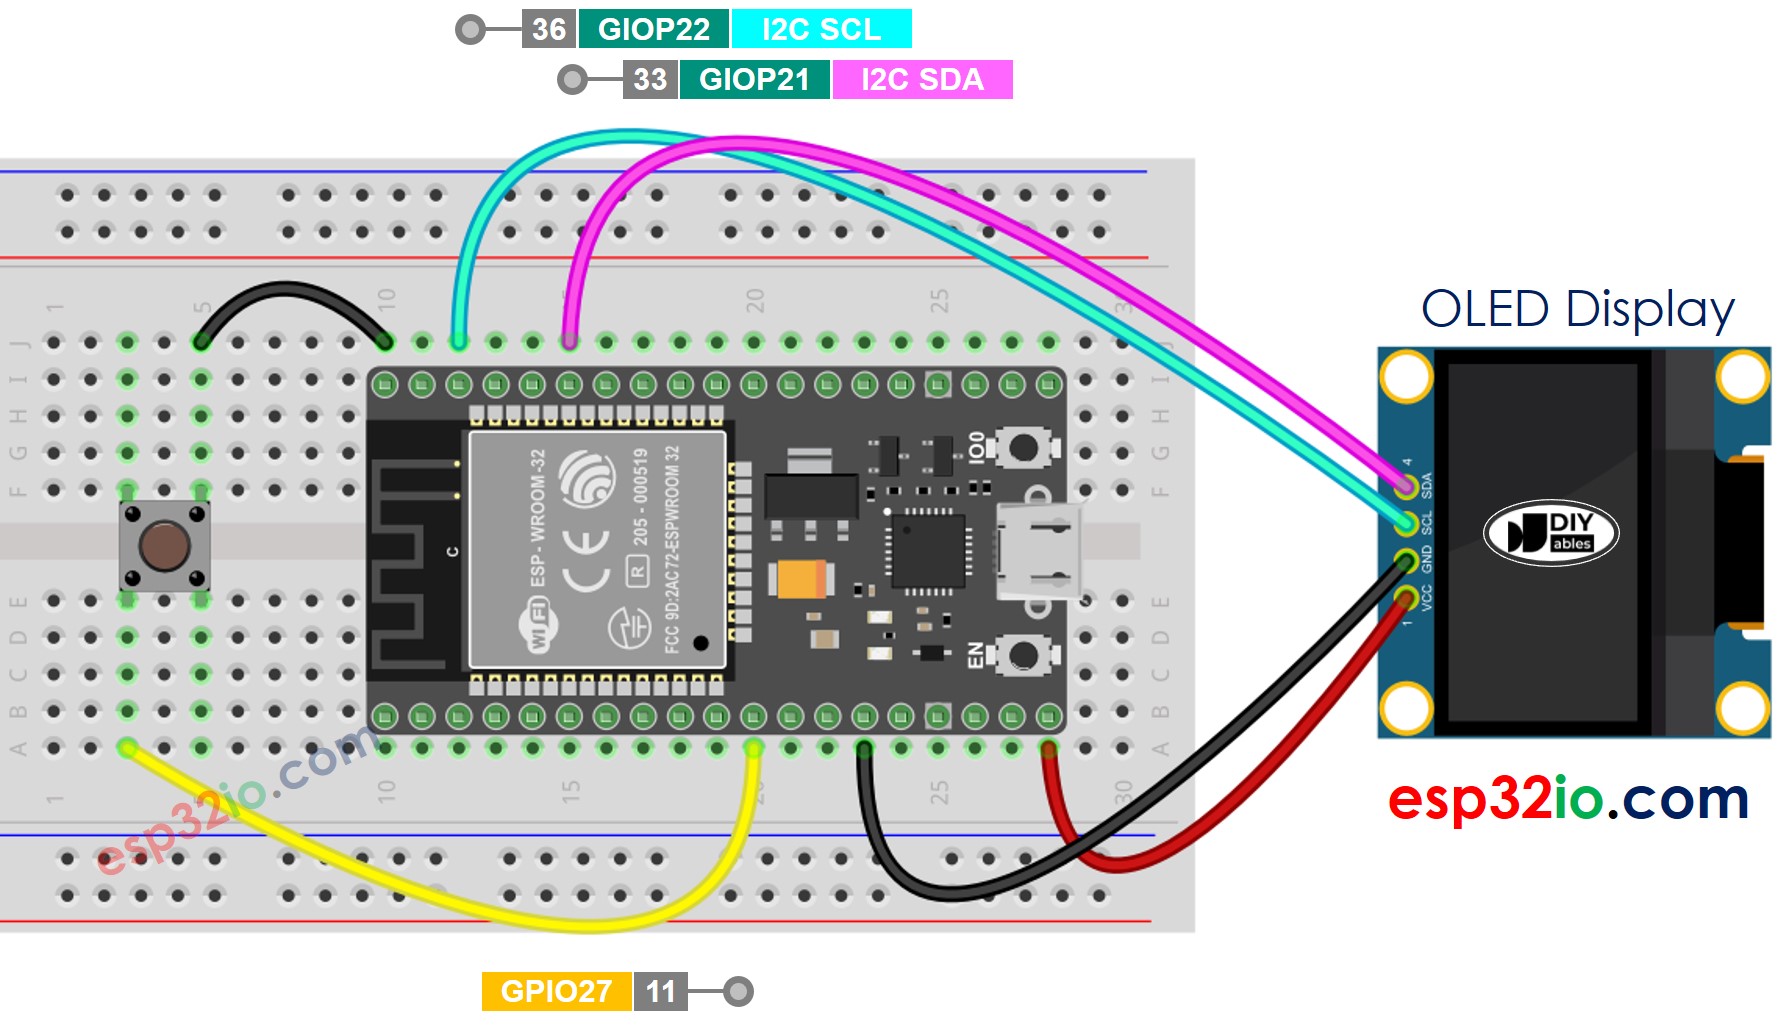
Schéma de câblage OLED bouton ESP32

This image is created using Fritzing. Click to enlarge image

Si vous ne savez pas comment alimenter l'ESP32 et d'autres composants, vous pouvez trouver des conseils dans le tutoriel suivant : Comment alimenter l'ESP32.

Code ESP32 - affichage du comptage des boutons sur OLED

/* * Ce code ESP32 a été développé par newbiely.fr * Ce code ESP32 est mis à disposition du public sans aucune restriction. * Pour des instructions complètes et des schémas de câblage, veuillez visiter: * https://newbiely.fr/tutorials/esp32/esp32-button-count-oled */ #include <Wire.h> #include <Adafruit_GFX.h> #include <Adafruit_SSD1306.h> #include <ezButton.h> #define SCREEN_WIDTH 128 // OLED display width, in pixels #define SCREEN_HEIGHT 64 // OLED display height, in pixels Adafruit_SSD1306 oled(SCREEN_WIDTH, SCREEN_HEIGHT, &Wire, -1); // create SSD1306 display object connected to I2C ezButton button(27); // create ezButton object that attach to the ESP32 pin GPIO27 unsigned long lastCount = 0; void setup() { Serial.begin(9600); // initialize OLED display with address 0x3C for 128x64 if (!oled.begin(SSD1306_SWITCHCAPVCC, 0x3C)) { Serial.println(F("SSD1306 allocation failed")); while (true); } delay(2000); // wait for initializing oled.clearDisplay(); // clear display oled.setTextSize(2); // text size oled.setTextColor(WHITE); // text color oled.setCursor(0, 10); // position to display button.setDebounceTime(50); // set debounce time to 50 milliseconds button.setCountMode(COUNT_FALLING); } void loop() { button.loop(); // MUST call the loop() function first unsigned long count = button.getCount(); if (lastCount != count) { Serial.println(count); // print count to Serial Monitor oled.clearDisplay(); // clear display oled.println(count); // display count oled.display(); // show on OLED lastCount != count; } }

Étapes rapides

  • Si c'est la première fois que vous utilisez un ESP32, consultez comment configurer l'environnement pour ESP32 sur Arduino IDE.
  • Faites le câblage comme sur l'image ci-dessus.
  • Connectez la carte ESP32 à votre PC via un câble micro USB.
  • Ouvrez Arduino IDE sur votre PC.
  • Sélectionnez la bonne carte ESP32 (par exemple, Module de développement ESP32) et le port COM.
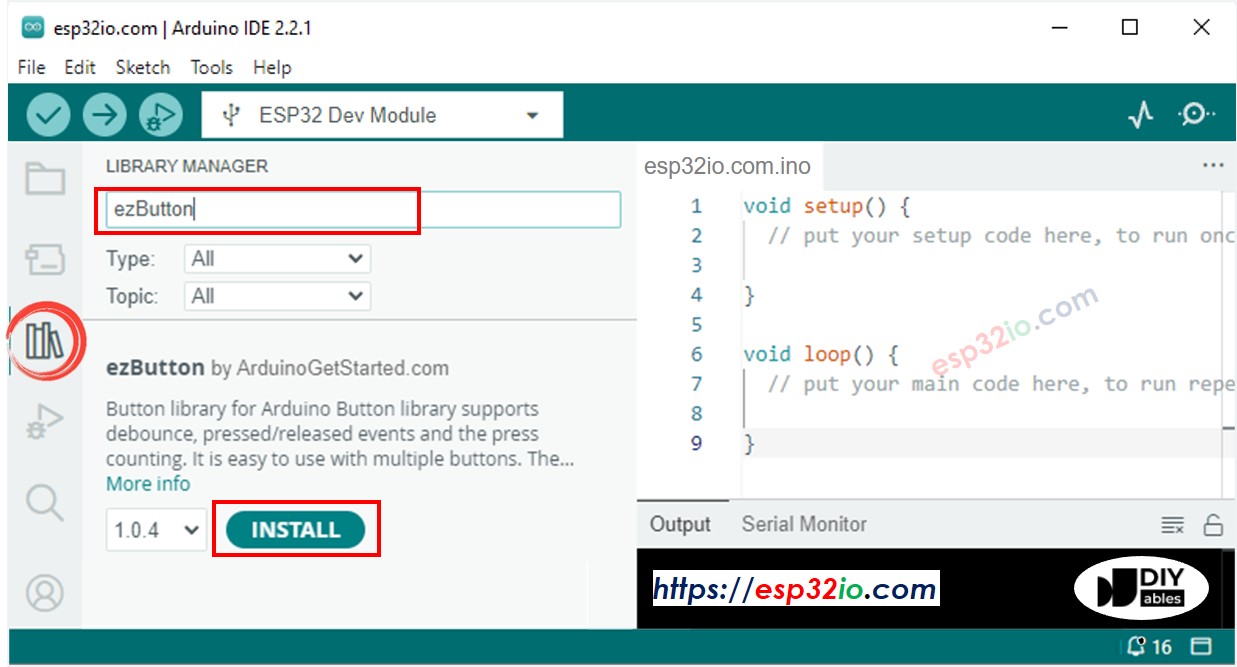
  • Cliquez sur l'icône Libraries dans la barre gauche de l'Arduino IDE.
  • Cherchez "ezButton", puis trouvez la bibliothèque du bouton par ArduinoGetStarted.
  • Cliquez sur le bouton Install pour installer la bibliothèque ezButton.
Bibliothèque de boutons ESP32
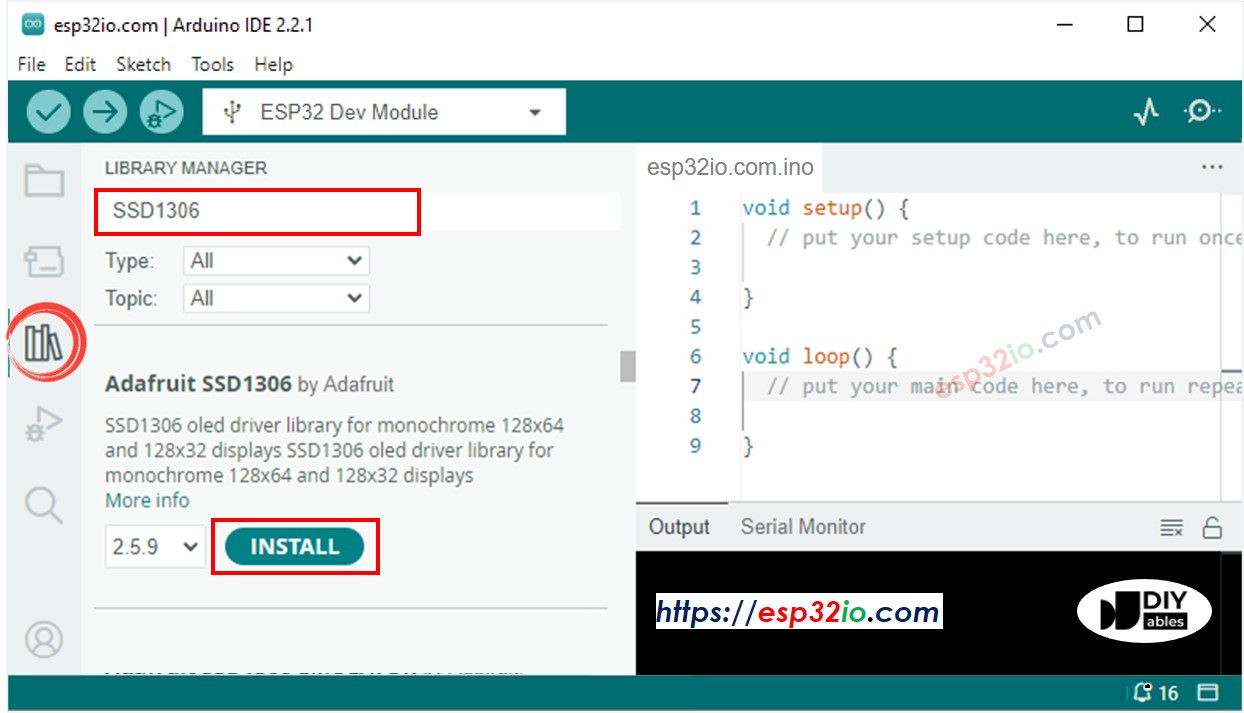
  • Recherchez « SSD1306 », puis trouvez la bibliothèque SSD1306 par Adafruit.
  • Cliquez sur le bouton Install pour installer la bibliothèque.
Bibliothèque OLED ESP32
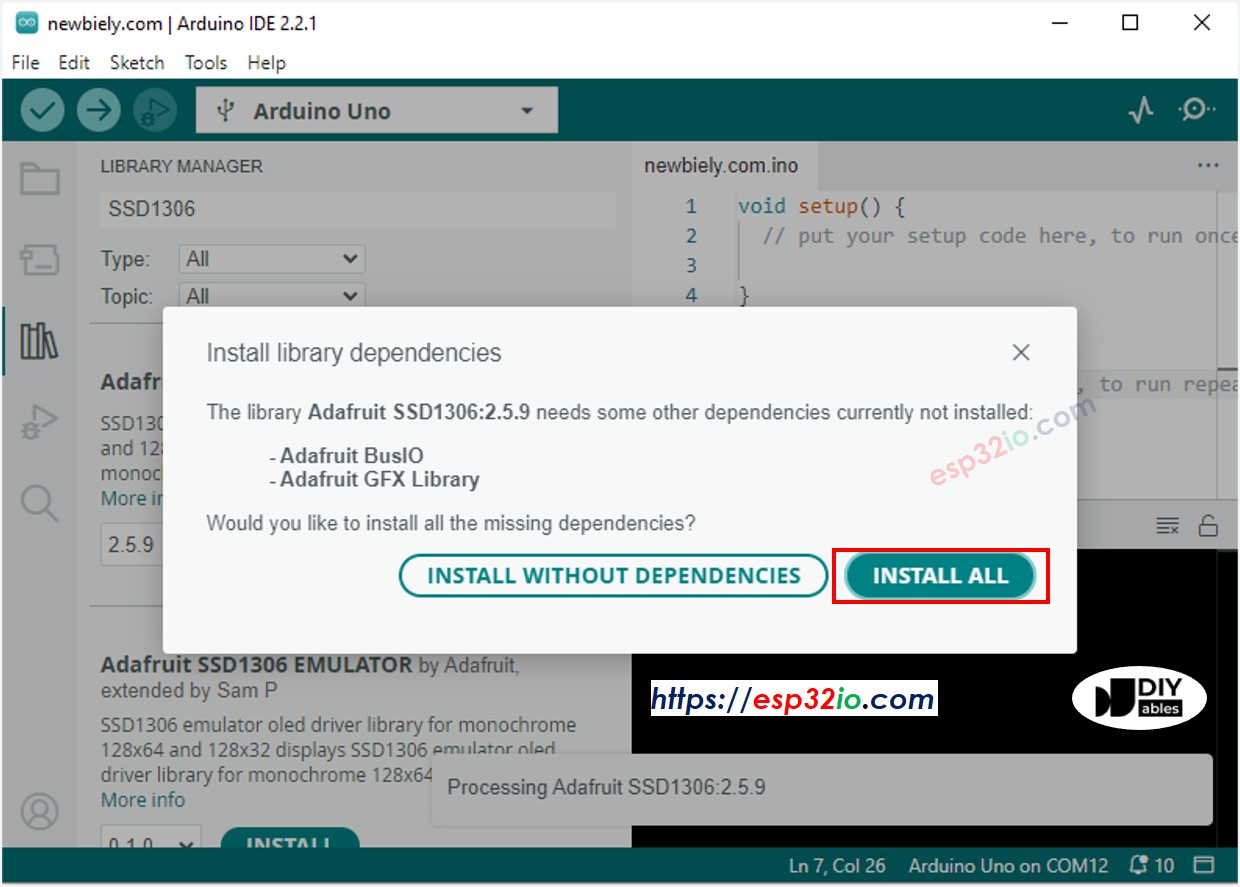
  • On vous demandera d'installer d'autres dépendances de bibliothèque.
  • Cliquez sur le bouton Install All pour installer toutes les dépendances de la bibliothèque.
Bibliothèque de capteurs ESP32 Adafruit GFX.
  • Copiez le code ci-dessus et ouvrez-le avec l'IDE Arduino
  • Cliquez sur le bouton Upload sur l'IDE Arduino pour téléverser le code vers l'ESP32
  • Appuyez plusieurs fois sur le bouton
  • Observez le changement du nombre compté sur l'OLED

Le code ci-dessus affiche simplement le compteur de pressions sur le bouton dans le coin supérieur gauche. Modifions le code pour le centraliser !

Code ESP32 - Alignement vertical et horizontal sur OLED

/* * Ce code ESP32 a été développé par newbiely.fr * Ce code ESP32 est mis à disposition du public sans aucune restriction. * Pour des instructions complètes et des schémas de câblage, veuillez visiter: * https://newbiely.fr/tutorials/esp32/esp32-button-count-oled */ #include <Wire.h> #include <Adafruit_GFX.h> #include <Adafruit_SSD1306.h> #include <ezButton.h> #define SCREEN_WIDTH 128 // OLED display width, in pixels #define SCREEN_HEIGHT 64 // OLED display height, in pixels Adafruit_SSD1306 oled(SCREEN_WIDTH, SCREEN_HEIGHT, &Wire, -1); // create SSD1306 display object connected to I2C ezButton button(27); // create ezButton object that attach to the ESP32 pin GPIO27 unsigned long lastCount = 0; void setup() { Serial.begin(9600); // initialize OLED display with address 0x3C for 128x64 if (!oled.begin(SSD1306_SWITCHCAPVCC, 0x3C)) { Serial.println(F("SSD1306 allocation failed")); while (true); } delay(2000); // wait for initializing oled.clearDisplay(); // clear display oled.setTextSize(2); // text size oled.setTextColor(WHITE); // text color oled.setCursor(0, 10); // position to display button.setDebounceTime(50); // set debounce time to 50 milliseconds button.setCountMode(COUNT_FALLING); } void loop() { button.loop(); // MUST call the loop() function first unsigned long count = button.getCount(); if (lastCount != count) { Serial.println(count); // print count to Serial Monitor String text = String(count); oledDisplayCenter(text); lastCount != count; } } void oledDisplayCenter(String text) { int16_t x1; int16_t y1; uint16_t width; uint16_t height; oled.getTextBounds(text, 0, 0, &x1, &y1, &width, &height); // display on horizontal and vertical center oled.clearDisplay(); // clear display oled.setCursor((SCREEN_WIDTH - width) / 2, (SCREEN_HEIGHT - height) / 2); oled.println(text); // text to display oled.display(); }

※ NOTE THAT:

Le code ci-dessus permet de centrer automatiquement le texte horizontalement et verticalement sur l'affichage OLED. Voir Comment centrer verticalement/horizontalement sur OLED pour plus de détails.

Vidéo

※ OUR MESSAGES

  • Please feel free to share the link of this tutorial. However, Please do not use our content on any other websites. We invested a lot of effort and time to create the content, please respect our work!