ESP32 - OLED

Ce tutoriel vous apprend à utiliser l'ESP32 pour afficher des données sur un OLED. En détail, nous apprendrons comment imprimer des caractères et des nombres, dessiner des lignes et des formes, et imprimer des images sur l'affichage OLED.

Préparation du matériel

1×ESP-WROOM-32 Dev Module
1×USB Cable Type-C
1×SSD1306 I2C OLED Display 128x64
1×Breadboard
1×Jumper Wires
1×(Optional) DC Power Jack
1×(Recommended) ESP32 Screw Terminal Adapter

Or you can buy the following sensor kits:

1×DIYables Sensor Kit (30 sensors/displays)
1×DIYables Sensor Kit (18 sensors/displays)
Divulgation : Certains des liens fournis dans cette section sont des liens affiliés Amazon. Nous pouvons recevoir une commission pour tout achat effectué via ces liens, sans coût supplémentaire pour vous. Nous vous remercions de votre soutien.

À propos de l'écran OLED

Il existe plusieurs types différents d'écrans OLED compatibles avec l'ESP32. Ils se distinguent par leur interface de communication (I2C, SPI), leurs couleurs (blanc, bleu, bicolore...) et leurs tailles (128x64, 128x32...).

ESP32 OLED

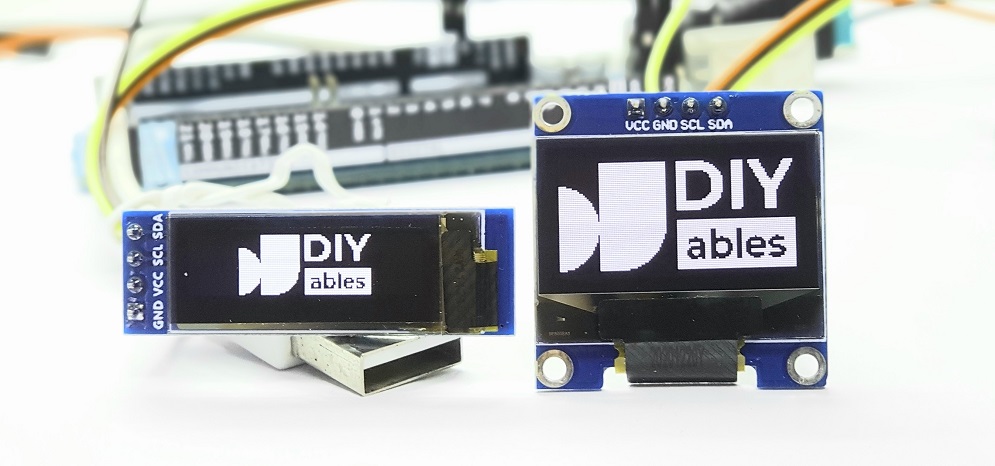
Ce tutoriel utilise un écran OLED I2C SSD1306 de 128x64.

Brochage de l'affichage OLED I2C

L'affichage OLED I2C comprend 4 broches :

  • Broche GND : doit être connectée à la masse de l'ESP32.
  • Broche VCC : doit être connectée à la broche 5 volts de l'ESP32.
  • Broche SCL : est une broche d'horloge I2C.
  • Broche SDA : est une broche de données I2C.
Brochage OLED

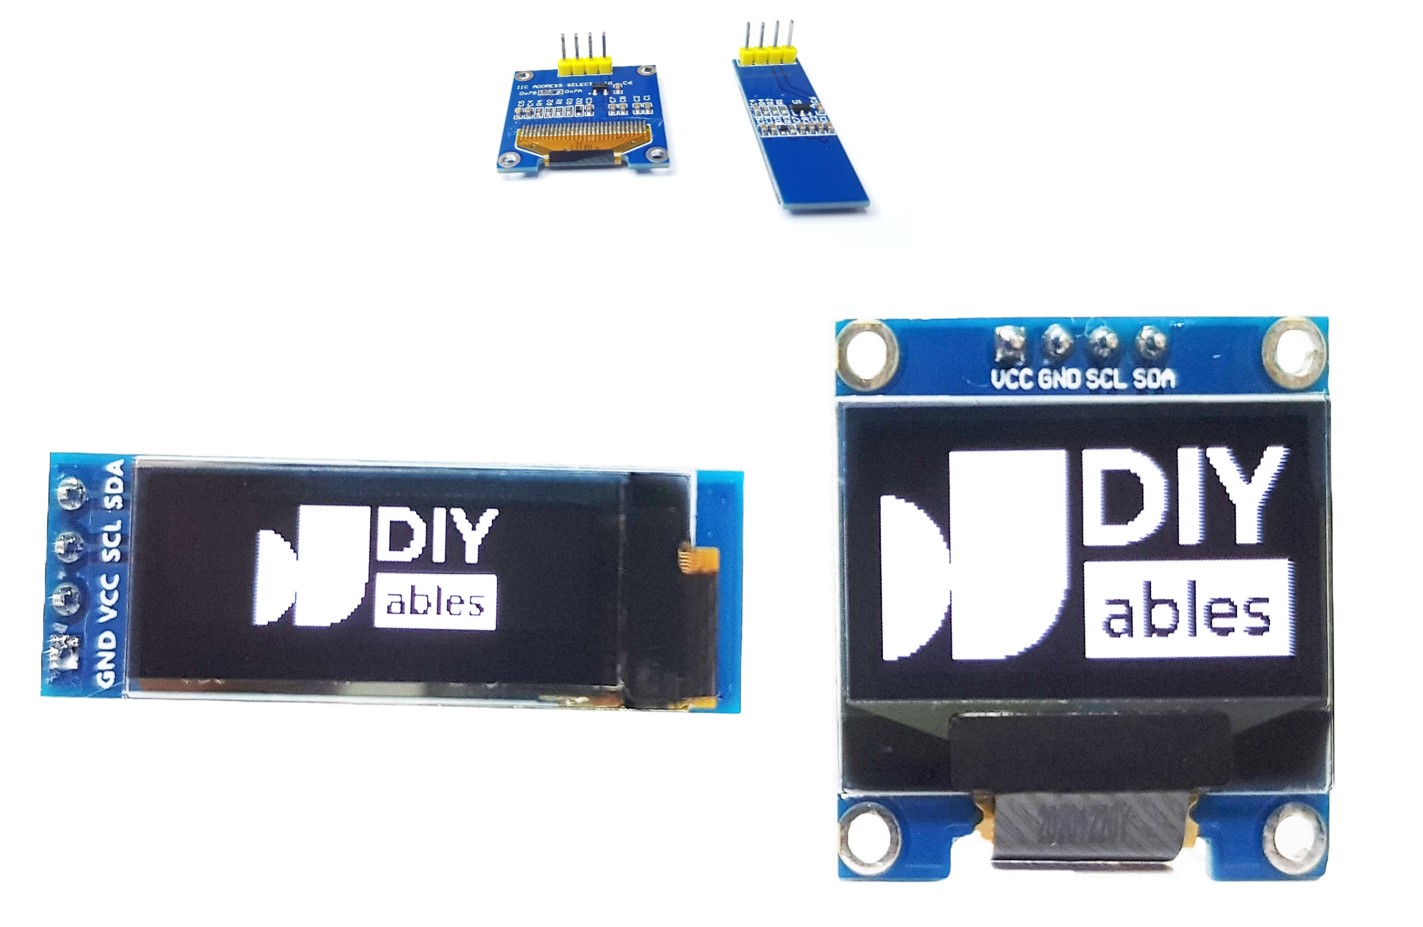
Diagramme de câblage

  • Le schéma de câblage avec alimentation par câble USB
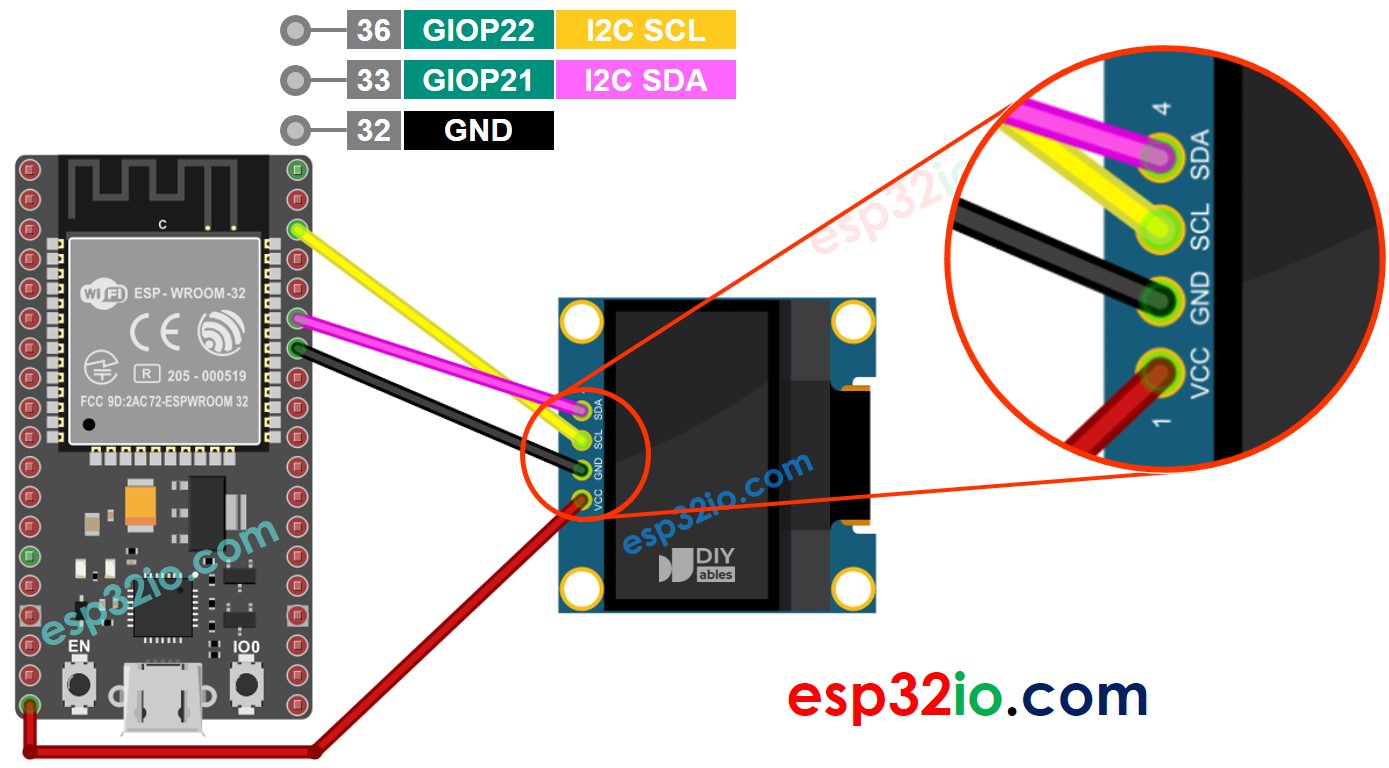
Schéma de câblage OLED ESP32

This image is created using Fritzing. Click to enlarge image

Si vous ne savez pas comment alimenter l'ESP32 et d'autres composants, vous pouvez trouver des conseils dans le tutoriel suivant : Comment alimenter l'ESP32.

  • Le schéma de câblage avec alimentation par adaptateur 5v
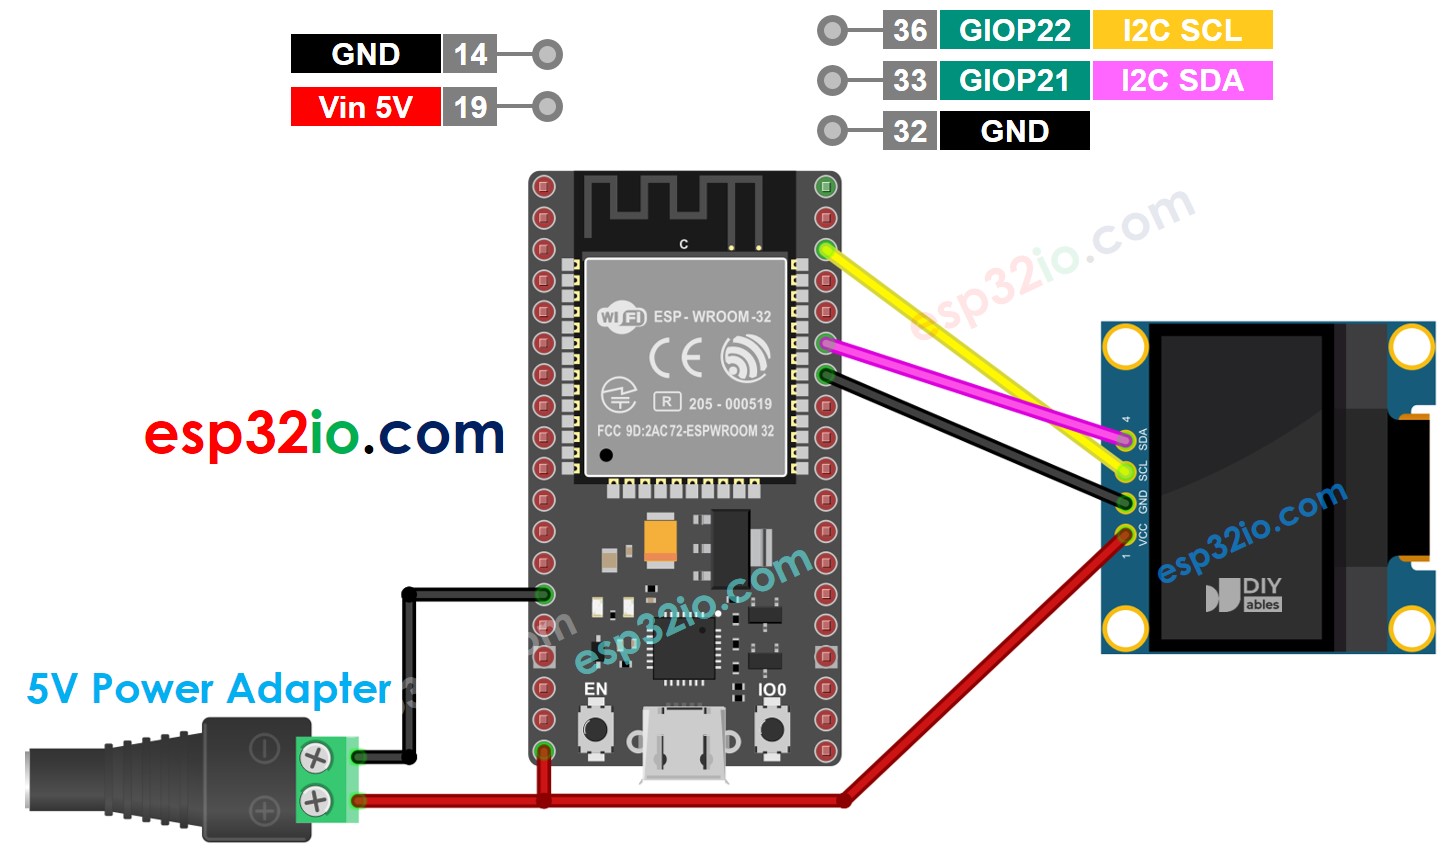
Schéma de câblage OLED ESP32 avec adaptateur secteur

This image is created using Fritzing. Click to enlarge image

※ NOTE THAT:

L'ordre des broches du module OLED peut varier d'un fabricant à l'autre. Utilisez TOUJOURS les étiquettes imprimées sur le module OLED. Regardez de près !

Comment utiliser un OLED avec l'ESP32

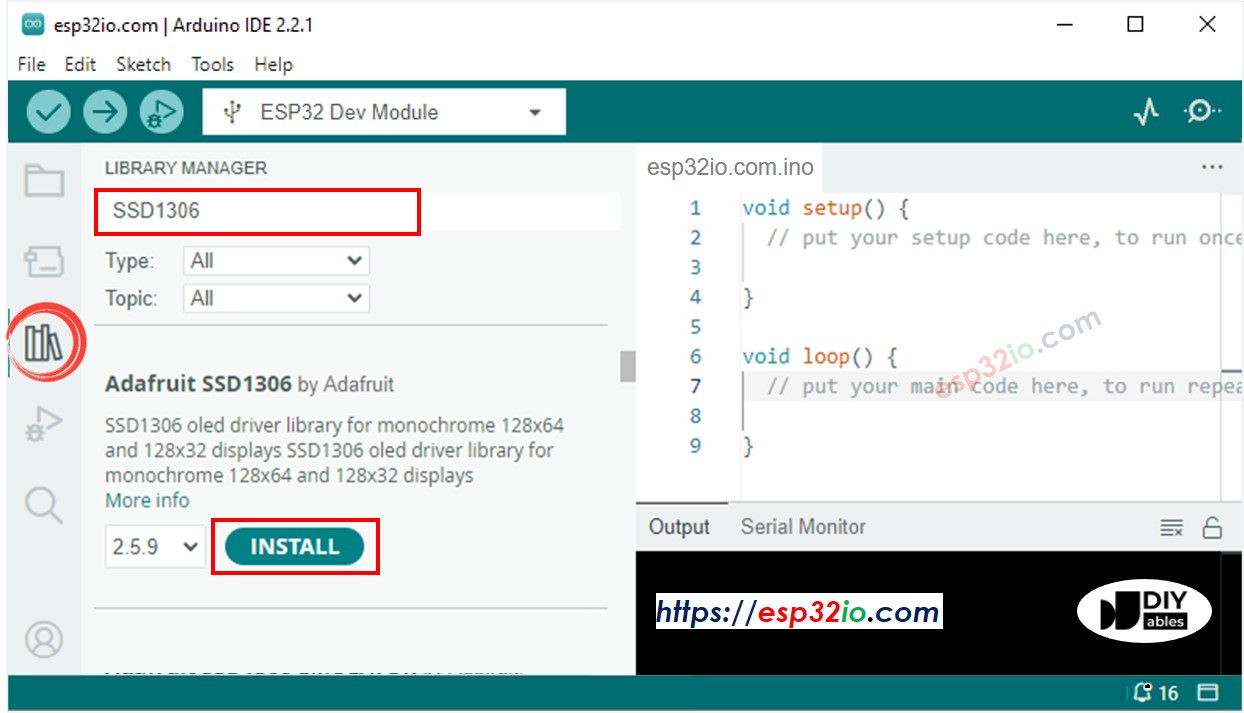
Installez la bibliothèque OLED SSD1306

  • Cliquez sur l'icône Libraries sur la barre gauche de l'IDE Arduino.
  • Tapez SSD1306 dans la boîte de recherche, puis recherchez la bibliothèque SSD1306 par Adafruit.
  • Installez la bibliothèque en cliquant sur le bouton Install.
Bibliothèque OLED ESP32
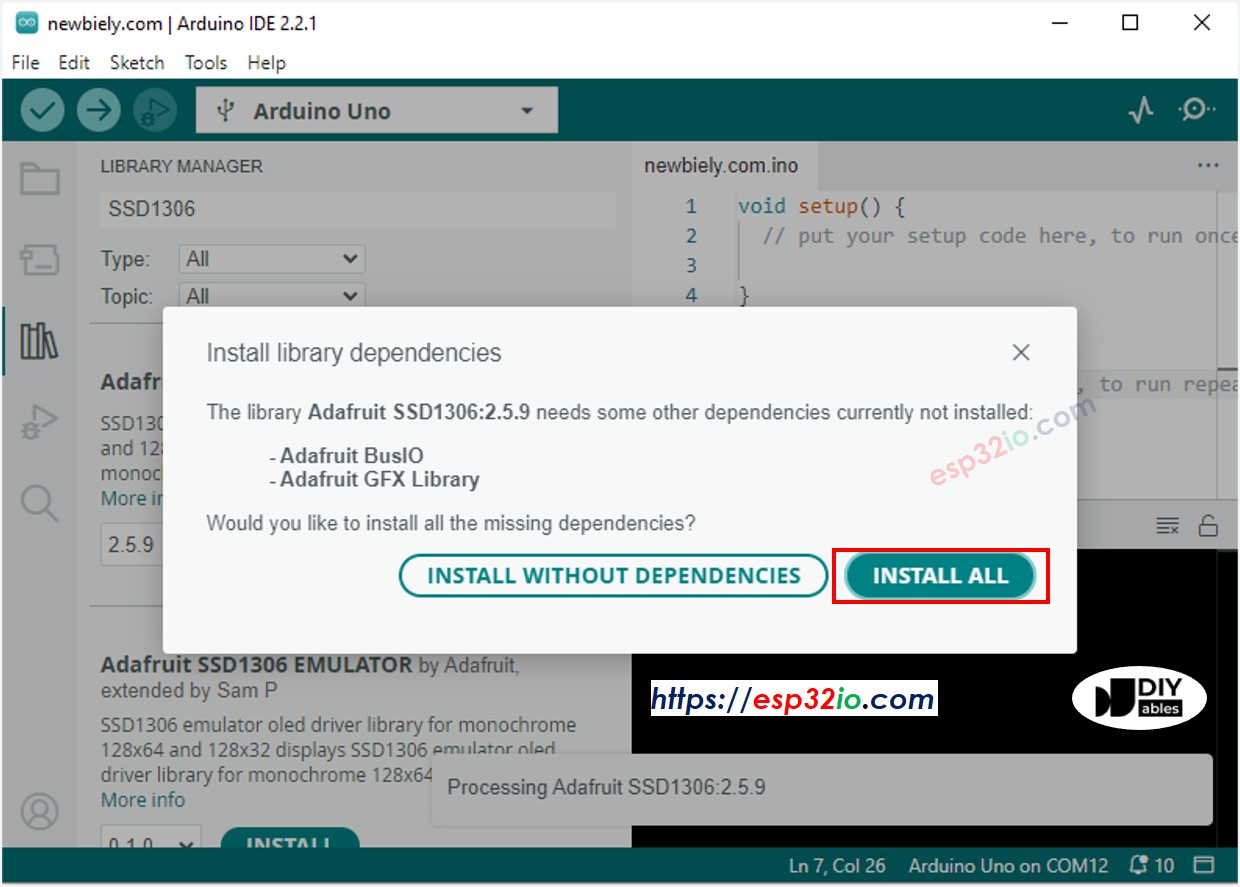
  • Une fenêtre apparaît pour vous demander d'installer les dépendances pour la bibliothèque
  • Installez toutes les dépendances pour la bibliothèque en cliquant sur le bouton Install All.
Bibliothèque de capteurs ESP32 Adafruit GFX

Comment programmer pour OLED

  • Inclure la bibliothèque
#include <Wire.h> #include <Adafruit_GFX.h> #include <Adafruit_SSD1306.h>
  • Définissez la taille de l'écran (123x64 ou 128x32)
#define SCREEN_WIDTH 128 // Largeur de l'afficheur OLED, en pixels #define SCREEN_HEIGHT 64 // Hauteur de l'afficheur OLED, en pixels
  • Déclarez un objet OLED SSD1306
// déclarer un objet d'affichage SSD1306 connecté à I2C Adafruit_SSD1306 oled(SCREEN_WIDTH, SCREEN_HEIGHT, &Wire, -1);
  • Dans la fonction setup(), initialisez l'affichage OLED.
// initialiser l'écran OLED avec l'adresse 0x3C pour 128x64 if (!oled.begin(SSD1306_SWITCHCAPVCC, 0x3C)) { Serial.println(F("SSD1306 allocation failed")); while (true); }
  • Et ensuite, vous pouvez afficher du texte, des images, tracer des lignes ...

Code ESP32 - Afficher du texte sur OLED

Le code ESP32 ci-dessous affiche un texte sur OLED.

/* * Ce code ESP32 a été développé par newbiely.fr * Ce code ESP32 est mis à disposition du public sans aucune restriction. * Pour des instructions complètes et des schémas de câblage, veuillez visiter: * https://newbiely.fr/tutorials/esp32/esp32-oled */ #include <Wire.h> #include <Adafruit_GFX.h> #include <Adafruit_SSD1306.h> #define SCREEN_WIDTH 128 // OLED width, in pixels #define SCREEN_HEIGHT 64 // OLED height, in pixels // create an OLED display object connected to I2C Adafruit_SSD1306 oled(SCREEN_WIDTH, SCREEN_HEIGHT, &Wire, -1); void setup() { Serial.begin(9600); // initialize OLED display with I2C address 0x3C if (!oled.begin(SSD1306_SWITCHCAPVCC, 0x3C)) { Serial.println(F("failed to start SSD1306 OLED")); while (1); } delay(2000); // wait two seconds for initializing oled.clearDisplay(); // clear display oled.setTextSize(1); // set text size oled.setTextColor(WHITE); // set text color oled.setCursor(0, 10); // set position to display oled.println("esp32io.com"); // set text oled.display(); // display on OLED } void loop() { }

Nous pouvons faire plus en utilisant les fonctions suivantes :

  • oled.clearDisplay() : cette fonction est utilisée pour effacer l'affichage
  • oled.setTextSize(n) : cette fonction est utilisée pour définir la taille de la police, elle prend en charge les tailles de 1 à 8
  • oled.setTextColor(WHITE) : cette fonction est utilisée pour définir la couleur du texte
  • oled.setCursor(x,y) : cette fonction est utilisée pour définir les coordonnées pour commencer à afficher le texte
  • oled.drawPixel(x,y, color) : cette fonction est utilisée pour tracer un pixel aux coordonnées x,y
  • oled.setTextColor(BLACK, WHITE) : cette fonction est utilisée pour définir respectivement la couleur du texte et la couleur de fond
  • oled.println("message") : cette fonction est utilisée pour imprimer une chaîne de caractères
  • oled.println(number) : cette fonction est utilisée pour imprimer un nombre
  • oled.println(number, HEX) : cette fonction est utilisée pour imprimer un nombre au format hexadécimal
  • oled.display() : cette fonction est utilisée pour appliquer les modifications
  • oled.startscrollright(start, stop) : cette fonction est utilisée pour faire défiler le texte de gauche à droite
  • oled.startscrollleft(start, stop) : cette fonction est utilisée pour faire défiler le texte de droite à gauche
  • oled.startscrolldiagright(start, stop) : cette fonction est utilisée pour faire défiler le texte du coin inférieur gauche au coin supérieur droit
  • oled.startscrolldiagleft(start, stop) : cette fonction est utilisée pour faire défiler le texte du coin inférieur droit au coin supérieur gauche
  • oled.stopscroll() : cette fonction est utilisée pour arrêter le défilement

Code ESP32 - Dessiner des formes sur OLED

Le code ci-dessous montre comment dessiner plusieurs formes sur OLED.

/* * Ce code ESP32 a été développé par newbiely.fr * Ce code ESP32 est mis à disposition du public sans aucune restriction. * Pour des instructions complètes et des schémas de câblage, veuillez visiter: * https://newbiely.fr/tutorials/esp32/esp32-oled */ #include <Wire.h> #include <Adafruit_GFX.h> #include <Adafruit_SSD1306.h> #define SCREEN_WIDTH 128 // OLED width, in pixels #define SCREEN_HEIGHT 64 // OLED height, in pixels // create an OLED display object connected to I2C Adafruit_SSD1306 oled(SCREEN_WIDTH, SCREEN_HEIGHT, &Wire, -1); void setup() { Serial.begin(9600); // initialize OLED display with I2C address 0x3C if (!oled.begin(SSD1306_SWITCHCAPVCC, 0x3C)) { Serial.println(F("failed to start SSD1306 OLED")); while (1); } delay(2000); // wait two seconds for initializing oled.setCursor(0, 0); } void loop() { // draw a circle oled.clearDisplay(); oled.drawCircle(20, 35, 20, WHITE); oled.display(); delay(1000); // fill a circle oled.clearDisplay(); oled.fillCircle(20, 35, 20, WHITE); oled.display(); delay(1000); // draw a triangle oled.clearDisplay(); oled.drawTriangle(30, 15, 0, 60, 60, 60, WHITE); oled.display(); delay(1000); // fill a triangle oled.clearDisplay(); oled.fillTriangle(30, 15, 0, 60, 60, 60, WHITE); oled.display(); delay(1000); // draw a rectangle oled.clearDisplay(); oled.drawRect(0, 15, 60, 40, WHITE); oled.display(); delay(1000); // fill a rectangle oled.clearDisplay(); oled.fillRect(0, 15, 60, 40, WHITE); oled.display(); delay(1000); // draw a round rectangle oled.clearDisplay(); oled.drawRoundRect(0, 15, 60, 40, 8, WHITE); oled.display(); delay(1000); // fill a round rectangle oled.clearDisplay(); oled.fillRoundRect(0, 15, 60, 40, 8, WHITE); oled.display(); delay(1000); }

Code ESP32 - Afficher une image sur OLED

Pour afficher une image sur un OLED, il est nécessaire de convertir l'image en tableau de bitmap. Il existe un outil en ligne pour convertir l'image en tableau de bitmap. L'image ci-dessous montre comment procéder. J'ai converti l'icône ESP32 en tableau de bitmap.

image en tableau de bitmap

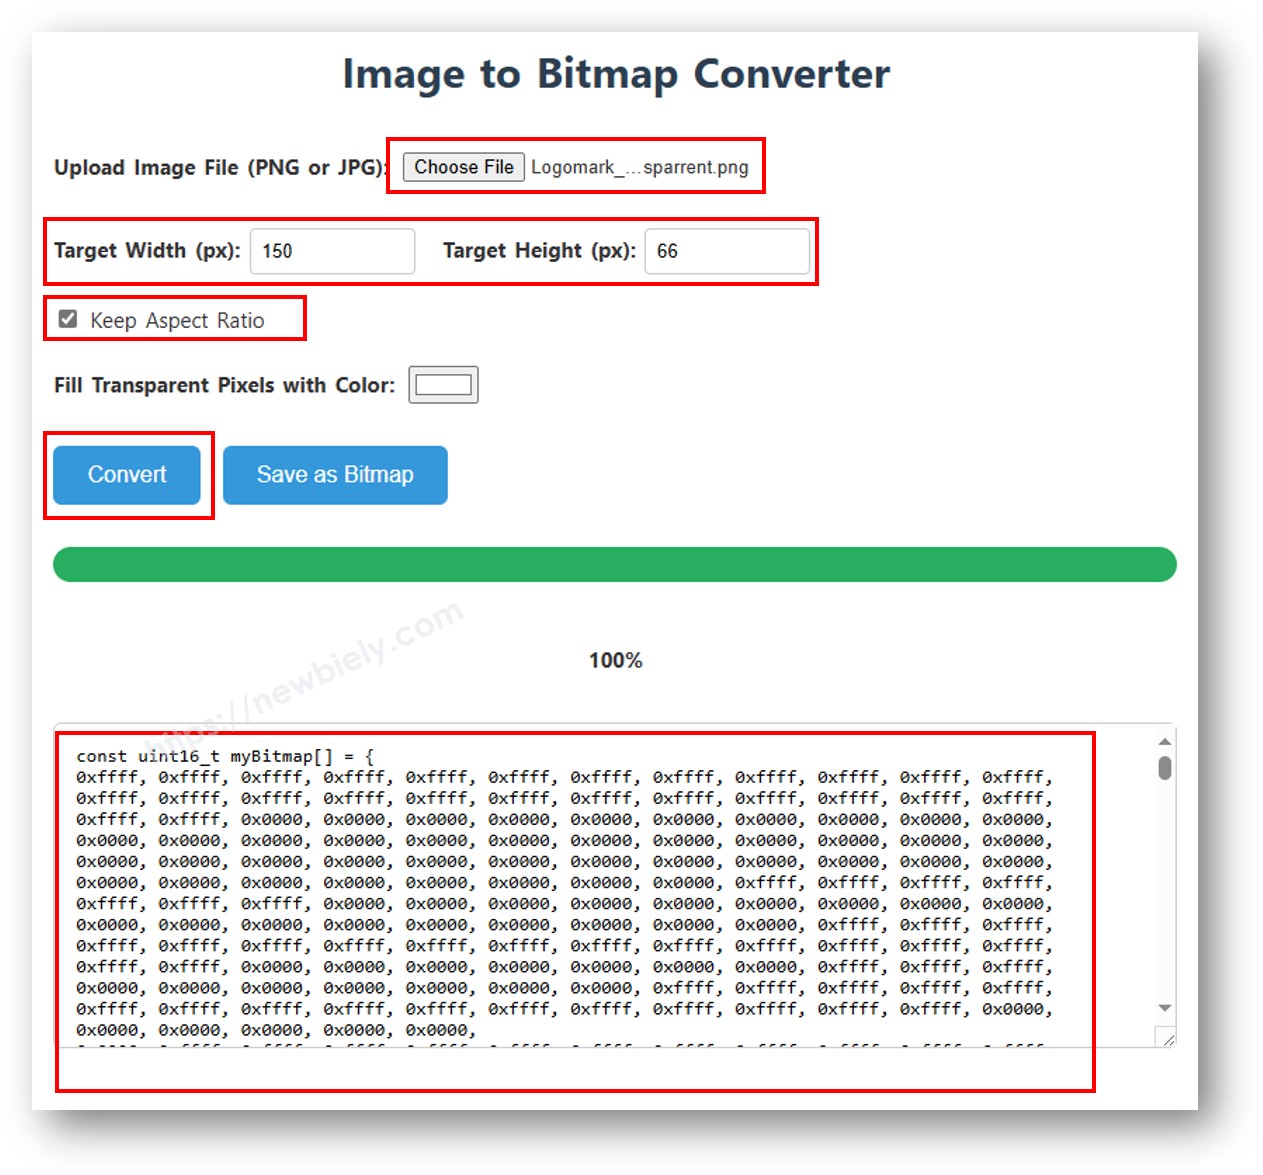
Après la conversion, copiez le code du tableau et mettez-le à jour dans le tableau arduino_icon dans le code suivant :

/* * Ce code ESP32 a été développé par newbiely.fr * Ce code ESP32 est mis à disposition du public sans aucune restriction. * Pour des instructions complètes et des schémas de câblage, veuillez visiter: * https://newbiely.fr/tutorials/esp32/esp32-oled */ #include <Wire.h> #include <Adafruit_GFX.h> #include <Adafruit_SSD1306.h> #define SCREEN_WIDTH 128 // OLED width, in pixels #define SCREEN_HEIGHT 64 // OLED height, in pixels // create an OLED display object connected to I2C Adafruit_SSD1306 oled(SCREEN_WIDTH, SCREEN_HEIGHT, &Wire, -1); // bitmap of arduino-icon image const unsigned char arduino_icon [] PROGMEM = { // 'arduino-icon', 128x64px 0xff, 0xff, 0xff, 0xff, 0xff, 0xff, 0xff, 0xff, 0xff, 0xff, 0xff, 0xff, 0xff, 0xff, 0xff, 0xff, 0xff, 0xff, 0xff, 0xff, 0xff, 0xff, 0xff, 0xff, 0xff, 0xff, 0xff, 0xff, 0xff, 0xff, 0xff, 0xff, 0xff, 0xff, 0xfe, 0x00, 0x07, 0xff, 0xff, 0xff, 0xff, 0xff, 0xff, 0x80, 0x01, 0xff, 0xff, 0xff, 0xff, 0xff, 0xe0, 0x00, 0x00, 0xff, 0xff, 0xff, 0xff, 0xff, 0xfc, 0x00, 0x00, 0x3f, 0xff, 0xff, 0xff, 0xff, 0x80, 0x00, 0x00, 0x1f, 0xff, 0xff, 0xff, 0xff, 0xe0, 0x00, 0x00, 0x07, 0xff, 0xff, 0xff, 0xfe, 0x00, 0x00, 0x00, 0x07, 0xff, 0xff, 0xff, 0xff, 0x80, 0x00, 0x00, 0x01, 0xff, 0xff, 0xff, 0xfc, 0x00, 0x00, 0x00, 0x03, 0xff, 0xff, 0xff, 0xff, 0x00, 0x00, 0x00, 0x00, 0xff, 0xff, 0xff, 0xf0, 0x00, 0x00, 0x00, 0x00, 0xff, 0xff, 0xff, 0xfc, 0x00, 0x00, 0x00, 0x00, 0x3f, 0xff, 0xff, 0xe0, 0x00, 0x00, 0x00, 0x00, 0x3f, 0xff, 0xff, 0xf0, 0x00, 0x00, 0x00, 0x00, 0x1f, 0xff, 0xff, 0xc0, 0x00, 0x00, 0x00, 0x00, 0x1f, 0xff, 0xff, 0xe0, 0x00, 0x00, 0x00, 0x00, 0x0f, 0xff, 0xff, 0x80, 0x00, 0x00, 0x00, 0x00, 0x0f, 0xff, 0xff, 0xc0, 0x00, 0x00, 0x00, 0x00, 0x07, 0xff, 0xff, 0x00, 0x00, 0x00, 0x00, 0x00, 0x03, 0xff, 0xff, 0x80, 0x00, 0x00, 0x00, 0x00, 0x03, 0xff, 0xfe, 0x00, 0x00, 0x00, 0x00, 0x00, 0x01, 0xff, 0xfe, 0x00, 0x00, 0x00, 0x00, 0x00, 0x01, 0xff, 0xfc, 0x00, 0x00, 0xff, 0xf0, 0x00, 0x00, 0xff, 0xfc, 0x00, 0x00, 0x3f, 0xfc, 0x00, 0x00, 0xff, 0xfc, 0x00, 0x03, 0xff, 0xfc, 0x00, 0x00, 0x7f, 0xf8, 0x00, 0x00, 0xff, 0xff, 0x00, 0x00, 0xff, 0xf8, 0x00, 0x0f, 0xff, 0xff, 0x00, 0x00, 0x3f, 0xf0, 0x00, 0x03, 0xff, 0xff, 0xc0, 0x00, 0x7f, 0xf0, 0x00, 0x1f, 0xff, 0xff, 0xc0, 0x00, 0x1f, 0xe0, 0x00, 0x0f, 0xff, 0xff, 0xe0, 0x00, 0x7f, 0xf0, 0x00, 0x7f, 0xff, 0xff, 0xe0, 0x00, 0x0f, 0xc0, 0x00, 0x1f, 0xff, 0xff, 0xf8, 0x00, 0x3f, 0xe0, 0x00, 0xff, 0xff, 0xff, 0xf8, 0x00, 0x07, 0x80, 0x00, 0x7f, 0xff, 0xff, 0xfc, 0x00, 0x1f, 0xe0, 0x00, 0xff, 0xff, 0xff, 0xfc, 0x00, 0x03, 0x80, 0x00, 0xff, 0xff, 0xff, 0xfc, 0x00, 0x1f, 0xc0, 0x01, 0xff, 0xff, 0xff, 0xfe, 0x00, 0x03, 0x00, 0x01, 0xff, 0xff, 0xff, 0xfe, 0x00, 0x1f, 0xc0, 0x03, 0xff, 0xff, 0xff, 0xff, 0x00, 0x00, 0x00, 0x03, 0xff, 0xff, 0xff, 0xff, 0x00, 0x0f, 0xc0, 0x03, 0xff, 0xff, 0xff, 0xff, 0x80, 0x00, 0x00, 0x07, 0xff, 0xf0, 0x7f, 0xff, 0x00, 0x0f, 0xc0, 0x07, 0xff, 0xff, 0xff, 0xff, 0xc0, 0x00, 0x00, 0x0f, 0xff, 0xf0, 0x7f, 0xff, 0x80, 0x0f, 0x80, 0x07, 0xff, 0xff, 0xff, 0xff, 0xe0, 0x00, 0x00, 0x1f, 0xff, 0xf0, 0x7f, 0xff, 0x80, 0x07, 0x80, 0x0f, 0xff, 0xff, 0xff, 0xff, 0xf0, 0x00, 0x00, 0x3f, 0xff, 0xf0, 0x7f, 0xff, 0xc0, 0x07, 0x80, 0x0f, 0xff, 0xff, 0xff, 0xff, 0xf8, 0x00, 0x00, 0x7f, 0xff, 0xf0, 0x7f, 0xff, 0xc0, 0x07, 0x80, 0x0f, 0xfe, 0x00, 0x00, 0xff, 0xfc, 0x00, 0x00, 0xff, 0xfc, 0x00, 0x03, 0xff, 0xc0, 0x07, 0x80, 0x0f, 0xfe, 0x00, 0x00, 0xff, 0xfe, 0x00, 0x01, 0xff, 0xfc, 0x00, 0x01, 0xff, 0xc0, 0x07, 0x80, 0x0f, 0xfe, 0x00, 0x00, 0xff, 0xff, 0x00, 0x03, 0xff, 0xfc, 0x00, 0x01, 0xff, 0xc0, 0x07, 0x80, 0x0f, 0xfe, 0x00, 0x00, 0xff, 0xff, 0x00, 0x03, 0xff, 0xfc, 0x00, 0x01, 0xff, 0xc0, 0x07, 0x80, 0x0f, 0xfe, 0x00, 0x00, 0xff, 0xff, 0x00, 0x03, 0xff, 0xfc, 0x00, 0x01, 0xff, 0xc0, 0x07, 0x80, 0x0f, 0xff, 0xff, 0xff, 0xff, 0xfe, 0x00, 0x01, 0xff, 0xff, 0xe0, 0x7f, 0xff, 0xc0, 0x07, 0x80, 0x0f, 0xff, 0xff, 0xff, 0xff, 0xfc, 0x00, 0x00, 0xff, 0xff, 0xf0, 0x7f, 0xff, 0xc0, 0x07, 0x80, 0x0f, 0xff, 0xff, 0xff, 0xff, 0xfc, 0x00, 0x00, 0xff, 0xff, 0xf0, 0x7f, 0xff, 0xc0, 0x07, 0x80, 0x0f, 0xff, 0xff, 0xff, 0xff, 0xf8, 0x00, 0x00, 0x7f, 0xff, 0xf0, 0x7f, 0xff, 0xc0, 0x07, 0x80, 0x0f, 0xff, 0xff, 0xff, 0xff, 0xf0, 0x00, 0x00, 0x3f, 0xff, 0xf0, 0x7f, 0xff, 0x80, 0x07, 0x80, 0x07, 0xff, 0xff, 0xff, 0xff, 0xe0, 0x00, 0x00, 0x1f, 0xff, 0xf0, 0x7f, 0xff, 0x80, 0x07, 0xc0, 0x07, 0xff, 0xff, 0xff, 0xff, 0xc0, 0x00, 0x00, 0x0f, 0xff, 0xff, 0xff, 0xff, 0x80, 0x0f, 0xc0, 0x03, 0xff, 0xff, 0xff, 0xff, 0x80, 0x00, 0x00, 0x07, 0xff, 0xff, 0xff, 0xff, 0x00, 0x0f, 0xc0, 0x03, 0xff, 0xff, 0xff, 0xff, 0x00, 0x00, 0x00, 0x03, 0xff, 0xff, 0xff, 0xff, 0x00, 0x0f, 0xe0, 0x01, 0xff, 0xff, 0xff, 0xfe, 0x00, 0x03, 0x00, 0x01, 0xff, 0xff, 0xff, 0xfe, 0x00, 0x1f, 0xe0, 0x00, 0xff, 0xff, 0xff, 0xfc, 0x00, 0x07, 0x80, 0x00, 0xff, 0xff, 0xff, 0xfc, 0x00, 0x1f, 0xe0, 0x00, 0x7f, 0xff, 0xff, 0xf0, 0x00, 0x0f, 0xc0, 0x00, 0x3f, 0xff, 0xff, 0xf8, 0x00, 0x3f, 0xf0, 0x00, 0x3f, 0xff, 0xff, 0xe0, 0x00, 0x1f, 0xe0, 0x00, 0x1f, 0xff, 0xff, 0xf0, 0x00, 0x3f, 0xf8, 0x00, 0x1f, 0xff, 0xff, 0x80, 0x00, 0x3f, 0xe0, 0x00, 0x07, 0xff, 0xff, 0xe0, 0x00, 0x7f, 0xf8, 0x00, 0x0f, 0xff, 0xff, 0x00, 0x00, 0x7f, 0xf8, 0x00, 0x03, 0xff, 0xff, 0xc0, 0x00, 0x7f, 0xfc, 0x00, 0x03, 0xff, 0xf8, 0x00, 0x00, 0xff, 0xfc, 0x00, 0x00, 0xff, 0xff, 0x00, 0x00, 0xff, 0xfe, 0x00, 0x00, 0x7f, 0xe0, 0x00, 0x01, 0xff, 0xfe, 0x00, 0x00, 0x1f, 0xf8, 0x00, 0x01, 0xff, 0xfe, 0x00, 0x00, 0x00, 0x00, 0x00, 0x03, 0xff, 0xff, 0x00, 0x00, 0x00, 0x00, 0x00, 0x03, 0xff, 0xff, 0x00, 0x00, 0x00, 0x00, 0x00, 0x07, 0xff, 0xff, 0x80, 0x00, 0x00, 0x00, 0x00, 0x03, 0xff, 0xff, 0x80, 0x00, 0x00, 0x00, 0x00, 0x0f, 0xff, 0xff, 0xc0, 0x00, 0x00, 0x00, 0x00, 0x07, 0xff, 0xff, 0xc0, 0x00, 0x00, 0x00, 0x00, 0x1f, 0xff, 0xff, 0xe0, 0x00, 0x00, 0x00, 0x00, 0x0f, 0xff, 0xff, 0xe0, 0x00, 0x00, 0x00, 0x00, 0x7f, 0xff, 0xff, 0xf8, 0x00, 0x00, 0x00, 0x00, 0x3f, 0xff, 0xff, 0xf8, 0x00, 0x00, 0x00, 0x01, 0xff, 0xff, 0xff, 0xfe, 0x00, 0x00, 0x00, 0x00, 0x7f, 0xff, 0xff, 0xfc, 0x00, 0x00, 0x00, 0x03, 0xff, 0xff, 0xff, 0xff, 0x00, 0x00, 0x00, 0x00, 0xff, 0xff, 0xff, 0xff, 0x00, 0x00, 0x00, 0x0f, 0xff, 0xff, 0xff, 0xff, 0xc0, 0x00, 0x00, 0x03, 0xff, 0xff, 0xff, 0xff, 0xc0, 0x00, 0x00, 0x3f, 0xff, 0xff, 0xff, 0xff, 0xf0, 0x00, 0x00, 0x0f, 0xff, 0xff, 0xff, 0xff, 0xf0, 0x00, 0x01, 0xff, 0xff, 0xff, 0xff, 0xff, 0xfe, 0x00, 0x00, 0x3f, 0xff, 0xff, 0xff, 0xff, 0xff, 0x00, 0x0f, 0xff, 0xff, 0xff, 0xff, 0xff, 0xff, 0xc0, 0x03, 0xff, 0xff, 0xff, 0xff, 0xff, 0xff, 0xff, 0xff, 0xff, 0xff, 0xff, 0xff, 0xff, 0xff, 0xff, 0xff, 0xff, 0xff, 0xff, 0xff, 0xff, 0xff, 0xff, 0xff, 0xff, 0xff, 0xff, 0xff, 0xff, 0xff, 0xff, 0xff, 0xff, 0xff, 0xff, 0xff, 0xff, 0xff, 0xff, 0xff, 0xff, 0xff, 0xff, 0xff, 0xff, 0xff, 0xff, 0xff, 0xff, 0xff, 0xff, 0xff, 0xff, 0xff, 0xff, 0xff, 0xff, 0xff, 0xff, 0xff, 0xff, 0xff, 0xff, 0xff, 0xff, 0xff, 0xff }; void setup() { Serial.begin(9600); // initialize OLED display with I2C address 0x3C if (!oled.begin(SSD1306_SWITCHCAPVCC, 0x3C)) { Serial.println(F("failed to start SSD1306 OLED")); while (1); } delay(2000); // wait two seconds for initializing oled.setCursor(0, 0); } void loop() { oled.clearDisplay(); // display bitmap oled.drawBitmap(0, 0, arduino_icon, 128, 64, WHITE); oled.display(); delay(1000); // invert display oled.invertDisplay(1); delay(1000); }

Dépannage OLED

Consultez le guide de dépannage OLED Dépannage OLED

※ OUR MESSAGES

  • Please feel free to share the link of this tutorial. However, Please do not use our content on any other websites. We invested a lot of effort and time to create the content, please respect our work!