Applications Web multiples Arduino Nano ESP32 avec la bibliothèque DIYables ESP32 WebApps
Vue d'ensemble
Ce tutoriel montre comment exécuter plusieurs pages d'application web simultanément sur un Arduino Nano ESP32 en utilisant la bibliothèque DIYables ESP32 WebApps. Chaque page est indépendante ; vous n'enregistrez que celles dont votre projet a besoin. La page d'accueil liste automatiquement toutes les applications enregistrées.
Ce que ce tutoriel couvre
Enregistrement de plusieurs objets de pages avec une seule instance de serveur
Configuration de variables d'état partagées entre les pages
Pré-configuration des modes de broches numériques pour la page de broches numériques web
Configuration de la sensibilité du joystick et du retour automatique depuis le sketch
Navigation entre les pages depuis la page d'accueil
Divulgation : Certains des liens fournis dans cette section sont des liens affiliés Amazon. Nous pouvons recevoir une commission pour tout achat effectué via ces liens, sans coût supplémentaire pour vous. Nous vous remercions de votre soutien.
Connectez la carte Arduino Nano ESP32 à votre ordinateur à l'aide d'un câble USB.
Lancez l'Arduino IDE sur votre ordinateur.
Sélectionnez la carte appropriée (par ex. Arduino Nano ESP32) et le port COM.
Accédez à l'icône Bibliothèques dans la barre gauche de l'Arduino IDE.
Recherchez "DIYables ESP32 WebApps", puis trouvez la bibliothèque DIYables ESP32 WebApps par DIYables
Cliquez sur le bouton Installer pour installer la bibliothèque.
Search for DIYables ESP32 WebApps created by DIYables and click the Install button.
Newbiely | Arduino IDE 2.3.8
──
☐
✕
File
Edit
Sketch
Tools
Help
Arduino Nano ESP32
Library Manager
DIYables ESP32 WebApps
Type:
All
Topic:
All
DIYables ESP32 WebAppsby DIYables
A comprehensive library designed for ESP32 that provides multiple professional web applications including Web Monitor, Chat, Digital Pin Control, Sliders, Joystick, Analog Gauge, Rotator Control, and Temperature Display via WebSocket communication. Features modular architecture for memory efficiency, automatic config handling, and perfect for IoT projects, robotics, sensor monitoring, servo/stepper control, temperature monitoring, and remote ESP32 control.
More info
1.0.1
INSTALL
Newbiely.ino
···
1
voidsetup() {
Output
Serial Monitor
Ln 1, Col 1
Arduino Nano ESP32 on COM15
1
Il vous sera demandé d'installer d'autres dépendances de bibliothèques
Cliquez sur le bouton Tout installer pour installer toutes les dépendances de la bibliothèque.
Dans Arduino IDE, allez dans Fichier Exemples DIYables ESP32 WebApps MultipleWebApps, ou copiez le code ci-dessus et collez-le dans l'éditeur Arduino IDE
/* * DIYables WebApp Library - Multiple WebApps Example * * This example demonstrates multiple web apps of the DIYables WebApp library: * - Home page with links to multiple web apps * - Web Monitor: Real-time serial monitoring via WebSocket * - Web Slider: Dual slider control * - Web Joystick: Interactive joystick control * - Web Rotator: Interactive rotatable disc control * - Web Analog Gauge: Professional circular gauge for sensor monitoring * - Web Table: Two-column data table with real-time updates * - Web Plotter: See WebPlotter example for real-time data visualization * * Features: * - Simplified callback system - no manual command parsing needed * - Automatic state synchronization and JSON handling * - All protocol details handled by the library * - Template for hardware control * * Hardware: ESP32 Boards * * Setup: * 1. Update WiFi credentials below * 2. Upload the sketch to your Arduino * 3. Open Serial Monitor to see the IP address * 4. Navigate to the IP address in your web browser */#include <DIYables_ESP32_Platform.h>#include <DIYablesWebApps.h>// WiFi credentials - UPDATE THESE WITH YOUR NETWORKconstchar WIFI_SSID[] = "YOUR_WIFI_SSID";constchar WIFI_PASSWORD[] = "YOUR_WIFI_PASSWORD";// Create WebApp server and page instancesESP32ServerFactory factory;DIYablesWebAppServerwebAppsServer(factory, 80, 81);DIYablesHomePage homePage;DIYablesWebMonitorPage webMonitorPage;DIYablesWebSliderPage webSliderPage;DIYablesWebJoystickPage webJoystickPage(false, 5); // autoReturn=false, sensitivity=5DIYablesWebRotatorPage webRotatorPage(ROTATOR_MODE_CONTINUOUS); // Continuous rotation mode (0-360°)DIYablesWebAnalogGaugePage webAnalogGaugePage(0.0, 100.0, "%"); // Range: 0-100%, units: %DIYablesWebTablePage webTablePage;// Variables to track statesint currentSlider1 = 64; // Slider 1 value (0-255)int currentSlider2 = 128; // Slider 2 value (0-255)int currentJoystickX = 0; // Current joystick X value (-100 to 100)int currentJoystickY = 0; // Current joystick Y value (-100 to 100)int currentRotatorAngle = 0; // Current rotator angle (0-360°)float currentGaugeValue = 50.0; // Current gauge value (0.0-100.0)voidsetup() {Serial.begin(9600);delay(1000);// TODO: Initialize your hardware pins hereSerial.println("DIYables ESP32 WebApp - Multiple Apps Example");// Add all web applications to the serverwebAppsServer.addApp(&homePage);webAppsServer.addApp(&webMonitorPage);webAppsServer.addApp(&webSliderPage);webAppsServer.addApp(&webJoystickPage);webAppsServer.addApp(&webRotatorPage);webAppsServer.addApp(&webAnalogGaugePage);webAppsServer.addApp(&webTablePage);// Add more web apps here (e.g., WebPlotter)// Set 404 Not Found page (optional - for better user experience)webAppsServer.setNotFoundPage(DIYablesNotFoundPage());// Configure table structure (only attribute names, values will be updated dynamically) webTablePage.addRow("Arduino Status"); webTablePage.addRow("WiFi Connected"); webTablePage.addRow("Uptime"); webTablePage.addRow("Slider 1"); webTablePage.addRow("Slider 2"); webTablePage.addRow("Joystick X"); webTablePage.addRow("Joystick Y"); webTablePage.addRow("Rotator Angle"); webTablePage.addRow("Gauge Value");// Start the WebApp serverif (!webAppsServer.begin(WIFI_SSID, WIFI_PASSWORD)) {while (1) {Serial.println("Failed to start WebApp server!");delay(1000); } } setupCallbacks();}void setupCallbacks() {// Web Monitor callback - echo messages back webMonitorPage.onWebMonitorMessage([](const String& message) {Serial.println("Web Monitor: " + message); webMonitorPage.sendToWebMonitor("Arduino received: " + message); });// Web Slider callback - handle slider values webSliderPage.onSliderValueFromWeb([](int slider1, int slider2) {// Store the received values currentSlider1 = slider1; currentSlider2 = slider2;// Print slider values (0-255) without String concatenationSerial.print("Slider 1: ");Serial.print(slider1);Serial.print(", Slider 2: ");Serial.println(slider2);// Update table with new slider values using String() conversion webTablePage.sendValueUpdate("Slider 1", String(slider1)); webTablePage.sendValueUpdate("Slider 2", String(slider2));// TODO: Add your control logic here based on slider values// Examples:// - Control PWM: analogWrite(LED_PIN, slider1);// - Control servos: servo.write(map(slider1, 0, 255, 0, 180));// - Control motor speed: analogWrite(MOTOR_PIN, slider2);// Update gauge based on slider1 value (map 0-255 to 0-100) currentGaugeValue = map(slider1, 0, 255, 0, 100); webAnalogGaugePage.sendToWebAnalogGauge(currentGaugeValue);char gaugeStr[16]; snprintf(gaugeStr, sizeof(gaugeStr), "%.1f%%", currentGaugeValue); webTablePage.sendValueUpdate("Gauge Value", String(gaugeStr)); });// Handle slider value requests webSliderPage.onSliderValueToWeb([]() { webSliderPage.sendToWebSlider(currentSlider1, currentSlider2); });// Web Joystick callback - handle joystick movement webJoystickPage.onJoystickValueFromWeb([](int x, int y) {// Store the received values currentJoystickX = x; currentJoystickY = y;// Print joystick position values (-100 to +100)Serial.print("Joystick - X: ");Serial.print(x);Serial.print(", Y: ");Serial.println(y);Serial.print(x);Serial.print(", Y: ");Serial.println(y);// Update table with new joystick values webTablePage.sendValueUpdate("Joystick X", String(x)); webTablePage.sendValueUpdate("Joystick Y", String(y));// TODO: Add your control logic here based on joystick position// Examples:// - Control motors: if (x > 50) { /* move right */ }// - Control servos: servo.write(map(y, -100, 100, 0, 180));// - Control LEDs: analogWrite(LED_PIN, map(abs(x), 0, 100, 0, 255)); });// Handle joystick values requests (when web page loads/reconnects) webJoystickPage.onJoystickValueToWeb([]() { webJoystickPage.sendToWebJoystick(currentJoystickX, currentJoystickY); });// Web Rotator callback - handle rotation angle changes webRotatorPage.onRotatorAngleFromWeb([](float angle) {// Store the received angle currentRotatorAngle = (int)angle;// Print rotator angle (0-360°)Serial.println("Rotator angle: " + String(angle) + "°");// Update table with new rotator angle webTablePage.sendValueUpdate("Rotator Angle", String(angle, 0) + "°");// TODO: Add your control logic here based on rotator angle// Examples:// - Control servo: servo.write(map(angle, 0, 360, 0, 180));// - Control stepper motor: stepper.moveTo(angle);// - Control directional LED strip: setLEDDirection(angle); });// Handle analog gauge value requests (when web page loads/reconnects) webAnalogGaugePage.onGaugeValueRequest([]() { webAnalogGaugePage.sendToWebAnalogGauge(currentGaugeValue); });// Handle table data requests (when web page loads/reconnects) webTablePage.onTableValueRequest([]() {// Send initial values to the table webTablePage.sendValueUpdate("Arduino Status", "Running"); webTablePage.sendValueUpdate("WiFi Connected", "Yes"); webTablePage.sendValueUpdate("Uptime", "0 seconds"); webTablePage.sendValueUpdate("Slider 1", String(currentSlider1)); webTablePage.sendValueUpdate("Slider 2", String(currentSlider2)); webTablePage.sendValueUpdate("Joystick X", String(currentJoystickX)); webTablePage.sendValueUpdate("Joystick Y", String(currentJoystickY)); webTablePage.sendValueUpdate("Rotator Angle", String(currentRotatorAngle) + "°"); webTablePage.sendValueUpdate("Gauge Value", String(currentGaugeValue, 1) + "%"); });}voidloop() {// Handle WebApp server communicationswebAppsServer.loop();// Update table with current uptime every 5 secondsstaticunsignedlong lastUptimeUpdate = 0;if (millis() - lastUptimeUpdate > 5000) { lastUptimeUpdate = millis();unsignedlong uptimeSeconds = millis() / 1000;String uptimeStr = String(uptimeSeconds) + " seconds";if (uptimeSeconds >= 60) { uptimeStr = String(uptimeSeconds / 60) + "m " + String(uptimeSeconds % 60) + "s"; } webTablePage.sendValueUpdate("Uptime", uptimeStr); }// Simulate sensor data updates every 3 secondsstaticunsignedlong lastSensorUpdate = 0;if (millis() - lastSensorUpdate > 3000) { lastSensorUpdate = millis();// Simulate a sensor reading that varies over timefloat sensorValue = 50.0 + 30.0 * sin(millis() / 10000.0); // Oscillates between 20-80 currentGaugeValue = sensorValue;// Update gauge and table webAnalogGaugePage.sendToWebAnalogGauge(currentGaugeValue); webTablePage.sendValueUpdate("Gauge Value", String(currentGaugeValue, 1) + "%"); }// TODO: Add your main application code heredelay(10);}
Mettez à jour les identifiants WiFi dans le sketch :
Cliquez sur le bouton Téléverser dans Arduino IDE pour téléverser le code sur Arduino Nano ESP32
Ouvrez le Moniteur Série
La sortie du Moniteur Série devrait ressembler à ce qui suit :
Newbiely | Arduino IDE 2.3.8
──
☐
✕
File
Edit
Sketch
Tools
Help
Arduino Nano ESP32
Newbiely.ino
···
8Serial.println("Hello World!");
Output
Serial Monitor
Message (Enter to send message to 'Arduino Nano ESP32' on 'COM15')
New Line
9600 baud
DIYables WebApp - Multiple Apps Example
INFO: Added app /
INFO: Added app /web-monitor
INFO: Added app /web-slider
INFO: Added app /web-joystick
INFO: Added app /web-rotator
INFO: Added app /web-gauge
INFO: Added app /web-table
DIYables WebApp Library
Platform: Arduino Nano ESP32
Network connected!
IP address: 192.168.0.2
HTTP server started on port 80
Configuring WebSocket server callbacks...
WebSocket server started on port 81
WebSocket URL: ws://192.168.0.2:81
WebSocket server started on port 81
==========================================
DIYables WebApp Ready!
==========================================
Web Interface: http://192.168.0.2
WebSocket: ws://192.168.0.2:81
Available Applications:
Home Page: http://192.168.0.2/
Web Monitor: http://192.168.0.2/web-monitor
Web Slider: http://192.168.0.2/web-slider
Web Joystick: http://192.168.0.2/web-joystick
Web Rotator: http://192.168.0.2/web-rotator
Web Analog Gauge: http://192.168.0.2/web-gauge
Web Table: http://192.168.0.2/web-table
==========================================
Ln 11, Col 1
Arduino Nano ESP32 on COM15
2
Si rien n'apparaît, appuyez sur le bouton de réinitialisation de la carte.
Notez l'adresse IP et entrez-la dans un navigateur sur un appareil connecté au même réseau WiFi.
Exemple : http://192.168.0.2
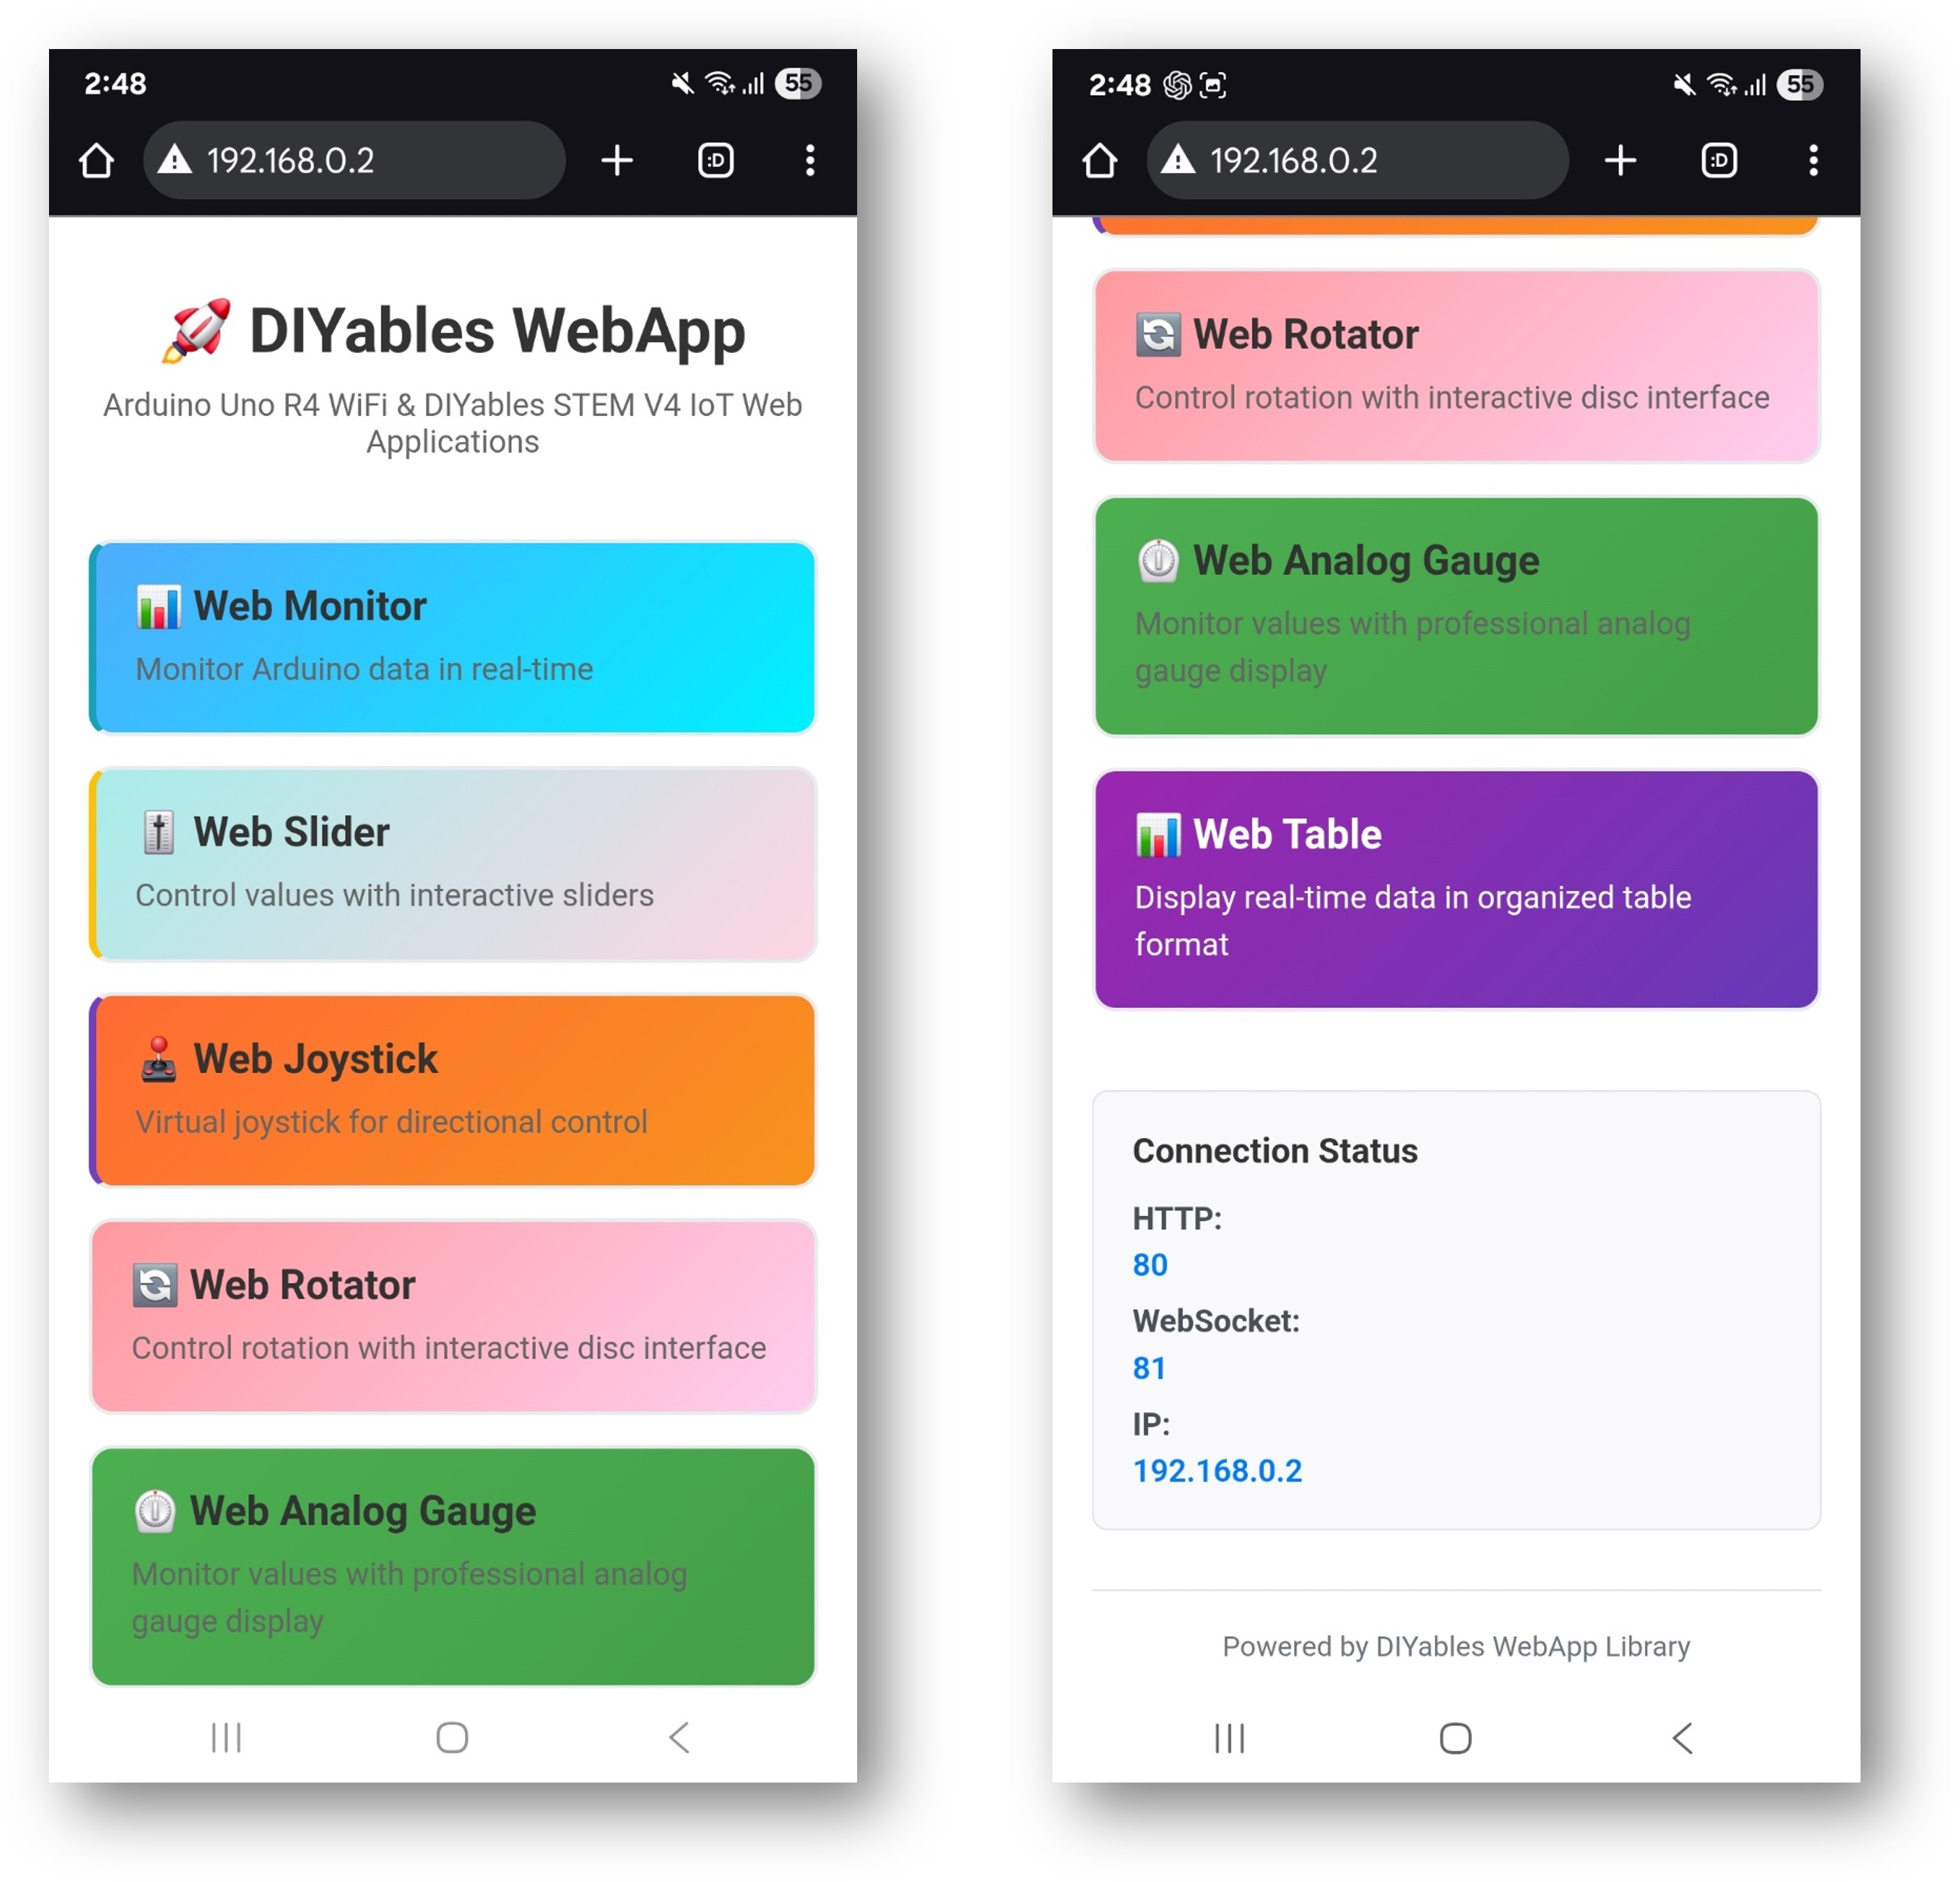
La page d'accueil affiche des cartes pour toutes les applications enregistrées :
Sélectionnez n'importe quelle carte pour ouvrir cette application. Chaque page est également accessible directement par son chemin, par exemple http://192.168.0.2/web-monitor ou http://192.168.0.2/web-slider.
URLs des applications
Application
Chemin URL
Page d'accueil
http
//[board-ip]/
Moniteur web
http
//[board-ip]/web-monitor
Curseur web
http
//[board-ip]/web-slider
Joystick web
http
//[board-ip]/web-joystick
Rotateur web
http
//[board-ip]/web-rotator
Jauge analogique web
http
//[board-ip]/web-gauge
Tableau web
http
//[board-ip]/web-table
Détails de configuration
Configuration des broches numériques
Les broches de sortie sont modifiables depuis le navigateur ; les broches d'entrée affichent leur état actuel :
// autoReturn=false : le joystick reste à la position de libération// sensitivity=5 : mises à jour uniquement quand le mouvement dépasse 5%DIYablesWebJoystickPage webJoystickPage(false, 5);
Variables d'état partagées
Les variables d'état maintiennent la cohérence de toutes les pages avec les valeurs matérielles réelles :
int pinStates[16] = { LOW }; // États des broches numériques pour les broches 0-13int currentSlider1 = 64; // Valeur du curseur 1 (0-255), commence à 25%int currentSlider2 = 128; // Valeur du curseur 2 (0-255), commence à 50%int currentJoystickX = 0; // Dernier X du joystick (-100 à 100)int currentJoystickY = 0; // Dernier Y du joystick (-100 à 100)
Commandes de chat intégrées
L'exemple de sketch gère les entrées de chat suivantes :
hello — Retourne un message de salutation
time — Rapporte le temps de fonctionnement de la carte en secondes
status — Rapporte l'état du système et l'état de la LED
help — Liste les commandes reconnues
ledon — Allume la LED intégrée
ledoff — Éteint la LED intégrée
Exemple d'échange :
User: hello
ESP32: Hello! I'm your Arduino. How can I help you?
User: led on
ESP32: Built-in LED is now ON
User: time
ESP32: I've been running for 1245 seconds.
User: status
ESP32: Status: Running smoothly! LED is ON
Adaptation de l'exemple
Utiliser le joystick avec le contrôle moteur
Mappez les valeurs X/Y du joystick aux vitesses des moteurs gauche et droit en utilisant le callback :
webJoystickPage.onJoystickValueFromWeb([](int x, int y) {int leftSpeed = constrain(y + (x / 2), -100, 100);int rightSpeed = constrain(y - (x / 2), -100, 100);// Mettre à l'échelle par le curseur 1 pour limiter la vitesse leftSpeed = map(leftSpeed, -100, 100, -currentSlider1, currentSlider1); rightSpeed = map(rightSpeed, -100, 100, -currentSlider1, currentSlider1);analogWrite(MOTOR_LEFT_PWM, abs(leftSpeed));analogWrite(MOTOR_RIGHT_PWM, abs(rightSpeed));});
Envoi de données de capteur vers le moniteur
Utilisez la page moniteur pour afficher les lectures de capteur au lieu du port Série :
Chaque page enregistrée augmente l'utilisation du flash et de la RAM. Supprimez les pages non utilisées par votre projet. La conception modulaire signifie qu'appeler addApp() uniquement pour les pages dont vous avez besoin est suffisant — les classes de pages inutilisées ne sont pas liées.
N'hésitez pas à partager le lien de ce tutoriel. Cependant, veuillez ne pas utiliser notre contenu sur d'autres sites web. Nous avons investi beaucoup d'efforts et de temps pour créer ce contenu, veuillez respecter notre travail !