Arduino Nano ESP32 - Bande LED WS2812B
Dans ce tutoriel, nous allons apprendre à utiliser l'Arduino Nano ESP32 pour contrôler une bande LED RGB WS2812B. Avec une seule broche Arduino Nano ESP32 :
- Arduino Nano ESP32 peut contrôler la couleur de chaque LED sur la bande LED individuellement.
- Arduino Nano ESP32 peut changer la luminosité de chaque LED sur la bande LED individuellement.
Préparation du matériel
Ou vous pouvez acheter les kits suivants:
| 1 | × | Kit de Capteurs DIYables (18 capteurs/écrans) |
Divulgation : Certains des liens fournis dans cette section sont des liens affiliés Amazon. Nous pouvons recevoir une commission pour tout achat effectué via ces liens, sans coût supplémentaire pour vous. Nous vous remercions de votre soutien.
À propos de la bande LED RGB WS2812B
Brochage
La bande LED RGB WS2812B possède trois broches :
- Broche GND : doit être connectée à GND (0V)
- Broche VCC : doit être connectée à 5V de l'alimentation externe
- Broche Din : est la broche qui reçoit le signal de commande. Elle doit être connectée à une broche Arduino Nano ESP32.
※ Note:
L'ordre des broches peut varier selon les fabricants. Utilisez TOUJOURS les étiquettes imprimées sur la bande LED.
Diagramme de câblage
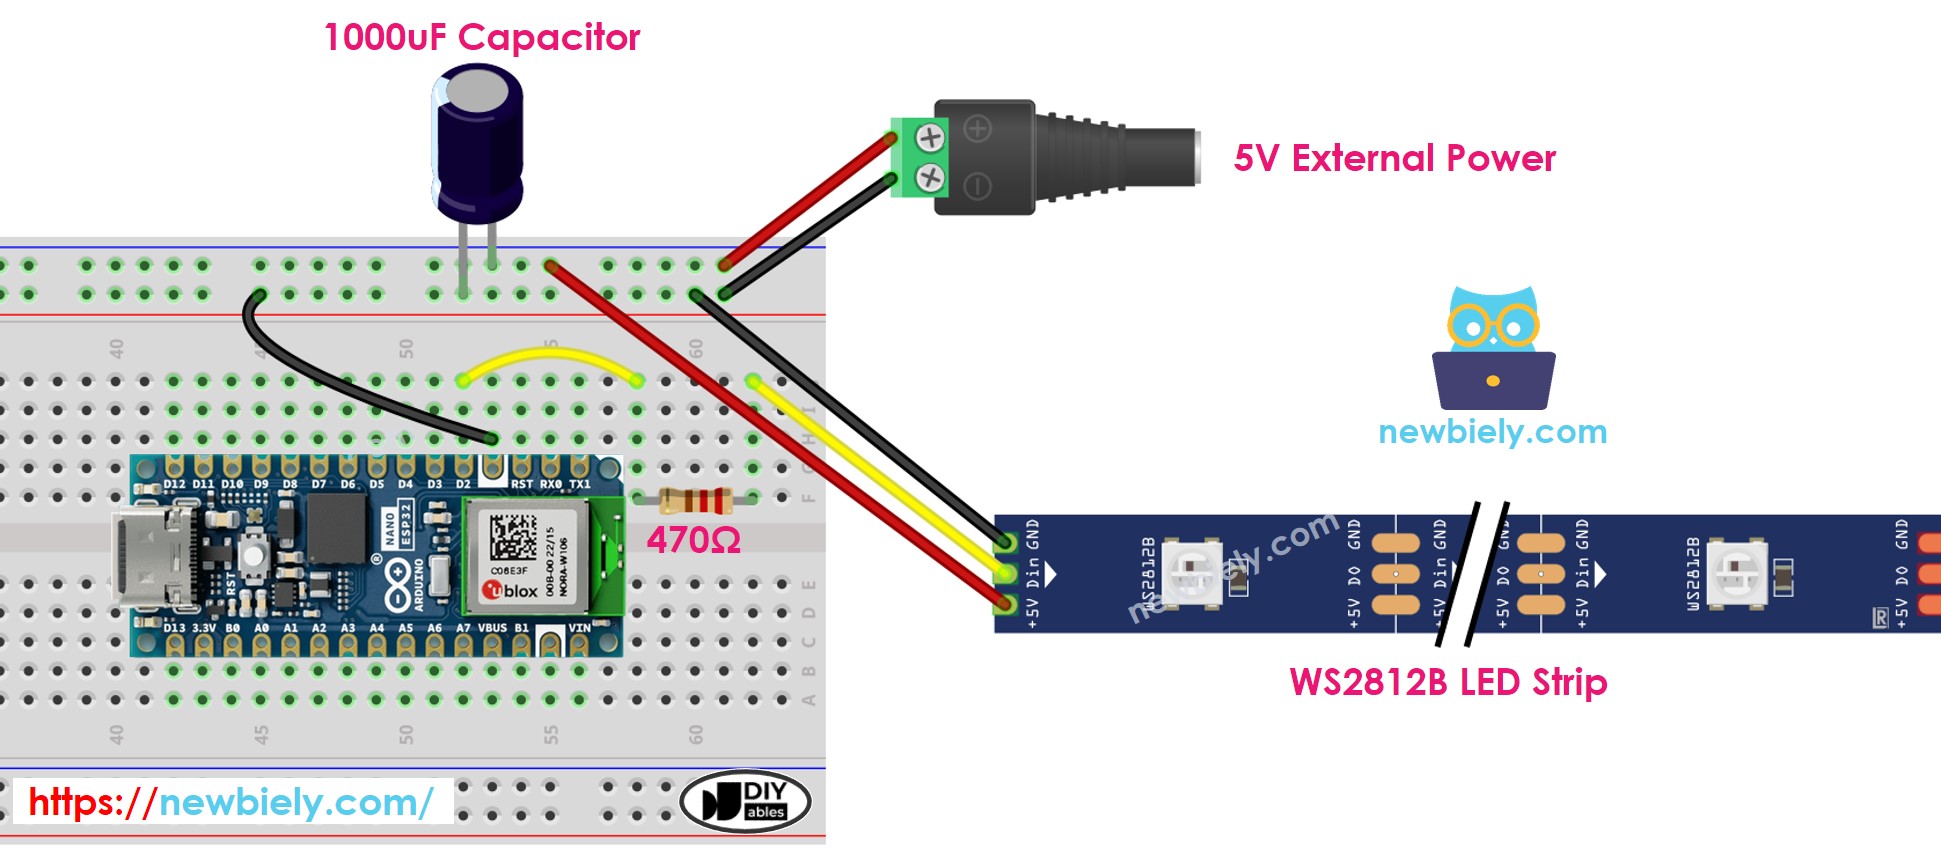
Cette image a été créée avec Fritzing. Cliquez pour agrandir l'image.
Comment programmer pour une bande LED RGB WS2812B
- Si c'est la première fois que vous utilisez le Arduino Nano ESP32, consultez Installation du logiciel Arduino Nano ESP32..
Il existe deux bibliothèques qui peuvent être utilisées pour contrôler la bande LED WS2812B :
- Bibliothèque Adafruit NeoPixel.
- Bibliothèque FastLED.
Ce tutoriel utilisera la bibliothèque Adafruit NeoPixel.
- Déclarez un objet WS2812B
#define PIN_WS2812B D2 // La broche Arduino Nano ESP32 qui se connecte à WS2812B
#define NUM_PIXELS 30 // Le nombre de LED (pixels) sur WS2812B
Adafruit_NeoPixel WS2812B(NUM_PIXELS, PIN_WS2812B, NEO_GRB + NEO_KHZ800);
- Initialise le WS2812B
WS2812B.begin(); // INITIALISER l'objet bande WS2812B (REQUIS)
- Définir la couleur de chaque LED individuelle (appelée pixel).
WS2812B.setPixelColor(pixel, WS2812B.Color(255, 0, 0));
- Réglez la luminosité de toutes les bandes.
WS2812B.setBrightness(100); // une valeur de 0 à 255
※ Note:
- WS2812B.setBrightness() est utilisé pour tous les pixels sur la bande LED. Pour régler la luminosité de chaque pixel individuellement, nous pouvons ajuster la valeur de la couleur.
- Les valeurs définies par WS2812B.setBrightness() et WS2812B.setPixelColor() ne prennent effet que lorsque WS2812B.show() est appelé.
Code Arduino Nano ESP32
Le code ci-dessous fait :
- Transformez les pixels en vert un par un avec un délai entre chaque pixel
- Éteignez tous les pixels pendant deux secondes
- Allumez tous les pixels en rouge simultanément pendant deux secondes
- Répétez le processus ci-dessus indéfiniment
/*
* Ce code Arduino Nano ESP32 a été développé par newbiely.fr
* Ce code Arduino Nano ESP32 est mis à disposition du public sans aucune restriction.
* Pour des instructions complètes et des schémas de câblage, veuillez visiter:
* https://newbiely.fr/tutorials/arduino-nano-esp32/arduino-nano-esp32-ws2812b-led-strip
*/
#include <Adafruit_NeoPixel.h>
#define PIN_WS2812B D2 // The Arduino Nano ESP32 pin connected to WS2812B
#define NUM_PIXELS 30 // The number of LEDs (pixels) on WS2812B LED strip
Adafruit_NeoPixel ws2812b(NUM_PIXELS, PIN_WS2812B, NEO_GRB + NEO_KHZ800);
void setup() {
ws2812b.begin(); // initialize WS2812B strip object (REQUIRED)
}
void loop() {
ws2812b.clear(); // set all pixel colors to 'off'. It only takes effect if pixels.show() is called
// turn pixels to green one-by-one with delay between each pixel
for (int pixel = 0; pixel < NUM_PIXELS; pixel++) { // for each pixel
ws2812b.setPixelColor(pixel, ws2812b.Color(0, 255, 0)); // it only takes effect if pixels.show() is called
ws2812b.show(); // update to the WS2812B Led Strip
delay(500); // 500ms pause between each pixel
}
// turn off all pixels for two seconds
ws2812b.clear();
ws2812b.show(); // update to the WS2812B Led Strip
delay(2000); // 2 seconds off time
// turn on all pixels to red at the same time for two seconds
for (int pixel = 0; pixel < NUM_PIXELS; pixel++) { // for each pixel
ws2812b.setPixelColor(pixel, ws2812b.Color(255, 0, 0)); // it only takes effect if pixels.show() is called
}
ws2812b.show(); // update to the WS2812B Led Strip
delay(1000); // 1 second on time
// turn off all pixels for one seconds
ws2812b.clear();
ws2812b.show(); // update to the WS2812B Led Strip
delay(1000); // 1 second off time
}
Étapes rapides
- Ouvrez le Gestionnaire de bibliothèques en cliquant sur l'icône Gestionnaire de bibliothèques dans la barre de navigation gauche de l'Arduino IDE
- Recherchez "Adafruit NeoPixel", puis trouvez la bibliothèque WS2812B par Adafruit
- Cliquez sur le bouton Install pour installer la bibliothèque NeoPixel.
- Copiez le code ci-dessus et ouvrez-le avec l'IDE Arduini
- Cliquez sur le bouton Upload dans l'IDE Arduini pour charger le code sur Arduino Nano ESP32
- Observez l'effet de la LED
※ Note:
Pour tout effet LED complexe, nous proposons le service de programmation payant