Exemple de broches numériques Bluetooth Arduino Nano ESP32 - Contrôle GPIO via tutoriel BLE
Cet exemple fournit un contrôle et une surveillance GPIO à distance sur l'Arduino Nano ESP32 en utilisant le BLE (Bluetooth Low Energy) via l'application DIYables Bluetooth STEM. Contrôlez les broches de sortie et surveillez les broches d'entrée sans fil depuis un smartphone. Convient au contrôle de relais, surveillance de boutons, commutation de LED et toute application nécessitant un accès aux broches à distance.
Remarque : L'Arduino Nano ESP32 prend en charge le BLE uniquement — le Bluetooth Classique n'est pas pris en charge. L'application Bluetooth DIYables fonctionne sur Android et iOS avec le BLE.
Contrôle de sortie : Mettez les broches numériques à HIGH ou LOW à distance
Surveillance d'entrée : Lisez les états des broches numériques et analogiques
Broches nommées : Assignez des étiquettes descriptives à chaque broche (ex. : "LED", "Relais")
Mises à jour en temps réel : Envoyez les changements d'état des broches à l'application
Jusqu'à 16 broches : Contrôlez plusieurs broches simultanément
Support Android et iOS : Le BLE est compatible avec les deux plateformes
Pas de couplage requis : Le BLE se connecte sans couplage manuel
Ou vous pouvez acheter les kits suivants:
Divulgation : Certains des liens fournis dans cette section sont des liens affiliés Amazon. Nous pouvons recevoir une commission pour tout achat effectué via ces liens, sans coût supplémentaire pour vous. Nous vous remercions de votre soutien.
Connectez l'Arduino Nano ESP32 à votre ordinateur via USB.
Ouvrez l'Arduino IDE.
Sélectionnez la carte Arduino Nano ESP32 et le port COM correct.
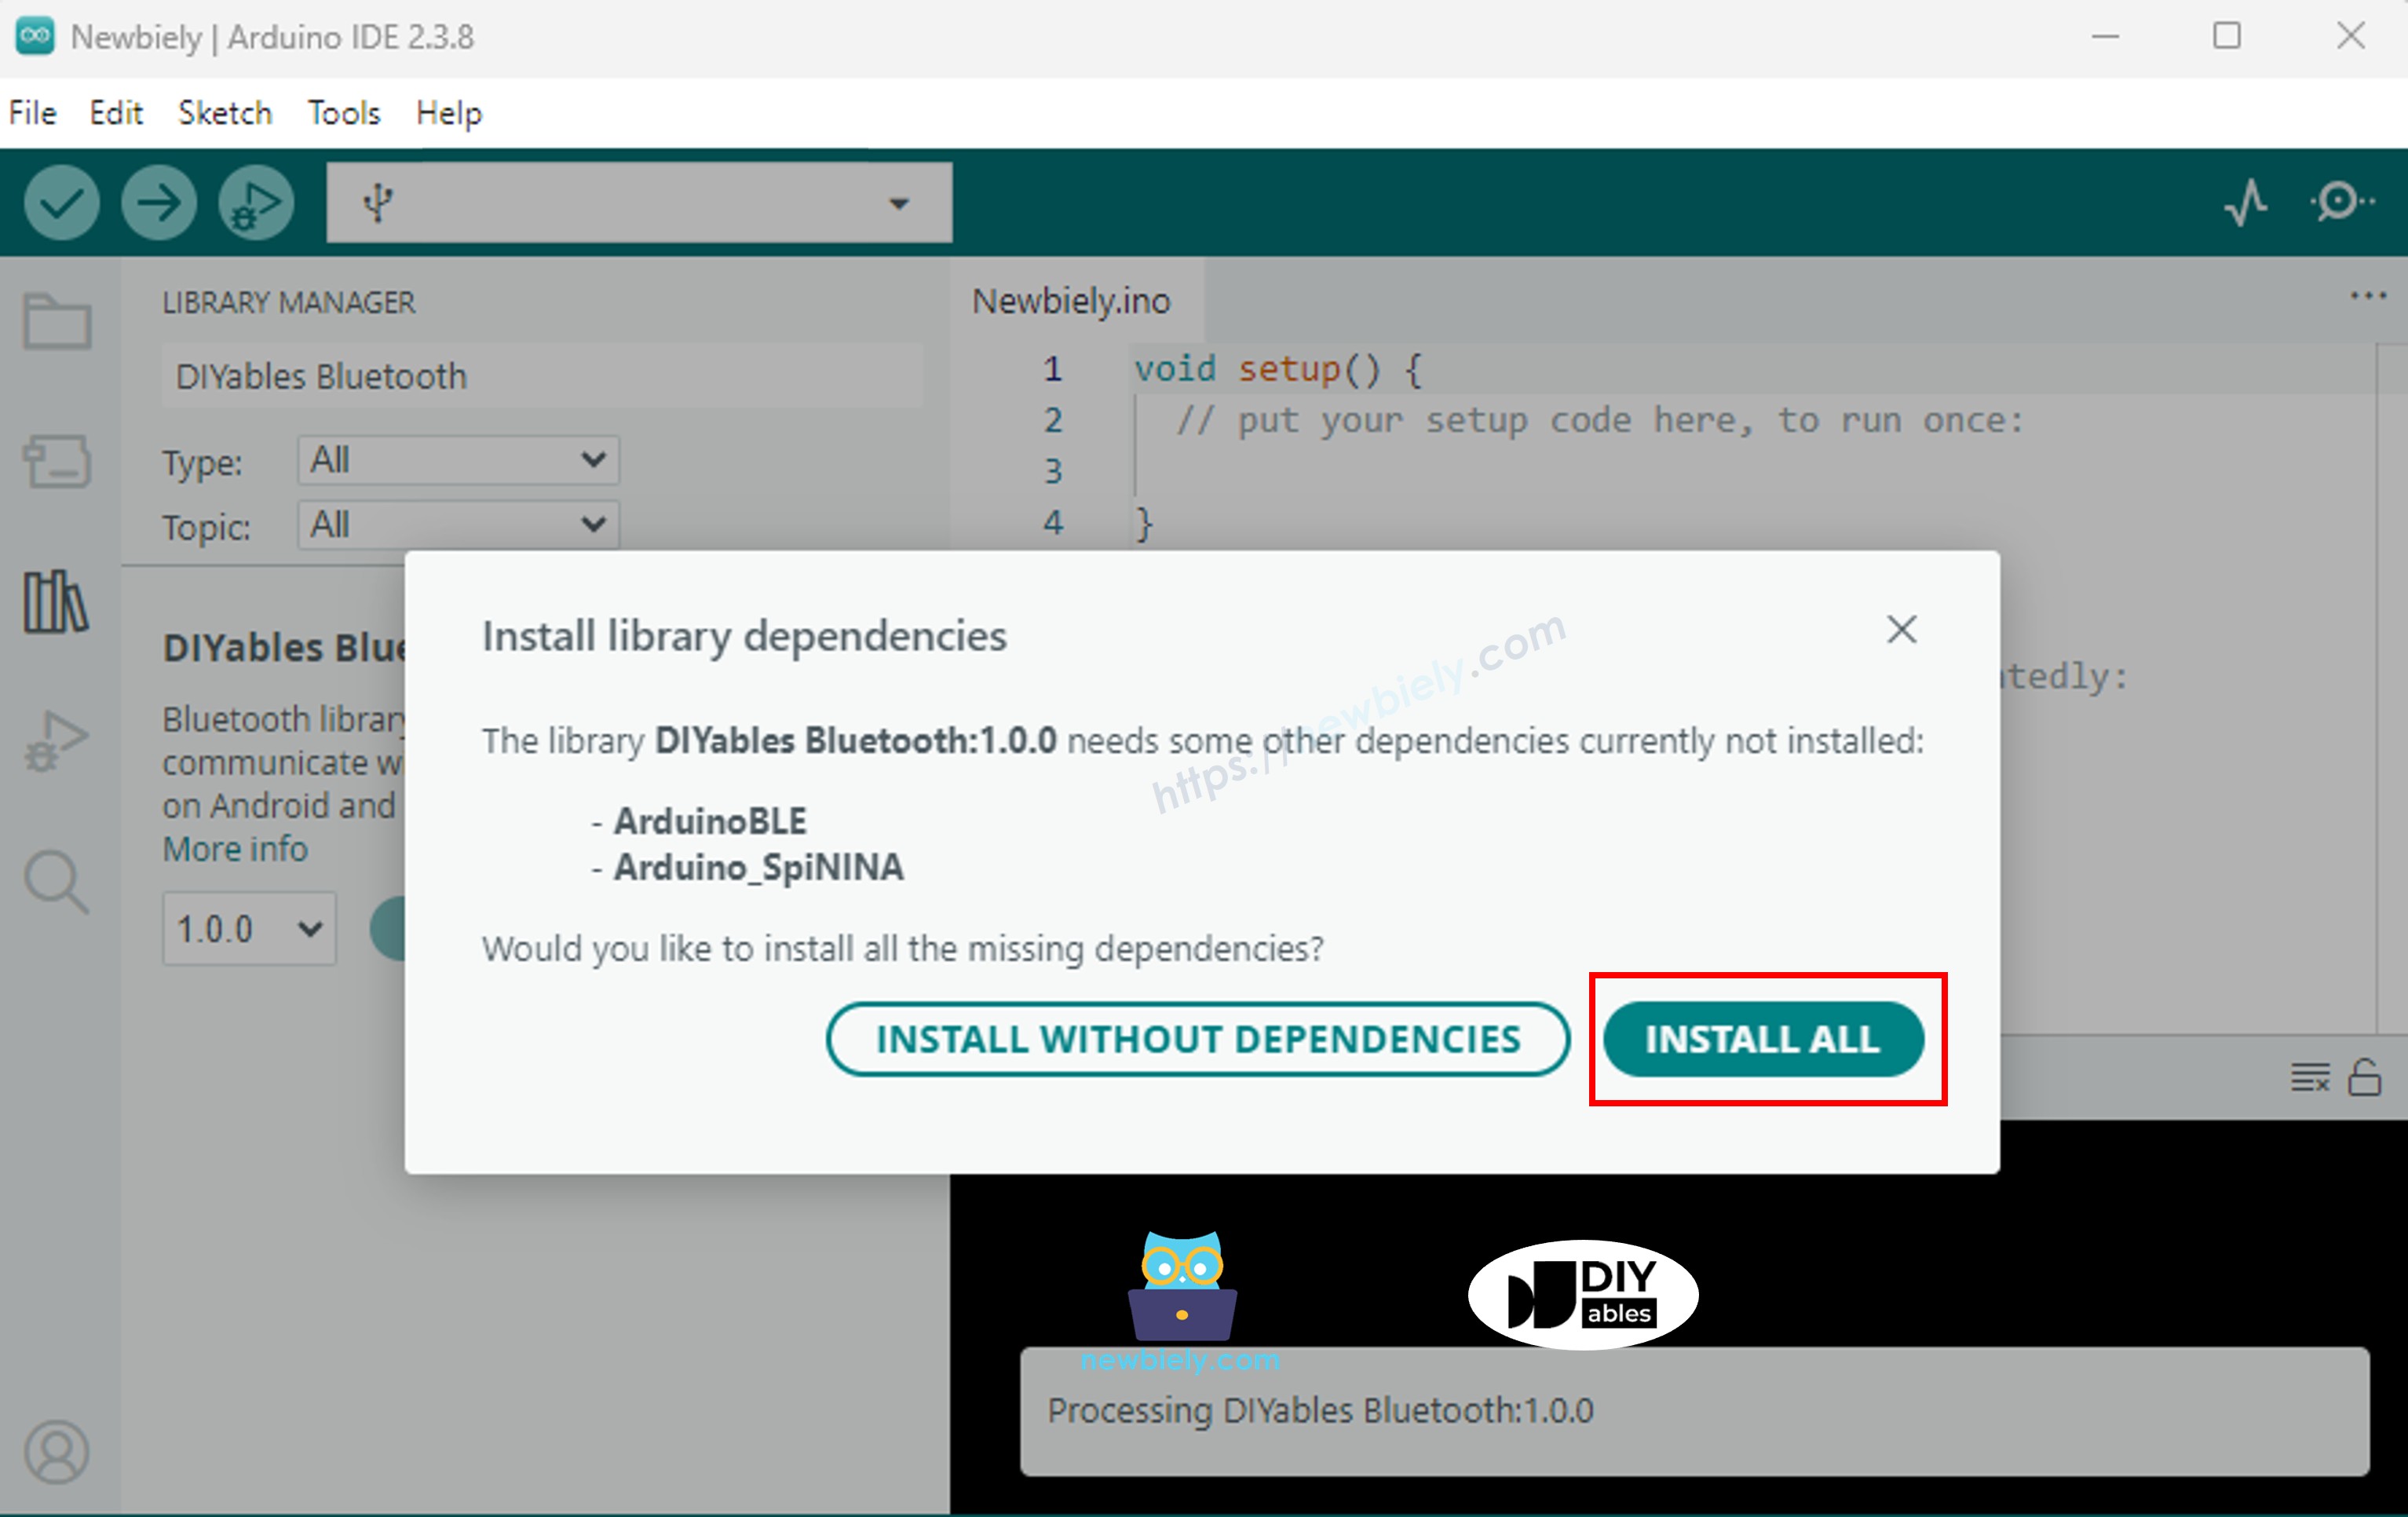
Cliquez sur l'icône Bibliothèques dans la barre latérale gauche.
Recherchez "DIYables Bluetooth" et sélectionnez la bibliothèque Bluetooth DIYables par DIYables.
Cliquez sur Installer .
#include <DIYables_BluetoothServer .h>
#include <DIYables_BluetoothPinControl .h>
#include <platforms/DIYables_Esp32BLE.h>
const char* DEVICE_NAME = "ESP32BLE_Pins" ;const char* SERVICE_UUID = "19B10000-E8F2-537E-4F6C-D104768A1214" ;const char* TX_UUID = "19B10001-E8F2-537E-4F6C-D104768A1214" ;const char* RX_UUID = "19B10002-E8F2-537E-4F6C-D104768A1214" ;DIYables_Esp32BLE bluetooth(DEVICE_NAME, SERVICE_UUID, TX_UUID, RX_UUID);DIYables_BluetoothServer bluetoothServer(bluetooth);DIYables_BluetoothPinControl bluetoothPins;const int LED_PIN = LED_BUILTIN ; const int OUTPUT_PIN_1 = D6;const int OUTPUT_PIN_2 = D7;const int INPUT_PIN_1 = D4;const int INPUT_PIN_2 = D5;const int ANALOG_PIN_1 = A0; const int ANALOG_PIN_2 = A1; void setup () { Serial .begin (115200);
delay (1000);
Serial .println ("DIYables Bluetooth - ESP32 BLE Pin Control/Monitor Example" );
pinMode (LED_PIN, OUTPUT );
pinMode (OUTPUT_PIN_1, OUTPUT );
pinMode (OUTPUT_PIN_2, OUTPUT );
pinMode (INPUT_PIN_1, INPUT_PULLUP );
pinMode (INPUT_PIN_2, INPUT_PULLUP );
bluetoothServer.begin ();
bluetoothServer.addApp (&bluetoothPins);
bluetoothPins.enablePin (LED_PIN, BT_PIN_OUTPUT , "LED" );
bluetoothPins.enablePin (OUTPUT_PIN_1, BT_PIN_OUTPUT , "Out1" );
bluetoothPins.enablePin (OUTPUT_PIN_2, BT_PIN_OUTPUT , "Out2" );
bluetoothPins.enablePin (INPUT_PIN_1, BT_PIN_INPUT , "Btn1" );
bluetoothPins.enablePin (INPUT_PIN_2, BT_PIN_INPUT , "Btn2" );
bluetoothPins.enablePin (ANALOG_PIN_1, BT_PIN_INPUT , "A34" );
bluetoothPins.enablePin (ANALOG_PIN_2, BT_PIN_INPUT , "A35" );
bluetoothServer.setOnConnected ([]() {
Serial .println ("Bluetooth connected!" );
});
bluetoothServer.setOnDisconnected ([]() {
Serial .println ("Bluetooth disconnected!" );
});
bluetoothPins.onPinWrite ([](int pin, int state) {
digitalWrite (pin, state);
Serial .print ("Pin " );
Serial .print (pin);
Serial .print (" set to " );
Serial .println (state ? "HIGH" : "LOW" );
});
bluetoothPins.onPinRead ([](int pin) -> int {
int state;
if (pin == ANALOG_PIN_1 || pin == ANALOG_PIN_2) {
state = analogRead (pin);
Serial .print ("Analog pin " );
Serial .print (pin);
Serial .print (" read: " );
Serial .println (state);
} else {
state = digitalRead (pin);
Serial .print ("Digital pin " );
Serial .print (pin);
Serial .print (" read: " );
Serial .println (state ? "HIGH" : "LOW" );
}
return state;
});
bluetoothPins.onPinModeChange ([](int pin, int mode) {
pinMode (pin, mode == BT_PIN_OUTPUT ? OUTPUT : INPUT_PULLUP );
Serial .print ("Pin " );
Serial .print (pin);
Serial .print (" mode changed to " );
Serial .println (mode == BT_PIN_OUTPUT ? "OUTPUT" : "INPUT" );
});
Serial .println ("Waiting for Bluetooth connection..." );
Serial .print ("Enabled pins: " );
Serial .println (bluetoothPins.getEnabledPinCount ());
}
void loop () { bluetoothServer.loop ();
static unsigned long lastInputCheck = 0;
static int lastInputState1 = HIGH ;
static int lastInputState2 = HIGH ;
static int lastAnalogState1 = 0;
static int lastAnalogState2 = 0;
if (millis () - lastInputCheck >= 100) {
lastInputCheck = millis ();
int currentState1 = digitalRead (INPUT_PIN_1);
if (currentState1 != lastInputState1) {
lastInputState1 = currentState1;
bluetoothPins.updatePinState (INPUT_PIN_1, currentState1);
Serial .print ("Input pin " );
Serial .print (INPUT_PIN_1);
Serial .print (" changed to " );
Serial .println (currentState1 ? "HIGH" : "LOW" );
}
int currentState2 = digitalRead (INPUT_PIN_2);
if (currentState2 != lastInputState2) {
lastInputState2 = currentState2;
bluetoothPins.updatePinState (INPUT_PIN_2, currentState2);
Serial .print ("Input pin " );
Serial .print (INPUT_PIN_2);
Serial .print (" changed to " );
Serial .println (currentState2 ? "HIGH" : "LOW" );
}
int currentAnalog1 = analogRead (ANALOG_PIN_1);
if (abs (currentAnalog1 - lastAnalogState1) > 40) {
lastAnalogState1 = currentAnalog1;
bluetoothPins.updatePinState (ANALOG_PIN_1, currentAnalog1);
Serial .print ("Analog pin " );
Serial .print (ANALOG_PIN_1);
Serial .print (" changed to " );
Serial .println (currentAnalog1);
}
int currentAnalog2 = analogRead (ANALOG_PIN_2);
if (abs (currentAnalog2 - lastAnalogState2) > 40) {
lastAnalogState2 = currentAnalog2;
bluetoothPins.updatePinState (ANALOG_PIN_2, currentAnalog2);
Serial .print ("Analog pin " );
Serial .print (ANALOG_PIN_2);
Serial .print (" changed to " );
Serial .println (currentAnalog2);
}
}
delay (10);
}
Cliquez sur Téléverser pour flasher le sketch sur la carte.
Ouvrez le Moniteur Série.
La sortie du Moniteur Série devrait ressembler à :
∞
Newbiely | Arduino IDE 2.3.8
8
Serial .println ("Hello World!" );
Message (Enter to send message to 'Arduino Nano ESP32' on 'COM15')
DIYables Bluetooth - Pin Control/Monitor Example
Waiting for Bluetooth connection...
Enabled pins: 7
Ln 11, Col 1
Arduino Nano ESP32 on COM15
2
Installez l'application Bluetooth DIYables sur votre smartphone :
Android |
iOS
Remarque : L'application Bluetooth DIYables fonctionne sur Android et iOS avec le BLE. Aucun couplage manuel n'est requis.
Lancez l'application Bluetooth DIYables.
Au premier lancement, accordez les autorisations suivantes :
Appareils à proximité (Android 12+) / Bluetooth (iOS) — requis pour scanner et se connecter aux appareils Bluetooth
Localisation (Android 11 et versions antérieures uniquement) — requis par les anciennes versions Android pour scanner le BLE
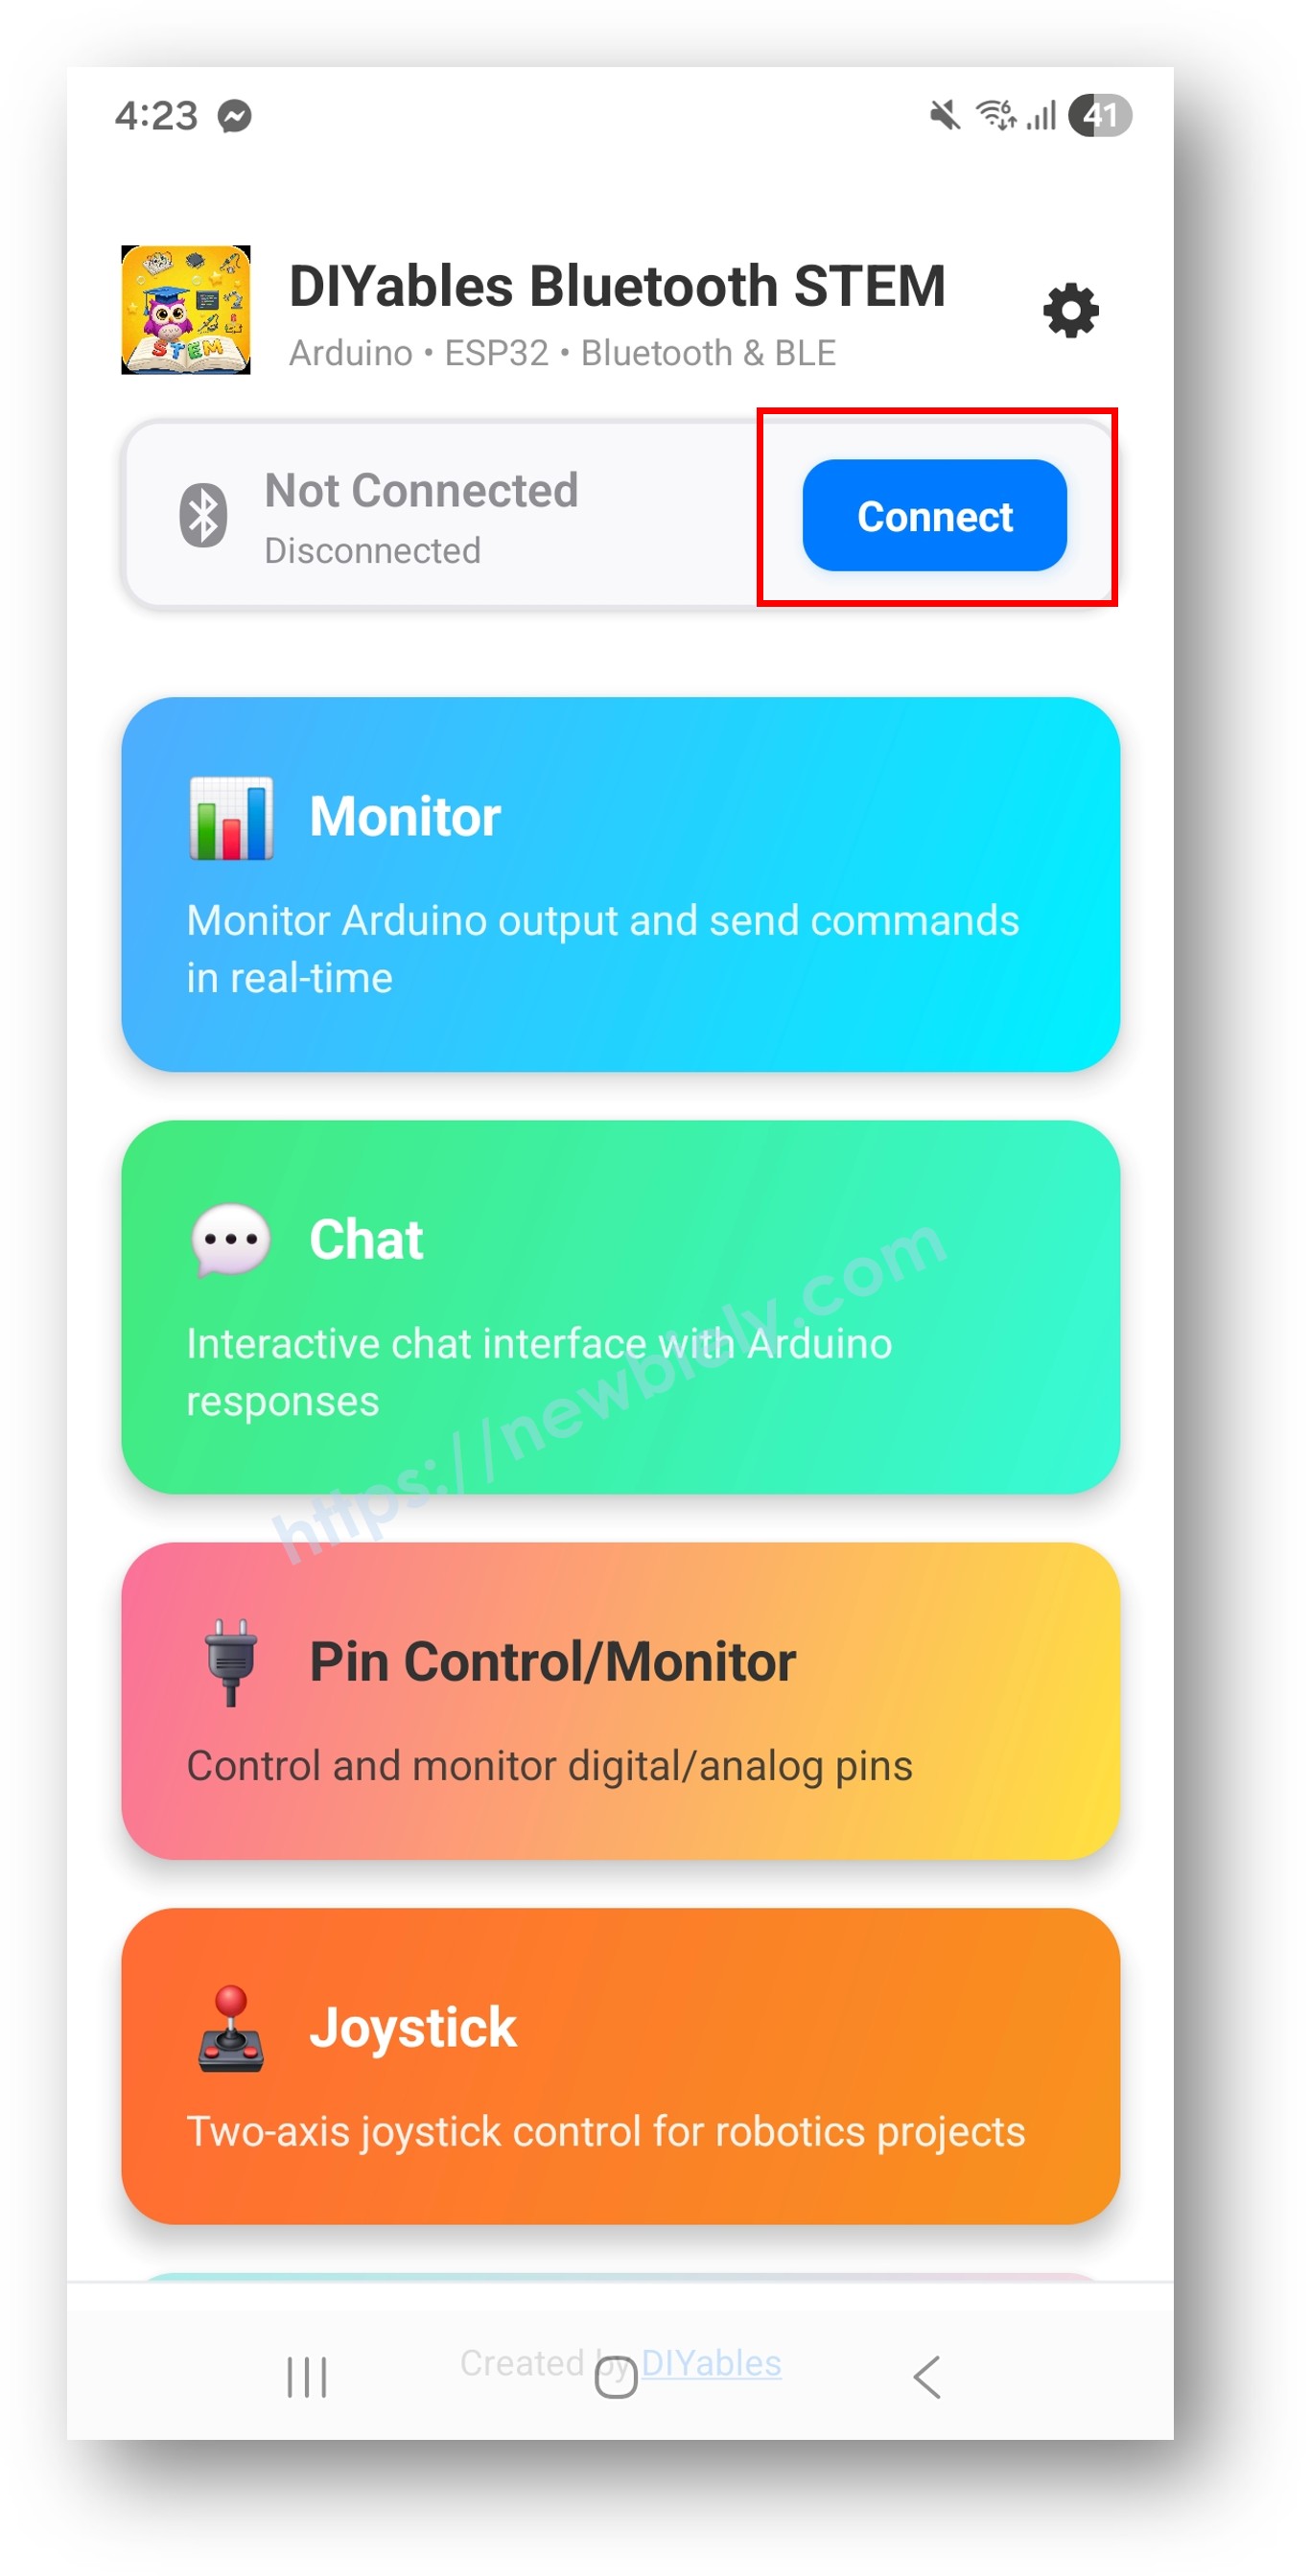
Assurez-vous que le Bluetooth est activé sur votre appareil.
Appuyez sur Connecter sur l'écran d'accueil. L'application va scanner les appareils BLE.
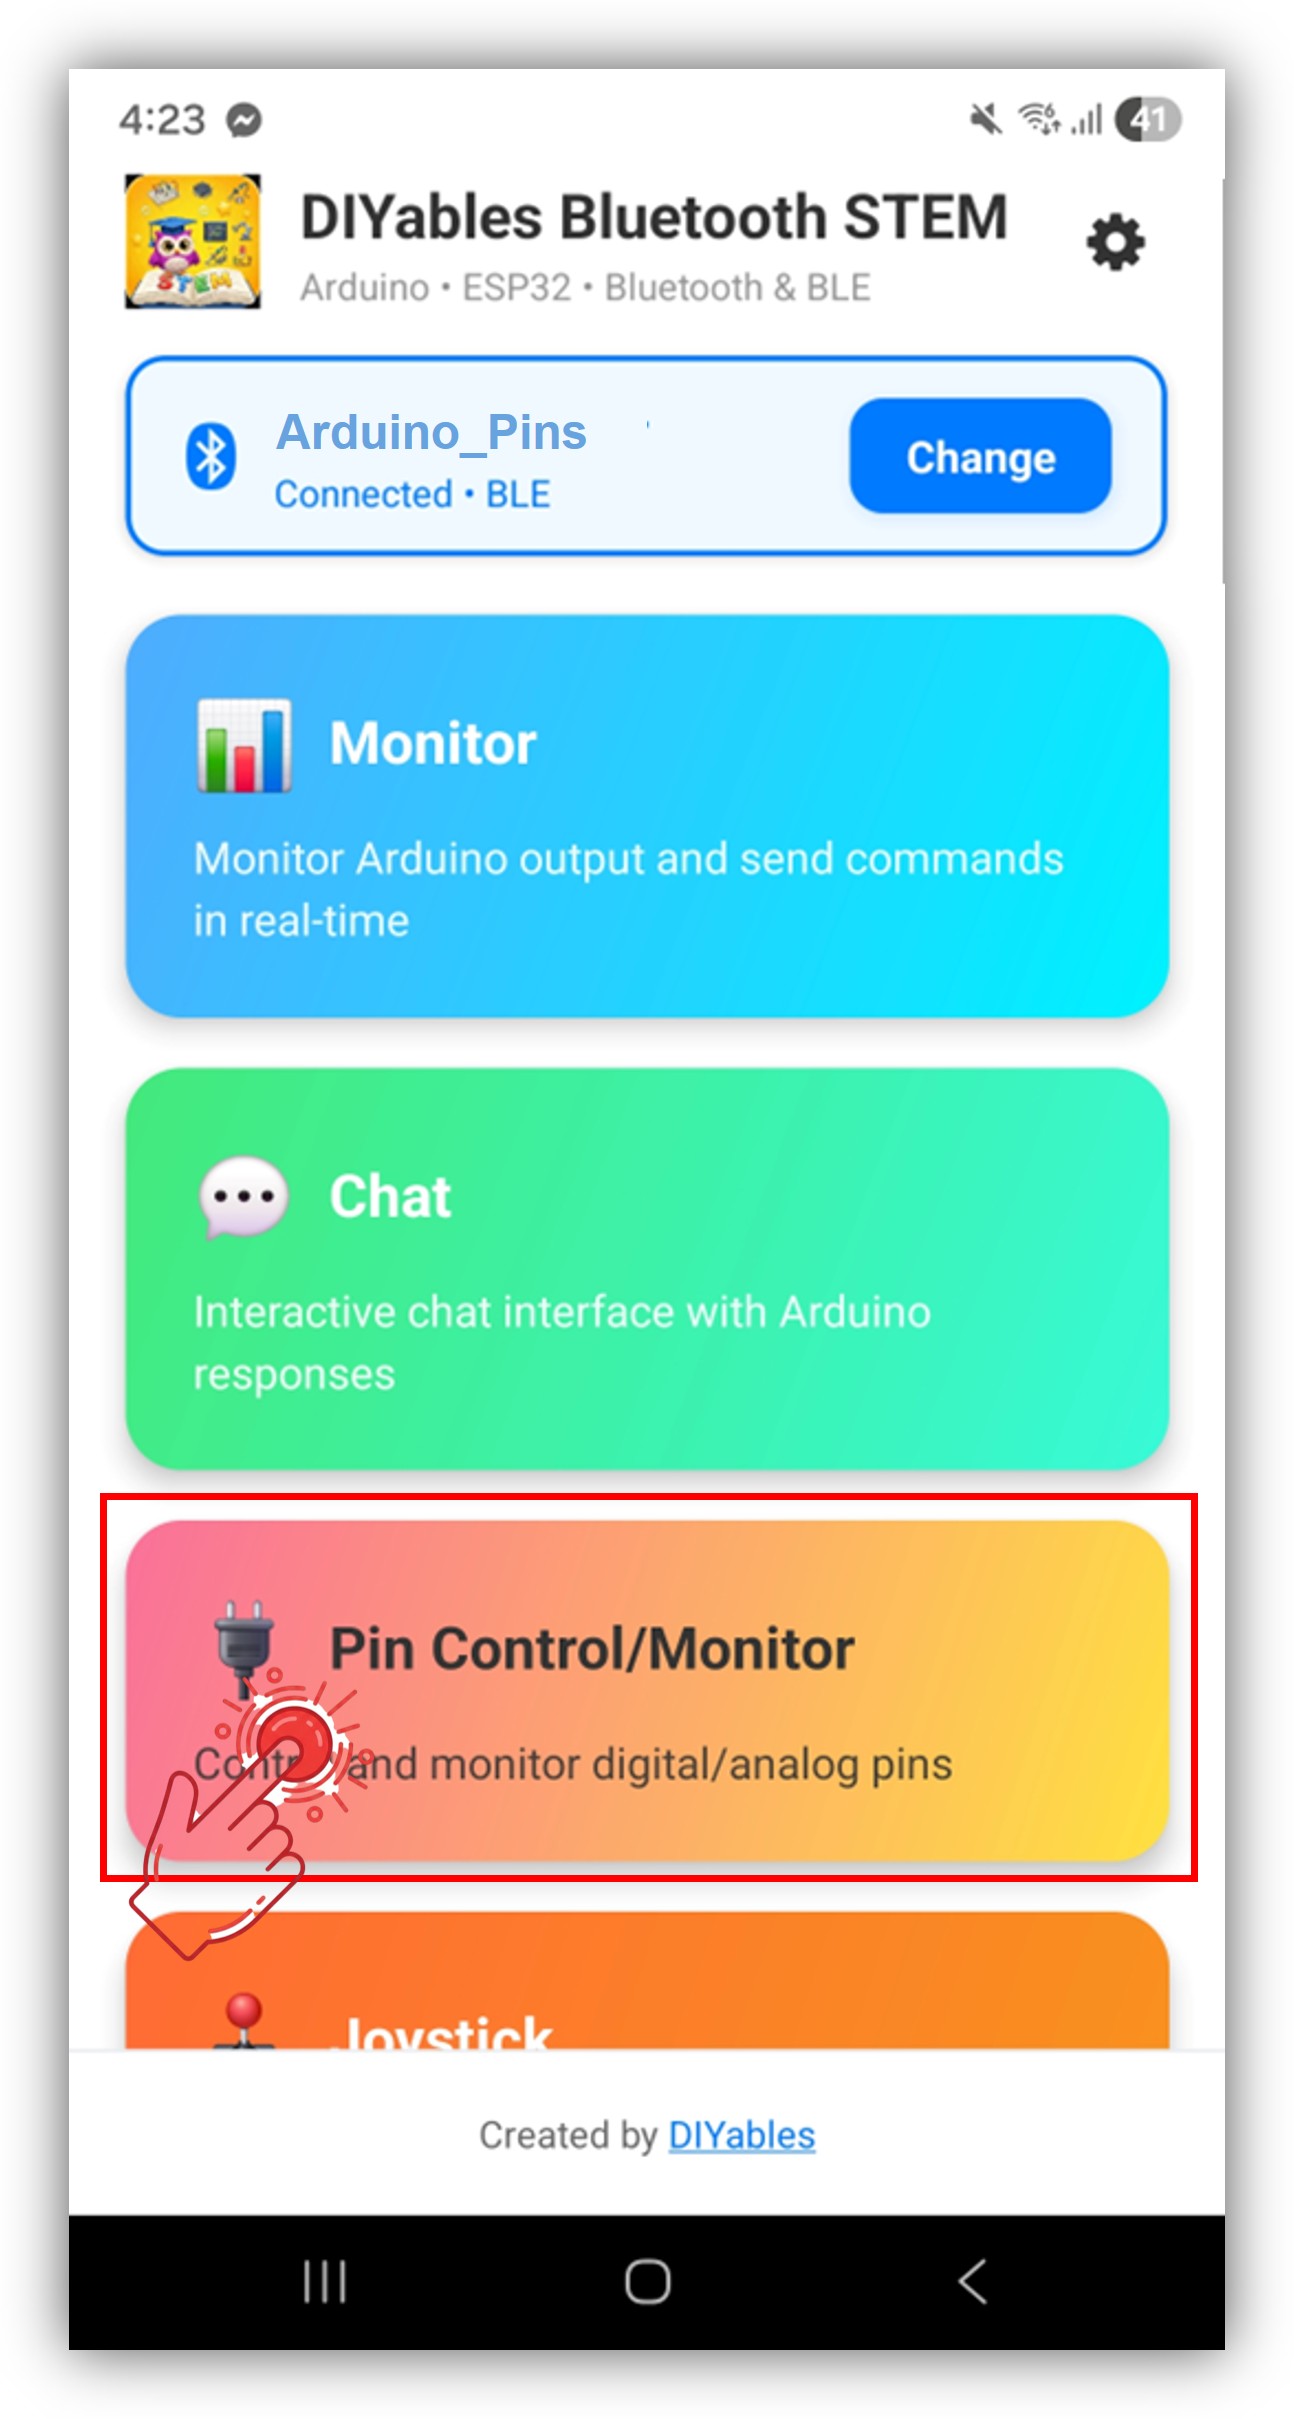
Appuyez sur "Arduino_Pins" dans les résultats du scan.
Après la connexion, revenez à l'écran d'accueil et ouvrez l'application Broches numériques .
Appuyez sur l'icône des paramètres sur l'écran d'accueil pour afficher ou masquer les applications. Consultez le Manuel utilisateur de l'application Bluetooth DIYables pour plus de détails.
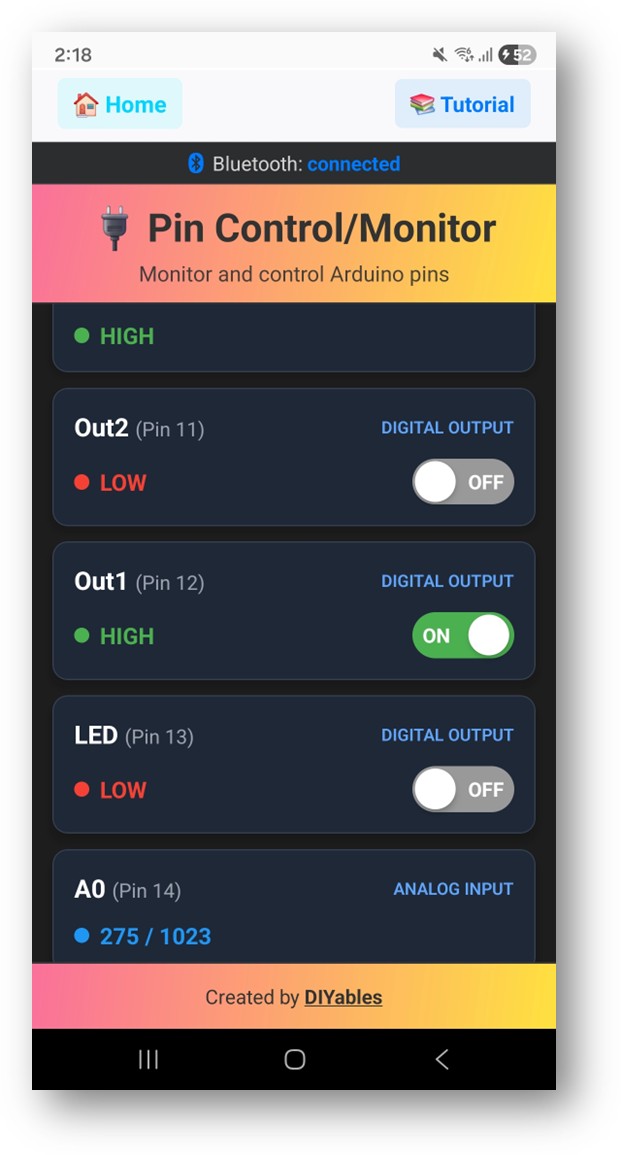
Les broches activées sont listées avec leurs noms et états actuels.
Appuyez sur les broches de sortie pour basculer entre HIGH /LOW, et observez les valeurs des broches d'entrée se mettre à jour en temps réel.
Regardez maintenant le Moniteur Série dans l'Arduino IDE. Vous verrez :
∞
Newbiely | Arduino IDE 2.3.8
8
Serial .println ("Hello World!" );
Message (Enter to send message to 'Arduino Nano ESP32' on 'COM15')
Bluetooth connected!
Pin 13 set to HIGH
Pin 13 set to LOW
Digital pin 7 read: HIGH
Ln 11, Col 1
Arduino Nano ESP32 on COM15
2
bluetoothPins.enablePin (13, BT_PIN_OUTPUT , "LED" );
bluetoothPins.enablePin (12, BT_PIN_OUTPUT , "Relay" );
bluetoothPins.enablePin (7, BT_PIN_INPUT , "Button" );
bluetoothPins.enablePin (A0, BT_PIN_INPUT , "Sensor" );
int count = bluetoothPins.getEnabledPinCount ();
bluetoothPins.onPinWrite ([](int pin, int state) {
digitalWrite (pin, state);
Serial .print ("Pin " );
Serial .print (pin);
Serial .println (state ? " ? HIGH" : " ? LOW" );
});
bluetoothPins.onPinRead ([](int pin) -> int {
if (pin >= A0) {
return analogRead (pin);
}
return digitalRead (pin);
});
bluetoothPins.onPinModeChange ([](int pin, int mode) {
pinMode (pin, mode == BT_PIN_OUTPUT ? OUTPUT : INPUT_PULLUP );
});
bluetoothPins.updatePinState (7, digitalRead (7));
bluetoothPins.updatePinState (A0, analogRead (A0));
const int RELAY_PIN = 12;const int BUTTON_PIN = 7;void setup () { pinMode (RELAY_PIN, OUTPUT );
pinMode (BUTTON_PIN, INPUT_PULLUP );
bluetoothPins.enablePin (RELAY_PIN, BT_PIN_OUTPUT , "Relay" );
bluetoothPins.enablePin (BUTTON_PIN, BT_PIN_INPUT , "Button" );
bluetoothPins.onPinWrite ([](int pin, int state) {
digitalWrite (pin, state);
});
}
void loop () { bluetoothServer.loop ();
static int lastState = HIGH ;
int state = digitalRead (BUTTON_PIN);
if (state != lastState) {
lastState = state;
bluetoothPins.updatePinState (BUTTON_PIN, state);
}
delay (10);
}
const int LED_PINS[] = {8, 9, 10, 11, 12, 13};const char* LED_NAMES[] = {"Red" , "Green" , "Blue" , "Yellow" , "White" , "Built-in" };const int NUM_LEDS = 6;void setup () { for (int i = 0; i < NUM_LEDS; i++) {
pinMode (LED_PINS[i], OUTPUT );
bluetoothPins.enablePin (LED_PINS[i], BT_PIN_OUTPUT , LED_NAMES[i]);
}
bluetoothPins.onPinWrite ([](int pin, int state) {
digitalWrite (pin, state);
});
}
1. L'appareil n'est pas visible dans l'application
Confirmez que la carte est alimentée et que le sketch est téléversé
Vérifiez que le Bluetooth est activé sur votre téléphone
Sur Android 11 et versions antérieures, activez également les services de localisation
2. Le basculement de broche ne fonctionne pas
Confirmez que la broche est activée avec le mode BT_PIN_OUTPUT
Vérifiez que le callback onPinWrite
Vérifiez les connexions de câblage
3. Les broches d'entrée ne se mettent pas à jour
4. Les valeurs analogiques ne s'affichent pas
5. La connexion se coupe fréquemment
6. Le téléversement échoue ou la carte n'est pas reconnue
Panneau de contrôle multi-relais
Moniteur de boutons et d'interrupteurs
Contrôleur d'éclairage LED
Panneau d'interrupteurs pour domotique
Tableau de bord d'entrées de capteurs
Après avoir terminé l'exemple de broches numériques Bluetooth, explorez :
Curseur Bluetooth — Contrôle de valeurs analogiques
Moniteur Bluetooth — Retour de statut basé sur du texte
Tableau Bluetooth — Affichage du statut des broches structuré
Applications Bluetooth multiples — Combinez le contrôle des broches avec d'autres widgets d'application
Pour une aide supplémentaire :
※ NOS MESSAGES
N'hésitez pas à partager le lien de ce tutoriel. Cependant, veuillez ne pas utiliser notre contenu sur d'autres sites web. Nous avons investi beaucoup d'efforts et de temps pour créer ce contenu, veuillez respecter notre travail !