Raspberry Pi Pico - OLED 128×32

Ce tutoriel vous explique comment utiliser un Raspberry Pi Pico avec un écran OLED I2C 128x32. Vous allez apprendre :

Écran OLED I2C Raspberry Pi Pico

Préparation du matériel

1×Raspberry Pi Pico W
1×Raspberry Pi Pico Alternativement:
1×Câble Micro USB
1×Écran OLED I2C SSD1306 128x32
1×Fils de connexion
1×Recommandé: Carte d'extension à bornier à vis pour Raspberry Pi Pico

Ou vous pouvez acheter les kits suivants:

1×Kit de Capteurs DIYables (30 capteurs/écrans)
1×Kit de Capteurs DIYables (18 capteurs/écrans)
Divulgation : Certains des liens fournis dans cette section sont des liens affiliés Amazon. Nous pouvons recevoir une commission pour tout achat effectué via ces liens, sans coût supplémentaire pour vous. Nous vous remercions de votre soutien.

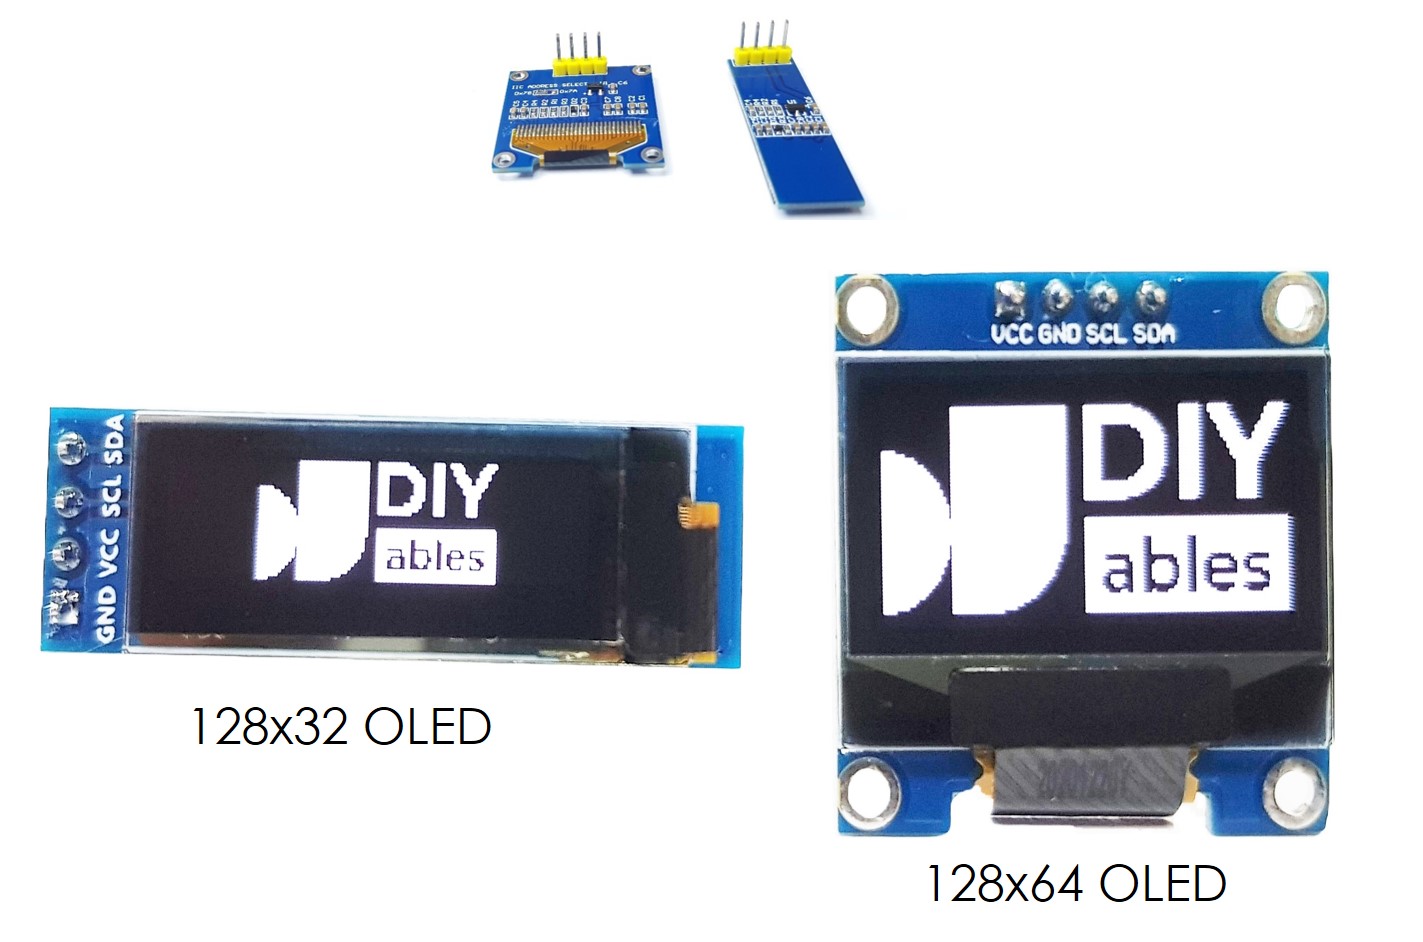
À propos de l'écran OLED

Brochage de l'écran OLED I2C

  • Broche GND : Connectez-la à la masse du Raspberry Pi Pico.
  • Broche VCC : Connectez-la à la broche 5 volts du Raspberry Pi Pico pour l'alimentation.
  • Broche SCL : Il s'agit de la broche d'horloge pour la communication I2C.
  • Broche SDA : Il s'agit de la broche de données pour la communication I2C.
Schéma de brochage OLED

※ Note:

La configuration des broches sur un module OLED peut varier selon le fabricant et le type de module. Regardez toujours et suivez les marquages sur le module OLED. Faites attention !

Ce guide est destiné à un écran OLED utilisant le pilote I2C SSD1306. Nous l'avons testé avec un écran OLED de DIYables et cela a très bien fonctionné sans aucun problème.

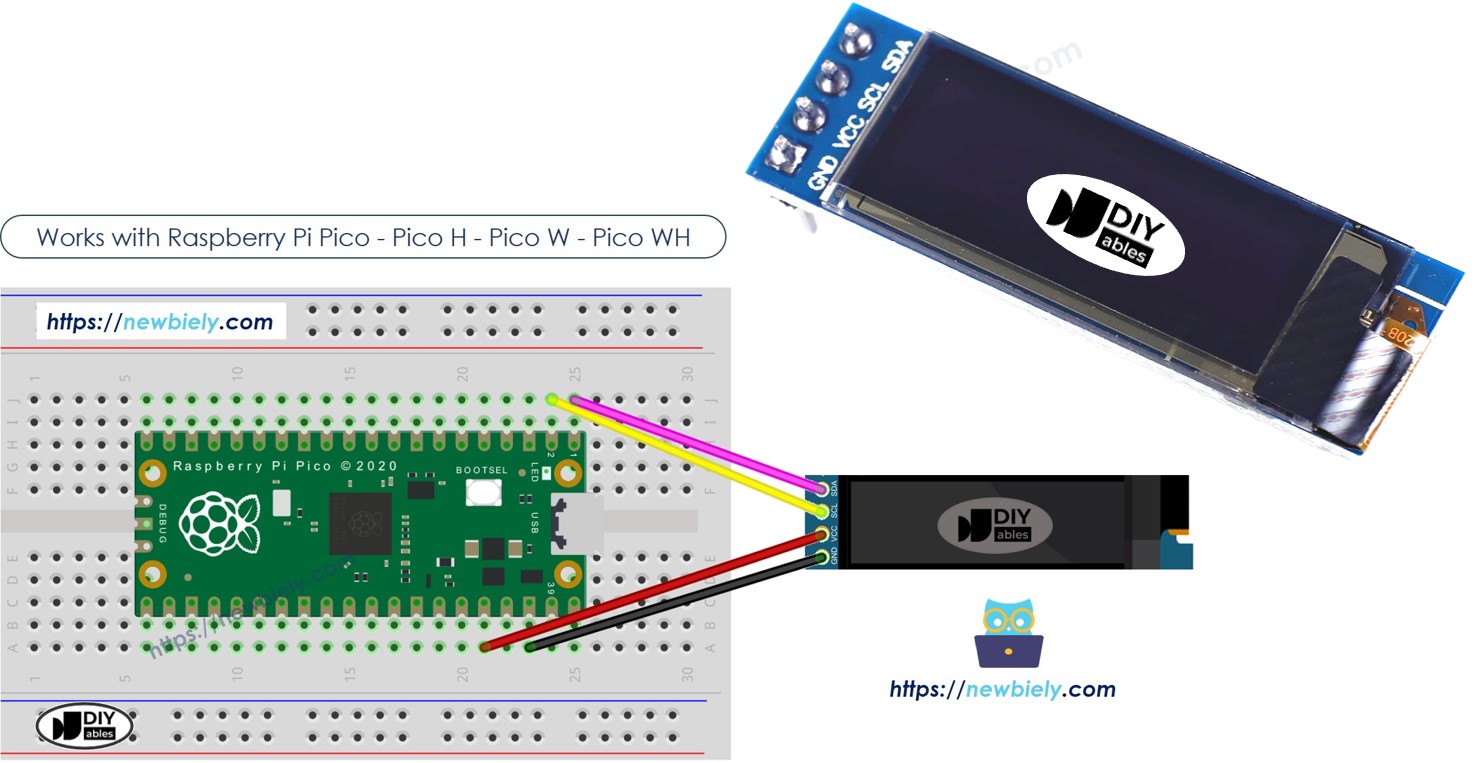
Diagramme de câblage

Schéma de câblage OLED 128x32 pour Raspberry Pi Pico

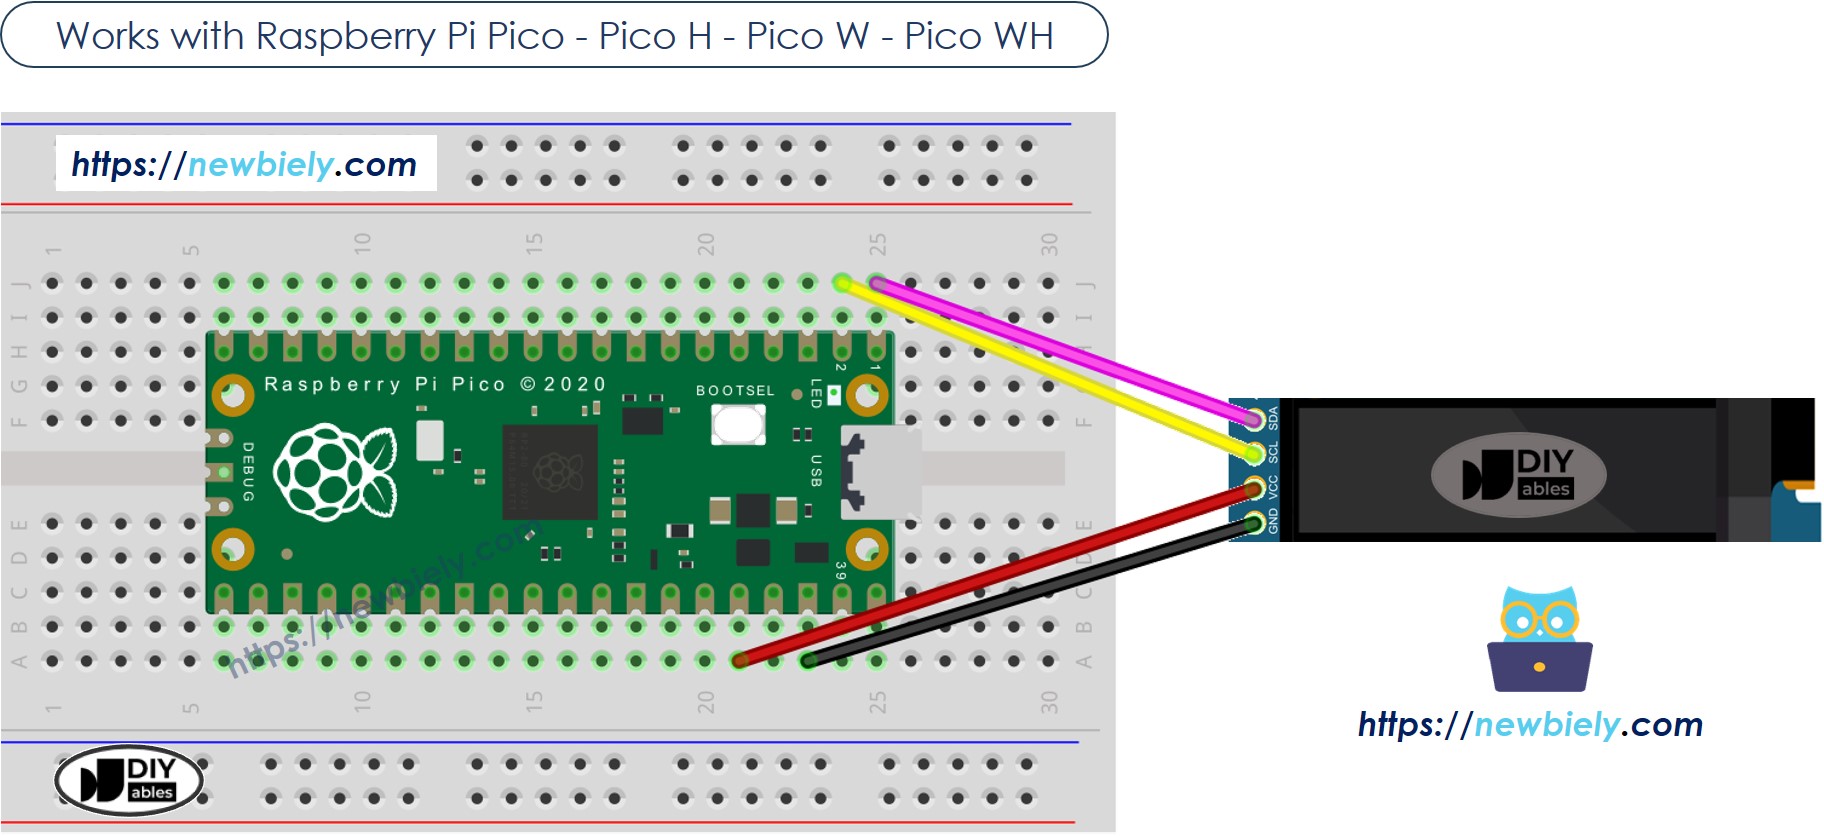
Cette image a été créée avec Fritzing. Cliquez pour agrandir l'image.

Ce qui suit est le tableau de câblage entre le module OLED 128x32 et le Raspberry Pi Pico.

128x32 OLED Module Raspberry Pi Pico
VCC 3.3V
GND GND
SDA GP0
SCL GP1

Code Raspberry Pi Pico - Afficher du texte, des nombres entiers et des nombres à virgule flottante sur un écran OLED

/* * Ce code Raspberry Pi Pico a été développé par newbiely.fr * Ce code Raspberry Pi Pico est mis à disposition du public sans aucune restriction. * Pour des instructions complètes et des schémas de câblage, veuillez visiter: * https://newbiely.fr/tutorials/raspberry-pico/raspberry-pi-pico-oled-128x32 */ from machine import I2C, Pin from DIYables_MicroPython_OLED import OLED_SSD1306_I2C # Initialize I2C i2c = I2C(0, scl=Pin(1), sda=Pin(0), freq=400000) # Adjust Raspberry Pi Pico pins according to your setup # Initialize the OLED display oled = OLED_SSD1306_I2C(128, 32, i2c) # Clear the display oled.clear_display() oled.display() oled.set_text_size(2) # Print a message to the display text = "DIYables" integer_value = 123 float_value = 45.678 oled.set_cursor(0, 0) oled.println(text) oled.set_cursor(0, 19) oled.println(str(integer_value)) # Print integer and move to the next line oled.set_cursor(50, 19) oled.println("{:.3f}".format(float_value)) # Print formatted float and move to the next line oled.display() # Ensure you update the display after writing to it

Étapes rapides

Veuillez suivre ces instructions étape par étape :

  • Assurez-vous que l’IDE Thonny est installé sur votre ordinateur.
  • Assurez-vous que le firmware MicroPython est installé sur votre Raspberry Pi Pico.
  • Si c'est votre première utilisation d'un Raspberry Pico, reportez-vous au tutoriel Raspberry Pi Pico - Premiers pas. pour des instructions détaillées.
  • Connectez l'écran OLED au Raspberry Pi Pico selon le diagramme fourni.
  • Connectez le Raspberry Pi Pico à votre ordinateur à l’aide d’un câble USB.
  • Lancez l’IDE Thonny sur votre ordinateur.
  • Sur l’IDE Thonny, sélectionnez l’interpréteur MicroPython (Raspberry Pi Pico) en accédant à Outils Options.
  • Dans l’onglet Interpréteur, sélectionnez MicroPython (Raspberry Pi Pico) dans le menu déroulant.
  • Assurez-vous que le port correct est sélectionné. L’IDE Thonny devrait détecter automatiquement le port, mais vous devrez peut-être le sélectionner manuellement (par exemple COM3 sur Windows ou /dev/ttyACM0 sur Linux).
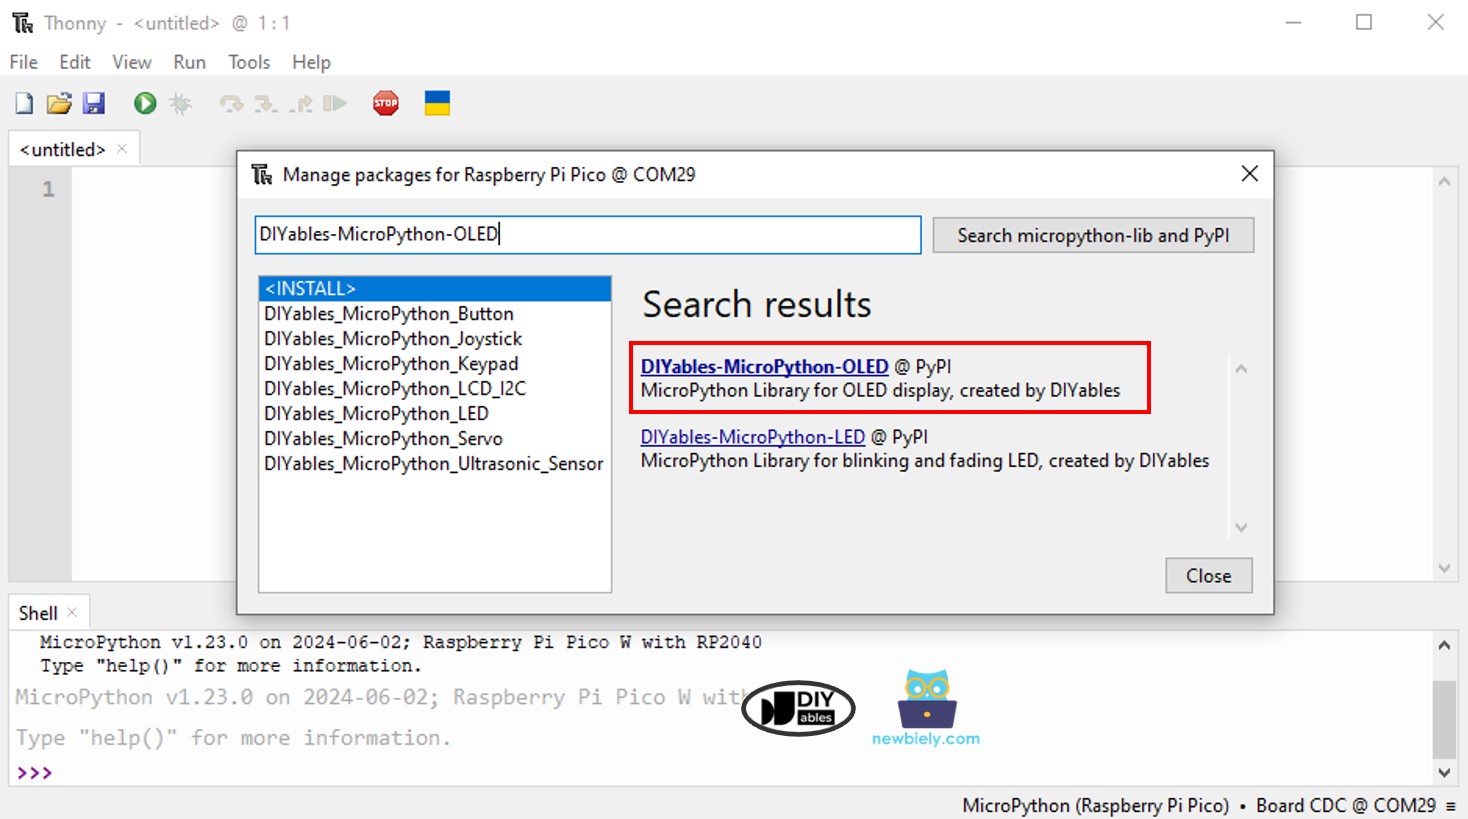
  • Accédez à Outils Gérer les paquets sur l’IDE Thonny.
  • Recherchez “DIYables-MicroPython-OLED”, puis trouvez la bibliothèque OLED créée par DIYables.
  • Cliquez sur DIYables-MicroPython-OLED, puis cliquez sur le bouton Install pour installer la bibliothèque OLED.
Bibliothèque OLED pour Raspberry Pi Pico
  • Copiez le code ci-dessus et collez-le dans l'éditeur de Thonny IDE.
  • Enregistrez le script sur votre Raspberry Pi Pico en procédant comme suit :
    • Cliquez sur le bouton Enregistrer, ou utilisez les touches Ctrl+S.
    • Dans la boîte de dialogue d'enregistrement, vous verrez deux sections : Cet ordinateur et Raspberry Pi Pico. Sélectionnez Raspberry Pi Pico.
    • Enregistrez le fichier sous main.py.
  • Cliquez sur le bouton vert Exécuter (ou appuyez sur F5) pour lancer le script. Le script s'exécutera.
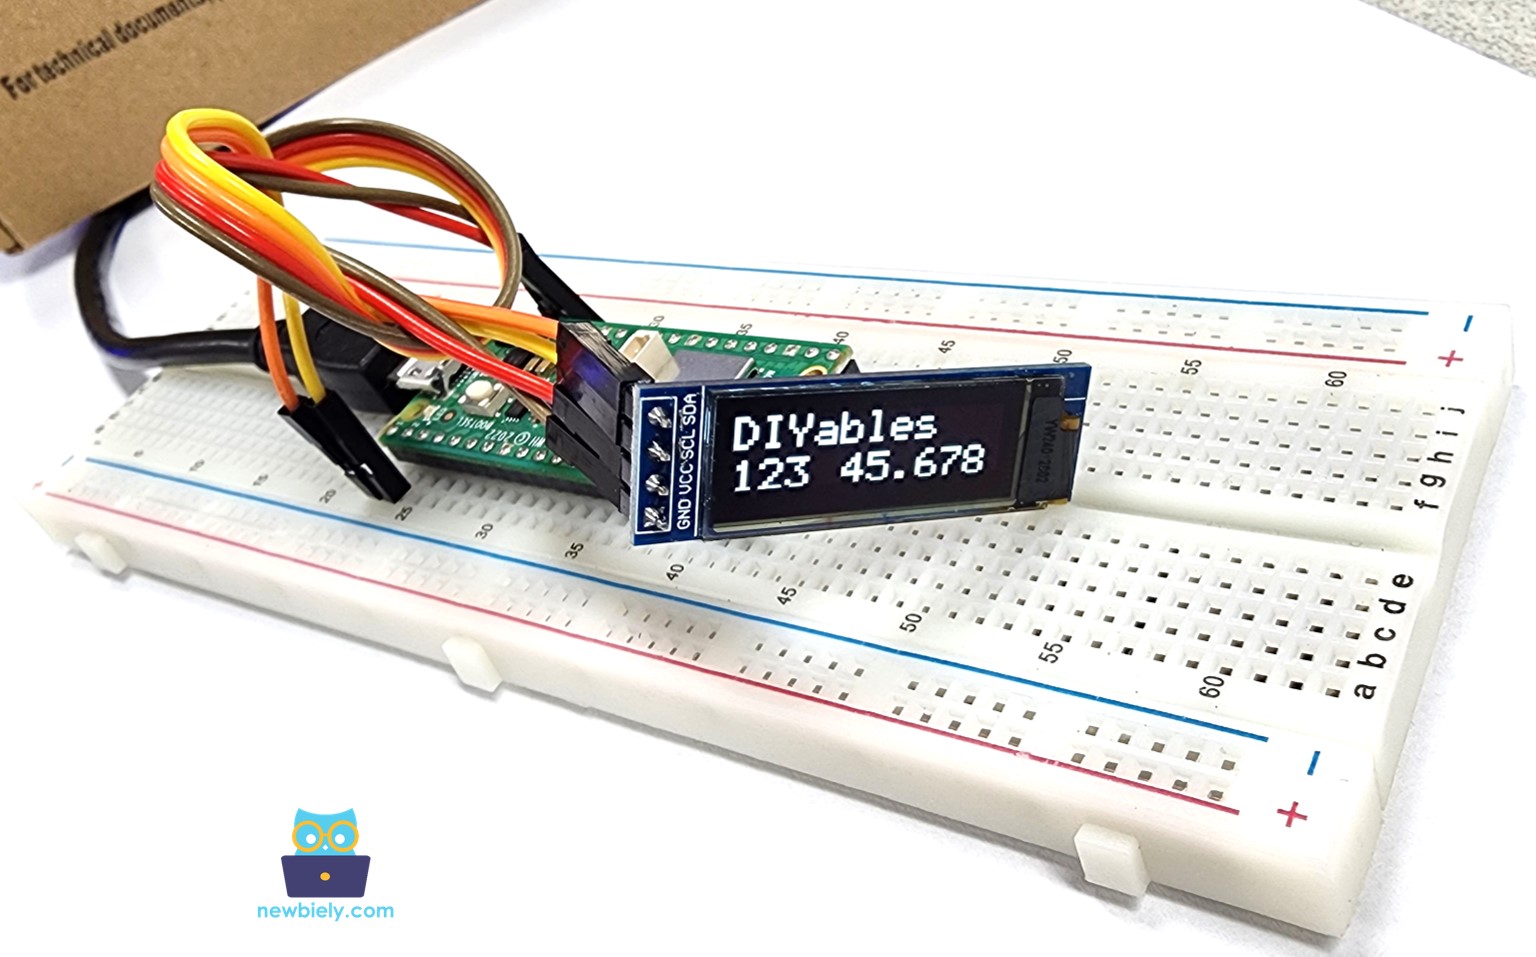
  • Jetez un œil sur l'écran OLED. Cela ressemble à ce qui suit :
Écran OLED Raspberry Pi Pico : texte, entier et nombre à virgule flottante

Code Raspberry Pi Pico - Dessiner sur l'OLED

/* * Ce code Raspberry Pi Pico a été développé par newbiely.fr * Ce code Raspberry Pi Pico est mis à disposition du public sans aucune restriction. * Pour des instructions complètes et des schémas de câblage, veuillez visiter: * https://newbiely.fr/tutorials/raspberry-pico/raspberry-pi-pico-oled-128x32 */ from machine import I2C, Pin from DIYables_MicroPython_OLED import OLED_SSD1306_I2C # Initialize I2C i2c = I2C(0, scl=Pin(1), sda=Pin(0), freq=400000) # Adjust Raspberry Pi Pico pins according to your setup # Initialize the OLED display oled = OLED_SSD1306_I2C(128, 32, i2c) # Clear the display oled.clear_display() oled.display() # Draw a rectangle #oled.draw_rect(0, 0, 40, 25, 1) oled.fill_rect(0, 0, 40, 25, 1) # Draw a circle oled.draw_circle(64, 16, 15, 1) #oled.fill_circle(64, 16, 15, 1) # Draw a triangle #oled.draw_triangle(80, 31, 128, 31, 104, 0, 1) oled.fill_triangle(80, 31, 128, 31, 104, 0, 1) oled.display()

Lorsque vous exécutez le code ci-dessus, un rectangle, un cercle et un triangle apparaîtront sur l'écran OLED, comme montré ci-dessous.

Raspberry Pi Pico dessine un rectangle, un cercle et un triangle sur un écran OLED.

Code pour Raspberry Pi Pico – Afficher une image sur OLED

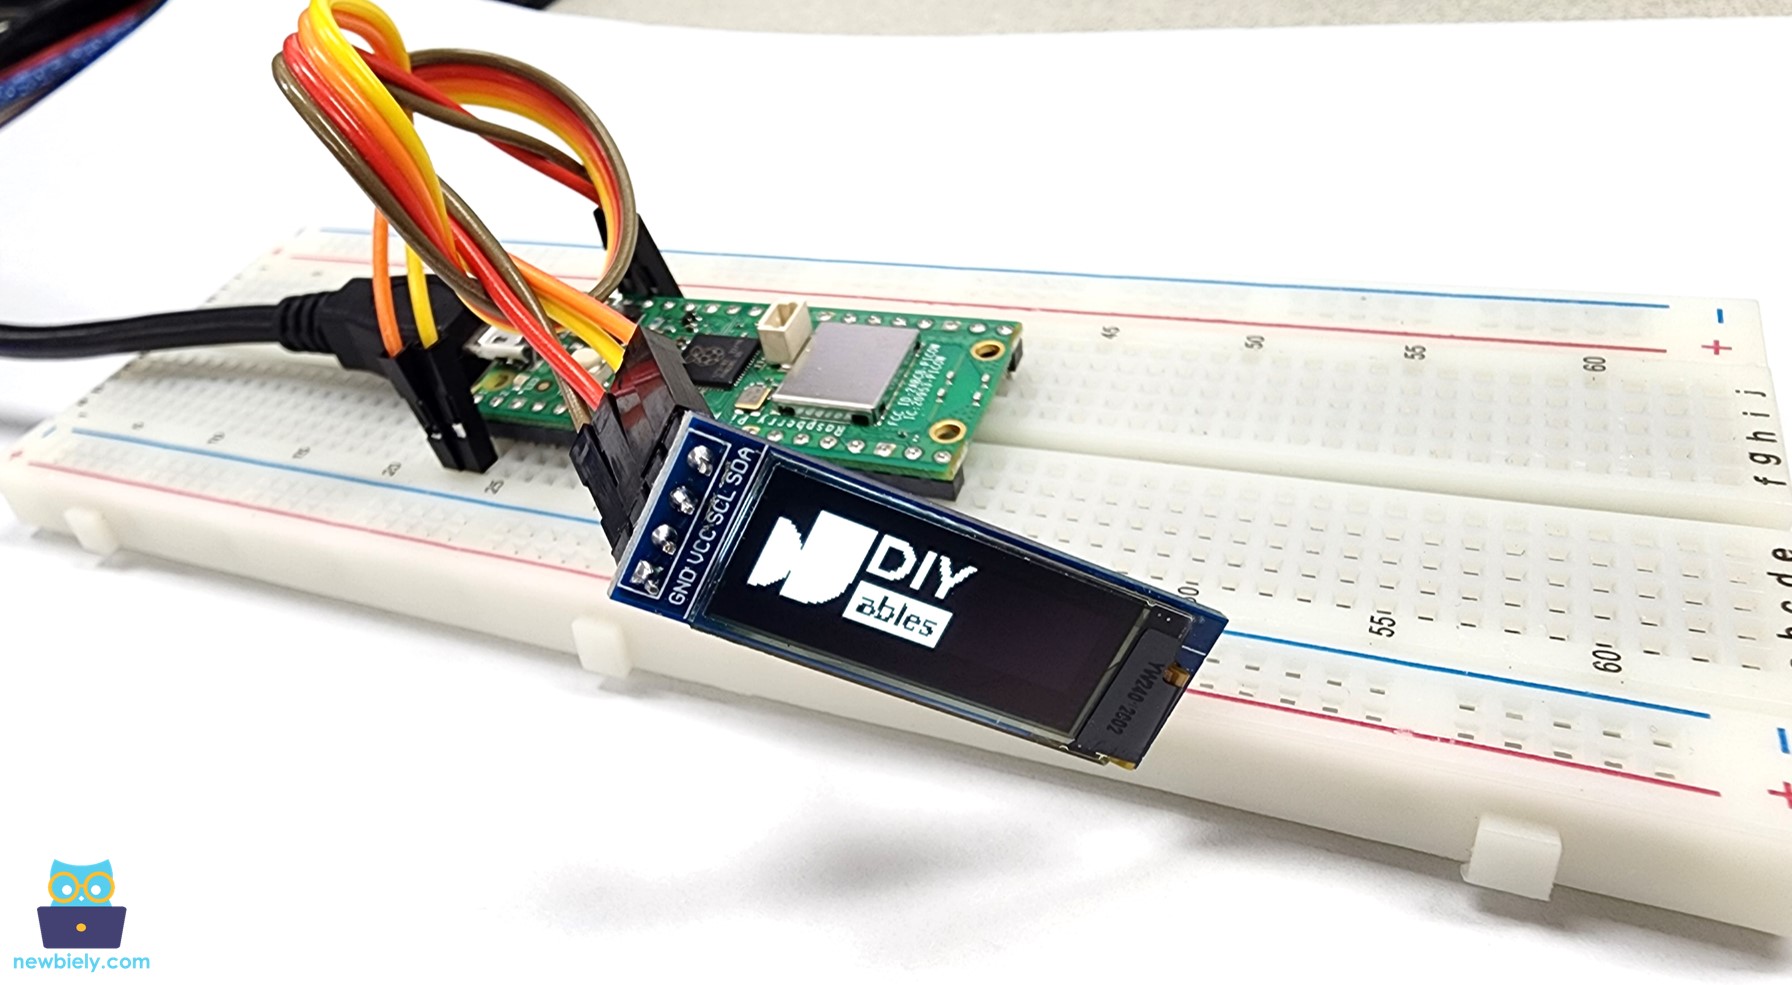
Le code ci-dessous dessine une image sur l'écran LCD. L'image est l'icône DIYables.

/* * Ce code Raspberry Pi Pico a été développé par newbiely.fr * Ce code Raspberry Pi Pico est mis à disposition du public sans aucune restriction. * Pour des instructions complètes et des schémas de câblage, veuillez visiter: * https://newbiely.fr/tutorials/raspberry-pico/raspberry-pi-pico-oled-128x32 */ from machine import I2C, Pin from DIYables_MicroPython_OLED import OLED_SSD1306_I2C import utime # Initialize I2C i2c = I2C(0, scl=Pin(1), sda=Pin(0), freq=400000) # Adjust Raspberry Pi Pico pins according to your setup # Create the SSD1306 display object oled = OLED_SSD1306_I2C(128, 32, i2c) # Clear the display buffer oled.clear_display() utime.sleep(2) # 16x16 heart bitmap in RGB565 format heart_bitmap = [ # 'DIYables Icon', 72x32 0x00, 0x0f, 0xff, 0xff, 0x8f, 0xf8, 0x07, 0x38, 0x07, 0x00, 0x0f, 0xff, 0xff, 0x8f, 0xfe, 0x07, 0x1c, 0x0e, 0x00, 0x0f, 0xff, 0xff, 0x8f, 0xff, 0x07, 0x1c, 0x1c, 0x00, 0x0f, 0xff, 0xff, 0x8e, 0x07, 0x87, 0x0e, 0x1c, 0x00, 0x0f, 0xff, 0xff, 0x8e, 0x03, 0xc7, 0x0f, 0x38, 0x00, 0x0f, 0xff, 0xff, 0x8e, 0x01, 0xc7, 0x07, 0x38, 0x00, 0x0f, 0xff, 0xff, 0x8e, 0x01, 0xc7, 0x03, 0xf0, 0xf0, 0x0f, 0xff, 0xff, 0x8e, 0x01, 0xc7, 0x03, 0xe0, 0xfc, 0x0f, 0xff, 0xff, 0x8e, 0x01, 0xc7, 0x01, 0xe0, 0xfe, 0x0f, 0xff, 0xff, 0x8e, 0x03, 0xc7, 0x01, 0xc0, 0xff, 0x8f, 0xff, 0xff, 0x8e, 0x03, 0x87, 0x01, 0xc0, 0xff, 0x8f, 0xff, 0xff, 0x8e, 0x0f, 0x87, 0x01, 0xc0, 0xff, 0xcf, 0xff, 0xff, 0x8f, 0xff, 0x07, 0x01, 0xc0, 0xff, 0xef, 0xff, 0xff, 0x8f, 0xfc, 0x07, 0x01, 0xc0, 0xff, 0xef, 0xff, 0xff, 0x80, 0x00, 0x00, 0x00, 0x00, 0xff, 0xff, 0xff, 0xff, 0x80, 0x00, 0x00, 0x00, 0x00, 0xff, 0xff, 0xff, 0xff, 0x80, 0x00, 0x00, 0x00, 0x00, 0xff, 0xff, 0xff, 0xff, 0x80, 0x00, 0x00, 0x00, 0x00, 0xff, 0xff, 0xff, 0xff, 0x8f, 0xff, 0xff, 0xff, 0xff, 0xff, 0xff, 0xff, 0xff, 0x8f, 0xff, 0xff, 0xff, 0xff, 0xff, 0xff, 0xff, 0xff, 0x0f, 0xfc, 0xfd, 0xff, 0xff, 0xff, 0xff, 0xff, 0xff, 0x0f, 0xfc, 0xfc, 0xff, 0xff, 0xff, 0xff, 0xff, 0xff, 0x0f, 0xfc, 0xfc, 0xff, 0xff, 0xff, 0xef, 0xff, 0xff, 0x0e, 0x0c, 0x0c, 0xc3, 0x07, 0xff, 0xef, 0xff, 0xfe, 0x0f, 0xec, 0xec, 0x99, 0x7f, 0xff, 0xef, 0xff, 0xfe, 0x0f, 0x04, 0xe4, 0x81, 0x0f, 0xff, 0xcf, 0xff, 0xfc, 0x0e, 0x32, 0xe4, 0x9f, 0xc7, 0xff, 0x8f, 0xff, 0xf8, 0x0e, 0x32, 0x4c, 0x9b, 0x67, 0xff, 0x0f, 0xff, 0xf0, 0x0e, 0x04, 0x0c, 0xc3, 0x0f, 0xfe, 0x0f, 0xff, 0xe0, 0x0f, 0xff, 0xff, 0xff, 0xff, 0xfc, 0x0f, 0xff, 0x80, 0x0f, 0xff, 0xff, 0xff, 0xff, 0xe0, 0x0f, 0xfc, 0x00, 0x0f, 0xff, 0xff, 0xff, 0xff ] # Draw the bitmap on the display oled.draw_bitmap(0, 0, heart_bitmap, 72, 32, 1) # Update the display with the new image oled.display() utime.sleep(3) #oled.invert_display(True)

Lorsque vous exécutez le code ci-dessus, l'image apparaîtra sur l'écran OLED, comme indiqué ci-dessous.

Affichage d'une image sur OLED avec Raspberry Pi Pico

Pour afficher une image différente sur l'écran OLED, suivez ces étapes :

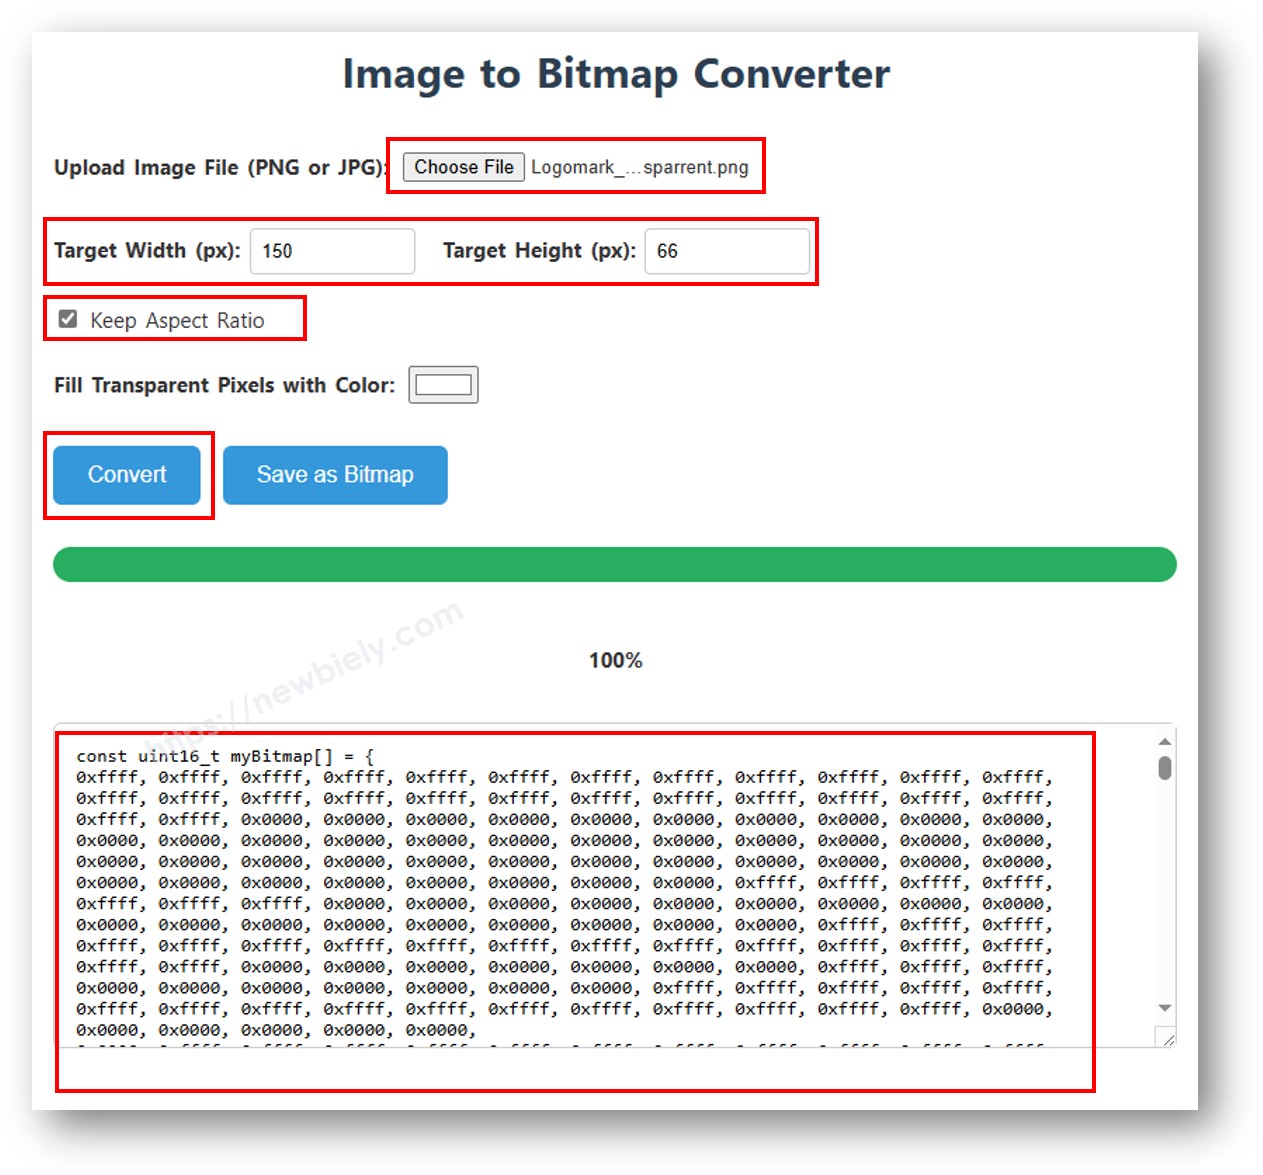
  • Convertissez l'image (dans n'importe quel format) en un tableau bitmap. Vous pouvez utiliser cet outil en ligne pour la conversion. Reportez-vous à l'image ci-dessous pour savoir comment convertir une image en un tableau bitmap. Dans cet exemple, j'ai converti l'icône Raspberry Pi Pico en un tableau bitmap.*
image en tableau bitmap
  • Remplacez le tableau bitmap existant dans le code de votre Raspberry Pi Pico par le nouveau tableau converti.
  • Ajustez la largeur et la hauteur de l'image dans le code de votre Raspberry Pi Pico pour qu'elles correspondent aux dimensions de la nouvelle image.

Remarque : Assurez-vous que la taille de l'image est égale ou inférieure à celle de l'écran OLED.

Comment centrer automatiquement verticalement et horizontalement le texte et les chiffres sur un écran OLED

Le code MicroPython ci-dessous centre automatiquement le texte à la fois verticalement et horizontalement sur l'écran OLED.

/* * Ce code Raspberry Pi Pico a été développé par newbiely.fr * Ce code Raspberry Pi Pico est mis à disposition du public sans aucune restriction. * Pour des instructions complètes et des schémas de câblage, veuillez visiter: * https://newbiely.fr/tutorials/raspberry-pico/raspberry-pi-pico-oled-128x32 */ from machine import I2C, Pin from DIYables_MicroPython_OLED import OLED_SSD1306_I2C import utime # Initialize I2C i2c = I2C(0, scl=Pin(1), sda=Pin(0), freq=400000) # Adjust Raspberry Pi Pico pins according to your setup # Initialize the OLED display oled = OLED_SSD1306_I2C(128, 32, i2c) # Clear the display oled.clear_display() oled.display() def oled_display_center(oled, text): # Get the text bounds (width and height) of the string x1, y1, width, height = oled.get_text_bounds(text, 0, 0) # Set cursor to the calculated centered position cursor_x = (oled.WIDTH - width) // 2 cursor_y = (oled.HEIGHT - height) // 2 oled.set_cursor(cursor_x, cursor_y) # Print the text on the display oled.println(text) # Refresh the display to show the text oled.display() oled.set_text_size(2) oled_display_center(oled, "DIYables")

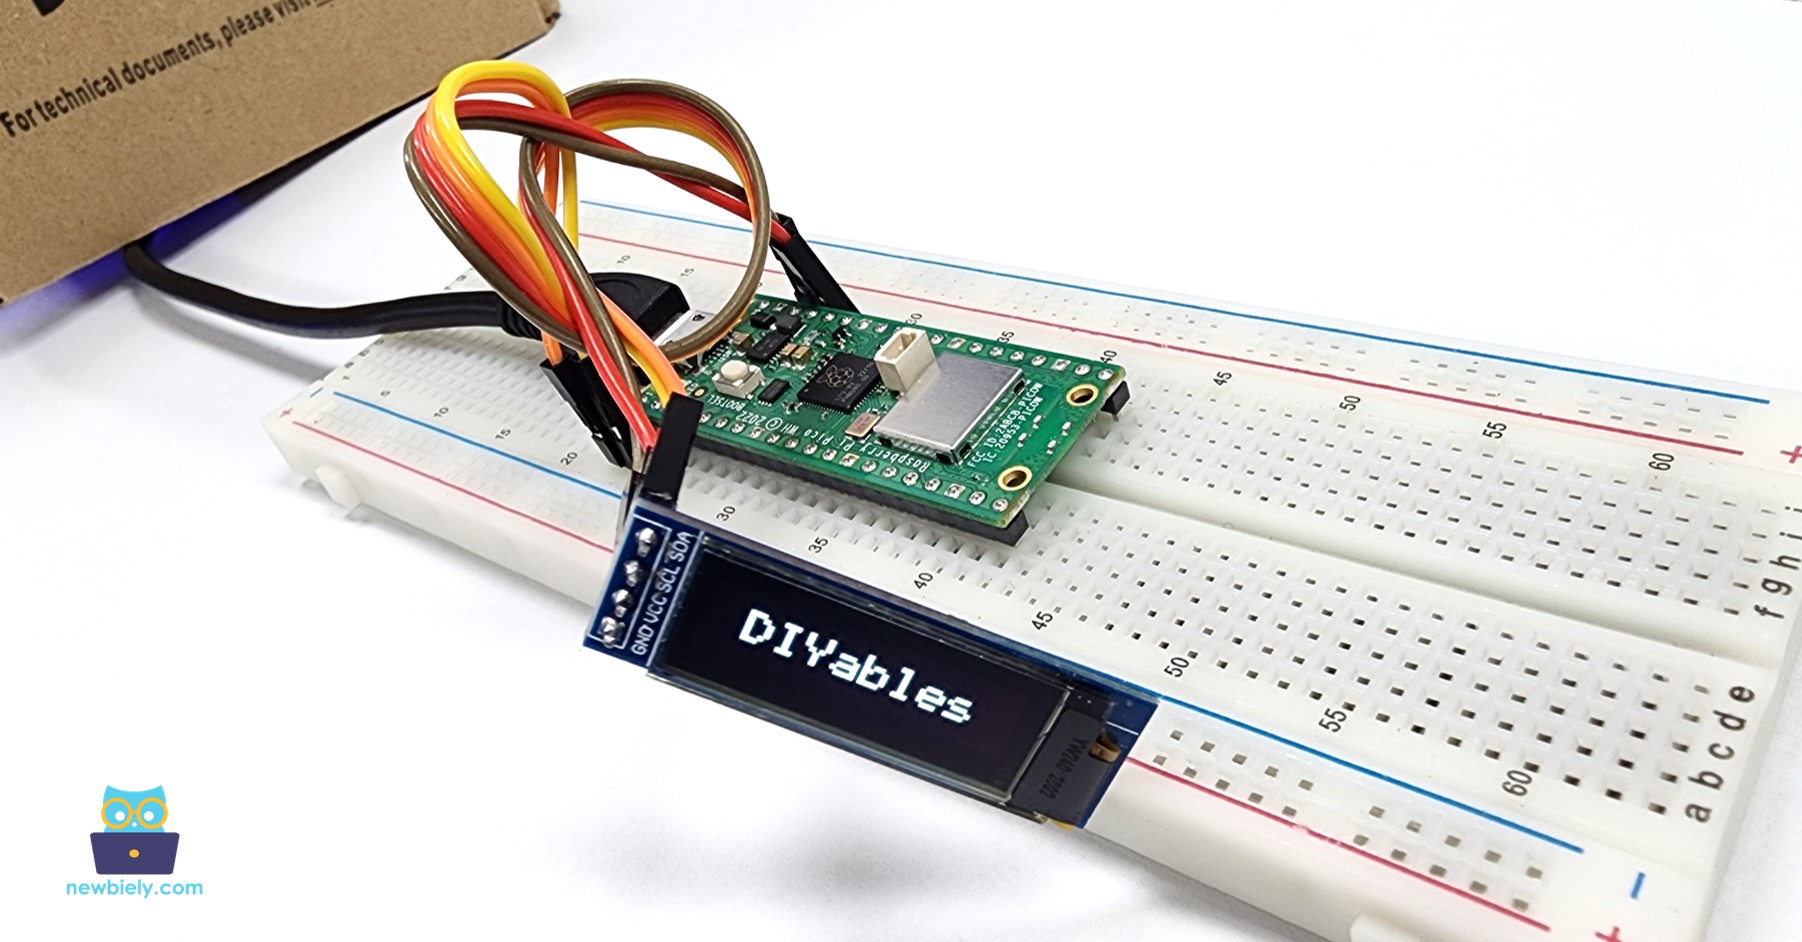
Après avoir exécuté le code, le texte sera centré à la fois verticalement et horizontalement sur l'écran OLED.

Centre vertical et horizontal de l'OLED sur le Raspberry Pi Pico

Dépannage des écrans OLED

Si rien n'est affiché sur l'écran OLED 128×32, veuillez essayer les étapes suivantes :

  1. Vérifiez que toutes les connexions de câblage sont correctes.
  2. Assurez-vous que votre OLED I2C utilise un pilote SSD1306.
  3. Déterminez l’adresse I2C de votre OLED en exécutant le code du scanner d’adresses I2C sur un Raspberry Pi Pico.
from machine import I2C, Pin import utime i2c = I2C(0, sda=Pin(0), scl=Pin(1)) print('Scanning I2C bus...') devices = i2c.scan() if len(devices) == 0: print("No I2C devices found") else: print('I2C devices found:',len(devices)) for device in devices: print("Decimal address: ",device," | Hex address: ",hex(device)) utime.sleep(2)

Sortie dans le Shell en bas de Thonny :

Shell x
>>> %Run -c $EDITOR_CONTENT
MPY: soft reboot Scanning... I2C device found at address 0x3C ! done Scanning... I2C device found at address 0x3C ! done
MicroPython (Raspberry Pi Pico) • Board CDC @ COM29 ≡

※ NOS MESSAGES

  • N'hésitez pas à partager le lien de ce tutoriel. Cependant, veuillez ne pas utiliser notre contenu sur d'autres sites web. Nous avons investi beaucoup d'efforts et de temps pour créer ce contenu, veuillez respecter notre travail !