Raspberry Pi Pico - Actionneur avec rétroaction
Dans un Raspberry Pi Pico - Actionneur., nous avons appris comment utiliser le Raspberry Pi Pico avec un actionneur linéaire sans rétroaction. Dans ce tutoriel, nous allons apprendre comment utiliser le Raspberry Pi Pico avec l'actionneur linéaire avec rétroaction. Le signal de rétroaction de l'actionneur indique sa position pendant le déplacement, ce qui nous aide à contrôler où il se dirige. Nous examinerons les détails suivants :
- Comment fonctionne un actionneur linéaire à rétroaction.
- Comment programmer le Raspberry Pi Pico pour lire la position d'un actionneur linéaire à rétroaction.
- Comment programmer le Raspberry Pi Pico pour contrôler la position d'un actionneur linéaire à rétroaction.
Préparation du matériel
Ou vous pouvez acheter les kits suivants:
| 1 | × | Kit de Capteurs DIYables (18 capteurs/écrans) |
À propos de l'actionneur linéaire à rétroaction
Un actionneur linéaire à rétroaction est un dispositif qui se déplace en ligne droite et qui comprend un système de vérification et d'ajustement de sa position. Il utilise un potentiomètre qui envoie un signal de tension correspondant à la position de l'actionneur.
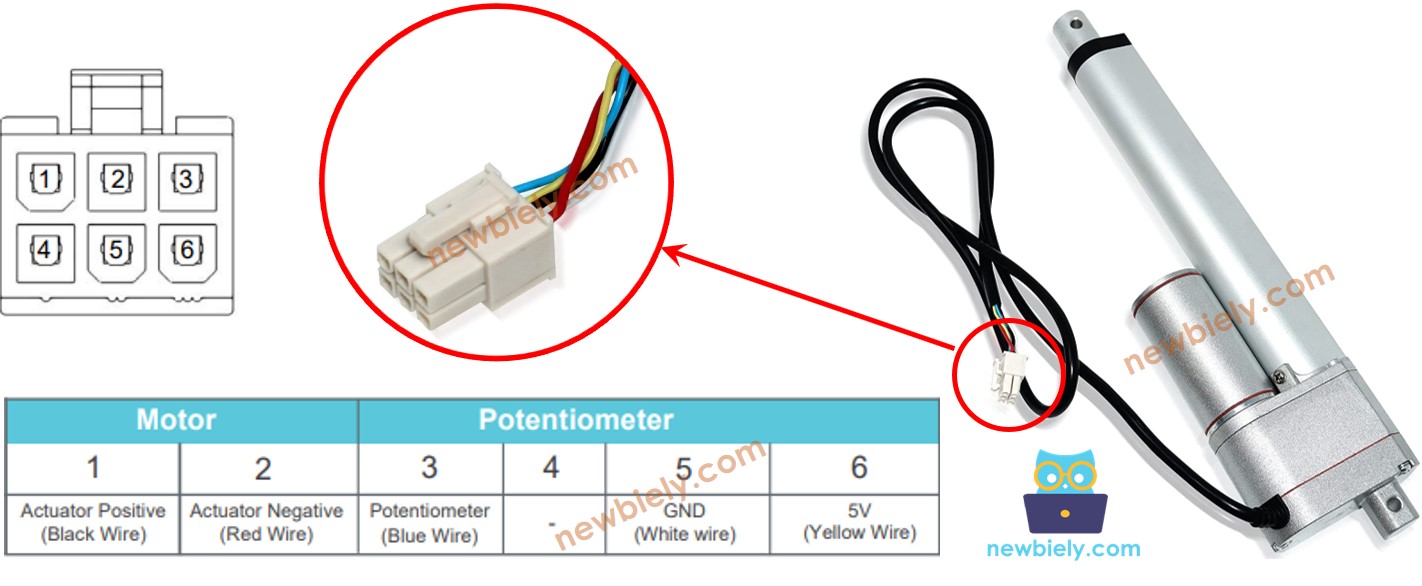
Schéma de brochage de l'actionneur linéaire à rétroaction
Un actionneur linéaire à rétroaction est livré avec cinq fils.
- Fil positif : Ce fil utilise une tension élevée (12V, 24V, 48V) pour contrôler l'actionneur linéaire.
- Fil négatif : Ce fil utilise une tension élevée (12V, 24V, 48V) pour contrôler l'actionneur linéaire.
- Fil 5V : Connectez ce fil au potentiomètre de rétroaction à 5V ou 3,3V.
- Fil GND : Connectez ce fil au potentiomètre de rétroaction à la masse (GND).
- Fil du potentiomètre : Également appelé fil de rétroaction ou de sortie, ce fil fait varier sa valeur de tension en fonction de la position de course.
Comment ça fonctionne
Lorsque nous appliquons une tension élevée aux fils positifs et négatifs, l'actionneur s'allonge ou se rétracte. Pour expliquer cela, si nous connectons :
- Connectez 12 V (ou 24 V, 48 V) au fil positif et la masse (GND) au fil négatif : l'actionneur s'étendra à sa vitesse maximale jusqu'à ce qu'il soit complètement déployé.
- Connectez 12 V (ou 24 V, 48 V) au fil négatif et la masse (GND) au fil positif : l'actionneur se rétractera à sa vitesse maximale jusqu'à ce qu'il soit complètement rétracté.
- Si l'alimentation de l'actionneur est coupée (en reliant la masse (GND) à ses deux fils) alors qu'il est en extension ou en rétraction, il cessera de bouger.
※ Note:
- La tension requise pour faire fonctionner l'actionneur dépend de ses caractéristiques spécifiques. Consultez la fiche technique ou le manuel pour déterminer la tension correcte.
- L'actionneur peut maintenir sa position sans électricité, même lorsqu'il supporte une charge.
La tension dans le fil du potentiomètre change lorsque l'actionneur se déplace. En mesurant cette tension, nous pouvons déterminer la position de la course.
Schéma de câblage
Retirez les trois cavaliers du module L298N avant de commencer le câblage.
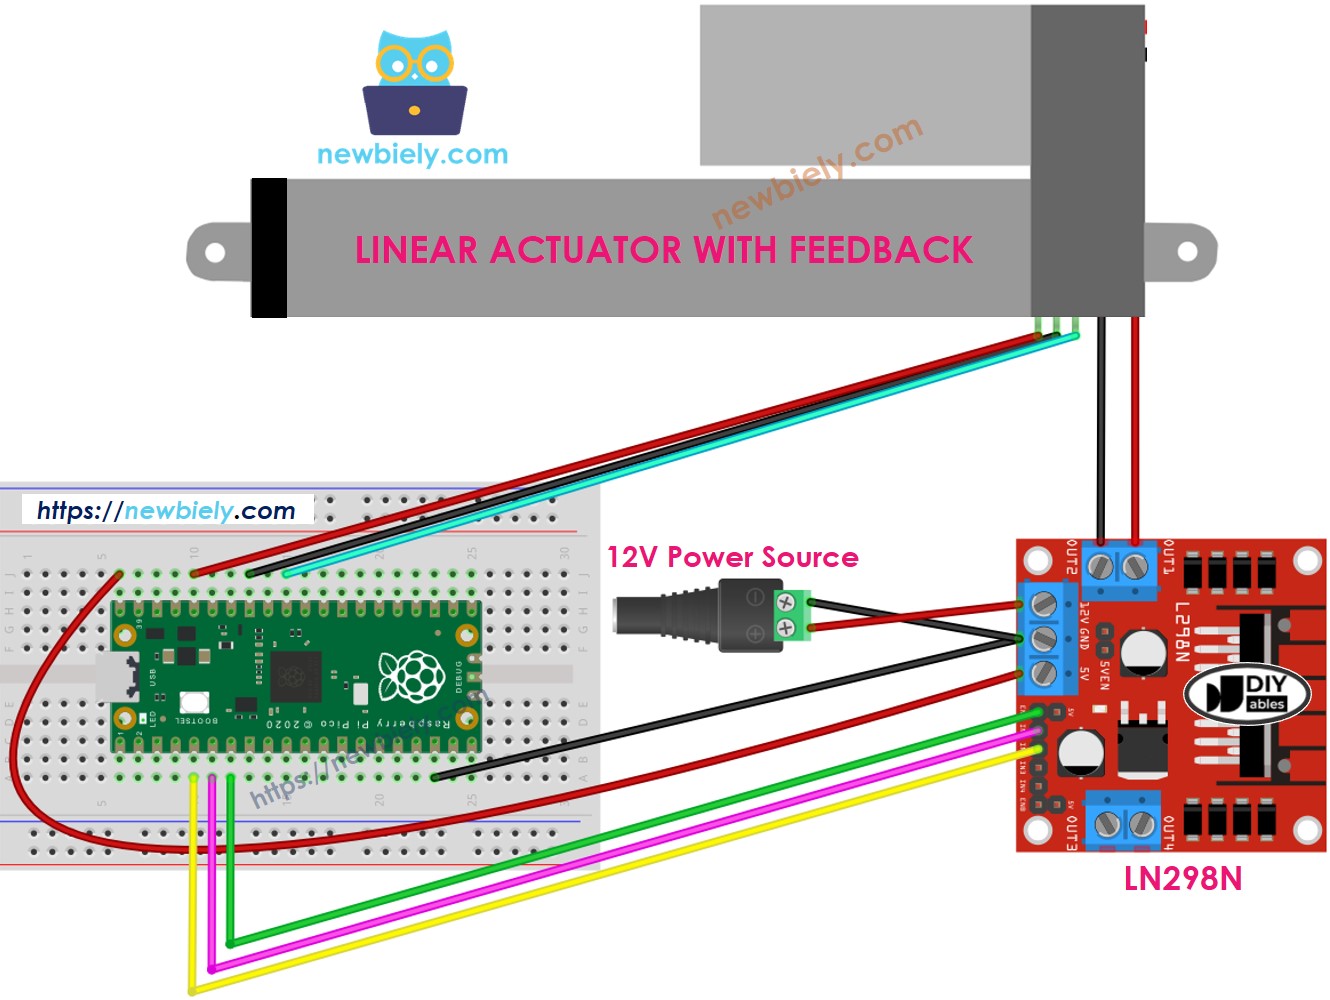
Cette image a été créée avec Fritzing. Cliquez pour agrandir l'image.
Comment contrôler l'extension et la rétraction d'un vérin linéaire
En savoir plus sur l'actuateur Raspberry Pi Pico en cliquant Raspberry Pi Pico - Actionneur..
Comment trouver la position de l'actuateur linéaire
Voici comment localiser la position de course d'un vérin linéaire :
Étalonnage
- Utilisez une règle pour connaître la distance parcourue par l'actionneur ou consultez la fiche technique pour plus de détails.
- Pour voir les valeurs lorsque l'actionneur linéaire est complètement ouvert ou fermé, exécutez ce code.
- Vous verrez l'enregistrement dans le Shell en bas de Thonny, comme dans l'exemple ci-dessous.
- Écrivez ces valeurs.
- Si la valeur minimale est supérieure à la valeur maximale, échangez IN1_PIN avec INI2_PIN.
- Modifiez trois valeurs dans le code ci-dessous.
Code du Raspberry Pi Pico qui calcule la position de l'actionneur
- Modifier les trois valeurs altérées dans le code
- Téléverser le code sur le Raspberry Pi Pico
- Consultez les résultats dans le Shell en bas de Thonny