Raspberry Pi Pico - joystick - servomoteur

Ce guide vous montrera comment contrôler deux servomoteurs ou un kit pan-tilt à l'aide d'un Raspberry Pi Pico et d'un joystick.

Un joystick comporte deux éléments de contrôle appelés potentiomètres, disposés en croix et formant les axes X et Y. Ces potentiomètres génèrent des signaux, appelés valeur X et valeur Y, qui proviennent des broches VRX et VRY du joystick. Nous utilisons ces signaux pour piloter deux servomoteurs : la valeur X pilote le servomoteur n°1 et la valeur Y pilote le servomoteur n°2. Lorsqu'ils sont utilisés avec un kit pan-tilt, les deux servomoteurs coopèrent pour se déplacer dans les trois dimensions.

L'application peut être utilisée de deux façons :

Servomoteur joystick pour Raspberry Pi Pico

Préparation du matériel

1×Raspberry Pi Pico W
1×Raspberry Pi Pico Alternativement:
1×Câble Micro USB
1×Joystick
2×Servo-moteur
2×Optionnel: Kit pan-tilt avec servo-moteur
1×Fils de connexion
1×Recommandé: Carte d'extension à bornier à vis pour Raspberry Pi Pico

Ou vous pouvez acheter les kits suivants:

1×Kit de Capteurs DIYables (30 capteurs/écrans)
1×Kit de Capteurs DIYables (18 capteurs/écrans)
Divulgation : Certains des liens fournis dans cette section sont des liens affiliés Amazon. Nous pouvons recevoir une commission pour tout achat effectué via ces liens, sans coût supplémentaire pour vous. Nous vous remercions de votre soutien.

À propos du joystick et du servomoteur

Si vous n'en savez pas grand-chose sur les détails du joystick et des servomoteurs, tels que le brochage, les fonctionnalités et la façon de les programmer, veuillez consulter ces tutoriels pour en savoir plus.

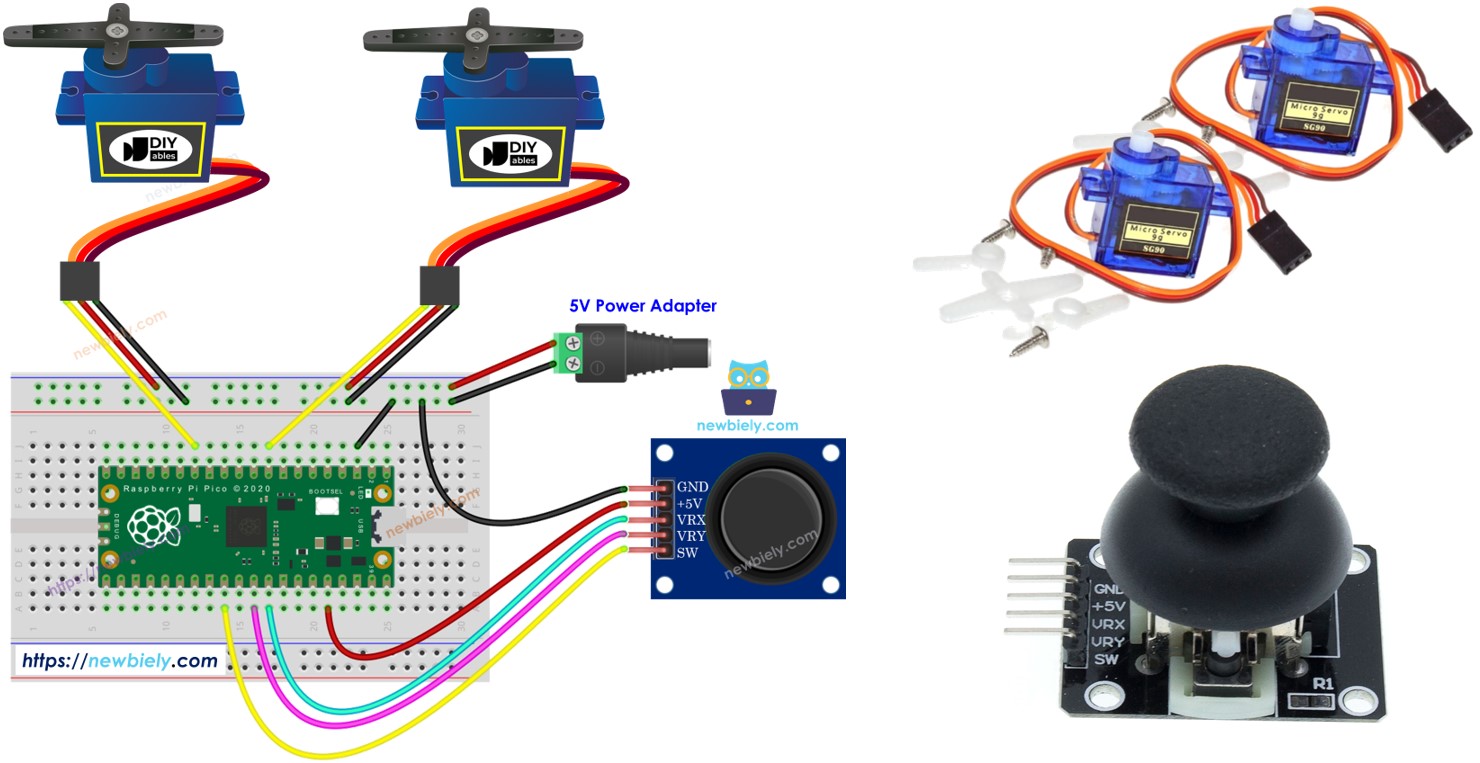
Diagramme de câblage

Schéma de câblage du joystick et du servomoteur pour Raspberry Pi Pico

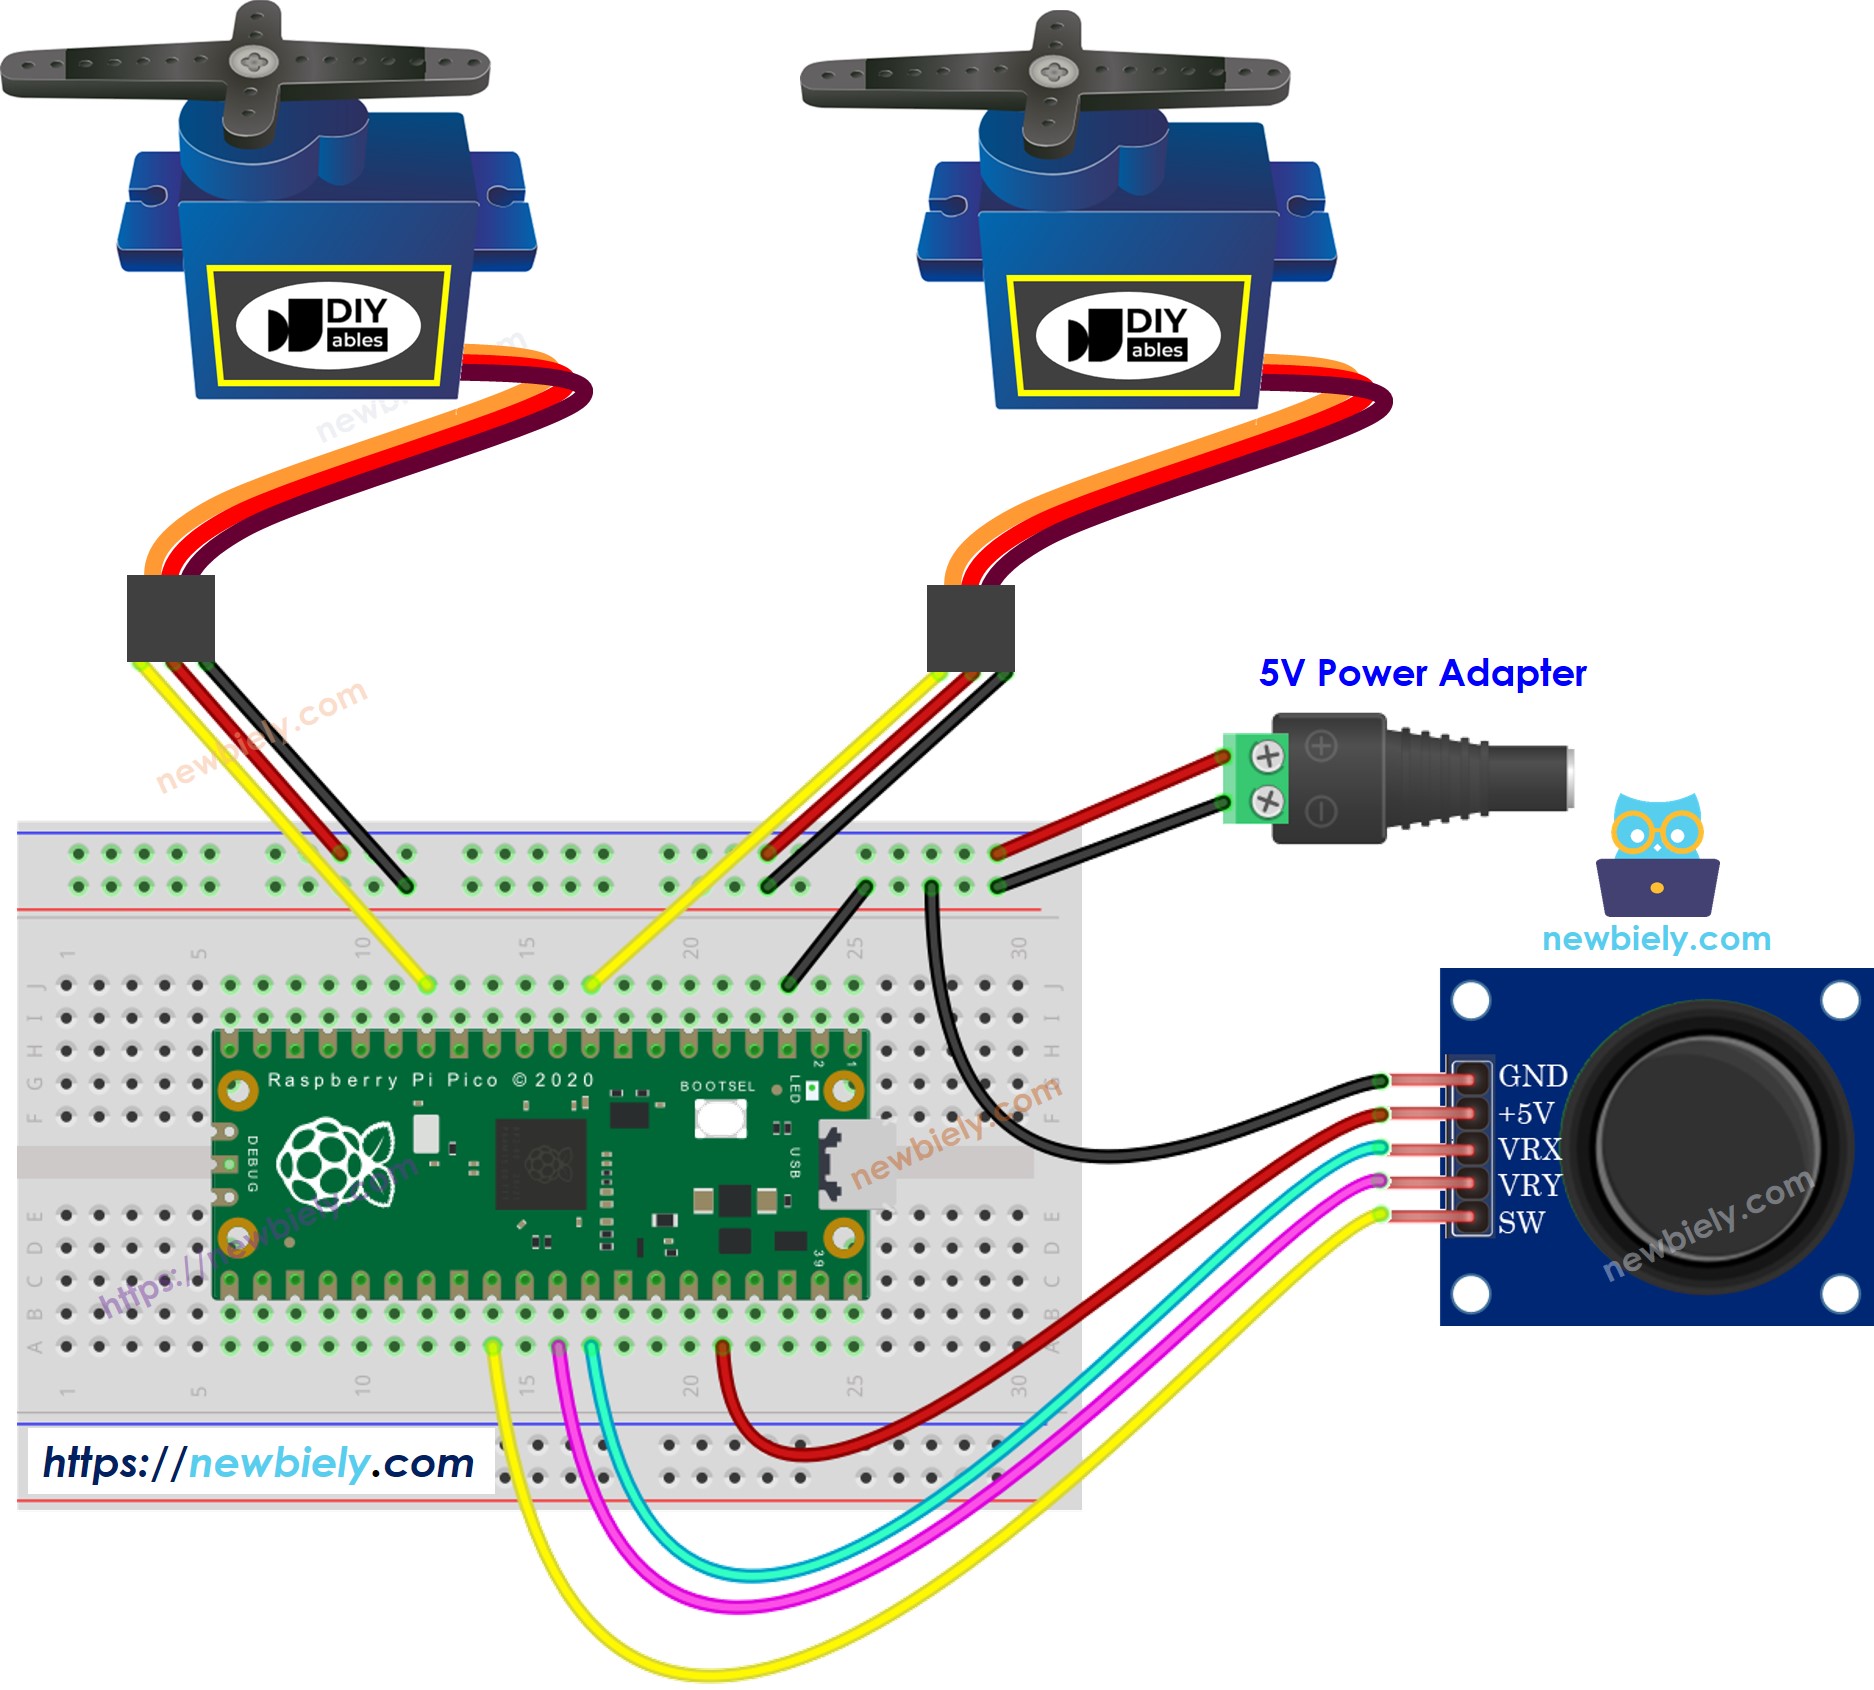
Cette image a été créée avec Fritzing. Cliquez pour agrandir l'image.

Code Raspberry Pi Pico

Code Raspberry Pi Pico - Les servomoteurs tournent en fonction du mouvement du pouce du joystick

/* * Ce code Raspberry Pi Pico a été développé par newbiely.fr * Ce code Raspberry Pi Pico est mis à disposition du public sans aucune restriction. * Pour des instructions complètes et des schémas de câblage, veuillez visiter: * https://newbiely.fr/tutorials/raspberry-pico/raspberry-pi-pico-joystick-servo-motor */ from DIYables_MicroPython_Joystick import Joystick from DIYables_MicroPython_Servo import Servo import time # Define constants for joystick, button, and servo pins JOYSTICK_X_PIN = 26 # The Raspberry Pi Pico pin connected to the VRX of the joystick JOYSTICK_Y_PIN = 27 # The Raspberry Pi Pico pin connected to the VRY of the joystick BUTTON_PIN = 22 # The Raspberry Pi Pico pin connected to the SW of the joystick SERVO_X_PIN = 6 # The Raspberry Pi Pico pin connected to Servo motor 1 SERVO_Y_PIN = 10 # The Raspberry Pi Pico pin connected to Servo motor 2 # Initialize the joystick with the corresponding pins for X and Y joystick = Joystick(pin_x=JOYSTICK_X_PIN, pin_y=JOYSTICK_Y_PIN, pin_button=BUTTON_PIN) # Initialize the two servos xServo = Servo(SERVO_X_PIN) # Use the constant for the X servo pin yServo = Servo(SERVO_Y_PIN) # Use the constant for the Y servo pin # Function to map the joystick value to servo angle def map_value(value, in_min, in_max, out_min, out_max): return int((value - in_min) * (out_max - out_min) / (in_max - in_min) + out_min) # Main loop while True: joystick.loop() # Must be called frequently to process joystick data # Read the X and Y axis values (12-bit resolution from the library) x_value = joystick.read_x() y_value = joystick.read_y() # Map the 12-bit values (0 to 4095) to servo angles (0 to 180 degrees) x_angle = map_value(x_value, 0, 4095, 0, 180) y_angle = map_value(y_value, 0, 4095, 0, 180) # Move the servos to the mapped angles xServo.move_to_angle(x_angle) yServo.move_to_angle(y_angle) # Print the joystick's X and Y values and the corresponding servo angles print(f'Joystick X: {x_value}, Y: {y_value} => Servo X Angle: {x_angle}°, Y Angle: {y_angle}°') time.sleep(0.05) # Delay to reduce the output frequency

Étapes rapides

Veuillez suivre ces instructions étape par étape :

  • Assurez-vous que l’IDE Thonny est installé sur votre ordinateur.
  • Assurez-vous que le firmware MicroPython est installé sur votre Raspberry Pi Pico.
  • Si c'est la première fois que vous utilisez un Raspberry Pico, consultez le tutoriel Raspberry Pi Pico - Premiers pas. pour obtenir des instructions détaillées.
  • Connectez le Raspberry Pi Pico au joystick et au servomoteur selon le schéma fourni.
  • Connectez le Raspberry Pi Pico à votre ordinateur à l’aide d’un câble USB.
  • Lancez l’IDE Thonny sur votre ordinateur.
  • Dans l’IDE Thonny, sélectionnez l’interpréteur MicroPython (Raspberry Pi Pico) en naviguant vers Outils Options.
  • Dans l’onglet Interpréteur, sélectionnez MicroPython (Raspberry Pi Pico) dans le menu déroulant.
  • Assurez-vous que le bon port est sélectionné. L’IDE Thonny détecte normalement le port automatiquement, mais vous devrez peut-être le sélectionner manuellement (par ex., COM3 sur Windows ou /dev/ttyACM0 sur Linux).
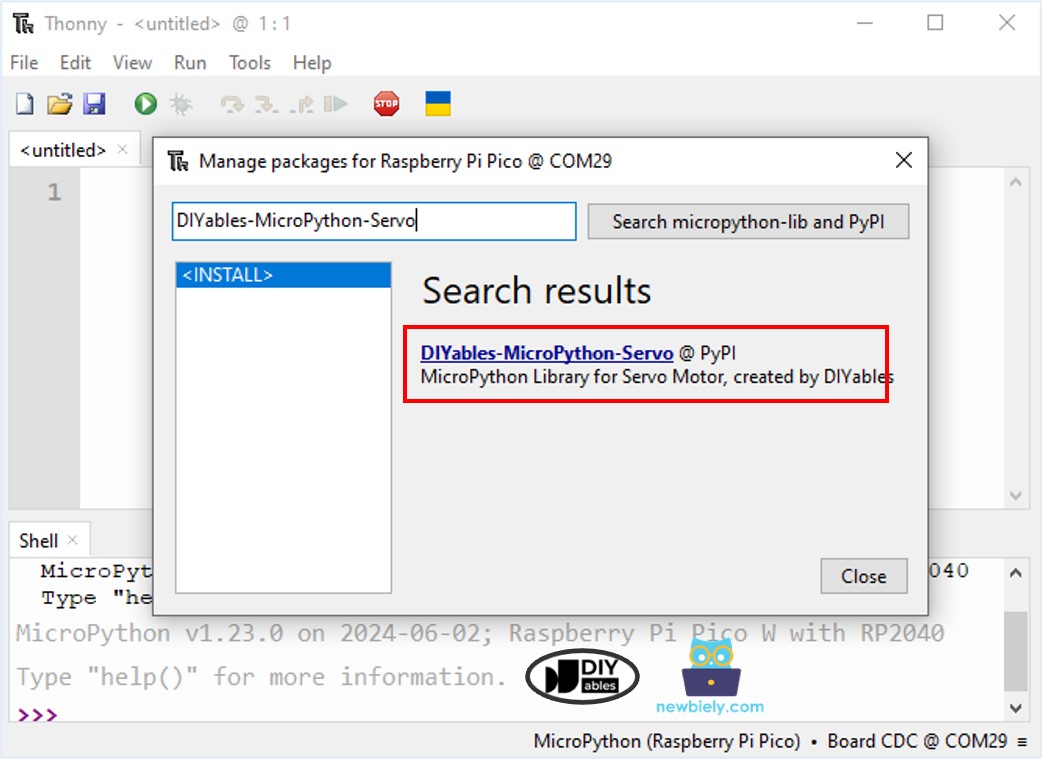
  • Accédez à Outils Gérer les paquets dans l’IDE Thonny.
  • Recherchez “DIYables-MicroPython-Servo”, puis trouvez la bibliothèque Servo-moteur créée par DIYables.
  • Cliquez sur DIYables-MicroPython-Servo, puis cliquez sur le bouton Install pour installer la bibliothèque Servo-moteur.
Bibliothèque de servomoteur pour Raspberry Pi Pico
  • Recherchez “DIYables-MicroPython-Joystick”, puis trouvez la bibliothèque Joystick créée par DIYables.
  • Cliquez sur DIYables-MicroPython-Joystick, puis cliquez sur le bouton Install pour installer la bibliothèque Joystick.
Bibliothèque de joystick pour Raspberry Pi Pico
  • Copier le code ci-dessus et le coller dans l’éditeur de l’IDE Thonny.
  • Enregistrez le script sur votre Raspberry Pi Pico en procédant comme suit :
    • Cliquez sur le bouton Enregistrer, ou utilisez les touches Ctrl+S.
    • Dans la boîte de dialogue d'enregistrement, vous verrez deux sections : Cet ordinateur et Raspberry Pi Pico. Sélectionnez Raspberry Pi Pico.
    • Enregistrez le fichier sous le nom main.py.
  • Cliquez sur le bouton vert Exécuter (ou appuyez sur F5) pour exécuter le script. Le script s'exécutera.
  • Poussez le joystick dans n'importe quelle direction.
  • Observez le servomoteur tourner.
  • Vérifiez le message dans le Shell en bas de Thonny.
Shell x
>>> %Run -c $EDITOR_CONTENT
MPY: soft reboot
MicroPython (Raspberry Pi Pico) • Board CDC @ COM29 ≡

Code Raspberry Pi Pico - Utilisez le joystick pour commander des servomoteurs

/* * Ce code Raspberry Pi Pico a été développé par newbiely.fr * Ce code Raspberry Pi Pico est mis à disposition du public sans aucune restriction. * Pour des instructions complètes et des schémas de câblage, veuillez visiter: * https://newbiely.fr/tutorials/raspberry-pico/raspberry-pi-pico-joystick-servo-motor */ from DIYables_MicroPython_Joystick import Joystick from DIYables_MicroPython_Servo import Servo from machine import Pin import time # Define constants for joystick, button, and servo pins JOYSTICK_X_PIN = 26 # The Raspberry Pi Pico pin connected to the VRX of the joystick JOYSTICK_Y_PIN = 27 # The Raspberry Pi Pico pin connected to the VRY of the joystick BUTTON_PIN = 22 # The Raspberry Pi Pico pin connected to the SW of the joystick SERVO_X_PIN = 6 # The Raspberry Pi Pico pin connected to Servo motor 1 SERVO_Y_PIN = 10 # The Raspberry Pi Pico pin connected to Servo motor 2 # Define commands COMMAND_NO = 0x00 COMMAND_LEFT = 0x01 COMMAND_RIGHT = 0x02 COMMAND_UP = 0x04 COMMAND_DOWN = 0x08 # Define thresholds and intervals LEFT_THRESHOLD = 1000 RIGHT_THRESHOLD = 3000 UP_THRESHOLD = 1000 DOWN_THRESHOLD = 3000 UPDATE_INTERVAL = 100 # 100ms # Initialize joystick, servos, and button joystick = Joystick(pin_x=JOYSTICK_X_PIN, pin_y=JOYSTICK_Y_PIN, pin_button=BUTTON_PIN) xServo = Servo(SERVO_X_PIN) yServo = Servo(SERVO_Y_PIN) # Initialize variables xAngle = 90 # The center position of servo #1 yAngle = 90 # The center position of servo #2 command = COMMAND_NO last_update_time = time.ticks_ms() # Function to ensure the angle stays within the 0 to 180 degree range def limit_angle(angle): if angle < 0: return 0 elif angle > 180: return 180 return angle while True: joystick.loop() # Process joystick data current_time = time.ticks_ms() if time.ticks_diff(current_time, last_update_time) > UPDATE_INTERVAL: last_update_time = current_time # Read X and Y analog values x_value = joystick.read_x() y_value = joystick.read_y() # Reset command command = COMMAND_NO # Check left/right commands if x_value < LEFT_THRESHOLD: command |= COMMAND_LEFT elif x_value > RIGHT_THRESHOLD: command |= COMMAND_RIGHT # Check up/down commands if y_value < UP_THRESHOLD: command |= COMMAND_UP elif y_value > DOWN_THRESHOLD: command |= COMMAND_DOWN # Print and process commands if command & COMMAND_LEFT: print("COMMAND LEFT") xAngle -= 1 if command & COMMAND_RIGHT: print("COMMAND RIGHT") xAngle += 1 if command & COMMAND_UP: print("COMMAND UP") yAngle -= 1 if command & COMMAND_DOWN: print("COMMAND DOWN") yAngle += 1 # Limit the angles to the range of 0 to 180 degrees xAngle = limit_angle(xAngle) yAngle = limit_angle(yAngle) # Handle button press if joystick.is_pressed(): print("The button is pressed") xAngle = 90 # Reset to center position yAngle = 90 # Move servos to the calculated angles xServo.move_to_angle(xAngle) yServo.move_to_angle(yAngle) # Print servo angles to console print(f"Servo Motor's Angle: {xAngle}°, {yAngle}°")

Étapes rapides

  • Copiez le code MicroPython fourni et collez-le dans l'éditeur de Thonny.
  • Enregistrez le code sur votre Raspberry Pi Pico.
  • Cliquez sur le bouton vert Exécuter (ou appuyez sur F5) pour exécuter le script.
  • Déplacez le joystick dans n'importe quelle direction.
  • Observez le servomoteur en rotation.
  • Consultez le message dans le Shell en bas de Thonny.
Shell x
>>> %Run -c $EDITOR_CONTENT
MPY: soft reboot
MicroPython (Raspberry Pi Pico) • Board CDC @ COM29 ≡

Explication du code

Regardez les explications dans les commentaires du code source.

Vidéo

Tutoriels connexes

※ NOS MESSAGES

  • N'hésitez pas à partager le lien de ce tutoriel. Cependant, veuillez ne pas utiliser notre contenu sur d'autres sites web. Nous avons investi beaucoup d'efforts et de temps pour créer ce contenu, veuillez respecter notre travail !