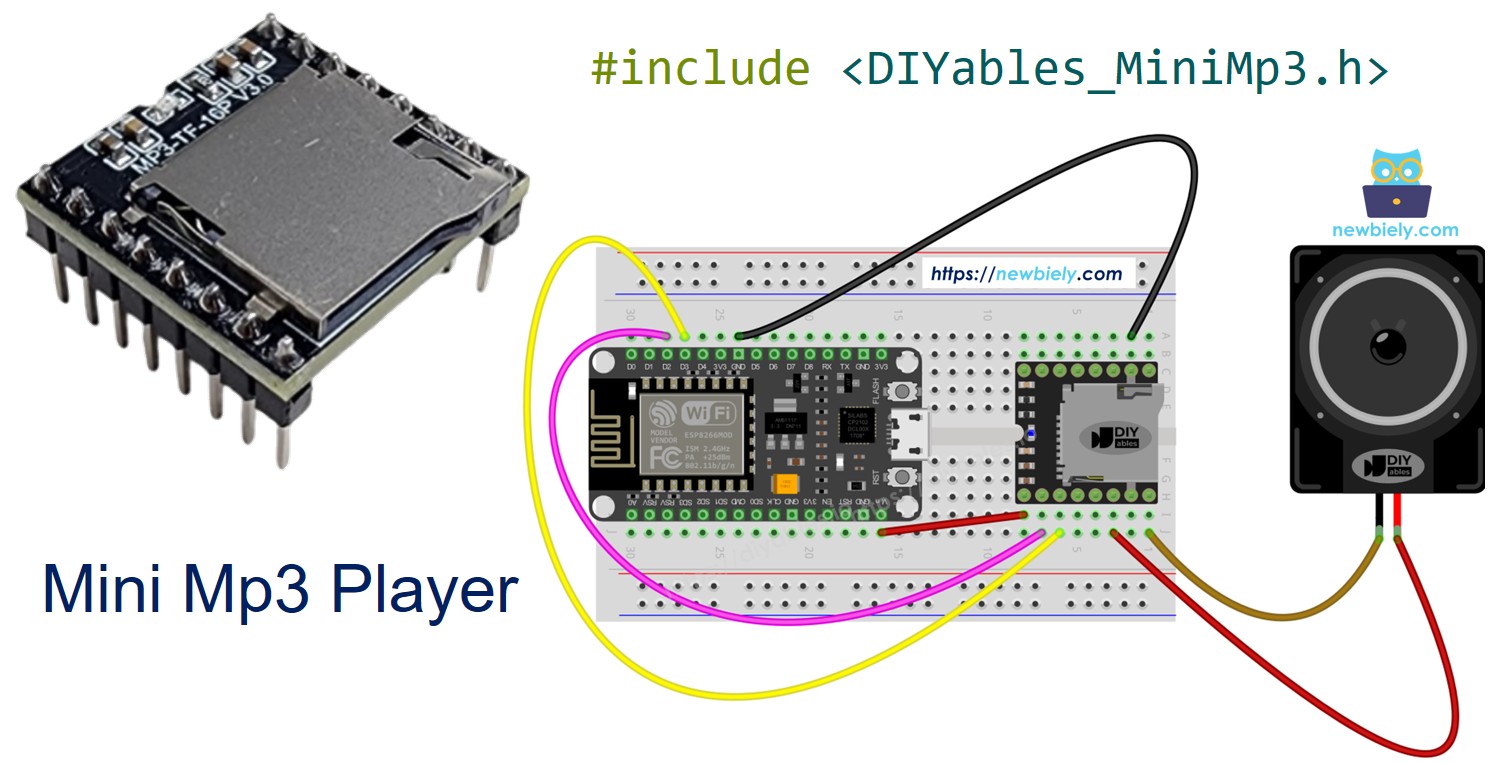
ESP8266 - Mini Lecteur Mp3
L'ESP8266 (NodeMCU, Wemos D1 Mini et cartes similaires) est un microcontrôleur WiFi populaire fonctionnant à 3,3V. L'associer avec le module DIYables Mini Mp3 Player vous donne un dispositif audio compatible WiFi avec seulement quelques fils et une micro carte SD.
Dans ce tutoriel, vous allez :
Câbler le Mini Mp3 Player à l'ESP8266 — sans résistance nécessaire.
Formater la carte SD et nommer correctement les fichiers.
Programmer l'ESP8266 pour lire, mettre en pause, reprendre et arrêter les pistes mp3.
Ajouter le contrôle du volume via des boutons.
Configurer les boucles, la lecture aléatoire et la lecture par dossier.
Interroger le module pour les informations de piste et le volume.
Ou vous pouvez acheter les kits suivants:
Divulgation : Certains des liens fournis dans cette section sont des liens affiliés Amazon. Nous pouvons recevoir une commission pour tout achat effectué via ces liens, sans coût supplémentaire pour vous. Nous vous remercions de votre soutien.
Aucune résistance nécessaire. L'ESP8266 utilise la logique 3,3V — une correspondance parfaite avec le module.
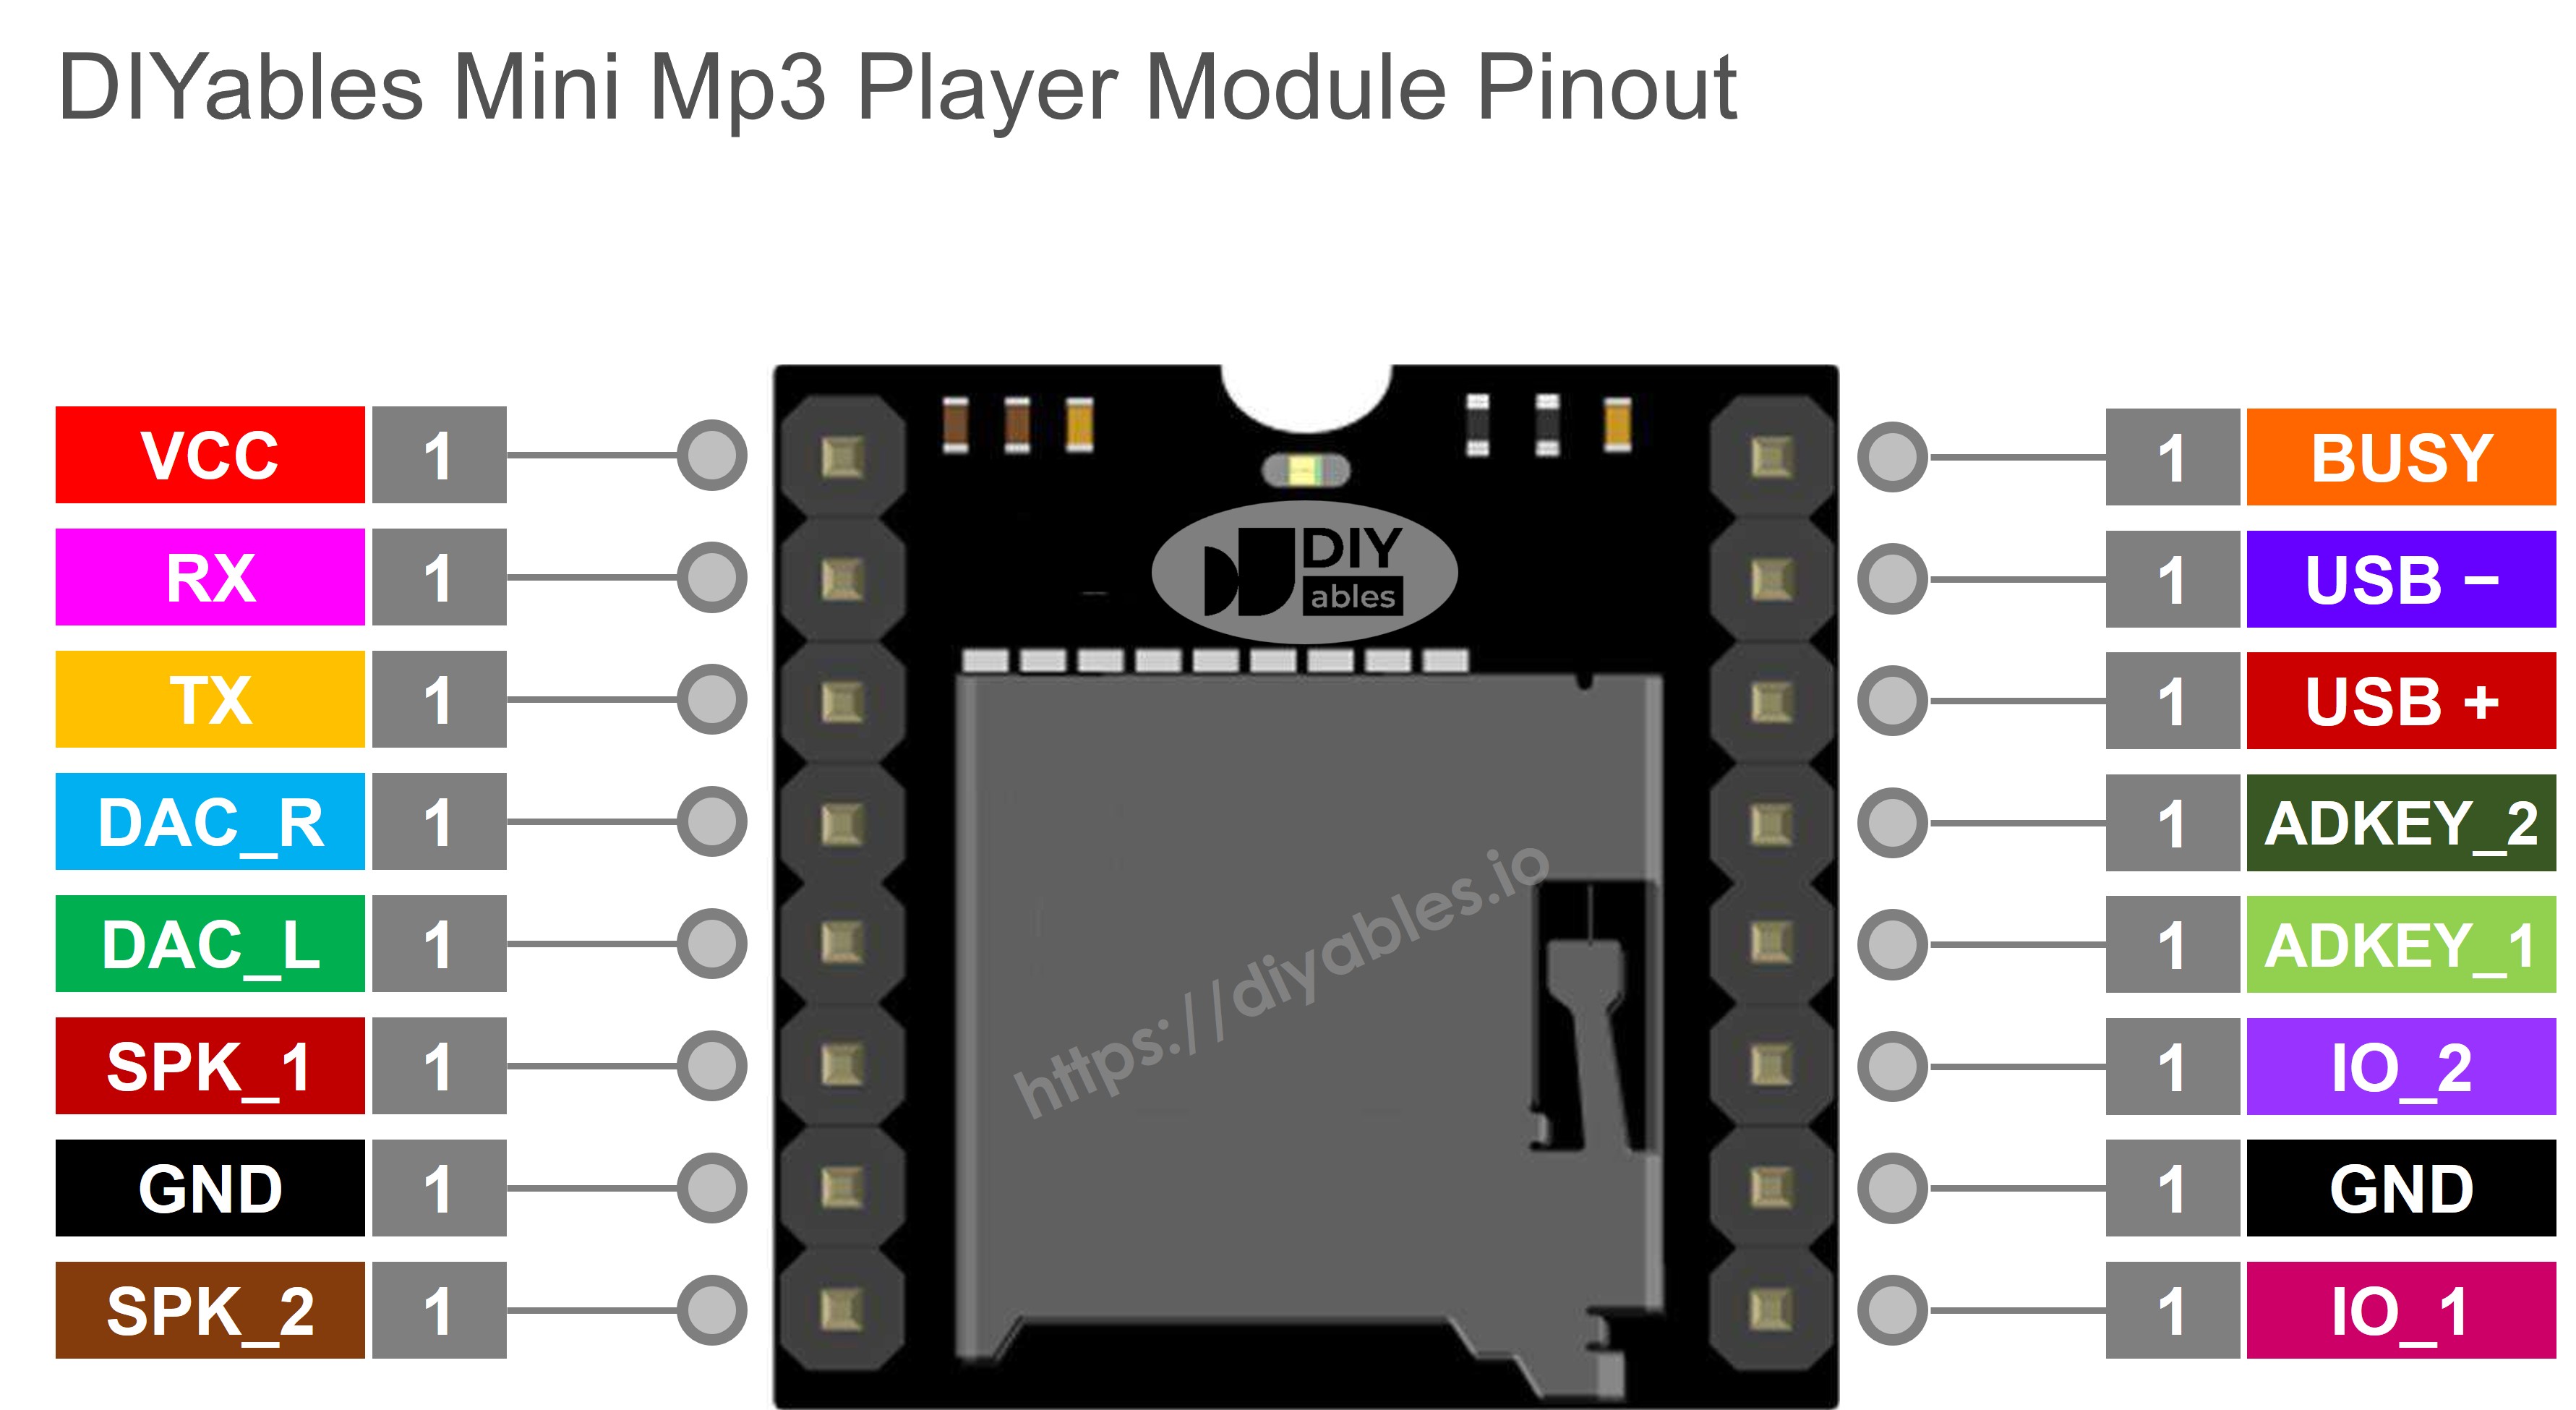
Le module DIYables Mini Mp3 Player encapsule la puce décodeur mp3 YX5200-24SS. Il lit les fichiers mp3 depuis une micro carte SD et sort l'audio via un amplificateur intégré (haut-parleur 3W max) ou des broches DAC pour une amplification externe.
Vous le contrôlez via UART à 9600 bauds. L'ensemble de fonctionnalités comprend :
Lecture, pause, reprise, arrêt, suivant, précédent
Contrôle du volume : 0 à 30
6 préréglages EQ (Normal, Pop, Rock, Jazz, Classique, Basses)
Boucler une piste, boucler un dossier, boucler tout, ou lecture aléatoire
Lecture depuis des dossiers numérotés
Interruptions de publicité
Lectures d'état (piste actuelle, volume, état de lecture)
| Broche | Description |
|---|
| VCC | Alimentation 3,2V – 5,0V |
| GND | Masse |
| RX | Entrée série depuis TX de l'ESP8266 |
| TX | Sortie série vers RX de l'ESP8266 |
| SPK_1 | Haut-parleur + (ampli intégré, 3W max) |
| SPK_2 | Haut-parleur − |
| DAC_R | Sortie ligne droite |
| DAC_L | Sortie ligne gauche |
| BUSY | LOW pendant la lecture |
| IO_1 | Appui court = préc., appui long = vol− |
| IO_2 | Appui court = suiv., appui long = vol+ |
L'ESP8266 n'a qu'un seul UART matériel qui est utilisé par le pont USB-Série. Pour le module mp3, nous utilisons SoftwareSerial sur deux broches GPIO disponibles.
| Mini Mp3 Player | ESP8266 (NodeMCU) | Notes |
|---|
| VCC | 3.3V | |
| GND | GND | |
| RX | D7 (GPIO 13) | Sans résistance — déjà en 3,3V |
| TX | D5 (GPIO 14) | |
| SPK_1 | Haut-parleur + | |
| SPK_2 | Haut-parleur − | |
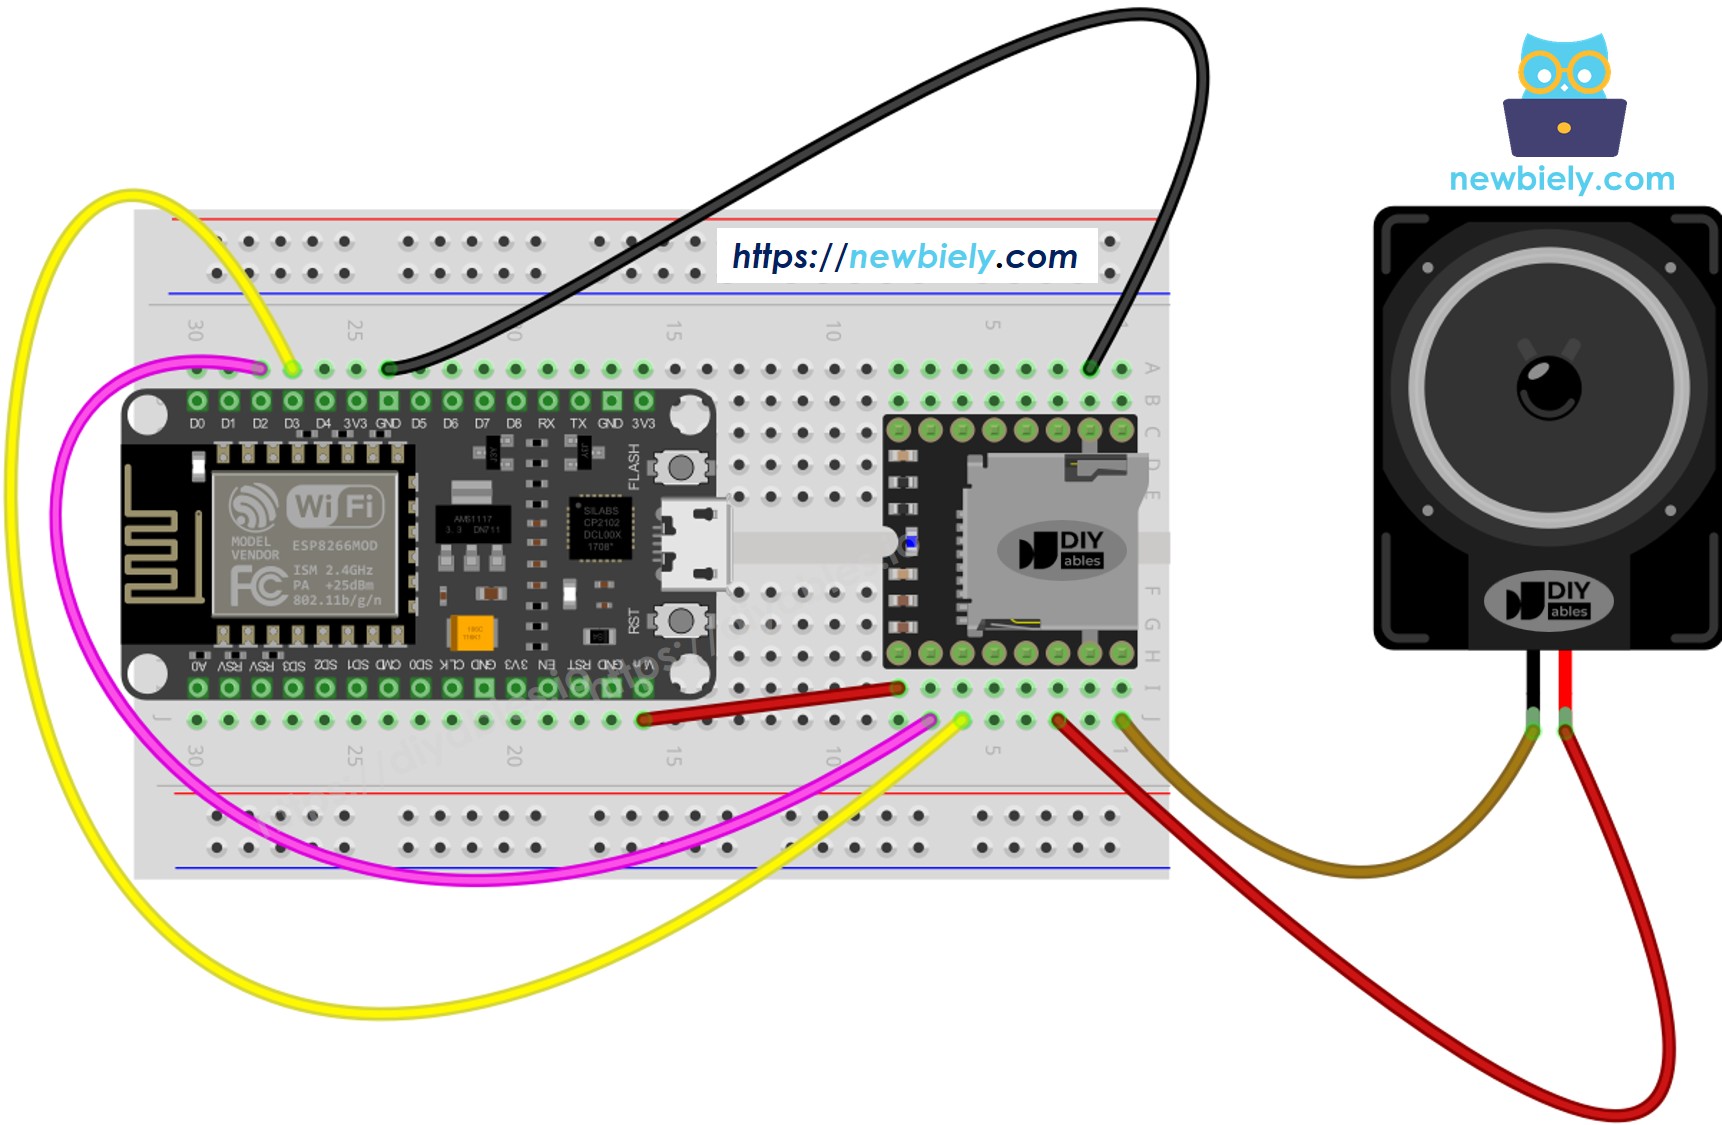
Cette image a été créée avec Fritzing. Cliquez pour agrandir l'image.
Pour plus d'informations, consultez Brochage ESP8266. et Comment alimenter l'ESP8266..
Évitez GPIO 0, 2 et 15 pour les lignes série mp3 — ces broches affectent le comportement au démarrage. D5 et D7 sont des broches à usage général sûres.
Formatez en FAT16 ou FAT32.
Ajoutez des fichiers mp3 avec des noms à zéros de tête :
/001.mp3
/002.mp3
/003.mp3
Pour les dossiers :
/01/001.mp3
/01/002.mp3
/02/001.mp3
Points à retenir :
La numérotation commence à 1, pas à 0.
L'ordre des pistes dépend de la séquence de copie, pas des noms de fichiers. Formatez d'abord, puis copiez les fichiers un par un.
Dossiers : 01–99. Fichiers dans les dossiers : 001–255.
Branchez l'ESP8266 dans votre ordinateur via USB.
Dans l'IDE Arduino, sélectionnez votre carte (par ex. NodeMCU 1.0) et le port.
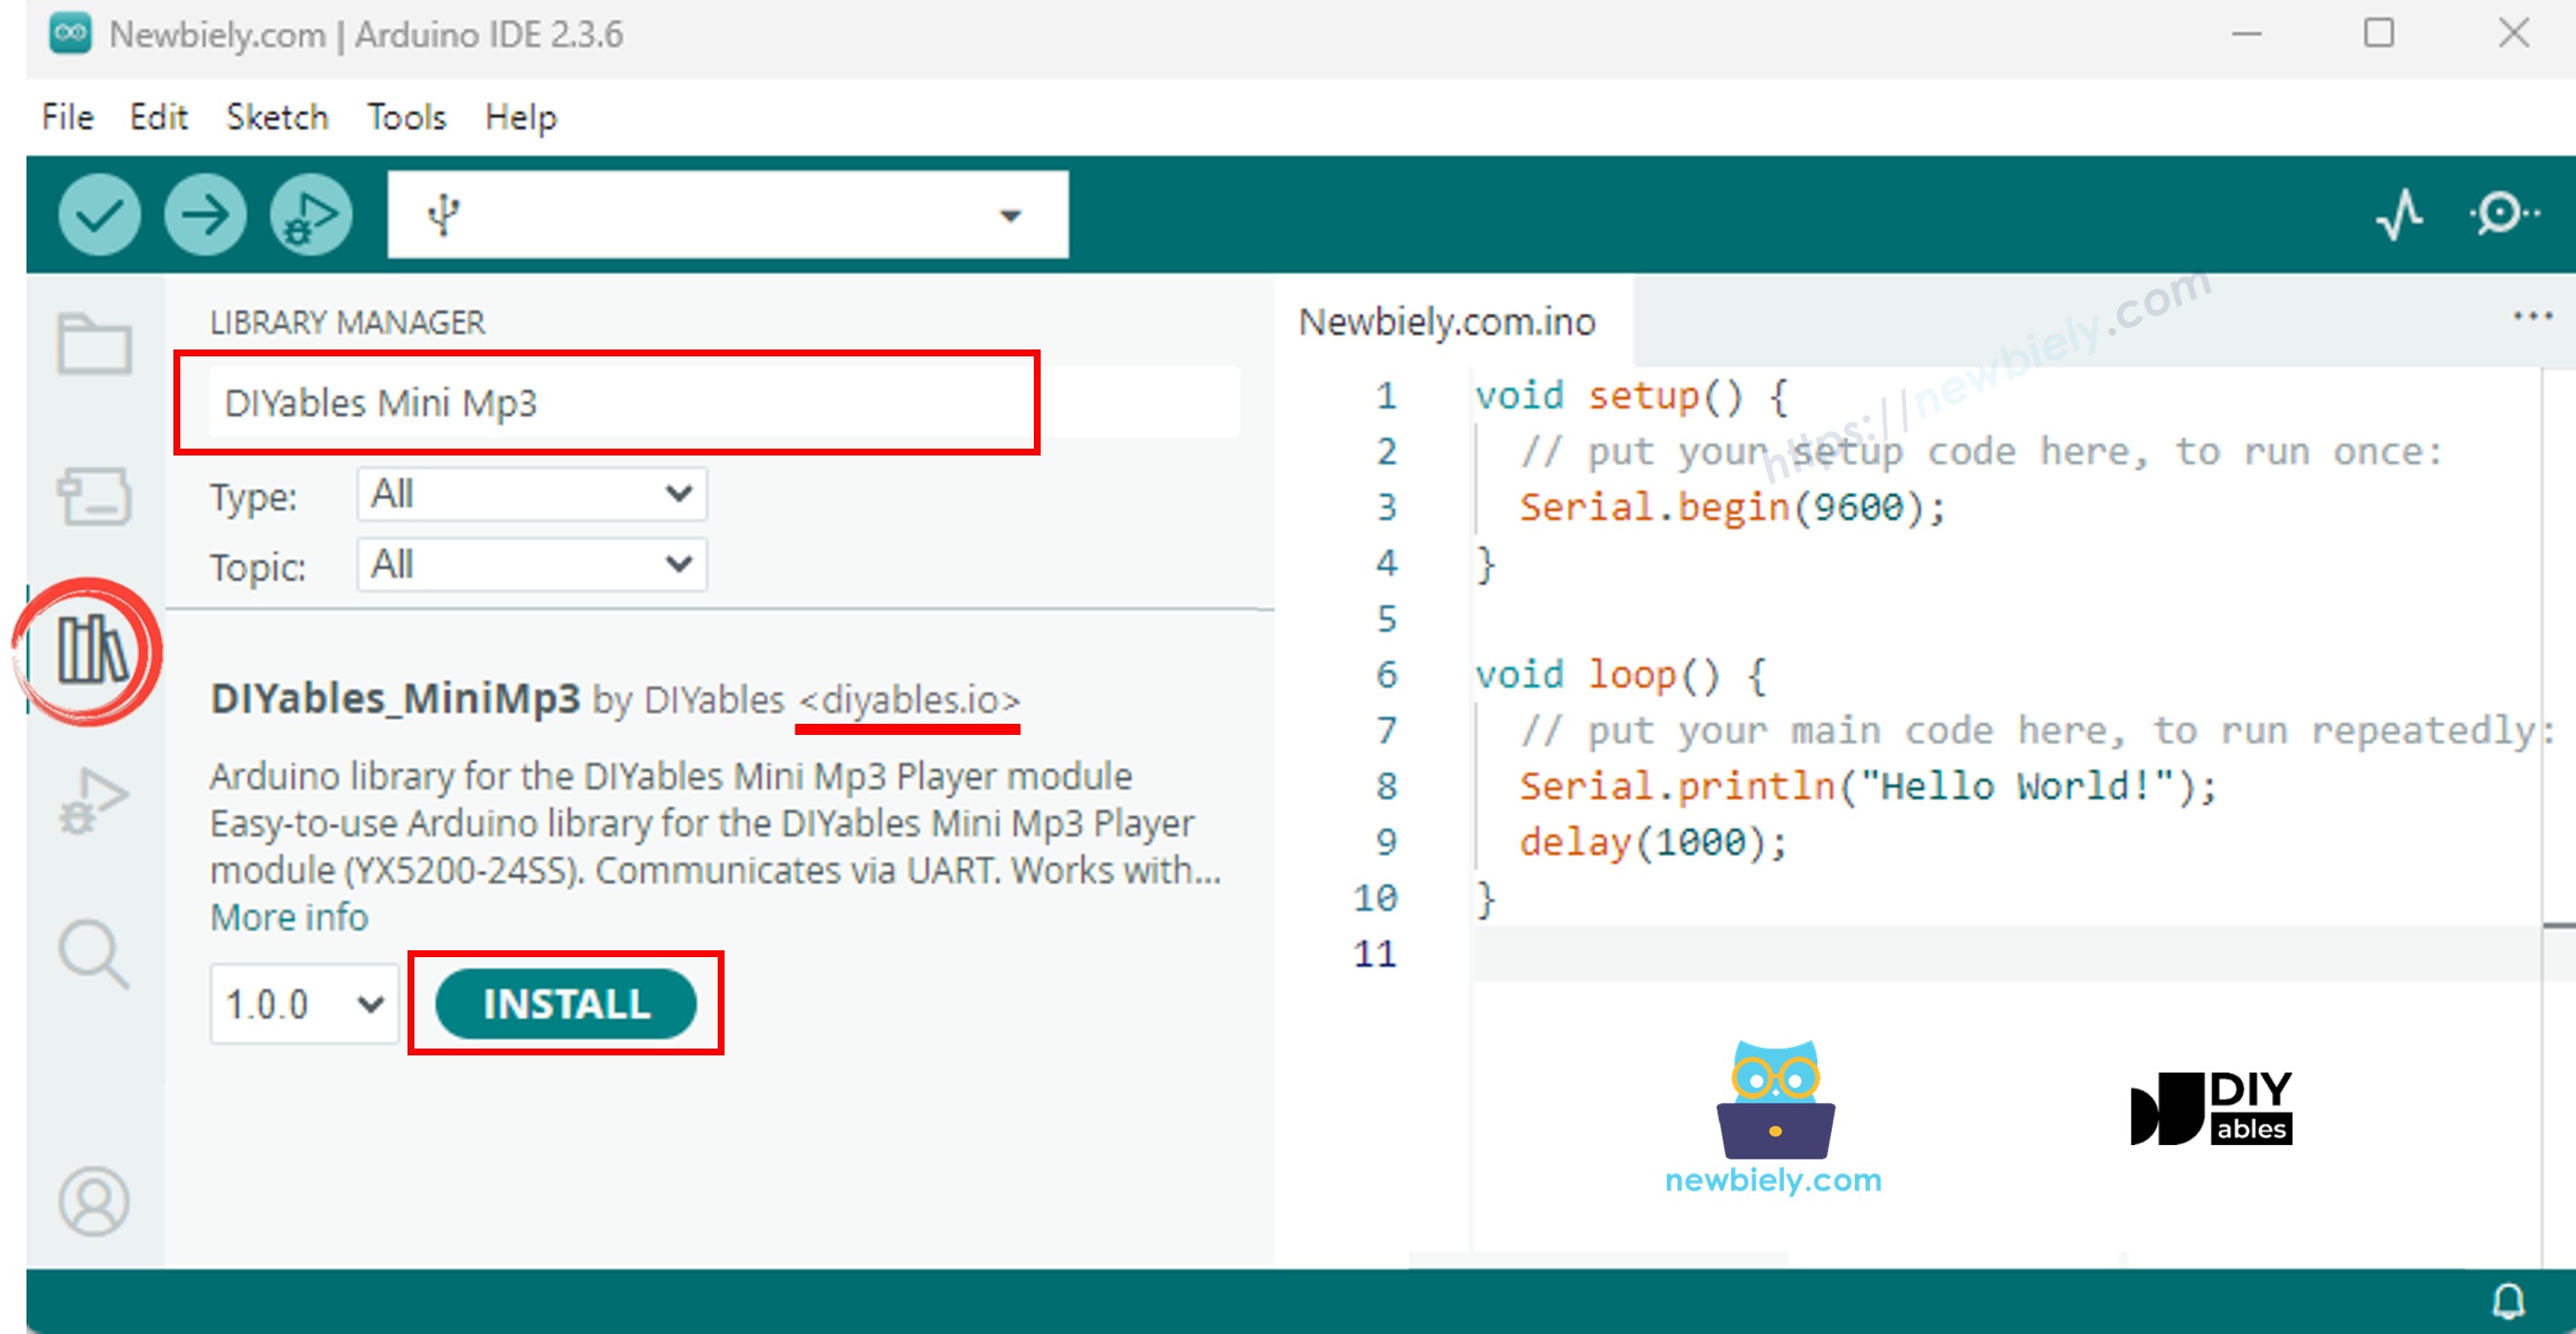
Allez dans Bibliothèques dans la barre latérale.
Recherchez "DIYables_MiniMp3" et installez-la.
Aucune autre bibliothèque n'est nécessaire.
#include <DIYables_MiniMp3.h>
#include <SoftwareSerial.h>
SoftwareSerial mp3Serial(D5, D7);
DIYables_MiniMp3 mp3;
void setup() {
Serial.begin(115200);
mp3Serial.begin(9600);
mp3.begin(mp3Serial);
delay(1000);
mp3.setVolume(25);
}
void loop() {
}
La bibliothèque SoftwareSerial de l'ESP8266 fonctionne de manière fiable à 9600 bauds. Appelez toujours delay(1000) après begin() pour laisser le module s'initialiser.
#include <DIYables_MiniMp3.h>
#include <SoftwareSerial.h>
SoftwareSerial mp3Serial(D3, D2);
DIYables_MiniMp3 mp3;
void setup()
{
Serial.begin(9600);
mp3Serial.begin(9600);
mp3.begin(mp3Serial);
delay(1000);
mp3.setVolume(25);
Serial.println("Playing track 1...");
mp3.play(1);
}
void loop()
{
}
Préparez la carte SD, insérez-la et câblez le module comme indiqué.
Ouvrez l'IDE Arduino, sélectionnez votre carte ESP8266 et téléversez.
La piste 001.mp3 joue immédiatement.
| Fonction | Explication | Code |
|---|
| play(n) | Démarrer la piste n | mp3.play(1) |
| playNext() | Passer à la suivante | mp3.playNext() |
| playPrevious() | Revenir à la précédente | mp3.playPrevious() |
| pause() | Mettre en pause la sortie | mp3.pause() |
| resume() | Continuer la piste mise en pause | mp3.resume() |
| stop() | Terminer la lecture | mp3.stop() |
#include <DIYables_MiniMp3.h>
#include <SoftwareSerial.h>
SoftwareSerial mp3Serial(D3, D2);
DIYables_MiniMp3 mp3;
int currentTrack = 1;
int totalTracks = 3;
unsigned long lastTrackTime = 0;
unsigned long trackDuration = 5000;
void setup()
{
Serial.begin(9600);
mp3Serial.begin(9600);
mp3.begin(mp3Serial);
delay(1000);
mp3.setVolume(20);
Serial.println("Playing track 1...");
mp3.play(currentTrack);
lastTrackTime = millis();
}
void loop()
{
if (millis() - lastTrackTime >= trackDuration)
{
currentTrack++;
if (currentTrack > totalTracks)
currentTrack = 1;
Serial.print("Playing track ");
Serial.println(currentTrack);
mp3.play(currentTrack);
lastTrackTime = millis();
}
}
#include <DIYables_MiniMp3.h>
#include <SoftwareSerial.h>
SoftwareSerial mp3Serial(D3, D2);
DIYables_MiniMp3 mp3;
const int BUTTON_VOL_UP = D5;
const int BUTTON_VOL_DOWN = D6;
int volume = 15;
void setup()
{
Serial.begin(9600);
mp3Serial.begin(9600);
pinMode(BUTTON_VOL_UP, INPUT_PULLUP);
pinMode(BUTTON_VOL_DOWN, INPUT_PULLUP);
mp3.begin(mp3Serial);
delay(1000);
mp3.setVolume(volume);
mp3.loopTrack(1);
Serial.print("Volume: ");
Serial.println(volume);
}
void loop()
{
if (digitalRead(BUTTON_VOL_UP) == LOW)
{
if (volume < 30)
{
volume++;
mp3.setVolume(volume);
Serial.print("Volume: ");
Serial.println(volume);
}
delay(200);
}
if (digitalRead(BUTTON_VOL_DOWN) == LOW)
{
if (volume > 0)
{
volume--;
mp3.setVolume(volume);
Serial.print("Volume: ");
Serial.println(volume);
}
delay(200);
}
}
| Fonction | Ce qu'elle fait | Code |
|---|
| setVolume(v) | Régler à un niveau spécifique | mp3.setVolume(20) |
| volumeUp() | Augmenter d'un niveau | mp3.volumeUp() |
| volumeDown() | Diminuer d'un niveau | mp3.volumeDown() |
| getVolume() | Lire le volume actuel | mp3.getVolume() |
#include <DIYables_MiniMp3.h>
#include <SoftwareSerial.h>
SoftwareSerial mp3Serial(D3, D2);
DIYables_MiniMp3 mp3;
const int BUTTON_NEXT = D5;
const int BUTTON_PREV = D6;
void setup()
{
Serial.begin(9600);
mp3Serial.begin(9600);
pinMode(BUTTON_NEXT, INPUT_PULLUP);
pinMode(BUTTON_PREV, INPUT_PULLUP);
mp3.begin(mp3Serial);
delay(1000);
mp3.setVolume(20);
mp3.play(1);
Serial.println("Press NEXT or PREV button to change track");
}
void loop()
{
if (digitalRead(BUTTON_NEXT) == LOW)
{
Serial.println("Next track");
mp3.playNext();
delay(300);
}
if (digitalRead(BUTTON_PREV) == LOW)
{
Serial.println("Previous track");
mp3.playPrevious();
delay(300);
}
}
#include <DIYables_MiniMp3.h>
#include <SoftwareSerial.h>
SoftwareSerial mp3Serial(D3, D2);
DIYables_MiniMp3 mp3;
const int BUTTON_PIN = D5;
bool paused = false;
void setup()
{
Serial.begin(9600);
mp3Serial.begin(9600);
pinMode(BUTTON_PIN, INPUT_PULLUP);
mp3.begin(mp3Serial);
delay(1000);
mp3.setVolume(20);
mp3.play(1);
Serial.println("Playing. Press button to pause/resume.");
}
void loop()
{
if (digitalRead(BUTTON_PIN) == LOW)
{
if (paused)
{
mp3.resume();
Serial.println("Resumed");
}
else
{
mp3.pause();
Serial.println("Paused");
}
paused = !paused;
delay(300);
}
}
#include <DIYables_MiniMp3.h>
#include <SoftwareSerial.h>
SoftwareSerial mp3Serial(D3, D2);
DIYables_MiniMp3 mp3;
void setup()
{
Serial.begin(9600);
mp3Serial.begin(9600);
mp3.begin(mp3Serial);
delay(1000);
mp3.setVolume(25);
mp3.setEQ(DIYables_MiniMp3::EQ_NORMAL);
Serial.println("Playing track 1 on loop...");
mp3.loopTrack(1);
}
void loop()
{
}
| Fonction | Comportement | Code |
|---|
| loopTrack(n) | Répéter une piste | mp3.loopTrack(1) |
| loopFolder(f) | Répéter le contenu d'un dossier | mp3.loopFolder(1) |
| loopAll() | Répéter tout | mp3.loopAll() |
| stopLoop() | Annuler la boucle | mp3.stopLoop() |
| shuffle() | Ordre aléatoire | mp3.shuffle() |
#include <DIYables_MiniMp3.h>
#include <SoftwareSerial.h>
SoftwareSerial mp3Serial(D3, D2);
DIYables_MiniMp3 mp3;
void setup()
{
Serial.begin(9600);
mp3Serial.begin(9600);
mp3.begin(mp3Serial);
delay(1000);
mp3.setVolume(20);
Serial.println("Playing folder 01, track 001...");
mp3.playFolder(1, 1);
delay(5000);
Serial.println("Playing folder 01, track 002...");
mp3.playFolder(1, 2);
delay(5000);
Serial.println("Playing folder 02, track 001...");
mp3.playFolder(2, 1);
}
void loop()
{
}
| Fonction | Utilisation | Code |
|---|
| playFolder(f, t) | Dossier f, piste t | mp3.playFolder(1, 1) |
| playLargeFolder(f, t) | Mode grand dossier | mp3.playLargeFolder(1, 500) |
| playFromMP3Folder(t) | Dossier /mp3 | mp3.playFromMP3Folder(1) |
#include <DIYables_MiniMp3.h>
#include <SoftwareSerial.h>
SoftwareSerial mp3Serial(D3, D2);
DIYables_MiniMp3 mp3;
void setup()
{
Serial.begin(9600);
mp3Serial.begin(9600);
mp3.begin(mp3Serial);
delay(1000);
mp3.setVolume(20);
Serial.println("=== DIYables Mini Mp3 Player ===");
Serial.println("Commands:");
Serial.println(" 1-9 Play track number");
Serial.println(" + Volume up");
Serial.println(" - Volume down");
Serial.println(" p Pause");
Serial.println(" r Resume");
Serial.println(" s Stop");
Serial.println(" n Next track");
Serial.println(" b Previous track");
Serial.println(" ? Show status");
Serial.println("================================");
}
void loop()
{
if (Serial.available())
{
char cmd = Serial.read();
switch (cmd)
{
case '1': case '2': case '3':
case '4': case '5': case '6':
case '7': case '8': case '9':
Serial.print("Playing track ");
Serial.println(cmd - '0');
mp3.play(cmd - '0');
break;
case '+':
Serial.println("Volume up");
mp3.volumeUp();
break;
case '-':
Serial.println("Volume down");
mp3.volumeDown();
break;
case 'p':
Serial.println("Paused");
mp3.pause();
break;
case 'r':
Serial.println("Resumed");
mp3.resume();
break;
case 's':
Serial.println("Stopped");
mp3.stop();
break;
case 'n':
Serial.println("Next track");
mp3.playNext();
break;
case 'b':
Serial.println("Previous track");
mp3.playPrevious();
break;
case '?':
{
Serial.println("--- Status ---");
int16_t vol = mp3.getVolume();
Serial.print("Volume: ");
Serial.println(vol);
int16_t track = mp3.getCurrentTrack();
Serial.print("Current track: ");
Serial.println(track);
bool playing = mp3.isPlaying();
Serial.print("Playing: ");
Serial.println(playing ? "Yes" : "No");
int16_t total = mp3.getTrackCount();
Serial.print("Total tracks: ");
Serial.println(total);
Serial.println("--------------");
break;
}
default:
break;
}
}
}
| Constante | Valeur | Profil Sonore |
|---|
| DIYables_MiniMp3::EQ_NORMAL | 0 | Plat |
| DIYables_MiniMp3::EQ_POP | 1 | Pop |
| DIYables_MiniMp3::EQ_ROCK | 2 | Rock |
| DIYables_MiniMp3::EQ_JAZZ | 3 | Jazz |
| DIYables_MiniMp3::EQ_CLASSIC | 4 | Classique |
| DIYables_MiniMp3::EQ_BASS | 5 | Graves accentués |
mp3.setEQ(DIYables_MiniMp3::EQ_NORMAL);
Chaque requête est bloquante (jusqu'à 100 ms). Retourne −1 en cas d'échec.
| Fonction | Retourne | Signification |
|---|
| isPlaying() | bool | true = audio actif |
| getVolume() | int16_t | 0–30 |
| getEQ() | int16_t | 0–5 |
| getTrackCount() | int16_t | Toutes les pistes sur la carte |
| getCurrentTrack() | int16_t | Numéro de piste actif |
| getFolderCount() | int16_t | Nombre de dossiers |
| getTrackCountInFolder(f) | int16_t | Pistes dans le dossier f |
※ NOS MESSAGES
N'hésitez pas à partager le lien de ce tutoriel. Cependant, veuillez ne pas utiliser notre contenu sur d'autres sites web. Nous avons investi beaucoup d'efforts et de temps pour créer ce contenu, veuillez respecter notre travail !