ESP8266 - GPS

Ce tutoriel vous explique comment utiliser l'ESP8266 avec un module GPS NEO-6M. En détail, nous allons apprendre :

Outre la longitude, la latitude et l'altitude, l'ESP8266 peut également lire la vitesse GPS (km/h) et l'heure à partir d'un module GPS NEO-6M.

Préparation du matériel

1×ESP8266 NodeMCU
1×Micro USB Cable
1×NEO-6M GPS module
1×Jumper Wires
1×(Optional) 5V Power Adapter for ESP8266
1×(Optional) ESP8266 Screw Terminal Adapter

Or you can buy the following sensor kits:

1×DIYables Sensor Kit (30 sensors/displays)
1×DIYables Sensor Kit (18 sensors/displays)
Divulgation : Certains des liens fournis dans cette section sont des liens affiliés Amazon. Nous pouvons recevoir une commission pour tout achat effectué via ces liens, sans coût supplémentaire pour vous. Nous vous remercions de votre soutien.

À propos du module GPS NEO-6M

Le module GPS NEO-6M est un module GPS qui peut fournir les informations suivantes :

  • Longitude
  • Latitude
  • Altitude
  • Vitesse GPS (km/h)
  • Date et heure

Brochage du module GPS NEO-6M

Le module GPS NEO-6M dispose de 4 broches :

  • Broche VCC : Celle-ci doit être connectée à VCC (5V)
  • Broche GND : Celle-ci doit être connectée à GND (0V)
  • Broche TX : Elle est destinée à la communication série et doit être connectée à la broche RX de Serial (ou SoftwareSerial) sur ESP8266.
  • Broche RX : Elle est destinée à la communication série et doit être connectée à la broche TX de Serial (ou SoftwareSerial) sur ESP8266.
Brochage du module GPS NEO-6M

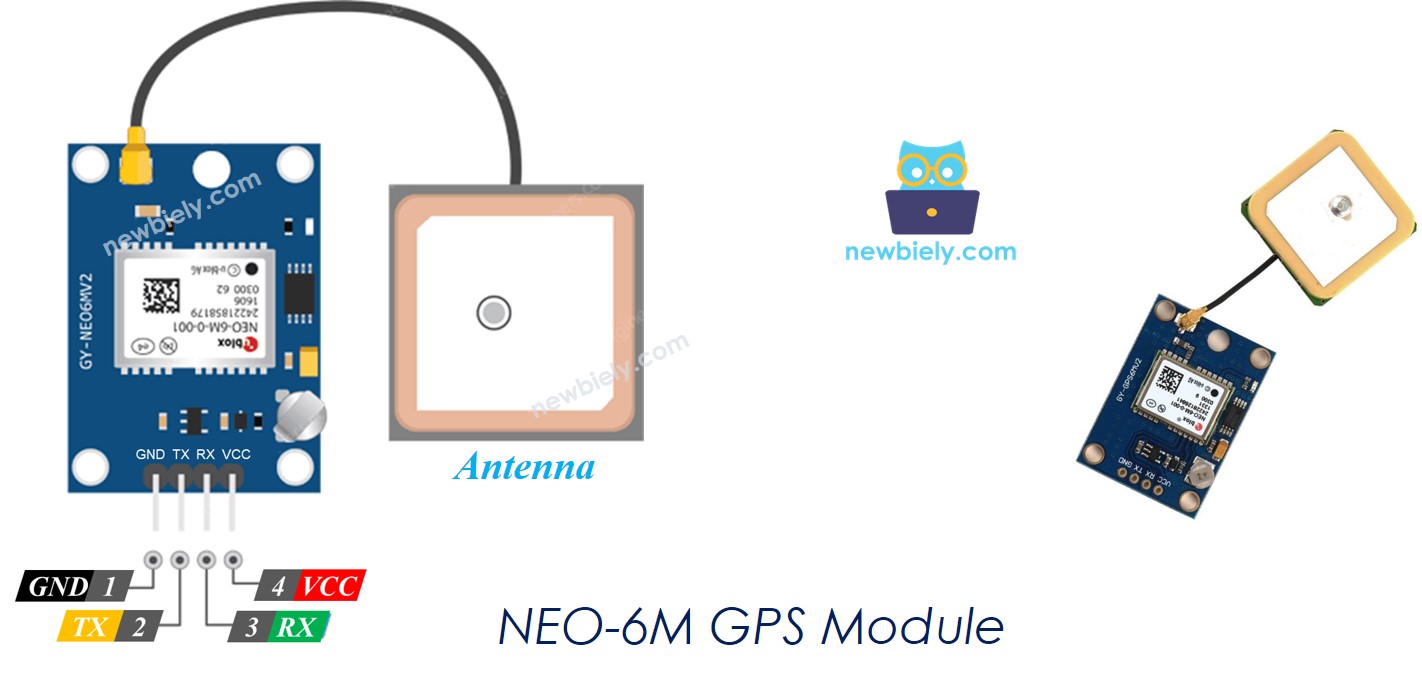
Diagramme de câblage
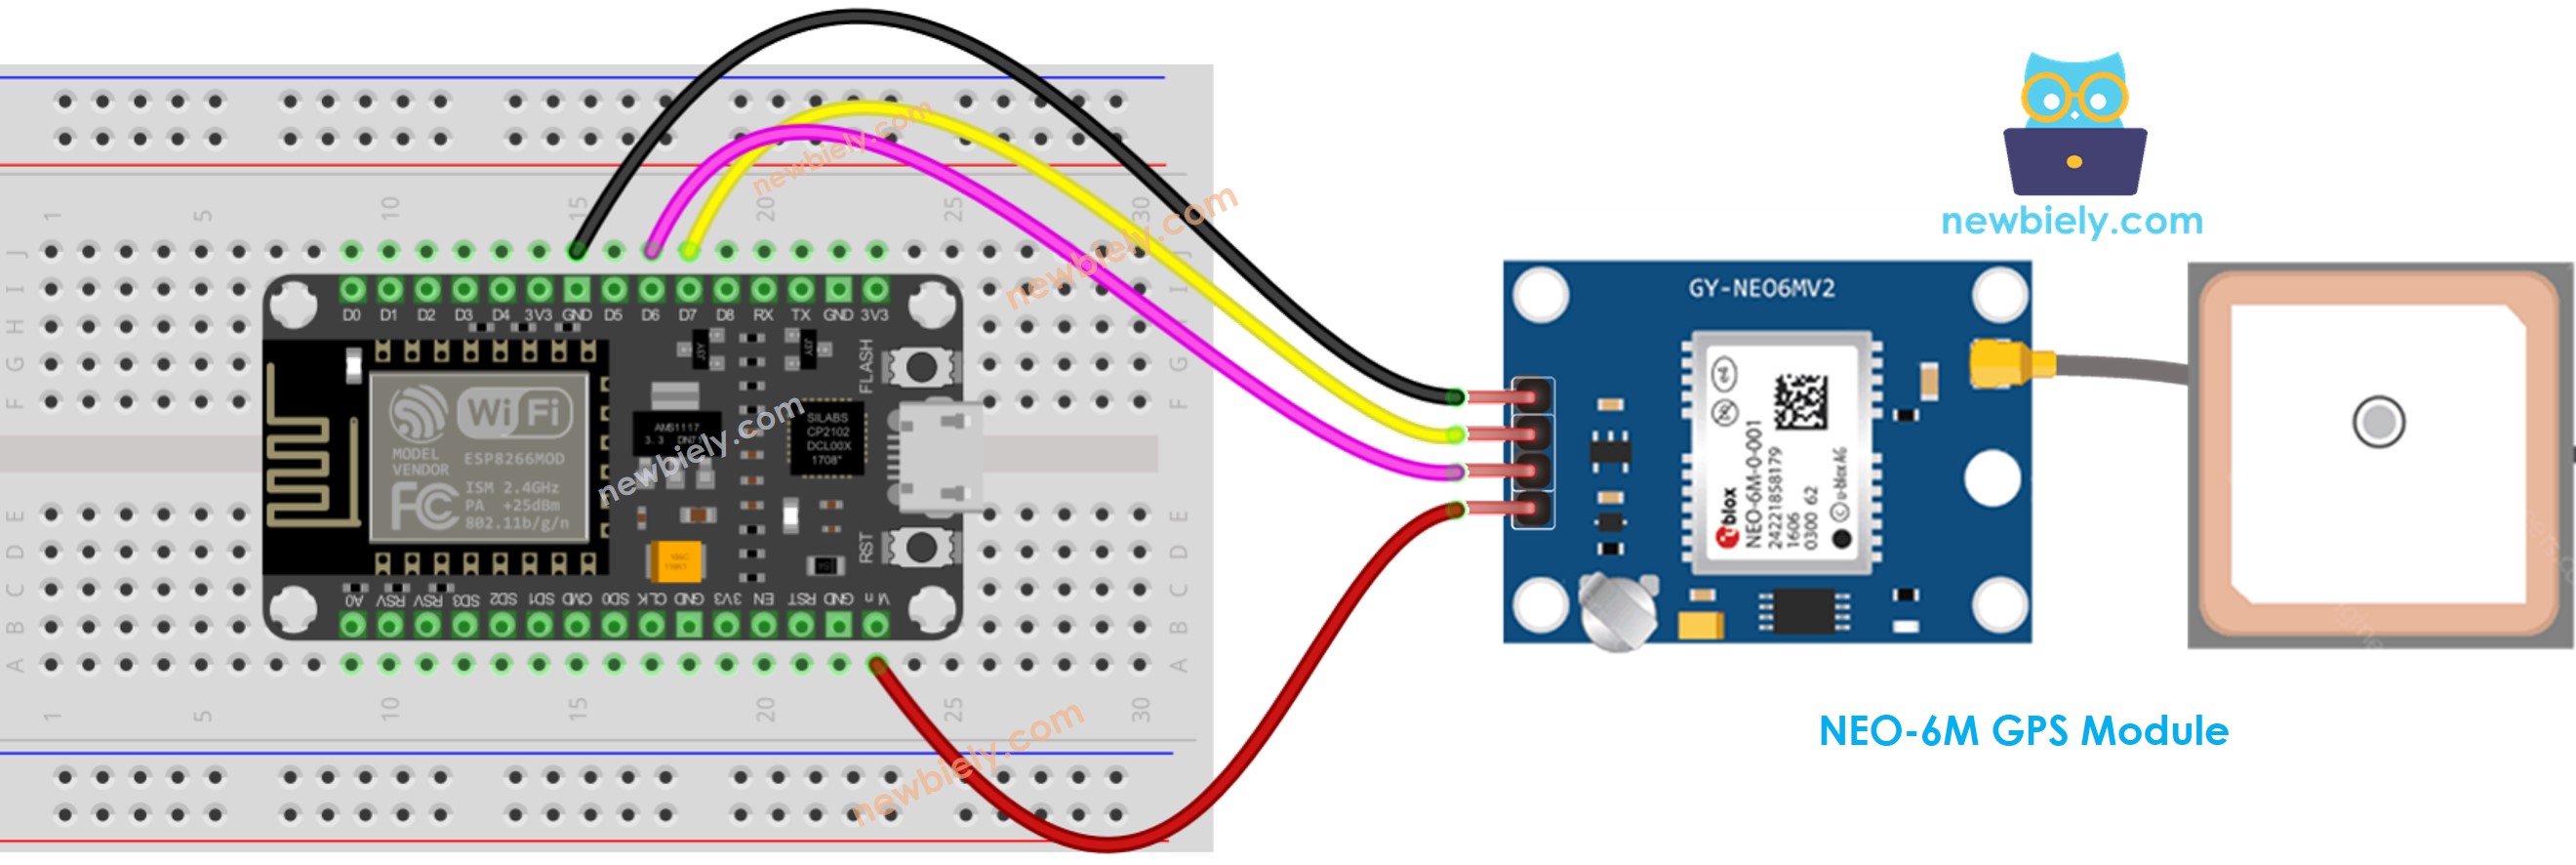
Schéma de câblage du module GPS ESP8266 NodeMCU

This image is created using Fritzing. Click to enlarge image

Voir plus dans l'agencement des broches de l'ESP8266 et comment alimenter l'ESP8266 et d'autres composants.

Code ESP8266

Lecture des coordonnées GPS, de la vitesse (km/h) et de la date_heure.

/* * Ce code ESP8266 NodeMCU a été développé par newbiely.fr * Ce code ESP8266 NodeMCU est mis à disposition du public sans aucune restriction. * Pour des instructions complètes et des schémas de câblage, veuillez visiter: * https://newbiely.fr/tutorials/esp8266/esp8266-gps */ #include <TinyGPS++.h> #include <SoftwareSerial.h> const int RX_PIN = 3, TX_PIN = 4; const uint32_t GPS_BAUD = 9600; //Default baud of NEO-6M is 9600 TinyGPSPlus gps; // The TinyGPS++ object SoftwareSerial gpsSerial(RX_PIN, TX_PIN); // The serial interface to the GPS device void setup() { Serial.begin(9600); gpsSerial.begin(GPS_BAUD); Serial.println(F("ESP8266 - GPS module")); } void loop() { if (gpsSerial.available() > 0) { if (gps.encode(gpsSerial.read())) { if (gps.location.isValid()) { Serial.print(F("- latitude: ")); Serial.println(gps.location.lat()); Serial.print(F("- longitude: ")); Serial.println(gps.location.lng()); Serial.print(F("- altitude: ")); if (gps.altitude.isValid()) Serial.println(gps.altitude.meters()); else Serial.println(F("INVALID")); } else { Serial.println(F("- location: INVALID")); } Serial.print(F("- speed: ")); if (gps.speed.isValid()) { Serial.print(gps.speed.kmph()); Serial.println(F(" km/h")); } else { Serial.println(F("INVALID")); } Serial.print(F("- GPS date&time: ")); if (gps.date.isValid() && gps.time.isValid()) { Serial.print(gps.date.year()); Serial.print(F("-")); Serial.print(gps.date.month()); Serial.print(F("-")); Serial.print(gps.date.day()); Serial.print(F(" ")); Serial.print(gps.time.hour()); Serial.print(F(":")); Serial.print(gps.time.minute()); Serial.print(F(":")); Serial.println(gps.time.second()); } else { Serial.println(F("INVALID")); } Serial.println(); } } if (millis() > 5000 && gps.charsProcessed() < 10) Serial.println(F("No GPS data received: check wiring")); }

Étapes rapides

Pour commencer avec l'ESP8266 sur Arduino IDE, suivez ces étapes :

  • Consultez le tutoriel comment configurer l'environnement pour ESP8266 sur Arduino IDE si c'est votre première utilisation de l'ESP8266.
  • Connectez les composants comme indiqué dans le schéma.
  • Connectez la carte ESP8266 à votre ordinateur à l'aide d'un câble USB.
  • Ouvrez Arduino IDE sur votre ordinateur.
  • Choisissez la bonne carte ESP8266, comme (par exemple NodeMCU 1.0 (Module ESP-12E)), et son port COM respectif.
  • Lancez Arduino IDE
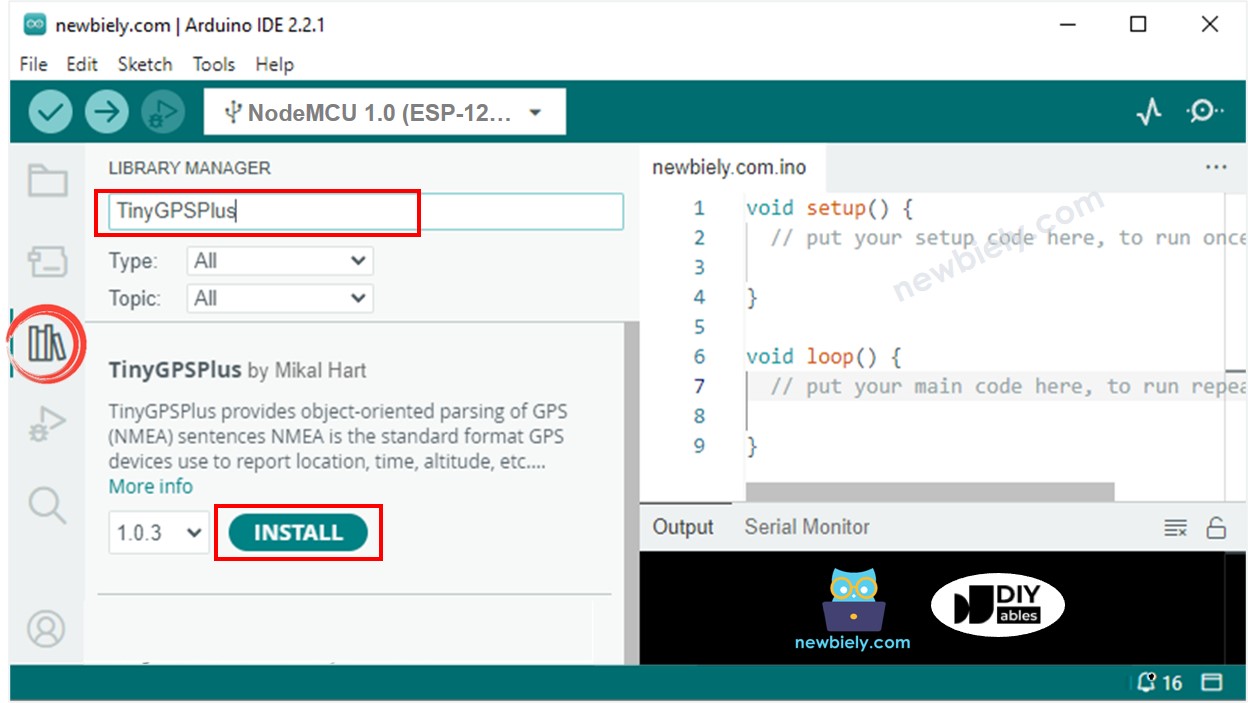
  • Cliquez sur l'icône Libraries dans la barre latérale gauche de l'Arduino IDE.
  • Recherchez "TinyGPSPlus", puis trouvez la bibliothèque TinyGPSPlus de Mikal Hart
  • Cliquez sur le bouton Install pour installer la bibliothèque TinyGPSPlus.
Bibliothèque TinyGPS++ ESP8266 NodeMCU
  • Copiez le code fourni et ouvrez-le dans l'IDE Arduino.
  • Cliquez sur le bouton Upload dans l'IDE Arduino pour envoyer le code à l'ESP8266.
  • Consultez le résultat sur le moniteur série.
COM6
Send
Autoscroll Show timestamp
Clear output
9600 baud  
Newline  

Calcul de la distance entre la position actuelle et un lieu prédéfini

Ce code calcule la distance entre l'emplacement actuel et Londres (latitude : 51.508131, longitude : -0.128002).

/* * Ce code ESP8266 NodeMCU a été développé par newbiely.fr * Ce code ESP8266 NodeMCU est mis à disposition du public sans aucune restriction. * Pour des instructions complètes et des schémas de câblage, veuillez visiter: * https://newbiely.fr/tutorials/esp8266/esp8266-gps */ #include <TinyGPS++.h> #include <SoftwareSerial.h> const int RX_PIN = 3, TX_PIN = 4; const uint32_t GPS_BAUD = 9600; //Default baud of NEO-6M is 9600 TinyGPSPlus gps; // The TinyGPS++ object SoftwareSerial gpsSerial(RX_PIN, TX_PIN); // The serial interface to the GPS device const double LONDON_LAT = 51.508131; const double LONDON_LON = -0.128002; void setup() { Serial.begin(9600); gpsSerial.begin(GPS_BAUD); Serial.println(F("ESP8266 - GPS module")); } void loop() { if (gpsSerial.available() > 0) { if (gps.encode(gpsSerial.read())) { if (gps.location.isValid()) { double latitude = gps.location.lat(); double longitude = gps.location.lng(); unsigned long distanceKm = TinyGPSPlus::distanceBetween(latitude, longitude, LONDON_LAT, LONDON_LON) / 1000; Serial.print(F("- latitude: ")); Serial.println(latitude); Serial.print(F("- longitude: ")); Serial.println(longitude); Serial.print(F("- distance to London: ")); Serial.println(distanceKm); } else { Serial.println(F("- location: INVALID")); } Serial.println(); } } if (millis() > 5000 && gps.charsProcessed() < 10) Serial.println(F("No GPS data received: check wiring")); }

Étapes rapides

  • Câblez les composants comme indiqué sur le schéma.
  • Connectez la carte ESP8266 à votre ordinateur à l'aide d'un câble USB.
  • Ouvrez Arduino IDE sur votre ordinateur.
  • Choisissez la bonne carte ESP8266, telle que (par exemple NodeMCU 1.0 (Module ESP-12E)), et son port COM respectif.
  • Copiez le code et ouvrez-le dans l'Arduino IDE.
  • Cliquez sur le bouton Upload dans l'Arduino IDE pour envoyer le code à l'ESP8266.
  • Consultez le résultat sur le moniteur série.
COM6
Send
Autoscroll Show timestamp
Clear output
9600 baud  
Newline  

Vidéo

Tutoriels connexes

※ OUR MESSAGES

  • Please feel free to share the link of this tutorial. However, Please do not use our content on any other websites. We invested a lot of effort and time to create the content, please respect our work!