ESP8266 - Module RTC DS1307

Ce tutoriel vous explique comment utiliser l'ESP8266 pour lire la date et l'heure à partir du module RTC DS1307. En détail, nous apprendrons :

Préparation du matériel

1×ESP8266 NodeMCU
1×Micro USB Cable
1×Real-Time Clock DS1307 Module
1×CR2032 battery
1×Jumper Wires
1×(Optional) 5V Power Adapter for ESP8266
1×(Optional) ESP8266 Screw Terminal Adapter

Or you can buy the following sensor kits:

1×DIYables Sensor Kit (30 sensors/displays)
1×DIYables Sensor Kit (18 sensors/displays)
Divulgation : Certains des liens fournis dans cette section sont des liens affiliés Amazon. Nous pouvons recevoir une commission pour tout achat effectué via ces liens, sans coût supplémentaire pour vous. Nous vous remercions de votre soutien.

À propos du module d'horloge en temps réel DS1307

ESP8266 dispose de certaines fonctions liées au temps, par exemple millis(), micros(). Cependant, celles-ci ne peuvent pas fournir la date et l'heure (secondes, minutes, heures, jour, date, mois et année). Pour obtenir la date et l'heure, il est nécessaire d'utiliser un module d'Horloge Temps Réel (RTC) tel que le DS3231 ou le DS1370. Le module DS3231 offre une précision supérieure à celle du DS1370. Pour plus d'informations, consultez DS3231 vs DS1307.

Brochage du module RTC DS1307

Le module d'horloge en temps réel DS1307 possède 12 broches, mais pour une utilisation courante, il nécessite 4 broches : VCC, GND, SDA et SCL.

  • La broche SCL : est une broche d'horloge série pour l'interface I2C.
  • La broche SDA : est une broche de données série pour l'interface I2C.
  • La broche VCC : fournit de l'énergie au module. Elle peut varier de 3,3V à 5,5V.
  • La broche GND : est la broche de masse.
Horloge temps réel DS1307 Module brochage

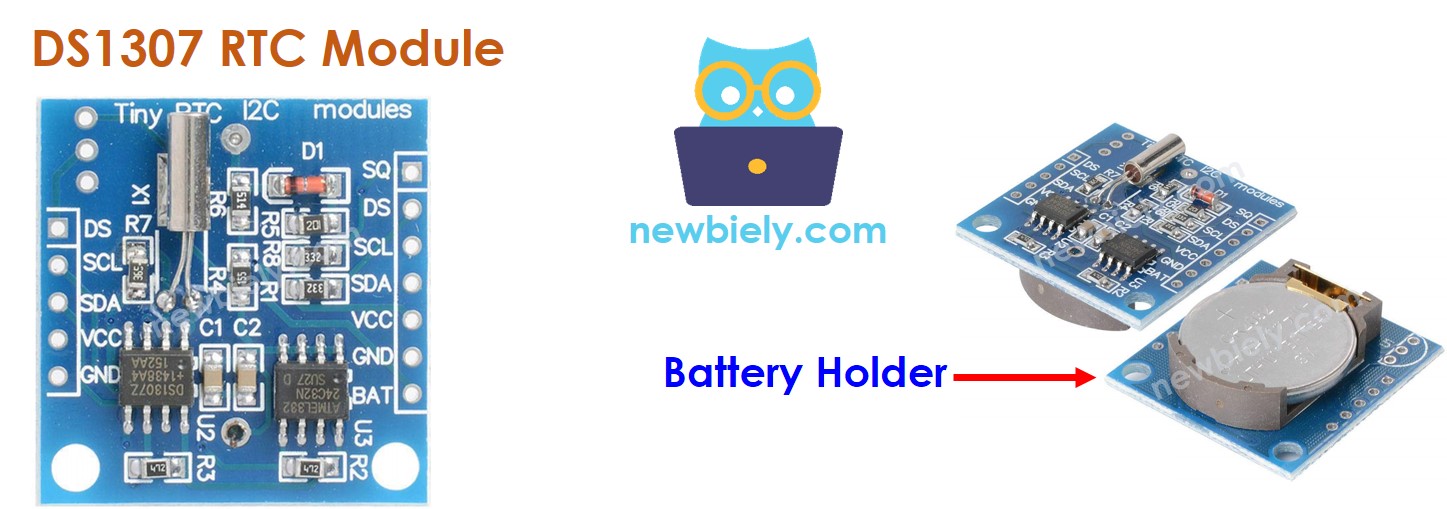
Le module DS1307 comporte un support de batterie qui, lorsqu'une batterie CR2032 est insérée, maintiendra l'heure sur le module lorsque l'alimentation principale est coupée. Sans la batterie, les informations horaires seront perdues si l'alimentation principale est déconnectée et devront être réinitialisées.

Diagramme de câblage
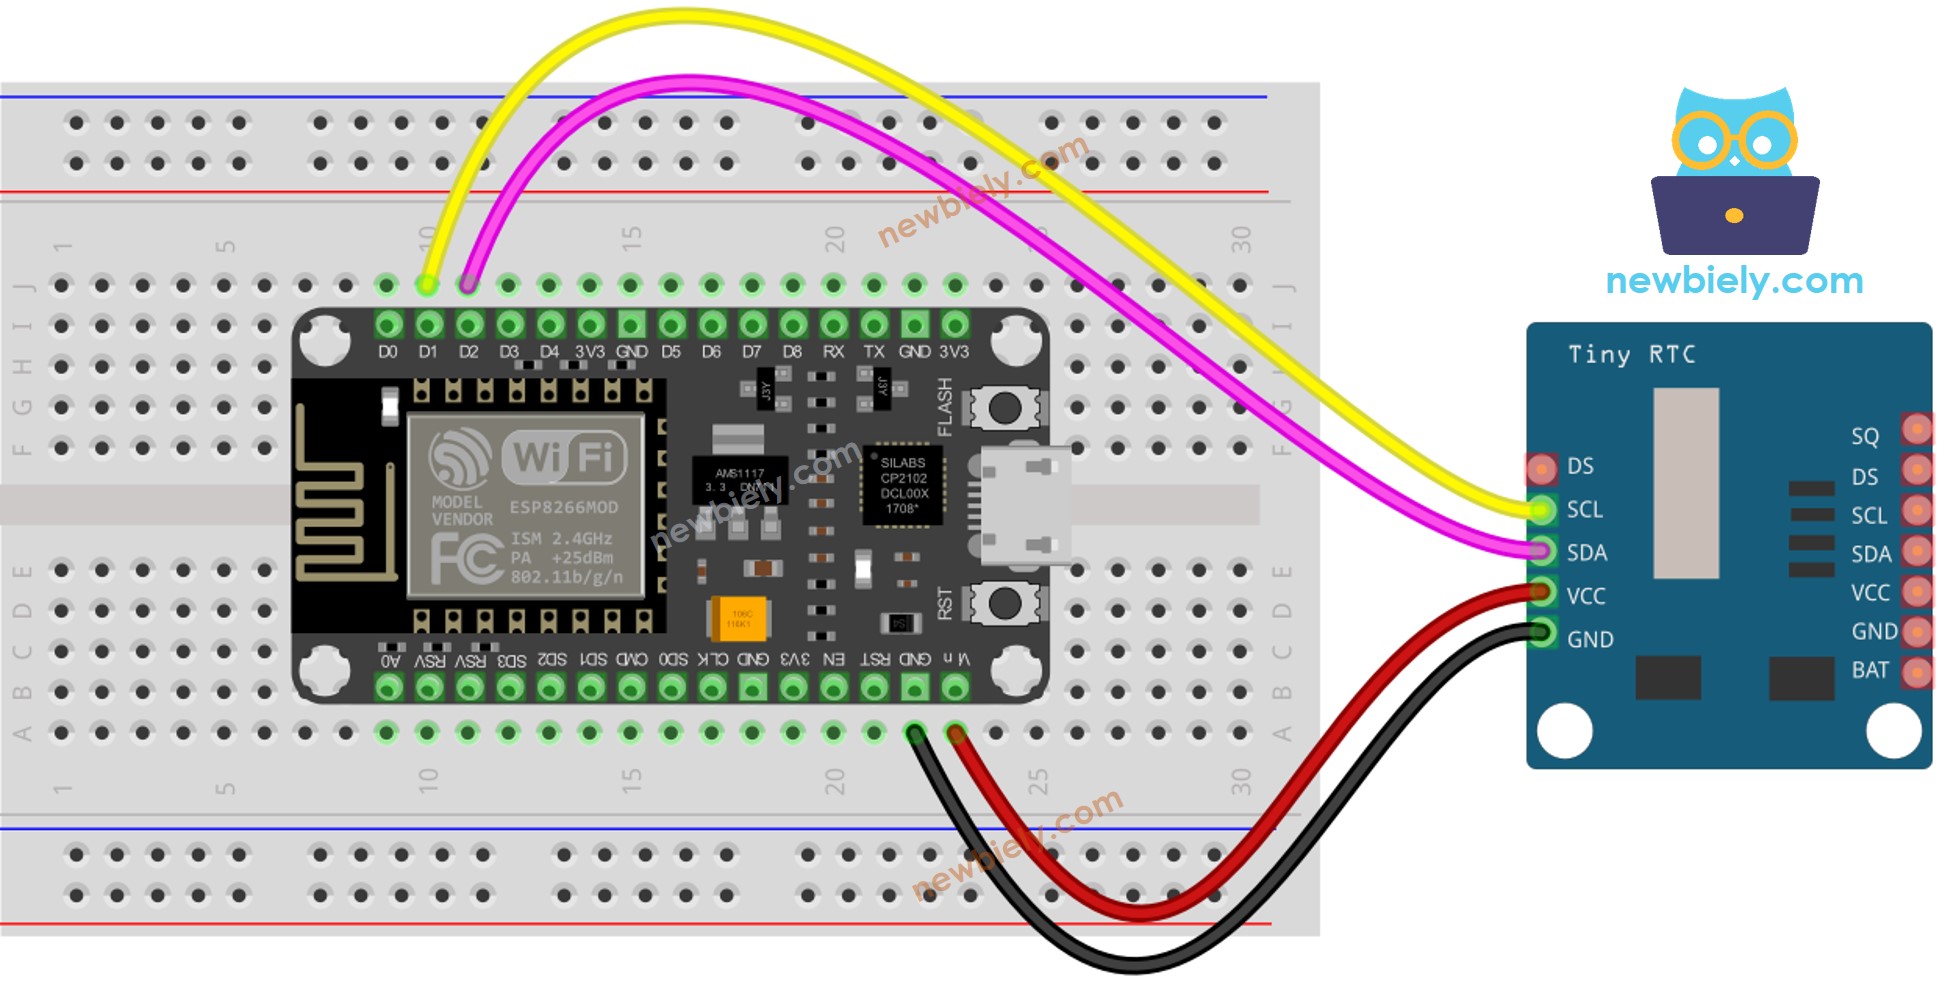
Schéma de câblage de l'horloge en temps réel DS1307 ESP8266 NodeMCU

This image is created using Fritzing. Click to enlarge image

Voir plus dans l'agencement des broches de l'ESP8266 et comment alimenter l'ESP8266 et d'autres composants.

ESP8266 - Module RTC DS1307

DS1307 RTC Module ESP8266
Vin 3.3V
GND GND
SDA GPIO4
SCL GPIO5

Comment programmer le module RTC DS1307

  • Inclure la bibliothèque.
#include <RTClib.h>
  • Créez un objet RTC :
RTC_DS1307 rtc;
  • Mettez en route l'horloge temps réel (RTC).
if (! rtc.begin()) { Serial.println("Couldn't find RTC"); while (1); }
  • Réglez l'horloge temps réel (RTC) à la date et à l'heure de l'ordinateur lors de la compilation initiale du croquis.
rtc.adjust(DateTime(F(__DATE__), F(__TIME__)));
  • Récupère les données de date et d'heure du module RTC.
DateTime now = rtc.now(); Serial.print("Date & Time: "); Serial.print(now.year(), DEC); Serial.print('/'); Serial.print(now.month(), DEC); Serial.print('/'); Serial.print(now.day(), DEC); Serial.print(" ("); Serial.print(now.dayOfTheWeek()); Serial.print(") "); Serial.print(now.hour(), DEC); Serial.print(':'); Serial.print(now.minute(), DEC); Serial.print(':'); Serial.println(now.second(), DEC);

Code ESP8266 – Comment obtenir des données et l'heure

/* * Ce code ESP8266 NodeMCU a été développé par newbiely.fr * Ce code ESP8266 NodeMCU est mis à disposition du public sans aucune restriction. * Pour des instructions complètes et des schémas de câblage, veuillez visiter: * https://newbiely.fr/tutorials/esp8266/esp8266-ds1307-rtc-module */ #include <RTClib.h> RTC_DS1307 rtc; char daysOfTheWeek[7][12] = { "Sunday", "Monday", "Tuesday", "Wednesday", "Thursday", "Friday", "Saturday" }; void setup () { Serial.begin(9600); // SETUP RTC MODULE if (! rtc.begin()) { Serial.println("Couldn't find RTC"); Serial.flush(); while (1); } // automatically sets the RTC to the date & time on PC this sketch was compiled rtc.adjust(DateTime(F(__DATE__), F(__TIME__))); // manually sets the RTC with an explicit date & time, for example to set // January 21, 2021 at 3am you would call: // rtc.adjust(DateTime(2021, 1, 21, 3, 0, 0)); } void loop () { DateTime now = rtc.now(); Serial.print("Date & Time: "); Serial.print(now.year(), DEC); Serial.print('/'); Serial.print(now.month(), DEC); Serial.print('/'); Serial.print(now.day(), DEC); Serial.print(" ("); Serial.print(daysOfTheWeek[now.dayOfTheWeek()]); Serial.print(") "); Serial.print(now.hour(), DEC); Serial.print(':'); Serial.print(now.minute(), DEC); Serial.print(':'); Serial.println(now.second(), DEC); delay(1000); // delay 1 seconds }

Étapes rapides

Pour commencer avec l'ESP8266 sur l'IDE Arduino, suivez ces étapes :

  • Consultez le tutoriel comment configurer l'environnement pour ESP8266 sur Arduino IDE si c'est la première fois que vous utilisez ESP8266.
  • Câblez les composants comme indiqué dans le schéma.
  • Connectez la carte ESP8266 à votre ordinateur à l'aide d'un câble USB.
  • Ouvrez Arduino IDE sur votre ordinateur.
  • Choisissez la bonne carte ESP8266, telle que (par exemple, NodeMCU 1.0 (Module ESP-12E)), et son port COM respectif.
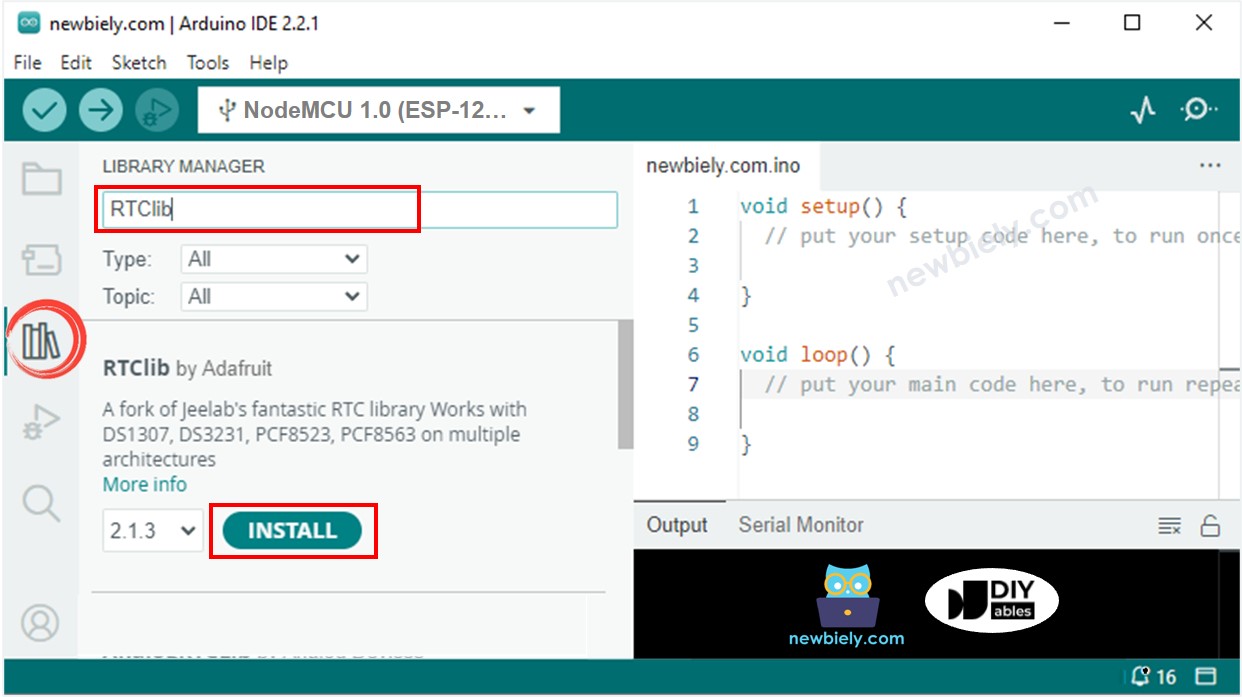
  • Cliquez sur l'icône Libraries sur la barre gauche de l'Arduino IDE.
  • Recherchez “RTClib” et localisez la bibliothèque RTC d'Adafruit.
  • Appuyez sur le bouton Install pour ajouter la bibliothèque RTC.
Bibliothèque RTC ESP8266 NodeMCU
  • Copiez le code et ouvrez-le dans l'IDE Arduino.
  • Cliquez sur le bouton Upload dans l'IDE Arduino pour compiler et téléverser le code vers l'ESP8266.
  • Ouvrez le moniteur série.
  • Consultez le résultat sur le moniteur série.
COM6
Send
Date & Time: 2021/10/6 (Wednesday) 9:9:35 Date & Time: 2021/10/6 (Wednesday) 9:9:36 Date & Time: 2021/10/6 (Wednesday) 9:9:37 Date & Time: 2021/10/6 (Wednesday) 9:9:38 Date & Time: 2021/10/6 (Wednesday) 9:9:39 Date & Time: 2021/10/6 (Wednesday) 9:9:40 Date & Time: 2021/10/6 (Wednesday) 9:9:41 Date & Time: 2021/10/6 (Wednesday) 9:9:42 Date & Time: 2021/10/6 (Wednesday) 9:9:43 Date & Time: 2021/10/6 (Wednesday) 9:9:44
Autoscroll Show timestamp
Clear output
9600 baud  
Newline  

Code ESP8266 - Comment créer un programme quotidien

/* * Ce code ESP8266 NodeMCU a été développé par newbiely.fr * Ce code ESP8266 NodeMCU est mis à disposition du public sans aucune restriction. * Pour des instructions complètes et des schémas de câblage, veuillez visiter: * https://newbiely.fr/tutorials/esp8266/esp8266-ds1307-rtc-module */ // Date and time functions using a DS1307 RTC connected via I2C and Wire lib #include <RTClib.h> // event from 13:50 to 14:10 uint8_t DAILY_EVENT_START_HH = 13; // event start time: hour uint8_t DAILY_EVENT_START_MM = 50; // event start time: minute uint8_t DAILY_EVENT_END_HH = 14; // event end time: hour uint8_t DAILY_EVENT_END_MM = 10; // event end time: minute RTC_DS1307 rtc; char daysOfTheWeek[7][12] = { "Sunday", "Monday", "Tuesday", "Wednesday", "Thursday", "Friday", "Saturday" }; void setup () { Serial.begin(9600); // SETUP RTC MODULE if (! rtc.begin()) { Serial.println("Couldn't find RTC"); while (1); } // sets the RTC to the date & time on PC this sketch was compiled rtc.adjust(DateTime(F(__DATE__), F(__TIME__))); // sets the RTC with an explicit date & time, for example to set // January 21, 2021 at 3am you would call: // rtc.adjust(DateTime(2021, 1, 21, 3, 0, 0)); } void loop () { DateTime now = rtc.now(); if (now.hour() >= DAILY_EVENT_START_HH && now.minute() >= DAILY_EVENT_START_MM && now.hour() < DAILY_EVENT_END_HH && now.minute() < DAILY_EVENT_END_MM) { Serial.println("It is on scheduled time"); // TODO: write your code" } else { Serial.println("It is NOT on scheduled time"); } printTime(now); } void printTime(DateTime time) { Serial.print("TIME: "); Serial.print(time.year(), DEC); Serial.print('/'); Serial.print(time.month(), DEC); Serial.print('/'); Serial.print(time.day(), DEC); Serial.print(" ("); Serial.print(daysOfTheWeek[time.dayOfTheWeek()]); Serial.print(") "); Serial.print(time.hour(), DEC); Serial.print(':'); Serial.print(time.minute(), DEC); Serial.print(':'); Serial.println(time.second(), DEC); }

Code ESP8266 - Comment créer un planning hebdomadaire

/* * Ce code ESP8266 NodeMCU a été développé par newbiely.fr * Ce code ESP8266 NodeMCU est mis à disposition du public sans aucune restriction. * Pour des instructions complètes et des schémas de câblage, veuillez visiter: * https://newbiely.fr/tutorials/esp8266/esp8266-ds1307-rtc-module */ // Date and time functions using a DS1307 RTC connected via I2C and Wire lib #include <RTClib.h> // UNCHANGABLE PARAMATERS #define SUNDAY 0 #define MONDAY 1 #define TUESDAY 2 #define WEDNESDAY 3 #define THURSDAY 4 #define FRIDAY 5 #define SATURDAY 6 // event on Monday, from 13:50 to 14:10 uint8_t WEEKLY_EVENT_DAY = MONDAY; uint8_t WEEKLY_EVENT_START_HH = 13; // event start time: hour uint8_t WEEKLY_EVENT_START_MM = 50; // event start time: minute uint8_t WEEKLY_EVENT_END_HH = 14; // event end time: hour uint8_t WEEKLY_EVENT_END_MM = 10; // event end time: minute RTC_DS1307 rtc; char daysOfTheWeek[7][12] = { "Sunday", "Monday", "Tuesday", "Wednesday", "Thursday", "Friday", "Saturday" }; void setup () { Serial.begin(9600); // SETUP RTC MODULE if (! rtc.begin()) { Serial.println("Couldn't find RTC"); while (1); } // sets the RTC to the date & time on PC this sketch was compiled rtc.adjust(DateTime(F(__DATE__), F(__TIME__))); // sets the RTC with an explicit date & time, for example to set // January 21, 2021 at 3am you would call: // rtc.adjust(DateTime(2021, 1, 21, 3, 0, 0)); } void loop () { DateTime now = rtc.now(); if (now.dayOfTheWeek() == WEEKLY_EVENT_DAY && now.hour() >= WEEKLY_EVENT_START_HH && now.minute() >= WEEKLY_EVENT_START_MM && now.hour() < WEEKLY_EVENT_END_HH && now.minute() < WEEKLY_EVENT_END_MM) { Serial.println("It is on scheduled time"); // TODO: write your code" } else { Serial.println("It is NOT on scheduled time"); } printTime(now); } void printTime(DateTime time) { Serial.print("TIME: "); Serial.print(time.year(), DEC); Serial.print('/'); Serial.print(time.month(), DEC); Serial.print('/'); Serial.print(time.day(), DEC); Serial.print(" ("); Serial.print(daysOfTheWeek[time.dayOfTheWeek()]); Serial.print(") "); Serial.print(time.hour(), DEC); Serial.print(':'); Serial.print(time.minute(), DEC); Serial.print(':'); Serial.println(time.second(), DEC); }

Code ESP8266 - Comment créer un planning à une date spécifique

/* * Ce code ESP8266 NodeMCU a été développé par newbiely.fr * Ce code ESP8266 NodeMCU est mis à disposition du public sans aucune restriction. * Pour des instructions complètes et des schémas de câblage, veuillez visiter: * https://newbiely.fr/tutorials/esp8266/esp8266-ds1307-rtc-module */ // Date and time functions using a DS1307 RTC connected via I2C and Wire lib #include <RTClib.h> // UNCHANGABLE PARAMATERS #define SUNDAY 0 #define MONDAY 1 #define TUESDAY 2 #define WEDNESDAY 3 #define THURSDAY 4 #define FRIDAY 5 #define SATURDAY 6 #define JANUARY 1 #define FEBRUARY 2 #define MARCH 3 #define APRIL 4 #define MAY 5 #define JUNE 6 #define JULY 7 #define AUGUST 8 #define SEPTEMBER 9 #define OCTOBER 10 #define NOVEMBER 11 #define DECEMBER 12 // event from 13:50 August 15, 2021 to 14:10 September 29, 2021 DateTime EVENT_START(2021, AUGUST, 15, 13, 50); DateTime EVENT_END(2021, SEPTEMBER, 29, 14, 10); RTC_DS1307 rtc; char daysOfTheWeek[7][12] = { "Sunday", "Monday", "Tuesday", "Wednesday", "Thursday", "Friday", "Saturday" }; void setup () { Serial.begin(9600); // SETUP RTC MODULE if (! rtc.begin()) { Serial.println("Couldn't find RTC"); Serial.flush(); while (1); } // sets the RTC to the date & time on PC this sketch was compiled rtc.adjust(DateTime(F(__DATE__), F(__TIME__))); // sets the RTC with an explicit date & time, for example to set // January 21, 2021 at 3am you would call: // rtc.adjust(DateTime(2021, 1, 21, 3, 0, 0)); } void loop () { DateTime now = rtc.now(); if (now.secondstime() >= EVENT_START.secondstime() && now.secondstime() < EVENT_END.secondstime()) { Serial.println("It is on scheduled time"); // TODO: write your code" } else { Serial.println("It is NOT on scheduled time"); } printTime(now); } void printTime(DateTime time) { Serial.print("TIME: "); Serial.print(time.year(), DEC); Serial.print('/'); Serial.print(time.month(), DEC); Serial.print('/'); Serial.print(time.day(), DEC); Serial.print(" ("); Serial.print(daysOfTheWeek[time.dayOfTheWeek()]); Serial.print(") "); Serial.print(time.hour(), DEC); Serial.print(':'); Serial.print(time.minute(), DEC); Serial.print(':'); Serial.println(time.second(), DEC); }

Vidéo

※ OUR MESSAGES

  • Please feel free to share the link of this tutorial. However, Please do not use our content on any other websites. We invested a lot of effort and time to create the content, please respect our work!