Ce tutoriel vous explique comment transformer un ESP8266 en un serveur web capable de gérer plusieurs pages simultanément, telles que index.html, temperature.html, led.html, error_404.html et error_405.html...
En suivant ce tutoriel, vous pourrez transformer votre ESP8266 en un serveur web avec quelques fonctionnalités intéressantes :
Plusieurs pages Web sont actives simultanément.
Le contenu HTML (y compris HTML, CSS et Javascript) de chaque page est conservé séparément dans son propre fichier sur l'IDE Arduino.
Le contenu HTML peut être mis à jour dynamiquement avec des valeurs en temps réel provenant de capteurs, rendant les pages Web dynamiques et réactives.
Le serveur Web permet de contrôler quelque chose connecté à l'ESP8266 via le web.
Le serveur Web gère les codes d'erreur HTTP tels que 404 Non Trouvé et 405 Méthode Non Autorisée
Cela peut sembler compliqué, mais ne vous inquiétez pas ! Ce tutoriel fournit des instructions étape par étape, et le code est conçu pour être accessible aux débutants, vous assurant ainsi de pouvoir facilement comprendre et créer votre propre serveur web ESP8266.
Divulgation : Certains des liens fournis dans cette section sont des liens affiliés Amazon. Nous pouvons recevoir une commission pour tout achat effectué via ces liens, sans coût supplémentaire pour vous. Nous vous remercions de votre soutien.
À propos de ESP8266 et du serveur Web
Si vous n'êtes pas familier avec l'ESP8266 et le serveur Web (y compris le brochage, son fonctionnement et la programmation), vous pouvez en apprendre davantage à leur sujet grâce aux tutoriels suivants :
Voici le code ESP8266 complet qui crée un serveur web avec plusieurs pages. Pour simplifier, le contenu HTML de chaque page est très simple et intégré directement dans le code ESP8266. Dans une autre partie, nous apprendrons à séparer le contenu HTML de chaque page dans des fichiers distincts, rendant le code plus organisé et gérable.
/* * Ce code ESP8266 NodeMCU a été développé par newbiely.fr * Ce code ESP8266 NodeMCU est mis à disposition du public sans aucune restriction. * Pour des instructions complètes et des schémas de câblage, veuillez visiter: * https://newbiely.fr/tutorials/esp8266/esp8266-web-server-multiple-pages*/#include <ESP8266WiFi.h>#include <ESP8266WebServer.h>#define LED_PIN D5 // The ESP8266 pin D5 connected to LEDconstchar *ssid = "YOUR_WIFI_SSID"; // CHANGE ITconstchar *password = "YOUR_WIFI_PASSWORD"; // CHANGE ITESP8266WebServer server(80); // Web server on port 80int LED_state = LOW;floatgetTemperature() {// YOUR SENSOR IMPLEMENTATION HERE// simulate the temperature valuefloat temp_x100 = random(0, 10000); // a ramdom value from 0 to 10000return temp_x100 / 100; // return the simulated temperature value from 0 to 100 in float}voidsetup() {Serial.begin(9600);pinMode(LED_PIN, OUTPUT);// Connect to Wi-FiWiFi.begin(ssid, password);while (WiFi.status() != WL_CONNECTED) {delay(1000);Serial.println("Connecting to WiFi..."); }Serial.println("Connected to WiFi");// Print the ESP8266's IP address Serial.print("ESP8266 Web Server's IP address: "); Serial.println(WiFi.localIP());// Serve the specified HTML pages server.on("/", HTTP_GET, []() {Serial.println("Web Server: home page"); server.send(200, "text/html", "This is the ESP8266 home page"); }); server.on("/temperature.html", HTTP_GET, []() {Serial.println("Web Server: temperature page");float temperature = getTemperature(); server.send(200, "text/html", "Temperature: " + String(temperature)); }); server.on("/led.html", HTTP_GET, []() {Serial.print("Web Server: LED page");// Check for the 'state' parameter in the query stringif (server.arg("state")) {String state = server.arg("state");if (state == "on") { LED_state = HIGH; } elseif (state == "off") { LED_state = LOW; }// control LED heredigitalWrite(LED_PIN, LED_state);Serial.print(" => turning LED to ");Serial.print(state); }Serial.println(); server.send(200, "text/html", "LED state: " + String(LED_state)); });// 404 and 405 error handler server.onNotFound([]() {if (server.method() == HTTP_GET) {// Handle 404 Not Found errorSerial.println("Web Server: Not Found"); server.send(404, "text/html", "Not Found"); } else {// Handle 405 Method Not Allowed errorSerial.println("Web Server: Method Not Allowed"); server.send(405, "text/html", "Method Not Allowed"); } }); server.begin();Serial.println("ESP8266 Web server started");}voidloop() {// Handle client requests server.handleClient();// Your code can go here or be empty; the server is handled asynchronously}
Étapes rapides
Pour commencer avec l'ESP8266 sur Arduino IDE, suivez ces étapes :
Veuillez noter que vous devez changer le 192.168.0.5 par l'adresse IP que vous avez obtenue sur le moniteur série.
Vous verrez les pages suivantes : page d'accueil, page de LED, page de température, et page Non Trouvée.
Vous pouvez également vérifier la sortie sur le moniteur série.
Newbiely | Arduino IDE 2.3.8
──
☐
✕
File
Edit
Sketch
Tools
Help
Nodemcu 1.0 (ESP-12E Module)
Newbiely.ino
···
8Serial.println("Hello World!");
Output
Serial Monitor
Message (Enter to send message to 'Nodemcu 1.0 (ESP-12E Module)' on 'COM15')
New Line
9600 baud
Connecting to WiFi...
Connected to WiFi
ESP8266 Web Server's IP address: 192.168.0.5
ESP8266 Web server started
Web Server: home page
Web Server: LED page
Web Server: LED page => turning LED to on
Web Server: LED page => turning LED to off
Web Server: temperature page
Web Server: Not Found
Ln 11, Col 1
Nodemcu 1.0 (ESP-12E Module) on COM15
2
Le code précédent possède un contenu HTML très simple pour chaque page. Cependant, si nous souhaitons créer une interface sophistiquée avec beaucoup de HTML, le code peut devenir volumineux et désordonné. Pour simplifier, nous allons apprendre à séparer le HTML du code ESP8266. Cela nous permet de conserver le HTML dans des fichiers séparés, rendant ainsi la gestion et le travail plus faciles.
Code ESP8266 - Serveur Web complet à pages multiples
Ouvrez l'IDE Arduino.
Créez un nouveau sketch et nommez-le, par exemple, ESP8266WebServer.ino.
Copiez le code fourni et collez-le dans ce fichier.
/* * Ce code ESP8266 NodeMCU a été développé par newbiely.fr * Ce code ESP8266 NodeMCU est mis à disposition du public sans aucune restriction. * Pour des instructions complètes et des schémas de câblage, veuillez visiter: * https://newbiely.fr/tutorials/esp8266/esp8266-web-server-multiple-pages*/#include <ESP8266WiFi.h>#include <ESP8266WebServer.h>#include"index.h"#include"temperature.h"#include"led.h"#include"error_404.h"#include"error_405.h"#define LED_PIN D6 // The ESP8266 pin connected to LEDconstchar *ssid = "YOUR_WIFI_SSID"; // CHANGE ITconstchar *password = "YOUR_WIFI_PASSWORD"; // CHANGE ITESP8266WebServer server(80); // Web server on port 80int LED_state = LOW;floatgetTemperature() {// YOUR SENSOR IMPLEMENTATION HERE// simulate the temperature valuefloat temp_x100 = random(0, 10000); // a ramdom value from 0 to 10000return temp_x100 / 100; // return the simulated temperature value from 0 to 100 in float}voidsetup() {Serial.begin(9600);pinMode(LED_PIN, OUTPUT);// Connect to Wi-FiWiFi.begin(ssid, password);while (WiFi.status() != WL_CONNECTED) {delay(1000);Serial.println("Connecting to WiFi..."); }Serial.println("Connected to WiFi");// Print the ESP8266's IP address Serial.print("ESP8266 Web Server's IP address: "); Serial.println(WiFi.localIP());// Serve the specified HTML pages server.on("/", HTTP_GET, []() {Serial.println("Web Server: home page");String html = HTML_CONTENT_HOME; // Use the HTML content from the index.h file server.send(200, "text/html", html); }); server.on("/temperature.html", HTTP_GET, []() {Serial.println("Web Server: temperature page");String html = HTML_CONTENT_TEMPERATURE; // Use the HTML content from the temperature.h filefloat temperature = getTemperature(); html.replace("%TEMPERATURE_VALUE%", String(temperature)); // update the temperature value server.send(200, "text/html", html); }); server.on("/led.html", HTTP_GET, []() {Serial.print("Web Server: LED page");// Check for the 'state' parameter in the query stringif (server.arg("state")) {String state = server.arg("state");if (state == "on") { LED_state = HIGH; } elseif (state == "off") { LED_state = LOW; }// control LED heredigitalWrite(LED_PIN, LED_state);Serial.print(" => turning LED to ");Serial.print(state); }Serial.println();String html = HTML_CONTENT_LED; // Use the HTML content from the led.h file html.replace("%LED_STATE%", LED_state ? "ON" : "OFF"); // update the LED state server.send(200, "text/html", html); });// 404 and 405 error handler server.onNotFound([]() {if (server.method() == HTTP_GET) {// Handle 404 Not Found errorSerial.println("Web Server: Not Found");String html = HTML_CONTENT_404; // Use the HTML content from the error_404.h file server.send(404, "text/html", html); } else {// Handle 405 Method Not Allowed errorSerial.println("Web Server: Method Not Allowed");String html = HTML_CONTENT_405; // Use the HTML content from the error_405.h file server.send(405, "text/html", html); } }); server.begin();Serial.println("ESP8266 Web server started");}voidloop() {// Handle client requests server.handleClient();// Your code can go here or be empty; the server is handled asynchronously}
Modifiez les informations WiFi (SSID et mot de passe) dans le code pour les vôtres.
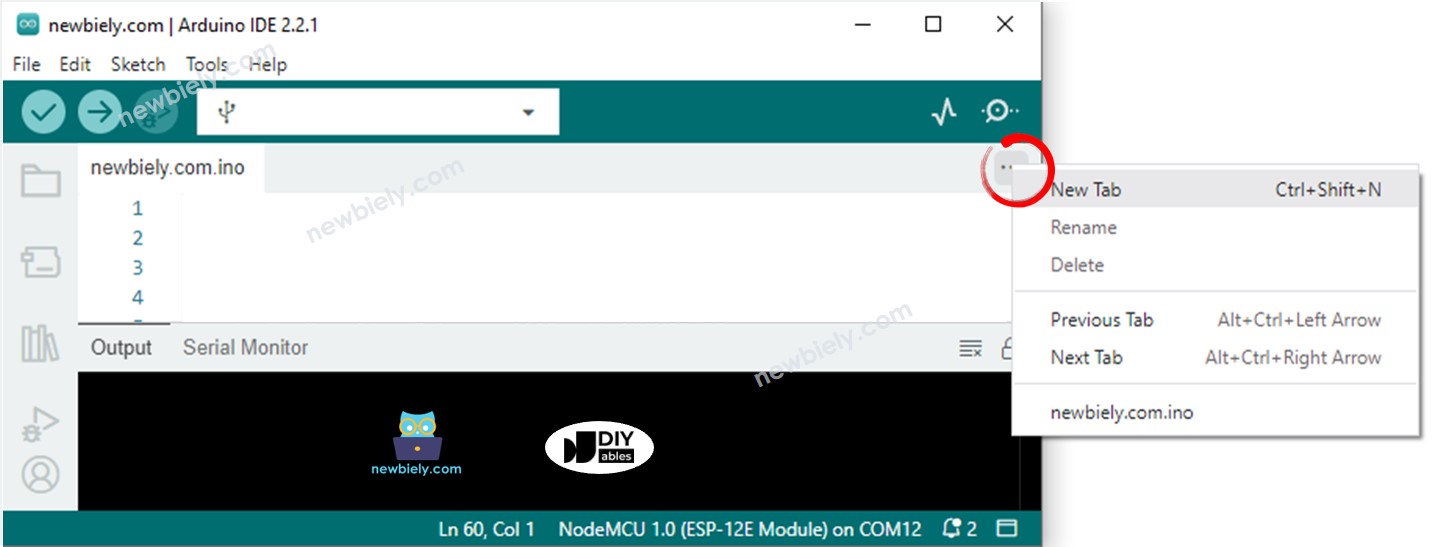
Créez le fichier index.h sur Arduino IDE en :
Cliquant soit sur le bouton juste en dessous de l'icône du moniteur série et choisissez Nouvel Onglet, soit en utilisant les touches Ctrl+Shift+N.
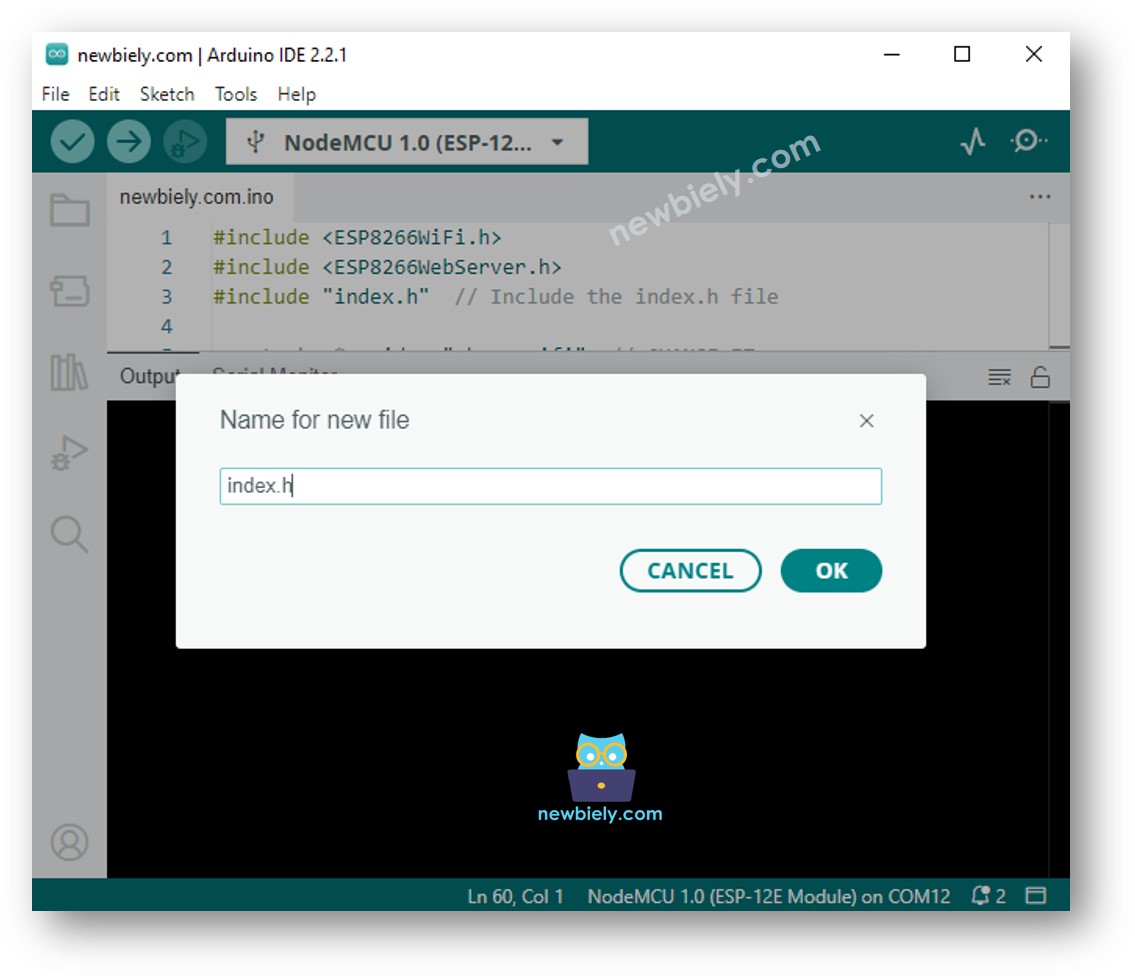
Nommez le fichier index.h et cliquez sur le bouton OK.
Copiez le code ci-dessous et collez-le dans le fichier index.h.
/* * Ce code ESP8266 NodeMCU a été développé par newbiely.fr * Ce code ESP8266 NodeMCU est mis à disposition du public sans aucune restriction. * Pour des instructions complètes et des schémas de câblage, veuillez visiter: * https://newbiely.fr/tutorials/esp8266/esp8266-web-server-multiple-pages*/constchar *HTML_CONTENT_HOME = R"=====(<!DOCTYPE html><html lang="en"><head> <meta charset="UTF-8"> <meta name="viewport" content="width=device-width, initial-scale=1.0"> <link rel="icon" href="data:,"> <title>Home Page</title></head><body> <h1>Welcome to the Home Page</h1> <ul> <li><a href="/led.html">LED Page</a></li> <li><a href="/temperature.html">Temperature Page</a></li> </ul></body></html>)=====";
De même, créez le fichier led.h sur Arduino IDE avec le contenu suivant.
/* * Ce code ESP8266 NodeMCU a été développé par newbiely.fr * Ce code ESP8266 NodeMCU est mis à disposition du public sans aucune restriction. * Pour des instructions complètes et des schémas de câblage, veuillez visiter: * https://newbiely.fr/tutorials/esp8266/esp8266-web-server-multiple-pages*/constchar *HTML_CONTENT_LED = R"=====(<!DOCTYPE html><html lang="en"><head> <meta charset="UTF-8"> <meta name="viewport" content="width=device-width, initial-scale=1.0"> <link rel="icon" href="data:,"> <title>LED Page</title></head><body> <h1>LED Page</h1> <p>LED State: <span style="color: red;">%LED_STATE%</span></p> <a href='/led.html?state=on'>Turn ON</a> <br><br> <a href='/led.html?state=off'>Turn OFF</a></body></html>)=====";
De même, créez le fichier temperature.h sur l'IDE Arduino avec le contenu suivant.
/* * Ce code ESP8266 NodeMCU a été développé par newbiely.fr * Ce code ESP8266 NodeMCU est mis à disposition du public sans aucune restriction. * Pour des instructions complètes et des schémas de câblage, veuillez visiter: * https://newbiely.fr/tutorials/esp8266/esp8266-web-server-multiple-pages*/constchar *HTML_CONTENT_TEMPERATURE = R"=====(<!DOCTYPE html><html><head><title>ESP8266 - Web Temperature</title><meta name="viewport" content="width=device-width, initial-scale=0.7, maximum-scale=0.7"><meta charset="utf-8"><link rel="icon" href="https://diyables.io/images/page/diyables.svg"><style>body { font-family: "Georgia"; text-align: center; font-size: width/2pt;}h1 { font-weight: bold; font-size: width/2pt;}h2 { font-weight: bold; font-size: width/2pt;}button { font-weight: bold; font-size: width/2pt;}</style><script>var cvs_width = 200, cvs_height = 450;function init() { var canvas = document.getElementById("cvs"); canvas.width = cvs_width; canvas.height = cvs_height + 50; var ctx = canvas.getContext("2d"); ctx.translate(cvs_width/2, cvs_height - 80); update_view(%TEMPERATURE_VALUE%);}function update_view(temp) { var canvas = document.getElementById("cvs"); var ctx = canvas.getContext("2d"); var radius = 70; var offset = 5; var width = 45; var height = 330; ctx.clearRect(-cvs_width/2, -350, cvs_width, cvs_height); ctx.strokeStyle="blue"; ctx.fillStyle="blue";//5-step Degree var x = -width/2; ctx.lineWidth=2;for (var i = 0; i <= 100; i+=5) { var y = -(height - radius)*i/100 - radius - 5; ctx.beginPath(); ctx.lineTo(x, y); ctx.lineTo(x - 20, y); ctx.stroke(); }//20-step Degree ctx.lineWidth=5;for (var i = 0; i <= 100; i+=20) { var y = -(height - radius)*i/100 - radius - 5; ctx.beginPath(); ctx.lineTo(x, y); ctx.lineTo(x - 25, y); ctx.stroke(); ctx.font="20px Georgia"; ctx.textBaseline="middle"; ctx.textAlign="right"; ctx.fillText(i.toString(), x - 35, y); }// shape ctx.lineWidth=16; ctx.beginPath(); ctx.arc(0, 0, radius, 0, 2 * Math.PI); ctx.stroke(); ctx.beginPath(); ctx.rect(-width/2, -height, width, height); ctx.stroke(); ctx.beginPath(); ctx.arc(0, -height, width/2, 0, 2 * Math.PI); ctx.stroke(); ctx.fillStyle="#e6e6ff"; ctx.beginPath(); ctx.arc(0, 0, radius, 0, 2 * Math.PI); ctx.fill(); ctx.beginPath(); ctx.rect(-width/2, -height, width, height); ctx.fill(); ctx.beginPath(); ctx.arc(0, -height, width/2, 0, 2 * Math.PI); ctx.fill(); ctx.fillStyle="#ff1a1a"; ctx.beginPath(); ctx.arc(0, 0, radius - offset, 0, 2 * Math.PI); ctx.fill(); temp = Math.round(temp * 100) / 100; var y = (height - radius)*temp/100.0 + radius + 5; ctx.beginPath(); ctx.rect(-width/2 + offset, -y, width - 2*offset, y); ctx.fill(); ctx.fillStyle="red"; ctx.font="bold 34px Georgia"; ctx.textBaseline="middle"; ctx.textAlign="center"; ctx.fillText(temp.toString() + "°C", 0, 100);}window.onload = init;</script></head><body><h1>ESP8266 - Web Temperature</h1><canvas id="cvs"></canvas></body></html>)=====";
De même, créez le fichier error_404.h sur Arduino IDE avec le contenu suivant.
/* * Ce code ESP8266 NodeMCU a été développé par newbiely.fr * Ce code ESP8266 NodeMCU est mis à disposition du public sans aucune restriction. * Pour des instructions complètes et des schémas de câblage, veuillez visiter: * https://newbiely.fr/tutorials/esp8266/esp8266-web-server-multiple-pages*/constchar *HTML_CONTENT_404 = R"=====(<!DOCTYPE html><html lang="en"><head> <meta charset="UTF-8"> <meta name="viewport" content="width=device-width, initial-scale=1.0"> <link rel="icon" href="data:,"> <title>404 - Page Not Found</title> <style> h1 {color: #ff4040;} </style></head><body> <h1>404</h1> <p>Oops! The page you are looking for could not be found on Esp32 Web Server.</p> <p>Please check the URL or go back to the <a href="/">homepage</a>.</p> <p>Or check <a href="https://esp32io.com/tutorials/esp32-web-server-multiple-pages"> Esp32 Web Server</a> tutorial.</p></body></html>)=====";
De même, créez le fichier error_405.h sur Arduino IDE avec le contenu suivant.
/* * Ce code ESP8266 NodeMCU a été développé par newbiely.fr * Ce code ESP8266 NodeMCU est mis à disposition du public sans aucune restriction. * Pour des instructions complètes et des schémas de câblage, veuillez visiter: * https://newbiely.fr/tutorials/esp8266/esp8266-web-server-multiple-pages*/constchar *HTML_CONTENT_405 = R"=====(<!DOCTYPE html><html lang="en"><head> <meta charset="UTF-8"> <meta name="viewport" content="width=device-width, initial-scale=1.0"> <link rel="icon" href="data:,"> <title>405 - Method Not Allowed</title> <style> h1 {color: #ff4040;} </style></head><body> <h1>405 - Method Not Allowed</h1> <p>Oops! The requested method is not allowed for this resource.</p> <p>Please check your request or go back to the <a href="/">homepage</a>.</p> <p>Or check <a href="https://esp32io.com/tutorials/esp32-web-server-multiple-pages"> Esp32 Web Server</a> tutorial.</p></body></html>)=====";
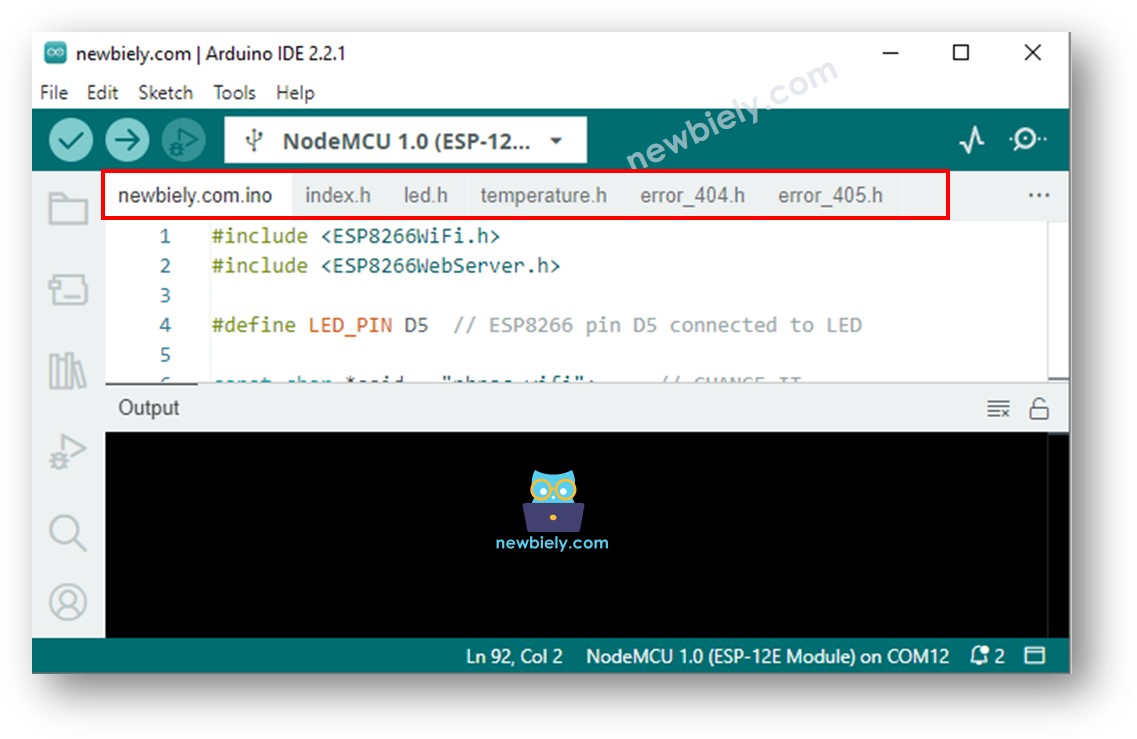
Maintenant, vous avez plusieurs fichiers dans l'IDE Arduino comme ci-dessous :
Cliquez sur le bouton Upload dans l'IDE Arduino pour téléverser le code sur l'ESP8266
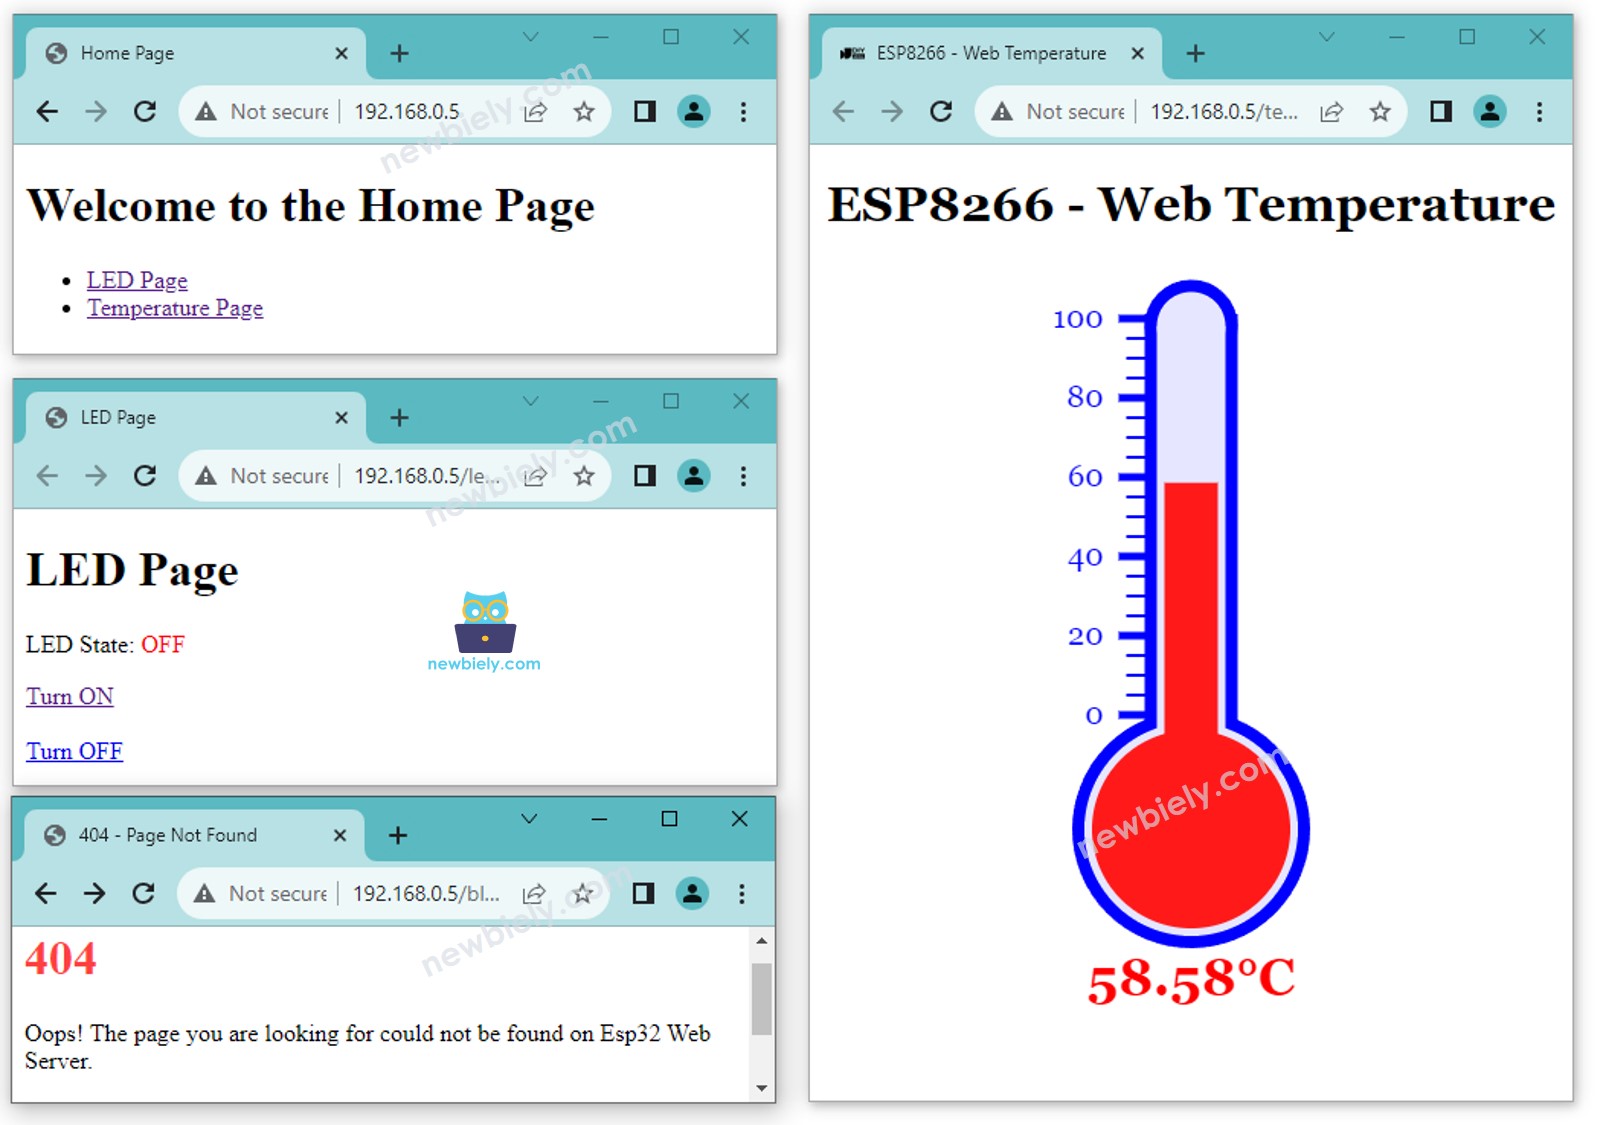
Accédez aux pages web de la carte ESP8266 via un navigateur web une par une comme auparavant. Vous verrez toutes les pages web comme ci-dessous :
N'hésitez pas à partager le lien de ce tutoriel. Cependant, veuillez ne pas utiliser notre contenu sur d'autres sites web. Nous avons investi beaucoup d'efforts et de temps pour créer ce contenu, veuillez respecter notre travail !