Arduino UNO Q - Écran Tactile LCD TFT SPI

Vous voulez ajouter un écran coloré à votre projet Arduino UNO Q avec seulement quelques fils ? Ce guide adapté aux débutants vous montre comment utiliser un écran LCD TFT SPI avec Arduino UNO Q — avec ou sans tactile — étape par étape.

Dans ce tutoriel, vous apprendrez :

Ce guide couvre les écrans LCD TFT SPI tactiles et non tactiles. Il fonctionne avec les écrans de 1,3, 1,54, 2,2, 2,4, 2,8, 3,2 et 3,5 pouces pilotés par les puces contrôleur ILI9341, ILI9488 ou ST7789.
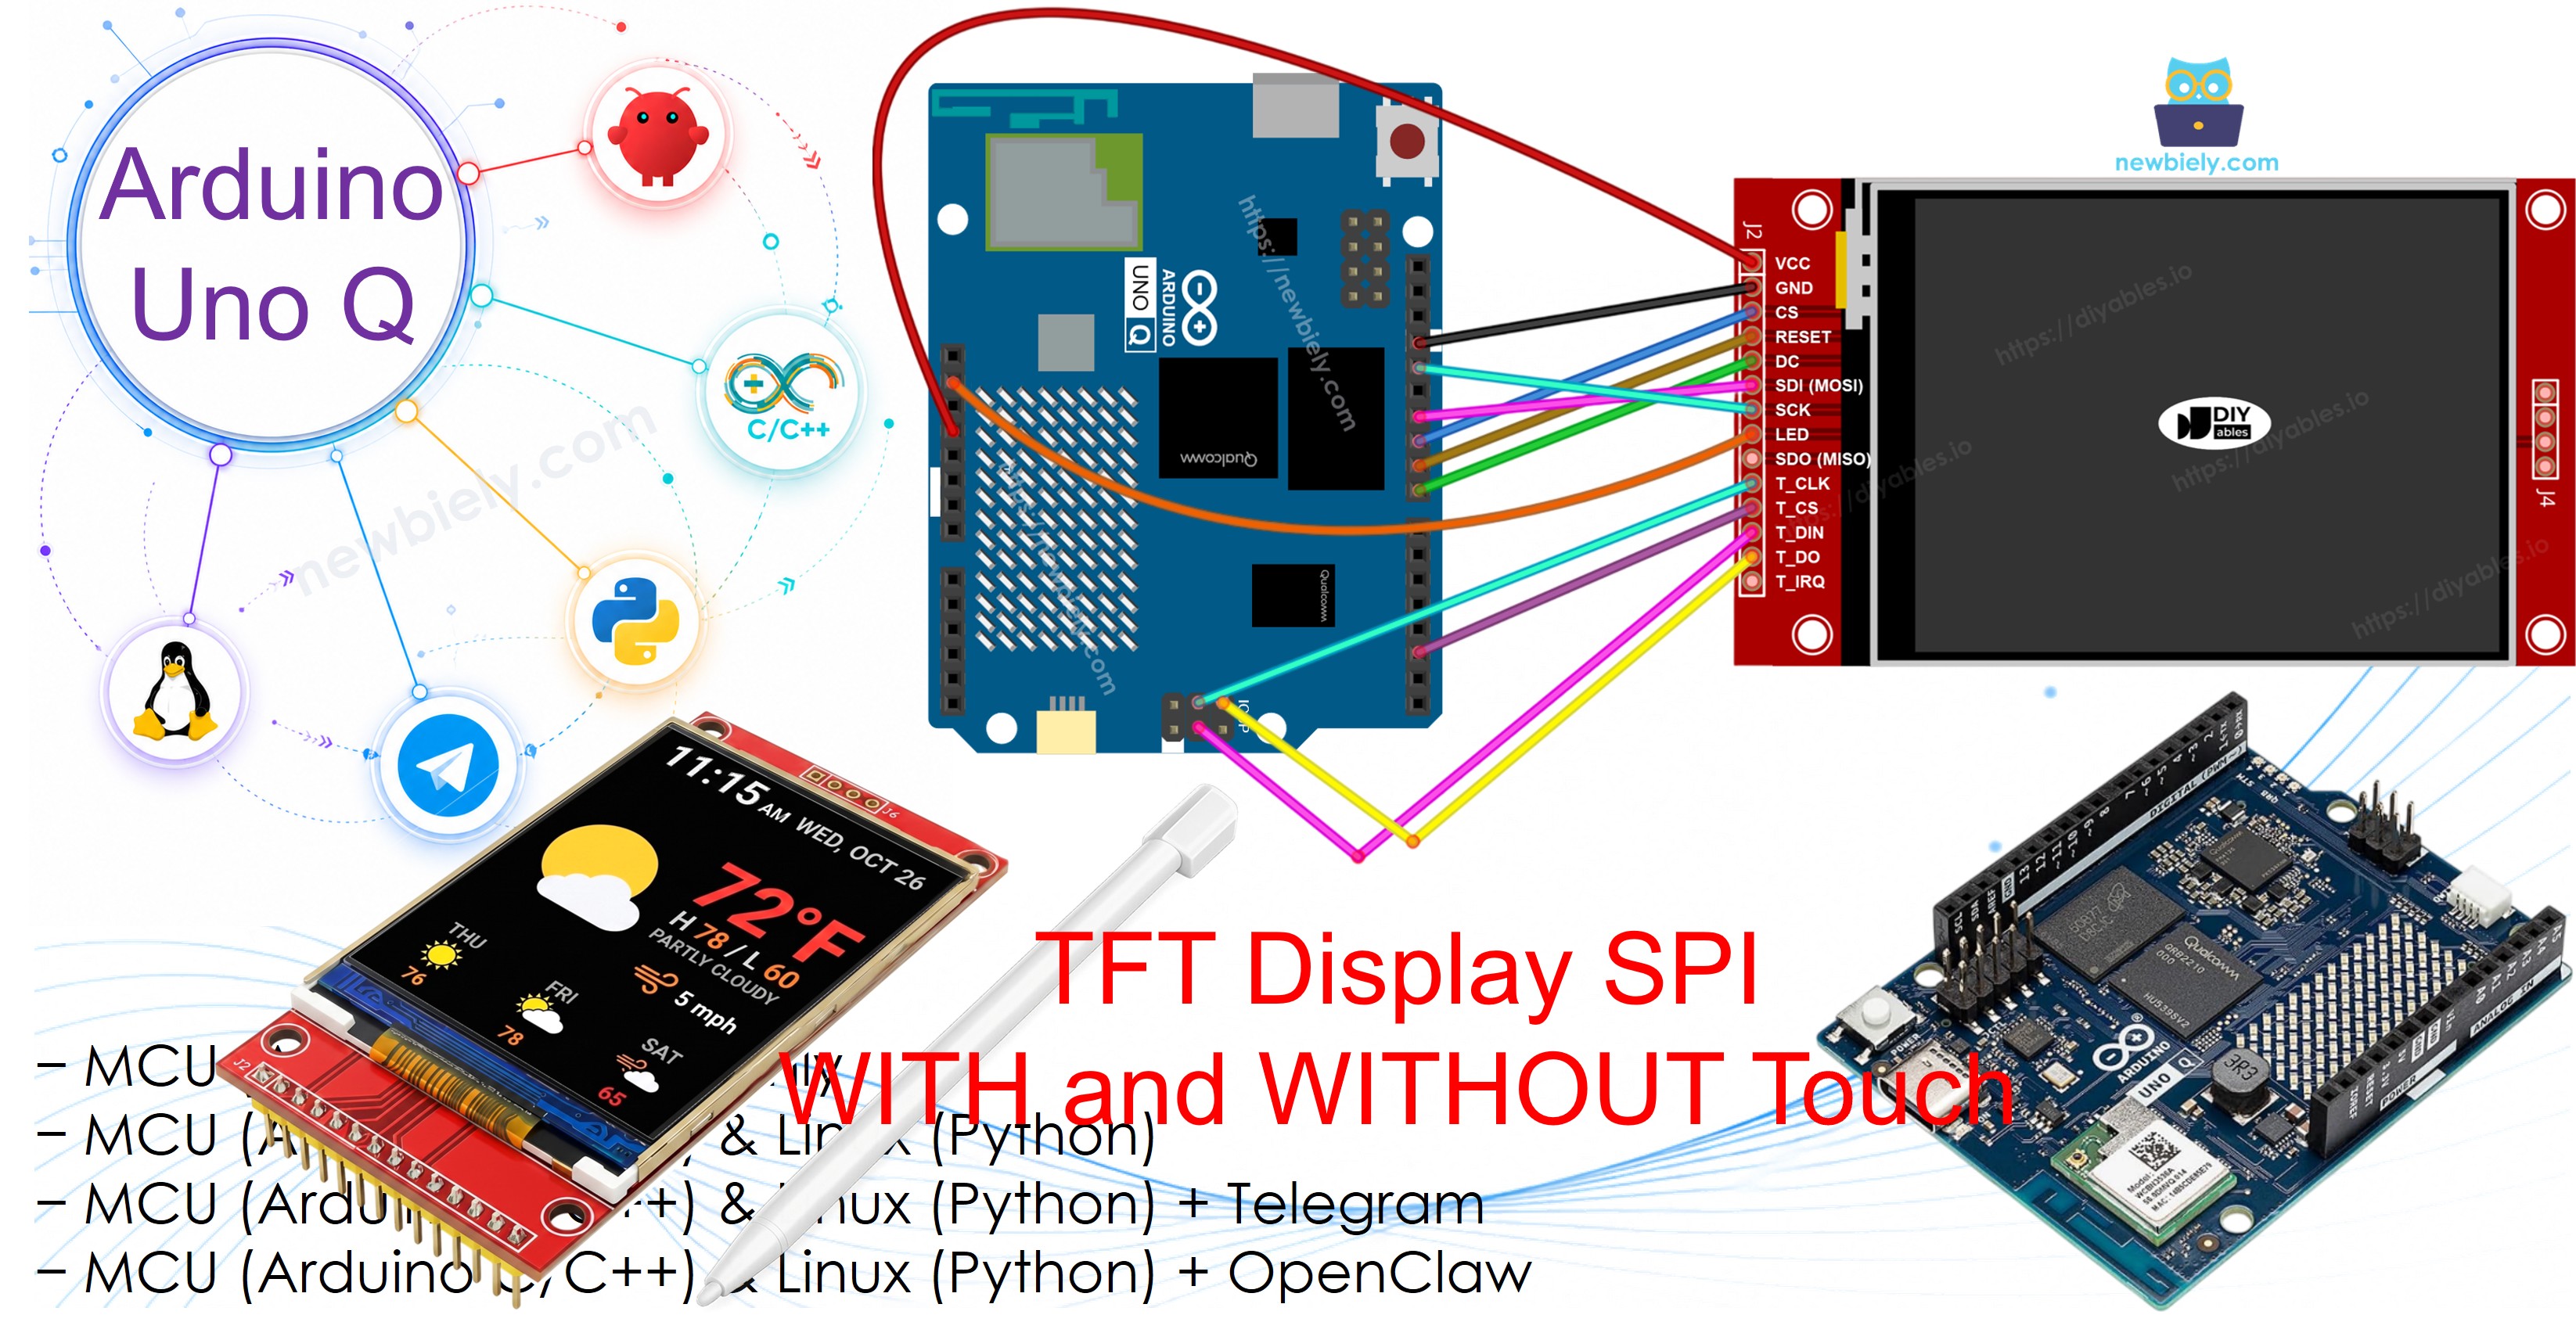
Arduino UNO Q Écran TFT SPI

Astuce — alternative plus simple et plus rapide : Si vous voulez un écran qui ne nécessite aucun câblage, envisagez plutôt le Arduino UNO Q - Écran TFT LCD Tactile. Il se branche directement sur les connecteurs de l'Arduino UNO Q — aucun fil de connexion nécessaire. Il utilise une interface parallèle 8 bits, qui transfère les données de pixels nettement plus vite que le SPI.

Matériel Requis

1×Arduino UNO Q
1×USB Cable for Arduino Uno Q
1×SPI TFT display module
1×Fils de connexion
1×Optionnel: Micro SD Card
1×Recommandé: Shield à bornier à vis pour Arduino Uno
1×Recommandé: Sensors/Servo Expansion Shield for Arduino Uno
1×Recommandé: Shield plaque d'essai pour Arduino Uno
1×Recommandé: Boîtier pour Arduino Uno
1×Recommandé: Kit plaque de base prototypage et plaque d'essai pour Arduino Uno

Ou vous pouvez acheter les kits suivants:

1×Kit de Capteurs DIYables (18 capteurs/écrans)
Divulgation : Certains des liens fournis dans cette section sont des liens affiliés Amazon. Nous pouvons recevoir une commission pour tout achat effectué via ces liens, sans coût supplémentaire pour vous. Nous vous remercions de votre soutien.

Remarque : Contrairement à une carte Arduino 5V, le MCU de l'Arduino UNO Q fonctionne déjà en logique 3,3V, donc aucun convertisseur de niveau 5V vers 3,3V n'est nécessaire pour ce câblage.

À propos de l'Écran LCD TFT SPI

Un écran TFT SPI est un panneau LCD couleur piloté par une puce contrôleur via le bus SPI.

Caractéristiques et fonctionnalités clés :

  • Interface : SPI (4 fils) — seulement quelques fils de signal nécessaires
  • Couleur : Couleur RGB complète, 16 bits ou 18 bits selon la puce de pilotage
  • Tailles prises en charge : écrans de 1,3, 1,54, 2,2, 2,4, 2,8, 3,2 et 3,5 pouces
  • Tactile (optionnel) : contrôleur tactile résistif XPT2046 / HR2046 / ADS7843 sur le même bus SPI
  • Emplacement MicroSD : Présent sur la plupart des modules, également sur le bus SPI partagé
  • Bibliothèque : DIYables_TFT_SPI — une seule bibliothèque pour l'écran et le contrôleur tactile
  • Niveau logique : 3,3V — parfaitement adapté aux broches du MCU de l'Arduino UNO Q

La bibliothèque DIYables_TFT_SPI prend en charge trois puces de pilotage courantes :

  • ILI9341 — couleur RGB565 16 bits, SPI jusqu'à 40 MHz
  • ILI9488 — couleur RGB666 18 bits, SPI jusqu'à 24 MHz
  • ST7789 — couleur RGB565 16 bits, SPI jusqu'à 40 MHz

Recommandation : Si vous n'avez pas encore acheté d'écran, nous recommandons le pilote ST7789. Il est largement disponible, fonctionne à la vitesse SPI maximale de 40 MHz et constitue le choix le plus simple pour les nouveaux projets.

La bibliothèque étend Adafruit GFX, donc toutes les fonctions standard de dessin et de texte sont disponibles.

Brochage

La plupart des écrans LCD TFT SPI ont les broches suivantes :

Broches de l'écran :

Broche Fonction
VCC Alimentation
GND Masse
CS Chip Select — mise à l'état bas pour sélectionner l'écran sur le bus SPI
DC / RS Sélection Données / Commande — haut pour les données de pixels, bas pour les commandes
RST Réinitialisation matérielle — optionnelle ; relier à 3,3V si inutilisée
MOSI / SDI / SDA Entrée de données SPI (du MCU vers l'écran)
SCK / CLK Horloge SPI
MISO / SDO Sortie de données SPI (de l'écran vers le MCU) — optionnelle pour un usage en affichage seul
LED / BL / BLK Alimentation du rétroéclairage — connecter à 3,3V ou à une broche PWM pour la gradation

Broches de la carte SD (si votre application doit accéder à la carte SD) :

Broche Fonction
SD_CS / TF_CS Chip Select de la carte SD
MOSI / SDI MOSI — données du MCU vers la carte SD
SCK / CLK SCK — horloge SPI
MISO / SDO MISO — données de la carte SD vers le MCU

Pour les écrans TFT prenant en charge le tactile, il y a des broches tactiles supplémentaires (si votre application utilise la fonction tactile et que l'écran la prend en charge) :

Broche Fonction
T_CS Chip Select du contrôleur tactile
T_CLK SCK — horloge SPI
T_DIN MOSI — données du MCU vers le contrôleur tactile
T_DO MISO — données du contrôleur tactile vers le MCU
T_IRQ Interruption tactile — optionnelle ; signale quand l'écran est touché

Remarque : Certains modules d'écran non tactiles exposent aussi les broches T_CS, T_CLK, T_DIN, T_DO et T_IRQ. Elles ne sont pas fonctionnelles sur ces cartes — le circuit intégré du contrôleur tactile n'est pas monté. Elles apparaissent parce que le PCB reprend le même tracé que la version tactile pour réduire les variantes de fabrication.
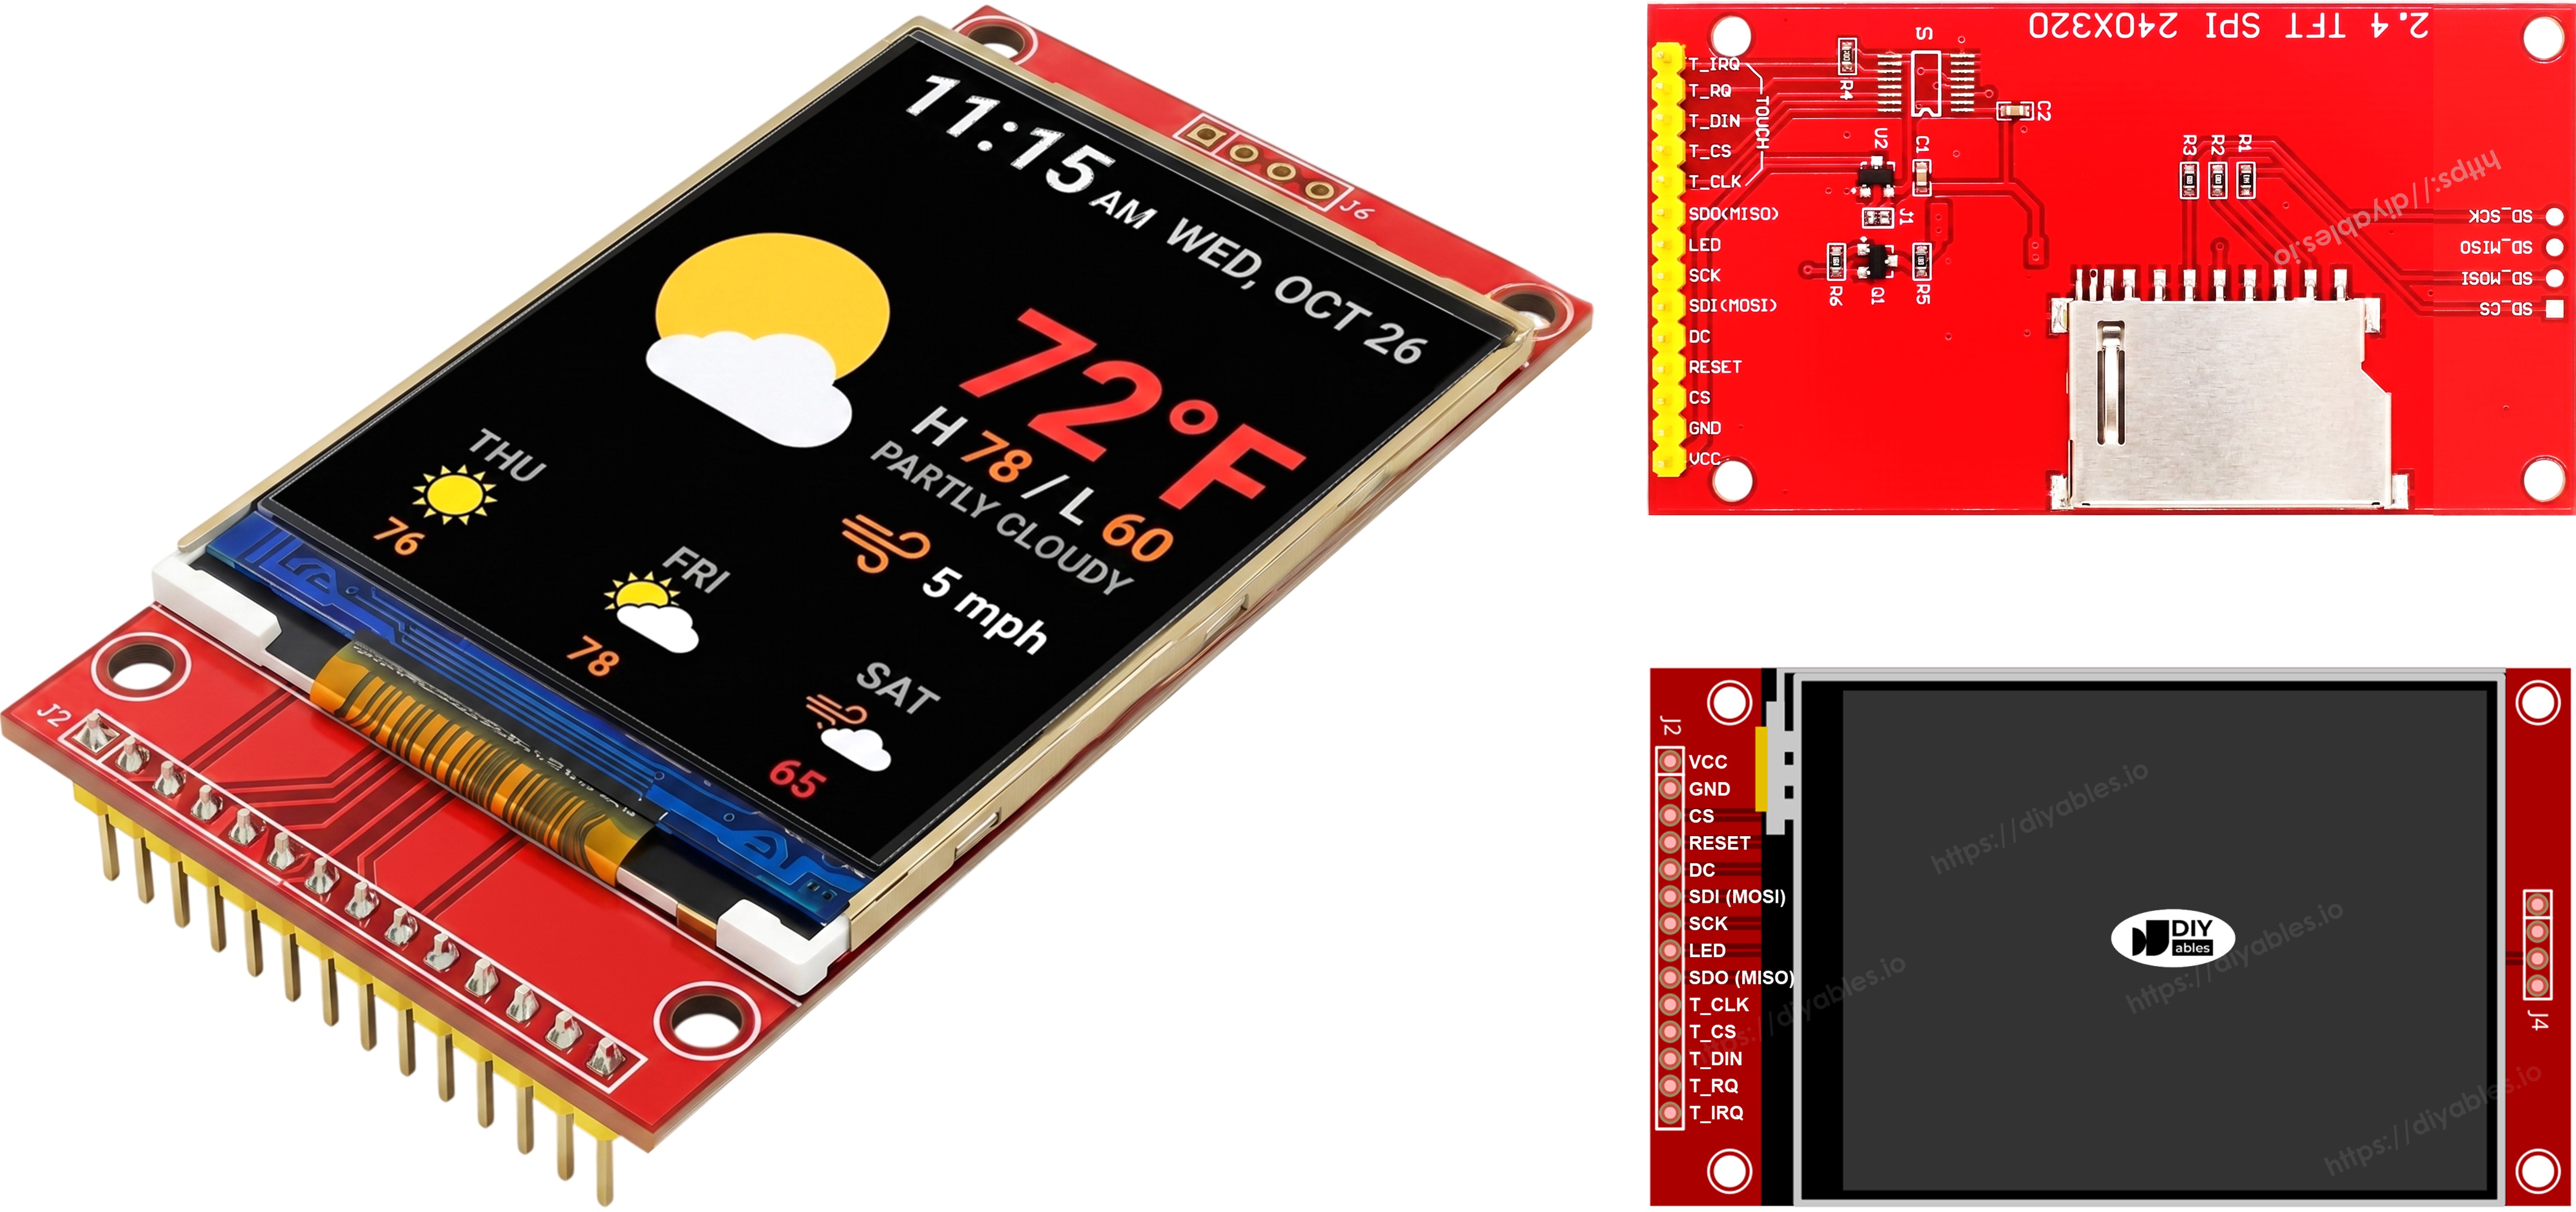
Brochage de l'écran TFT SPI

Schéma de Câblage

Remarque — SDO (MISO) est optionnelle : La ligne SDO (MISO) ne transporte que les données de l'écran vers la carte. Aucun des exemples de code de ce tutoriel ne lit depuis l'écran, donc cette broche peut rester non connectée. Sur les modules où le contrôleur tactile partage le même bus SPI, une ligne SDO connectée peut perturber la communication, il est donc recommandé de la laisser non connectée.

L'écran se connecte aux broches SPI matérielles des connecteurs du MCU de l'Arduino UNO Q.

  • Remarque : Les broches du MCU de l'Arduino UNO Q délivrent une logique 3,3V, ce qui correspond à l'écran TFT SPI — connectez les lignes de signal directement, aucun convertisseur de niveau nécessaire.
  • Remarque : Connectez la broche VCC du TFT à la broche 3,3V de l'Arduino UNO Q, pas au 5V.
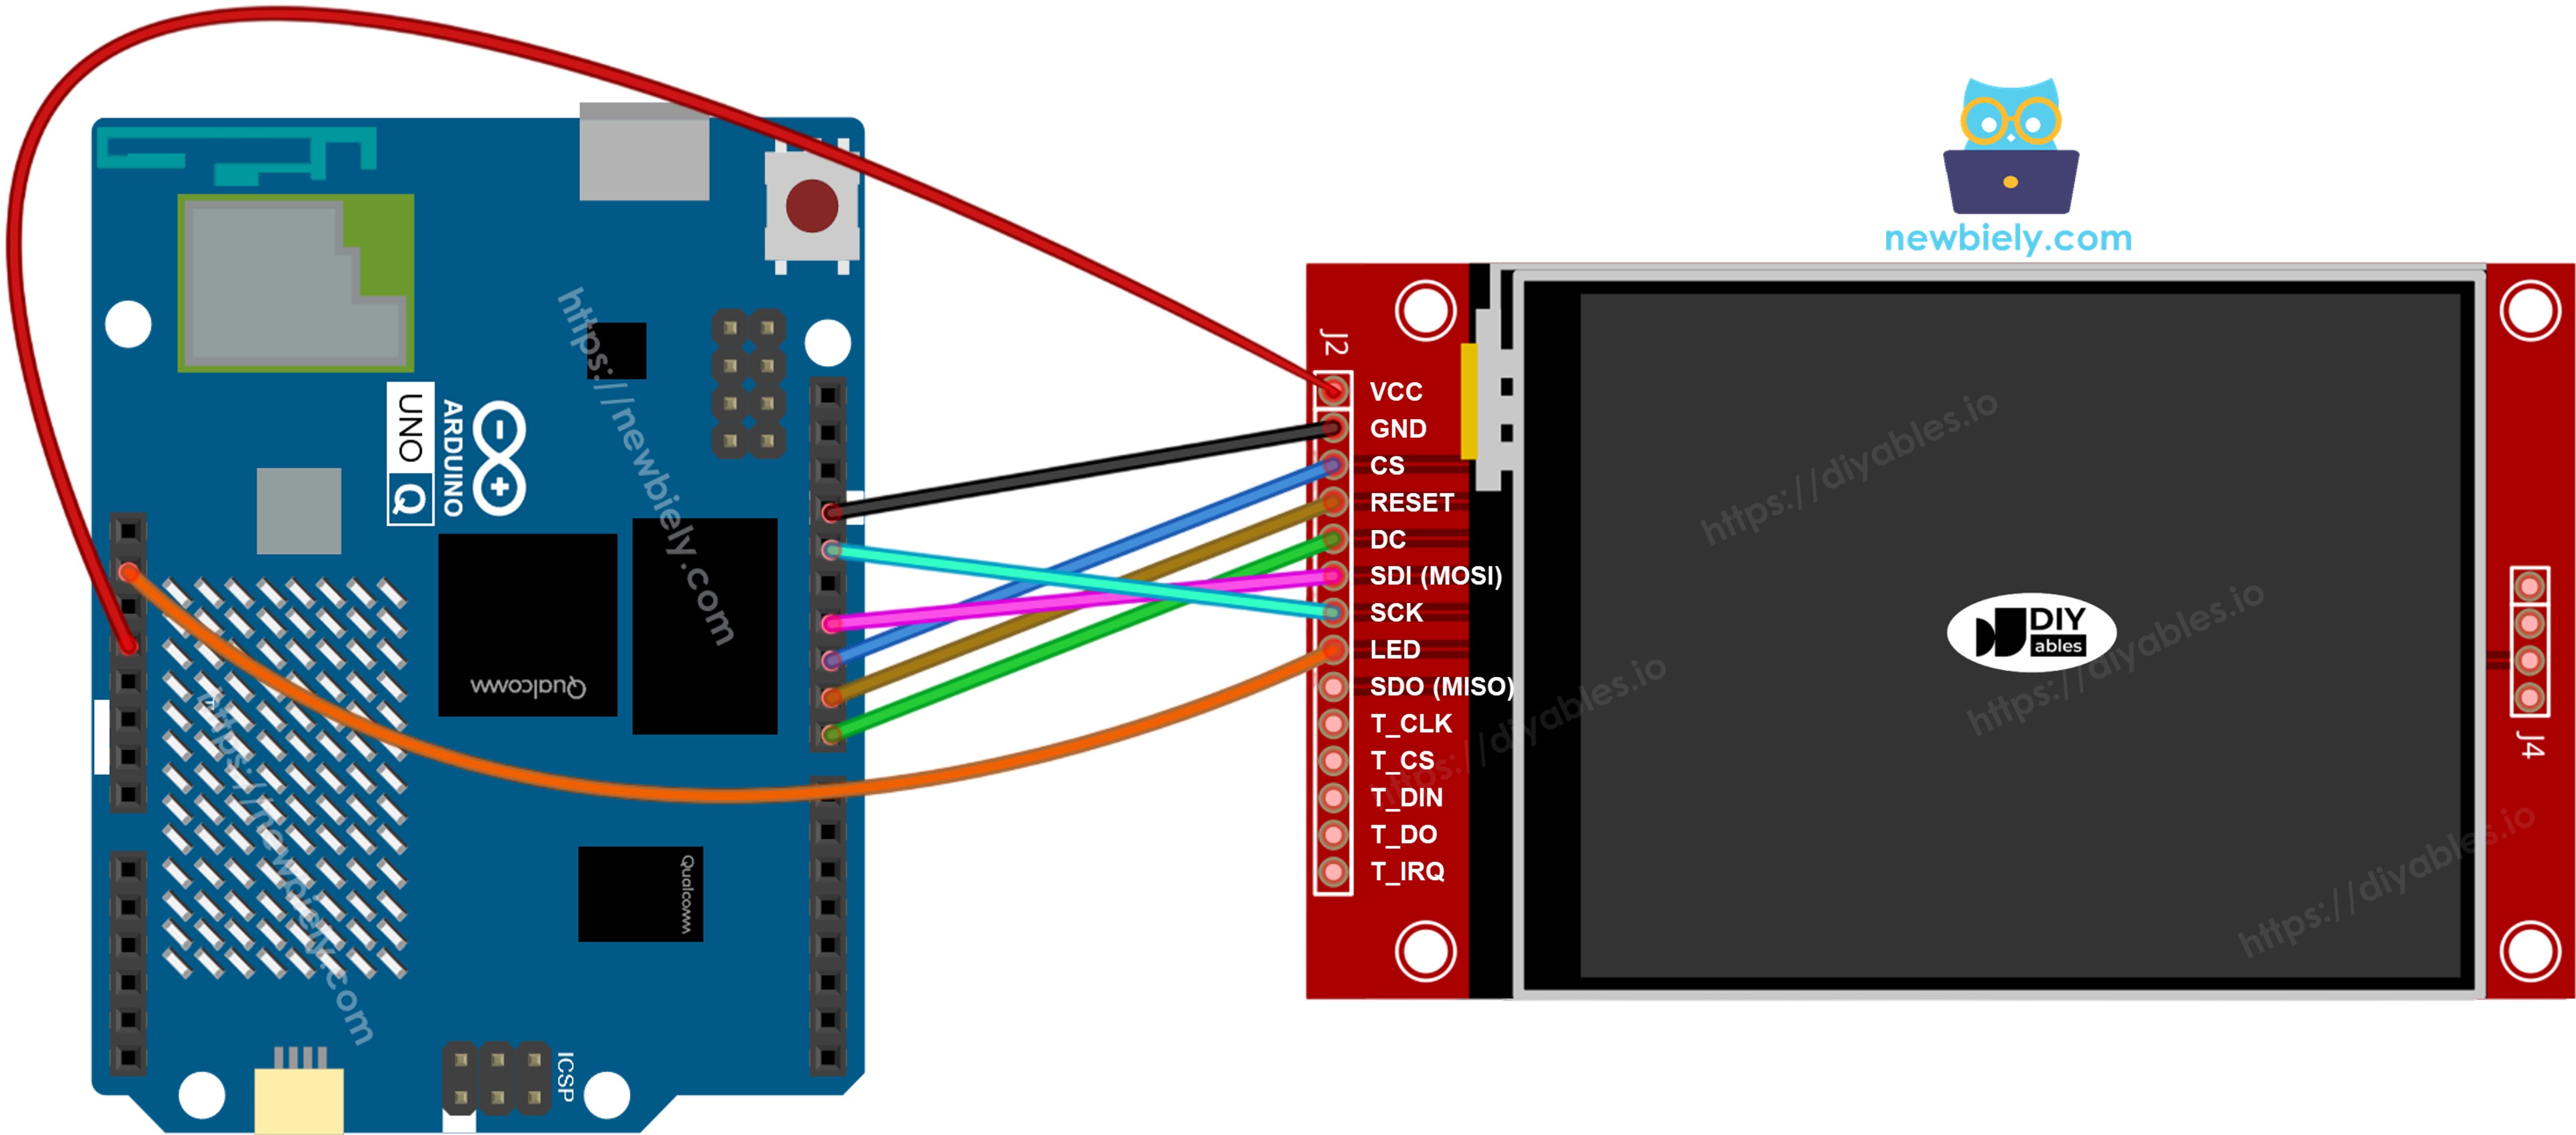
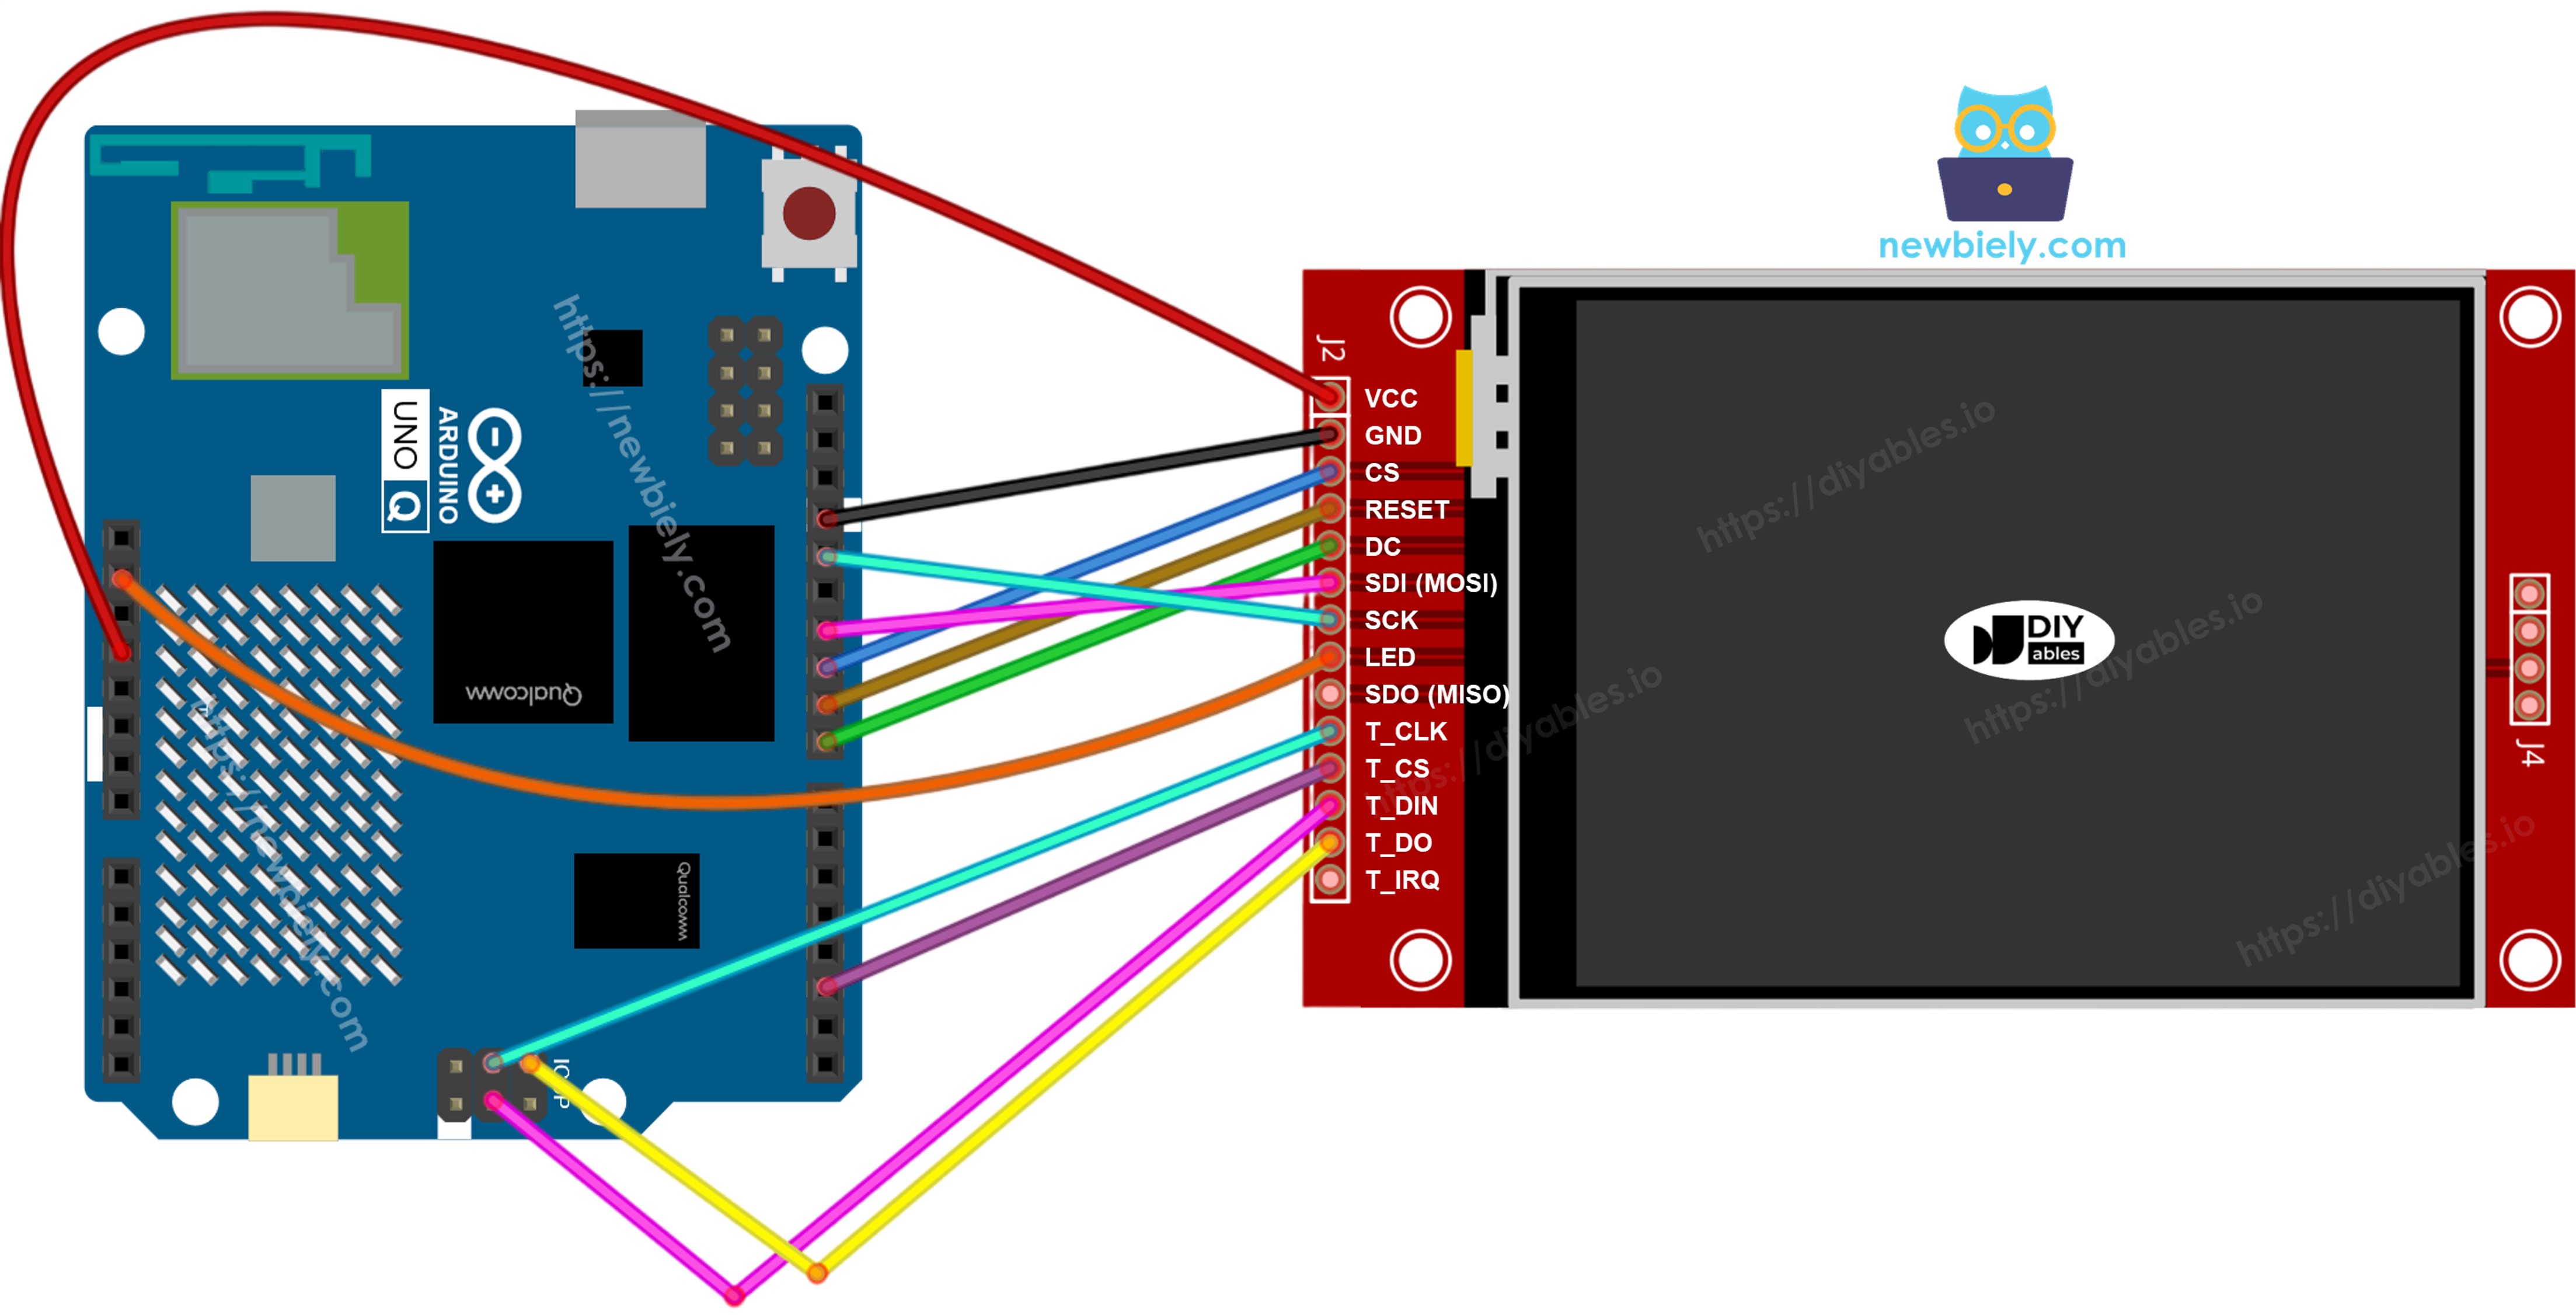
  • Remarque : L'écran, la carte SD et le contrôleur tactile partagent tous MOSI (D11), SCK (D13) et MISO (D12). Chacun a sa propre broche CS, donc un seul est actif à la fois.

Sans Tactile

Connectez MOSI à D11, SCK à D13 et MISO à D12 sur l'Arduino UNO Q. CS, DC et RST peuvent être n'importe quel GPIO disponible — D10, D8, D9 sont utilisés dans les exemples.

Écran :

Broche TFT Broche MCU Arduino UNO Q Description
VCC 3.3V Alimentation
GND GND Masse
CS D10 Chip Select
DC / RS D8 Sélection Données / Commande
RST D9 Réinitialisation (optionnelle)
MOSI / SDI D11 MOSI SPI matériel
SCK D13 Horloge SPI matérielle
MISO / SDO D12 MISO SPI matériel (optionnel)
LED / BL 3.3V Alimentation du rétroéclairage

Carte SD (si votre application doit accéder à la carte SD) :

Broche SD Broche MCU Arduino UNO Q Description
SD_CS / TF_CS D4 Chip Select de la carte SD
MOSI / SDI D11 Partagée avec le MOSI de l'écran (D11)
SCK / CLK D13 Partagée avec le SCK de l'écran (D13)
MISO / SDO D12 Partagée avec le MISO de l'écran (D12)
Schéma de câblage Arduino UNO Q écran TFT SPI sans tactile

Cette image a été créée avec Fritzing. Cliquez pour agrandir l'image.

Avec Tactile

Connectez le contrôleur tactile XPT2046 au bus SPI de l'Arduino UNO Q, en partageant D11, D13 et D12 avec l'écran.

Écran :

Broche TFT Broche MCU Arduino UNO Q Description
VCC 3.3V Alimentation
GND GND Masse
CS D10 Chip Select
DC / RS D8 Sélection Données / Commande
RST D9 Réinitialisation (optionnelle)
MOSI / SDI D11 MOSI SPI matériel
SCK D13 Horloge SPI matérielle
MISO / SDO D12 MISO SPI matériel (optionnel)
LED / BL 3.3V Alimentation du rétroéclairage

Contrôleur tactile (si votre application utilise la fonction tactile et que l'écran la prend en charge) :

Broche tactile Broche MCU Arduino UNO Q Description
T_CS D2 Chip Select tactile
T_IRQ D2 Interruption tactile (optionnelle)
T_DIN D11 Partagée avec le MOSI de l'écran (D11)
T_CLK D13 Partagée avec le SCK de l'écran (D13)
T_DO D12 Partagée avec le MISO de l'écran (D12)
Schéma de câblage Arduino UNO Q écran TFT SPI avec tactile

Cette image a été créée avec Fritzing. Cliquez pour agrandir l'image.

Le MCU de l'Arduino UNO Q expose une seule interface SPI matérielle sur les connecteurs Uno, donc les trois périphériques — écran, carte SD et contrôleur tactile — partagent les mêmes trois lignes de données. La bibliothèque DIYables_TFT_SPI gère à la fois l'écran et le contrôleur tactile XPT2046 via une seule API, donc aucune bibliothèque SPI séparée n'est nécessaire pour la partie tactile.

Code Arduino UNO Q — Structure Minimale du Sketch

L'Arduino UNO Q dispose de deux processeurs qui fonctionnent ensemble :

  • Le MCU STM32 pilote l'écran TFT SPI et lit le contrôleur tactile — il affiche tout le texte et les graphiques en temps réel
  • Le MPU Qualcomm exécute Debian Linux et gère le Wi-Fi, Python et la connectivité cloud
  • Dans cette section, seul le MCU est programmé — le côté Linux reste inactif. Une section ultérieure montre comment les deux processeurs fonctionnent ensemble via Bridge.

Tous les sketches utilisant la bibliothèque DIYables_TFT_SPI partagent ce squelette :

#include <DIYables_TFT_SPI.h> #define TFT_CS_PIN 10 #define TFT_DC_PIN 8 #define TFT_RST_PIN 9 // Uncomment the line that matches your driver chip: // DIYables_ILI9341_SPI TFT_display(240, 320, TFT_CS_PIN, TFT_DC_PIN, TFT_RST_PIN); // DIYables_ILI9488_SPI TFT_display(320, 480, TFT_CS_PIN, TFT_DC_PIN, TFT_RST_PIN); DIYables_ST7789_SPI TFT_display(240, 320, TFT_CS_PIN, TFT_DC_PIN, TFT_RST_PIN); void setup() { TFT_display.begin(); TFT_display.setRotation(1); } void loop() { // drawing code here }

Passez les dimensions physiques en pixels de votre écran au constructeur. Les modules utilisant la même puce de pilotage existent en différentes tailles.

Code Arduino UNO Q — Dessiner des Formes

Le sketch ci-dessous présente les primitives de dessin Adafruit GFX sur votre écran TFT SPI : cercles, triangles, rectangles, rectangles arrondis et lignes.

Ce que fait le code :

  • Crée l'objet écran pour votre puce de pilotage
  • Initialise l'écran et définit la rotation en mode paysage
  • Adapte la position de chaque forme à la taille réelle de l'écran
  • Redessine toute la grille de formes colorées toutes les 10 secondes
/* * Ce code Arduino UNO Q a été développé par newbiely.fr * Ce code Arduino UNO Q est mis à disposition du public sans aucune restriction. * Pour des instructions complètes et des schémas de câblage, veuillez visiter: * https://newbiely.fr/tutorials/arduino-uno-q/arduino-uno-q-tft-lcd-touch-display-spi */ /* Created by DIYables This example code is in the public domain Product page: https://diyables.io */ // ============================================= // Single include brings in the base class plus all driver classes. // ============================================= #include <DIYables_TFT_SPI.h> // ============================================= // Wiring (Arduino UNO Q - MCU side) // --------------------------------------------- // TFT module Arduino UNO Q // ------------ --------------------------------- // VCC -> 3.3V // GND -> GND // CS -> D10 (TFT_CS_PIN) // RESET -> D9 (TFT_RST_PIN) // DC / RS -> D8 (TFT_DC_PIN) // SDI / MOSI -> D11 (hardware SPI MOSI) // SCK -> D13 (hardware SPI SCK) // LED -> 3.3V (or any GPIO via initBacklight) // SDO / MISO -> D12 (only needed when reading from display) // // The Arduino UNO Q MCU pins are 3.3V - no level converter is needed. // ============================================= // ============================================= // SPI pin definitions (adjust for your board) // ============================================= #define TFT_CS_PIN 10 #define TFT_DC_PIN 8 #define TFT_RST_PIN 9 // Panel resolution in native (portrait) orientation - change to match your module #define TFT_WIDTH 240 #define TFT_HEIGHT 320 // MOSI and SCK use default hardware SPI pins // ============================================= // Create display object (uncomment matching driver) // ============================================= // DIYables_ILI9341_SPI TFT_display(TFT_WIDTH, TFT_HEIGHT, TFT_CS_PIN, TFT_DC_PIN, TFT_RST_PIN); // DIYables_ILI9488_SPI TFT_display(TFT_WIDTH, TFT_HEIGHT, TFT_CS_PIN, TFT_DC_PIN, TFT_RST_PIN); DIYables_ST7789_SPI TFT_display(TFT_WIDTH, TFT_HEIGHT, TFT_CS_PIN, TFT_DC_PIN, TFT_RST_PIN); #define BLACK DIYables_TFT_SPI::colorRGB(0, 0, 0) #define BLUE DIYables_TFT_SPI::colorRGB(0, 0, 255) #define RED DIYables_TFT_SPI::colorRGB(255, 0, 0) #define GREEN DIYables_TFT_SPI::colorRGB(0, 255, 0) #define ORANGE DIYables_TFT_SPI::colorRGB(255, 165, 0) #define PINK DIYables_TFT_SPI::colorRGB(255, 192, 203) #define VIOLET DIYables_TFT_SPI::colorRGB(148, 0, 211) #define TURQUOISE DIYables_TFT_SPI::colorRGB(64, 224, 208) #define WHITE DIYables_TFT_SPI::colorRGB(255, 255, 255) // Helper to draw a filled diamond void fillDiamond(int cx, int cy, int h, int v, uint16_t color) { int x0 = cx, y0 = cy - v; int x1 = cx + h, y1 = cy; int x2 = cx, y2 = cy + v; int x3 = cx - h, y3 = cy; TFT_display.fillTriangle(x0, y0, x1, y1, x2, y2, color); TFT_display.fillTriangle(x0, y0, x2, y2, x3, y3, color); } void setup() { TFT_display.begin(); TFT_display.setRotation(1); // Landscape } void loop() { TFT_display.fillScreen(WHITE); uint16_t w = TFT_display.width(); uint16_t h = TFT_display.height(); // Scale positions relative to screen size with better spacing int col1 = w / 8; int col2 = w * 3 / 8; int col3 = w * 5 / 8; int col4 = w * 7 / 8; int row1 = h / 4; int row2 = h / 2; int row3 = h * 3 / 4; // Outlined circle TFT_display.drawCircle(col1, row1, 30, RED); // Filled circle TFT_display.fillCircle(col2, row1, 30, RED); // Outlined triangle TFT_display.drawTriangle(col3 - 30, row1 + 25, col3 + 30, row1 + 25, col3, row1 - 25, BLUE); // Filled triangle TFT_display.fillTriangle(col4 - 30, row1 + 25, col4 + 30, row1 + 25, col4, row1 - 25, GREEN); // Outlined rectangle TFT_display.drawRect(col1 - 35, row2 - 20, 70, 40, ORANGE); // Filled rectangle TFT_display.fillRect(col2 - 35, row2 - 20, 70, 40, TURQUOISE); // Outlined round rectangle TFT_display.drawRoundRect(col3 - 35, row2 - 20, 70, 40, 10, VIOLET); // Filled round rectangle TFT_display.fillRoundRect(col4 - 35, row2 - 20, 70, 40, 10, PINK); // Outlined diamond (centered between col1 and col2) int diamond1_x = (col1 + col2) / 2; TFT_display.drawLine(diamond1_x, row3 - 30, diamond1_x + 25, row3, GREEN); TFT_display.drawLine(diamond1_x + 25, row3, diamond1_x, row3 + 30, GREEN); TFT_display.drawLine(diamond1_x, row3 + 30, diamond1_x - 25, row3, GREEN); TFT_display.drawLine(diamond1_x - 25, row3, diamond1_x, row3 - 30, GREEN); // Filled diamond (centered between col3 and col4) int diamond2_x = (col3 + col4) / 2; fillDiamond(diamond2_x, row3, 25, 30, BLUE); delay(10000); }

Étapes Rapides

Première fois avec Arduino UNO Q ? Suivez le tutoriel Démarrer avec Arduino UNO Q pour préparer votre environnement de développement avant de continuer.

  • Connecter : Câblez l'écran TFT SPI à l'Arduino UNO Q comme indiqué dans le schéma de câblage, puis branchez le câble USB-C.
  • Ouvrir Arduino App Lab : Lancez Arduino App Lab et attendez qu'il détecte votre Arduino UNO Q — cela peut prendre plusieurs minutes au premier lancement.
  • Créer une nouvelle application : Cliquez sur le bouton Créer une nouvelle application.
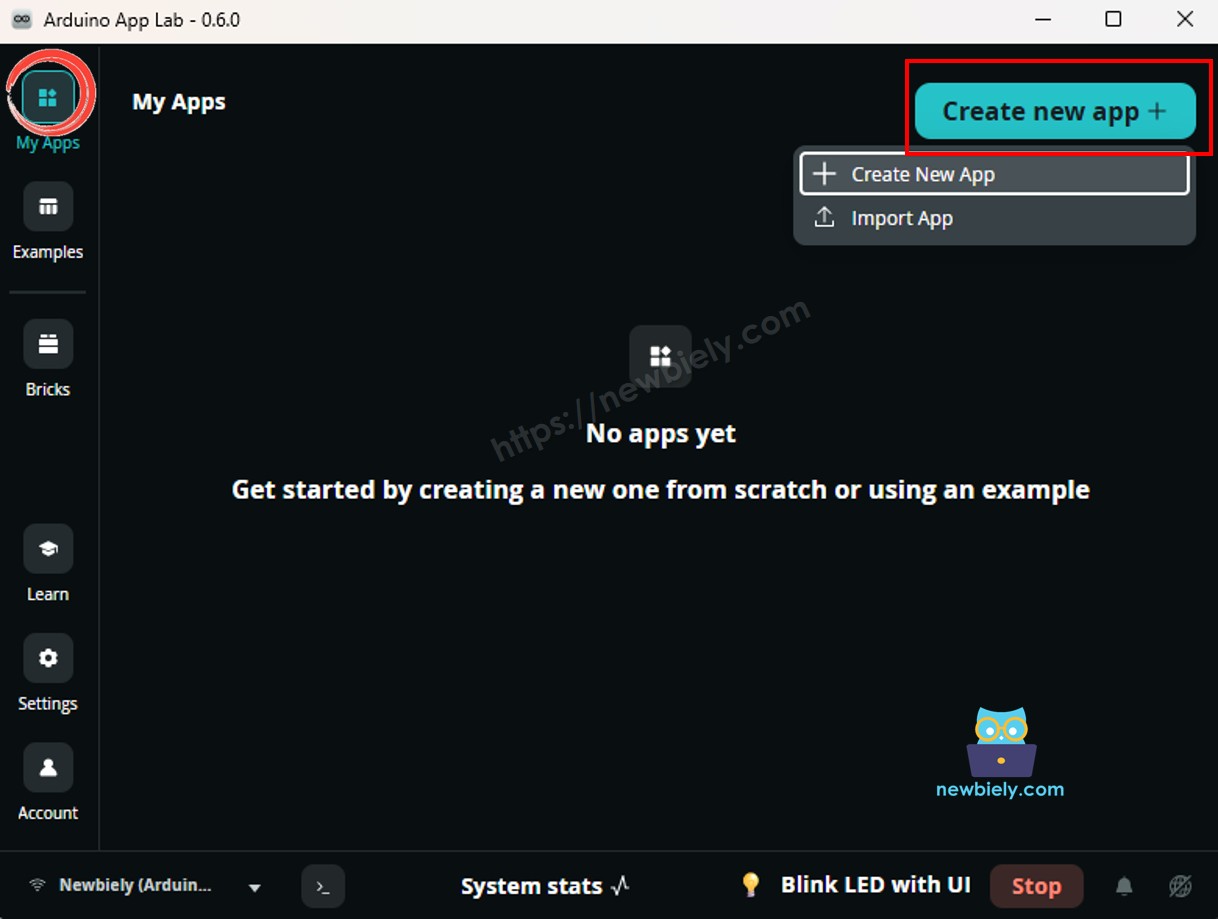
Créer une nouvelle application dans Arduino App Lab sur Arduino UNO Q
  • Donnez un nom à l'application, par exemple : DIYables_TftSpi
  • Cliquez sur Créer pour confirmer.
  • Vous verrez un ensemble de dossiers et de fichiers générés dans votre nouvelle application.
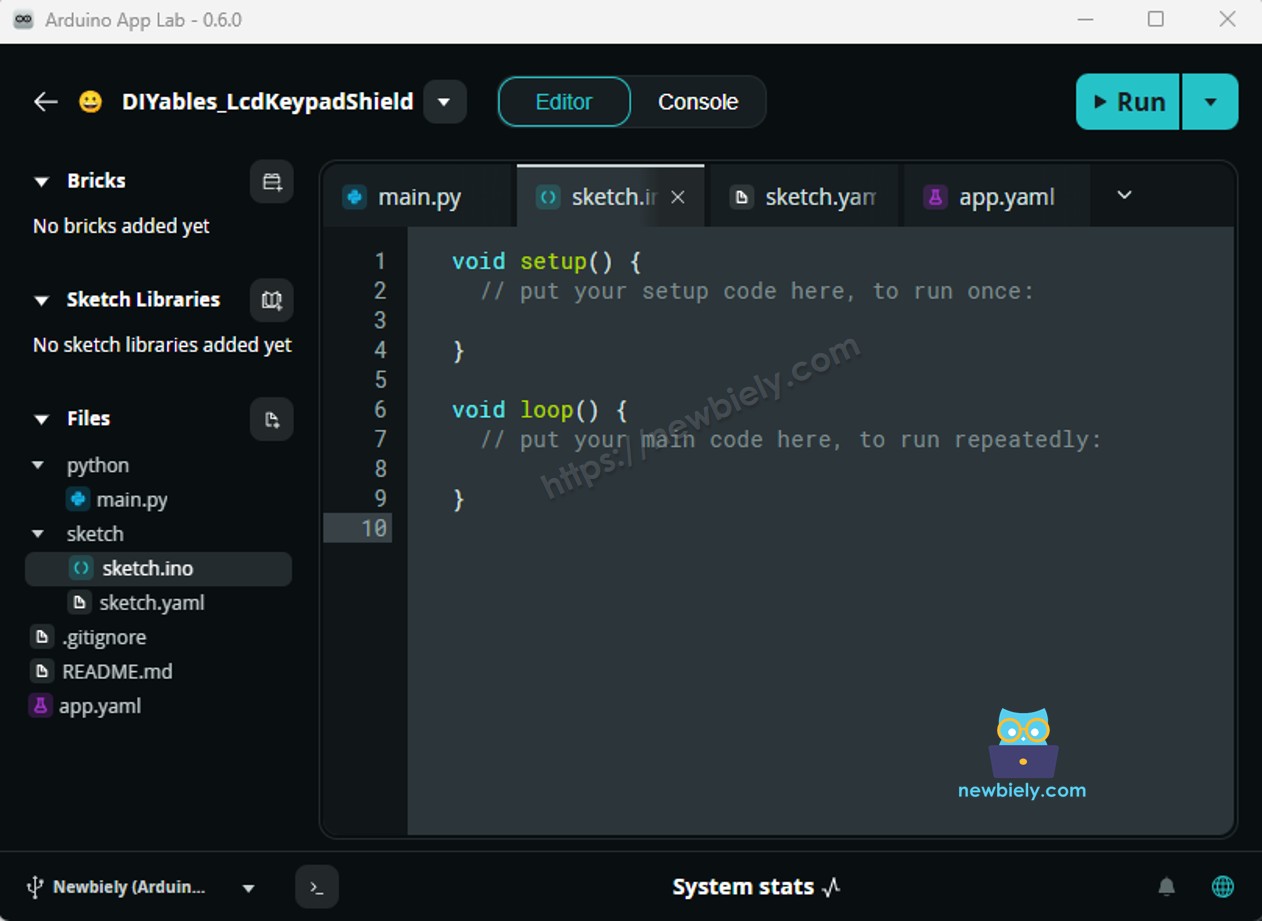
Dossiers et fichiers de l'application Arduino App Lab sur Arduino UNO Q
  • Trouvez le fichier sketch/sketch.ino — c'est là que vous collerez le sketch MCU.
  • Coller le sketch : Copiez le code MCU ci-dessus et collez-le dans ce fichier sketch. Conservez les autres fichiers par défaut.
  • Choisir votre pilote : Décommentez la ligne du constructeur correspondant à votre écran — ILI9341, ILI9488 ou ST7789 — et commentez les deux autres.
    • Install the library: Click the Add sketch library button (the open book icon with a + sign) in the left sidebar.
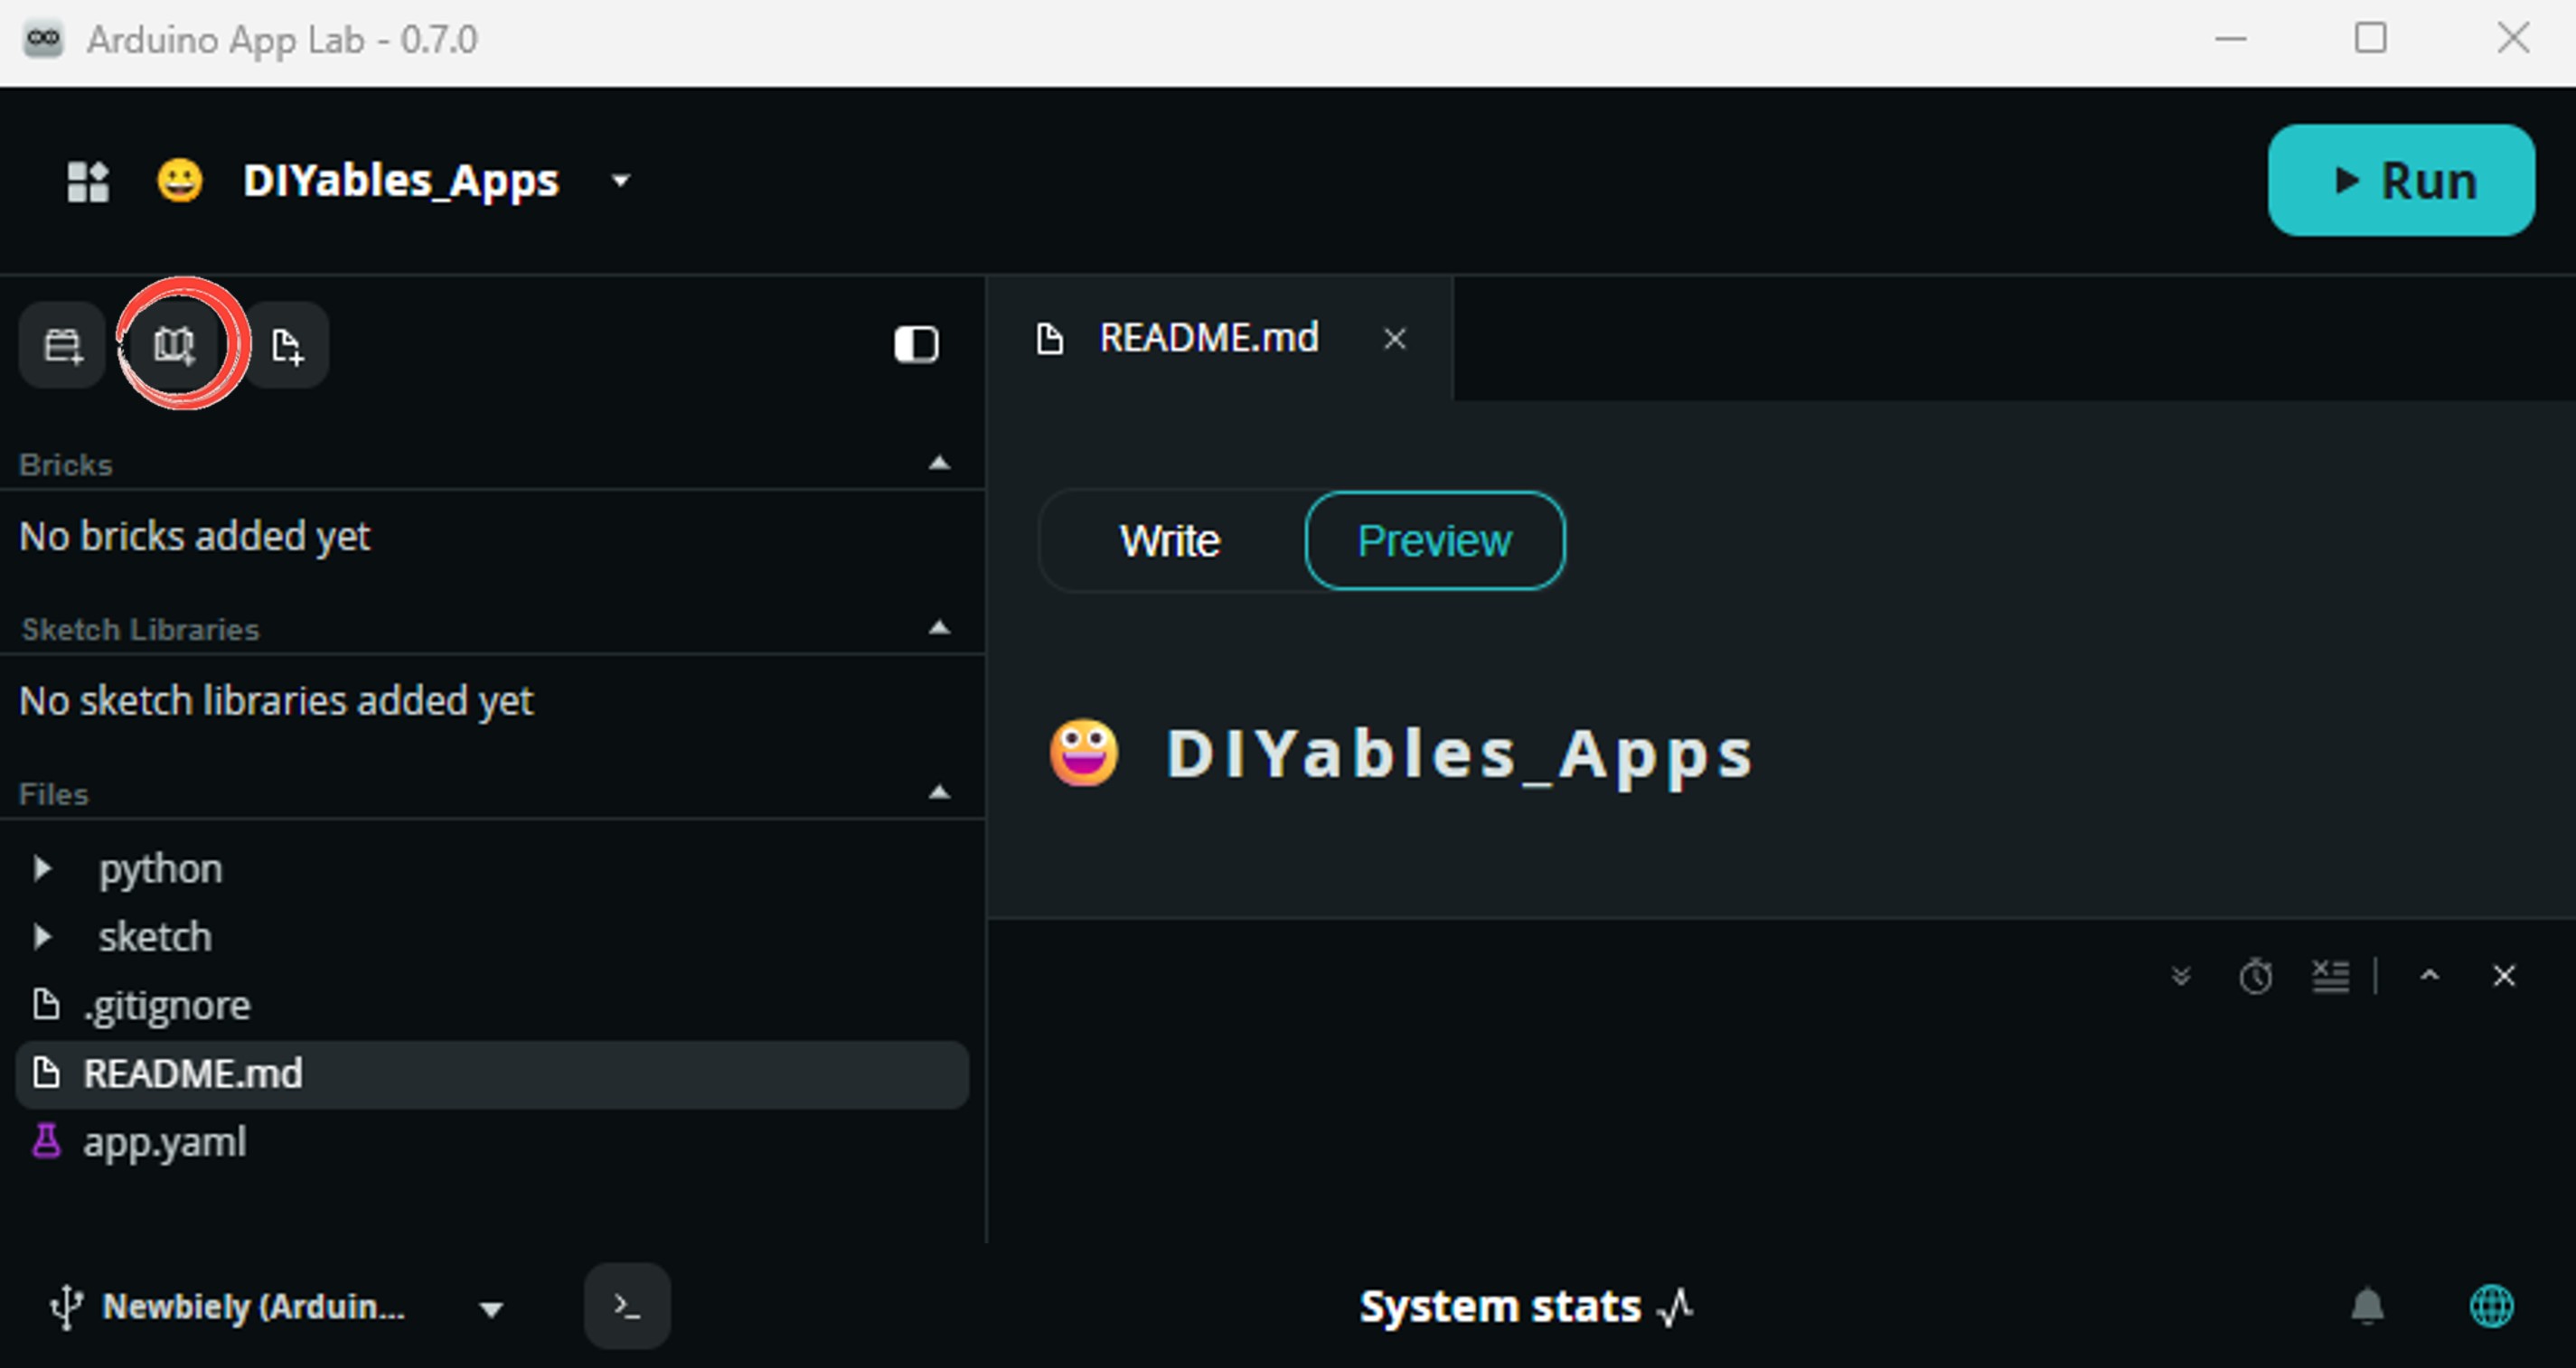
    Add sketch library in Arduino App Lab on Arduino UNO Q
    • Search for Arduino_RouterBridge created by Arduino and click the Install button.
    My Apps / DIYables Apps
    Run
    Bricks
    No bricks added...
    Sketch Libraries
    No sketch libra...
    Files
    python
    sketch
    .gitignore
    README.md
    app.yaml
    sketch.ino
    Add sketch library
    Arduino_RouterBridge Arduino

    This library provides a simple RPC bridge for Arduino UNO Q boards, allowing communication between the board and other devices using MsgPack serialization.

    0.4.1
    Install
    More Info
    • Search for DIYables TFT SPI created by DIYables.io and click the Install button.
    My Apps / DIYables Apps
    Run
    Bricks
    No bricks added...
    Sketch Libraries
    No sketch libra...
    Files
    python
    sketch
    .gitignore
    README.md
    app.yaml
    sketch.ino
    Add sketch library
    DIYables TFT SPI DIYables.io

    Works with both touch and non-touch versions of the same SPI TFT modules. Supports ILI9341 (240x320, 16-bit RGB565), ILI9488 (320x480, 18-bit RGB666), and ST7789 (240x320, 16-bit RGB565) displays over SPI. Includes built-in driver for XPT2046 / HR2046 / ADS7843 SPI touch controllers and 4-wire resistive touch panels - no separate touch library required. Use the display-only API for non-touch panels, or add initTouchSPI() to enable touch on modules that include a touch controller. Extends Adafruit GFX for full graphics support. Works with any Arduino-compatible board that has SPI.

    1.0.3
    Install
    More Info
    • Téléverser : Cliquez sur le bouton Exécuter dans Arduino App Lab pour compiler et téléverser sur le STM32.
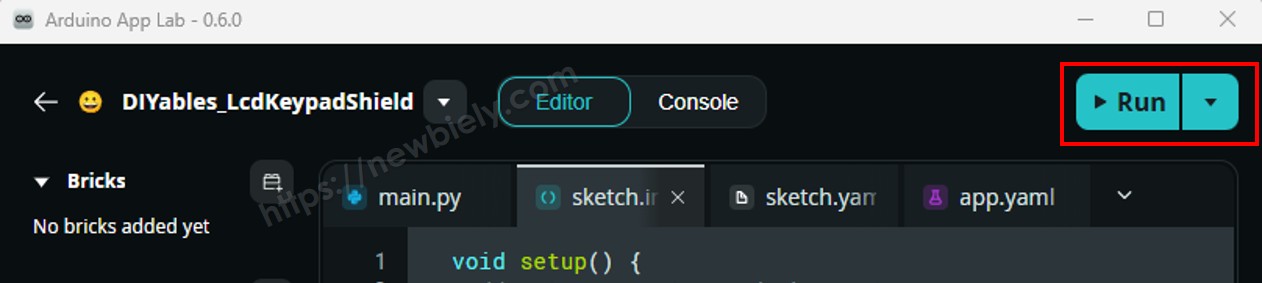
    Cliquez sur le bouton Exécuter dans Arduino App Lab sur Arduino UNO Q

    L'écran affiche une grille de formes colorées qui se rafraîchit toutes les quelques secondes !

    • Conseil Pro : Réglez la largeur et la hauteur dans le constructeur sur la taille réelle en pixels de votre écran. Une erreur à ce niveau est la cause la plus fréquente d'une image décalée ou tronquée.

    Référence Rapide des Méthodes

    Méthode Fonction Utilisation
    begin() Initialise le contrôleur de l'écran. À appeler une fois dans setup(). TFT_display.begin();
    setRotation(r) Fait pivoter le système de coordonnées. 0=portrait, 1=paysage. TFT_display.setRotation(1);
    fillScreen(color) Efface l'écran avec une couleur unie. TFT_display.fillScreen(WHITE);
    colorRGB(r,g,b) Construit une couleur RGB565 16 bits à partir de composantes 8 bits. colorRGB(0, 128, 255)
    fillCircle(x,y,r,color) Dessine un cercle plein. TFT_display.fillCircle(80, 80, 40, RED);
    fillRect(x,y,w,h,color) Dessine un rectangle plein. TFT_display.fillRect(10, 10, 60, 40, BLUE);
    drawRoundRect(x,y,w,h,r,color) Dessine le contour d'un rectangle arrondi. TFT_display.drawRoundRect(5,5,100,50,10,GREEN);

    Code Arduino UNO Q — Afficher du Texte et des Nombres

    Ce sketch montre comment afficher des chaînes et des nombres avec différentes tailles, couleurs et positions sur l'écran TFT SPI.

    Ce que fait le code :

    • Remplit l'écran en blanc
    • Définit une couleur de texte magenta et une grande taille de texte
    • Affiche une valeur de température avec une décimale et un symbole de degré
    • Affiche une valeur d'humidité sur la ligne suivante
    /* * Ce code Arduino UNO Q a été développé par newbiely.fr * Ce code Arduino UNO Q est mis à disposition du public sans aucune restriction. * Pour des instructions complètes et des schémas de câblage, veuillez visiter: * https://newbiely.fr/tutorials/arduino-uno-q/arduino-uno-q-tft-lcd-touch-display-spi */ /* Created by DIYables This example code is in the public domain Product page: https://diyables.io */ // ============================================= // Single include brings in the base class plus all driver classes. // ============================================= #include <DIYables_TFT_SPI.h> // ============================================= // Wiring (Arduino UNO Q - MCU side) // --------------------------------------------- // TFT module Arduino UNO Q // ------------ --------------------------------- // VCC -> 3.3V // GND -> GND // CS -> D10 (TFT_CS_PIN) // RESET -> D9 (TFT_RST_PIN) // DC / RS -> D8 (TFT_DC_PIN) // SDI / MOSI -> D11 (hardware SPI MOSI) // SCK -> D13 (hardware SPI SCK) // LED -> 3.3V (or any GPIO via initBacklight) // SDO / MISO -> D12 (only needed when reading from display) // // The Arduino UNO Q MCU pins are 3.3V - no level converter is needed. // ============================================= // ============================================= // SPI pin definitions (adjust for your board) // ============================================= #define TFT_CS_PIN 10 #define TFT_DC_PIN 8 #define TFT_RST_PIN 9 // Panel resolution in native (portrait) orientation - change to match your module #define TFT_WIDTH 240 #define TFT_HEIGHT 320 // ============================================= // Create display object (uncomment matching driver) // ============================================= // DIYables_ILI9341_SPI TFT_display(TFT_WIDTH, TFT_HEIGHT, TFT_CS_PIN, TFT_DC_PIN, TFT_RST_PIN); // DIYables_ILI9488_SPI TFT_display(TFT_WIDTH, TFT_HEIGHT, TFT_CS_PIN, TFT_DC_PIN, TFT_RST_PIN); DIYables_ST7789_SPI TFT_display(TFT_WIDTH, TFT_HEIGHT, TFT_CS_PIN, TFT_DC_PIN, TFT_RST_PIN); #define MAGENTA DIYables_TFT_SPI::colorRGB(255, 0, 255) #define WHITE DIYables_TFT_SPI::colorRGB(255, 255, 255) void setup() { TFT_display.begin(); TFT_display.setRotation(1); // Landscape TFT_display.fillScreen(WHITE); // Set text color and size TFT_display.setTextColor(MAGENTA); TFT_display.setTextSize(3); // Sample values float temperature = 23.5; float humidity = 78.6; // Display temperature TFT_display.setCursor(20, 20); TFT_display.print("Temperature: "); TFT_display.print(temperature, 1); TFT_display.print(char(247)); TFT_display.println("C"); // Display humidity TFT_display.setCursor(20, 60); TFT_display.print("Humidity: "); TFT_display.print(humidity, 1); TFT_display.print("%"); } void loop() { }

    Étapes Rapides

    • Copiez le code ci-dessus et collez-le dans sketch/sketch.ino.
    • Cliquez sur le bouton Exécuter dans Arduino App Lab.
    Cliquez sur le bouton Exécuter dans Arduino App Lab sur Arduino UNO Q

    L'écran affiche les valeurs de température et d'humidité en grand texte magenta.

    Référence Rapide des Méthodes

    Méthode Fonction Utilisation
    setTextColor(color) Définit la couleur du texte. TFT_display.setTextColor(BLACK);
    setTextSize(size) Met le texte à l'échelle. La taille 1 correspond à 6x8 pixels. TFT_display.setTextSize(2);
    setCursor(x, y) Positionne le curseur de texte. TFT_display.setCursor(10, 30);
    print(value) Affiche une chaîne ou un nombre à la position du curseur. TFT_display.print("Temp: ");
    println(value) Affiche et passe à la ligne suivante. TFT_display.println(25.4);

    Code Arduino UNO Q — Dessiner une Image

    Ce sketch affiche une image bitmap RGB565 en couleur stockée dans la mémoire programme. Les données de l'image sont déclarées dans bitmap.h sous forme de tableau const uint16_t marqué PROGMEM. Cela conserve les données de pixels en mémoire flash plutôt qu'en SRAM, de sorte que l'écran fonctionne correctement même lorsque la RAM est limitée. Copiez bitmap.h dans le dossier du sketch avant de compiler.

    Ce que fait le code :

    • Inclut le tableau bitmap depuis bitmap.h
    • Lit la taille réelle de l'écran pour centrer l'image
    • Dessine le bitmap RGB565 à la position centrée
    • Inverse les couleurs de l'écran toutes les 2 secondes comme effet simple
    /* * Ce code Arduino UNO Q a été développé par newbiely.fr * Ce code Arduino UNO Q est mis à disposition du public sans aucune restriction. * Pour des instructions complètes et des schémas de câblage, veuillez visiter: * https://newbiely.fr/tutorials/arduino-uno-q/arduino-uno-q-tft-lcd-touch-display-spi */ /* Created by DIYables This example code is in the public domain Product page: https://diyables.io */ // ============================================= // Single include brings in the base class plus all driver classes. // ============================================= #include <DIYables_TFT_SPI.h> #include "bitmap.h" // ============================================= // Wiring (Arduino UNO Q - MCU side) // --------------------------------------------- // TFT module Arduino UNO Q // ------------ --------------------------------- // VCC -> 3.3V // GND -> GND // CS -> D10 (TFT_CS_PIN) // RESET -> D9 (TFT_RST_PIN) // DC / RS -> D8 (TFT_DC_PIN) // SDI / MOSI -> D11 (hardware SPI MOSI) // SCK -> D13 (hardware SPI SCK) // LED -> 3.3V (or any GPIO via initBacklight) // SDO / MISO -> D12 (only needed when reading from display) // // The Arduino UNO Q MCU pins are 3.3V - no level converter is needed. // ============================================= // ============================================= // SPI pin definitions (adjust for your board) // ============================================= #define TFT_CS_PIN 10 #define TFT_DC_PIN 8 #define TFT_RST_PIN 9 // Panel resolution in native (portrait) orientation - change to match your module #define TFT_WIDTH 240 #define TFT_HEIGHT 320 // ============================================= // Create display object (uncomment matching driver) // ============================================= // DIYables_ILI9341_SPI TFT_display(TFT_WIDTH, TFT_HEIGHT, TFT_CS_PIN, TFT_DC_PIN, TFT_RST_PIN); // DIYables_ILI9488_SPI TFT_display(TFT_WIDTH, TFT_HEIGHT, TFT_CS_PIN, TFT_DC_PIN, TFT_RST_PIN); DIYables_ST7789_SPI TFT_display(TFT_WIDTH, TFT_HEIGHT, TFT_CS_PIN, TFT_DC_PIN, TFT_RST_PIN); #define WHITE DIYables_TFT_SPI::colorRGB(255, 255, 255) int img_width = 120; int img_height = 53; void setup() { TFT_display.begin(); uint16_t SCREEN_WIDTH = TFT_display.width(); uint16_t SCREEN_HEIGHT = TFT_display.height(); int x = (SCREEN_WIDTH - img_width) / 2; int y = (SCREEN_HEIGHT - img_height) / 2; TFT_display.fillScreen(WHITE); TFT_display.drawRGBBitmap(x, y, myBitmap, img_width, img_height); } void loop() { delay(2000); TFT_display.invertDisplay(true); delay(2000); TFT_display.invertDisplay(false); }

    Étapes Rapides

    • Copiez le code ci-dessus et collez-le dans sketch/sketch.ino.
    • Créez un nouveau fichier nommé bitmap.h dans le même dossier que le sketch :
      • Dans Arduino App Lab, faites un clic droit sur le dossier sketch/ et choisissez Nouveau fichier.
      • Nommez-le bitmap.h.
      • Copiez le tableau bitmap ci-dessous et collez-le dans bitmap.h. Ce tableau contient le logo DIYables.
      const uint16_t myBitmap[] PROGMEM = {0xffff, 0xffff, 0xffff, 0xffff, 0xffff, 0xffff, 0xffff, 0xffff, 0xffff, 0xffff, 0xffff, 0xffff, 0xffff, 0xffff, 0xffff, 0xffff, 0xffff, 0xffff, 0xffff, 0xffff, 0xef5d, 0x0000, 0x0000, 0x0000, 0x0000, 0x0000, 0x0000, 0x0000, 0x0000, 0x0000, 0x0000, 0x0000, 0x0000, 0x0000, 0x0000, 0x0000, 0x0000, 0x0000, 0x0000, 0x0000, 0x0000, 0x0000, 0x0000, 0x0000, 0x0000, 0x0000, 0x0000, 0x0000, 0x0000, 0x0000, 0x0000, 0x0000, 0x0000, 0x0000, 0x0000, 0xffff, 0xffff, 0xffff, 0xffff, 0xbdf7, 0x0000, 0x0000, 0x0000, 0x0000, 0x0000, 0x0000, 0x0000, 0x0000, 0x0000, 0x0000, 0x0000, 0x0000, 0x0000, 0x18c3, 0xbdf7, 0xbdf7, 0xe73c, 0xffff, 0xffff, 0xffff, 0xffff, 0xffff, 0xffff, 0xffff, 0xffff, 0xffff, 0xffff, 0xffdf, 0x0000, 0x0000, 0x0000, 0x0000, 0x0000, 0xffdf, 0xffff, 0xffff, 0x2124, 0x0000, 0x0000, 0x0000, 0x0000, 0x0000, 0xdedb, 0xffff, 0xffff, 0xffff, 0xffff, 0xffff, 0xffff, 0xffff, 0xffff, 0xffff, 0xffff, 0xffff, 0x0841, 0x0000, 0x0000, 0x0000, 0x0000, 0x3186, 0xffff, 0xffff, 0xffff, 0xffff, 0xffff, 0xffff, 0xffff, 0xffff, 0xffff, 0xffff, 0xffff, 0xffff, 0xffff, 0xffff, 0xffff, 0xffff, 0xffff, 0xffff, 0xffff, 0xffff, 0xef5d, 0x0000, 0x0000, 0x0000, 0x0000, 0x0000, 0x0000, 0x0000, 0x0000, 0x0000, 0x0000, 0x0000, 0x0000, 0x0000, 0x0000, 0x0000, 0x0000, 0x0000, 0x0000, 0x0000, 0x0000, 0x0000, 0x0000, 0x0000, 0x0000, 0x0000, 0x0000, 0x0000, 0x0000, 0x0000, 0x0000, 0x0000, 0x0000, 0x0000, 0x0000, 0xffff, 0xffff, 0xffff, 0xffff, 0xbdf7, 0x0000, 0x0000, 0x0000, 0x0000, 0x0000, 0x0000, 0x0000, 0x0000, 0x0000, 0x0000, 0x0000, 0x0000, 0x0000, 0x0000, 0x0000, 0x0000, 0x2124, 0x528a, 0xffff, 0xffff, 0xffff, 0xffff, 0xffff, 0xffff, 0xffff, 0xffff, 0xffff, 0xffdf, 0x0000, 0x0000, 0x0000, 0x0000, 0x0000, 0xffdf, 0xffff, 0xffff, 0x8c71, 0x0000, 0x0000, 0x0000, 0x0000, 0x0000, 0x632c, 0xffff, 0xffff, 0xffff, 0xffff, 0xffff, 0xffff, 0xffff, 0xffff, 0xffff, 0xffff, 0x630c, 0x0000, 0x0000, 0x0000, 0x0000, 0x3186, 0xf79e, 0xffff, 0xffff, 0xffff, 0xffff, 0xffff, 0xffff, 0xffff, 0xffff, 0xffff, 0xffff, 0xffff, 0xffff, 0xffff, 0xffff, 0xffff, 0xffff, 0xffff, 0xffff, 0xffff, 0xffff, 0xef5d, 0x0000, 0x0000, 0x0000, 0x0000, 0x0000, 0x0000, 0x0000, 0x0000, 0x0000, 0x0000, 0x0000, 0x0000, 0x0000, 0x0000, 0x0000, 0x0000, 0x0000, 0x0000, 0x0000, 0x0000, 0x0000, 0x0000, 0x0000, 0x0000, 0x0000, 0x0000, 0x0000, 0x0000, 0x0000, 0x0000, 0x0000, 0x0000, 0x0000, 0x0000, 0xffff, 0xffff, 0xffff, 0xffff, 0xbdf7, 0x0000, 0x0000, 0x0000, 0x0000, 0x0000, 0x0000, 0x0000, 0x0000, 0x0000, 0x0000, 0x0000, 0x0000, 0x0000, 0x0000, 0x0000, 0x0000, 0x0000, 0x0000, 0x0000, 0xbdf7, 0xffff, 0xffff, 0xffff, 0xffff, 0xffff, 0xffff, 0xffff, 0xffdf, 0x0000, 0x0000, 0x0000, 0x0000, 0x0000, 0xffdf, 0xffff, 0xffff, 0xffff, 0x528a, 0x0000, 0x0000, 0x0000, 0x0000, 0x0000, 0xe71c, 0xffff, 0xffff, 0xffff, 0xffff, 0xffff, 0xffff, 0xffff, 0xffff, 0xef5d, 0x2124, 0x0000, 0x0000, 0x0000, 0x0000, 0x73ae, 0xffff, 0xffff, 0xffff, 0xffff, 0xffff, 0xffff, 0xffff, 0xffff, 0xffff, 0xffff, 0xffff, 0xffff, 0xffff, 0xffff, 0xffff, 0xffff, 0xffff, 0xffff, 0xffff, 0xffff, 0xffff, 0xef5d, 0x0000, 0x0000, 0x0000, 0x0000, 0x0000, 0x0000, 0x0000, 0x0000, 0x0000, 0x0000, 0x0000, 0x0000, 0x0000, 0x0000, 0x0000, 0x0000, 0x0000, 0x0000, 0x0000, 0x0000, 0x0000, 0x0000, 0x0000, 0x0000, 0x0000, 0x0000, 0x0000, 0x0000, 0x0000, 0x0000, 0x0000, 0x0000, 0x0000, 0x0000, 0xffff, 0xffff, 0xffff, 0xffff, 0xbdf7, 0x0000, 0x0000, 0x0000, 0x0000, 0x0000, 0x0000, 0x0000, 0x0000, 0x0000, 0x0000, 0x0000, 0x0000, 0x0000, 0x0000, 0x0000, 0x0000, 0x0000, 0x0000, 0x0000, 0x0020, 0xad55, 0xffff, 0xffff, 0xffff, 0xffff, 0xffff, 0xffff, 0xffdf, 0x0000, 0x0000, 0x0000, 0x0000, 0x0000, 0xffdf, 0xffff, 0xffff, 0xffff, 0xffff, 0x0000, 0x0000, 0x0000, 0x0000, 0x0000, 0x3186, 0xffff, 0xffff, 0xffff, 0xffff, 0xffff, 0xffff, 0xffff, 0xffff, 0x4a69, 0x0000, 0x0000, 0x0000, 0x0000, 0x0000, 0xffff, 0xffff, 0xffff, 0xffff, 0xffff, 0xffff, 0xffff, 0xffff, 0xffff, 0xffff, 0xffff, 0xffff, 0xffff, 0xffff, 0xffff, 0xffff, 0xffff, 0xffff, 0xffff, 0xffff, 0xffff, 0xffff, 0xef5d, 0x0000, 0x0000, 0x0000, 0x0000, 0x0000, 0x0000, 0x0000, 0x0000, 0x0000, 0x0000, 0x0000, 0x0000, 0x0000, 0x0000, 0x0000, 0x0000, 0x0000, 0x0000, 0x0000, 0x0000, 0x0000, 0x0000, 0x0000, 0x0000, 0x0000, 0x0000, 0x0000, 0x0000, 0x0000, 0x0000, 0x0000, 0x0000, 0x0000, 0x0000, 0xffff, 0xffff, 0xffff, 0xffff, 0xbdf7, 0x0000, 0x0000, 0x0000, 0x0000, 0x0000, 0x4a49, 0x4a49, 0x4a49, 0x4a49, 0x4a49, 0x4a49, 0x4a49, 0x4a49, 0x0000, 0x0000, 0x0000, 0x0000, 0x0000, 0x0000, 0x0000, 0x0000, 0xbdd7, 0xffff, 0xffff, 0xffff, 0xffff, 0xffff, 0xffdf, 0x0000, 0x0000, 0x0000, 0x0000, 0x0000, 0xffdf, 0xffff, 0xffff, 0xffff, 0xffff, 0x9492, 0x0000, 0x0000, 0x0000, 0x0000, 0x0000, 0x630c, 0xffff, 0xffff, 0xffff, 0xffff, 0xffff, 0xffff, 0xc618, 0x0000, 0x0000, 0x0000, 0x0000, 0x10a2, 0xd6ba, 0xffff, 0xffff, 0xffff, 0xffff, 0xffff, 0xffff, 0xffff, 0xffff, 0xffff, 0xffff, 0xffff, 0xffff, 0xffff, 0xffff, 0xffff, 0xffff, 0xffff, 0xffff, 0xffff, 0xffff, 0xffff, 0xffff, 0xef5d, 0x0000, 0x0000, 0x0000, 0x0000, 0x0000, 0x0000, 0x0000, 0x0000, 0x0000, 0x0000, 0x0000, 0x0000, 0x0000, 0x0000, 0x0000, 0x0000, 0x0000, 0x0000, 0x0000, 0x0000, 0x0000, 0x0000, 0x0000, 0x0000, 0x0000, 0x0000, 0x0000, 0x0000, 0x0000, 0x0000, 0x0000, 0x0000, 0x0000, 0x0000, 0xffff, 0xffff, 0xffff, 0xffff, 0xbdf7, 0x0000, 0x0000, 0x0000, 0x0000, 0x0000, 0xffff, 0xffff, 0xffff, 0xffff, 0xffff, 0xffff, 0xffff, 0xffff, 0xce79, 0xb596, 0x0000, 0x0000, 0x0000, 0x0000, 0x0000, 0x0000, 0x1082, 0xffff, 0xffff, 0xffff, 0xffff, 0xffff, 0xffdf, 0x0000, 0x0000, 0x0000, 0x0000, 0x0000, 0xffdf, 0xffff, 0xffff, 0xffff, 0xffff, 0xef5d, 0x1082, 0x0000, 0x0000, 0x0000, 0x0000, 0x1082, 0xe73c, 0xffff, 0xffff, 0xffff, 0xffff, 0xffff, 0x2965, 0x0000, 0x0000, 0x0000, 0x0000, 0x4228, 0xffff, 0xffff, 0xffff, 0xffff, 0xffff, 0xffff, 0xffff, 0xffff, 0xffff, 0xffff, 0xffff, 0xffff, 0xffff, 0xffff, 0xffff, 0xffff, 0xffff, 0xffff, 0xffff, 0xffff, 0xffff, 0xffff, 0xffff, 0xef5d, 0x0000, 0x0000, 0x0000, 0x0000, 0x0000, 0x0000, 0x0000, 0x0000, 0x0000, 0x0000, 0x0000, 0x0000, 0x0000, 0x0000, 0x0000, 0x0000, 0x0000, 0x0000, 0x0000, 0x0000, 0x0000, 0x0000, 0x0000, 0x0000, 0x0000, 0x0000, 0x0000, 0x0000, 0x0000, 0x0000, 0x0000, 0x0000, 0x0000, 0x0000, 0xffff, 0xffff, 0xffff, 0xffff, 0xbdf7, 0x0000, 0x0000, 0x0000, 0x0000, 0x0000, 0xffff, 0xffff, 0xffff, 0xffff, 0xffff, 0xffff, 0xffff, 0xffff, 0xffff, 0xffff, 0xef5d, 0x18e3, 0x0000, 0x0000, 0x0000, 0x0000, 0x0000, 0x8c71, 0xffff, 0xffff, 0xffff, 0xffff, 0xffdf, 0x0000, 0x0000, 0x0000, 0x0000, 0x0000, 0xffdf, 0xffff, 0xffff, 0xffff, 0xffff, 0xffff, 0xffff, 0x0000, 0x0000, 0x0000, 0x0000, 0x0000, 0x9cd3, 0xffff, 0xffff, 0xffff, 0xffff, 0x9cf3, 0x0000, 0x0000, 0x0000, 0x0000, 0x0000, 0xffff, 0xffff, 0xffff, 0xffff, 0xffff, 0xffff, 0xffff, 0xffff, 0xffff, 0xffff, 0xffff, 0xffff, 0xffff, 0xffff, 0xffff, 0xffff, 0xffff, 0xffff, 0xffff, 0xffff, 0xffff, 0xffff, 0xffff, 0xffff, 0xef5d, 0x0000, 0x0000, 0x0000, 0x0000, 0x0000, 0x0000, 0x0000, 0x0000, 0x0000, 0x0000, 0x0000, 0x0000, 0x0000, 0x0000, 0x0000, 0x0000, 0x0000, 0x0000, 0x0000, 0x0000, 0x0000, 0x0000, 0x0000, 0x0000, 0x0000, 0x0000, 0x0000, 0x0000, 0x0000, 0x0000, 0x0000, 0x0000, 0x0000, 0x0000, 0xffff, 0xffff, 0xffff, 0xffff, 0xbdf7, 0x0000, 0x0000, 0x0000, 0x0000, 0x0000, 0xffff, 0xffff, 0xffff, 0xffff, 0xffff, 0xffff, 0xffff, 0xffff, 0xffff, 0xffff, 0xffff, 0xe71c, 0x0000, 0x0000, 0x0000, 0x0000, 0x0000, 0x18c3, 0xffff, 0xffff, 0xffff, 0xffff, 0xffdf, 0x0000, 0x0000, 0x0000, 0x0000, 0x0000, 0xffdf, 0xffff, 0xffff, 0xffff, 0xffff, 0xffff, 0xffff, 0x7bcf, 0x0000, 0x0000, 0x0000, 0x0000, 0x0000, 0x7bef, 0xffff, 0xffff, 0xffff, 0x10a2, 0x0000, 0x0000, 0x0000, 0x0000, 0xa534, 0xffff, 0xffff, 0xffff, 0xffff, 0xffff, 0xffff, 0xffff, 0xffff, 0xffff, 0xffff, 0xffff, 0xffff, 0xffff, 0xffff, 0xffff, 0xffff, 0xffff, 0xffff, 0xffff, 0xffff, 0xffff, 0xffff, 0xffff, 0xffff, 0xef5d, 0x0000, 0x0000, 0x0000, 0x0000, 0x0000, 0x0000, 0x0000, 0x0000, 0x0000, 0x0000, 0x0000, 0x0000, 0x0000, 0x0000, 0x0000, 0x0000, 0x0000, 0x0000, 0x0000, 0x0000, 0x0000, 0x0000, 0x0000, 0x0000, 0x0000, 0x0000, 0x0000, 0x0000, 0x0000, 0x0000, 0x0000, 0x0000, 0x0000, 0x0000, 0xffff, 0xffff, 0xffff, 0xffff, 0xbdf7, 0x0000, 0x0000, 0x0000, 0x0000, 0x0000, 0xffff, 0xffff, 0xffff, 0xffff, 0xffff, 0xffff, 0xffff, 0xffff, 0xffff, 0xffff, 0xffff, 0xffff, 0x4a69, 0x0000, 0x0000, 0x0000, 0x0000, 0x0000, 0xffff, 0xffff, 0xffff, 0xffff, 0xffdf, 0x0000, 0x0000, 0x0000, 0x0000, 0x0000, 0xffdf, 0xffff, 0xffff, 0xffff, 0xffff, 0xffff, 0xffff, 0xbdd7, 0x0841, 0x0000, 0x0000, 0x0000, 0x0000, 0x39e7, 0xf79e, 0xffff, 0x2945, 0x0000, 0x0000, 0x0000, 0x0000, 0x4a69, 0xffff, 0xffff, 0xffff, 0xffff, 0xffff, 0xffff, 0xffff, 0xffff, 0xffff, 0xffff, 0xffff, 0xffff, 0xffff, 0xffff, 0xffff, 0xffff, 0xffff, 0xffff, 0xffff, 0xffff, 0xffff, 0xffff, 0xffff, 0xffff, 0xffff, 0xef5d, 0x0000, 0x0000, 0x0000, 0x0000, 0x0000, 0x0000, 0x0000, 0x0000, 0x0000, 0x0000, 0x0000, 0x0000, 0x0000, 0x0000, 0x0000, 0x0000, 0x0000, 0x0000, 0x0000, 0x0000, 0x0000, 0x0000, 0x0000, 0x0000, 0x0000, 0x0000, 0x0000, 0x0000, 0x0000, 0x0000, 0x0000, 0x0000, 0x0000, 0x0000, 0xffff, 0xffff, 0xffff, 0xffff, 0xbdf7, 0x0000, 0x0000, 0x0000, 0x0000, 0x0000, 0xffff, 0xffff, 0xffff, 0xffff, 0xffff, 0xffff, 0xffff, 0xffff, 0xffff, 0xffff, 0xffff, 0xffff, 0xe73c, 0x0000, 0x0000, 0x0000, 0x0000, 0x0000, 0x31a6, 0xffff, 0xffff, 0xffff, 0xffdf, 0x0000, 0x0000, 0x0000, 0x0000, 0x0000, 0xffdf, 0xffff, 0xffff, 0xffff, 0xffff, 0xffff, 0xffff, 0xffff, 0xdedb, 0x0000, 0x0000, 0x0000, 0x0000, 0x0000, 0xdedb, 0xb5b6, 0x0020, 0x0000, 0x0000, 0x0000, 0x0000, 0xe71c, 0xffff, 0xffff, 0xffff, 0xffff, 0xffff, 0xffff, 0xffff, 0xffff, 0xffff, 0xffff, 0xffff, 0xffff, 0xffff, 0xffff, 0xffff, 0xffff, 0xffff, 0xffff, 0xffff, 0xffff, 0xffff, 0xffff, 0xffff, 0xffff, 0xffff, 0xef5d, 0x0000, 0x0000, 0x0000, 0x0000, 0x0000, 0x0000, 0x0000, 0x0000, 0x0000, 0x0000, 0x0000, 0x0000, 0x0000, 0x0000, 0x0000, 0x0000, 0x0000, 0x0000, 0x0000, 0x0000, 0x0000, 0x0000, 0x0000, 0x0000, 0x0000, 0x0000, 0x0000, 0x0000, 0x0000, 0x0000, 0x0000, 0x0000, 0x0000, 0x0000, 0xffff, 0xffff, 0xffff, 0xffff, 0xbdf7, 0x0000, 0x0000, 0x0000, 0x0000, 0x0000, 0xffff, 0xffff, 0xffff, 0xffff, 0xffff, 0xffff, 0xffff, 0xffff, 0xffff, 0xffff, 0xffff, 0xffff, 0xe73c, 0x0841, 0x0000, 0x0000, 0x0000, 0x0000, 0x0861, 0xffff, 0xffff, 0xffff, 0xffdf, 0x0000, 0x0000, 0x0000, 0x0000, 0x0000, 0xffdf, 0xffff, 0xffff, 0xffff, 0xffff, 0xffff, 0xffff, 0xffff, 0xffff, 0x31a6, 0x0000, 0x0000, 0x0000, 0x0000, 0x0000, 0x6b6d, 0x0000, 0x0000, 0x0000, 0x0000, 0x4a49, 0xffff, 0xffff, 0xffff, 0xffff, 0xffff, 0xffff, 0x2124, 0x2124, 0x2124, 0x2124, 0xffff, 0xffff, 0xffff, 0xffff, 0xffff, 0xffff, 0xffff, 0xffff, 0xffff, 0xffff, 0xffff, 0xffff, 0xffff, 0xffff, 0xffff, 0xffff, 0xef5d, 0x0000, 0x0000, 0x0000, 0x0000, 0x0000, 0x0000, 0x0000, 0x0000, 0x0000, 0x0000, 0x0000, 0x0000, 0x0000, 0x0000, 0x0000, 0x0000, 0x0000, 0x0000, 0x0000, 0x0000, 0x0000, 0x0000, 0x0000, 0x0000, 0x0000, 0x0000, 0x0000, 0x0000, 0x0000, 0x0000, 0x0000, 0x0000, 0x0000, 0x0000, 0xffff, 0xffff, 0xffff, 0xffff, 0xbdf7, 0x0000, 0x0000, 0x0000, 0x0000, 0x0000, 0xffff, 0xffff, 0xffff, 0xffff, 0xffff, 0xffff, 0xffff, 0xffff, 0xffff, 0xffff, 0xffff, 0xffff, 0xffff, 0x5aeb, 0x0000, 0x0000, 0x0000, 0x0000, 0x0861, 0xffff, 0xffff, 0xffff, 0xffdf, 0x0000, 0x0000, 0x0000, 0x0000, 0x0000, 0xffdf, 0xffff, 0xffff, 0xffff, 0xffff, 0xffff, 0xffff, 0xffff, 0xffff, 0x9cd3, 0x0000, 0x0000, 0x0000, 0x0000, 0x0000, 0x0000, 0x0000, 0x0000, 0x0000, 0x4228, 0xffdf, 0xffff, 0xffff, 0xffff, 0xffff, 0xffff, 0xffff, 0x0000, 0x0000, 0x0000, 0x0000, 0x0000, 0x0000, 0x2104, 0xa514, 0xffff, 0xffff, 0xffff, 0xffff, 0xffff, 0xffff, 0xffff, 0xffff, 0xffff, 0xffff, 0xffff, 0xffff, 0xef5d, 0x0000, 0x0000, 0x0000, 0x0000, 0x0000, 0x0000, 0x0000, 0x0000, 0x0000, 0x0000, 0x0000, 0x0000, 0x0000, 0x0000, 0x0000, 0x0000, 0x0000, 0x0000, 0x0000, 0x0000, 0x0000, 0x0000, 0x0000, 0x0000, 0x0000, 0x0000, 0x0000, 0x0000, 0x0000, 0x0000, 0x0000, 0x0000, 0x0000, 0x0000, 0xffff, 0xffff, 0xffff, 0xffff, 0xbdf7, 0x0000, 0x0000, 0x0000, 0x0000, 0x0000, 0xffff, 0xffff, 0xffff, 0xffff, 0xffff, 0xffff, 0xffff, 0xffff, 0xffff, 0xffff, 0xffff, 0xffff, 0xffdf, 0x528a, 0x0000, 0x0000, 0x0000, 0x0000, 0x0861, 0xffff, 0xffff, 0xffff, 0xffdf, 0x0000, 0x0000, 0x0000, 0x0000, 0x0000, 0xffdf, 0xffff, 0xffff, 0xffff, 0xffff, 0xffff, 0xffff, 0xffff, 0xffff, 0xffff, 0x6b6d, 0x0000, 0x0000, 0x0000, 0x0000, 0x0000, 0x0000, 0x0000, 0x0000, 0x9492, 0xffff, 0xffff, 0xffff, 0xffff, 0xffff, 0xffff, 0xffff, 0x0000, 0x0000, 0x0000, 0x0000, 0x0000, 0x0000, 0x0000, 0x0000, 0x18e3, 0xb5b6, 0xffff, 0xffff, 0xffff, 0xffff, 0xffff, 0xffff, 0xffff, 0xffff, 0xffff, 0xffff, 0xef5d, 0x0000, 0x0000, 0x0000, 0x0000, 0x0000, 0x0000, 0x0000, 0x0000, 0x0000, 0x0000, 0x0000, 0x0000, 0x0000, 0x0000, 0x0000, 0x0000, 0x0000, 0x0000, 0x0000, 0x0000, 0x0000, 0x0000, 0x0000, 0x0000, 0x0000, 0x0000, 0x0000, 0x0000, 0x0000, 0x0000, 0x0000, 0x0000, 0x0000, 0x0000, 0xffff, 0xffff, 0xffff, 0xffff, 0xbdf7, 0x0000, 0x0000, 0x0000, 0x0000, 0x0000, 0xffff, 0xffff, 0xffff, 0xffff, 0xffff, 0xffff, 0xffff, 0xffff, 0xffff, 0xffff, 0xffff, 0xffff, 0xe73c, 0x0020, 0x0000, 0x0000, 0x0000, 0x0000, 0x0861, 0xffff, 0xffff, 0xffff, 0xffdf, 0x0000, 0x0000, 0x0000, 0x0000, 0x0000, 0xffdf, 0xffff, 0xffff, 0xffff, 0xffff, 0xffff, 0xffff, 0xffff, 0xffff, 0xffff, 0xffff, 0x0000, 0x0000, 0x0000, 0x0000, 0x0000, 0x0000, 0x0000, 0x0000, 0xffff, 0xffff, 0xffff, 0xffff, 0xffff, 0xffff, 0xffff, 0xffff, 0x0000, 0x0000, 0x0000, 0x0000, 0x0000, 0x0000, 0x0000, 0x0000, 0x0000, 0x0000, 0x18c3, 0xdefb, 0xffff, 0xffff, 0xffff, 0xffff, 0xffff, 0xffff, 0xffff, 0xffff, 0xef5d, 0x0000, 0x0000, 0x0000, 0x0000, 0x0000, 0x0000, 0x0000, 0x0000, 0x0000, 0x0000, 0x0000, 0x0000, 0x0000, 0x0000, 0x0000, 0x0000, 0x0000, 0x0000, 0x0000, 0x0000, 0x0000, 0x0000, 0x0000, 0x0000, 0x0000, 0x0000, 0x0000, 0x0000, 0x0000, 0x0000, 0x0000, 0x0000, 0x0000, 0x0000, 0xffff, 0xffff, 0xffff, 0xffff, 0xbdf7, 0x0000, 0x0000, 0x0000, 0x0000, 0x0000, 0xffff, 0xffff, 0xffff, 0xffff, 0xffff, 0xffff, 0xffff, 0xffff, 0xffff, 0xffff, 0xffff, 0xffff, 0xe73c, 0x0000, 0x0000, 0x0000, 0x0000, 0x0000, 0x6b6d, 0xffff, 0xffff, 0xffff, 0xffdf, 0x0000, 0x0000, 0x0000, 0x0000, 0x0000, 0xffdf, 0xffff, 0xffff, 0xffff, 0xffff, 0xffff, 0xffff, 0xffff, 0xffff, 0xffff, 0xffff, 0x9cf3, 0x0000, 0x0000, 0x0000, 0x0000, 0x0000, 0x18e3, 0xe71c, 0xffff, 0xffff, 0xffff, 0xffff, 0xffff, 0xffff, 0xffff, 0xffff, 0x0000, 0x0000, 0x0000, 0x0000, 0x0000, 0x0000, 0x0000, 0x0000, 0x0000, 0x0000, 0x0000, 0x1082, 0x39e7, 0xffff, 0xffff, 0xffff, 0xffff, 0xffff, 0xffff, 0xffff, 0xef5d, 0x0000, 0x0000, 0x0000, 0x0000, 0x0000, 0x0000, 0x0000, 0x0000, 0x0000, 0x0000, 0x0000, 0x0000, 0x0000, 0x0000, 0x0000, 0x0000, 0x0000, 0x0000, 0x0000, 0x0000, 0x0000, 0x0000, 0x0000, 0x0000, 0x0000, 0x0000, 0x0000, 0x0000, 0x0000, 0x0000, 0x0000, 0x0000, 0x0000, 0x0000, 0xffff, 0xffff, 0xffff, 0xffff, 0xbdf7, 0x0000, 0x0000, 0x0000, 0x0000, 0x0000, 0xffff, 0xffff, 0xffff, 0xffff, 0xffff, 0xffff, 0xffff, 0xffff, 0xffff, 0xffff, 0xffff, 0xffff, 0x18c3, 0x0000, 0x0000, 0x0000, 0x0000, 0x0000, 0xffff, 0xffff, 0xffff, 0xffff, 0xffdf, 0x0000, 0x0000, 0x0000, 0x0000, 0x0000, 0xffdf, 0xffff, 0xffff, 0xffff, 0xffff, 0xffff, 0xffff, 0xffff, 0xffff, 0xffff, 0xffff, 0xf7be, 0x18e3, 0x0000, 0x0000, 0x0000, 0x0000, 0x528a, 0xffff, 0xffff, 0xffff, 0xffff, 0xffff, 0xffff, 0xffff, 0xffff, 0xffff, 0x0000, 0x0000, 0x0000, 0x0000, 0x0000, 0x0000, 0x0000, 0x0000, 0x0000, 0x0000, 0x0000, 0x0000, 0x0000, 0x630c, 0xffff, 0xffff, 0xffff, 0xffff, 0xffff, 0xffff, 0xef5d, 0x0000, 0x0000, 0x0000, 0x0000, 0x0000, 0x0000, 0x0000, 0x0000, 0x0000, 0x0000, 0x0000, 0x0000, 0x0000, 0x0000, 0x0000, 0x0000, 0x0000, 0x0000, 0x0000, 0x0000, 0x0000, 0x0000, 0x0000, 0x0000, 0x0000, 0x0000, 0x0000, 0x0000, 0x0000, 0x0000, 0x0000, 0x0000, 0x0000, 0x0000, 0xffff, 0xffff, 0xffff, 0xffff, 0xbdf7, 0x0000, 0x0000, 0x0000, 0x0000, 0x0000, 0xffff, 0xffff, 0xffff, 0xffff, 0xffff, 0xffff, 0xffff, 0xffff, 0xffff, 0xffff, 0xffff, 0xbdf7, 0x0000, 0x0000, 0x0000, 0x0000, 0x0000, 0x18e3, 0xffff, 0xffff, 0xffff, 0xffff, 0xffdf, 0x0000, 0x0000, 0x0000, 0x0000, 0x0000, 0xffdf, 0xffff, 0xffff, 0xffff, 0xffff, 0xffff, 0xffff, 0xffff, 0xffff, 0xffff, 0xffff, 0xffff, 0x2104, 0x0000, 0x0000, 0x0000, 0x0000, 0x52aa, 0xffff, 0xffff, 0xffff, 0xffff, 0xffff, 0xffff, 0xffff, 0xffff, 0xffff, 0x0000, 0x0000, 0x0000, 0x0000, 0x0000, 0x0000, 0x0000, 0x0000, 0x0000, 0x0000, 0x0000, 0x0000, 0x0000, 0x0000, 0x31a6, 0xffff, 0xffff, 0xffff, 0xffff, 0xffff, 0xef5d, 0x0000, 0x0000, 0x0000, 0x0000, 0x0000, 0x0000, 0x0000, 0x0000, 0x0000, 0x0000, 0x0000, 0x0000, 0x0000, 0x0000, 0x0000, 0x0000, 0x0000, 0x0000, 0x0000, 0x0000, 0x0000, 0x0000, 0x0000, 0x0000, 0x0000, 0x0000, 0x0000, 0x0000, 0x0000, 0x0000, 0x0000, 0x0000, 0x0000, 0x0000, 0xffff, 0xffff, 0xffff, 0xffff, 0xbdf7, 0x0000, 0x0000, 0x0000, 0x0000, 0x0000, 0xffff, 0xffff, 0xffff, 0xffff, 0xffff, 0xffff, 0xffff, 0xffff, 0xffff, 0xffff, 0xe71c, 0x0841, 0x0000, 0x0000, 0x0000, 0x0000, 0x0000, 0x8c51, 0xffff, 0xffff, 0xffff, 0xffff, 0xffdf, 0x0000, 0x0000, 0x0000, 0x0000, 0x0000, 0xffdf, 0xffff, 0xffff, 0xffff, 0xffff, 0xffff, 0xffff, 0xffff, 0xffff, 0xffff, 0xffff, 0xffff, 0x2104, 0x0000, 0x0000, 0x0000, 0x0000, 0x52aa, 0xffff, 0xffff, 0xffff, 0xffff, 0xffff, 0xffff, 0xffff, 0xffff, 0xffff, 0x0000, 0x0000, 0x0000, 0x0000, 0x0000, 0x0000, 0x0000, 0x0000, 0x0000, 0x0000, 0x0000, 0x0000, 0x0000, 0x0000, 0x0000, 0x5acb, 0xffff, 0xffff, 0xffff, 0xffff, 0xef5d, 0x0000, 0x0000, 0x0000, 0x0000, 0x0000, 0x0000, 0x0000, 0x0000, 0x0000, 0x0000, 0x0000, 0x0000, 0x0000, 0x0000, 0x0000, 0x0000, 0x0000, 0x0000, 0x0000, 0x0000, 0x0000, 0x0000, 0x0000, 0x0000, 0x0000, 0x0000, 0x0000, 0x0000, 0x0000, 0x0000, 0x0000, 0x0000, 0x0000, 0x0000, 0xffff, 0xffff, 0xffff, 0xffff, 0xbdf7, 0x0000, 0x0000, 0x0000, 0x0000, 0x0000, 0xffff, 0xffff, 0xffff, 0xffff, 0xffff, 0xffff, 0xffff, 0xffff, 0xc618, 0x9492, 0x0000, 0x0000, 0x0000, 0x0000, 0x0000, 0x0000, 0x1082, 0xffff, 0xffff, 0xffff, 0xffff, 0xffff, 0xffdf, 0x0000, 0x0000, 0x0000, 0x0000, 0x0000, 0xffdf, 0xffff, 0xffff, 0xffff, 0xffff, 0xffff, 0xffff, 0xffff, 0xffff, 0xffff, 0xffff, 0xffff, 0x2104, 0x0000, 0x0000, 0x0000, 0x0000, 0x52aa, 0xffff, 0xffff, 0xffff, 0xffff, 0xffff, 0xffff, 0xffff, 0xffff, 0xffff, 0x0000, 0x0000, 0x0000, 0x0000, 0x0000, 0x0000, 0x0000, 0x0000, 0x0000, 0x0000, 0x0000, 0x0000, 0x0000, 0x0000, 0x0000, 0x0000, 0xffff, 0xffff, 0xffff, 0xffff, 0xef5d, 0x0000, 0x0000, 0x0000, 0x0000, 0x0000, 0x0000, 0x0000, 0x0000, 0x0000, 0x0000, 0x0000, 0x0000, 0x0000, 0x0000, 0x0000, 0x0000, 0x0000, 0x0000, 0x0000, 0x0000, 0x0000, 0x0000, 0x0000, 0x0000, 0x0000, 0x0000, 0x0000, 0x0000, 0x0000, 0x0000, 0x0000, 0x0000, 0x0000, 0x0000, 0xffff, 0xffff, 0xffff, 0xffff, 0xbdf7, 0x0000, 0x0000, 0x0000, 0x0000, 0x0000, 0x1082, 0x1082, 0x1082, 0x1082, 0x1082, 0x1082, 0x1082, 0x1082, 0x0020, 0x0000, 0x0000, 0x0000, 0x0000, 0x0000, 0x0000, 0x0000, 0xef7d, 0xffff, 0xffff, 0xffff, 0xffff, 0xffff, 0xffdf, 0x0000, 0x0000, 0x0000, 0x0000, 0x0000, 0xffdf, 0xffff, 0xffff, 0xffff, 0xffff, 0xffff, 0xffff, 0xffff, 0xffff, 0xffff, 0xffff, 0xffff, 0x2104, 0x0000, 0x0000, 0x0000, 0x0000, 0x52aa, 0xffff, 0xffff, 0xffff, 0xffff, 0xffff, 0xffff, 0xffff, 0xffff, 0xffff, 0x0000, 0x0000, 0x0000, 0x0000, 0x0000, 0x0000, 0x0000, 0x0000, 0x0000, 0x0000, 0x0000, 0x0000, 0x0000, 0x0000, 0x0000, 0x0000, 0x1082, 0xd69a, 0xffff, 0xffff, 0xef5d, 0x0000, 0x0000, 0x0000, 0x0000, 0x0000, 0x0000, 0x0000, 0x0000, 0x0000, 0x0000, 0x0000, 0x0000, 0x0000, 0x0000, 0x0000, 0x0000, 0x0000, 0x0000, 0x0000, 0x0000, 0x0000, 0x0000, 0x0000, 0x0000, 0x0000, 0x0000, 0x0000, 0x0000, 0x0000, 0x0000, 0x0000, 0x0000, 0x0000, 0x0000, 0xffff, 0xffff, 0xffff, 0xffff, 0xbdf7, 0x0000, 0x0000, 0x0000, 0x0000, 0x0000, 0x0000, 0x0000, 0x0000, 0x0000, 0x0000, 0x0000, 0x0000, 0x0000, 0x0000, 0x0000, 0x0000, 0x0000, 0x0000, 0x0000, 0x0841, 0xc618, 0xffff, 0xffff, 0xffff, 0xffff, 0xffff, 0xffff, 0xffdf, 0x0000, 0x0000, 0x0000, 0x0000, 0x0000, 0xffdf, 0xffff, 0xffff, 0xffff, 0xffff, 0xffff, 0xffff, 0xffff, 0xffff, 0xffff, 0xffff, 0xffff, 0x2104, 0x0000, 0x0000, 0x0000, 0x0000, 0x52aa, 0xffff, 0xffff, 0xffff, 0xffff, 0xffff, 0xffff, 0xffff, 0xffff, 0xffff, 0x0000, 0x0000, 0x0000, 0x0000, 0x0000, 0x0000, 0x0000, 0x0000, 0x0000, 0x0000, 0x0000, 0x0000, 0x0000, 0x0000, 0x0000, 0x0000, 0x0000, 0x9cd3, 0xffff, 0xffff, 0xef5d, 0x0000, 0x0000, 0x0000, 0x0000, 0x0000, 0x0000, 0x0000, 0x0000, 0x0000, 0x0000, 0x0000, 0x0000, 0x0000, 0x0000, 0x0000, 0x0000, 0x0000, 0x0000, 0x0000, 0x0000, 0x0000, 0x0000, 0x0000, 0x0000, 0x0000, 0x0000, 0x0000, 0x0000, 0x0000, 0x0000, 0x0000, 0x0000, 0x0000, 0x0000, 0xffff, 0xffff, 0xffff, 0xffff, 0xbdf7, 0x0000, 0x0000, 0x0000, 0x0000, 0x0000, 0x0000, 0x0000, 0x0000, 0x0000, 0x0000, 0x0000, 0x0000, 0x0000, 0x0000, 0x0000, 0x0000, 0x0000, 0x0000, 0x0000, 0xf7be, 0xffff, 0xffff, 0xffff, 0xffff, 0xffff, 0xffff, 0xffff, 0xffdf, 0x0000, 0x0000, 0x0000, 0x0000, 0x0000, 0xffdf, 0xffff, 0xffff, 0xffff, 0xffff, 0xffff, 0xffff, 0xffff, 0xffff, 0xffff, 0xffff, 0xffff, 0x2104, 0x0000, 0x0000, 0x0000, 0x0000, 0x52aa, 0xffff, 0xffff, 0xffff, 0xffff, 0xffff, 0xffff, 0xffff, 0xffff, 0xffff, 0x0000, 0x0000, 0x0000, 0x0000, 0x0000, 0x0000, 0x0000, 0x0000, 0x0000, 0x0000, 0x0000, 0x0000, 0x0000, 0x0000, 0x0000, 0x0000, 0x0000, 0x0000, 0xffff, 0xffff, 0xef5d, 0x0000, 0x0000, 0x0000, 0x0000, 0x0000, 0x0000, 0x0000, 0x0000, 0x0000, 0x0000, 0x0000, 0x0000, 0x0000, 0x0000, 0x0000, 0x0000, 0x0000, 0x0000, 0x0000, 0x0000, 0x0000, 0x0000, 0x0000, 0x0000, 0x0000, 0x0000, 0x0000, 0x0000, 0x0000, 0x0000, 0x0000, 0x0000, 0x0000, 0x0000, 0xffff, 0xffff, 0xffff, 0xffff, 0xbdf7, 0x0000, 0x0000, 0x0000, 0x0000, 0x0000, 0x0000, 0x0000, 0x0000, 0x0000, 0x0000, 0x0000, 0x0000, 0x0000, 0x0000, 0x0000, 0x0000, 0x4a49, 0x8430, 0xffff, 0xffff, 0xffff, 0xffff, 0xffff, 0xffff, 0xffff, 0xffff, 0xffff, 0xffdf, 0x0000, 0x0000, 0x0000, 0x0000, 0x0000, 0xffdf, 0xffff, 0xffff, 0xffff, 0xffff, 0xffff, 0xffff, 0xffff, 0xffff, 0xffff, 0xffff, 0xffff, 0x2104, 0x0000, 0x0000, 0x0000, 0x0000, 0x52aa, 0xffff, 0xffff, 0xffff, 0xffff, 0xffff, 0xffff, 0xffff, 0xffff, 0xffff, 0x0000, 0x0000, 0x0000, 0x0000, 0x0000, 0x0000, 0x0000, 0x0000, 0x0000, 0x0000, 0x0000, 0x0000, 0x0000, 0x0000, 0x0000, 0x0000, 0x0000, 0x0000, 0x18e3, 0xffff, 0xef5d, 0x0000, 0x0000, 0x0000, 0x0000, 0x0000, 0x0000, 0x0000, 0x0000, 0x0000, 0x0000, 0x0000, 0x0000, 0x0000, 0x0000, 0x0000, 0x0000, 0x0000, 0x0000, 0x0000, 0x0000, 0x0000, 0x0000, 0x0000, 0x0000, 0x0000, 0x0000, 0x0000, 0x0000, 0x0000, 0x0000, 0x0000, 0x0000, 0x0000, 0x0000, 0xffff, 0xffff, 0xffff, 0xffff, 0xbdf7, 0x0000, 0x0000, 0x0000, 0x0000, 0x0000, 0x0000, 0x0000, 0x0000, 0x0000, 0x0000, 0x0000, 0x0000, 0x0000, 0x0000, 0x9cf3, 0xffdf, 0xffff, 0xffff, 0xffff, 0xffff, 0xffff, 0xffff, 0xffff, 0xffff, 0xffff, 0xffff, 0xffff, 0xffdf, 0x0000, 0x0000, 0x0000, 0x0000, 0x0000, 0xffdf, 0xffff, 0xffff, 0xffff, 0xffff, 0xffff, 0xffff, 0xffff, 0xffff, 0xffff, 0xffff, 0xffff, 0x2104, 0x0000, 0x0000, 0x0000, 0x0000, 0x52aa, 0xffff, 0xffff, 0xffff, 0xffff, 0xffff, 0xffff, 0xffff, 0xffff, 0xffff, 0x0000, 0x0000, 0x0000, 0x0000, 0x0000, 0x0000, 0x0000, 0x0000, 0x0000, 0x0000, 0x0000, 0x0000, 0x0000, 0x0000, 0x0000, 0x0000, 0x0000, 0x0000, 0x0861, 0xce79, 0xef5d, 0x0000, 0x0000, 0x0000, 0x0000, 0x0000, 0x0000, 0x0000, 0x0000, 0x0000, 0x0000, 0x0000, 0x0000, 0x0000, 0x0000, 0x0000, 0x0000, 0x0000, 0x0000, 0x0000, 0x0000, 0x0000, 0x0000, 0x0000, 0x0000, 0x0000, 0x0000, 0x0000, 0x0000, 0x0000, 0x0000, 0x0000, 0x0000, 0x0000, 0x0000, 0xffff, 0xffff, 0xffff, 0xffff, 0xffff, 0xffff, 0xffff, 0xffff, 0xffff, 0xffff, 0xffff, 0xffff, 0xffff, 0xffff, 0xffff, 0xffff, 0xffff, 0xffff, 0xffff, 0xffff, 0xffff, 0xffff, 0xffff, 0xffff, 0xffff, 0xffff, 0xffff, 0xffff, 0xffff, 0xffff, 0xffff, 0xffff, 0xffff, 0xffff, 0xffff, 0xffff, 0xffff, 0xffff, 0xffff, 0xffff, 0xffff, 0xffff, 0xffff, 0xffff, 0xffff, 0xffff, 0xffff, 0xffff, 0xffff, 0xffff, 0xffff, 0xffff, 0xffff, 0xffff, 0xffff, 0xffff, 0xffff, 0xffff, 0xffff, 0xffff, 0xffff, 0xffff, 0xffff, 0xffff, 0xffff, 0x0000, 0x0000, 0x0000, 0x0000, 0x0000, 0x0000, 0x0000, 0x0000, 0x0000, 0x0000, 0x0000, 0x0000, 0x0000, 0x0000, 0x0000, 0x0000, 0x0000, 0x0000, 0x0000, 0x94b2, 0xef5d, 0x0000, 0x0000, 0x0000, 0x0000, 0x0000, 0x0000, 0x0000, 0x0000, 0x0000, 0x0000, 0x0000, 0x0000, 0x0000, 0x0000, 0x0000, 0x0000, 0x0000, 0x0000, 0x0000, 0x0000, 0x0000, 0x0000, 0x0000, 0x0000, 0x0000, 0x0000, 0x0000, 0x0000, 0x0000, 0x0000, 0x0000, 0x0000, 0x0000, 0x0000, 0xffff, 0xffff, 0xffff, 0xffff, 0xffff, 0xffff, 0xffff, 0xffff, 0xffff, 0xffff, 0xffff, 0xffff, 0xffff, 0xffff, 0xffff, 0xffff, 0xffff, 0xffff, 0xffff, 0xffff, 0xffff, 0xffff, 0xffff, 0xffff, 0xffff, 0xffff, 0xffff, 0xffff, 0xffff, 0xffff, 0xffff, 0xffff, 0xffff, 0xffff, 0xffff, 0xffff, 0xffff, 0xffff, 0xffff, 0xffff, 0xffff, 0xffff, 0xffff, 0xffff, 0xffff, 0xffff, 0xffff, 0xffff, 0xffff, 0xffff, 0xffff, 0xffff, 0xffff, 0xffff, 0xffff, 0xffff, 0xffff, 0xffff, 0xffff, 0xffff, 0xffff, 0xffff, 0xffff, 0xffff, 0xffff, 0x0000, 0x0000, 0x0000, 0x0000, 0x0000, 0x0000, 0x0000, 0x0000, 0x0000, 0x0000, 0x0000, 0x0000, 0x0000, 0x0000, 0x0000, 0x0000, 0x0000, 0x0000, 0x0000, 0x4a49, 0xef5d, 0x0000, 0x0000, 0x0000, 0x0000, 0x0000, 0x0000, 0x0000, 0x0000, 0x0000, 0x0000, 0x0000, 0x0000, 0x0000, 0x0000, 0x0000, 0x0000, 0x0000, 0x0000, 0x0000, 0x0000, 0x0000, 0x0000, 0x0000, 0x0000, 0x0000, 0x0000, 0x0000, 0x0000, 0x0000, 0x0000, 0x0000, 0x0000, 0x0000, 0x0000, 0xffff, 0xffff, 0xffff, 0xffff, 0xffff, 0xffff, 0xffff, 0xffff, 0xffff, 0xffff, 0xffff, 0xffff, 0xffff, 0xffff, 0xffff, 0xffff, 0xffff, 0xffff, 0xffff, 0xffff, 0xffff, 0xffff, 0xffff, 0xffff, 0xffff, 0xffff, 0xffff, 0xffff, 0xffff, 0xffff, 0xffff, 0xffff, 0xffff, 0xffff, 0xffff, 0xffff, 0xffff, 0xffff, 0xffff, 0xffff, 0xffff, 0xffff, 0xffff, 0xffff, 0xffff, 0xffff, 0xffff, 0xffff, 0xffff, 0xffff, 0xffff, 0xffff, 0xffff, 0xffff, 0xffff, 0xffff, 0xffff, 0xffff, 0xffff, 0xffff, 0xffff, 0xffff, 0xffff, 0xffff, 0xffff, 0x0000, 0x0000, 0x0000, 0x0000, 0x0000, 0x0000, 0x0000, 0x0000, 0x0000, 0x0000, 0x0000, 0x0000, 0x0000, 0x0000, 0x0000, 0x0000, 0x0000, 0x0000, 0x0000, 0x0000, 0xef5d, 0x0000, 0x0000, 0x0000, 0x0000, 0x0000, 0x0000, 0x0000, 0x0000, 0x0000, 0x0000, 0x0000, 0x0000, 0x0000, 0x0000, 0x0000, 0x0000, 0x0000, 0x0000, 0x0000, 0x0000, 0x0000, 0x0000, 0x0000, 0x0000, 0x0000, 0x0000, 0x0000, 0x0000, 0x0000, 0x0000, 0x0000, 0x0000, 0x0000, 0x0000, 0xffff, 0xffff, 0xffff, 0xffff, 0xffff, 0xffff, 0xffff, 0xffff, 0xffff, 0xffff, 0xffff, 0xffff, 0xffff, 0xffff, 0xffff, 0xffff, 0xffff, 0xffff, 0xffff, 0xffff, 0xffff, 0xffff, 0xffff, 0xffff, 0xffff, 0xffff, 0xffff, 0xffff, 0xffff, 0xffff, 0xffff, 0xffff, 0xffff, 0xffff, 0xffff, 0xffff, 0xffff, 0xffff, 0xffff, 0xffff, 0xffff, 0xffff, 0xffff, 0xffff, 0xffff, 0xffff, 0xffff, 0xffff, 0xffff, 0xffff, 0xffff, 0xffff, 0xffff, 0xffff, 0xffff, 0xffff, 0xffff, 0xffff, 0xffff, 0xffff, 0xffff, 0xffff, 0xffff, 0xffff, 0xffff, 0x0000, 0x0000, 0x0000, 0x0000, 0x0000, 0x0000, 0x0000, 0x0000, 0x0000, 0x0000, 0x0000, 0x0000, 0x0000, 0x0000, 0x0000, 0x0000, 0x0000, 0x0000, 0x0000, 0x0000, 0xef5d, 0x0000, 0x0000, 0x0000, 0x0000, 0x0000, 0x0000, 0x0000, 0x0000, 0x0000, 0x0000, 0x0000, 0x0000, 0x0000, 0x0000, 0x0000, 0x0000, 0x0000, 0x0000, 0x0000, 0x0000, 0x0000, 0x0000, 0x0000, 0x0000, 0x0000, 0x0000, 0x0000, 0x0000, 0x0000, 0x0000, 0x0000, 0x0000, 0x0000, 0x0000, 0xffff, 0xffff, 0xffff, 0xffff, 0xffff, 0xffff, 0xffff, 0xffff, 0xffff, 0xffff, 0xffff, 0xffff, 0xffff, 0xffff, 0xffff, 0xffff, 0xffff, 0xffff, 0xffff, 0xffff, 0xffff, 0xffff, 0xffff, 0xffff, 0xffff, 0xffff, 0xffff, 0xffff, 0xffff, 0xffff, 0xffff, 0xffff, 0xffff, 0xffff, 0xffff, 0xffff, 0xffff, 0xffff, 0xffff, 0xffff, 0xffff, 0xffff, 0xffff, 0xffff, 0xffff, 0xffff, 0xffff, 0xffff, 0xffff, 0xffff, 0xffff, 0xffff, 0xffff, 0xffff, 0xffff, 0xffff, 0xffff, 0xffff, 0xffff, 0xffff, 0xffff, 0xffff, 0xffff, 0xffff, 0xffff, 0x0000, 0x0000, 0x0000, 0x0000, 0x0000, 0x0000, 0x0000, 0x0000, 0x0000, 0x0000, 0x0000, 0x0000, 0x0000, 0x0000, 0x0000, 0x0000, 0x0000, 0x0000, 0x0000, 0x0000, 0xef5d, 0x0000, 0x0000, 0x0000, 0x0000, 0x0000, 0x0000, 0x0000, 0x0000, 0x0000, 0x0000, 0x0000, 0x0000, 0x0000, 0x0000, 0x0000, 0x0000, 0x0000, 0x0000, 0x0000, 0x0000, 0x0000, 0x0000, 0x0000, 0x0000, 0x0000, 0x0000, 0x0000, 0x0000, 0x0000, 0x0000, 0x0000, 0x0000, 0x0000, 0x0000, 0xffff, 0xffff, 0xffff, 0xffff, 0xbdf7, 0x0000, 0x0000, 0x0000, 0x0000, 0x0000, 0x0000, 0x0000, 0x0000, 0x0000, 0x0000, 0x0000, 0x0000, 0x0000, 0x0000, 0x0000, 0x0000, 0x0000, 0x0000, 0x0000, 0x0000, 0x0000, 0x0000, 0x0000, 0x0000, 0x0000, 0x0000, 0x0000, 0x0000, 0x0000, 0x0000, 0x0000, 0x0000, 0x0000, 0x0000, 0x0000, 0x0000, 0x0000, 0x0000, 0x0000, 0x0000, 0x0000, 0x0000, 0x0000, 0x0000, 0x0000, 0x0000, 0x0000, 0x0000, 0x0000, 0x0000, 0x0000, 0x0000, 0x0000, 0x0000, 0x0000, 0x0000, 0x0000, 0x0000, 0x0000, 0x0000, 0x0000, 0x0000, 0x0000, 0x0000, 0x0000, 0x0000, 0x0000, 0x0000, 0x0000, 0x0000, 0x0000, 0x0000, 0x0000, 0x0000, 0x0000, 0x0000, 0x0000, 0x0000, 0x0000, 0x0000, 0xef5d, 0x0000, 0x0000, 0x0000, 0x0000, 0x0000, 0x0000, 0x0000, 0x0000, 0x0000, 0x0000, 0x0000, 0x0000, 0x0000, 0x0000, 0x0000, 0x0000, 0x0000, 0x0000, 0x0000, 0x0000, 0x0000, 0x0000, 0x0000, 0x0000, 0x0000, 0x0000, 0x0000, 0x0000, 0x0000, 0x0000, 0x0000, 0x0000, 0x0000, 0x0000, 0xffff, 0xffff, 0xffff, 0xffff, 0xbdf7, 0x0000, 0x0000, 0x0000, 0x0000, 0x0000, 0x0000, 0x0000, 0x0000, 0x0000, 0x0000, 0x0000, 0x0000, 0x0000, 0x0000, 0x0000, 0x0000, 0x0000, 0x0000, 0x0000, 0x0000, 0x0000, 0x0000, 0x0000, 0x0000, 0x0000, 0x0000, 0x0000, 0x0000, 0x0000, 0x0000, 0x0000, 0x0000, 0x0000, 0x0000, 0x0000, 0x0000, 0x0000, 0x0000, 0x0000, 0x0000, 0x0000, 0x0000, 0x0000, 0x0000, 0x0000, 0x0000, 0x0000, 0x0000, 0x0000, 0x0000, 0x0000, 0x0000, 0x0000, 0x0000, 0x0000, 0x0000, 0x0000, 0x0000, 0x0000, 0x0000, 0x0000, 0x0000, 0x0000, 0x0000, 0x0000, 0x0000, 0x0000, 0x0000, 0x0000, 0x0000, 0x0000, 0x0000, 0x0000, 0x0000, 0x0000, 0x0000, 0x0000, 0x0000, 0x0000, 0x0000, 0x0000, 0x0000, 0x0000, 0x0000, 0x0000, 0x0000, 0x0000, 0x0000, 0x0000, 0x0000, 0x0000, 0x0000, 0x0000, 0x0000, 0x0000, 0x0000, 0x0000, 0x0000, 0x0000, 0x0000, 0x0000, 0x0000, 0x0000, 0x0000, 0x0000, 0x0000, 0x0000, 0x0000, 0x0000, 0x0000, 0x0000, 0x0000, 0x0000, 0x0000, 0x18e3, 0xffff, 0xffff, 0xffff, 0xffff, 0xbdf7, 0x0000, 0x0000, 0x0000, 0x0000, 0x0000, 0x0000, 0x0000, 0x0000, 0x0000, 0x0000, 0x0000, 0x0000, 0x0000, 0x0000, 0x0000, 0x0000, 0x0000, 0x0000, 0x0000, 0x0000, 0x0000, 0x0000, 0x0000, 0x0000, 0x0000, 0x0000, 0x0000, 0x0000, 0x0000, 0x0000, 0x0000, 0x0000, 0x0000, 0x0000, 0x0000, 0x0000, 0x0000, 0x0000, 0x0000, 0x0000, 0x0000, 0x0000, 0x0000, 0x0000, 0x0000, 0x0000, 0x0000, 0x0000, 0x0000, 0x0000, 0x0000, 0x0000, 0x0000, 0x0000, 0x0000, 0x0000, 0x0000, 0x0000, 0x0000, 0x0000, 0x0000, 0x0000, 0x0000, 0x0000, 0x0000, 0x0000, 0x0000, 0x0000, 0x0000, 0x0000, 0x0000, 0x0000, 0x0000, 0x0000, 0x0000, 0x0000, 0x0000, 0x0000, 0x0000, 0x0000, 0x0000, 0x0000, 0x0000, 0x0000, 0x0000, 0x0000, 0x0000, 0x0000, 0x0000, 0x0000, 0x0000, 0x0000, 0x0000, 0x0000, 0x0000, 0x0000, 0x0000, 0x0000, 0x0000, 0x0000, 0x0000, 0x0000, 0x0000, 0x0000, 0x0000, 0x0000, 0x0000, 0x0000, 0x0000, 0x0000, 0x0000, 0x0000, 0x0000, 0x0000, 0xce59, 0xffff, 0xffff, 0xffff, 0xffff, 0xbdf7, 0x0000, 0x0000, 0x0000, 0x0000, 0x0000, 0x0000, 0x0000, 0x0000, 0x0000, 0x0000, 0x0000, 0x0000, 0x0000, 0x0000, 0x0000, 0x0000, 0x0000, 0x0000, 0x0000, 0x0000, 0x0000, 0x0000, 0x0000, 0x0000, 0x0000, 0x0000, 0x0000, 0x0000, 0x0000, 0x0000, 0x0000, 0x0000, 0x0000, 0x0000, 0x0000, 0x0000, 0x0000, 0x0000, 0x0000, 0x0000, 0x0000, 0x0000, 0x0000, 0x0000, 0x0000, 0x0000, 0x0000, 0x0000, 0x0000, 0x0000, 0x0000, 0x0000, 0x0000, 0x0000, 0x0000, 0x0000, 0x0000, 0x0000, 0x0000, 0x0000, 0x0000, 0x0000, 0x0000, 0x0000, 0x0000, 0x0000, 0x0000, 0x0000, 0x0000, 0x0000, 0x0000, 0x0000, 0x0000, 0x0000, 0x0000, 0x0000, 0x0000, 0x0000, 0x0000, 0x0000, 0xef5d, 0x0000, 0x0000, 0x0000, 0x0000, 0x0000, 0x0000, 0x0000, 0x0000, 0x0000, 0x0000, 0x0000, 0x0000, 0x0000, 0x0000, 0x0000, 0x0000, 0x0000, 0x0000, 0x0000, 0x0000, 0x0000, 0x0000, 0x0000, 0x0000, 0x0000, 0x0000, 0x0000, 0x0000, 0x0000, 0x0000, 0x0000, 0x0000, 0x0000, 0xce59, 0xffff, 0xffff, 0xffff, 0xffff, 0xbdf7, 0x0000, 0x0000, 0x0000, 0x0000, 0x0000, 0x0000, 0x0000, 0x0000, 0x0000, 0x0000, 0x0000, 0x0000, 0x0000, 0x0000, 0x0000, 0x0000, 0x0000, 0x1082, 0x1082, 0x0000, 0x0000, 0x0000, 0x0000, 0x0000, 0x0000, 0x0000, 0x0000, 0x0000, 0x0000, 0x0000, 0x1082, 0x1082, 0x0841, 0x0000, 0x0000, 0x0000, 0x0000, 0x0000, 0x0000, 0x0000, 0x0000, 0x0000, 0x0000, 0x0000, 0x0000, 0x0000, 0x0000, 0x0000, 0x0000, 0x0000, 0x0000, 0x0000, 0x0000, 0x0000, 0x0000, 0x0000, 0x0000, 0x0000, 0x0000, 0x0000, 0x0000, 0x0000, 0x0000, 0x0000, 0x0000, 0x0000, 0x0000, 0x0000, 0x0000, 0x0000, 0x0000, 0x0000, 0x0000, 0x0000, 0x0000, 0x0000, 0x0000, 0x0000, 0x0000, 0x0000, 0xef5d, 0x0000, 0x0000, 0x0000, 0x0000, 0x0000, 0x0000, 0x0000, 0x0000, 0x0000, 0x0000, 0x0000, 0x0000, 0x0000, 0x0000, 0x0000, 0x0000, 0x0000, 0x0000, 0x0000, 0x0000, 0x0000, 0x0000, 0x0000, 0x0000, 0x0000, 0x0000, 0x0000, 0x0000, 0x0000, 0x0000, 0x0000, 0x0000, 0x0000, 0xce59, 0xffff, 0xffff, 0xffff, 0xffff, 0xbdf7, 0x0000, 0x0000, 0x0000, 0x0000, 0x0000, 0x0000, 0x0000, 0x0000, 0x0000, 0x0000, 0x0000, 0x0000, 0x0000, 0x0000, 0x0000, 0x0000, 0x0000, 0xffff, 0xffff, 0x0000, 0x0000, 0x0000, 0x0000, 0x0000, 0x0000, 0x0000, 0x0000, 0x0000, 0x0000, 0x0000, 0xffff, 0xffff, 0x8430, 0x0000, 0x0000, 0x0000, 0x0000, 0x0000, 0x0000, 0x0000, 0x0000, 0x0000, 0x0000, 0x0000, 0x0000, 0x0000, 0x0000, 0x0000, 0x0000, 0x0000, 0x0000, 0x0000, 0x0000, 0x0000, 0x0000, 0x0000, 0x0000, 0x0000, 0x0000, 0x0000, 0x0000, 0x0000, 0x0000, 0x0000, 0x0000, 0x0000, 0x0000, 0x0000, 0x0000, 0x0000, 0x0000, 0x0000, 0x0000, 0x0000, 0x0000, 0x0000, 0x0000, 0x0000, 0x0000, 0x0000, 0xef5d, 0x0000, 0x0000, 0x0000, 0x0000, 0x0000, 0x0000, 0x0000, 0x0000, 0x0000, 0x0000, 0x0000, 0x0000, 0x0000, 0x0000, 0x0000, 0x0000, 0x0000, 0x0000, 0x0000, 0x0000, 0x0000, 0x0000, 0x0000, 0x0000, 0x0000, 0x0000, 0x0000, 0x0000, 0x0000, 0x0000, 0x0000, 0x0000, 0x0020, 0xce79, 0xffff, 0xffff, 0xffff, 0xffff, 0xbdf7, 0x0000, 0x0000, 0x0000, 0x0000, 0x0000, 0x0000, 0x0000, 0x0000, 0x0000, 0x0000, 0x0000, 0x0000, 0x0000, 0x0000, 0x0000, 0x0000, 0x0000, 0xffff, 0xffff, 0x0000, 0x0000, 0x0000, 0x0000, 0x0000, 0x0000, 0x0000, 0x0000, 0x0000, 0x0000, 0x0000, 0xffff, 0xffff, 0x8430, 0x0000, 0x0000, 0x0000, 0x0000, 0x0000, 0x0000, 0x0000, 0x0000, 0x0000, 0x0000, 0x0000, 0x0000, 0x0000, 0x0000, 0x0000, 0x0000, 0x0000, 0x0000, 0x0000, 0x0000, 0x0000, 0x0000, 0x0000, 0x0000, 0x0000, 0x0000, 0x0000, 0x0000, 0x0000, 0x0000, 0x0000, 0x0000, 0x0000, 0x0000, 0x0000, 0x0000, 0x0000, 0x0000, 0x0000, 0x0000, 0x0000, 0x0000, 0x0000, 0x0000, 0x0000, 0x0000, 0x0000, 0xef5d, 0x0000, 0x0000, 0x0000, 0x0000, 0x0000, 0x0000, 0x0000, 0x0000, 0x0000, 0x0000, 0x0000, 0x0000, 0x0000, 0x0000, 0x0000, 0x0000, 0x0000, 0x0000, 0x0000, 0x0000, 0x0000, 0x0000, 0x0000, 0x0000, 0x0000, 0x0000, 0x0000, 0x0000, 0x0000, 0x0000, 0x0000, 0x0000, 0x4a69, 0xffff, 0xffff, 0xffff, 0xffff, 0xffff, 0xbdf7, 0x0000, 0x0000, 0x0000, 0x0000, 0x0000, 0x0000, 0x0000, 0x0000, 0x0000, 0x0000, 0x0000, 0x0000, 0x0000, 0x0000, 0x0000, 0x0000, 0x0000, 0xffff, 0xffff, 0x0000, 0x0000, 0x0000, 0x0000, 0x0000, 0x0000, 0x0000, 0x0000, 0x0000, 0x0000, 0x0000, 0xffff, 0xffff, 0x8430, 0x0000, 0x0000, 0x0000, 0x0000, 0x0000, 0x0000, 0x0000, 0x0000, 0x0000, 0x0000, 0x0000, 0x0000, 0x0000, 0x0000, 0x0000, 0x0000, 0x0000, 0x0000, 0x0000, 0x0000, 0x0000, 0x0000, 0x0000, 0x0000, 0x0000, 0x0000, 0x0000, 0x0000, 0x0000, 0x0000, 0x0000, 0x0000, 0x0000, 0x0000, 0x0000, 0x0000, 0x0000, 0x0000, 0x0000, 0x0000, 0x0000, 0x0000, 0x0000, 0x0000, 0x0000, 0x0000, 0x1082, 0xef5d, 0x0000, 0x0000, 0x0000, 0x0000, 0x0000, 0x0000, 0x0000, 0x0000, 0x0000, 0x0000, 0x0000, 0x0000, 0x0000, 0x0000, 0x0000, 0x0000, 0x0000, 0x0000, 0x0000, 0x0000, 0x0000, 0x0000, 0x0000, 0x0000, 0x0000, 0x0000, 0x0000, 0x0000, 0x0000, 0x0000, 0x0000, 0x0000, 0x630c, 0xffff, 0xffff, 0xffff, 0xffff, 0xffff, 0xbdf7, 0x0000, 0x0000, 0x0000, 0x0000, 0x0000, 0x0000, 0x0000, 0x18c3, 0x18c3, 0x18c3, 0x18c3, 0x10a2, 0x0000, 0x0000, 0x0000, 0x0000, 0x0000, 0xffff, 0xffff, 0x0000, 0x0861, 0x18c3, 0x18c3, 0x18c3, 0x0861, 0x0000, 0x0000, 0x0000, 0x0000, 0x0000, 0xffff, 0xffff, 0x8430, 0x0000, 0x0000, 0x0000, 0x0000, 0x0000, 0x18c3, 0x18c3, 0x18c3, 0x18c3, 0x0000, 0x0000, 0x0000, 0x0000, 0x0000, 0x0000, 0x0841, 0x18c3, 0x18c3, 0x18c3, 0x18c3, 0x0020, 0x0000, 0x0000, 0x0000, 0x0000, 0x0000, 0x0000, 0x0000, 0x0000, 0x0000, 0x0000, 0x0000, 0x0000, 0x0000, 0x0000, 0x0000, 0x0000, 0x0000, 0x0000, 0x0000, 0x0000, 0x0000, 0x0000, 0x0000, 0x0000, 0x0000, 0x94b2, 0xef5d, 0x0000, 0x0000, 0x0000, 0x0000, 0x0000, 0x0000, 0x0000, 0x0000, 0x0000, 0x0000, 0x0000, 0x0000, 0x0000, 0x0000, 0x0000, 0x0000, 0x0000, 0x0000, 0x0000, 0x0000, 0x0000, 0x0000, 0x0000, 0x0000, 0x0000, 0x0000, 0x0000, 0x0000, 0x0000, 0x0000, 0x0000, 0x0000, 0xffff, 0xffff, 0xffff, 0xffff, 0xffff, 0xffff, 0xbdf7, 0x0000, 0x0000, 0x0000, 0x0000, 0x0000, 0x2104, 0x9cf3, 0xffff, 0xffff, 0xffff, 0xffff, 0xf79e, 0x9cf3, 0x0000, 0x0000, 0x0000, 0x0000, 0xffff, 0xffff, 0x0861, 0xce59, 0xffff, 0xffff, 0xffff, 0xce59, 0x94b2, 0x0000, 0x0000, 0x0000, 0x0000, 0xffff, 0xffff, 0x8430, 0x0000, 0x0000, 0x0000, 0x4228, 0x9cf3, 0xffff, 0xffff, 0xffff, 0xffff, 0x9cf3, 0x1082, 0x0000, 0x0000, 0x0000, 0x8430, 0xbdf7, 0xffff, 0xffff, 0xffff, 0xffff, 0xad75, 0x6b6d, 0x0000, 0x0000, 0x0000, 0x0000, 0x0000, 0x0000, 0x0000, 0x0000, 0x0000, 0x0000, 0x0000, 0x0000, 0x0000, 0x0000, 0x0000, 0x0000, 0x0000, 0x0000, 0x0000, 0x0000, 0x0000, 0x0000, 0x0000, 0x0000, 0xa514, 0xef5d, 0x0000, 0x0000, 0x0000, 0x0000, 0x0000, 0x0000, 0x0000, 0x0000, 0x0000, 0x0000, 0x0000, 0x0000, 0x0000, 0x0000, 0x0000, 0x0000, 0x0000, 0x0000, 0x0000, 0x0000, 0x0000, 0x0000, 0x0000, 0x0000, 0x0000, 0x0000, 0x0000, 0x0000, 0x0000, 0x0000, 0x0000, 0xce79, 0xffff, 0xffff, 0xffff, 0xffff, 0xffff, 0xffff, 0xbdf7, 0x0000, 0x0000, 0x0000, 0x0000, 0x0000, 0x8430, 0xffff, 0xe71c, 0xe71c, 0xe71c, 0xe71c, 0xffff, 0xffff, 0x18c3, 0x0000, 0x0000, 0x0000, 0xffff, 0xffff, 0xffff, 0xffff, 0xe71c, 0xe71c, 0xe71c, 0xffff, 0xffff, 0x8c51, 0x0000, 0x0000, 0x0000, 0xffff, 0xffff, 0x8430, 0x0000, 0x0000, 0x18e3, 0xffff, 0xffff, 0xe73c, 0xe71c, 0xe71c, 0xffdf, 0xffff, 0xffff, 0x1082, 0x0000, 0x5aeb, 0xffff, 0xffff, 0xe73c, 0xe71c, 0xe71c, 0xe71c, 0xffdf, 0x0000, 0x0000, 0x0000, 0x0000, 0x0000, 0x0000, 0x0000, 0x0000, 0x0000, 0x0000, 0x0000, 0x0000, 0x0000, 0x0000, 0x0000, 0x0000, 0x0000, 0x0000, 0x0000, 0x0000, 0x0000, 0x0000, 0x0000, 0x0000, 0x18c3, 0xffff, 0xef5d, 0x0000, 0x0000, 0x0000, 0x0000, 0x0000, 0x0000, 0x0000, 0x0000, 0x0000, 0x0000, 0x0000, 0x0000, 0x0000, 0x0000, 0x0000, 0x0000, 0x0000, 0x0000, 0x0000, 0x0000, 0x0000, 0x0000, 0x0000, 0x0000, 0x0000, 0x0000, 0x0000, 0x0000, 0x0000, 0x0000, 0x2965, 0xef5d, 0xffff, 0xffff, 0xffff, 0xffff, 0xffff, 0xffff, 0xbdf7, 0x0000, 0x0000, 0x0000, 0x0000, 0x0000, 0x1082, 0x5aeb, 0x0000, 0x0000, 0x0000, 0x0000, 0xe73c, 0xffff, 0xdefb, 0x0000, 0x0000, 0x0000, 0xffff, 0xffff, 0xf79e, 0x5aeb, 0x0000, 0x0000, 0x0020, 0xb5b6, 0xffff, 0xffff, 0x0000, 0x0000, 0x0000, 0xffff, 0xffff, 0x8430, 0x0000, 0x0000, 0xf79e, 0xffff, 0x6b4d, 0x10a2, 0x0000, 0x0000, 0x4a69, 0xef7d, 0xffff, 0x94b2, 0x0000, 0x5aeb, 0xffff, 0xc638, 0x0861, 0x0000, 0x0000, 0x0000, 0x4a69, 0x0000, 0x0000, 0x0000, 0x0000, 0x0000, 0x0000, 0x0000, 0x0000, 0x0000, 0x0000, 0x0000, 0x0000, 0x0000, 0x0000, 0x0000, 0x0000, 0x0000, 0x0000, 0x0000, 0x0000, 0x0000, 0x0000, 0x0000, 0x0000, 0xffff, 0xffff, 0xef5d, 0x0000, 0x0000, 0x0000, 0x0000, 0x0000, 0x0000, 0x0000, 0x0000, 0x0000, 0x0000, 0x0000, 0x0000, 0x0000, 0x0000, 0x0000, 0x0000, 0x0000, 0x0000, 0x0000, 0x0000, 0x0000, 0x0000, 0x0000, 0x0000, 0x0000, 0x0000, 0x0000, 0x0000, 0x0000, 0x0000, 0x6b4d, 0xffff, 0xffff, 0xffff, 0xffff, 0xffff, 0xffff, 0xffff, 0xbdf7, 0x0000, 0x0000, 0x0000, 0x0000, 0x0000, 0x0000, 0x0000, 0x0000, 0x18e3, 0x2124, 0x2124, 0x4228, 0xffff, 0xdefb, 0x0000, 0x0000, 0x0000, 0xffff, 0xffff, 0xd69a, 0x0000, 0x0000, 0x0000, 0x0000, 0x0000, 0xffff, 0xffff, 0xffdf, 0x0000, 0x0000, 0xffff, 0xffff, 0x8430, 0x0000, 0x73ae, 0xffff, 0xffff, 0x2124, 0x10a2, 0x10a2, 0x10a2, 0x10a2, 0x738e, 0xffff, 0xad55, 0x0020, 0x5aeb, 0xffff, 0xffff, 0x4a49, 0x2124, 0x0020, 0x0000, 0x0000, 0x0000, 0x0000, 0x0000, 0x0000, 0x0000, 0x0000, 0x0000, 0x0000, 0x0000, 0x0000, 0x0000, 0x0000, 0x0000, 0x0000, 0x0000, 0x0000, 0x0000, 0x0000, 0x0000, 0x0000, 0x0000, 0x0000, 0x0000, 0x632c, 0xffff, 0xffff, 0xef5d, 0x0000, 0x0000, 0x0000, 0x0000, 0x0000, 0x0000, 0x0000, 0x0000, 0x0000, 0x0000, 0x0000, 0x0000, 0x0000, 0x0000, 0x0000, 0x0000, 0x0000, 0x0000, 0x0000, 0x0000, 0x0000, 0x0000, 0x0000, 0x0000, 0x0000, 0x0000, 0x0000, 0x0000, 0x0000, 0x0000, 0xffff, 0xffff, 0xffff, 0xffff, 0xffff, 0xffff, 0xffff, 0xffff, 0xbdf7, 0x0000, 0x0000, 0x0000, 0x0000, 0x0000, 0x2104, 0xa534, 0xad75, 0xef5d, 0xffff, 0xffff, 0xffff, 0xffff, 0xdefb, 0x0000, 0x0000, 0x0000, 0xffff, 0xffff, 0x10a2, 0x0000, 0x0000, 0x0000, 0x0000, 0x0000, 0xffff, 0xffff, 0xffdf, 0x0000, 0x0000, 0xffff, 0xffff, 0x8430, 0x0000, 0x73ae, 0xffff, 0xffff, 0xe71c, 0xe71c, 0xe71c, 0xe71c, 0xe71c, 0xef7d, 0xffff, 0xffff, 0x2104, 0x2104, 0xe73c, 0xffff, 0xffff, 0xffff, 0xb5b6, 0xa534, 0xa534, 0x0000, 0x0000, 0x0000, 0x0000, 0x0000, 0x0000, 0x0000, 0x0000, 0x0000, 0x0000, 0x0000, 0x0000, 0x0000, 0x0000, 0x0000, 0x0000, 0x0000, 0x0000, 0x0000, 0x0000, 0x0000, 0x0000, 0x0020, 0xad55, 0xffff, 0xffff, 0xef5d, 0x0000, 0x0000, 0x0000, 0x0000, 0x0000, 0x0000, 0x0000, 0x0000, 0x0000, 0x0000, 0x0000, 0x0000, 0x0000, 0x0000, 0x0000, 0x0000, 0x0000, 0x0000, 0x0000, 0x0000, 0x0000, 0x0000, 0x0000, 0x0000, 0x0000, 0x0000, 0x0000, 0x0000, 0x0861, 0xdedb, 0xffff, 0xffff, 0xffff, 0xffff, 0xffff, 0xffff, 0xffff, 0xffff, 0xbdf7, 0x0000, 0x0000, 0x0000, 0x0000, 0x0000, 0xffff, 0xffff, 0xf7be, 0xd6ba, 0xd6ba, 0xd6ba, 0xdefb, 0xffff, 0xdefb, 0x0000, 0x0000, 0x0000, 0xffff, 0xffff, 0x2124, 0x0000, 0x0000, 0x0000, 0x0000, 0x0000, 0xffff, 0xffff, 0xffdf, 0x0000, 0x0000, 0xffff, 0xffff, 0x8430, 0x0000, 0x73ae, 0xffff, 0xffff, 0xdedb, 0xd6ba, 0xd6ba, 0xd6ba, 0xd6ba, 0xd6ba, 0xd6ba, 0xd6ba, 0x18e3, 0x0000, 0x0000, 0xd6ba, 0xd6ba, 0xd6ba, 0xffdf, 0xffff, 0xffff, 0xb596, 0x0000, 0x0000, 0x0000, 0x0000, 0x0000, 0x0000, 0x0000, 0x0000, 0x0000, 0x0000, 0x0000, 0x0000, 0x0000, 0x0000, 0x0000, 0x0000, 0x0000, 0x0000, 0x0000, 0x0000, 0x0000, 0xb5b6, 0xffff, 0xffff, 0xffff, 0xef5d, 0x0000, 0x0000, 0x0000, 0x0000, 0x0000, 0x0000, 0x0000, 0x0000, 0x0000, 0x0000, 0x0000, 0x0000, 0x0000, 0x0000, 0x0000, 0x0000, 0x0000, 0x0000, 0x0000, 0x0000, 0x0000, 0x0000, 0x0000, 0x0000, 0x0000, 0x0000, 0x0000, 0x0000, 0xc638, 0xffff, 0xffff, 0xffff, 0xffff, 0xffff, 0xffff, 0xffff, 0xffff, 0xffff, 0xbdf7, 0x0000, 0x0000, 0x0000, 0x0000, 0x0000, 0xffff, 0xffff, 0x4228, 0x0000, 0x0000, 0x0000, 0x2124, 0xffff, 0xdefb, 0x0000, 0x0000, 0x0000, 0xffff, 0xffff, 0xef5d, 0x0000, 0x0000, 0x0000, 0x0000, 0x0000, 0xffff, 0xffff, 0x6b6d, 0x0000, 0x0000, 0xffff, 0xffff, 0x8430, 0x0000, 0x2124, 0xf7be, 0xffff, 0x1082, 0x0000, 0x0000, 0x0000, 0x0000, 0x0000, 0x0000, 0x0000, 0x0000, 0x0000, 0x0000, 0x0000, 0x0000, 0x0000, 0x4228, 0x8c51, 0xffff, 0xbdd7, 0x0000, 0x0000, 0x0000, 0x0000, 0x0000, 0x0000, 0x0000, 0x0000, 0x0000, 0x0000, 0x0000, 0x0000, 0x0000, 0x0000, 0x0000, 0x0000, 0x0000, 0x0000, 0x0000, 0x0000, 0x18e3, 0xffff, 0xffff, 0xffff, 0xffff, 0xef5d, 0x0000, 0x0000, 0x0000, 0x0000, 0x0000, 0x0000, 0x0000, 0x0000, 0x0000, 0x0000, 0x0000, 0x0000, 0x0000, 0x0000, 0x0000, 0x0000, 0x0000, 0x0000, 0x0000, 0x0000, 0x0000, 0x0000, 0x0000, 0x0000, 0x0000, 0x0000, 0x0000, 0x2124, 0xffff, 0xffff, 0xffff, 0xffff, 0xffff, 0xffff, 0xffff, 0xffff, 0xffff, 0xffff, 0xbdf7, 0x0000, 0x0000, 0x0000, 0x0000, 0x0000, 0xffff, 0xffff, 0x2124, 0x0000, 0x0000, 0x18e3, 0xffff, 0xffff, 0xdefb, 0x0000, 0x0000, 0x0000, 0xffff, 0xffff, 0xffff, 0x8430, 0x2965, 0x2965, 0x2965, 0xa514, 0xffff, 0xef5d, 0x0000, 0x0000, 0x0000, 0xffff, 0xffff, 0x8430, 0x0000, 0x0000, 0xc638, 0xffff, 0xffff, 0x2965, 0x2965, 0x18c3, 0x2965, 0x8410, 0x4228, 0x0000, 0x0000, 0x5aeb, 0x4a69, 0x2965, 0x0841, 0x0000, 0x2104, 0x738e, 0xffff, 0xb596, 0x0000, 0x0000, 0x0000, 0x0000, 0x0000, 0x0000, 0x0000, 0x0000, 0x0000, 0x0000, 0x0000, 0x0000, 0x0000, 0x0000, 0x0000, 0x0000, 0x0000, 0x0000, 0x0000, 0x10a2, 0xe71c, 0xffff, 0xffff, 0xffff, 0xffff, 0xef5d, 0x0000, 0x0000, 0x0000, 0x0000, 0x0000, 0x0000, 0x0000, 0x0000, 0x0000, 0x0000, 0x0000, 0x0000, 0x0000, 0x0000, 0x0000, 0x0000, 0x0000, 0x0000, 0x0000, 0x0000, 0x0000, 0x0000, 0x0000, 0x0000, 0x0000, 0x0000, 0x39e7, 0xf79e, 0xffff, 0xffff, 0xffff, 0xffff, 0xffff, 0xffff, 0xffff, 0xffff, 0xffff, 0xffff, 0xbdf7, 0x0000, 0x0000, 0x0000, 0x0000, 0x0000, 0xa534, 0xffff, 0xf79e, 0xad75, 0xad75, 0xe73c, 0xffff, 0xffff, 0xdefb, 0x0000, 0x0000, 0x0000, 0xffff, 0xffff, 0xffff, 0xffff, 0xffff, 0xffff, 0xffff, 0xffff, 0xffff, 0x7bef, 0x0000, 0x0000, 0x0000, 0xffff, 0xffff, 0x8430, 0x0000, 0x0000, 0x0000, 0x9cf3, 0xffff, 0xffff, 0xffff, 0xdedb, 0xffff, 0xffff, 0xffff, 0x0000, 0x0000, 0xce79, 0xffff, 0xffff, 0xbdf7, 0xad75, 0xef5d, 0xffff, 0xffff, 0x632c, 0x0000, 0x0000, 0x0000, 0x0000, 0x0000, 0x0000, 0x0000, 0x0000, 0x0000, 0x0000, 0x0000, 0x0000, 0x0000, 0x0000, 0x0000, 0x0000, 0x0000, 0x0000, 0x2104, 0xffff, 0xffff, 0xffff, 0xffff, 0xffff, 0xffff, 0xef5d, 0x0000, 0x0000, 0x0000, 0x0000, 0x0000, 0x0000, 0x0000, 0x0000, 0x0000, 0x0000, 0x0000, 0x0000, 0x0000, 0x0000, 0x0000, 0x0000, 0x0000, 0x0000, 0x0000, 0x0000, 0x0000, 0x0000, 0x0000, 0x0000, 0x1082, 0x6b4d, 0xffff, 0xffff, 0xffff, 0xffff, 0xffff, 0xffff, 0xffff, 0xffff, 0xffff, 0xffff, 0xffff, 0xffff, 0xbdf7, 0x0000, 0x0000, 0x0000, 0x0000, 0x0000, 0x0000, 0x8c71, 0xce79, 0xf79e, 0xce79, 0xce79, 0x18e3, 0xce79, 0xb596, 0x0000, 0x0000, 0x0000, 0xce79, 0xce79, 0x0020, 0x94b2, 0xce79, 0xef7d, 0xce79, 0xce79, 0x0000, 0x0000, 0x0000, 0x0000, 0x0000, 0xce79, 0xce79, 0x6b4d, 0x0000, 0x0000, 0x0000, 0x0000, 0xbdf7, 0xce79, 0xd69a, 0xef7d, 0xce79, 0xce79, 0x10a2, 0x0000, 0x0000, 0x2104, 0xbdf7, 0xce79, 0xd69a, 0xf7be, 0xd69a, 0xce79, 0x2945, 0x0000, 0x0000, 0x0000, 0x0000, 0x0000, 0x0000, 0x0000, 0x0000, 0x0000, 0x0000, 0x0000, 0x0000, 0x0000, 0x0000, 0x0000, 0x0000, 0x0000, 0x0000, 0x2104, 0xe73c, 0xffff, 0xffff, 0xffff, 0xffff, 0xffff, 0xffff, 0xef5d, 0x0000, 0x0000, 0x0000, 0x0000, 0x0000, 0x0000, 0x0000, 0x0000, 0x0000, 0x0000, 0x0000, 0x0000, 0x0000, 0x0000, 0x0000, 0x0000, 0x0000, 0x0000, 0x0000, 0x0000, 0x0000, 0x0000, 0x0000, 0x0000, 0xd69a, 0xffff, 0xffff, 0xffff, 0xffff, 0xffff, 0xffff, 0xffff, 0xffff, 0xffff, 0xffff, 0xffff, 0xffff, 0xffff, 0xbdf7, 0x0000, 0x0000, 0x0000, 0x0000, 0x0000, 0x0000, 0x0000, 0x0000, 0x31a6, 0x0000, 0x0000, 0x0000, 0x0000, 0x0000, 0x0000, 0x0000, 0x0000, 0x0000, 0x0000, 0x0000, 0x0000, 0x0000, 0x3186, 0x0000, 0x0000, 0x0000, 0x0000, 0x0000, 0x0000, 0x0000, 0x0000, 0x0000, 0x0000, 0x0000, 0x0000, 0x0000, 0x0000, 0x0000, 0x0000, 0x0841, 0x2965, 0x0000, 0x0000, 0x0000, 0x0000, 0x0000, 0x0000, 0x0000, 0x0000, 0x0020, 0x39e7, 0x0020, 0x0000, 0x0000, 0x0000, 0x0000, 0x0000, 0x0000, 0x0000, 0x0000, 0x0000, 0x0000, 0x0000, 0x0000, 0x0000, 0x0000, 0x0000, 0x0000, 0x0000, 0x0000, 0x0841, 0xbdd7, 0xffff, 0xffff, 0xffff, 0xffff, 0xffff, 0xffff, 0xffff, 0xffff, 0xef5d, 0x0000, 0x0000, 0x0000, 0x0000, 0x0000, 0x0000, 0x0000, 0x0000, 0x0000, 0x0000, 0x0000, 0x0000, 0x0000, 0x0000, 0x0000, 0x0000, 0x0000, 0x0000, 0x0000, 0x0000, 0x0000, 0x0000, 0x528a, 0xf79e, 0xffff, 0xffff, 0xffff, 0xffff, 0xffff, 0xffff, 0xffff, 0xffff, 0xffff, 0xffff, 0xffff, 0xffff, 0xffff, 0xffff, 0xbdf7, 0x0000, 0x0000, 0x0000, 0x0000, 0x0000, 0x0000, 0x0000, 0x0000, 0x0000, 0x0000, 0x0000, 0x0000, 0x0000, 0x0000, 0x0000, 0x0000, 0x0000, 0x0000, 0x0000, 0x0000, 0x0000, 0x0000, 0x0000, 0x0000, 0x0000, 0x0000, 0x0000, 0x0000, 0x0000, 0x0000, 0x0000, 0x0000, 0x0000, 0x0000, 0x0000, 0x0000, 0x0000, 0x0000, 0x0000, 0x0000, 0x0000, 0x0000, 0x0000, 0x0000, 0x0000, 0x0000, 0x0000, 0x0000, 0x0000, 0x0000, 0x0000, 0x0000, 0x0000, 0x0000, 0x0000, 0x0000, 0x0000, 0x0000, 0x0000, 0x0000, 0x0000, 0x0000, 0x0000, 0x0000, 0x0000, 0x0000, 0x0000, 0x0000, 0x0000, 0x7bef, 0xc638, 0xffff, 0xffff, 0xffff, 0xffff, 0xffff, 0xffff, 0xffff, 0xffff, 0xffff, 0xef5d, 0x0000, 0x0000, 0x0000, 0x0000, 0x0000, 0x0000, 0x0000, 0x0000, 0x0000, 0x0000, 0x0000, 0x0000, 0x0000, 0x0000, 0x0000, 0x0000, 0x0000, 0x0000, 0x0000, 0x0000, 0x4a49, 0xbdd7, 0xffff, 0xffff, 0xffff, 0xffff, 0xffff, 0xffff, 0xffff, 0xffff, 0xffff, 0xffff, 0xffff, 0xffff, 0xffff, 0xffff, 0xffff, 0xffff, 0xbdf7, 0x0000, 0x0000, 0x0000, 0x0000, 0x0000, 0x0000, 0x0000, 0x0000, 0x0000, 0x0000, 0x0000, 0x0000, 0x0000, 0x0000, 0x0000, 0x0000, 0x0000, 0x0000, 0x0000, 0x0000, 0x0000, 0x0000, 0x0000, 0x0000, 0x0000, 0x0000, 0x0000, 0x0000, 0x0000, 0x0000, 0x0000, 0x0000, 0x0000, 0x0000, 0x0000, 0x0000, 0x0000, 0x0000, 0x0000, 0x0000, 0x0000, 0x0000, 0x0000, 0x0000, 0x0000, 0x0000, 0x0000, 0x0000, 0x0000, 0x0000, 0x0000, 0x0000, 0x0000, 0x0000, 0x0000, 0x0000, 0x0000, 0x0000, 0x0000, 0x0000, 0x0000, 0x0000, 0x0000, 0x0000, 0x0000, 0x0000, 0x39e7, 0x39e7, 0xffff, 0xffff, 0xffff, 0xffff, 0xffff, 0xffff, 0xffff, 0xffff, 0xffff, 0xffff, 0xffff, 0xffff, 0xef5d, 0x0000, 0x0000, 0x0000, 0x0000, 0x0000, 0x0000, 0x0000, 0x0000, 0x0000, 0x0000, 0x0000, 0x0000, 0x0000, 0x0000, 0x0000, 0x0000, 0x0000, 0x39c7, 0x39e7, 0xef7d, 0xffff, 0xffff, 0xffff, 0xffff, 0xffff, 0xffff, 0xffff, 0xffff, 0xffff, 0xffff, 0xffff, 0xffff, 0xffff, 0xffff, 0xffff, 0xffff, 0xffff, 0xffff, 0xbdf7, 0x0000, 0x0000, 0x0000, 0x0000, 0x0000, 0x0000, 0x0000, 0x0000, 0x0000, 0x0000, 0x0000, 0x0000, 0x0000, 0x0000, 0x0000, 0x0000, 0x0000, 0x0000, 0x0000, 0x0000, 0x0000, 0x0000, 0x0000, 0x0000, 0x0000, 0x0000, 0x0000, 0x0000, 0x0000, 0x0000, 0x0000, 0x0000, 0x0000, 0x0000, 0x0000, 0x0000, 0x0000, 0x0000, 0x0000, 0x0000, 0x0000, 0x0000, 0x0000, 0x0000, 0x0000, 0x0000, 0x0000, 0x0000, 0x0000, 0x0000, 0x0000, 0x0000, 0x0000, 0x0000, 0x0000, 0x0000, 0x0000, 0x0000, 0x0000, 0x0000, 0x0000, 0x0000, 0x0000, 0x8c51, 0xbdf7, 0xbdf7, 0xffff, 0xffff, 0xffff, 0xffff, 0xffff, 0xffff, 0xffff, 0xffff, 0xffff, 0xffff, 0xffff, 0xffff, 0xffff, 0xffff, 0xef5d, 0x0000, 0x0000, 0x0000, 0x0000, 0x0000, 0x0000, 0x0000, 0x0000, 0x0000, 0x0000, 0x0000, 0x0000, 0x0000, 0x0000, 0x8410, 0xbdf7, 0xbdf7, 0xffdf, 0xffff, 0xffff, 0xffff, 0xffff, 0xffff, 0xffff, 0xffff, 0xffff, 0xffff, 0xffff, 0xffff, 0xffff, 0xffff, 0xffff, 0xffff, 0xffff, 0xffff, 0xffff, 0xffff, 0xffff, 0xbdf7, 0x0000, 0x0000, 0x0000, 0x0000, 0x0000, 0x0000, 0x0000, 0x0000, 0x0000, 0x0000, 0x0000, 0x0000, 0x0000, 0x0000, 0x0000, 0x0000, 0x0000, 0x0000, 0x0000, 0x0000, 0x0000, 0x0000, 0x0000, 0x0000, 0x0000, 0x0000, 0x0000, 0x0000, 0x0000, 0x0000, 0x0000, 0x0000, 0x0000, 0x0000, 0x0000, 0x0000, 0x0000, 0x0000, 0x0000, 0x0000, 0x0000, 0x0000, 0x0000, 0x0000, 0x0000, 0x0000, 0x0000, 0x0000, 0x0000, 0x0000, 0x0000, 0x0000, 0x0000, 0x0000, 0x0000, 0x0000, 0x0000, 0x0000, 0x0000, 0x0000, };
      • Mettez à jour img_width et img_height dans le sketch avec les dimensions de votre image.
      • Cliquez sur le bouton Exécuter dans Arduino App Lab.
      Cliquez sur le bouton Exécuter dans Arduino App Lab sur Arduino UNO Q

      L'écran affiche l'image bitmap chargée depuis la mémoire programme.

      Pour utiliser votre propre image, suivez ces étapes :
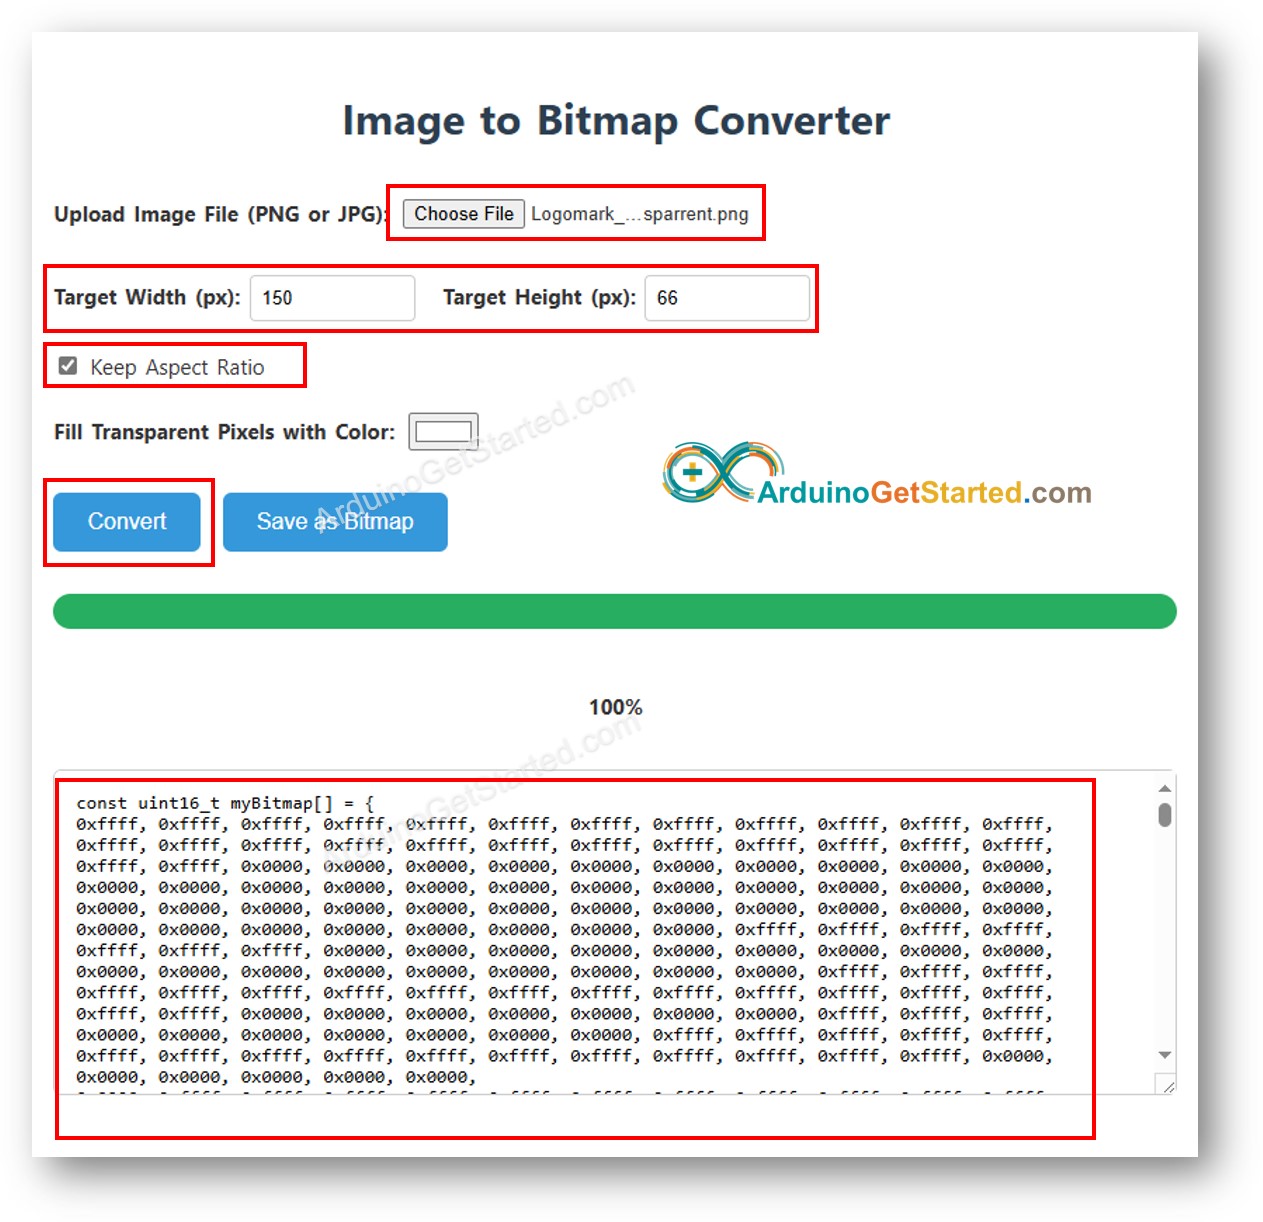
      • Préparez votre image (format JPEG ou PNG).
      • Convertissez-la en tableau bitmap avec l'outil Image to Bitmap Converter.
        • Téléversez votre image et réglez la taille pour qu'elle s'adapte à votre écran.
        • Pour les PNG transparents, choisissez une couleur d'arrière-plan.
        • Cliquez sur Convert, puis copiez le tableau généré dans bitmap.h.
        conversion d'image en tableau bitmap
        • Mettez à jour img_width et img_height, puis cliquez à nouveau sur Exécuter.

        Remarque : Si vous modifiez bitmap.h et que le sketch ne se recompile pas, ajoutez un espace n'importe où dans le fichier sketch pour forcer une recompilation.

        Référence Rapide des Méthodes

        Méthode Fonction Utilisation
        drawRGBBitmap(x,y,bitmap,w,h) Dessine un bitmap RGB565 en PROGMEM à partir du pixel (x, y). TFT_display.drawRGBBitmap(0, 0, myImage, 240, 320);
        fillScreen(color) Efface l'écran avant de dessiner l'image. TFT_display.fillScreen(BLACK);
        invertDisplay(flag) Active ou désactive l'inversion des couleurs de l'écran. TFT_display.invertDisplay(true);

    Code Arduino UNO Q — Dessiner une Image depuis une Carte SD

    Ce sketch lit un fichier image BMP 24 bits depuis une carte micro SD et envoie les données de pixels à l'écran par petits morceaux. Cette approche diffuse l'image sans jamais la garder entièrement en RAM, ce qui la rend pratique pour les grands écrans.

    Connectez la carte SD au même bus SPI que l'écran. Partagez MOSI (D11), SCK (D13) et MISO (D12). Attribuez une broche CS séparée au module SD — elle est définie comme SD_CS dans le sketch (D4).

    Ce que fait le code :

    • Initialise la carte SD sur sa propre broche CS
    • Lit l'en-tête BMP pour obtenir la largeur et la hauteur de l'image
    • Centre l'image sur l'écran
    • Diffuse les pixels ligne par ligne et les dessine sur l'écran TFT
    • Affiche les messages de progression et d'erreur dans la console App Lab
    /* * Ce code Arduino UNO Q a été développé par newbiely.fr * Ce code Arduino UNO Q est mis à disposition du public sans aucune restriction. * Pour des instructions complètes et des schémas de câblage, veuillez visiter: * https://newbiely.fr/tutorials/arduino-uno-q/arduino-uno-q-tft-lcd-touch-display-spi */ /* Created by DIYables This example code is in the public domain Product page: https://diyables.io */ // ============================================= // Single include brings in the base class plus all driver classes. // ============================================= #include "Arduino_RouterBridge.h" #include <DIYables_TFT_SPI.h> #include <SD.h> // ============================================= // Wiring (Arduino UNO Q - MCU side) // --------------------------------------------- // TFT + SD module Arduino UNO Q // ----------------------- --------------------------------- // VCC -> 3.3V // GND -> GND // TFT CS -> D10 (TFT_CS_PIN) // TFT RESET -> D9 (TFT_RST_PIN) // TFT DC / RS -> D8 (TFT_DC_PIN) // SD CS -> D4 (SD_CS) // SDI / MOSI (shared) -> D11 (hardware SPI MOSI) // SDO / MISO (shared) -> D12 (hardware SPI MISO) // SCK (shared) -> D13 (hardware SPI SCK) // LED -> 3.3V (or any GPIO via initBacklight) // // The Arduino UNO Q MCU pins are 3.3V - no level converter is needed. // ============================================= // ============================================= // SPI pin definitions (adjust for your board) // ============================================= #define TFT_CS_PIN 10 #define TFT_DC_PIN 8 #define TFT_RST_PIN 9 // Panel resolution in native (portrait) orientation - change to match your module #define TFT_WIDTH 240 #define TFT_HEIGHT 320 #define SD_CS 4 // SD card chip select (must differ from TFT_CS_PIN) // ============================================= // Create display object (uncomment matching driver) // ============================================= // DIYables_ILI9341_SPI TFT_display(TFT_WIDTH, TFT_HEIGHT, TFT_CS_PIN, TFT_DC_PIN, TFT_RST_PIN); // DIYables_ILI9488_SPI TFT_display(TFT_WIDTH, TFT_HEIGHT, TFT_CS_PIN, TFT_DC_PIN, TFT_RST_PIN); DIYables_ST7789_SPI TFT_display(TFT_WIDTH, TFT_HEIGHT, TFT_CS_PIN, TFT_DC_PIN, TFT_RST_PIN); #define WHITE DIYables_TFT_SPI::colorRGB(255, 255, 255) #define BUFFPIXEL 20 File bmpFile; uint16_t SCREEN_WIDTH; uint16_t SCREEN_HEIGHT; // Helper functions to read BMP file header uint16_t read16(File &f) { uint16_t result; result = f.read(); result |= (f.read() << 8); return result; } uint32_t read32(File &f) { uint32_t result; result = f.read(); result |= ((uint32_t)f.read() << 8); result |= ((uint32_t)f.read() << 16); result |= ((uint32_t)f.read() << 24); return result; } int32_t readS32(File &f) { int32_t result; result = f.read(); result |= ((uint32_t)f.read() << 8); result |= ((uint32_t)f.read() << 16); result |= ((uint32_t)f.read() << 24); return result; } bool getBMPDimensions(const char *filename, uint32_t &w, uint32_t &h) { File f = SD.open(filename); if (!f) return false; if (read16(f) != 0x4D42) { f.close(); return false; } read32(f); // file size read32(f); // reserved read32(f); // image offset read32(f); // DIB header size w = read32(f); int32_t sh = readS32(f); h = (sh < 0) ? -sh : sh; f.close(); return true; } void drawBMP(const char *filename, int x, int y) { bmpFile = SD.open(filename); if (!bmpFile) { Monitor.println("File not found"); return; } if (read16(bmpFile) != 0x4D42) { Monitor.println("Not a BMP file"); bmpFile.close(); return; } uint32_t fileSize = read32(bmpFile); read32(bmpFile); // Reserved uint32_t imageOffset = read32(bmpFile); uint32_t dibHeaderSize = read32(bmpFile); uint32_t bmpWidth = read32(bmpFile); int32_t bmpHeight = readS32(bmpFile); bool topDown = false; if (bmpHeight < 0) { bmpHeight = -bmpHeight; topDown = true; } if (read16(bmpFile) != 1) { Monitor.println("Invalid BMP file"); bmpFile.close(); return; } uint16_t depth = read16(bmpFile); if (depth != 24) { Monitor.println("Only 24-bit BMP is supported"); bmpFile.close(); return; } if (read32(bmpFile) != 0) { Monitor.println("Unsupported BMP compression"); bmpFile.close(); return; } bmpFile.seek(imageOffset); uint8_t sdbuffer[3 * BUFFPIXEL]; uint16_t color; uint32_t rowSize = (bmpWidth * 3 + 3) & ~3; if (x >= SCREEN_WIDTH || y >= SCREEN_HEIGHT) return; uint32_t maxRow = min((uint32_t)bmpHeight, (uint32_t)(SCREEN_HEIGHT - y)); uint32_t maxCol = min(bmpWidth, (uint32_t)(SCREEN_WIDTH - x)); for (uint32_t row = 0; row < maxRow; row++) { int32_t rowPos = topDown ? row : bmpHeight - 1 - row; uint32_t filePosition = imageOffset + rowPos * rowSize; bmpFile.seek(filePosition); for (uint32_t col = 0; col < maxCol; col += BUFFPIXEL) { uint32_t pixelsToRead = min((uint32_t)BUFFPIXEL, maxCol - col); bmpFile.read(sdbuffer, 3 * pixelsToRead); for (uint32_t i = 0; i < pixelsToRead; i++) { uint8_t b = sdbuffer[i * 3]; uint8_t g = sdbuffer[i * 3 + 1]; uint8_t r = sdbuffer[i * 3 + 2]; color = DIYables_TFT_SPI::colorRGB(r, g, b); if ((x + col + i) < SCREEN_WIDTH && (y + row) < SCREEN_HEIGHT) { TFT_display.drawPixel(x + col + i, y + row, color); } } } } bmpFile.close(); Monitor.println("BMP drawn"); } void setup() { Monitor.begin(9600); if (!SD.begin(SD_CS)) { Monitor.println("SD card initialization failed!"); return; } Monitor.println("SD card initialized."); TFT_display.begin(); TFT_display.setRotation(1); // Landscape SCREEN_WIDTH = TFT_display.width(); SCREEN_HEIGHT = TFT_display.height(); TFT_display.fillScreen(WHITE); uint32_t imgWidth, imgHeight; if (getBMPDimensions("diyables.bmp", imgWidth, imgHeight)) { int x = (SCREEN_WIDTH - imgWidth) / 2; int y = (SCREEN_HEIGHT - imgHeight) / 2; drawBMP("diyables.bmp", x, y); } else { Monitor.println("Failed to get BMP dimensions"); } } void loop() { }

    Étapes Rapides

    • Téléchargez diyables.bmp et copiez-le à la racine de votre carte Micro SD.
    • Insérez la carte Micro SD dans l'emplacement du module d'écran.
    • Copiez le code ci-dessus et collez-le dans sketch/sketch.ino.
    • Cliquez sur le bouton Exécuter dans Arduino App Lab.
    Cliquez sur le bouton Exécuter dans Arduino App Lab sur Arduino UNO Q
    • Ouvrez l'onglet Console et sélectionnez le sous-onglet Serial Monitor pour voir les messages de progression.

    L'image est lue depuis la carte et affichée à l'écran.

    Pour utiliser votre propre image :

    • Utilisez l'outil Image to Bitmap Converter pour convertir votre image — cliquez sur Save as Bitmap pour télécharger le fichier .bmp.
    • Gardez un nom de fichier court (moins de 9 caractères, sans compter .bmp).
    • Copiez le fichier .bmp sur la carte Micro SD, mettez à jour le nom du fichier dans le sketch et cliquez sur Exécuter.

    Sortie Console App Lab

    DIYables_Apps
    Stop
    sketch.ino
    1#include "Arduino_RouterBridge.h"
    Serial Monitor
    Python
    Message (Enter to send a message to "Newbiely" on usb(2820070321))
    New Line
    9600 baud
    [2026-08-20 09:00:01] SD card initialized. [2026-08-20 09:00:02] BMP drawn

    Référence Rapide des Méthodes

    Méthode Fonction Utilisation
    SD.begin(cs) Initialise la carte SD sur sa propre broche Chip Select. SD.begin(SD_CS);
    SD.open(name) Ouvre un fichier stocké sur la carte SD. File f = SD.open("diyables.bmp");
    width() / height() Obtient la taille actuelle de l'écran après rotation. uint16_t w = TFT_display.width();
    drawPixel(x,y,color) Dessine un seul pixel dans la couleur donnée. TFT_display.drawPixel(10, 20, color);

    Code Arduino UNO Q — Utiliser une Police Externe

    Ce sketch affiche du texte à l'écran avec une police personnalisée compatible Adafruit GFX. Par rapport à la police bitmap 5x7 intégrée, les polices personnalisées offrent une meilleure lisibilité et un meilleur style. Le fichier de police est inclus comme en-tête et activé par un simple appel à setFont().

    Ce que fait le code :

    • Inclut l'en-tête de police FreeSansBold12pt7b
    • Active la police avec setFont()
    • Affiche les mêmes valeurs de température et d'humidité qu'auparavant, désormais dans la police personnalisée
    /* * Ce code Arduino UNO Q a été développé par newbiely.fr * Ce code Arduino UNO Q est mis à disposition du public sans aucune restriction. * Pour des instructions complètes et des schémas de câblage, veuillez visiter: * https://newbiely.fr/tutorials/arduino-uno-q/arduino-uno-q-tft-lcd-touch-display-spi */ /* Created by DIYables This example code is in the public domain Product page: https://diyables.io */ // ============================================= // Single include brings in the base class plus all driver classes. // ============================================= #include <DIYables_TFT_SPI.h> #include <Fonts/FreeSansBold12pt7b.h> // ============================================= // Wiring (Arduino UNO Q - MCU side) // --------------------------------------------- // TFT module Arduino UNO Q // ------------ --------------------------------- // VCC -> 3.3V // GND -> GND // CS -> D10 (TFT_CS_PIN) // RESET -> D9 (TFT_RST_PIN) // DC / RS -> D8 (TFT_DC_PIN) // SDI / MOSI -> D11 (hardware SPI MOSI) // SCK -> D13 (hardware SPI SCK) // LED -> 3.3V (or any GPIO via initBacklight) // SDO / MISO -> D12 (only needed when reading from display) // // The Arduino UNO Q MCU pins are 3.3V - no level converter is needed. // ============================================= // ============================================= // SPI pin definitions (adjust for your board) // ============================================= #define TFT_CS_PIN 10 #define TFT_DC_PIN 8 #define TFT_RST_PIN 9 // Panel resolution in native (portrait) orientation - change to match your module #define TFT_WIDTH 240 #define TFT_HEIGHT 320 // ============================================= // Create display object (uncomment matching driver) // ============================================= // DIYables_ILI9341_SPI TFT_display(TFT_WIDTH, TFT_HEIGHT, TFT_CS_PIN, TFT_DC_PIN, TFT_RST_PIN); // DIYables_ILI9488_SPI TFT_display(TFT_WIDTH, TFT_HEIGHT, TFT_CS_PIN, TFT_DC_PIN, TFT_RST_PIN); DIYables_ST7789_SPI TFT_display(TFT_WIDTH, TFT_HEIGHT, TFT_CS_PIN, TFT_DC_PIN, TFT_RST_PIN); #define MAGENTA DIYables_TFT_SPI::colorRGB(255, 0, 255) #define WHITE DIYables_TFT_SPI::colorRGB(255, 255, 255) void setup() { TFT_display.begin(); TFT_display.setFont(&FreeSansBold12pt7b); TFT_display.setRotation(1); // Landscape TFT_display.fillScreen(WHITE); TFT_display.setTextColor(MAGENTA); TFT_display.setTextSize(1); float temperature = 23.5; float humidity = 78.6; TFT_display.setCursor(20, 30); TFT_display.print("Temperature: "); TFT_display.print(temperature, 1); TFT_display.print(char(247)); TFT_display.println("C"); TFT_display.setCursor(20, 70); TFT_display.print("Humidity: "); TFT_display.print(humidity, 1); TFT_display.print("%"); } void loop() { }

    Étapes Rapides

    • Copiez le code ci-dessus et collez-le dans sketch/sketch.ino.
    • Cliquez sur le bouton Exécuter dans Arduino App Lab.
    Cliquez sur le bouton Exécuter dans Arduino App Lab sur Arduino UNO Q

    L'écran affiche le texte dans la police personnalisée. Remarquez la meilleure qualité des glyphes par rapport à la police intégrée.

    Important : Certaines polices personnalisées n'incluent pas les caractères spéciaux comme le symbole de degré. La police intégrée les prend en charge.

    Référence Rapide des Méthodes

    Méthode Fonction Utilisation
    setFont(&FontName) Active une police personnalisée compatible GFX. Passez NULL pour revenir à la police 5x7 intégrée. TFT_display.setFont(&FreeSans12pt7b);
    setCursor(x, y) Déplace le curseur de texte à la position donnée. TFT_display.setCursor(10, 40);
    setTextColor(color) Définit la couleur du texte. TFT_display.setTextColor(WHITE);
    print(text) Affiche une chaîne à la position actuelle du curseur avec la police active. TFT_display.print("Hello!");

    Code Arduino UNO Q — Lire un Point Tactile

    Ce sketch lit les coordonnées tactiles du contrôleur tactile XPT2046, les affiche dans la console Arduino App Lab et dessine un point rouge à l'endroit touché. L'exécuter en premier vous aide à voir la plage numérique de votre écran spécifique.

    Câblage : T_CLK sur D13, T_DIN sur D11, T_DO sur D12 (bus SPI partagé avec l'écran). T_CS sur D7, T_IRQ sur D2 ou laissée non connectée.

    Ce que fait le code :

    • Initialise le XPT2046 sur le bus SPI partagé
    • Applique les valeurs de calibration tactile par défaut
    • Attend un toucher et lit les coordonnées à l'écran
    • Affiche les coordonnées dans la console et marque le point d'un point rouge
    /* * Ce code Arduino UNO Q a été développé par newbiely.fr * Ce code Arduino UNO Q est mis à disposition du public sans aucune restriction. * Pour des instructions complètes et des schémas de câblage, veuillez visiter: * https://newbiely.fr/tutorials/arduino-uno-q/arduino-uno-q-tft-lcd-touch-display-spi */ /* Touch Get Point Example ----------------------- This example demonstrates how to read and display touch coordinates using a DIYables SPI TFT display with a 4-wire resistive touch panel. When you touch the screen, the sketch prints the mapped (screen) X and Y coordinates to the Arduino App Lab console and draws a red dot at the touched location. NOTE: Run the TouchCalibration example first and paste the calibration values into setTouchCalibration() below if the touch coordinates are inaccurate. Created by DIYables This example code is in the public domain Product page: https://diyables.io */ // ============================================= // Single include brings in the base class plus all driver classes. // ============================================= #include "Arduino_RouterBridge.h" #include <DIYables_TFT_SPI.h> // ============================================= // Wiring (Arduino UNO Q - MCU side) // ============================================= // TFT pins (always required) // TFT module Arduino UNO Q // ------------ --------------------------------- // VCC -> 3.3V // GND -> GND // CS -> D10 (TFT_CS_PIN) // RESET -> D9 (TFT_RST_PIN) // DC / RS -> D8 (TFT_DC_PIN) // SDI / MOSI -> D11 (hardware SPI MOSI) // SCK -> D13 (hardware SPI SCK) // SDO / MISO -> D12 (only needed when reading from display) // LED -> 3.3V (or any GPIO via initBacklight) // // XPT2046 / HR2046 / ADS7843 SPI touch controller // (modules with pins: T_CS, T_CLK, T_DIN, T_DO, T_IRQ) // Touch pin Arduino UNO Q // ------------ --------------------------------- // T_CS -> D2 (TOUCH_CS_PIN) // T_IRQ -> D2 (TOUCH_IRQ_PIN, optional - use -1 to skip) // T_CLK -> D13 (shared with display SCK) // T_DIN -> D11 (shared with display MOSI) // T_DO -> D12 (shared with display MISO) // // The Arduino UNO Q MCU pins are 3.3V - no level converter is needed. // ============================================= // ============================================= // SPI pin definitions (adjust for your board) // ============================================= #define TFT_CS_PIN 10 #define TFT_DC_PIN 8 #define TFT_RST_PIN 9 // Panel resolution in native (portrait) orientation - change to match your module #define TFT_WIDTH 240 #define TFT_HEIGHT 320 // MOSI and SCK use default hardware SPI pins // ============================================= // Touch pin definitions (XPT2046 / HR2046 SPI touch controller) // ============================================= #define TOUCH_CS_PIN 2 // T_CS (any GPIO) #define TOUCH_IRQ_PIN -1 // T_IRQ (any GPIO, or -1 if not connected) // ============================================= // ============================================= // Calibration values. // Run the TouchCalibration example and update these if touch is inaccurate. // Typical raw ranges: // - XPT2046 / HR2046 : ~200..3900 (default below) // - 4-wire resistive : ~100..900 // ============================================= #define TOUCH_LEFT_X 300 #define TOUCH_RIGHT_X 3700 #define TOUCH_TOP_Y 300 #define TOUCH_BOT_Y 3700 // ============================================= // Create display object (uncomment matching driver) // ============================================= // DIYables_ILI9341_SPI TFT_display(TFT_WIDTH, TFT_HEIGHT, TFT_CS_PIN, TFT_DC_PIN, TFT_RST_PIN); // DIYables_ILI9488_SPI TFT_display(TFT_WIDTH, TFT_HEIGHT, TFT_CS_PIN, TFT_DC_PIN, TFT_RST_PIN); DIYables_ST7789_SPI TFT_display(TFT_WIDTH, TFT_HEIGHT, TFT_CS_PIN, TFT_DC_PIN, TFT_RST_PIN); #define RED DIYables_TFT_SPI::colorRGB(255, 0, 0) #define WHITE DIYables_TFT_SPI::colorRGB(255, 255, 255) void setup() { Monitor.begin(9600); TFT_display.begin(); TFT_display.setRotation(0); TFT_display.fillScreen(WHITE); TFT_display.initTouchSPI(TOUCH_CS_PIN, TOUCH_IRQ_PIN); // If touch X is mirrored on your board, uncomment: //TFT_display.setTouchInvertX(true); // If touch Y is mirrored on your board, uncomment: //TFT_display.setTouchInvertY(false); TFT_display.setTouchCalibration(TOUCH_LEFT_X, TOUCH_RIGHT_X, TOUCH_TOP_Y, TOUCH_BOT_Y); Monitor.println("Touch the screen to see coordinates."); } void loop() { int x, y; if (TFT_display.getTouch(x, y)) { Monitor.print("Touch at: "); Monitor.print(x); Monitor.print(", "); Monitor.println(y); TFT_display.fillCircle(x, y, 4, RED); delay(200); } }

    Étapes Rapides

    • Copiez le code ci-dessus et collez-le dans sketch/sketch.ino.
    • Cliquez sur le bouton Exécuter dans Arduino App Lab.
    Cliquez sur le bouton Exécuter dans Arduino App Lab sur Arduino UNO Q
    • Ouvrez l'onglet Console et sélectionnez le sous-onglet Serial Monitor.
    • Touchez l'écran et regardez les coordonnées apparaître !

    Sortie Console App Lab

    DIYables_Apps
    Stop
    sketch.ino
    1#include "Arduino_RouterBridge.h"
    Serial Monitor
    Python
    Message (Enter to send a message to "Newbiely" on usb(2820070321))
    New Line
    9600 baud
    [2026-08-20 09:05:00] Touch the screen to see coordinates. [2026-08-20 09:05:04] Touch at: 118, 96 [2026-08-20 09:05:06] Touch at: 63, 210 [2026-08-20 09:05:09] Touch at: 187, 148 [2026-08-20 09:05:12] Touch at: 42, 287

    Référence Rapide des Méthodes

    Méthode Fonction Utilisation
    initTouchSPI(cs, irq) Initialise le XPT2046 sur le bus SPI partagé. Utilisez -1 pour irq si la broche d'interruption n'est pas connectée. TFT_display.initTouchSPI(7, 2);
    setTouchCalibration(minX,maxX,minY,maxY) Fait correspondre les valeurs ADC brutes aux coordonnées en pixels de l'écran. TFT_display.setTouchCalibration(300, 3700, 300, 3700);
    getTouch(x, y) Récupère les coordonnées tactiles calibrées en pixels d'écran. Renvoie true lorsque l'écran est pressé. if (TFT_display.getTouch(x, y)) { ... }
    readTouchRaw(x, y, z) Renvoie les valeurs tactiles ADC brutes sans appliquer de calibration. TFT_display.readTouchRaw(x, y, z);

    Code Arduino UNO Q — Dessin Tactile

    Ce sketch transforme l'écran tactile TFT SPI en une simple tablette de dessin au doigt. Les coordonnées tactiles calibrées placent de petits cercles pleins à chaque point de contact du doigt, formant un dessin continu au fil de son déplacement.

    Ce que fait le code :

    • Configure l'écran et le contrôleur tactile XPT2046
    • Vérifie en continu si l'écran est pressé
    • Dessine un petit point rouge à chaque point de contact
    /* * Ce code Arduino UNO Q a été développé par newbiely.fr * Ce code Arduino UNO Q est mis à disposition du public sans aucune restriction. * Pour des instructions complètes et des schémas de câblage, veuillez visiter: * https://newbiely.fr/tutorials/arduino-uno-q/arduino-uno-q-tft-lcd-touch-display-spi */ /* Touch Draw Lines Example ------------------------- Draws lines on the screen following the pen. - Touch and drag on the screen to draw. - Lift the pen to stop drawing. - Touch again to start a new line from the last point. NOTE: Run the TouchCalibration example and update setTouchCalibration() below if the touch coordinates are inaccurate. Created by DIYables This example code is in the public domain Product page: https://diyables.io */ // ============================================= // Single include brings in the base class plus all driver classes. // ============================================= #include <DIYables_TFT_SPI.h> // ============================================= // Wiring (Arduino UNO Q - MCU side) // ============================================= // TFT pins (always required) // TFT module Arduino UNO Q // ------------ --------------------------------- // VCC -> 3.3V // GND -> GND // CS -> D10 (TFT_CS_PIN) // RESET -> D9 (TFT_RST_PIN) // DC / RS -> D8 (TFT_DC_PIN) // SDI / MOSI -> D11 (hardware SPI MOSI) // SCK -> D13 (hardware SPI SCK) // SDO / MISO -> D12 (only needed when reading from display) // LED -> 3.3V (or any GPIO via initBacklight) // // XPT2046 / HR2046 / ADS7843 SPI touch controller // (modules with pins: T_CS, T_CLK, T_DIN, T_DO, T_IRQ) // Touch pin Arduino UNO Q // ------------ --------------------------------- // T_CS -> D2 (TOUCH_CS_PIN) // T_IRQ -> D2 (TOUCH_IRQ_PIN, optional - use -1 to skip) // T_CLK -> D13 (shared with display SCK) // T_DIN -> D11 (shared with display MOSI) // T_DO -> D12 (shared with display MISO) // // The Arduino UNO Q MCU pins are 3.3V - no level converter is needed. // ============================================= // ============================================= // SPI pin definitions (adjust for your board) // ============================================= #define TFT_CS_PIN 10 #define TFT_DC_PIN 8 #define TFT_RST_PIN 9 // Panel resolution in native (portrait) orientation - change to match your module #define TFT_WIDTH 240 #define TFT_HEIGHT 320 // ============================================= // Touch pin definitions (XPT2046 / HR2046 SPI touch controller) // ============================================= #define TOUCH_CS_PIN 2 // T_CS (any GPIO) #define TOUCH_IRQ_PIN -1 // T_IRQ (any GPIO, or -1 if not connected) // ============================================= // ============================================= // Calibration values. // Run the TouchCalibration example and update these if touch is inaccurate. // Typical raw ranges: // - XPT2046 / HR2046 : ~200..3900 (default below) // - 4-wire resistive : ~100..900 // ============================================= #define TOUCH_LEFT_X 300 #define TOUCH_RIGHT_X 3700 #define TOUCH_TOP_Y 300 #define TOUCH_BOT_Y 3700 // ============================================= // Create display object (uncomment matching driver) // ============================================= // DIYables_ILI9341_SPI TFT_display(TFT_WIDTH, TFT_HEIGHT, TFT_CS_PIN, TFT_DC_PIN, TFT_RST_PIN); // DIYables_ILI9488_SPI TFT_display(TFT_WIDTH, TFT_HEIGHT, TFT_CS_PIN, TFT_DC_PIN, TFT_RST_PIN); DIYables_ST7789_SPI TFT_display(TFT_WIDTH, TFT_HEIGHT, TFT_CS_PIN, TFT_DC_PIN, TFT_RST_PIN); #define RED DIYables_TFT_SPI::colorRGB(255, 0, 0) #define WHITE DIYables_TFT_SPI::colorRGB(255, 255, 255) #define PEN_RADIUS 3 void setup() { TFT_display.begin(); TFT_display.setRotation(0); TFT_display.fillScreen(WHITE); TFT_display.initTouchSPI(TOUCH_CS_PIN, TOUCH_IRQ_PIN); // If touch X is mirrored on your board, uncomment: //TFT_display.setTouchInvertX(true); // If touch Y is mirrored on your board, uncomment: //TFT_display.setTouchInvertY(false); TFT_display.setTouchCalibration(TOUCH_LEFT_X, TOUCH_RIGHT_X, TOUCH_TOP_Y, TOUCH_BOT_Y); } void loop() { int x, y; if (TFT_display.getTouch(x, y)) { TFT_display.fillCircle(x, y, PEN_RADIUS, RED); } }

    Étapes Rapides

    • Copiez le code ci-dessus et collez-le dans sketch/sketch.ino.
    • Cliquez sur le bouton Exécuter dans Arduino App Lab.
    Cliquez sur le bouton Exécuter dans Arduino App Lab sur Arduino UNO Q

    Vous pouvez maintenant dessiner sur l'écran :

    • Touchez et faites glisser sur l'écran pour peindre.
    • Levez le doigt pour arrêter de dessiner.
    • Touchez à nouveau pour continuer.

    Référence Rapide des Méthodes

    Méthode Fonction Utilisation
    initTouchSPI(cs, irq) Configure le XPT2046 sur le bus SPI partagé. TFT_display.initTouchSPI(7, -1);
    setTouchInvertX(invert) / setTouchInvertY(invert) Inverse l'axe tactile lorsque X ou Y est en miroir sur votre écran. À appeler AVANT setTouchCalibration(). TFT_display.setTouchInvertY(true);
    getTouch(x, y) Récupère les coordonnées tactiles calibrées. Renvoie true tant que l'écran est pressé. if (TFT_display.getTouch(x, y)) { ... }
    fillCircle(x, y, r, color) Dessine un petit point au point de contact. TFT_display.fillCircle(x, y, 3, RED);

    Code Arduino UNO Q — Bouton Tactile

    Ce sketch dessine un bouton rectangulaire à l'écran et compare les coordonnées tactiles aux limites du bouton. Lorsque le bouton est touché, il se met en surbrillance et affiche un événement dans la console App Lab. C'est la façon la plus simple de créer une interface utilisateur tactile.

    La broche T_IRQ est optionnelle pour cet exemple. Passez -1 comme argument irq si vous préférez ne pas la connecter.

    Ce que fait le code :

    • Dessine un bouton rouge portant l'étiquette "PRESS"
    • Vérifie si chaque toucher tombe à l'intérieur du rectangle du bouton
    • Applique un anti-rebond à l'appui pour qu'un seul toucher donne un seul événement
    • Redessine le bouton en gris avec "PRESSED" et enregistre les événements d'appui et de relâchement
    /* * Ce code Arduino UNO Q a été développé par newbiely.fr * Ce code Arduino UNO Q est mis à disposition du public sans aucune restriction. * Pour des instructions complètes et des schémas de câblage, veuillez visiter: * https://newbiely.fr/tutorials/arduino-uno-q/arduino-uno-q-tft-lcd-touch-display-spi */ /* Touch Button Press/Release Example ------------------------------------ This example shows how to detect press and release events on a rectangular button using a DIYables SPI TFT display with a 4-wire resistive touch panel. When you touch inside the button, it changes colour and shows "PRESSED". When you release, it returns to its original state. NOTE: Run the TouchCalibration example and update setTouchCalibration() below if the touch coordinates are inaccurate. Created by DIYables This example code is in the public domain Product page: https://diyables.io */ // ============================================= // Single include brings in the base class plus all driver classes. // ============================================= #include "Arduino_RouterBridge.h" #include <DIYables_TFT_SPI.h> // ============================================= // Wiring (Arduino UNO Q - MCU side) // ============================================= // TFT pins (always required) // TFT module Arduino UNO Q // ------------ --------------------------------- // VCC -> 3.3V // GND -> GND // CS -> D10 (TFT_CS_PIN) // RESET -> D9 (TFT_RST_PIN) // DC / RS -> D8 (TFT_DC_PIN) // SDI / MOSI -> D11 (hardware SPI MOSI) // SCK -> D13 (hardware SPI SCK) // SDO / MISO -> D12 (only needed when reading from display) // LED -> 3.3V (or any GPIO via initBacklight) // // XPT2046 / HR2046 / ADS7843 SPI touch controller // (modules with pins: T_CS, T_CLK, T_DIN, T_DO, T_IRQ) // Touch pin Arduino UNO Q // ------------ --------------------------------- // T_CS -> D2 (TOUCH_CS_PIN) // T_IRQ -> D2 (TOUCH_IRQ_PIN, optional - use -1 to skip) // T_CLK -> D13 (shared with display SCK) // T_DIN -> D11 (shared with display MOSI) // T_DO -> D12 (shared with display MISO) // // The Arduino UNO Q MCU pins are 3.3V - no level converter is needed. // ============================================= // ============================================= // SPI pin definitions (adjust for your board) // ============================================= #define TFT_CS_PIN 10 #define TFT_DC_PIN 8 #define TFT_RST_PIN 9 // Panel resolution in native (portrait) orientation - change to match your module #define TFT_WIDTH 240 #define TFT_HEIGHT 320 // ============================================= // Touch pin definitions (XPT2046 / HR2046 SPI touch controller) // ============================================= #define TOUCH_CS_PIN 2 // T_CS (any GPIO) #define TOUCH_IRQ_PIN -1 // T_IRQ (any GPIO, or -1 if not connected) // ============================================= // ============================================= // Calibration values. // Run the TouchCalibration example and update these if touch is inaccurate. // Typical raw ranges: // - XPT2046 / HR2046 : ~200..3900 (default below) // - 4-wire resistive : ~100..900 // ============================================= #define TOUCH_LEFT_X 300 #define TOUCH_RIGHT_X 3700 #define TOUCH_TOP_Y 300 #define TOUCH_BOT_Y 3700 // ============================================= // Create display object (uncomment matching driver) // ============================================= // DIYables_ILI9341_SPI TFT_display(TFT_WIDTH, TFT_HEIGHT, TFT_CS_PIN, TFT_DC_PIN, TFT_RST_PIN); // DIYables_ILI9488_SPI TFT_display(TFT_WIDTH, TFT_HEIGHT, TFT_CS_PIN, TFT_DC_PIN, TFT_RST_PIN); DIYables_ST7789_SPI TFT_display(TFT_WIDTH, TFT_HEIGHT, TFT_CS_PIN, TFT_DC_PIN, TFT_RST_PIN); #define BLACK DIYables_TFT_SPI::colorRGB( 0, 0, 0) #define WHITE DIYables_TFT_SPI::colorRGB(255, 255, 255) #define GRAY DIYables_TFT_SPI::colorRGB(128, 128, 128) #define RED DIYables_TFT_SPI::colorRGB(255, 0, 0) #define BUTTON_X 30 #define BUTTON_Y 100 #define BUTTON_W 180 #define BUTTON_H 60 #define DEBOUNCE_DELAY 50 bool lastPressed = false; bool stablePressed = false; unsigned long lastDebounceTime = 0; void drawButton(bool pressed) { uint16_t bg = pressed ? GRAY : RED; TFT_display.fillRect(BUTTON_X, BUTTON_Y, BUTTON_W, BUTTON_H, bg); TFT_display.drawRect(BUTTON_X, BUTTON_Y, BUTTON_W, BUTTON_H, BLACK); TFT_display.setTextColor(WHITE, bg); TFT_display.setTextSize(3); TFT_display.setCursor(BUTTON_X + 10, BUTTON_Y + 16); TFT_display.print(pressed ? "PRESSED" : " PRESS "); } void setup() { Monitor.begin(9600); TFT_display.begin(); TFT_display.setRotation(0); TFT_display.fillScreen(WHITE); TFT_display.initTouchSPI(TOUCH_CS_PIN, TOUCH_IRQ_PIN); // If touch X is mirrored on your board, uncomment: //TFT_display.setTouchInvertX(true); // If touch Y is mirrored on your board, uncomment: //TFT_display.setTouchInvertY(false); TFT_display.setTouchCalibration(TOUCH_LEFT_X, TOUCH_RIGHT_X, TOUCH_TOP_Y, TOUCH_BOT_Y); drawButton(false); } void loop() { int x, y; bool pressed = false; if (TFT_display.getTouch(x, y)) { if (x >= BUTTON_X && x < (BUTTON_X + BUTTON_W) && y >= BUTTON_Y && y < (BUTTON_Y + BUTTON_H)) { pressed = true; } } if (pressed != lastPressed) { lastDebounceTime = millis(); } lastPressed = pressed; if ((millis() - lastDebounceTime) > DEBOUNCE_DELAY) { if (pressed != stablePressed) { stablePressed = pressed; drawButton(stablePressed); Monitor.println(stablePressed ? "Button PRESSED" : "Button RELEASED"); } } }

    Étapes Rapides

    • Copiez le code ci-dessus et collez-le dans sketch/sketch.ino.
    • Cliquez sur le bouton Exécuter dans Arduino App Lab.
    Cliquez sur le bouton Exécuter dans Arduino App Lab sur Arduino UNO Q
    • Ouvrez l'onglet Console et sélectionnez le sous-onglet Serial Monitor.
    • Touchez le bouton à l'écran — il change de couleur pendant l'appui.

    Sortie Console App Lab

    DIYables_Apps
    Stop
    sketch.ino
    1#include "Arduino_RouterBridge.h"
    Serial Monitor
    Python
    Message (Enter to send a message to "Newbiely" on usb(2820070321))
    New Line
    9600 baud
    [2026-08-20 09:10:02] Button PRESSED [2026-08-20 09:10:03] Button RELEASED [2026-08-20 09:10:07] Button PRESSED [2026-08-20 09:10:08] Button RELEASED

    Référence Rapide des Méthodes

    Méthode Fonction Utilisation
    initTouchSPI(cs, irq) Initialise le XPT2046. Passez -1 pour irq pour interroger sans la broche d'interruption. TFT_display.initTouchSPI(7, -1);
    setTouchCalibration(minX,maxX,minY,maxY) Applique la calibration pour que getTouch() renvoie des coordonnées en pixels de l'écran. TFT_display.setTouchCalibration(300, 3700, 300, 3700);
    getTouch(x, y) Obtient la position tactile calibrée actuelle. Renvoie true tant que l'écran est pressé. if (TFT_display.getTouch(x, y)) { ... }
    fillRect(x, y, w, h, color) Dessine un rectangle de couleur unie pour le fond du bouton. TFT_display.fillRect(10, 10, 120, 60, BLUE);

    Code Arduino UNO Q — Calibration Tactile

    Les exemples tactiles ci-dessus utilisent des valeurs de calibration par défaut et fonctionnent sur la plupart des écrans. Si la position tactile n'est pas précise, exécutez ce sketch pour mesurer la plage ADC brute de votre propre écran XPT2046. Touchez chaque coin lorsque cela vous est demandé, puis copiez les quatre nombres affichés dans setTouchCalibration() de vos autres sketches tactiles.

    La calibration est nécessaire car la couche tactile résistive ne s'aligne pas parfaitement avec les pixels de l'écran en raison des différences de fabrication. Elle ne doit être effectuée qu'une seule fois par écran.

    Ce que fait le code :

    • Fait clignoter un point rouge dans chacun des quatre coins, numérotés de 1 à 4
    • Fait la moyenne de plusieurs lectures brutes pendant que vous maintenez chaque coin
    • Affiche en direct les valeurs brutes Z, X et Y pour que vous puissiez confirmer la détection du toucher
    • Affiche à la fin une ligne setTouchCalibration() prête à l'emploi
    /* * Ce code Arduino UNO Q a été développé par newbiely.fr * Ce code Arduino UNO Q est mis à disposition du public sans aucune restriction. * Pour des instructions complètes et des schémas de câblage, veuillez visiter: * https://newbiely.fr/tutorials/arduino-uno-q/arduino-uno-q-tft-lcd-touch-display-spi */ /* Touch Screen Calibration Example --------------------------------- This example measures the raw touch coordinates at all four screen corners and prints ready-to-use calibration values to the App Lab console. It uses readTouchRaw() directly — it does NOT rely on getTouch() or any existing calibration values, so it works even when touch is completely broken. INSTRUCTIONS: 1. Upload this sketch to the Arduino UNO Q MCU with the Run button. 2. Open the Console tab in Arduino App Lab and select the Serial Monitor subtab. 3. The screen shows a blinking red dot in each corner, numbered 1–4: 1 = Top-left 2 = Top-right 3 = Bottom-right 4 = Bottom-left 4. Press and HOLD firmly on the blinking dot. Keep holding until the console prints "Captured!" for that corner. 5. Release, then wait for the next dot to appear and repeat. 6. After all 4 corners, the console prints the calibration values and a ready-to-use setTouchCalibration() call. Copy it into your sketch. NOTE: While waiting, the console continuously prints the live raw Z/X/Y readings so you can confirm that touch is being detected. Created by DIYables This example code is in the public domain Product page: https://diyables.io */ // ============================================= // Single include brings in the base class plus all driver classes. // ============================================= #include "Arduino_RouterBridge.h" #include <DIYables_TFT_SPI.h> // ============================================= // Wiring (Arduino UNO Q) // ============================================= // TFT pins (always required) // TFT module Arduino UNO Q // ------------ --------------------------------- // VCC -> 3.3V // GND -> GND // CS -> D10 (TFT_CS_PIN) // RESET -> D9 (TFT_RST_PIN) // DC / RS -> D8 (TFT_DC_PIN) // SDI / MOSI -> D11 (hardware SPI MOSI) // SCK -> D13 (hardware SPI SCK) // SDO / MISO -> D12 (only needed when reading from display) // LED -> 3.3V (or any GPIO via initBacklight) // // XPT2046 / HR2046 / ADS7843 SPI touch controller // (modules with pins: T_CS, T_CLK, T_DIN, T_DO, T_IRQ) // Touch pin Arduino UNO Q // ------------ --------------------------------- // T_CS -> D2 (TOUCH_CS_PIN) // T_IRQ -> D2 (TOUCH_IRQ_PIN, optional - use -1 to skip) // T_CLK -> D13 (shared with display SCK) // T_DIN -> D11 (shared with display MOSI) // T_DO -> D12 (shared with display MISO) // // The Arduino UNO Q MCU pins are 3.3V - no level converter is needed. // ============================================= // ============================================= // SPI pin definitions (adjust for your board) // ============================================= #define TFT_CS_PIN 10 #define TFT_DC_PIN 8 #define TFT_RST_PIN 9 // Panel resolution in native (portrait) orientation - change to match your module #define TFT_WIDTH 240 #define TFT_HEIGHT 320 // ============================================= // Touch pin definitions (XPT2046 / HR2046 SPI touch controller) // ============================================= #define TOUCH_CS_PIN 2 // T_CS (any GPIO) #define TOUCH_IRQ_PIN -1 // T_IRQ (any GPIO, or -1 if not connected) // ============================================= // ============================================= // Create display object (uncomment matching driver) // ============================================= // DIYables_ILI9341_SPI TFT_display(TFT_WIDTH, TFT_HEIGHT, TFT_CS_PIN, TFT_DC_PIN, TFT_RST_PIN); // DIYables_ILI9488_SPI TFT_display(TFT_WIDTH, TFT_HEIGHT, TFT_CS_PIN, TFT_DC_PIN, TFT_RST_PIN); DIYables_ST7789_SPI TFT_display(TFT_WIDTH, TFT_HEIGHT, TFT_CS_PIN, TFT_DC_PIN, TFT_RST_PIN); // Minimum pressure to count as a valid touch. #define TOUCH_Z_MIN 10 // How many consecutive valid samples required before a corner is accepted. #define SAMPLES_NEEDED 10 // Delay between samples (ms). #define SAMPLE_DELAY_MS 30 #define DOT_RADIUS 12 #define BLACK DIYables_TFT_SPI::colorRGB( 0, 0, 0) #define WHITE DIYables_TFT_SPI::colorRGB(255, 255, 255) #define RED DIYables_TFT_SPI::colorRGB(255, 0, 0) // Corner pixel positions — filled in setup() once display size is known. // Order: 0=top-left, 1=top-right, 2=bottom-right, 3=bottom-left int cx[4], cy[4]; // Captured averaged raw values per corner. int cap_x[4], cap_y[4]; // ----------------------------------------------------------------------- void drawDot(int corner, bool on) { uint16_t color = on ? RED : WHITE; TFT_display.fillCircle(cx[corner], cy[corner], DOT_RADIUS, color); TFT_display.setTextSize(2); TFT_display.setTextColor(BLACK, color); TFT_display.setCursor(cx[corner] - 6, cy[corner] - 8); TFT_display.print(corner + 1); } void captureCorner(int corner) { const char* names[] = { "Top-left", "Top-right", "Bottom-right", "Bottom-left" }; Monitor.println(); Monitor.print("Corner "); Monitor.print(corner + 1); Monitor.print(" ("); Monitor.print(names[corner]); Monitor.println(")"); Monitor.println(" Press and HOLD firmly on the blinking dot."); Monitor.println(" Keep holding until you see 'Captured!'"); unsigned long lastBlink = 0; unsigned long lastPrint = 0; bool dotOn = false; int goodSamples = 0; long sumX = 0, sumY = 0; while (true) { // Blink the dot if (millis() - lastBlink > 400) { lastBlink = millis(); dotOn = !dotOn; drawDot(corner, dotOn); } int raw_x, raw_y, z; TFT_display.readTouchRaw(raw_x, raw_y, z); // Print live readings every 500 ms if (millis() - lastPrint > 500) { lastPrint = millis(); Monitor.print(" Z="); Monitor.print(z); Monitor.print(" X="); Monitor.print(raw_x); Monitor.print(" Y="); Monitor.println(raw_y); } if (z >= TOUCH_Z_MIN) { sumX += raw_x; sumY += raw_y; goodSamples++; if (goodSamples >= SAMPLES_NEEDED) { cap_x[corner] = sumX / goodSamples; cap_y[corner] = sumY / goodSamples; Monitor.print(" Captured! raw_x="); Monitor.print(cap_x[corner]); Monitor.print(" raw_y="); Monitor.println(cap_y[corner]); drawDot(corner, false); delay(500); return; } } else { goodSamples = 0; sumX = 0; sumY = 0; } delay(SAMPLE_DELAY_MS); } } // ----------------------------------------------------------------------- void setup() { Monitor.begin(9600); TFT_display.begin(); TFT_display.setRotation(0); // Always calibrate in rotation 0 TFT_display.fillScreen(WHITE); TFT_display.initTouchSPI(TOUCH_CS_PIN, TOUCH_IRQ_PIN); // If touch X is mirrored on your board, uncomment the line below // BEFORE calibrating (so the printed values match your panel): //TFT_display.setTouchInvertX(true); // If touch Y is mirrored on your board, uncomment: //TFT_display.setTouchInvertY(false); int w = TFT_display.width(); int h = TFT_display.height(); int m = DOT_RADIUS + 4; cx[0] = m; cy[0] = m; cx[1] = w - m; cy[1] = m; cx[2] = w - m; cy[2] = h - m; cx[3] = m; cy[3] = h - m; Monitor.println("=== Touch Calibration ==="); for (int i = 0; i < 4; i++) { captureCorner(i); } // Derive calibration values from the four corners int min_x = (cap_x[0] + cap_x[3]) / 2; // left edge int max_x = (cap_x[1] + cap_x[2]) / 2; // right edge int min_y = (cap_y[0] + cap_y[1]) / 2; // top edge int max_y = (cap_y[2] + cap_y[3]) / 2; // bottom edge Monitor.println(); Monitor.println("=== Calibration Results ==="); Monitor.print(" Left X (min_x): "); Monitor.println(min_x); Monitor.print(" Right X (max_x): "); Monitor.println(max_x); Monitor.print(" Top Y (min_y): "); Monitor.println(min_y); Monitor.print(" Bot Y (max_y): "); Monitor.println(max_y); Monitor.println(); Monitor.println("Copy this line into your sketch:"); Monitor.print(" TFT_display.setTouchCalibration("); Monitor.print(min_x); Monitor.print(", "); Monitor.print(max_x); Monitor.print(", "); Monitor.print(min_y); Monitor.print(", "); Monitor.print(max_y); Monitor.println(");"); TFT_display.fillScreen(WHITE); TFT_display.setTextColor(BLACK); TFT_display.setTextSize(2); TFT_display.setCursor(10, 10); TFT_display.println("Done! Check"); TFT_display.setCursor(10, 35); TFT_display.println("App Lab console"); } void loop() {}

    Étapes Rapides

    • Copiez le code ci-dessus et collez-le dans sketch/sketch.ino.
    • Cliquez sur le bouton Exécuter dans Arduino App Lab.
    Cliquez sur le bouton Exécuter dans Arduino App Lab sur Arduino UNO Q
    • Ouvrez l'onglet Console et sélectionnez le sous-onglet Serial Monitor.
    • Appuyez et maintenez chaque point de coin clignotant dans l'ordre : haut-gauche, haut-droit, bas-droit, bas-gauche.
    • Copiez la ligne setTouchCalibration() affichée dans le setup() de vos autres sketches tactiles.

    Sortie Console App Lab

    DIYables_Apps
    Stop
    sketch.ino
    1#include "Arduino_RouterBridge.h"
    Serial Monitor
    Python
    Message (Enter to send a message to "Newbiely" on usb(2820070321))
    New Line
    9600 baud
    [2026-08-20 09:15:00] === Touch Calibration === [2026-08-20 09:15:04] Captured! raw_x=312 raw_y=289 [2026-08-20 09:15:11] Captured! raw_x=3704 raw_y=305 [2026-08-20 09:15:19] Captured! raw_x=3688 raw_y=3712 [2026-08-20 09:15:26] Captured! raw_x=298 raw_y=3695 [2026-08-20 09:15:27] TFT_display.setTouchCalibration(305, 3696, 297, 3703);

    Référence Rapide des Méthodes

    Méthode Fonction Utilisation
    initTouchSPI(cs, irq) Initialise le contrôleur tactile XPT2046. TFT_display.initTouchSPI(7, 2);
    readTouchRaw(x, y, z) Lit les valeurs ADC brutes pour mesurer la plage de calibration. TFT_display.readTouchRaw(x, y, z);
    setTouchCalibration(minX,maxX,minY,maxY) Enregistre les valeurs de calibration pour que getTouch() corresponde correctement aux coordonnées en pixels. TFT_display.setTouchCalibration(305, 3696, 297, 3703);
    setTouchInvertX(invert) / setTouchInvertY(invert) Inverse l'axe tactile lorsque X ou Y est en miroir sur votre écran. À appeler AVANT d'exécuter la calibration pour que les valeurs enregistrées correspondent. TFT_display.setTouchInvertY(true);

    Code Arduino UNO Q — Bus SPI Personnalisé

    Ce sketch montre comment fournir une instance SPIClass explicite au constructeur de l'écran. Utilisez cette approche lorsque vous voulez nommer le bus explicitement, le partager avec une configuration supplémentaire, ou déplacer l'écran vers une seconde interface SPI sur les cartes qui en possèdent une.

    Le MCU de l'Arduino UNO Q expose un seul bus SPI matériel sur D11, D13 et D12, donc MY_SPI reste &SPI ici. Le même sketch fonctionne sans modification sur les cartes à deux bus en changeant simplement ce define.

    Ce que fait le code :

    • Définit MY_SPI comme un pointeur vers le bus SPI à utiliser
    • Passe ce pointeur comme dernier argument du constructeur
    • Dessine une mire de test à barres de couleur rouge, verte et bleue
    • Affiche une étiquette de confirmation par-dessus les barres
    /* * Ce code Arduino UNO Q a été développé par newbiely.fr * Ce code Arduino UNO Q est mis à disposition du public sans aucune restriction. * Pour des instructions complètes et des schémas de câblage, veuillez visiter: * https://newbiely.fr/tutorials/arduino-uno-q/arduino-uno-q-tft-lcd-touch-display-spi */ /* Created by DIYables This example code is in the public domain Product page: https://diyables.io This example demonstrates how to use a custom (non-default) SPI bus with the DIYables TFT SPI library. This is useful on boards that have multiple SPI interfaces, such as: - ESP32: HSPI / VSPI - Arduino Giga / Portenta: SPI1 - Raspberry Pi Pico: SPI1 */ // ============================================= // Single include brings in the base class plus all driver classes. // ============================================= #include <DIYables_TFT_SPI.h> // ============================================= // Wiring (Arduino UNO Q - default SPI bus) // --------------------------------------------- // NOTE: The Arduino UNO Q MCU exposes ONE hardware SPI bus on the Uno // headers, so this example is most useful on boards with multiple buses // (ESP32, Giga, RP2040...). On the Arduino UNO Q, MY_SPI must remain // &SPI and the wiring is the standard hardware SPI mapping below. // // TFT module Arduino UNO Q // ------------ --------------------------------- // VCC -> 3.3V // GND -> GND // CS -> D10 (TFT_CS_PIN) // RESET -> D9 (TFT_RST_PIN) // DC / RS -> D8 (TFT_DC_PIN) // SDI / MOSI -> D11 (hardware SPI MOSI) // SCK -> D13 (hardware SPI SCK) // LED -> 3.3V (or any GPIO via initBacklight) // SDO / MISO -> D12 (only needed when reading from display) // // The Arduino UNO Q MCU pins are 3.3V - no level converter is needed. // ============================================= // ============================================= // SPI pin definitions (adjust for your board) // ============================================= #define TFT_CS_PIN 10 #define TFT_DC_PIN 8 #define TFT_RST_PIN 9 // Panel resolution in native (portrait) orientation - change to match your module #define TFT_WIDTH 240 #define TFT_HEIGHT 320 // ============================================= // Select alternate SPI bus (uncomment for your board) // ============================================= // --- ESP32: use HSPI --- // SPIClass hspi(HSPI); // #define MY_SPI &hspi // --- Arduino Giga / Portenta / RP2040: use SPI1 --- // #define MY_SPI &SPI1 // --- Default SPI (fallback, and the correct choice on Arduino UNO Q) --- #define MY_SPI &SPI // ============================================= // Create display object with custom SPI bus // (uncomment matching driver) // ============================================= // DIYables_ILI9341_SPI TFT_display(TFT_WIDTH, TFT_HEIGHT, TFT_CS_PIN, TFT_DC_PIN, TFT_RST_PIN, MY_SPI); // DIYables_ILI9488_SPI TFT_display(TFT_WIDTH, TFT_HEIGHT, TFT_CS_PIN, TFT_DC_PIN, TFT_RST_PIN, MY_SPI); DIYables_ST7789_SPI TFT_display(TFT_WIDTH, TFT_HEIGHT, TFT_CS_PIN, TFT_DC_PIN, TFT_RST_PIN, MY_SPI); #define BLACK DIYables_TFT_SPI::colorRGB(0, 0, 0) #define WHITE DIYables_TFT_SPI::colorRGB(255, 255, 255) #define RED DIYables_TFT_SPI::colorRGB(255, 0, 0) #define GREEN DIYables_TFT_SPI::colorRGB(0, 255, 0) #define BLUE DIYables_TFT_SPI::colorRGB(0, 0, 255) void setup() { // For ESP32 HSPI: optionally remap pins before begin() // hspi.begin(14, 12, 13, -1); // SCK, MISO, MOSI, SS TFT_display.begin(); TFT_display.setRotation(1); // Landscape TFT_display.fillScreen(BLACK); uint16_t w = TFT_display.width(); uint16_t h = TFT_display.height(); // Draw a simple test pattern TFT_display.fillRect(0, 0, w / 3, h, RED); TFT_display.fillRect(w / 3, 0, w / 3, h, GREEN); TFT_display.fillRect(w * 2 / 3, 0, w / 3, h, BLUE); TFT_display.setTextColor(WHITE); TFT_display.setTextSize(2); TFT_display.setCursor(10, h / 2 - 10); TFT_display.print("Custom SPI bus OK"); } void loop() { // Nothing to do }

    Étapes Rapides

    • Copiez le code ci-dessus et collez-le dans sketch/sketch.ino.
    • Cliquez sur le bouton Exécuter dans Arduino App Lab.
    Cliquez sur le bouton Exécuter dans Arduino App Lab sur Arduino UNO Q

    L'écran démarre sur le bus SPI explicite et affiche la mire de test à barres de couleur.

    Référence Rapide des Méthodes

    Méthode Fonction Utilisation
    DIYables_ILI9341_SPI(w,h,cs,dc,rst,spi) Variante du constructeur qui accepte un pointeur vers n'importe quelle SPIClass. Vaut &SPI par défaut lorsque l'argument est omis. DIYables_ILI9341_SPI tft(240, 320, 10, 9, 8, &SPI);
    begin() Initialise l'écran sur le bus SPI configuré. TFT_display.begin();

    Bridge : Linux + MCU

    Cette section montre comment programmer les deux processeurs de l'Arduino UNO Q pour que le côté Linux puisse contrôler l'écran TFT SPI et lire l'entrée tactile à distance :

    • L'écran TFT SPI et le contrôleur tactile XPT2046 sont connectés au MCU (STM32) — le MCU affiche toute la sortie et lit chaque toucher
    • Le MPU ne peut pas piloter le TFT ni lire le tactile directement — il doit demander les résultats au MCU via Bridge.call(), qui déclenche le callback Bridge.provide() correspondant sur le MCU
    • Le MPU dispose du Wi-Fi — exécutant Debian Linux complet, il peut accéder à Internet, appeler des API REST et envoyer des mises à jour d'affichage depuis n'importe où
    • Arduino_RouterBridge permet la communication RPC entre les deux processeurs — le service Arduino Router sous Linux gère tout le trafic
    • ⚠️ /dev/ttyHS1 (Linux) et Serial1 (MCU) sont RÉSERVÉS par le routeur — ne les ouvrez jamais dans le code utilisateur

    En résumé : MCU pilote l'écran TFT SPI et lit le tactile → MPU demande les commandes et les données tactiles → MPU les utilise via Internet.

    Code MCU (Bridge)

    /* * Ce code Arduino UNO Q a été développé par newbiely.fr * Ce code Arduino UNO Q est mis à disposition du public sans aucune restriction. * Pour des instructions complètes et des schémas de câblage, veuillez visiter: * https://newbiely.fr/tutorials/arduino-uno-q/arduino-uno-q-tft-lcd-touch-display-spi */ #include "Arduino_RouterBridge.h" #include <DIYables_TFT_SPI.h> // SPI TFT display pins on the Arduino UNO Q MCU #define TFT_CS_PIN 10 #define TFT_DC_PIN 8 #define TFT_RST_PIN 9 // Panel resolution in native (portrait) orientation #define TFT_WIDTH 240 #define TFT_HEIGHT 320 // XPT2046 touch controller pins (shared SPI bus) #define TOUCH_CS_PIN 2 // T_CS #define TOUCH_IRQ_PIN -1 // T_IRQ (-1 if not connected) // Touch calibration - run the TouchCalibration sketch and update these #define TOUCH_LEFT_X 300 #define TOUCH_RIGHT_X 3700 #define TOUCH_TOP_Y 300 #define TOUCH_BOT_Y 3700 // Uncomment the line that matches your driver chip // DIYables_ILI9341_SPI TFT_display(TFT_WIDTH, TFT_HEIGHT, TFT_CS_PIN, TFT_DC_PIN, TFT_RST_PIN); // DIYables_ILI9488_SPI TFT_display(TFT_WIDTH, TFT_HEIGHT, TFT_CS_PIN, TFT_DC_PIN, TFT_RST_PIN); DIYables_ST7789_SPI TFT_display(TFT_WIDTH, TFT_HEIGHT, TFT_CS_PIN, TFT_DC_PIN, TFT_RST_PIN); #define WHITE DIYables_TFT_SPI::colorRGB(255, 255, 255) #define BLUE DIYables_TFT_SPI::colorRGB(0, 0, 255) #define RED DIYables_TFT_SPI::colorRGB(255, 0, 0) String current_text = ""; int last_touch_x = -1; int last_touch_y = -1; // Called from Linux via Bridge.call("display_text", "...") String display_text(String text) { current_text = text; TFT_display.fillScreen(WHITE); TFT_display.setTextColor(BLUE); TFT_display.setTextSize(2); TFT_display.setCursor(10, 40); TFT_display.println(text); return "TFT shows: " + text; } // Called from Linux via Bridge.call("clear_tft") String clear_tft() { current_text = ""; TFT_display.fillScreen(WHITE); return "TFT is clear"; } // Called from Linux via Bridge.call("get_touch") String get_touch() { if (last_touch_x < 0) return "No touch detected"; return "Touch: " + String(last_touch_x) + ", " + String(last_touch_y); } // Called from Linux via Bridge.call("get_status") String get_status() { if (current_text == "") return "TFT is clear"; return "TFT shows: " + current_text; } void setup() { Bridge.begin(); Monitor.begin(9600); TFT_display.begin(); TFT_display.setRotation(0); TFT_display.fillScreen(WHITE); TFT_display.initTouchSPI(TOUCH_CS_PIN, TOUCH_IRQ_PIN); TFT_display.setTouchCalibration(TOUCH_LEFT_X, TOUCH_RIGHT_X, TOUCH_TOP_Y, TOUCH_BOT_Y); // Expose MCU functions to the Linux side. // provide_safe is used for callbacks that call standard Arduino APIs. Bridge.provide_safe("display_text", display_text); Bridge.provide_safe("clear_tft", clear_tft); Bridge.provide("get_touch", get_touch); Bridge.provide("get_status", get_status); Monitor.println("SPI TFT Bridge ready"); } void loop() { int x, y; if (TFT_display.getTouch(x, y)) { last_touch_x = x; last_touch_y = y; Monitor.println("Touch at: " + String(x) + ", " + String(y)); TFT_display.fillCircle(x, y, 4, RED); delay(150); // Debounce } }

    Code Python (Bridge)

    /* * Ce code Arduino UNO Q a été développé par newbiely.fr * Ce code Arduino UNO Q est mis à disposition du public sans aucune restriction. * Pour des instructions complètes et des schémas de câblage, veuillez visiter: * https://newbiely.fr/tutorials/arduino-uno-q/arduino-uno-q-tft-lcd-touch-display-spi */ from arduino.app_utils import * import time def loop(): # Ask the MCU to show text on the SPI TFT display result = Bridge.call("display_text", "Hello UNO Q") print(result) time.sleep(3) result = Bridge.call("display_text", "Touch the screen!") print(result) time.sleep(5) # Ask the MCU for the last touch point it detected result = Bridge.call("get_touch") print(result) time.sleep(2) result = Bridge.call("clear_tft") print(result) time.sleep(2) result = Bridge.call("get_status") print(result) time.sleep(2) App.run(user_loop=loop)

    Étapes Rapides

    • Connecter : Câblez l'écran TFT SPI et le contrôleur tactile XPT2046 à l'Arduino UNO Q, puis branchez le câble USB-C.
    • Ouvrir Arduino App Lab : Lancez Arduino App Lab et attendez la détection de la carte.
    • Créer une nouvelle application : Cliquez sur Créer une nouvelle application, nommez-la DIYables_TftSpiBridge, puis cliquez sur Créer.
    • Coller le sketch MCU : Copiez le code MCU Bridge ci-dessus et collez-le dans sketch/sketch.ino.
    • Coller le code Python : Copiez le code Python Bridge ci-dessus et collez-le dans le fichier Python de l'application.
    • Install the library: Click the Add sketch library button (the open book icon with a + sign) in the left sidebar.
    Add sketch library in Arduino App Lab on Arduino UNO Q
    • Search for Arduino_RouterBridge created by Arduino and click the Install button.
    My Apps / DIYables Apps
    Run
    Bricks
    No bricks added...
    Sketch Libraries
    No sketch libra...
    Files
    python
    sketch
    .gitignore
    README.md
    app.yaml
    sketch.ino
    Add sketch library
    Arduino_RouterBridge Arduino

    This library provides a simple RPC bridge for Arduino UNO Q boards, allowing communication between the board and other devices using MsgPack serialization.

    0.4.1
    Install
    More Info
    • Search for DIYables TFT SPI created by DIYables.io and click the Install button.
    My Apps / DIYables Apps
    Run
    Bricks
    No bricks added...
    Sketch Libraries
    No sketch libra...
    Files
    python
    sketch
    .gitignore
    README.md
    app.yaml
    sketch.ino
    Add sketch library
    DIYables TFT SPI DIYables.io

    Works with both touch and non-touch versions of the same SPI TFT modules. Supports ILI9341 (240x320, 16-bit RGB565), ILI9488 (320x480, 18-bit RGB666), and ST7789 (240x320, 16-bit RGB565) displays over SPI. Includes built-in driver for XPT2046 / HR2046 / ADS7843 SPI touch controllers and 4-wire resistive touch panels - no separate touch library required. Use the display-only API for non-touch panels, or add initTouchSPI() to enable touch on modules that include a touch controller. Extends Adafruit GFX for full graphics support. Works with any Arduino-compatible board that has SPI.

    1.0.3
    Install
    More Info
    • Téléverser : Cliquez sur le bouton Exécuter dans Arduino App Lab.
    Cliquez sur le bouton Exécuter dans Arduino App Lab sur Arduino UNO Q
    • Remarque : Assurez-vous que Bridge.begin() est appelé dans le sketch MCU et que le sketch est téléversé avant d'exécuter le script Python côté Linux.
    • ⚠️ Avertissement : N'ouvrez jamais directement /dev/ttyHS1 (sous Linux) et n'utilisez jamais Serial1 (sur le MCU) dans votre code — ils sont réservés par l'Arduino Router et y accéder cassera le Bridge.

    Sortie Console App Lab

    DIYables_Apps
    Stop
    sketch.ino
    1#include "Arduino_RouterBridge.h"
    Serial Monitor
    Python
    Message (Enter to send a message to "Newbiely" on usb(2820070321))
    New Line
    9600 baud
    [2026-08-20 09:20:00] SPI TFT Bridge ready [2026-08-20 09:20:06] Touch at: 118, 96 [2026-08-20 09:20:09] Touch at: 63, 210 [2026-08-20 09:20:14] Touch at: 187, 148
    DIYables_Apps
    Stop
    sketch.ino
    1#include "Arduino_RouterBridge.h"
    Serial Monitor
    Python
    [2026-08-20 09:20:00] TFT shows: Hello UNO Q [2026-08-20 09:20:03] TFT shows: Touch the screen! [2026-08-20 09:20:08] Touch: 118, 96 [2026-08-20 09:20:10] TFT is clear [2026-08-20 09:20:12] TFT is clear

    Telegram

    Contrôlez l'écran TFT SPI depuis n'importe où avec Telegram. Envoyez un message depuis votre téléphone et l'écran se met à jour en temps réel — et demandez à la carte où vous avez touché l'écran pour la dernière fois.

    Si vous n'avez pas encore de bot Telegram, consultez Arduino UNO Q - Bot Telegram pour obtenir votre token de bot avant de continuer.

    Cette section couvre :

    • L'exécution d'un script Python côté Linux de l'Arduino UNO Q pour écouter les messages Telegram
    • Le transfert des commandes de Telegram vers le côté MCU pour écrire sur l'écran TFT SPI
    • Le renvoi du résultat du MCU — l'état de l'écran ou le dernier point tactile — sous forme de réponse Telegram

    Sketch MCU : Conservez le même sketch MCU de la section Bridge précédente — aucune modification nécessaire. Assurez-vous qu'il est déjà téléversé et en cours d'exécution sur le STM32 avant de continuer.

    Code Python (Telegram)

    /* * Ce code Arduino UNO Q a été développé par newbiely.fr * Ce code Arduino UNO Q est mis à disposition du public sans aucune restriction. * Pour des instructions complètes et des schémas de câblage, veuillez visiter: * https://newbiely.fr/tutorials/arduino-uno-q/arduino-uno-q-tft-lcd-touch-display-spi */ from arduino.app_utils import * import requests import time TELEGRAM_TOKEN = "YOUR_TELEGRAM_BOT_TOKEN" CHAT_ID = "YOUR_CHAT_ID" last_update_id = 0 def get_updates(): global last_update_id url = f"https://api.telegram.org/bot{TELEGRAM_TOKEN}/getUpdates" params = {"offset": last_update_id + 1, "timeout": 5} try: response = requests.get(url, params=params, timeout=10) data = response.json() if data["ok"]: return data["result"] except Exception: pass return [] def send_message(text): url = f"https://api.telegram.org/bot{TELEGRAM_TOKEN}/sendMessage" requests.post(url, data={"chat_id": CHAT_ID, "text": text}) def loop(): global last_update_id updates = get_updates() for update in updates: last_update_id = update["update_id"] message = update.get("message", {}) text = message.get("text", "") if text.startswith("/display "): display_text = text[9:].strip() result = Bridge.call("display_text", display_text) send_message(result) elif text == "/clear": result = Bridge.call("clear_tft") send_message(result) elif text == "/touch": result = Bridge.call("get_touch") send_message(result) elif text == "/status": result = Bridge.call("get_status") send_message(result) elif text == "/start": send_message("Commands:\n/display <text> - Show text on the SPI TFT\n/clear - Clear the display\n/touch - Get the last touch point\n/status - Get the current display status") App.run(user_loop=loop)

    Étapes Rapides

    • Remplacez YOUR_TELEGRAM_BOT_TOKEN par votre vrai token de bot de BotFather.
    • Remplacez YOUR_CHAT_ID par votre identifiant de chat Telegram.
    • Collez ce code Python dans le fichier Python de votre application, en conservant le même sketch MCU de la section Bridge.
    • Cliquez sur le bouton Exécuter dans Arduino App Lab.
    Cliquez sur le bouton Exécuter dans Arduino App Lab sur Arduino UNO Q
    • Ouvrez Telegram et envoyez /start à votre bot pour voir la liste des commandes.
    • Remarque : Remplacez YOUR_BOT_TOKEN par le token obtenu auprès de @BotFather sur Telegram.

    Sortie Console App Lab

    DIYables_Apps
    Stop
    sketch.ino
    1#include "Arduino_RouterBridge.h"
    Serial Monitor
    Python
    [2026-08-20 09:30:00] Waiting for Telegram messages... [2026-08-20 09:30:12] Received: /display Hello from Telegram [2026-08-20 09:30:28] Received: /touch [2026-08-20 09:30:41] Received: /status [2026-08-20 09:30:55] Received: /clear
    Telegram
    Telegram 12:45
    Welcome to Telegram!
    ArduinoBot 10:19
    Chatting with Arduino...
    telegram-botfather
    BotFather Yesterday
    Your bot has been created.

    ArduinoBot

    bot
    Today
    /display Hello from Telegram
    10:15 AM ✓✓
    TFT shows: Hello from Telegram
    10:16 AM
    /touch
    10:17 AM ✓✓
    Touch: 118, 96
    10:18 AM
    /status
    10:19 AM ✓✓
    TFT shows: Hello from Telegram
    10:20 AM
    /clear
    10:21 AM ✓✓
    TFT is clear
    10:22 AM

    OpenClaw

    You can adapt the OpenClaw to this tutorial by refering the instruction on Arduino UNO Q - OpenClaw Tutorial

    Dépannage

    Si l'écran ne se comporte pas comme prévu, vérifiez d'abord ces points :

    • Écran noir — Vérifiez que CS, DC, MOSI et SCK sont tous connectés. Une ligne CS manquante laisse l'écran inactif.
    • Mauvais pilote — Une seule ligne de constructeur doit être active. Les deux autres doivent rester commentées.
    • Image décalée ou tronquée — La largeur et la hauteur dans le constructeur doivent correspondre à la taille physique de l'écran.
    • Rien ne s'affiche avec un rétroéclairage lumineux — Vérifiez que VCC et LED / BL sont sur 3,3V, pas sur 5V.
    • Le tactile ne fonctionne pas — Exécutez le sketch de calibration tactile pour obtenir des valeurs de calibration propres à votre écran.
    • Axe tactile inversé — Appelez setTouchInvertX(true) ou setTouchInvertY(true) avant setTouchCalibration().

    Compatibilité des Plateformes

    La bibliothèque DIYables_TFT_SPI repose uniquement sur les API Arduino standard — SPI, digitalWrite et millis :

    • Elle fonctionne sur le MCU de l'Arduino UNO Q (STM32) via Arduino App Lab
    • Les mêmes sketches fonctionnent aussi sans modification sur d'autres cartes compatibles Arduino
    • Seuls les numéros de broches et la taille de l'écran dans le constructeur doivent être ajustés d'une carte à l'autre

    Idées de Projets

    Vous pouvez réaliser de nombreux projets créatifs avec un écran TFT SPI et l'Arduino UNO Q :

    • Tableau de bord météo Wi-Fi : Le côté Linux récupère une prévision depuis une API en ligne et le MCU l'affiche sur l'écran TFT
    • Panneau de commande tactile : Dessinez des boutons à l'écran qui commutent des LED, des relais ou des moteurs câblés au MCU
    • Tableau de messages à distance : Envoyez un texte via Telegram qui apparaît instantanément sur l'écran, où que vous soyez dans le monde
    • Cadre photo : Faites défiler les images BMP stockées sur la carte Micro SD en diaporama
    • Tablette de signature : Capturez une signature dessinée au doigt et laissez le côté Linux l'envoyer dans le cloud
    • Moniteur de capteurs en direct : Affichez les lectures de température, d'humidité ou de distance en grands chiffres faciles à lire

    Relevez le Défi

    Prêt à aller plus loin avec l'écran TFT SPI sur Arduino UNO Q ? Essayez ces défis :

    • Facile : Changez la couleur et le rayon du stylo dans le sketch Dessin Tactile pour que chaque nouveau toucher peigne dans une couleur différente.
    • Moyen : Ajoutez un second bouton à l'écran à côté du premier, et affichez un message différent pour chaque bouton dans la console App Lab.
    • Avancé : Construisez un tableau de bord contrôlé par Telegram : le côté Python récupère des données météo en direct via Wi-Fi, les envoie via Bridge, et le MCU dessine une jauge de température avec une barre colorée sur l'écran TFT SPI.

    ※ NOS MESSAGES

    • N'hésitez pas à partager le lien de ce tutoriel. Cependant, veuillez ne pas utiliser notre contenu sur d'autres sites web. Nous avons investi beaucoup d'efforts et de temps pour créer ce contenu, veuillez respecter notre travail !