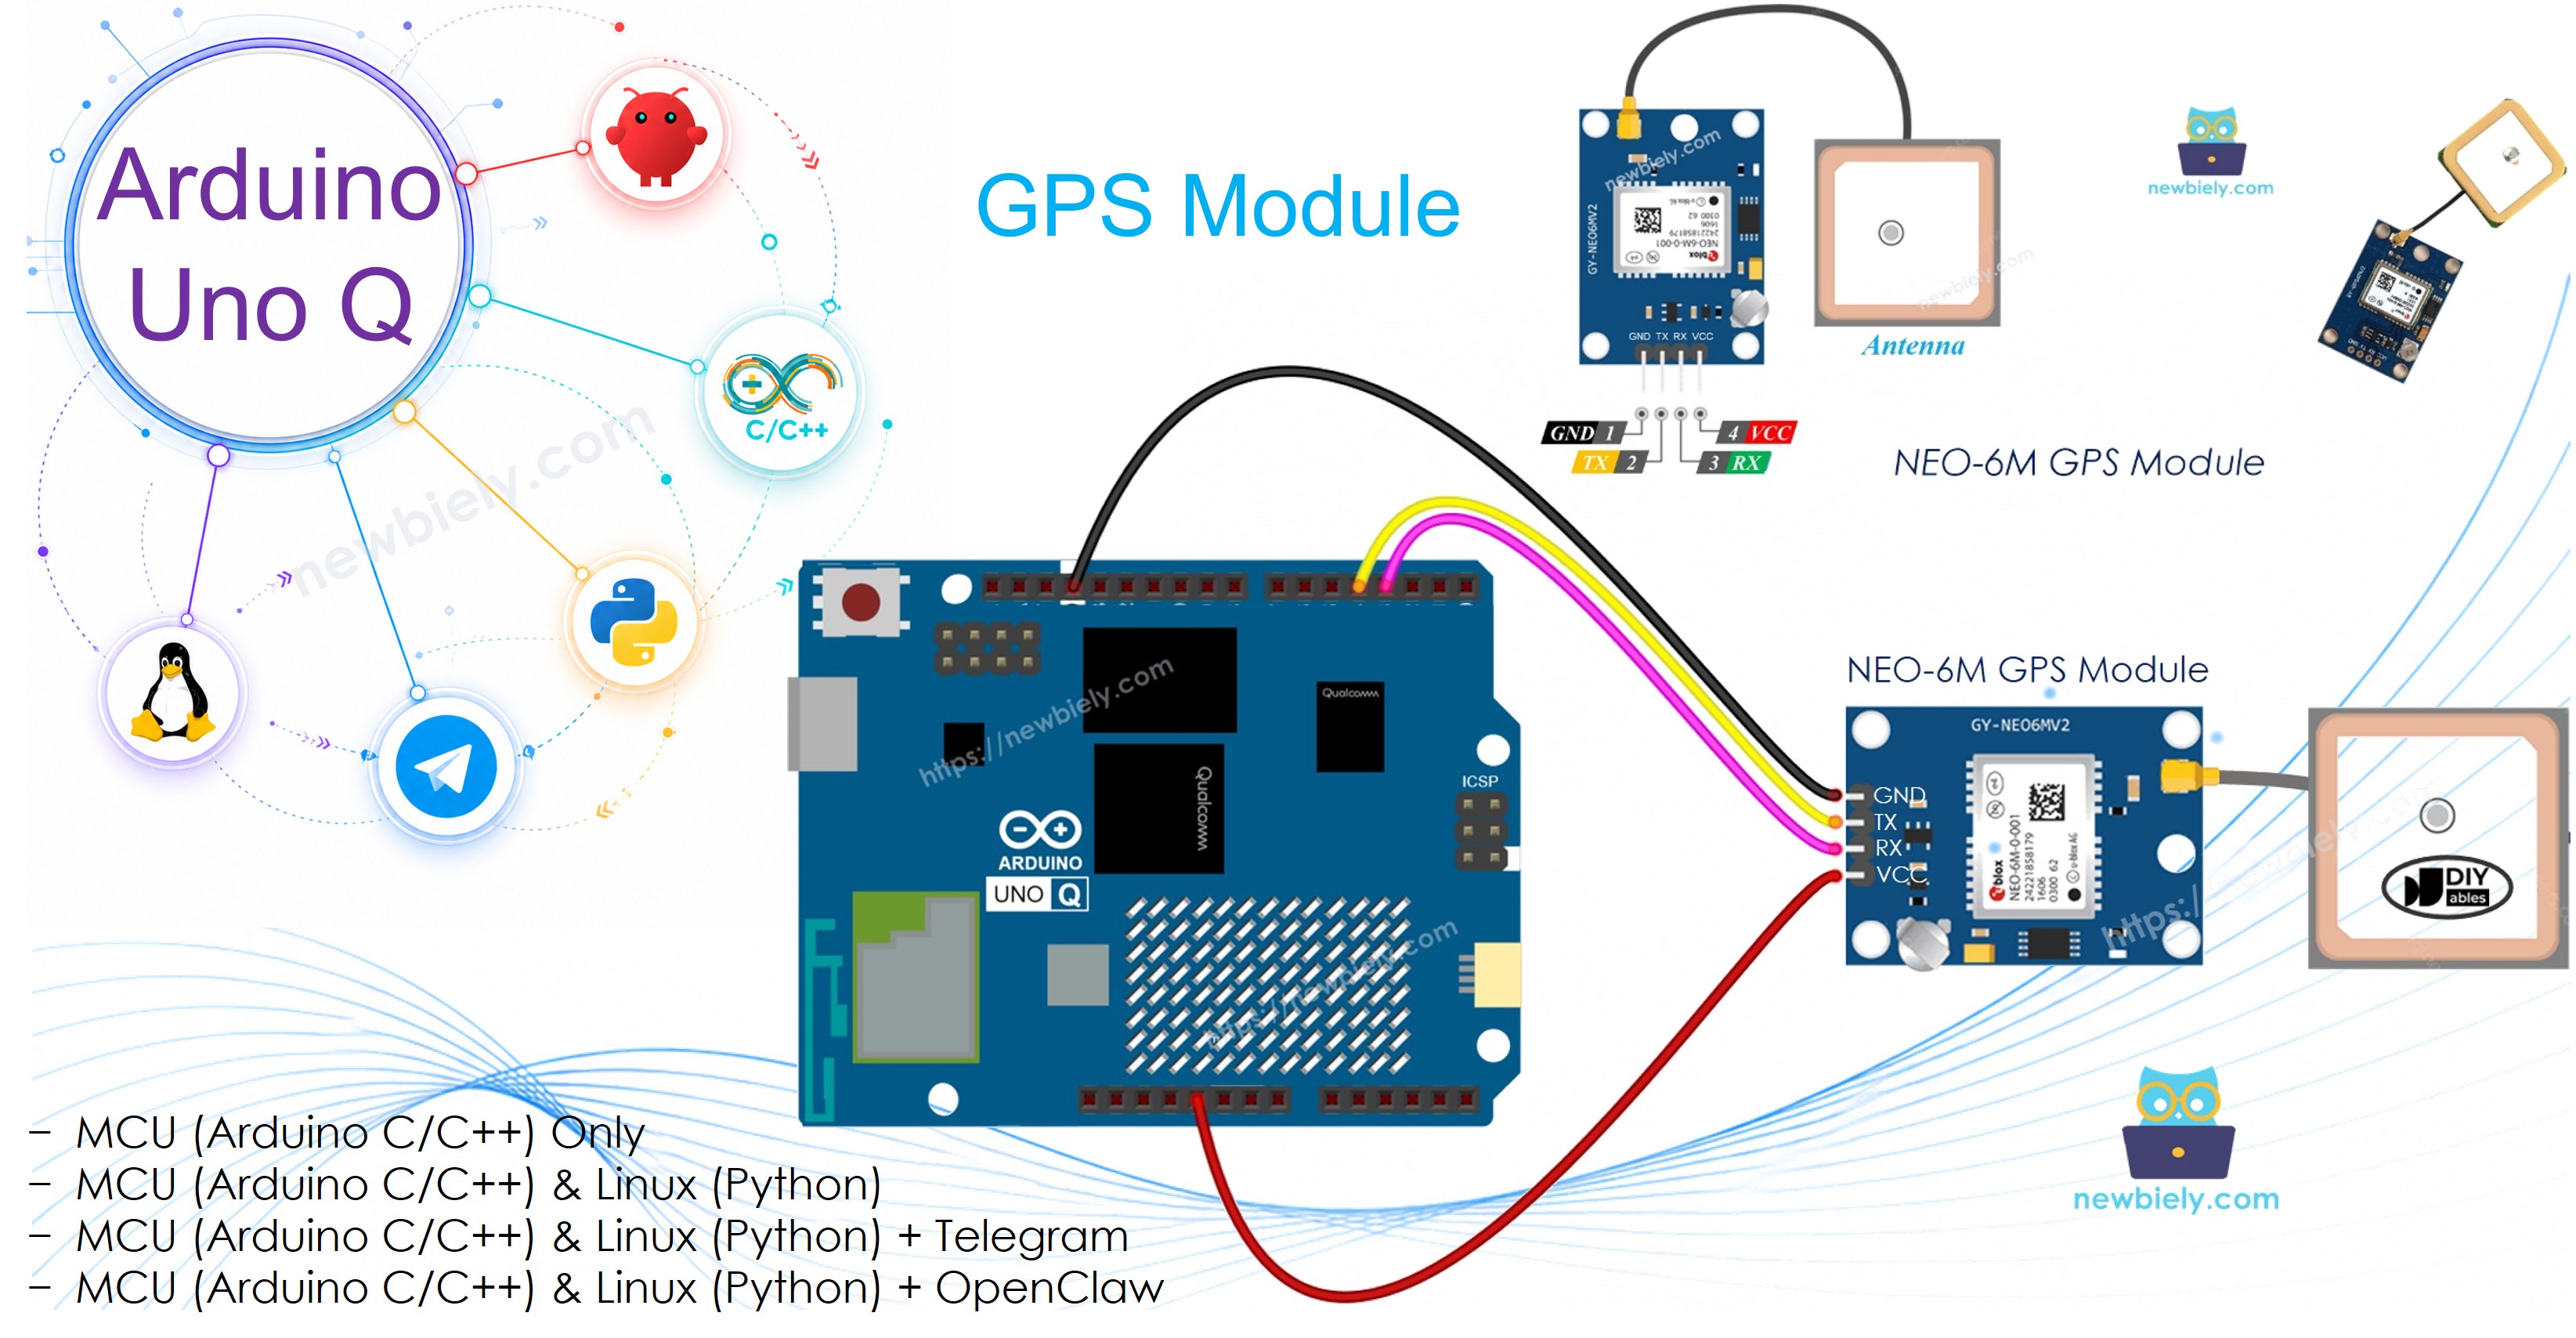
Le module GPS NEO-6M fournit des données précises de localisation, vitesse, altitude et heure via la sortie série NMEA. Le MCU Arduino UNO Q analyse les données GPS en utilisant TinyGPS++, met en cache les résultats et les expose au côté Linux via Bridge — permettant le partage de localisation Google Maps via Telegram.
Dans ce tutoriel, vous apprendrez :
Comment fonctionne le module GPS NEO-6M
Comment câbler le module GPS sur le MCU Arduino UNO Q
Comment analyser les données NMEA GPS avec TinyGPS++ sur Arduino UNO Q
Comment lire la latitude, la longitude, l'altitude, la vitesse et la date/heure
Comment utiliser Bridge pour exposer les données GPS au côté Linux (Python)
Comment construire un tracker GPS qui partage votre localisation via Telegram sur Arduino UNO Q
Comment utiliser OpenClaw sur Arduino UNO Q avec GPS
※ Note:
Le module GPS nécessite une vue dégagée du ciel pour acquérir un signal satellite. En extérieur est optimal ; près d'une fenêtre peut fonctionner. La première acquisition peut prendre plusieurs minutes.
Divulgation : Certains des liens fournis dans cette section sont des liens affiliés Amazon. Nous pouvons recevoir une commission pour tout achat effectué via ces liens, sans coût supplémentaire pour vous. Nous vous remercions de votre soutien.
À Propos du Module GPS NEO-6M
Le NEO-6M est un module récepteur GPS très utilisé qui fournit des données au format NMEA via UART à 9600 bauds. Il peut suivre jusqu'à 22 satellites sur 50 canaux et offre une précision de position d'environ 2,5 mètres.
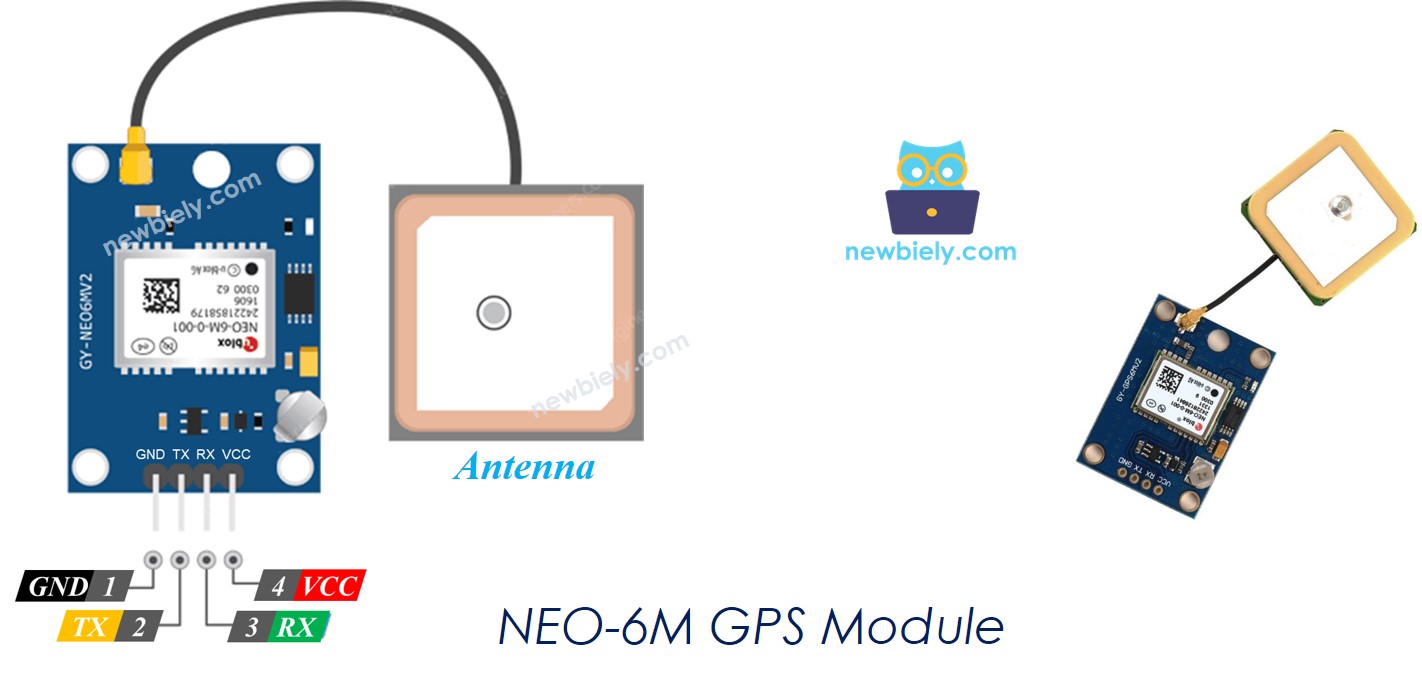
Brochage
Broche VCC : Connectez à VCC (5V ou 3,3V — la plupart des modules supportent les deux)
Broche GND : Connectez à GND (0V)
Broche TX : Sortie série — envoie les données NMEA GPS à la broche MCU RX
Broche RX : Entrée série — reçoit des commandes de configuration optionnelles depuis la broche MCU TX
Fonctionnement
Le NEO-6M produit en continu des phrases NMEA (ex. $GPGGA, $GPRMC) à 9600 bauds. Le MCU Arduino UNO Q lit ces phrases, les envoie à la bibliothèque TinyGPS++, qui les analyse en valeurs de latitude, longitude, altitude, vitesse et date/heure.
LED bleue sur le module : Clignote une fois par seconde quand un signal satellite est acquis
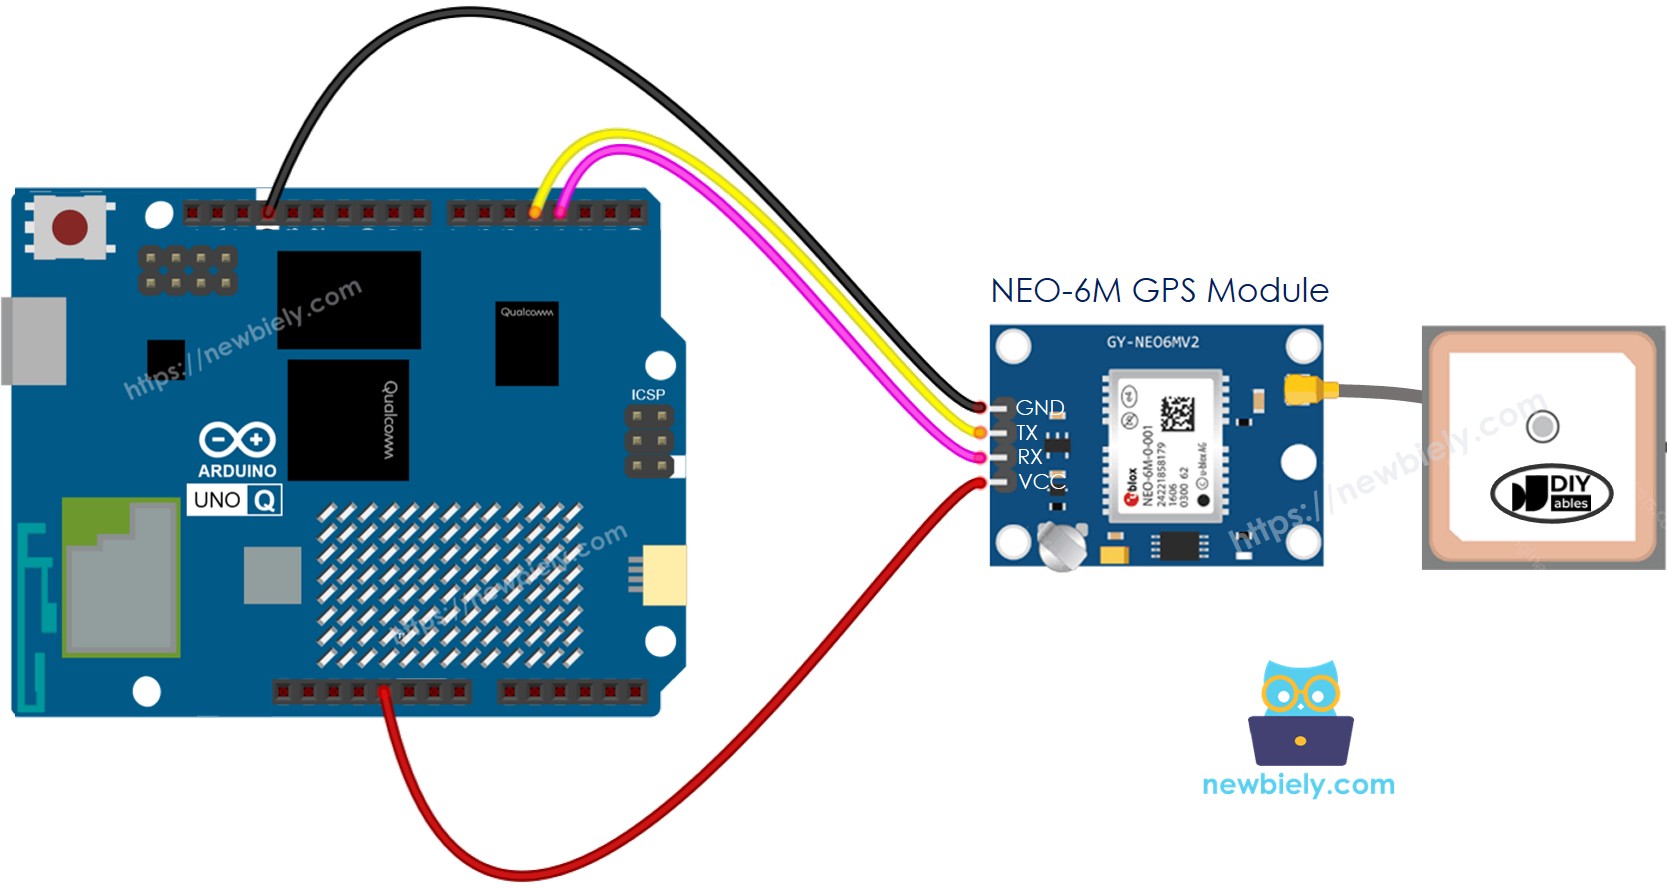
Schéma de Câblage
Cette image a été créée avec Fritzing. Cliquez pour agrandir l'image.
Broche Module GPS NEO-6M
MCU Arduino UNO Q
VCC
3,3V
GND
GND
TX
D4 (MCU RX)
RX
D3 (MCU TX)
※ Note:
La broche TX MCU (D3) produit des signaux 3,3V. Ceci est compatible avec la broche RX du NEO-6M qui accepte la logique 3,3V, donc aucun convertisseur de niveau n'est nécessaire.
Comment Programmer pour GPS
Incluez la bibliothèque TinyGPS++ et configurez SoftwareSerial :
Alimentez les octets entrants dans l'analyseur TinyGPS++ :
while (gpsSerial.available() > 0) { gps.encode(gpsSerial.read());}
Lisez les coordonnées quand un signal est valide :
if (gps.location.isValid()) {double lat = gps.location.lat();double lng = gps.location.lng();}
Code Arduino UNO Q
/* * Ce code Arduino UNO Q a été développé par newbiely.fr * Ce code Arduino UNO Q est mis à disposition du public sans aucune restriction. * Pour des instructions complètes et des schémas de câblage, veuillez visiter: * https://newbiely.fr/tutorials/arduino-uno-q/arduino-uno-q-gps*/#include <TinyGPS++.h>#include <SoftwareSerial.h>#define RX_PIN 4 // The Arduino UNO Q MCU pin connected to TX of the GPS module#define TX_PIN 3 // The Arduino UNO Q MCU pin connected to RX of the GPS moduleTinyGPSPlus gps;SoftwareSerial gpsSerial(RX_PIN, TX_PIN);voidsetup() {Serial.begin(9600); gpsSerial.begin(9600); // NEO-6M default baud rateSerial.println("Arduino UNO Q - NEO-6M GPS Module");}voidloop() {while (gpsSerial.available() > 0) {if (gps.encode(gpsSerial.read())) {if (gps.location.isValid()) {Serial.print("- Latitude : ");Serial.println(gps.location.lat(), 6);Serial.print("- Longitude: ");Serial.println(gps.location.lng(), 6);Serial.print("- Altitude : ");if (gps.altitude.isValid())Serial.println(gps.altitude.meters());elseSerial.println("INVALID"); } else {Serial.println("- Location: INVALID (waiting for fix...)"); }Serial.print("- Speed : ");if (gps.speed.isValid()) {Serial.print(gps.speed.kmph());Serial.println(" km/h"); } else {Serial.println("INVALID"); }Serial.print("- Date/Time: ");if (gps.date.isValid() && gps.time.isValid()) {Serial.print(gps.date.year());Serial.print("-");Serial.print(gps.date.month());Serial.print("-");Serial.print(gps.date.day());Serial.print(" ");Serial.print(gps.time.hour());Serial.print(":");Serial.print(gps.time.minute());Serial.print(":");Serial.println(gps.time.second()); } else {Serial.println("INVALID"); }Serial.println(); } }if (millis() > 5000 && gps.charsProcessed() < 10)Serial.println("No GPS data received: check wiring");}
Étapes Rapides
Première utilisation de l'Arduino UNO Q ? Suivez le tutoriel Démarrer avec Arduino UNO Q avant de continuer.
Connecter : Câblez le module GPS sur le MCU Arduino UNO Q comme indiqué dans le schéma de câblage.
Ouvrir Arduino App Lab : Créez une nouvelle application nommée GPS.
Coller le programme : Collez le code MCU dans sketch/sketch.ino.
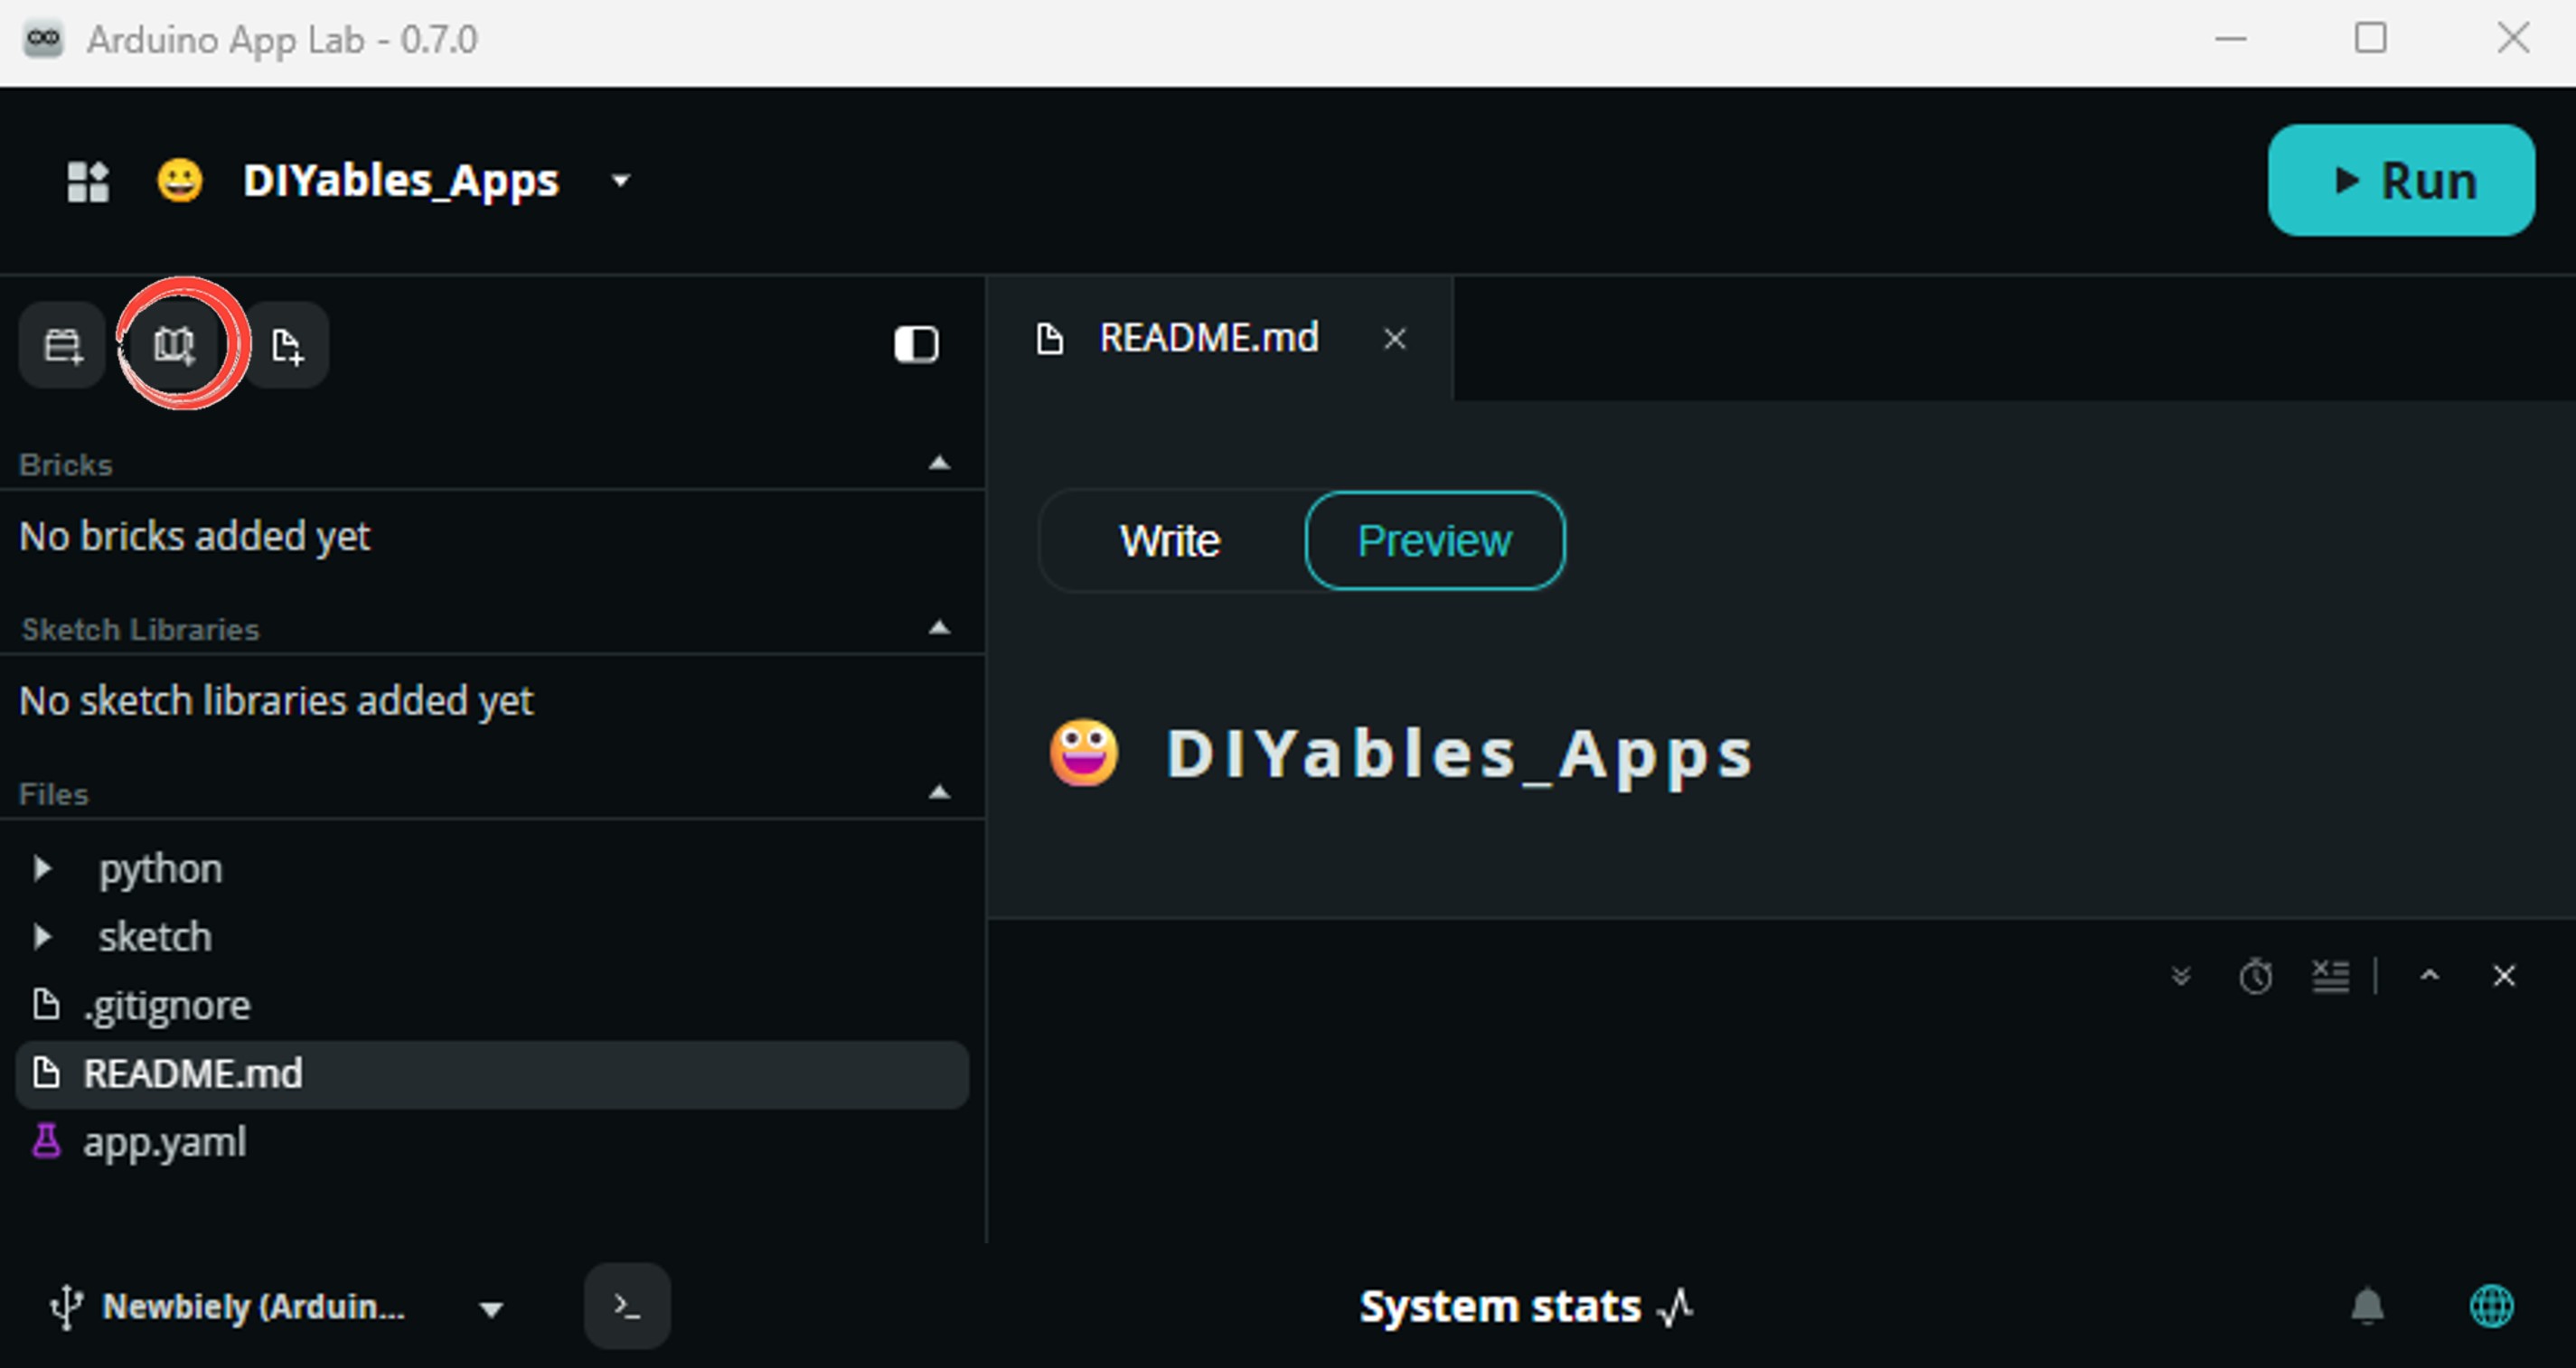
Install the library: Click the Add sketch library button (the open book icon with a + sign) in the left sidebar.
Search for TinyGPSPlus created by Mikal Hart and click the Install button.
My Apps/DIYables Apps
Run
Bricks
No bricks added...
Sketch Libraries
No sketch libra...
Files
python
sketch
.gitignore
README.md
app.yaml
sketch.ino
Add sketch library
TinyGPSPlus
TinyGPSPlusMikal Hart
NMEA is the standard format GPS devices use to report location, time, altitude, etc. TinyGPSPlus is a compact, resilient library that parses the most common NMEA 'sentences' used: GGA and RMC. It can also be customized to extract data from *any* compliant sentence.
1.0.3
Install
More Info
Search for Arduino_RouterBridge created by Arduino and click the Install button.
My Apps/DIYables Apps
Run
Bricks
No bricks added...
Sketch Libraries
No sketch libra...
Files
python
sketch
.gitignore
README.md
app.yaml
sketch.ino
Add sketch library
Arduino_RouterBridge
Arduino_RouterBridgeArduino
This library provides a simple RPC bridge for Arduino UNO Q boards, allowing communication between the board and other devices using MsgPack serialization.
0.4.1
Install
More Info
Téléverser : Cliquez sur le bouton Exécuter dans Arduino App Lab.
Placez le module GPS près d'une fenêtre ou en extérieur. Attendez que la LED bleue clignote (signal acquis).
Sortie de la Console App Lab
DIYables_Apps
Stop
sketch.ino
1#include"Arduino_RouterBridge.h"
Serial Monitor
Python
Message (Enter to send a message to "Newbiely" on usb(2820070321))
New Line
9600 baud
[2026-04-29 09:00:01] Arduino UNO Q GPS ready - waiting for fix...
[2026-04-29 09:02:30] Fix acquired!
[2026-04-29 09:02:30] Lat: 35.6762, Lng: 139.6503, Alt: 25.0m, Speed: 0.0 km/h
[2026-04-29 09:02:33] Lat: 35.6762, Lng: 139.6503, Alt: 25.1m, Speed: 0.0 km/h
Bridge : Linux + MCU
/* * Ce code Arduino UNO Q a été développé par newbiely.fr * Ce code Arduino UNO Q est mis à disposition du public sans aucune restriction. * Pour des instructions complètes et des schémas de câblage, veuillez visiter: * https://newbiely.fr/tutorials/arduino-uno-q/arduino-uno-q-gps*/#include"Arduino_RouterBridge.h"#include <TinyGPS++.h>#include <SoftwareSerial.h>#define RX_PIN 4 // The Arduino UNO Q MCU pin connected to TX of the GPS module#define TX_PIN 3 // The Arduino UNO Q MCU pin connected to RX of the GPS moduleTinyGPSPlus gps;SoftwareSerial gpsSerial(RX_PIN, TX_PIN);// Cached GPS databool cached_valid = false;double cached_lat = 0.0;double cached_lng = 0.0;double cached_alt = 0.0;double cached_speed = 0.0;char cached_datetime[32] = "INVALID";String get_location(String arg) {if (!cached_valid) return"INVALID";char buf[48]; dtostrf(cached_lat, 10, 6, buf);String result = "lat:"; result += buf; dtostrf(cached_lng, 11, 6, buf); result += " lng:"; result += buf;return result;}String get_latitude(String arg) {if (!cached_valid) return"INVALID";char buf[16]; dtostrf(cached_lat, 10, 6, buf);returnString(buf);}String get_longitude(String arg) {if (!cached_valid) return"INVALID";char buf[16]; dtostrf(cached_lng, 11, 6, buf);returnString(buf);}String get_altitude(String arg) {if (!cached_valid || cached_alt == 0.0) return"INVALID";char buf[10]; dtostrf(cached_alt, 6, 1, buf);returnString(buf);}String get_speed(String arg) {if (!cached_valid) return"INVALID";char buf[10]; dtostrf(cached_speed, 6, 2, buf);returnString(buf);}String get_datetime(String arg) {returnString(cached_datetime);}voidsetup() {Bridge.begin(); Monitor.begin(); gpsSerial.begin(9600);Bridge.provide("get_location", get_location);Bridge.provide("get_latitude", get_latitude);Bridge.provide("get_longitude", get_longitude);Bridge.provide("get_altitude", get_altitude);Bridge.provide("get_speed", get_speed);Bridge.provide("get_datetime", get_datetime); Monitor.println("Arduino UNO Q GPS Bridge ready. Waiting for fix...");}voidloop() {while (gpsSerial.available() > 0) {if (gps.encode(gpsSerial.read())) {if (gps.location.isValid()) { cached_valid = true; cached_lat = gps.location.lat(); cached_lng = gps.location.lng();if (gps.altitude.isValid()) cached_alt = gps.altitude.meters();if (gps.speed.isValid()) cached_speed = gps.speed.kmph();if (gps.date.isValid() && gps.time.isValid()) { snprintf(cached_datetime, sizeof(cached_datetime),"%04d-%02d-%02d %02d:%02d:%02d", gps.date.year(), gps.date.month(), gps.date.day(), gps.time.hour(), gps.time.minute(), gps.time.second()); } } } }if (millis() > 5000 && gps.charsProcessed() < 10) Monitor.println("No GPS data received: check wiring");}
/* * Ce code Arduino UNO Q a été développé par newbiely.fr * Ce code Arduino UNO Q est mis à disposition du public sans aucune restriction. * Pour des instructions complètes et des schémas de câblage, veuillez visiter: * https://newbiely.fr/tutorials/arduino-uno-q/arduino-uno-q-gps*/from arduino.app_utils import *import timedef loop(): location = Bridge.call("get_location") speed = Bridge.call("get_speed") datetime = Bridge.call("get_datetime") altitude = Bridge.call("get_altitude")print(f"Location : {location}")print(f"Speed : {speed} km/h")print(f"Altitude : {altitude} m")print(f"Date/Time: {datetime}")print() time.sleep(2)App.run(user_loop=loop)
Sortie de la Console App Lab
DIYables_Apps
Stop
sketch.ino
1#include"Arduino_RouterBridge.h"
Serial Monitor
Python
Message (Enter to send a message to "Newbiely" on usb(2820070321))
[2026-04-29 09:02:31] GPS: Lat=35.6762, Lng=139.6503, Alt=25.0m, Speed=0.0 km/h
Telegram
Partagez votre localisation GPS en temps réel via Telegram avec des liens Google Maps.
Programme MCU : Conservez le même programme MCU de la section Bridge précédente.
/* * Ce code Arduino UNO Q a été développé par newbiely.fr * Ce code Arduino UNO Q est mis à disposition du public sans aucune restriction. * Pour des instructions complètes et des schémas de câblage, veuillez visiter: * https://newbiely.fr/tutorials/arduino-uno-q/arduino-uno-q-gps*/from arduino.app_utils import *import requestsimport timeTELEGRAM_BOT_TOKEN = "YOUR_TELEGRAM_BOT_TOKEN"CHAT_ID = "YOUR_CHAT_ID"last_update_id = 0def get_updates():global last_update_id url = f"https://api.telegram.org/bot{TELEGRAM_BOT_TOKEN}/getUpdates" params = {"offset": last_update_id + 1, "timeout": 5}try: response = requests.get(url, params=params, timeout=10) data = response.json()if data["ok"]:return data["result"]exceptExceptionas e:print(f"Error getting updates: {e}")return []def send_message(chat_id, text): url = f"https://api.telegram.org/bot{TELEGRAM_BOT_TOKEN}/sendMessage" payload = {"chat_id": chat_id, "text": text}try: requests.post(url, data=payload, timeout=10)exceptExceptionas e:print(f"Error sending message: {e}")def loop(): updates = get_updates()for update in updates: last_update_id = update["update_id"]if"message"notin update:continue message = update["message"] chat_id = message["chat"]["id"] text = message.get("text", "").strip()print(f"Received: {text}")if text == "/start": send_message(chat_id,"Arduino UNO Q GPS Bot\n""/location - Current GPS coordinates + Google Maps link\n""/speed - Current speed (km/h)\n""/altitude - Current altitude (meters)\n""/time - Current GPS date and time")elif text == "/location": lat = Bridge.call("get_latitude") lng = Bridge.call("get_longitude")if lat == "INVALID"or lng == "INVALID": send_message(chat_id, "GPS location not yet available. Waiting for fix...")else: maps_url = f"https://maps.google.com/?q={lat.strip()},{lng.strip()}" send_message(chat_id, f"📍 Location:\nLatitude : {lat.strip()}\nLongitude: {lng.strip()}\n{maps_url}")elif text == "/speed": result = Bridge.call("get_speed")if result == "INVALID": send_message(chat_id, "Speed not yet available.")else: send_message(chat_id, f"🚀 Speed: {result.strip()} km/h")elif text == "/altitude": result = Bridge.call("get_altitude")if result == "INVALID": send_message(chat_id, "Altitude not yet available.")else: send_message(chat_id, f"⛰️ Altitude: {result.strip()} m")elif text == "/time": result = Bridge.call("get_datetime") send_message(chat_id, f"🕐 GPS Date/Time: {result}")else: send_message(chat_id, "Unknown command. Send /start for help.") time.sleep(0.3)App.run(user_loop=loop)
Étapes Rapides
Remplacez YOUR_TELEGRAM_BOT_TOKEN par votre vrai token de bot depuis BotFather.
Remplacez YOUR_CHAT_ID par votre identifiant de discussion Telegram.
Collez ce code Python dans votre application.
Cliquez sur Exécuter. Envoyez /location depuis Telegram pour obtenir un lien Google Maps.
Sortie de la Console App Lab
DIYables_Apps
Stop
sketch.ino
1#include"Arduino_RouterBridge.h"
Serial Monitor
Python
[2026-04-29 09:10:00] Waiting for Telegram messages...
[2026-04-29 09:10:05] Received: /location
[2026-04-29 09:10:05] Sending Google Maps link...
Telegram12:45
Welcome to Telegram!
ArduinoBot10:19
Chatting with Arduino...
BotFatherYesterday
Your bot has been created.
ArduinoBot
bot
Today
/location
10:15 AM✓✓
📍 Current location:
10:16 AM
https://maps.google.com/?q=35.6762,139.6503
10:17 AM
Altitude: 25.0m Speed: 0.0 km/h
10:18 AM
/gps
10:19 AM✓✓
Lat: 35.6762 Lng: 139.6503 Alt: 25.0m Speed: 0.0 km/h
10:20 AM
Intégration d'OpenClaw
Vous pouvez adapter OpenClaw à ce tutoriel en vous référant aux instructions du tutoriel Arduino UNO Q - OpenClaw.
Idées de Projets
Tracker de Véhicule : Montez l'Arduino UNO Q dans une voiture — envoyez automatiquement un lien de localisation Telegram toutes les 5 minutes ou quand vous appuyez sur un bouton
Journal de Trajet : Enregistrez les coordonnées GPS toutes les 30 secondes dans un fichier CSV Linux — tracez plus tard la route sur Google Maps
Alarme de Géorepérage : Définissez un rayon géographique — recevez une alerte Telegram si l'appareil sort de la zone autorisée
Balise d'Urgence : Appuyez sur un bouton pour envoyer immédiatement votre localisation GPS exacte à un contact de confiance via Telegram
Mettez-Vous au Défi
Facile : Ajoutez la date et l'heure GPS au message Telegram de localisation.
Moyen : Implémentez un suivi automatique — envoyez automatiquement la localisation toutes les 10 minutes via Telegram sans commande manuelle.
Avancé : Construisez un journal de trajet complet — enregistrez les coordonnées dans un CSV et générez automatiquement une carte HTML interactive avec Leaflet.js.
Tutoriels connexes
※ NOS MESSAGES
N'hésitez pas à partager le lien de ce tutoriel. Cependant, veuillez ne pas utiliser notre contenu sur d'autres sites web. Nous avons investi beaucoup d'efforts et de temps pour créer ce contenu, veuillez respecter notre travail !