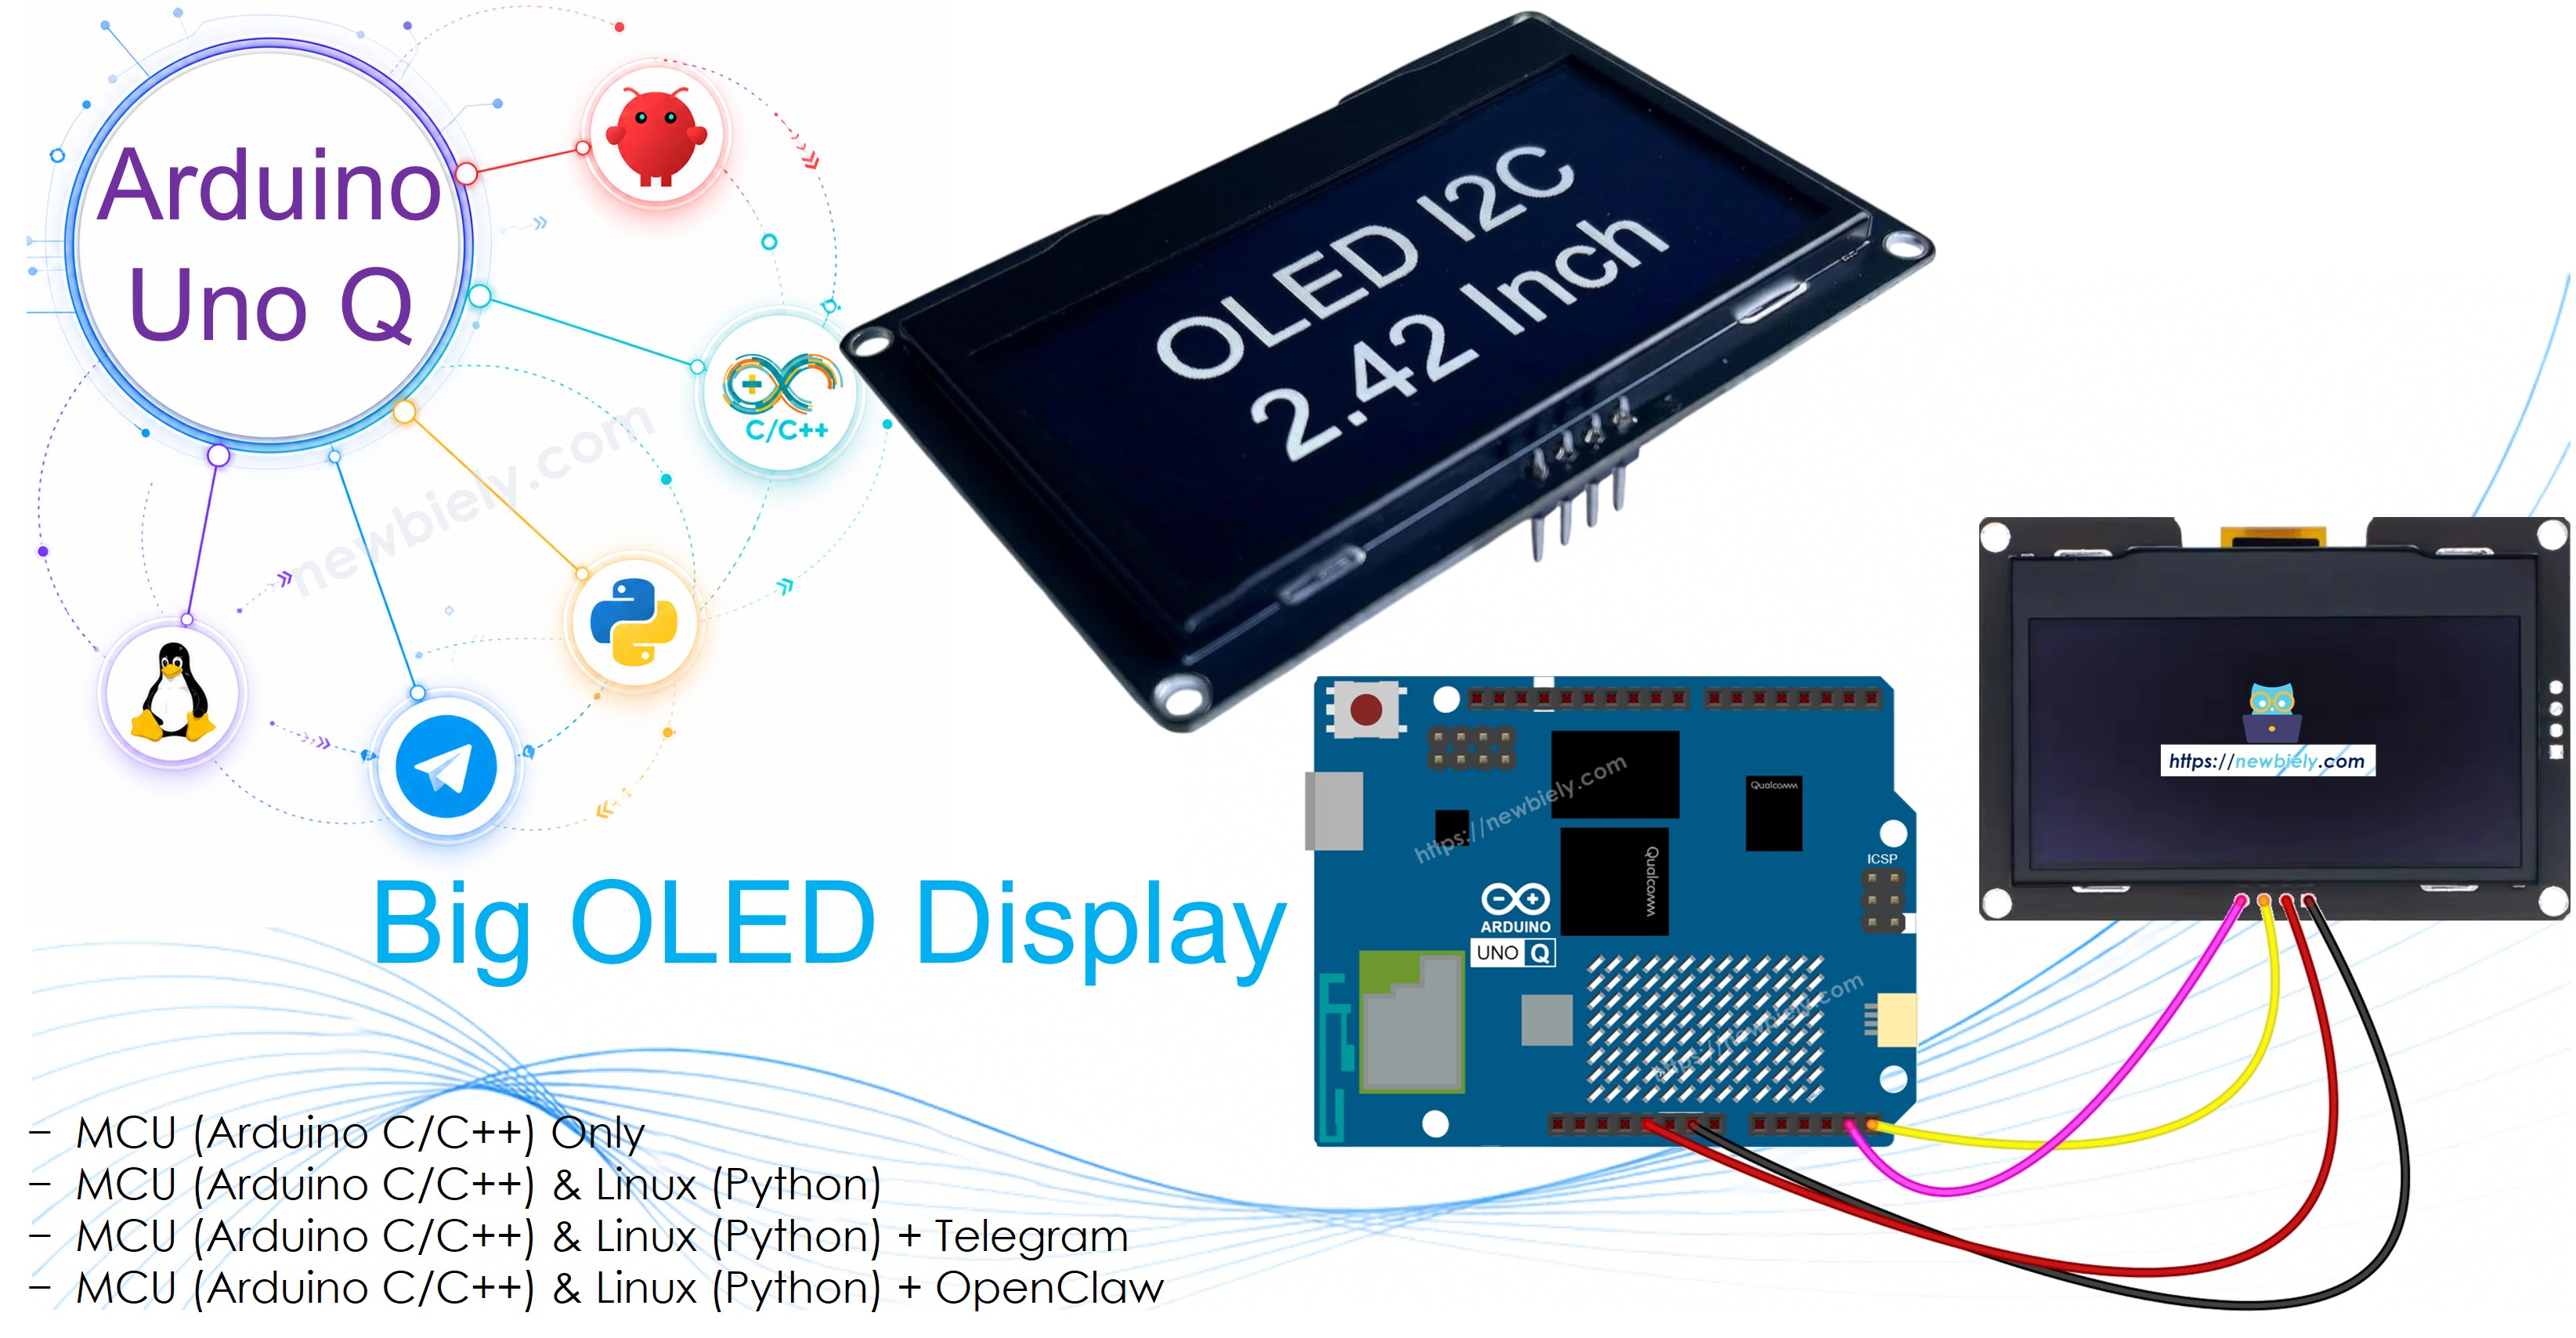
Arduino UNO Q - Écran OLED SSD1309 (2,42 pouces)

Ce tutoriel vous montre comment utiliser un écran OLED SSD1309 128x64 de 2,42 pouces avec l'Arduino UNO Q — depuis le texte et les graphiques de base jusqu'à la commande à distance via Telegram.

Arduino UNO Q - Écran OLED SSD1309 2,42 pouces

Matériel Requis

1×Arduino UNO Q
1×USB Cable for Arduino Uno Q
1×SSD1309 I2C OLED Display 128x64 (2.42 inch)
1×Fils de connexion
1×Recommandé: Shield à bornier à vis pour Arduino Uno
1×Recommandé: Sensors/Servo Expansion Shield for Arduino Uno
1×Recommandé: Shield plaque d'essai pour Arduino Uno
1×Recommandé: Boîtier pour Arduino Uno
1×Recommandé: Kit plaque de base prototypage et plaque d'essai pour Arduino Uno

Ou vous pouvez acheter les kits suivants:

1×Kit de Capteurs DIYables (18 capteurs/écrans)
Divulgation : Certains des liens fournis dans cette section sont des liens affiliés Amazon. Nous pouvons recevoir une commission pour tout achat effectué via ces liens, sans coût supplémentaire pour vous. Nous vous remercions de votre soutien.

À Propos de l'Écran OLED SSD1309 de 2,42 Pouces

Le SSD1309 est un circuit pilote OLED 128×64 couramment trouvé sur les modules OLED I2C de 2,42 pouces (parfois étiquetés 2,4 pouces). Il est compatible en registres avec le SSD1306, mais utilise un rail VCC externe (géré de manière transparente par le convertisseur boost embarqué de la carte breakout). Caractéristiques principales :

  • Résolution : 128 × 64 pixels
  • Interface : I2C (seulement 4 fils nécessaires)
  • Couleur d'affichage : Blanc, bleu ou jaune selon le matériau OLED — non contrôlable par logiciel
  • Angle de vision : Large, pixels auto-émissifs — noirs profonds, pas de rétroéclairage nécessaire
  • Bibliothèque : Utilise DIYables_OLED_SSD1309 (étend Adafruit GFX)

Brochage du SSD1309 OLED

  • GND — connecter à GND
  • VCC — connecter à 5V
  • SCL — signal d'horloge I2C
  • SDA — signal de données I2C
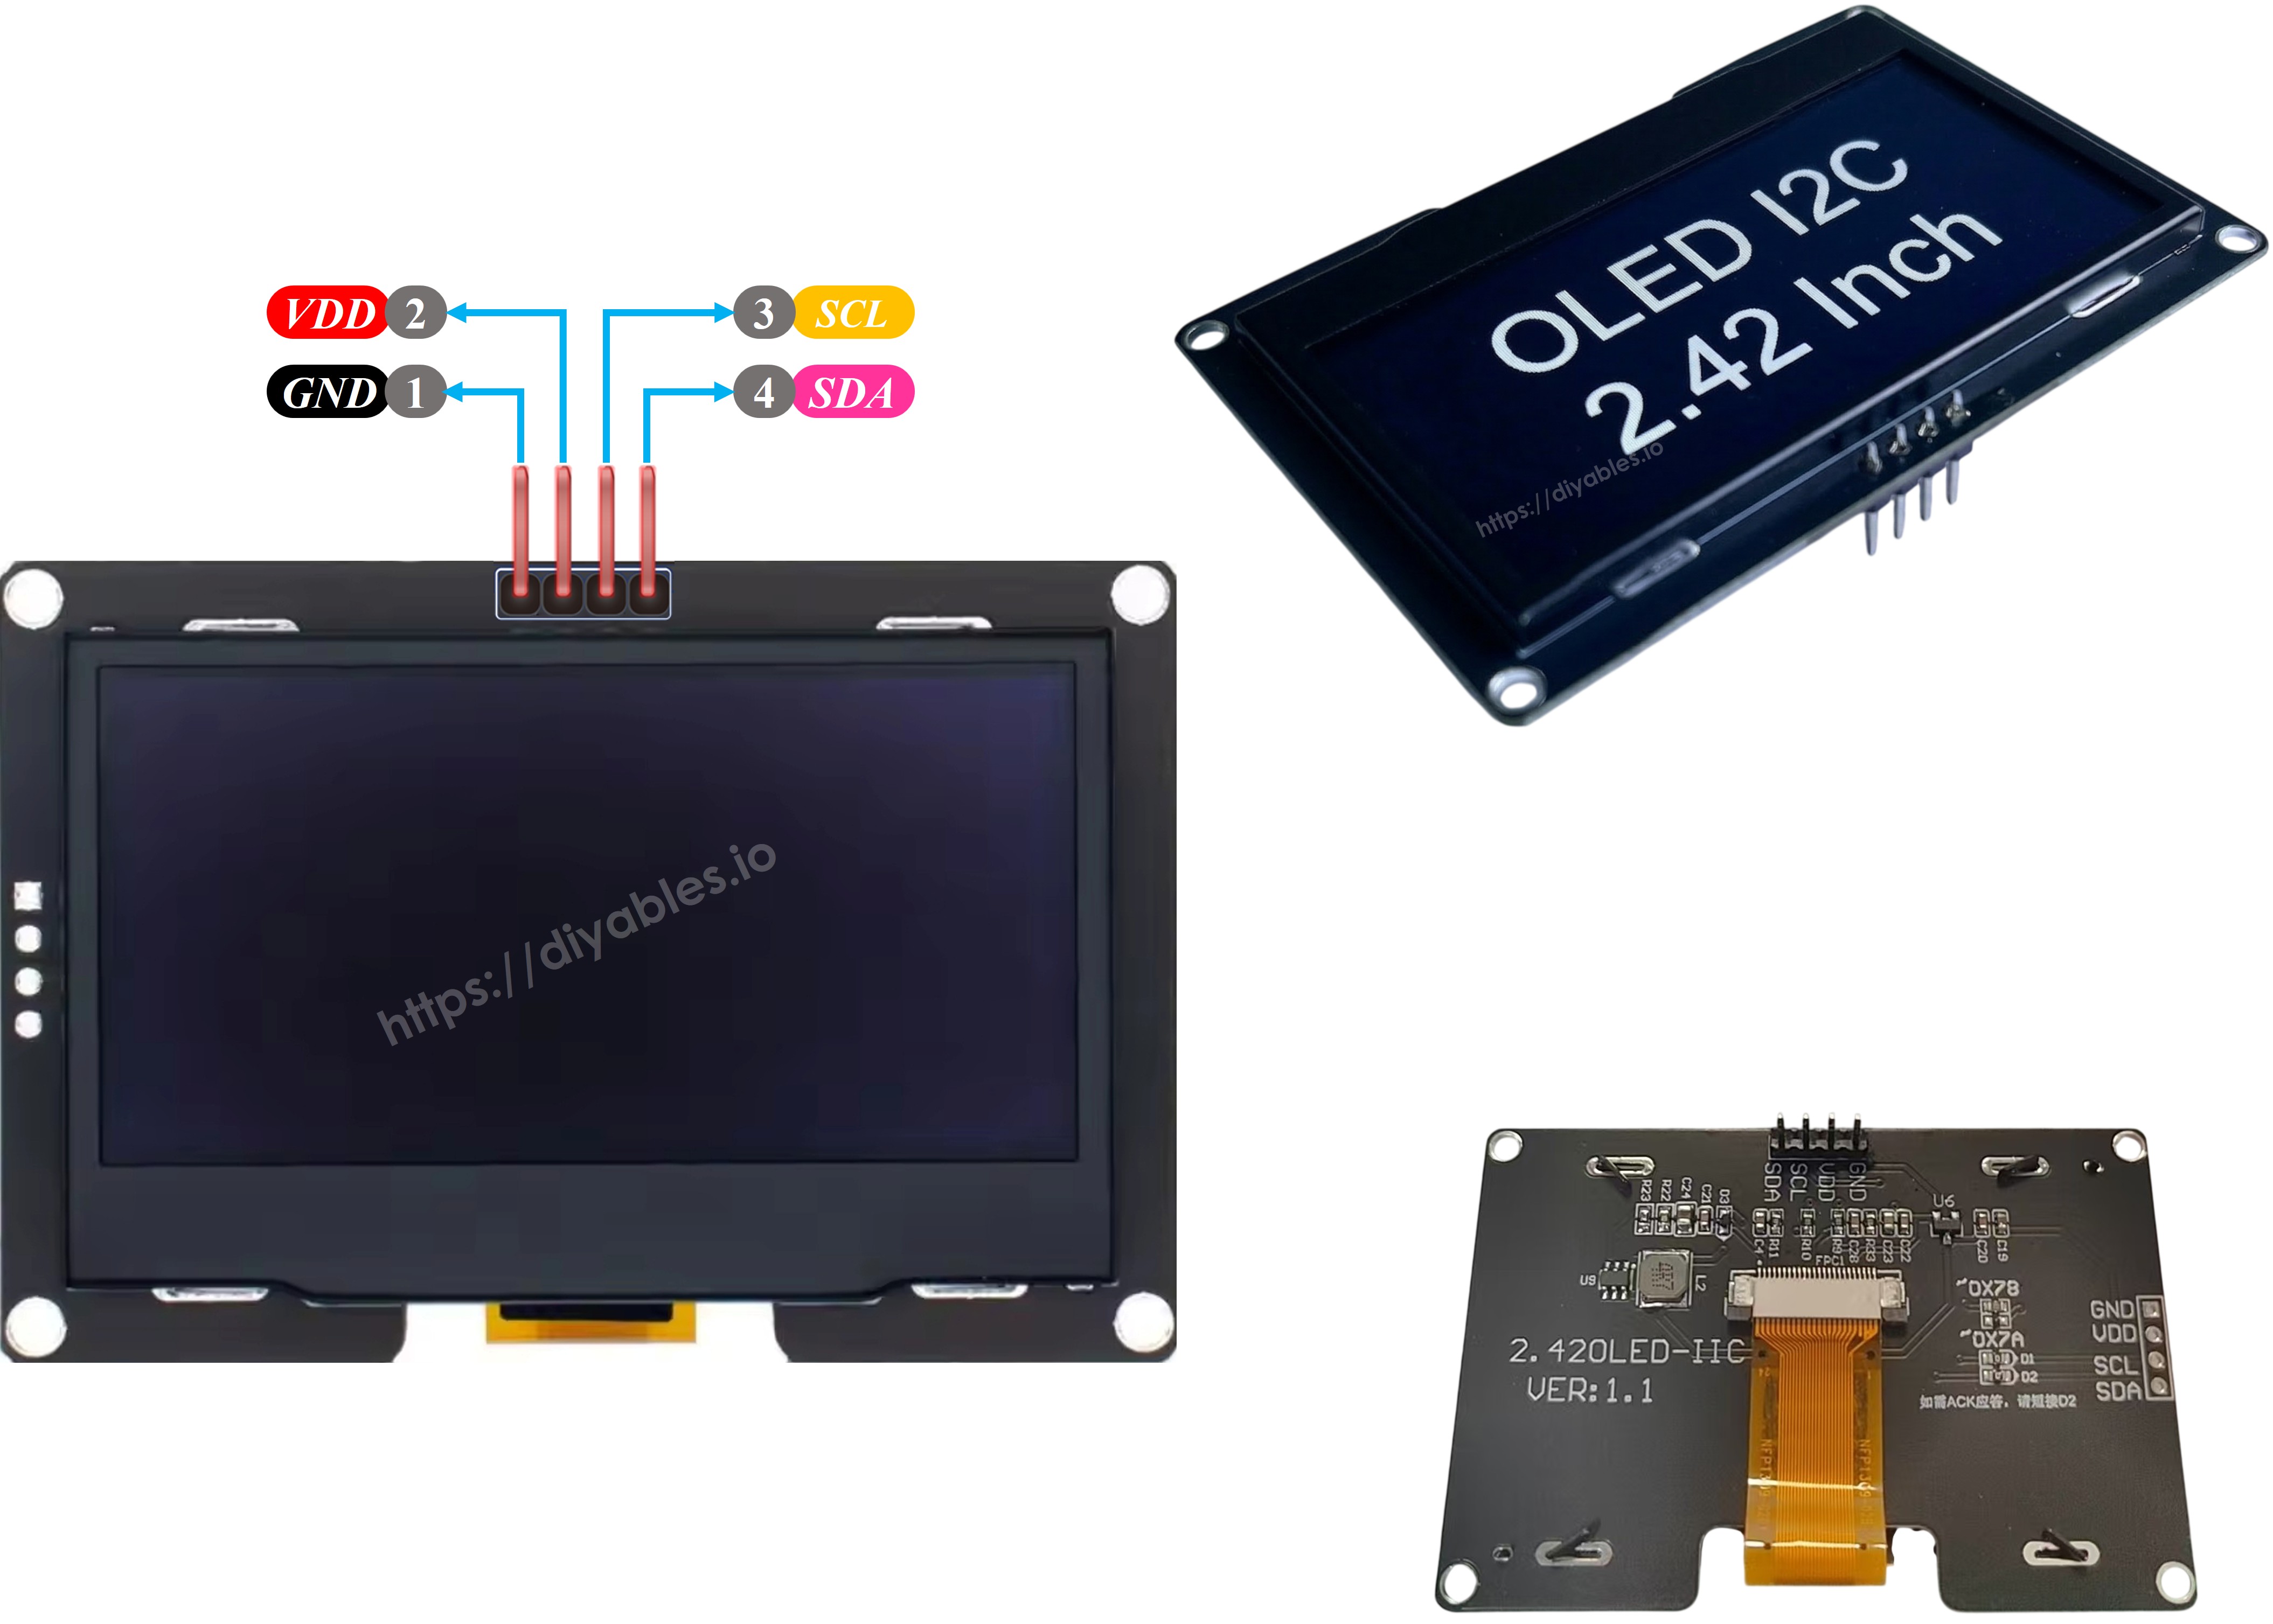
Brochage du SSD1309 OLED

※ Note:

L'ordre des broches peut différer selon les fabricants. Utilisez toujours les étiquettes imprimées sur le module OLED.

Schéma de Câblage

Schéma de Câblage Arduino UNO Q SSD1309 OLED

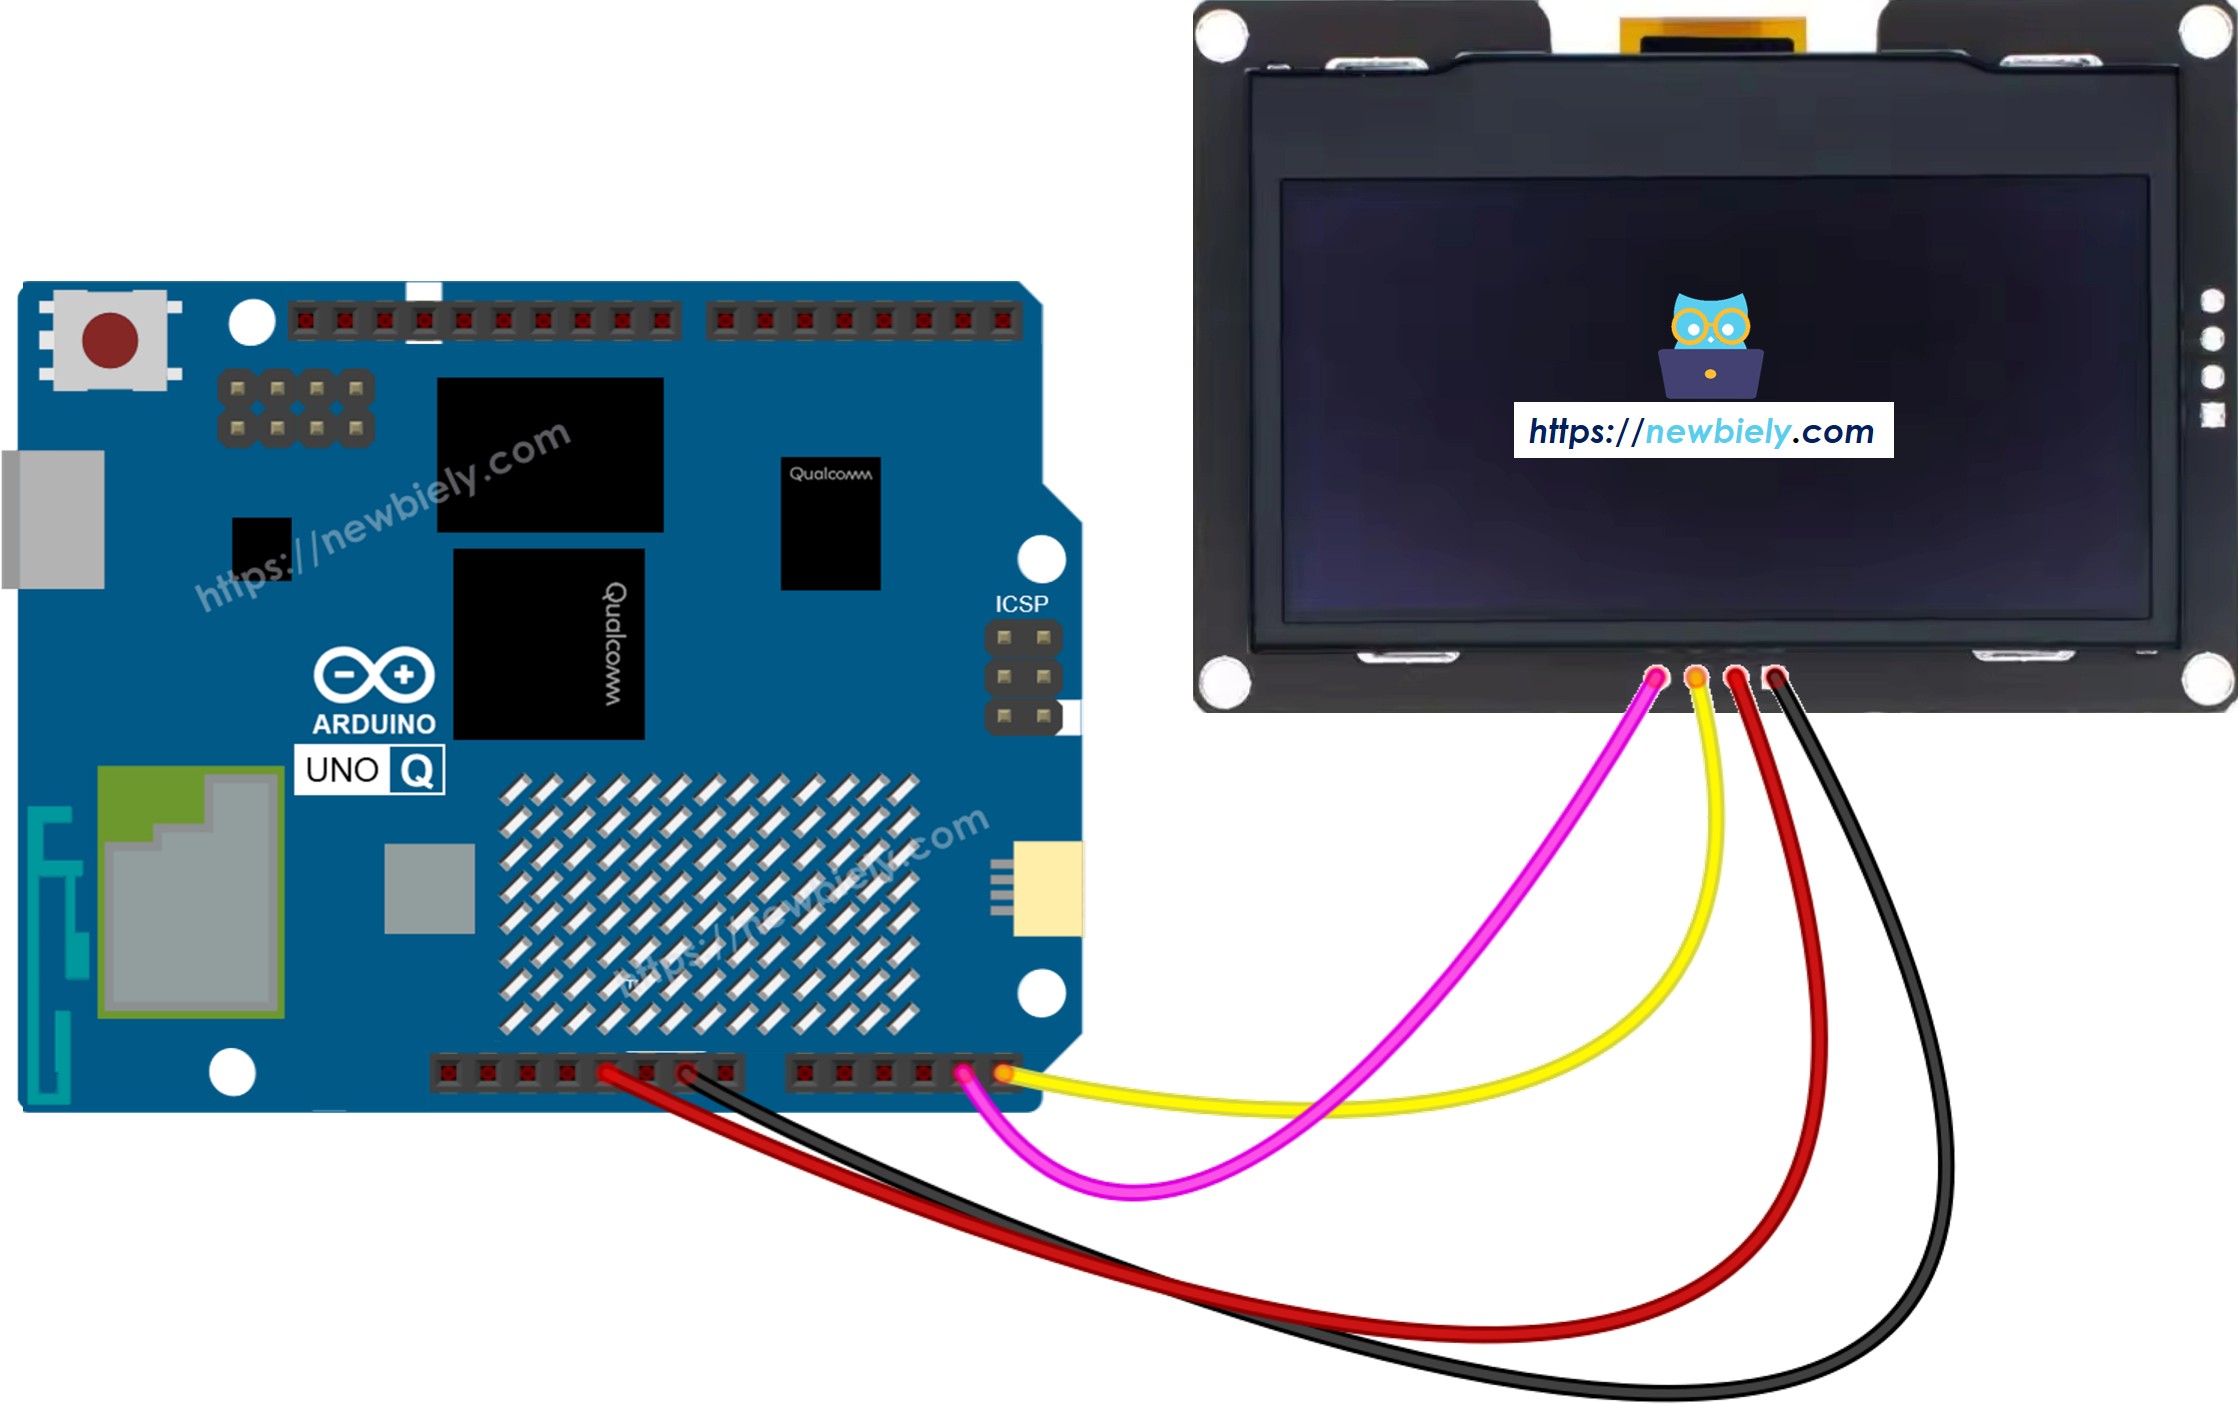
Cette image a été créée avec Fritzing. Cliquez pour agrandir l'image.

Broche OLEDBroche Arduino UNO Q
GNDGND
VCC5V
SCLSCL
SDASDA

Comment Programmer le SSD1309 OLED

  • Inclure les bibliothèques :
#include <Wire.h> #include <Adafruit_GFX.h> #include <DIYables_OLED_SSD1309.h>
  • Créer l'objet d'affichage :
#define SCREEN_WIDTH 128 #define SCREEN_HEIGHT 64 #define OLED_RESET -1 #define SCREEN_ADDRESS 0x3C DIYables_OLED_SSD1309 display(SCREEN_WIDTH, SCREEN_HEIGHT, &Wire, OLED_RESET);
  • Initialiser dans setup() :
if (!display.begin(SSD1309_SWITCHCAPVCC, SCREEN_ADDRESS)) { while (true); // halt if display not found } display.clearDisplay();
  • Afficher du texte :
display.setTextSize(2); display.setTextColor(SSD1309_PIXEL_ON); display.setCursor(0, 0); display.println("Hello!"); display.display(); // push buffer to screen — required!

※ Note:

Appelez toujours display.display() après les commandes de dessin pour envoyer le tampon vers l'écran physique.

Code Arduino UNO Q — Hello World sur l'OLED SSD1309

L'Arduino UNO Q possède deux processeurs : le MCU STM32 (gère le contrôle matériel en temps réel) et le MPU Qualcomm (exécute Debian Linux). Dans cette section, seul le MCU STM32 est programmé — le côté Linux reste inactif. Une section ultérieure montrera comment les deux processeurs fonctionnent ensemble.

Le sketch ci-dessous affiche du texte en deux tailles différentes sur l'OLED.

/* * Ce code Arduino UNO Q a été développé par newbiely.fr * Ce code Arduino UNO Q est mis à disposition du public sans aucune restriction. * Pour des instructions complètes et des schémas de câblage, veuillez visiter: * https://newbiely.fr/tutorials/arduino-uno-q/arduino-uno-q-ssd1309-oled-display */ #include <Wire.h> #include <Adafruit_GFX.h> #include <DIYables_OLED_SSD1309.h> #define SCREEN_WIDTH 128 #define SCREEN_HEIGHT 64 #define OLED_RESET -1 #define SCREEN_ADDRESS 0x3C DIYables_OLED_SSD1309 display(SCREEN_WIDTH, SCREEN_HEIGHT, &Wire, OLED_RESET); void setup() { Monitor.begin(9600); if (!display.begin(SSD1309_SWITCHCAPVCC, SCREEN_ADDRESS)) { Monitor.println(F("SSD1309 allocation failed")); for (;;); } display.clearDisplay(); display.setTextSize(1); // 6x8 pixels per character display.setTextColor(SSD1309_PIXEL_ON); // turn pixels on display.setCursor(0, 0); display.println(F("Hello, World!")); display.println(); display.setTextSize(2); // 12x16 pixels per character display.println(F("DIYables")); display.setTextSize(1); display.println(); display.println(F("SSD1309 OLED 128x64")); display.display(); // push buffer to screen } void loop() {}

Étapes Rapides

  • Première utilisation d'Arduino UNO Q ? Suivez le tutoriel Démarrer avec Arduino UNO Q pour préparer votre environnement de développement avant de continuer.
  • Câbler l'OLED : Connectez GND→GND, VCC→5V, SCL→SCL, SDA→SDA.
  • Connecter : Branchez l'Arduino UNO Q à votre ordinateur avec un câble USB-C.
  • Ouvrir Arduino App Lab : Lancez Arduino App Lab et attendez qu'il détecte votre Arduino UNO Q.
  • Créer une nouvelle application : Cliquez sur le bouton Créer une nouvelle application.
Créer une nouvelle application dans Arduino App Lab sur Arduino UNO Q
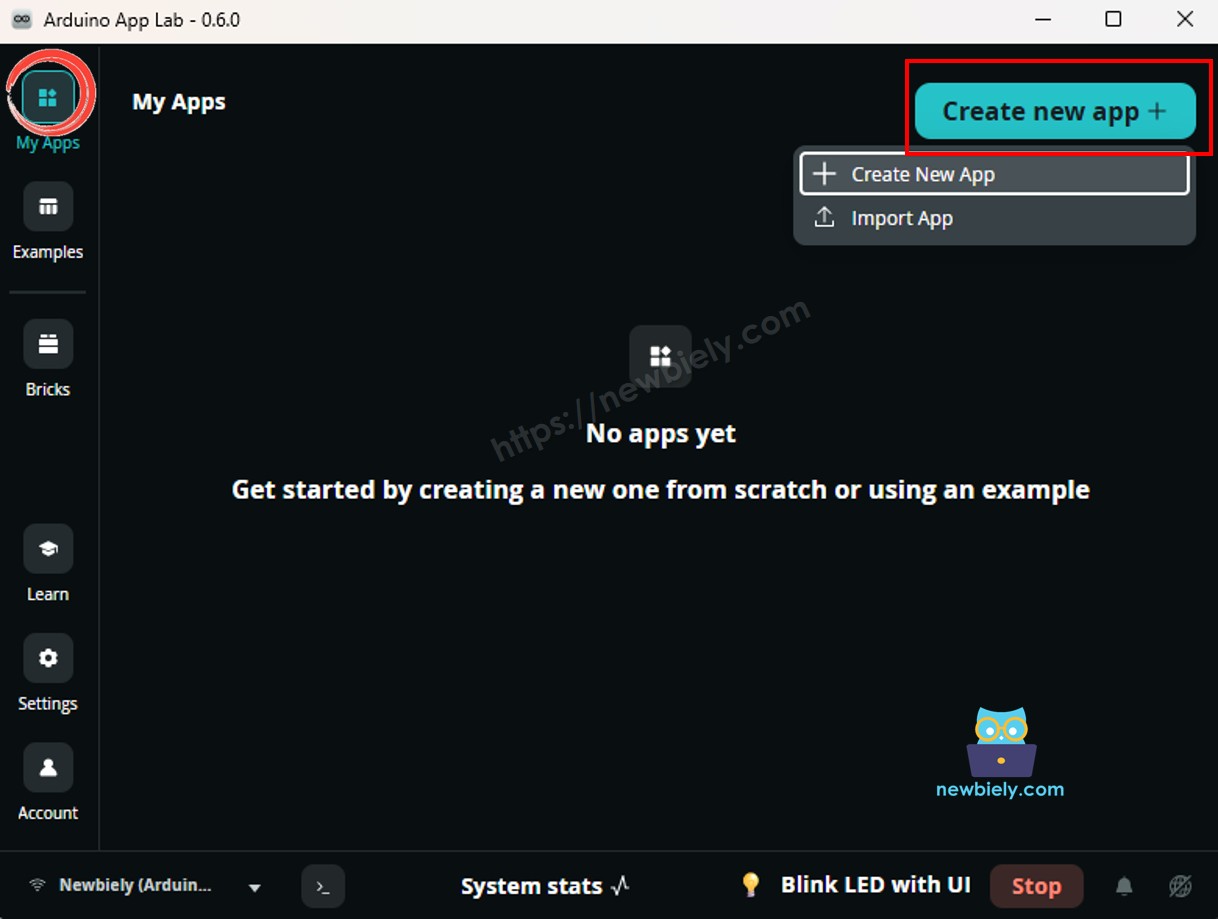
  • Donnez un nom à l'application, par exemple : DIYables_SSD1309
  • Cliquez sur Créer pour confirmer.
  • Vous verrez un ensemble de dossiers et fichiers générés dans votre nouvelle application.
Dossiers et fichiers de l'application Arduino App Lab sur Arduino UNO Q
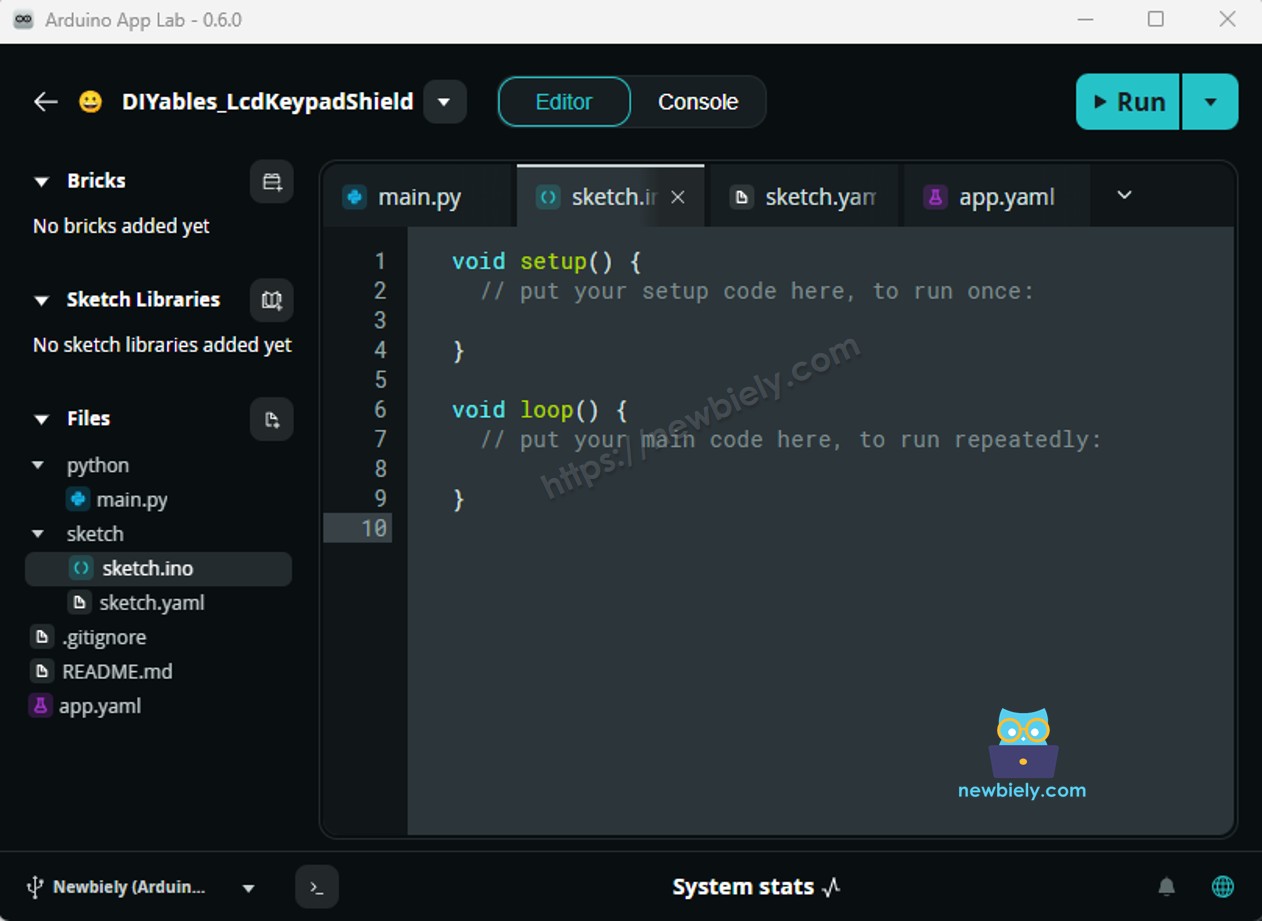
  • Trouvez le fichier sketch/sketch.ino — c'est ici que vous collerez le sketch MCU.
  • Coller le sketch : Copiez le code MCU ci-dessus et collez-le dans le fichier sketch.
    • Install the library: Click the Add sketch library button (the open book icon with a + sign) in the left sidebar.
    Add sketch library in Arduino App Lab on Arduino UNO Q
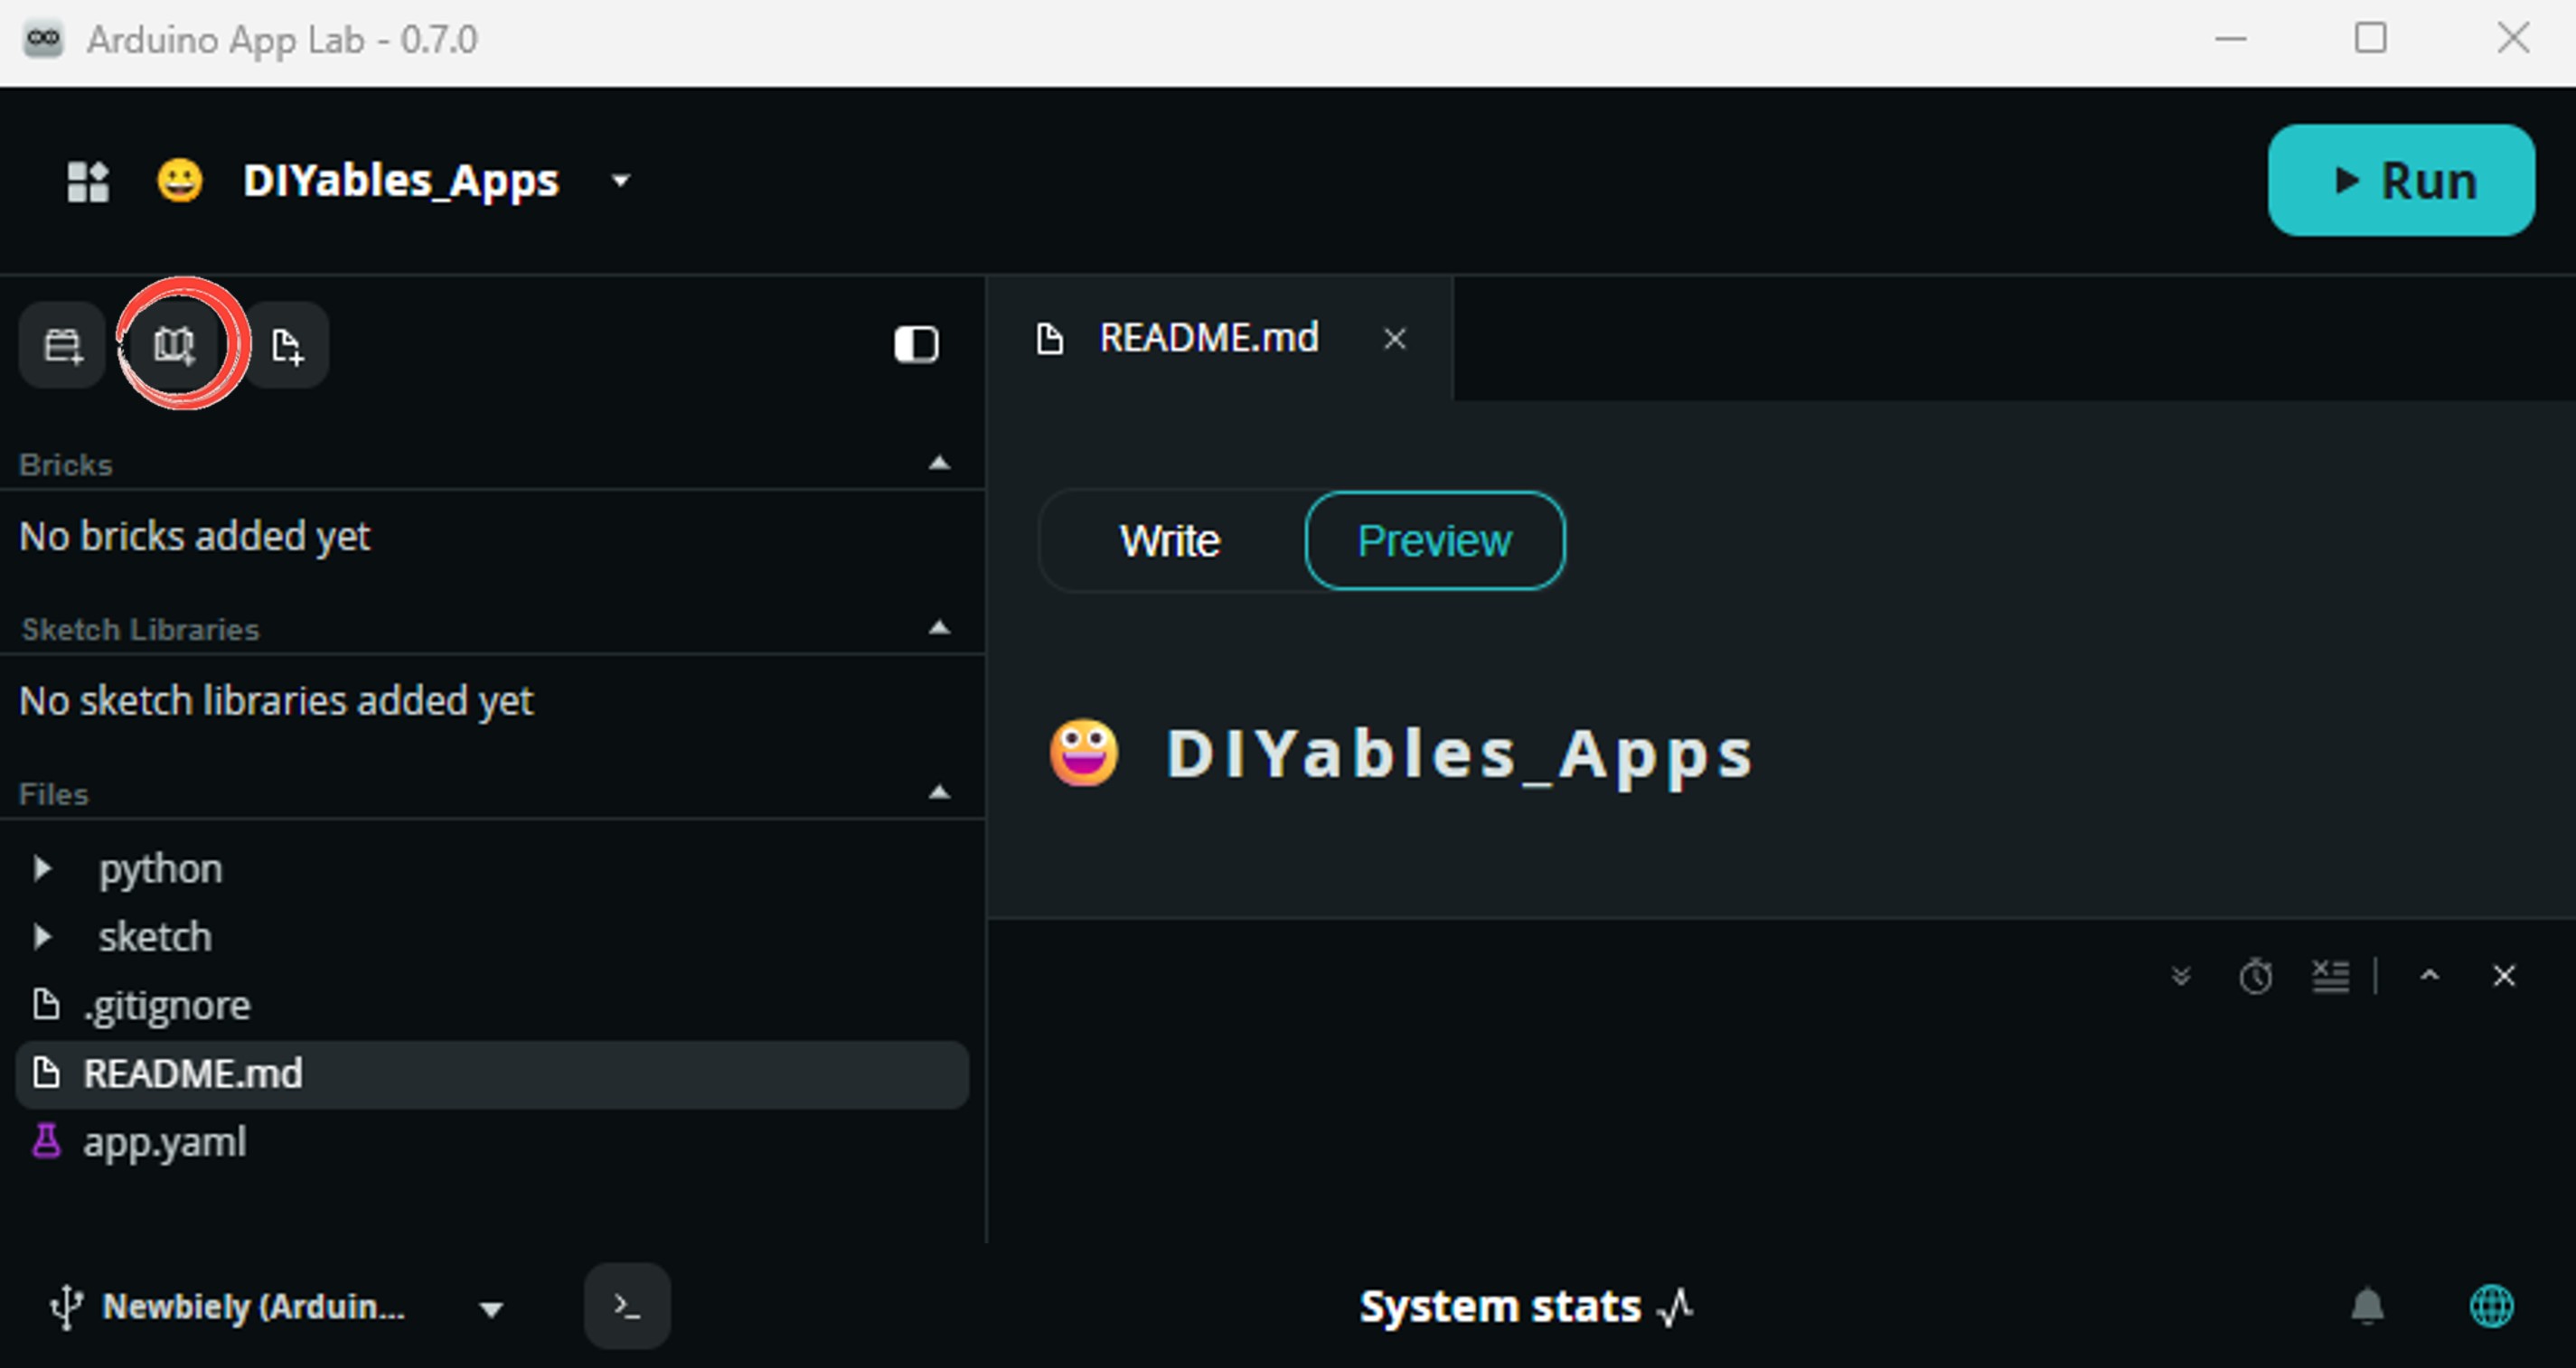
    • Search for Arduino_RouterBridge created by Arduino and click the Install button.
    My Apps / DIYables Apps
    Run
    Bricks
    No bricks added...
    Sketch Libraries
    No sketch libra...
    Files
    python
    sketch
    .gitignore
    README.md
    app.yaml
    sketch.ino
    Add sketch library
    Arduino_RouterBridge Arduino

    This library provides a simple RPC bridge for Arduino UNO Q boards, allowing communication between the board and other devices using MsgPack serialization.

    0.4.1
    Install
    More Info
    • Search for DIYables_OLED_SSD1309 created by DIYables and click the Install button.
    My Apps / DIYables Apps
    Run
    Bricks
    No bricks added...
    Sketch Libraries
    No sketch libra...
    Files
    python
    sketch
    .gitignore
    README.md
    app.yaml
    sketch.ino
    Add sketch library
    DIYables_OLED_SSD1309 DIYables

    Supports 128x64 and 128x32 SSD1309-based monochrome OLED displays over I2C. API compatible with Adafruit_SSD1306. Extends Adafruit_GFX for full graphics support. Works with all Arduino-compatible boards.

    1.0.2
    Install
    More Info
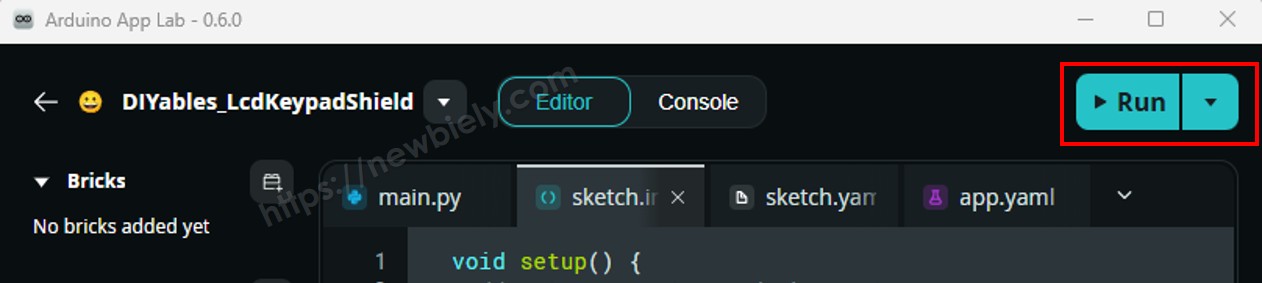
    • Téléverser : Cliquez sur le bouton Exécuter dans Arduino App Lab pour compiler et téléverser vers le STM32.
    Cliquez sur le bouton Exécuter dans Arduino App Lab sur Arduino UNO Q

    Regardez l'OLED — il affiche "Hello, World!", "DIYables" et "SSD1309 OLED 128x64" !

    Code Arduino UNO Q — Afficher du Texte sur l'OLED SSD1309

    Cet exemple montre différentes tailles de texte et comment afficher des entiers, des flottants et des nombres hexadécimaux sur l'OLED.

    /* * Ce code Arduino UNO Q a été développé par newbiely.fr * Ce code Arduino UNO Q est mis à disposition du public sans aucune restriction. * Pour des instructions complètes et des schémas de câblage, veuillez visiter: * https://newbiely.fr/tutorials/arduino-uno-q/arduino-uno-q-ssd1309-oled-display */ #include <Wire.h> #include <Adafruit_GFX.h> #include <DIYables_OLED_SSD1309.h> #define SCREEN_WIDTH 128 #define SCREEN_HEIGHT 64 #define OLED_RESET -1 #define SCREEN_ADDRESS 0x3C DIYables_OLED_SSD1309 display(SCREEN_WIDTH, SCREEN_HEIGHT, &Wire, OLED_RESET); void setup() { Monitor.begin(9600); if (!display.begin(SSD1309_SWITCHCAPVCC, SCREEN_ADDRESS)) { Monitor.println(F("SSD1309 allocation failed")); for (;;); } delay(2000); display.clearDisplay(); display.setTextSize(1); display.setTextColor(SSD1309_PIXEL_ON); display.setCursor(0, 10); display.println(F("Text size = 1")); display.display(); delay(2000); display.setTextSize(2); display.setCursor(0, 30); display.println(F("Size = 2")); display.display(); delay(2000); display.clearDisplay(); display.setTextSize(1); display.setCursor(0, 0); display.println(F("Display integer:")); display.println(12345); display.println(); display.println(F("Display float:")); display.println(1.2345); display.println(); display.println(F("Display HEX:")); display.println(0xABCD, HEX); display.display(); } void loop() {}

    Étapes Rapides

    • Copiez le code ci-dessus et collez-le dans sketch/sketch.ino.
    • Cliquez sur le bouton Exécuter dans Arduino App Lab.
    Cliquez sur le bouton Exécuter dans Arduino App Lab sur Arduino UNO Q

    L'OLED affiche successivement des démos de taille de texte, puis un entier, un flottant et un nombre hexadécimal.

    Référence des Fonctions d'Affichage Utiles

    Référence rapide des fonctions SSD1309 OLED couramment utilisées :

    • display.clearDisplay() — efface le tampon d'image (tous les pixels éteints)
    • display.display() — envoie le tampon vers l'écran — requis après chaque appel de dessin
    • display.drawPixel(x, y, color) — définit ou efface un pixel unique
    • display.setTextSize(n) — met à l'échelle la police par le facteur *n* (1 = 6×8 px, 2 = 12×16 px, …)
    • display.setCursor(x, y) — déplace le curseur de texte aux coordonnées pixel *(x, y)*
    • display.setTextColor(SSD1309_PIXEL_ON) — premier plan du texte uniquement (arrière-plan transparent)
    • display.setTextColor(SSD1309_PIXEL_OFF, SSD1309_PIXEL_ON) — texte avec arrière-plan explicite
    • display.println("message") — imprime une chaîne et passe à la ligne suivante
    • display.println(number) — imprime un entier en décimal
    • display.println(number, HEX) — imprime un entier en hexadécimal
    • display.startscrollright(start, stop) — défilement matériel vers la droite entre les pages
    • display.startscrollleft(start, stop) — défilement matériel vers la gauche
    • display.startscrolldiagright(start, stop) — défilement diagonal vers la droite
    • display.startscrolldiagleft(start, stop) — défilement diagonal vers la gauche
    • display.stopscroll() — arrête tout défilement matériel actif
    • display.setContrast(value) — ajuste la luminosité (0–255)
    • display.dim(true/false) — basculement rapide d'atténuation
    • display.invertDisplay(true/false) — inversion des couleurs au niveau matériel

    Code Arduino UNO Q — Dessiner des Formes sur l'OLED SSD1309

    La bibliothèque DIYables_OLED_SSD1309 hérite d'Adafruit_GFX, vous donnant accès aux pixels, lignes, rectangles, rectangles remplis, cercles, cercles remplis, triangles, triangles remplis et rectangles arrondis. Le sketch ci-dessous parcourt tous ces éléments.

    /* * Ce code Arduino UNO Q a été développé par newbiely.fr * Ce code Arduino UNO Q est mis à disposition du public sans aucune restriction. * Pour des instructions complètes et des schémas de câblage, veuillez visiter: * https://newbiely.fr/tutorials/arduino-uno-q/arduino-uno-q-ssd1309-oled-display */ #include <Wire.h> #include <Adafruit_GFX.h> #include <DIYables_OLED_SSD1309.h> #define SCREEN_WIDTH 128 #define SCREEN_HEIGHT 64 #define OLED_RESET -1 #define SCREEN_ADDRESS 0x3C DIYables_OLED_SSD1309 display(SCREEN_WIDTH, SCREEN_HEIGHT, &Wire, OLED_RESET); void setup() { Monitor.begin(9600); if (!display.begin(SSD1309_SWITCHCAPVCC, SCREEN_ADDRESS)) { Monitor.println(F("SSD1309 allocation failed")); for (;;); } display.clearDisplay(); } void loop() { // --- Pixels --- display.clearDisplay(); for (int16_t i = 0; i < display.width(); i += 4) { display.drawPixel(i, i * display.height() / display.width(), SSD1309_PIXEL_ON); } display.display(); delay(1500); // --- Lines --- display.clearDisplay(); for (int16_t i = 0; i < display.width(); i += 8) { display.drawLine(0, 0, i, display.height() - 1, SSD1309_PIXEL_ON); } for (int16_t i = 0; i < display.height(); i += 8) { display.drawLine(0, 0, display.width() - 1, i, SSD1309_PIXEL_ON); } display.display(); delay(1500); // --- Rectangles --- display.clearDisplay(); for (int16_t i = 0; i < display.height() / 2; i += 4) { display.drawRect(i, i, display.width() - 2 * i, display.height() - 2 * i, SSD1309_PIXEL_ON); } display.display(); delay(1500); // --- Filled rectangles (inverse) --- display.clearDisplay(); for (int16_t i = 0; i < display.height() / 2; i += 6) { display.fillRect(i, i, display.width() - 2 * i, display.height() - 2 * i, SSD1309_PIXEL_INVERSE); } display.display(); delay(1500); // --- Circles --- display.clearDisplay(); for (int16_t i = max(display.width(), display.height()) / 2; i > 0; i -= 5) { display.drawCircle(display.width() / 2, display.height() / 2, i, SSD1309_PIXEL_ON); } display.display(); delay(1500); // --- Filled circles (inverse) --- display.clearDisplay(); for (int16_t i = max(display.width(), display.height()) / 2; i > 0; i -= 6) { display.fillCircle(display.width() / 2, display.height() / 2, i, SSD1309_PIXEL_INVERSE); } display.display(); delay(1500); // --- Rounded rectangles --- display.clearDisplay(); for (int16_t i = 0; i < display.height() / 2 - 2; i += 4) { display.drawRoundRect(i, i, display.width() - 2 * i, display.height() - 2 * i, display.height() / 4, SSD1309_PIXEL_ON); } display.display(); delay(1500); // --- Filled rounded rectangles (inverse) --- display.clearDisplay(); for (int16_t i = 0; i < display.height() / 2 - 2; i += 4) { display.fillRoundRect(i, i, display.width() - 2 * i, display.height() - 2 * i, display.height() / 4, SSD1309_PIXEL_INVERSE); } display.display(); delay(1500); // --- Triangles --- display.clearDisplay(); for (int16_t i = 0; i < max(display.width(), display.height()) / 2; i += 5) { display.drawTriangle( display.width() / 2, display.height() / 2 - i, display.width() / 2 - i, display.height() / 2 + i, display.width() / 2 + i, display.height() / 2 + i, SSD1309_PIXEL_ON); } display.display(); delay(1500); // --- Filled triangles (inverse) --- display.clearDisplay(); for (int16_t i = max(display.width(), display.height()) / 2; i > 0; i -= 6) { display.fillTriangle( display.width() / 2, display.height() / 2 - i, display.width() / 2 - i, display.height() / 2 + i, display.width() / 2 + i, display.height() / 2 + i, SSD1309_PIXEL_INVERSE); } display.display(); delay(1500); }

    Étapes Rapides

    • Copiez le code ci-dessus et collez-le dans sketch/sketch.ino.
    • Cliquez sur le bouton Exécuter dans Arduino App Lab.
    Cliquez sur le bouton Exécuter dans Arduino App Lab sur Arduino UNO Q

    Regardez l'OLED parcourir toutes les formes — pixels, lignes, rectangles, cercles, rectangles arrondis et triangles !

    Code Arduino UNO Q — Défilement Matériel sur l'OLED SSD1309

    Le SSD1309 dispose d'un moteur de défilement matériel intégré qui déplace le contenu sans travail du CPU. La bibliothèque offre quatre directions de défilement : droite, gauche, diagonal-droite et diagonal-gauche.

    ※ Note:

    Appelez toujours display.display() pour transférer votre contenu vers l'OLED avant de démarrer un défilement. Appelez stopscroll() avant de dessiner un nouveau contenu.

    /* * Ce code Arduino UNO Q a été développé par newbiely.fr * Ce code Arduino UNO Q est mis à disposition du public sans aucune restriction. * Pour des instructions complètes et des schémas de câblage, veuillez visiter: * https://newbiely.fr/tutorials/arduino-uno-q/arduino-uno-q-ssd1309-oled-display */ #include <Wire.h> #include <Adafruit_GFX.h> #include <DIYables_OLED_SSD1309.h> #define SCREEN_WIDTH 128 #define SCREEN_HEIGHT 64 #define OLED_RESET -1 #define SCREEN_ADDRESS 0x3C DIYables_OLED_SSD1309 display(SCREEN_WIDTH, SCREEN_HEIGHT, &Wire, OLED_RESET); void setup() { Monitor.begin(9600); if (!display.begin(SSD1309_SWITCHCAPVCC, SCREEN_ADDRESS)) { Monitor.println(F("SSD1309 allocation failed")); for (;;); } display.clearDisplay(); display.setTextSize(2); display.setTextColor(SSD1309_PIXEL_ON); display.setCursor(10, 24); display.println(F("DIYables")); display.display(); delay(2000); } void loop() { // Scroll right across all pages display.startscrollright(0x00, 0x07); delay(3000); display.stopscroll(); delay(500); // Scroll left display.startscrollleft(0x00, 0x07); delay(3000); display.stopscroll(); delay(500); // Diagonal scroll right display.startscrolldiagright(0x00, 0x07); delay(3000); display.stopscroll(); delay(500); // Diagonal scroll left display.startscrolldiagleft(0x00, 0x07); delay(3000); display.stopscroll(); delay(500); }

    Étapes Rapides

    • Copiez le code ci-dessus et collez-le dans sketch/sketch.ino.
    • Cliquez sur le bouton Exécuter dans Arduino App Lab.
    Cliquez sur le bouton Exécuter dans Arduino App Lab sur Arduino UNO Q

    L'OLED fait défiler "DIYables" vers la droite, la gauche, diagonal-droite et diagonal-gauche, en répétant indéfiniment.

    Code Arduino UNO Q — Afficher une Image Bitmap sur l'OLED SSD1309

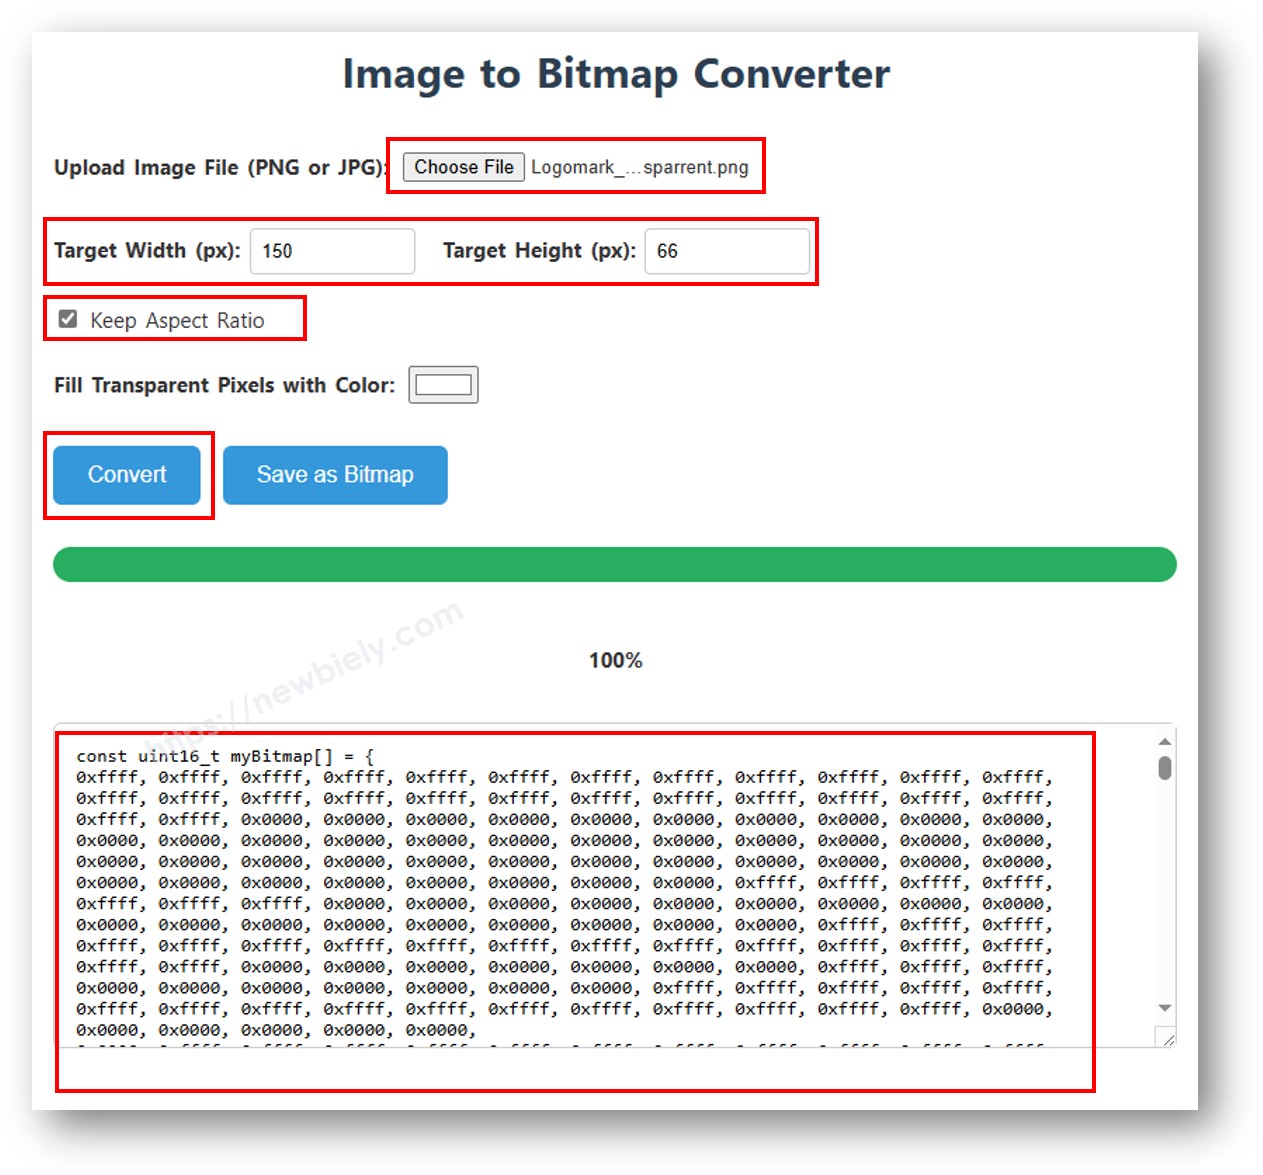
    Pour afficher un bitmap sur l'OLED SSD1309, vous devez d'abord convertir votre image en tableau d'octets C. Utilisez l'outil gratuit Convertisseur Image vers Bitmap :

    1. Téléchargez votre fichier image (PNG, JPG, BMP, etc.).
    2. Définissez la taille du canevas à 128×64 (ou moins).
    3. Sélectionnez Code Arduino comme format de sortie.
    4. Copiez le tableau généré dans votre sketch.
    convertisseur image vers tableau bitmap

    Le sketch ci-dessous montre une icône cœur 16×16 puis passe au logo DIYables complet 128×64 — tous deux stockés sous forme de tableaux d'octets dans le code :

    /* * Ce code Arduino UNO Q a été développé par newbiely.fr * Ce code Arduino UNO Q est mis à disposition du public sans aucune restriction. * Pour des instructions complètes et des schémas de câblage, veuillez visiter: * https://newbiely.fr/tutorials/arduino-uno-q/arduino-uno-q-ssd1309-oled-display */ #include <Wire.h> #include <Adafruit_GFX.h> #include <DIYables_OLED_SSD1309.h> #define SCREEN_WIDTH 128 #define SCREEN_HEIGHT 64 #define OLED_RESET -1 #define SCREEN_ADDRESS 0x3C DIYables_OLED_SSD1309 display(SCREEN_WIDTH, SCREEN_HEIGHT, &Wire, OLED_RESET); // 16x16 heart bitmap const unsigned char heart16x16[] PROGMEM = { 0x00, 0x00, 0x03, 0xc0, 0x0f, 0xf0, 0x1f, 0xf8, 0x3f, 0xfc, 0x7f, 0xfe, 0xff, 0xff, 0xff, 0xff, 0xff, 0xff, 0xff, 0xff, 0x7f, 0xfe, 0x3f, 0xfc, 0x1f, 0xf8, 0x0f, 0xf0, 0x03, 0xc0, 0x00, 0x00 }; // 128x64 DIYables logo bitmap const unsigned char diyablesLogo[] PROGMEM = { 0xff, 0xff, 0xff, 0xff, 0xff, 0xff, 0xff, 0xff, 0xff, 0xff, 0xff, 0xff, 0xff, 0xff, 0xff, 0xff, 0xff, 0xff, 0xff, 0xff, 0xff, 0xff, 0xff, 0xff, 0xff, 0xff, 0xff, 0xff, 0xff, 0xff, 0xff, 0xff, 0xff, 0xff, 0xfe, 0x00, 0x07, 0xff, 0xff, 0xff, 0xff, 0xff, 0xff, 0x80, 0x01, 0xff, 0xff, 0xff, 0xff, 0xff, 0xe0, 0x00, 0x00, 0xff, 0xff, 0xff, 0xff, 0xff, 0xfc, 0x00, 0x00, 0x3f, 0xff, 0xff, 0xff, 0xff, 0x80, 0x00, 0x00, 0x1f, 0xff, 0xff, 0xff, 0xff, 0xe0, 0x00, 0x00, 0x07, 0xff, 0xff, 0xff, 0xfe, 0x00, 0x00, 0x00, 0x07, 0xff, 0xff, 0xff, 0xff, 0x80, 0x00, 0x00, 0x01, 0xff, 0xff, 0xff, 0xfc, 0x00, 0x00, 0x00, 0x03, 0xff, 0xff, 0xff, 0xff, 0x00, 0x00, 0x00, 0x00, 0xff, 0xff, 0xff, 0xf0, 0x00, 0x00, 0x00, 0x00, 0xff, 0xff, 0xff, 0xfc, 0x00, 0x00, 0x00, 0x00, 0x3f, 0xff, 0xff, 0xe0, 0x00, 0x00, 0x00, 0x00, 0x3f, 0xff, 0xff, 0xf0, 0x00, 0x00, 0x00, 0x00, 0x1f, 0xff, 0xff, 0xc0, 0x00, 0x00, 0x00, 0x00, 0x1f, 0xff, 0xff, 0xe0, 0x00, 0x00, 0x00, 0x00, 0x0f, 0xff, 0xff, 0x80, 0x00, 0x00, 0x00, 0x00, 0x0f, 0xff, 0xff, 0xc0, 0x00, 0x00, 0x00, 0x00, 0x07, 0xff, 0xff, 0x00, 0x00, 0x00, 0x00, 0x00, 0x03, 0xff, 0xff, 0x80, 0x00, 0x00, 0x00, 0x00, 0x03, 0xff, 0xfe, 0x00, 0x00, 0x00, 0x00, 0x00, 0x01, 0xff, 0xfe, 0x00, 0x00, 0x00, 0x00, 0x00, 0x01, 0xff, 0xfc, 0x00, 0x00, 0xff, 0xf0, 0x00, 0x00, 0xff, 0xfc, 0x00, 0x00, 0x3f, 0xfc, 0x00, 0x00, 0xff, 0xfc, 0x00, 0x03, 0xff, 0xfc, 0x00, 0x00, 0x7f, 0xf8, 0x00, 0x00, 0xff, 0xff, 0x00, 0x00, 0xff, 0xf8, 0x00, 0x0f, 0xff, 0xff, 0x00, 0x00, 0x3f, 0xf0, 0x00, 0x03, 0xff, 0xff, 0xc0, 0x00, 0x7f, 0xf0, 0x00, 0x1f, 0xff, 0xff, 0xc0, 0x00, 0x1f, 0xe0, 0x00, 0x0f, 0xff, 0xff, 0xe0, 0x00, 0x7f, 0xf0, 0x00, 0x7f, 0xff, 0xff, 0xe0, 0x00, 0x0f, 0xc0, 0x00, 0x1f, 0xff, 0xff, 0xf8, 0x00, 0x3f, 0xe0, 0x00, 0xff, 0xff, 0xff, 0xf8, 0x00, 0x07, 0x80, 0x00, 0x7f, 0xff, 0xff, 0xfc, 0x00, 0x1f, 0xe0, 0x00, 0xff, 0xff, 0xff, 0xfc, 0x00, 0x03, 0x80, 0x00, 0xff, 0xff, 0xff, 0xfc, 0x00, 0x1f, 0xc0, 0x01, 0xff, 0xff, 0xff, 0xfe, 0x00, 0x03, 0x00, 0x01, 0xff, 0xff, 0xff, 0xfe, 0x00, 0x1f, 0xc0, 0x03, 0xff, 0xff, 0xff, 0xff, 0x00, 0x00, 0x00, 0x03, 0xff, 0xff, 0xff, 0xff, 0x00, 0x0f, 0xc0, 0x03, 0xff, 0xff, 0xff, 0xff, 0x80, 0x00, 0x00, 0x07, 0xff, 0xf0, 0x7f, 0xff, 0x00, 0x0f, 0xc0, 0x07, 0xff, 0xff, 0xff, 0xff, 0xc0, 0x00, 0x00, 0x0f, 0xff, 0xf0, 0x7f, 0xff, 0x80, 0x0f, 0x80, 0x07, 0xff, 0xff, 0xff, 0xff, 0xe0, 0x00, 0x00, 0x1f, 0xff, 0xf0, 0x7f, 0xff, 0x80, 0x07, 0x80, 0x0f, 0xff, 0xff, 0xff, 0xff, 0xf0, 0x00, 0x00, 0x3f, 0xff, 0xf0, 0x7f, 0xff, 0xc0, 0x07, 0x80, 0x0f, 0xff, 0xff, 0xff, 0xff, 0xf8, 0x00, 0x00, 0x7f, 0xff, 0xf0, 0x7f, 0xff, 0xc0, 0x07, 0x80, 0x0f, 0xfe, 0x00, 0x00, 0xff, 0xfc, 0x00, 0x00, 0xff, 0xfc, 0x00, 0x03, 0xff, 0xc0, 0x07, 0x80, 0x0f, 0xfe, 0x00, 0x00, 0xff, 0xfe, 0x00, 0x01, 0xff, 0xfc, 0x00, 0x01, 0xff, 0xc0, 0x07, 0x80, 0x0f, 0xfe, 0x00, 0x00, 0xff, 0xff, 0x00, 0x03, 0xff, 0xfc, 0x00, 0x01, 0xff, 0xc0, 0x07, 0x80, 0x0f, 0xfe, 0x00, 0x00, 0xff, 0xff, 0x00, 0x03, 0xff, 0xfc, 0x00, 0x01, 0xff, 0xc0, 0x07, 0x80, 0x0f, 0xfe, 0x00, 0x00, 0xff, 0xff, 0x00, 0x03, 0xff, 0xfc, 0x00, 0x01, 0xff, 0xc0, 0x07, 0x80, 0x0f, 0xff, 0xff, 0xff, 0xff, 0xfe, 0x00, 0x01, 0xff, 0xff, 0xe0, 0x7f, 0xff, 0xc0, 0x07, 0x80, 0x0f, 0xff, 0xff, 0xff, 0xff, 0xfc, 0x00, 0x00, 0xff, 0xff, 0xf0, 0x7f, 0xff, 0xc0, 0x07, 0x80, 0x0f, 0xff, 0xff, 0xff, 0xff, 0xfc, 0x00, 0x00, 0xff, 0xff, 0xf0, 0x7f, 0xff, 0xc0, 0x07, 0x80, 0x0f, 0xff, 0xff, 0xff, 0xff, 0xf8, 0x00, 0x00, 0x7f, 0xff, 0xf0, 0x7f, 0xff, 0xc0, 0x07, 0x80, 0x0f, 0xff, 0xff, 0xff, 0xff, 0xf0, 0x00, 0x00, 0x3f, 0xff, 0xf0, 0x7f, 0xff, 0x80, 0x07, 0x80, 0x07, 0xff, 0xff, 0xff, 0xff, 0xe0, 0x00, 0x00, 0x1f, 0xff, 0xf0, 0x7f, 0xff, 0x80, 0x07, 0xc0, 0x07, 0xff, 0xff, 0xff, 0xff, 0xc0, 0x00, 0x00, 0x0f, 0xff, 0xff, 0xff, 0xff, 0x80, 0x0f, 0xc0, 0x03, 0xff, 0xff, 0xff, 0xff, 0x80, 0x00, 0x00, 0x07, 0xff, 0xff, 0xff, 0xff, 0x00, 0x0f, 0xc0, 0x03, 0xff, 0xff, 0xff, 0xff, 0x00, 0x00, 0x00, 0x03, 0xff, 0xff, 0xff, 0xff, 0x00, 0x0f, 0xe0, 0x01, 0xff, 0xff, 0xff, 0xfe, 0x00, 0x03, 0x00, 0x01, 0xff, 0xff, 0xff, 0xfe, 0x00, 0x1f, 0xe0, 0x00, 0xff, 0xff, 0xff, 0xfc, 0x00, 0x07, 0x80, 0x00, 0xff, 0xff, 0xff, 0xfc, 0x00, 0x1f, 0xe0, 0x00, 0x7f, 0xff, 0xff, 0xf0, 0x00, 0x0f, 0xc0, 0x00, 0x3f, 0xff, 0xff, 0xf8, 0x00, 0x3f, 0xf0, 0x00, 0x3f, 0xff, 0xff, 0xe0, 0x00, 0x1f, 0xe0, 0x00, 0x1f, 0xff, 0xff, 0xf0, 0x00, 0x3f, 0xf8, 0x00, 0x1f, 0xff, 0xff, 0x80, 0x00, 0x3f, 0xe0, 0x00, 0x07, 0xff, 0xff, 0xe0, 0x00, 0x7f, 0xf8, 0x00, 0x0f, 0xff, 0xff, 0x00, 0x00, 0x7f, 0xf8, 0x00, 0x03, 0xff, 0xff, 0xc0, 0x00, 0x7f, 0xfc, 0x00, 0x03, 0xff, 0xf8, 0x00, 0x00, 0xff, 0xfc, 0x00, 0x00, 0xff, 0xff, 0x00, 0x00, 0xff, 0xfe, 0x00, 0x00, 0x7f, 0xe0, 0x00, 0x01, 0xff, 0xfe, 0x00, 0x00, 0x1f, 0xf8, 0x00, 0x01, 0xff, 0xfe, 0x00, 0x00, 0x00, 0x00, 0x00, 0x03, 0xff, 0xff, 0x00, 0x00, 0x00, 0x00, 0x00, 0x03, 0xff, 0xff, 0x00, 0x00, 0x00, 0x00, 0x00, 0x07, 0xff, 0xff, 0x80, 0x00, 0x00, 0x00, 0x00, 0x03, 0xff, 0xff, 0x80, 0x00, 0x00, 0x00, 0x00, 0x0f, 0xff, 0xff, 0xc0, 0x00, 0x00, 0x00, 0x00, 0x07, 0xff, 0xff, 0xc0, 0x00, 0x00, 0x00, 0x00, 0x1f, 0xff, 0xff, 0xe0, 0x00, 0x00, 0x00, 0x00, 0x0f, 0xff, 0xff, 0xe0, 0x00, 0x00, 0x00, 0x00, 0x7f, 0xff, 0xff, 0xf8, 0x00, 0x00, 0x00, 0x00, 0x3f, 0xff, 0xff, 0xf8, 0x00, 0x00, 0x00, 0x01, 0xff, 0xff, 0xff, 0xfe, 0x00, 0x00, 0x00, 0x00, 0x7f, 0xff, 0xff, 0xff, 0xff, 0xff, 0xff, 0xff, 0xff, 0xff, 0xff, 0xff, 0xff, 0xff, 0xff, 0xff, 0xff, 0xff, 0xff, 0xff, 0xff, 0xff, 0xff, 0xff, 0xff, 0xff, 0xff, 0xff, 0xff, 0xff, 0xff, 0xff, 0xff, 0xff }; void setup() { Monitor.begin(9600); if (!display.begin(SSD1309_SWITCHCAPVCC, SCREEN_ADDRESS)) { Monitor.println(F("SSD1309 allocation failed")); for (;;); } // Show heart icon centered display.clearDisplay(); display.drawBitmap( (SCREEN_WIDTH - 16) / 2, (SCREEN_HEIGHT - 16) / 2, heart16x16, 16, 16, SSD1309_PIXEL_ON); display.display(); delay(3000); // Show full DIYables logo display.clearDisplay(); display.drawBitmap(0, 0, diyablesLogo, SCREEN_WIDTH, SCREEN_HEIGHT, SSD1309_PIXEL_ON); display.display(); } void loop() {}

    Étapes Rapides

    • Copiez le code ci-dessus et collez-le dans sketch/sketch.ino.
    • Cliquez sur le bouton Exécuter dans Arduino App Lab.
    Cliquez sur le bouton Exécuter dans Arduino App Lab sur Arduino UNO Q

    L'OLED affiche l'icône cœur pendant 3 secondes, puis passe au logo DIYables.

    ※ Note:

    Les dimensions du bitmap ne doivent pas dépasser la résolution de l'écran (128×64).

    Code Arduino UNO Q — Contraste et Atténuation sur l'OLED SSD1309

    Le SSD1309 prend en charge 256 niveaux de contraste (0–255). Utilisez setContrast() pour un contrôle précis et dim() pour un basculement rapide de la luminosité.

    /* * Ce code Arduino UNO Q a été développé par newbiely.fr * Ce code Arduino UNO Q est mis à disposition du public sans aucune restriction. * Pour des instructions complètes et des schémas de câblage, veuillez visiter: * https://newbiely.fr/tutorials/arduino-uno-q/arduino-uno-q-ssd1309-oled-display */ #include <Wire.h> #include <Adafruit_GFX.h> #include <DIYables_OLED_SSD1309.h> #define SCREEN_WIDTH 128 #define SCREEN_HEIGHT 64 #define OLED_RESET -1 #define SCREEN_ADDRESS 0x3C DIYables_OLED_SSD1309 display(SCREEN_WIDTH, SCREEN_HEIGHT, &Wire, OLED_RESET); void setup() { Monitor.begin(9600); if (!display.begin(SSD1309_SWITCHCAPVCC, SCREEN_ADDRESS)) { Monitor.println(F("SSD1309 allocation failed")); for (;;); } // Draw a test pattern so the contrast change is visible display.clearDisplay(); display.fillRect(0, 0, 64, 32, SSD1309_PIXEL_ON); display.fillRect(64, 32, 64, 32, SSD1309_PIXEL_ON); display.setTextSize(1); display.setTextColor(SSD1309_PIXEL_INVERSE); display.setCursor(16, 28); display.println(F("Contrast Demo")); display.display(); delay(2000); } void loop() { // Ramp up for (int c = 0; c <= 255; c += 5) { display.setContrast((uint8_t)c); delay(30); } delay(1000); // Ramp down for (int c = 255; c >= 0; c -= 5) { display.setContrast((uint8_t)c); delay(30); } delay(1000); // Quick dim toggle display.dim(true); // minimum brightness delay(2000); display.dim(false); // restore delay(2000); }

    Étapes Rapides

    • Copiez le code ci-dessus et collez-le dans sketch/sketch.ino.
    • Cliquez sur le bouton Exécuter dans Arduino App Lab.
    Cliquez sur le bouton Exécuter dans Arduino App Lab sur Arduino UNO Q

    Regardez la luminosité de l'OLED augmenter puis diminuer, suivie d'un cycle atténuation-activée/atténuation-désactivée.

    Code Arduino UNO Q — Polices Externes Personnalisées sur l'OLED SSD1309

    La bibliothèque Adafruit GFX inclut de nombreuses polices FreeFont (Serif, Sans, Mono — en plusieurs tailles). Utilisez-les en incluant l'en-tête de police et en appelant setFont().

    ※ Note:

    Lorsqu'une police externe est active, la coordonnée Y du curseur fait référence à la ligne de base du texte, et non au coin supérieur gauche. Cela diffère de la police intégrée 5×7.

    /* * Ce code Arduino UNO Q a été développé par newbiely.fr * Ce code Arduino UNO Q est mis à disposition du public sans aucune restriction. * Pour des instructions complètes et des schémas de câblage, veuillez visiter: * https://newbiely.fr/tutorials/arduino-uno-q/arduino-uno-q-ssd1309-oled-display */ #include <Wire.h> #include <Adafruit_GFX.h> #include <DIYables_OLED_SSD1309.h> #include <Fonts/FreeSerif9pt7b.h> #include <Fonts/FreeSansBold12pt7b.h> #include <Fonts/FreeMono9pt7b.h> #define SCREEN_WIDTH 128 #define SCREEN_HEIGHT 64 #define OLED_RESET -1 #define SCREEN_ADDRESS 0x3C DIYables_OLED_SSD1309 display(SCREEN_WIDTH, SCREEN_HEIGHT, &Wire, OLED_RESET); void setup() { Monitor.begin(9600); if (!display.begin(SSD1309_SWITCHCAPVCC, SCREEN_ADDRESS)) { Monitor.println(F("SSD1309 allocation failed")); for (;;); } display.clearDisplay(); display.display(); } void loop() { // ── Built-in 5×7 font ── display.clearDisplay(); display.setFont(NULL); display.setTextSize(1); display.setTextColor(SSD1309_PIXEL_ON); display.setCursor(0, 0); display.println(F("Built-in 5x7 font")); display.println(); display.setTextSize(2); display.println(F("DIYables")); display.display(); delay(3000); // ── FreeSerif 9pt ── display.clearDisplay(); display.setFont(&FreeSerif9pt7b); display.setTextSize(1); display.setTextColor(SSD1309_PIXEL_ON); display.setCursor(0, 14); // Y = baseline display.println(F("FreeSerif 9pt")); display.setCursor(0, 38); display.println(F("DIYables OLED")); display.setCursor(0, 58); display.println(F("Hello World!")); display.display(); delay(3000); // ── FreeSansBold 12pt ── display.clearDisplay(); display.setFont(&FreeSansBold12pt7b); display.setTextSize(1); display.setTextColor(SSD1309_PIXEL_ON); display.setCursor(0, 20); display.println(F("SansBold")); display.setCursor(0, 52); display.println(F("DIYables")); display.display(); delay(3000); // ── FreeMono 9pt ── display.clearDisplay(); display.setFont(&FreeMono9pt7b); display.setTextSize(1); display.setTextColor(SSD1309_PIXEL_ON); display.setCursor(0, 14); display.println(F("FreeMono 9pt")); display.setCursor(0, 34); display.println(F("0123456789")); display.setCursor(0, 54); display.println(F("!@#$%^&*()")); display.display(); delay(3000); }

    Étapes Rapides

    • Copiez le code ci-dessus et collez-le dans sketch/sketch.ino.
    • Cliquez sur le bouton Exécuter dans Arduino App Lab.
    Cliquez sur le bouton Exécuter dans Arduino App Lab sur Arduino UNO Q

    L'OLED parcourt la police intégrée, FreeSerif 9pt, FreeSansBold 12pt et FreeMono 9pt.

    Programmation Bridge Linux + MCU

    L'Arduino UNO Q possède deux processeurs qui fonctionnent ensemble : le MPU (Qualcomm, exécute Debian Linux) et le MCU (STM32, exécute Zephyr OS avec votre sketch Arduino). Ils communiquent via RPC grâce à la bibliothèque Arduino_RouterBridge — jamais via des ports série bruts.

    • L'OLED SSD1309 est connecté au MCU (STM32) — via I2C (SCL/SDA). Seul le MCU peut le piloter directement.
    • Le MPU ne peut pas contrôler l'OLED directement — il appelle Bridge.call("display_text", "text") qui met à jour l'affichage et imprime le résultat dans le Monitor.
    • Le MPU dispose du Wi-Fi — parce que le MPU exécute Debian Linux complet avec Wi-Fi, il peut recevoir des commandes Telegram et afficher n'importe quel message sur l'OLED à distance.
    • Communication : Bridge.call() côté Linux invoque les fonctions Bridge.provide_safe() côté MCU (car les écritures OLED sont des appels API matériels).
    • ⚠️ Réservé : /dev/ttyHS1 (Linux) et Serial1 (MCU) sont utilisés par le routeur Arduino — ne les ouvrez jamais directement.

    Sketch MCU — OLED SSD1309 avec Bridge et sortie Monitor :

    /* * Ce code Arduino UNO Q a été développé par newbiely.fr * Ce code Arduino UNO Q est mis à disposition du public sans aucune restriction. * Pour des instructions complètes et des schémas de câblage, veuillez visiter: * https://newbiely.fr/tutorials/arduino-uno-q/arduino-uno-q-ssd1309-oled-display */ #include "Arduino_RouterBridge.h" #include <Wire.h> #include <Adafruit_GFX.h> #include <DIYables_OLED_SSD1309.h> #define SCREEN_WIDTH 128 #define SCREEN_HEIGHT 64 #define OLED_RESET -1 #define SCREEN_ADDRESS 0x3C DIYables_OLED_SSD1309 display(SCREEN_WIDTH, SCREEN_HEIGHT, &Wire, OLED_RESET); String current_text = ""; void display_text(String text) { current_text = text; display.clearDisplay(); display.setTextSize(1); display.setTextColor(SSD1309_PIXEL_ON); display.setCursor(0, 0); display.println(text); display.display(); Monitor.println("OLED: " + text); } void clear_oled() { current_text = ""; display.clearDisplay(); display.display(); Monitor.println("OLED cleared"); } void get_status() { Monitor.println("Text: " + current_text); } void setup() { Bridge.begin(); Monitor.begin(); if (!display.begin(SSD1309_SWITCHCAPVCC, SCREEN_ADDRESS)) { Monitor.println("SSD1309 init failed"); while (true); } delay(1000); display.clearDisplay(); display.setTextSize(1); display.setTextColor(SSD1309_PIXEL_ON); display.setCursor(0, 0); display.println("Bridge Ready"); display.display(); Bridge.provide_safe("display_text", display_text); Bridge.provide_safe("clear_oled", clear_oled); Bridge.provide("get_status", get_status); Monitor.println("SSD1309 OLED Bridge ready"); } void loop() {}

    Script Python (Arduino App Lab) — afficher du texte sur l'OLED SSD1309 depuis Linux :

    /* * Ce code Arduino UNO Q a été développé par newbiely.fr * Ce code Arduino UNO Q est mis à disposition du public sans aucune restriction. * Pour des instructions complètes et des schémas de câblage, veuillez visiter: * https://newbiely.fr/tutorials/arduino-uno-q/arduino-uno-q-ssd1309-oled-display */ from arduino.app_utils import * import time def loop(): result = Bridge.call("display_text", "Hello UNO Q\nSSD1309 OLED\n2.42 inch") print(result) time.sleep(3) result = Bridge.call("clear_oled") print(result) time.sleep(1) result = Bridge.call("display_text", "DIYables.io") print(result) time.sleep(3) App.run(user_loop=loop)

    Étapes Rapides

    • Créer une nouvelle application : Ouvrez Arduino App Lab, cliquez sur Créer une nouvelle application, nommez-la DIYables_SSD1309_Bridge, et cliquez sur Créer.
    • Coller le sketch MCU : Copiez le code MCU Bridge ci-dessus et collez-le dans sketch/sketch.ino.
    • Coller le script Python : Copiez le code Python ci-dessus et collez-le dans le fichier Python de l'application.
    • Exécuter l'application : Cliquez sur le bouton Exécuter — le côté Python fait défiler les messages sur l'OLED.

    Sortie de la Console App Lab

    DIYables_Apps
    Stop
    sketch.ino
    1#include "Arduino_RouterBridge.h"
    Serial Monitor
    Python
    Message (Enter to send a message to "Newbiely" on usb(2820070321))
    New Line
    9600 baud
    SSD1309 OLED Bridge ready OLED: Hello UNO Q OLED cleared OLED: DIYables.io

    Intégration Telegram

    Affichez n'importe quel texte sur votre OLED SSD1309 depuis n'importe où via Telegram.

    Si vous n'avez pas encore de bot Telegram, consultez Arduino UNO Q - Bot Telegram pour obtenir votre token de bot avant de continuer.

    Sketch MCU : Conservez le même sketch MCU de la section Bridge précédente — aucune modification nécessaire. Assurez-vous qu'il est déjà téléversé et en cours d'exécution sur le STM32 avant de continuer.

    Script Python (Arduino App Lab) — bot Telegram pour l'OLED SSD1309 :

    /* * Ce code Arduino UNO Q a été développé par newbiely.fr * Ce code Arduino UNO Q est mis à disposition du public sans aucune restriction. * Pour des instructions complètes et des schémas de câblage, veuillez visiter: * https://newbiely.fr/tutorials/arduino-uno-q/arduino-uno-q-ssd1309-oled-display */ from arduino.app_utils import * import requests import time BOT_TOKEN = "YOUR_BOT_TOKEN" API_URL = f"https://api.telegram.org/bot{BOT_TOKEN}" last_update_id = 0 def send_message(chat_id, text): requests.post(f"{API_URL}/sendMessage", json={"chat_id": chat_id, "text": text}) def get_updates(): global last_update_id resp = requests.get(f"{API_URL}/getUpdates", params={"offset": last_update_id + 1, "timeout": 5}) return resp.json().get("result", []) def loop(): global last_update_id updates = get_updates() for update in updates: last_update_id = update["update_id"] msg = update.get("message", {}) chat_id = msg.get("chat", {}).get("id") text = msg.get("text", "").strip() if text.startswith("/display "): content = text[9:] result = Bridge.call("display_text", content) print(f"[Telegram] /display: {content}") send_message(chat_id, result) elif text == "/clear": result = Bridge.call("clear_oled") print(f"[Telegram] /clear") send_message(chat_id, result) elif text == "/status": result = Bridge.call("get_status") print(f"[Telegram] /status: {result}") send_message(chat_id, result) else: send_message(chat_id, "Commands:\n/display <text> — show text on OLED\n/clear — clear the OLED\n/status — show current OLED content") App.run(user_loop=loop)
    • Note : Remplacez YOUR_BOT_TOKEN par le token de @BotFather sur Telegram.
    • Envoyez /display Hello — apparaît sur l'OLED.
    • Envoyez /clear — efface l'OLED.
    • Envoyez /status — le bot répond avec le texte actuel.

    Sortie de la Console App Lab

    DIYables_Apps
    Stop
    sketch.ino
    1#include "Arduino_RouterBridge.h"
    Serial Monitor
    Python
    [2026-04-29 12:00:01] Telegram: /display Arduino UNO Q [2026-04-29 12:00:01] OLED: Arduino UNO Q [2026-04-29 12:05:10] Telegram: /status [2026-04-29 12:05:10] Text: Arduino UNO Q [2026-04-29 12:10:20] Telegram: /clear [2026-04-29 12:10:20] OLED cleared
    Telegram
    Telegram 12:45
    Welcome to Telegram!
    ArduinoBot 10:19
    Chatting with Arduino...
    telegram-botfather
    BotFather Yesterday
    Your bot has been created.

    ArduinoBot

    bot
    Today
    /display Arduino UNO Q
    10:15 AM ✓✓
    OLED: Arduino UNO Q
    10:16 AM
    /status
    10:17 AM ✓✓
    Text: Arduino UNO Q
    10:18 AM
    /clear
    10:19 AM ✓✓
    OLED cleared
    10:20 AM

    Intégration d'OpenClaw

    Vous pouvez adapter OpenClaw à ce tutoriel en vous référant aux instructions du tutoriel Arduino UNO Q - OpenClaw.

    Idées d'Applications/Projets

    • Affichage d'alerte en grand texte : Utilisez la taille de texte 3 ou 4 pour afficher une seule valeur critique (température, tension) sur tout l'écran de 2,42 pouces
    • Tableau d'informations distant : Envoyez des messages depuis un groupe Telegram à afficher sur l'OLED pour des annonces d'équipe
    • État de l'enregistreur de données : Affichez le dernier horodatage d'enregistrement et le nombre de lignes sur l'OLED lorsque le MPU écrit dans un fichier CSV
    • Indicateur de signal Wi-Fi : Affichez le SSID Wi-Fi du MPU et la puissance du signal RSSI sur le grand écran de 2,42 pouces
    • Rendu d'icône personnalisée : Utilisez drawBitmap() pour afficher des logos ou des icônes d'avertissement stockés sous forme de tableaux d'octets dans le sketch MCU

    Défiez-Vous

    • Facile : Modifiez le sketch pour utiliser setTextSize(2) pour la première ligne et setTextSize(1) pour les lignes suivantes afin de créer une mise en page titre/corps
    • Moyen : Ajoutez une commande Telegram /contrast <0-255> qui appelle display.ssd1309_command(SSD1309_SETCONTRAST) suivi de la valeur pour ajuster la luminosité de l'écran
    • Avancé : Affichez un graphique à barres en temps réel sur l'OLED en utilisant fillRect() qui se met à jour à partir des données de capteur envoyées depuis le MPU via Bridge

    ※ NOS MESSAGES

    • N'hésitez pas à partager le lien de ce tutoriel. Cependant, veuillez ne pas utiliser notre contenu sur d'autres sites web. Nous avons investi beaucoup d'efforts et de temps pour créer ce contenu, veuillez respecter notre travail !