Raspberry Pi - Feu de circulation

Dans ce tutoriel, nous allons apprendre à utiliser Raspberry Pi pour contrôler le module de feu de circulation. En détail, nous allons apprendre :

Préparation du matériel

1×Raspberry Pi 4 Model B
1×Traffic Light Module
1×Jumper Wires
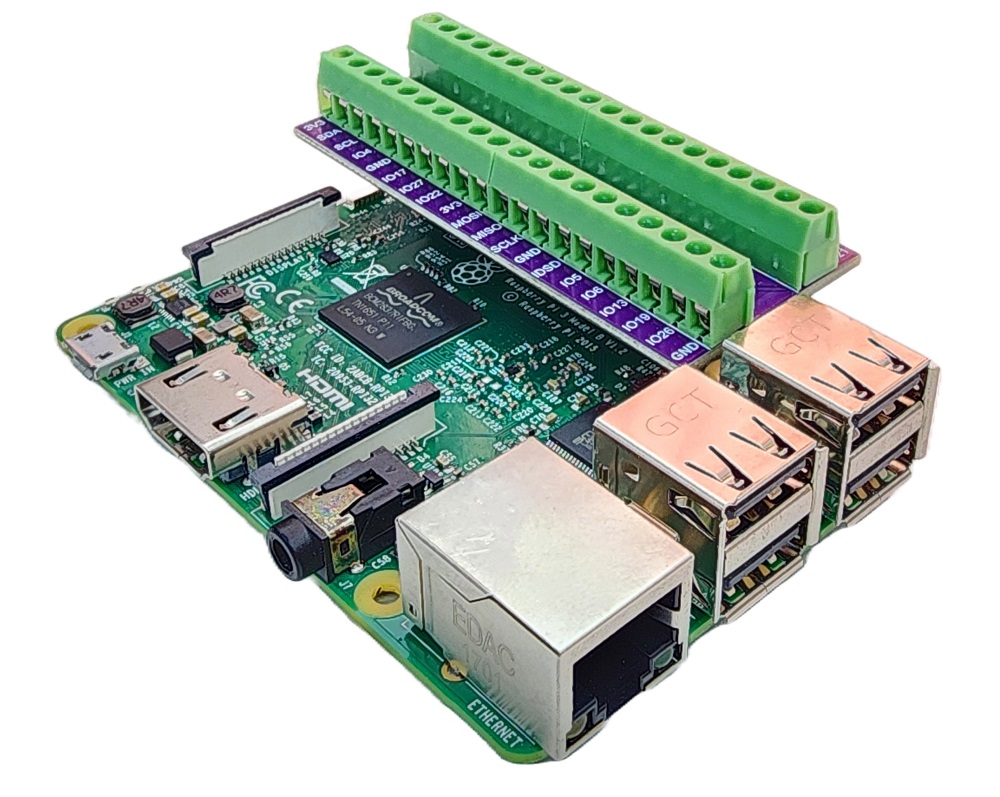
1×(Optional) Screw Terminal Block Shield for Raspberry Pi
1×(Optional) USB-C Power Cable with On/Off Switch for Raspberry Pi 4B
1×(Optional) Plastic Case and Cooling Fan for Raspberry Pi 4B
1×(Optional) HDMI Touch Screen Monitor for Raspberry Pi

Or you can buy the following sensor kits:

1×DIYables Sensor Kit (30 sensors/displays)
1×DIYables Sensor Kit (18 sensors/displays)
Divulgation : Certains des liens fournis dans cette section sont des liens affiliés Amazon. Nous pouvons recevoir une commission pour tout achat effectué via ces liens, sans coût supplémentaire pour vous. Nous vous remercions de votre soutien.

À propos du module de feux de circulation

Brochage

Un module de feu de circulation comprend 4 broches :

  • Broche GND : La broche de masse, connectez cette broche au GND du Raspberry Pi.
  • Broche R : La broche pour contrôler la lumière rouge, connectez cette broche à une sortie numérique du Raspberry Pi.
  • Broche Y : La broche pour contrôler la lumière jaune, connectez cette broche à une sortie numérique du Raspberry Pi.
  • Broche G : La broche pour contrôler la lumière verte, connectez cette broche à une sortie numérique du Raspberry Pi.
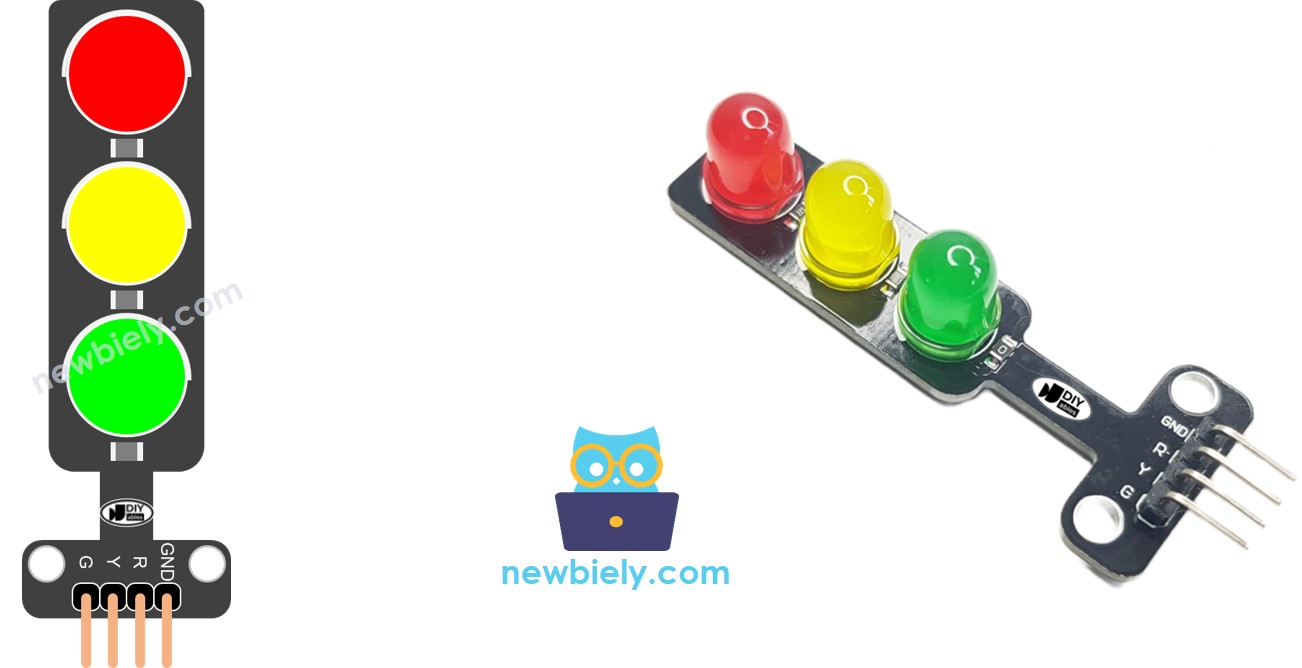
Brochage de feu tricolore

Comment ça marche

Diagramme de câblage
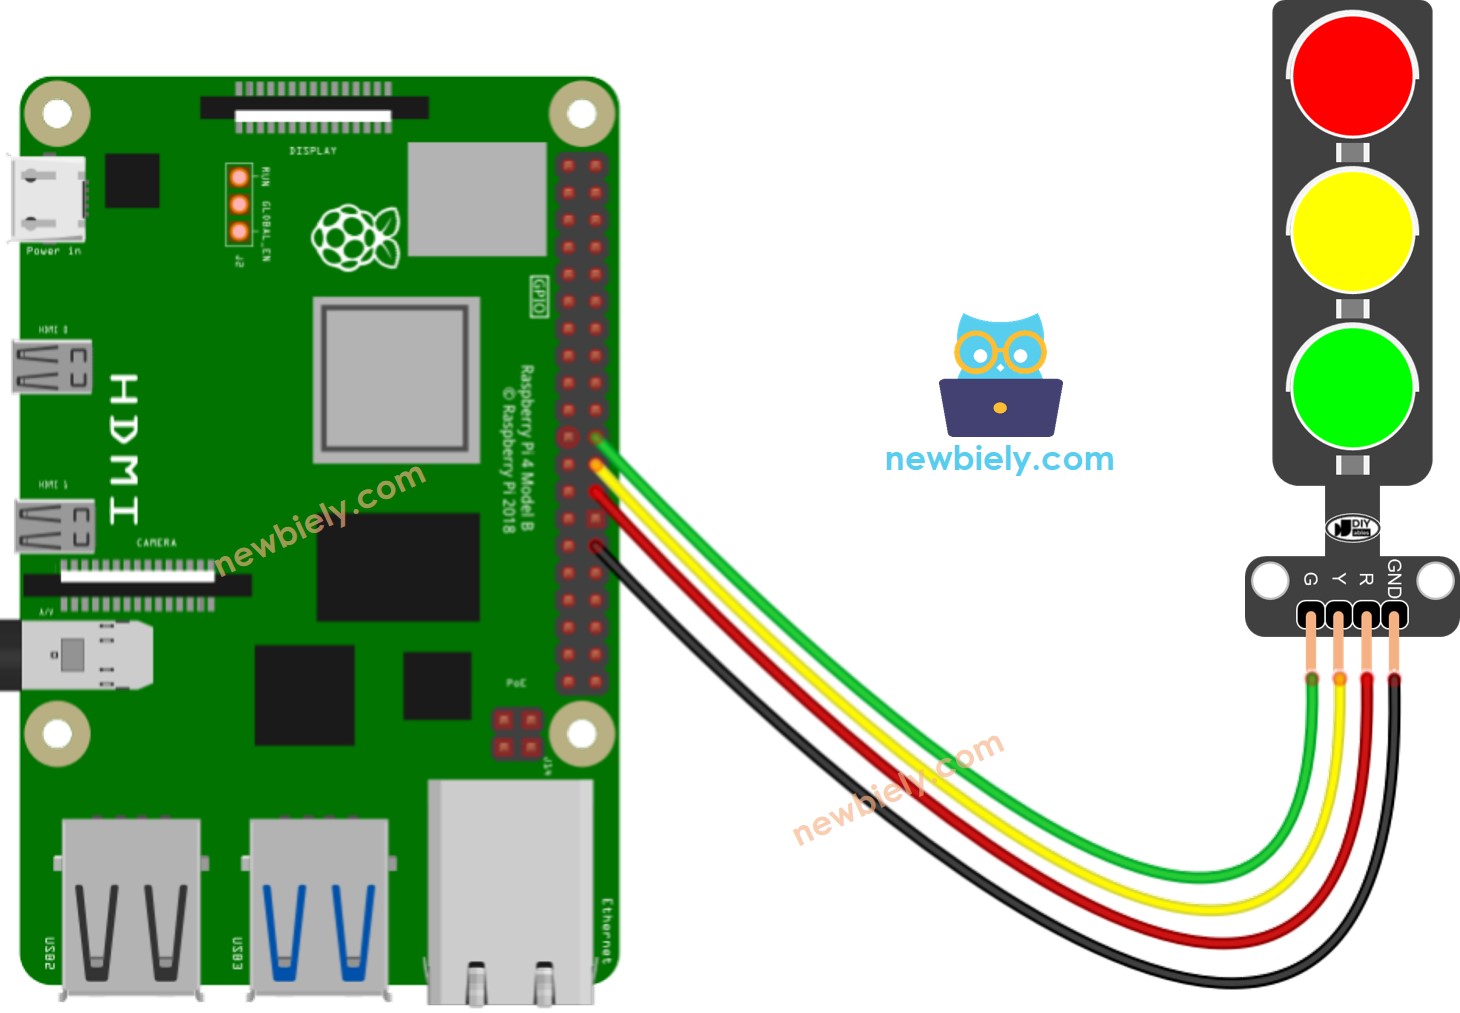
Schéma de câblage du feu tricolore Raspberry Pi

This image is created using Fritzing. Click to enlarge image

Pour simplifier et organiser votre câblage, nous vous recommandons d'utiliser un Screw Terminal Block Shield pour Raspberry Pi. Ce shield garantit des connexions plus sûres et plus faciles à gérer, comme illustré ci-dessous :

Raspberry Pi Screw Terminal Block Shield

Code Raspberry Pi

# Ce code Raspberry Pi a été développé par newbiely.fr # Ce code Raspberry Pi est mis à disposition du public sans aucune restriction. # Pour des instructions complètes et des schémas de câblage, veuillez visiter: # https://newbiely.fr/tutorials/raspberry-pi/raspberry-pi-traffic-light import RPi.GPIO as GPIO import time # Define GPIO pins PIN_RED = 7 # The Raspberry Pi GPIO pin connected to the R pin of the traffic light module PIN_YELLOW = 8 # The Raspberry Pi GPIO pin connected to the Y pin of the traffic light module PIN_GREEN = 25 # The Raspberry Pi GPIO pin connected to the G pin of the traffic light module # Define time durations RED_TIME = 4 # RED time in seconds YELLOW_TIME = 4 # YELLOW time in seconds GREEN_TIME = 4 # GREEN time in seconds # Set up GPIO GPIO.setmode(GPIO.BCM) GPIO.setup(PIN_RED, GPIO.OUT) GPIO.setup(PIN_YELLOW, GPIO.OUT) GPIO.setup(PIN_GREEN, GPIO.OUT) try: while True: # Red light on GPIO.output(PIN_RED, GPIO.HIGH) GPIO.output(PIN_YELLOW, GPIO.LOW) GPIO.output(PIN_GREEN, GPIO.LOW) time.sleep(RED_TIME) # Yellow light on GPIO.output(PIN_RED, GPIO.LOW) GPIO.output(PIN_YELLOW, GPIO.HIGH) GPIO.output(PIN_GREEN, GPIO.LOW) time.sleep(YELLOW_TIME) # Green light on GPIO.output(PIN_RED, GPIO.LOW) GPIO.output(PIN_YELLOW, GPIO.LOW) GPIO.output(PIN_GREEN, GPIO.HIGH) time.sleep(GREEN_TIME) except KeyboardInterrupt: # Clean up GPIO on exit GPIO.cleanup()

Étapes rapides

  • Assurez-vous d'avoir installé Raspbian ou tout autre système d'exploitation compatible avec Raspberry Pi sur votre Pi.
  • Assurez-vous que votre Raspberry Pi est connecté au même réseau local que votre PC.
  • Assurez-vous que votre Raspberry Pi est connecté à Internet si vous devez installer des bibliothèques.
  • Si c'est la première fois que vous utilisez Raspberry Pi, consultez Installation du logiciel - Raspberry Pi..
  • Connectez votre PC au Raspberry Pi via SSH en utilisant le client SSH intégré sur Linux et macOS ou PuTTY sur Windows. Consultez comment connecter votre PC au Raspberry Pi via SSH.
  • Assurez-vous que vous avez installé la bibliothèque RPi.GPIO. Sinon, installez-la en utilisant la commande suivante :
sudo apt-get update sudo apt-get install python3-rpi.gpio
  • Créez un fichier de script Python traffic_light.py et ajoutez le code suivant :
# Ce code Raspberry Pi a été développé par newbiely.fr # Ce code Raspberry Pi est mis à disposition du public sans aucune restriction. # Pour des instructions complètes et des schémas de câblage, veuillez visiter: # https://newbiely.fr/tutorials/raspberry-pi/raspberry-pi-traffic-light import RPi.GPIO as GPIO import time # Define GPIO pins PIN_RED = 7 # The Raspberry Pi GPIO pin connected to the R pin of the traffic light module PIN_YELLOW = 8 # The Raspberry Pi GPIO pin connected to the Y pin of the traffic light module PIN_GREEN = 25 # The Raspberry Pi GPIO pin connected to the G pin of the traffic light module # Define time durations RED_TIME = 4 # RED time in seconds YELLOW_TIME = 4 # YELLOW time in seconds GREEN_TIME = 4 # GREEN time in seconds # Set up GPIO GPIO.setmode(GPIO.BCM) GPIO.setup(PIN_RED, GPIO.OUT) GPIO.setup(PIN_YELLOW, GPIO.OUT) GPIO.setup(PIN_GREEN, GPIO.OUT) try: while True: # Red light on GPIO.output(PIN_RED, GPIO.HIGH) GPIO.output(PIN_YELLOW, GPIO.LOW) GPIO.output(PIN_GREEN, GPIO.LOW) time.sleep(RED_TIME) # Yellow light on GPIO.output(PIN_RED, GPIO.LOW) GPIO.output(PIN_YELLOW, GPIO.HIGH) GPIO.output(PIN_GREEN, GPIO.LOW) time.sleep(YELLOW_TIME) # Green light on GPIO.output(PIN_RED, GPIO.LOW) GPIO.output(PIN_YELLOW, GPIO.LOW) GPIO.output(PIN_GREEN, GPIO.HIGH) time.sleep(GREEN_TIME) except KeyboardInterrupt: # Clean up GPIO on exit GPIO.cleanup()
  • Enregistrez le fichier et exécutez le script Python en exécutant la commande suivante dans le terminal :
python3 traffic_light.py

Le script s'exécute en boucle infinie continuellement jusqu'à ce que vous appuyiez sur Ctrl + C dans le terminal.

  • Consultez le module de feu tricolore

Il est important de noter que le fonctionnement exact d'un feu de signalisation peut varier en fonction du design spécifique et de la technologie utilisés dans différentes régions et intersections. Les principes décrits ci-dessus fournissent une compréhension générale de la manière dont les feux de signalisation fonctionnent pour gérer le trafic et améliorer la sécurité sur les routes.

Le code ci-dessus démontre le contrôle individuel de la lumière. Maintenant, améliorons le code pour une meilleure optimisation.

Optimisation du Code du Raspberry Pi

  • Améliorons le code en implémentant une fonction pour le contrôle de l'éclairage.
# Ce code Raspberry Pi a été développé par newbiely.fr # Ce code Raspberry Pi est mis à disposition du public sans aucune restriction. # Pour des instructions complètes et des schémas de câblage, veuillez visiter: # https://newbiely.fr/tutorials/raspberry-pi/raspberry-pi-traffic-light import RPi.GPIO as GPIO import time # Define GPIO pins PIN_RED = 7 # The Raspberry Pi GPIO pin connected to the R pin of the traffic light module PIN_YELLOW = 8 # The Raspberry Pi GPIO pin connected to the Y pin of the traffic light module PIN_GREEN = 25 # The Raspberry Pi GPIO pin connected to the G pin of the traffic light module # Define time durations in seconds RED_TIME = 2 # RED time in seconds YELLOW_TIME = 1 # YELLOW time in seconds GREEN_TIME = 2 # GREEN time in seconds # Define indices for the light states RED = 0 YELLOW = 1 GREEN = 2 # Create lists for pins and times pins = [PIN_RED, PIN_YELLOW, PIN_GREEN] times = [RED_TIME, YELLOW_TIME, GREEN_TIME] # Set up GPIO GPIO.setmode(GPIO.BCM) GPIO.setup(PIN_RED, GPIO.OUT) GPIO.setup(PIN_YELLOW, GPIO.OUT) GPIO.setup(PIN_GREEN, GPIO.OUT) def traffic_light_on(light): for i in range(len(pins)): if i == light: GPIO.output(pins[i], GPIO.HIGH) # turn on else: GPIO.output(pins[i], GPIO.LOW) # turn off try: while True: # Red light on traffic_light_on(RED) time.sleep(times[RED]) # keep red light on during a period of time # Yellow light on traffic_light_on(YELLOW) time.sleep(times[YELLOW]) # keep yellow light on during a period of time # Green light on traffic_light_on(GREEN) time.sleep(times[GREEN]) # keep green light on during a period of time except KeyboardInterrupt: # Clean up GPIO on exit GPIO.cleanup()
  • Améliorons le code en utilisant une boucle for.
# Ce code Raspberry Pi a été développé par newbiely.fr # Ce code Raspberry Pi est mis à disposition du public sans aucune restriction. # Pour des instructions complètes et des schémas de câblage, veuillez visiter: # https://newbiely.fr/tutorials/raspberry-pi/raspberry-pi-traffic-light import RPi.GPIO as GPIO import time # Define GPIO pins PIN_RED = 7 # The Raspberry Pi GPIO pin connected to the R pin of the traffic light module PIN_YELLOW = 8 # The Raspberry Pi GPIO pin connected to the Y pin of the traffic light module PIN_GREEN = 25 # The Raspberry Pi GPIO pin connected to the G pin of the traffic light module # Define time durations in seconds RED_TIME = 2 # RED time in seconds YELLOW_TIME = 1 # YELLOW time in seconds GREEN_TIME = 2 # GREEN time in seconds # Define indices for the light states RED = 0 YELLOW = 1 GREEN = 2 # Create lists for pins and times pins = [PIN_RED, PIN_YELLOW, PIN_GREEN] times = [RED_TIME, YELLOW_TIME, GREEN_TIME] # Set up GPIO GPIO.setmode(GPIO.BCM) GPIO.setup(PIN_RED, GPIO.OUT) GPIO.setup(PIN_YELLOW, GPIO.OUT) GPIO.setup(PIN_GREEN, GPIO.OUT) def traffic_light_on(light): for i in range(len(pins)): if i == light: GPIO.output(pins[i], GPIO.HIGH) # turn on else: GPIO.output(pins[i], GPIO.LOW) # turn off try: while True: for light in range(RED, GREEN + 1): traffic_light_on(light) time.sleep(times[light]) # keep light on during a period of time except KeyboardInterrupt: # Clean up GPIO on exit GPIO.cleanup()
  • Améliorons le code en utilisant la fonction millis() au lieu de delay().
# Ce code Raspberry Pi a été développé par newbiely.fr # Ce code Raspberry Pi est mis à disposition du public sans aucune restriction. # Pour des instructions complètes et des schémas de câblage, veuillez visiter: # https://newbiely.fr/tutorials/raspberry-pi/raspberry-pi-traffic-light import RPi.GPIO as GPIO import time # Define GPIO pins PIN_RED = 7 # The Raspberry Pi GPIO pin connected to the R pin of the traffic light module PIN_YELLOW = 8 # The Raspberry Pi GPIO pin connected to the Y pin of the traffic light module PIN_GREEN = 25 # The Raspberry Pi GPIO pin connected to the G pin of the traffic light module # Define time durations in seconds RED_TIME = 2 # RED time in seconds YELLOW_TIME = 1 # YELLOW time in seconds GREEN_TIME = 2 # GREEN time in seconds # Define indices for the light states RED = 0 YELLOW = 1 GREEN = 2 # Create lists for pins and times pins = [PIN_RED, PIN_YELLOW, PIN_GREEN] times = [RED_TIME, YELLOW_TIME, GREEN_TIME] # Set up GPIO GPIO.setmode(GPIO.BCM) GPIO.setup(PIN_RED, GPIO.OUT) GPIO.setup(PIN_YELLOW, GPIO.OUT) GPIO.setup(PIN_GREEN, GPIO.OUT) light = RED # start with RED light last_time = time.time() def traffic_light_on(light): for i in range(len(pins)): if i == light: GPIO.output(pins[i], GPIO.HIGH) # turn on else: GPIO.output(pins[i], GPIO.LOW) # turn off try: while True: if (time.time() - last_time) > times[light]: light += 1 if light >= 3: light = RED # new circle traffic_light_on(light) last_time = time.time() # TO DO: your other code except KeyboardInterrupt: # Clean up GPIO on exit GPIO.cleanup()

Vidéo

※ OUR MESSAGES

  • Please feel free to share the link of this tutorial. However, Please do not use our content on any other websites. We invested a lot of effort and time to create the content, please respect our work!