Raspberry Pi - OLED

Ce didacticiel vous explique comment utiliser Raspberry Pi avec un écran OLED. En détail, nous apprendrons :

Préparation du matériel

1×Raspberry Pi 4 Model B
1×SSD1306 I2C OLED Display 128x64
1×SSD1306 I2C OLED Display 128x32
1×Jumper Wires
1×(Optional) Screw Terminal Block Shield for Raspberry Pi
1×(Optional) USB-C Power Cable with On/Off Switch for Raspberry Pi 4B
1×(Optional) Plastic Case and Cooling Fan for Raspberry Pi 4B
1×(Optional) HDMI Touch Screen Monitor for Raspberry Pi

Or you can buy the following sensor kits:

1×DIYables Sensor Kit (30 sensors/displays)
1×DIYables Sensor Kit (18 sensors/displays)
Divulgation : Certains des liens fournis dans cette section sont des liens affiliés Amazon. Nous pouvons recevoir une commission pour tout achat effectué via ces liens, sans coût supplémentaire pour vous. Nous vous remercions de votre soutien.

À propos de l'affichage OLED

Il existe différents types d'écrans OLED disponibles. L'OLED le plus couramment utilisé avec Raspberry Pi est l'écran SSD1306 I2C OLED 128x64 et 128x32.

Écran OLED

I2C OLED Afficheur Brochage

  • Broche GND : doit être connectée à la masse du Raspberry Pi.
  • Broche VCC : est l'alimentation de l'écran qui doit être connectée à la broche 5 volts du Raspberry Pi.
  • Broche SCL : est une broche d'horloge série pour l'interface I2C.
  • Broche SDA : est une broche de données séries pour l'interface I2C.
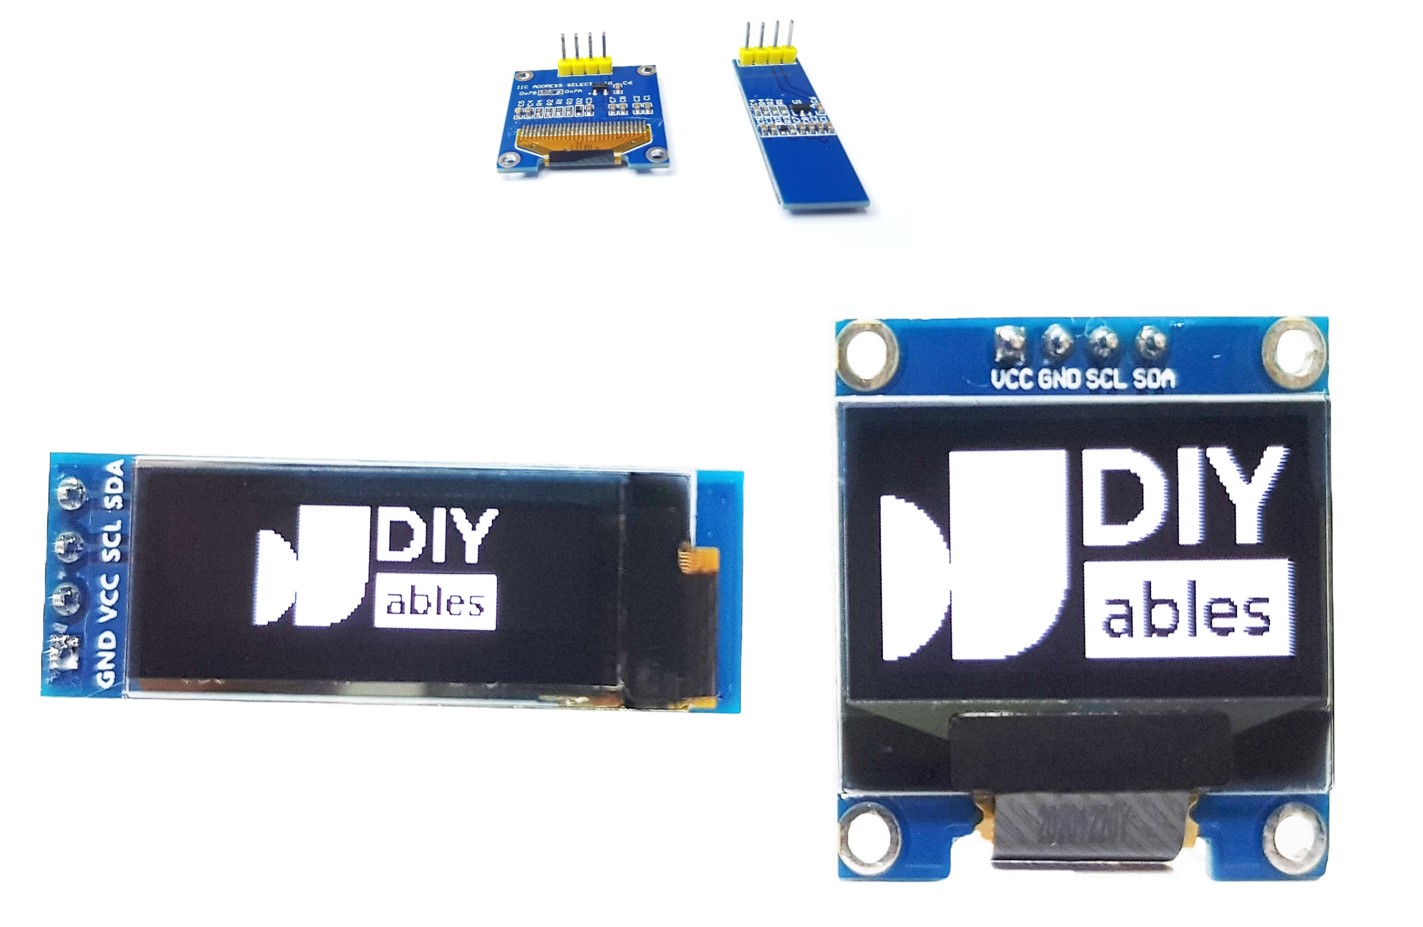
Brochage OLED

※ Note:

  • Les broches d'un module OLED peuvent être disposées différemment selon le fabricant et le type de module. Il est IMPÉRATIF de toujours se référer aux étiquettes imprimées sur le module OLED. Faites très attention !
  • Ce tutoriel utilise un écran OLED qui utilise le pilote I2C SSD1306. Nous l'avons testé avec l'écran OLED de DIYables et il fonctionne parfaitement.

Diagramme de câblage

  • Schéma de câblage entre Raspberry Pi et OLED 128x64
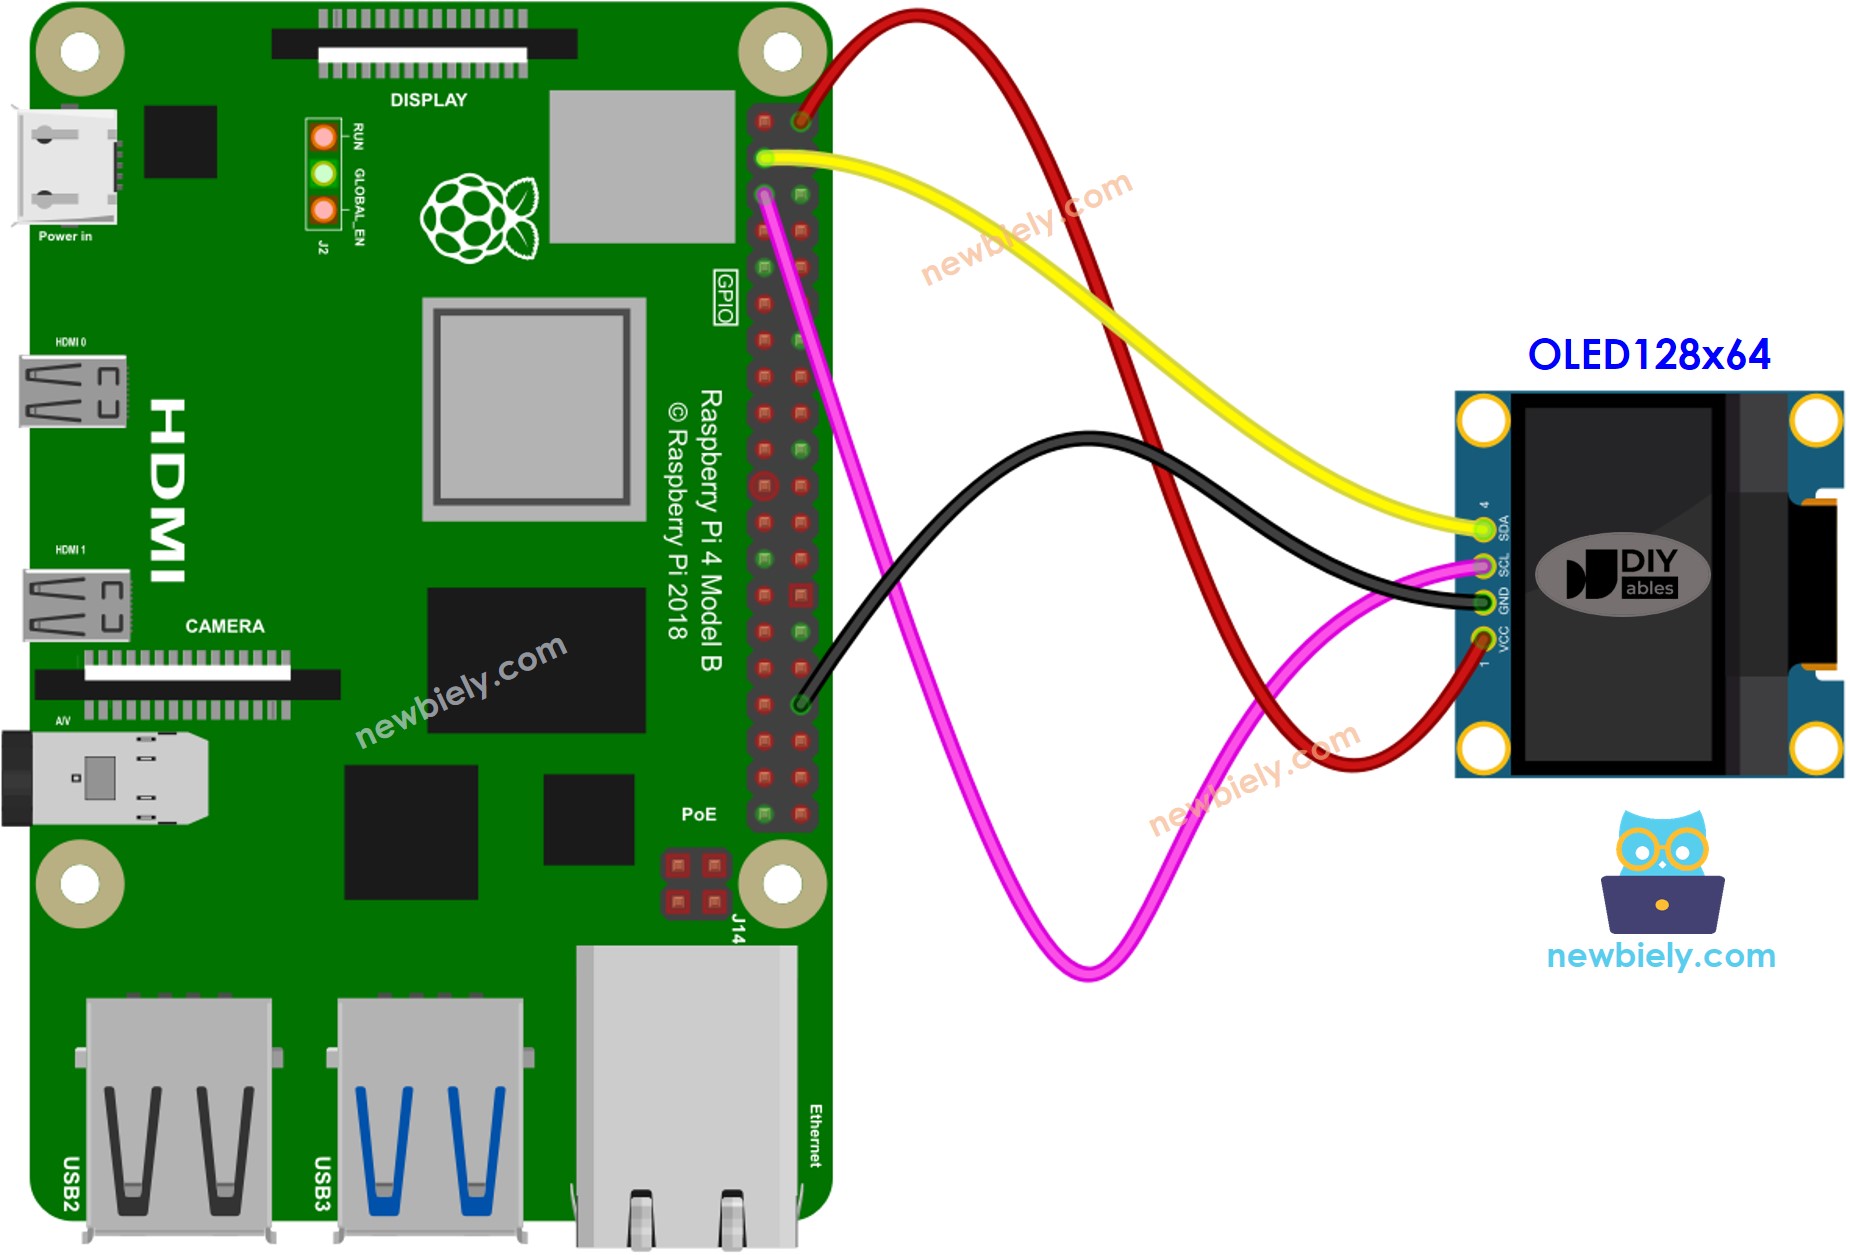
Diagramme de câblage OLED Raspberry Pi

This image is created using Fritzing. Click to enlarge image

  • Schéma de câblage entre Raspberry Pi et OLED 128x32
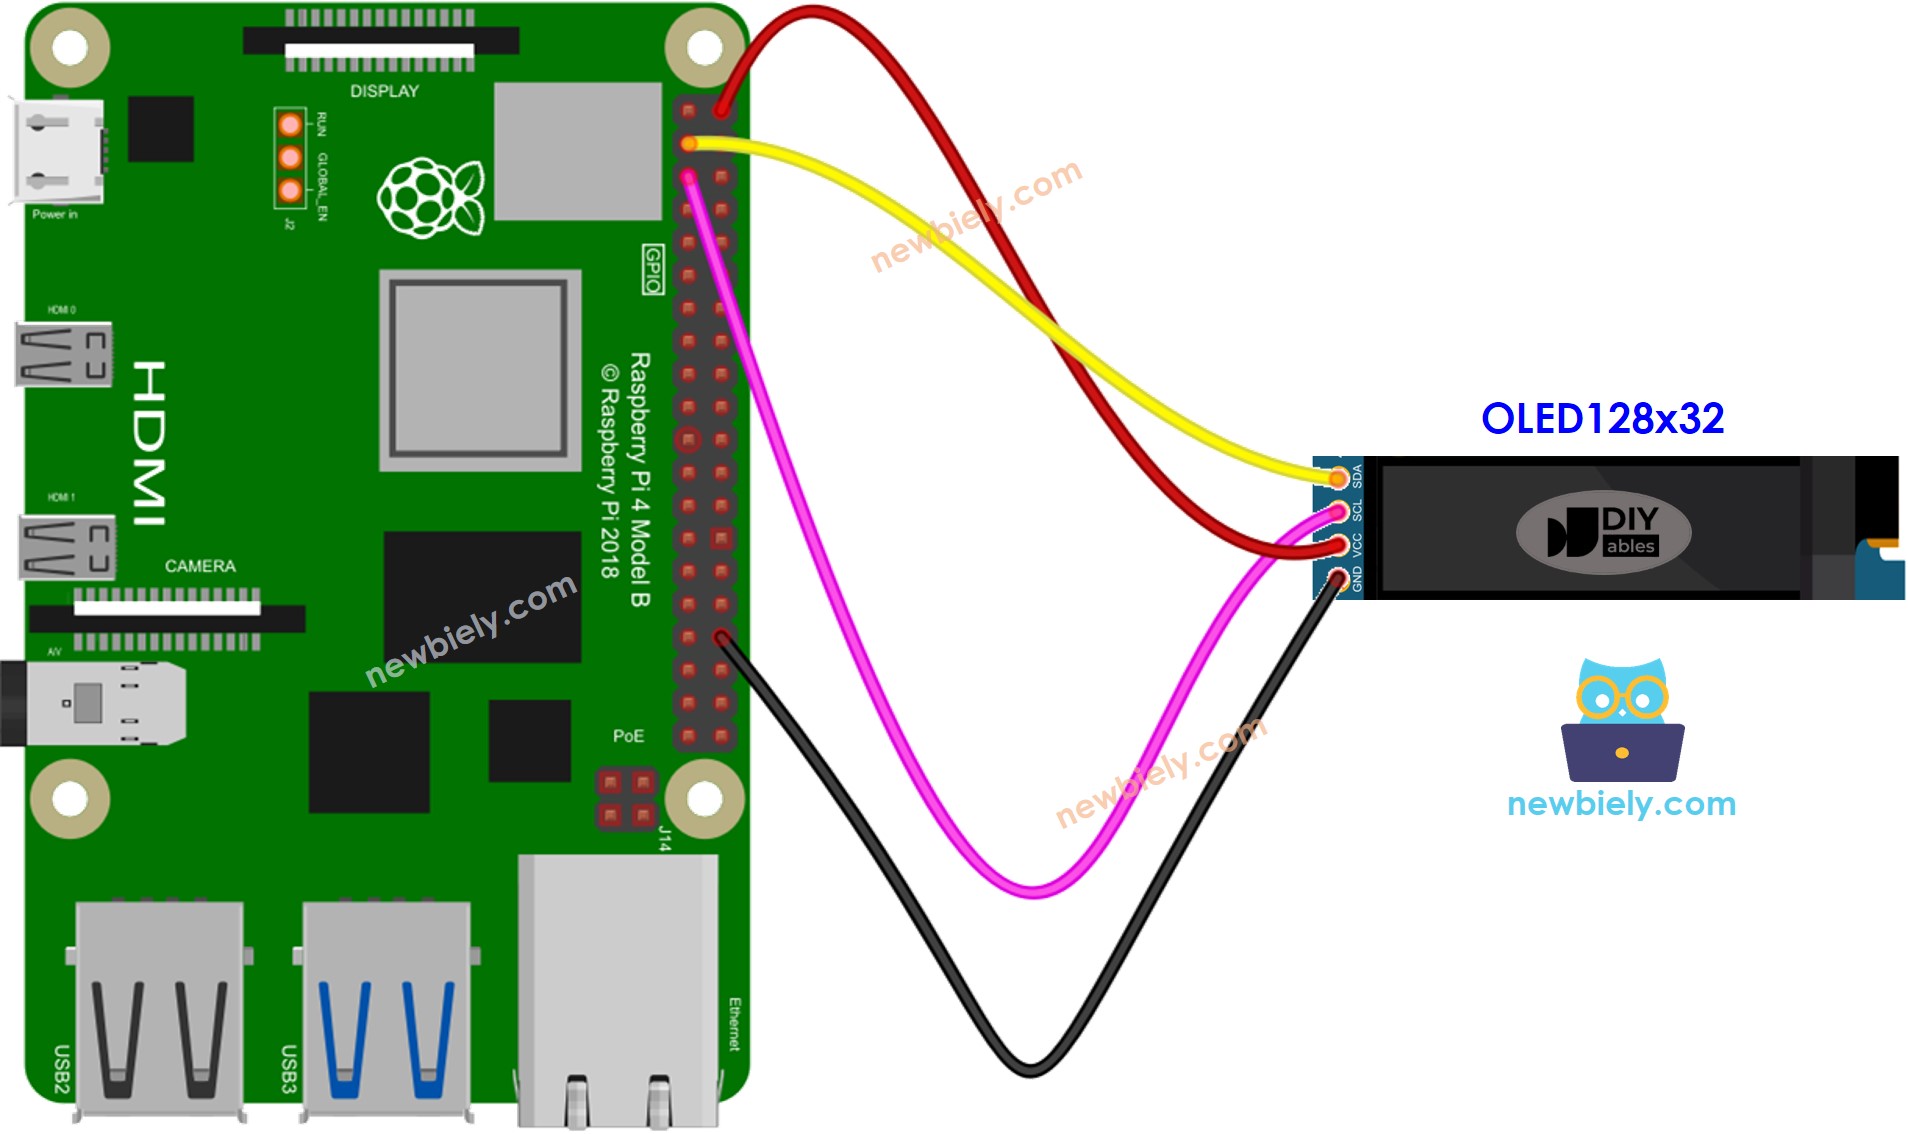
Schéma de câblage OLED 128x64 Raspberry Pi

This image is created using Fritzing. Click to enlarge image

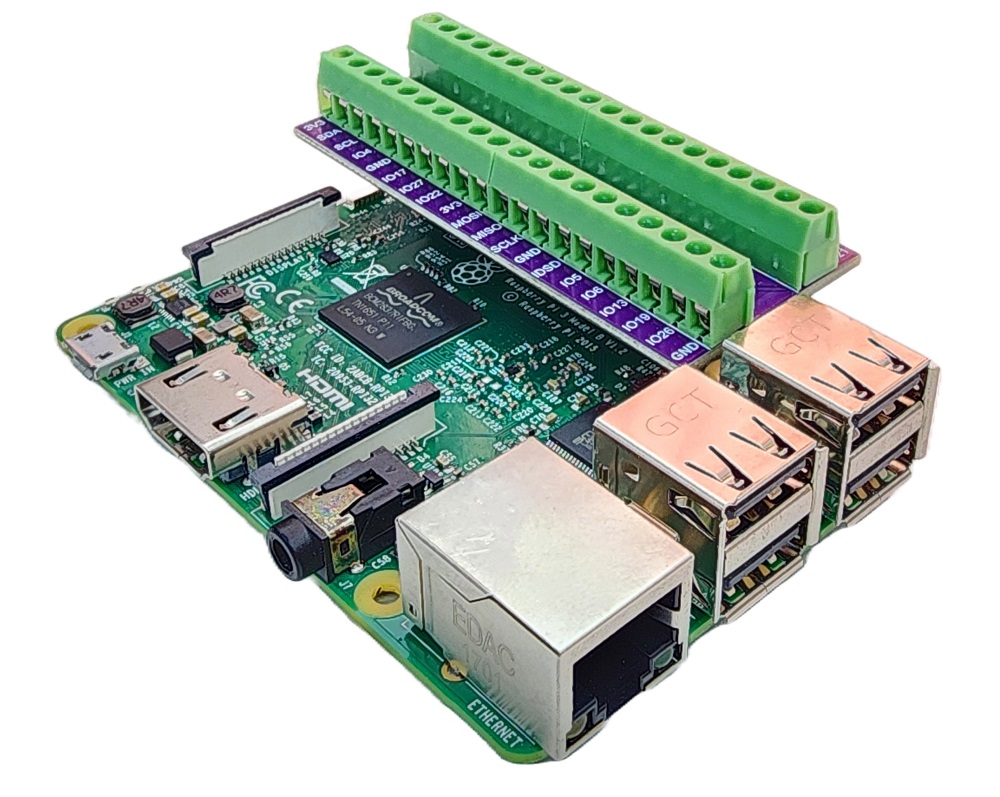
Pour simplifier et organiser votre câblage, nous vous recommandons d'utiliser un Screw Terminal Block Shield pour Raspberry Pi. Ce shield garantit des connexions plus sûres et plus faciles à gérer, comme illustré ci-dessous :

Raspberry Pi Screw Terminal Block Shield

Le tableau de câblage entre le Raspberry Pi et l'écran OLED :

OLED Module Raspberry Pi
Vin 5V
GND GND
SDA GPIO2 (pin 3)
SCL GPIO3 (pin 5)

Code Raspberry Pi - Afficher du texte sur OLED

Étapes rapides

  • Assurez-vous d'avoir Raspbian ou tout autre système d'exploitation compatible avec Raspberry Pi installé sur votre Pi.
  • Assurez-vous que votre Raspberry Pi est connecté au même réseau local que votre PC.
  • Assurez-vous que votre Raspberry Pi est connecté à Internet si vous avez besoin d'installer certaines bibliothèques.
  • Si c'est la première fois que vous utilisez Raspberry Pi, voyez Installation du logiciel - Raspberry Pi.
  • Connectez votre PC au Raspberry Pi via SSH en utilisant le client SSH intégré sur Linux et macOS ou PuTTY sur Windows. Voir comment connecter votre PC au Raspberry Pi via SSH.
  • Assurez-vous que vous avez la bibliothèque RPi.GPIO installée. Sinon, installez-la en utilisant la commande suivante :
sudo apt-get update sudo apt-get install python3-rpi.gpio
pip install Adafruit-SSD1306
  • Créez un fichier de script Python oled.py et ajoutez le code suivant :
# Ce code Raspberry Pi a été développé par newbiely.fr # Ce code Raspberry Pi est mis à disposition du public sans aucune restriction. # Pour des instructions complètes et des schémas de câblage, veuillez visiter: # https://newbiely.fr/tutorials/raspberry-pi/raspberry-pi-oled import time import RPi.GPIO as GPIO import Adafruit_SSD1306 # GPIO pin configuration for the OLED display OLED_RESET_PIN = None # Set to GPIO pin if your display has a reset pin OLED = Adafruit_SSD1306.SSD1306_128_64(rst=OLED_RESET_PIN) # Initialize the OLED display OLED.begin() # Clear the display OLED.clear() OLED.display() try: while True: # Clear the display OLED.clear() # Display "Hello World!" on OLED OLED.draw.text((0, 0), "Hello World!", font=None, fill=255) # Display on OLED OLED.display() # Delay for readability time.sleep(1) except KeyboardInterrupt: print("Program terminated by user.") finally: GPIO.cleanup()
  • Enregistrez le fichier et exécutez le script Python en entrant la commande suivante dans le terminal :
python3 oled.py
  • Vérifiez l'affichage OLED.

Le script s'exécute en boucle infinie jusqu'à ce que vous appuyiez sur Ctrl + C dans le terminal.

Code Raspberry Pi – Afficher une image

Pour afficher une image sur OLED, nous devons d'abord la convertir (quel que soit le format) en un tableau bitmap. Cela peut être fait en utilisant cet outil en ligne. Veuillez vous référer à l'image ci-dessous pour les instructions sur la façon de procéder. J'ai déjà converti l'icône Raspberry Pi en un tableau bitmap.
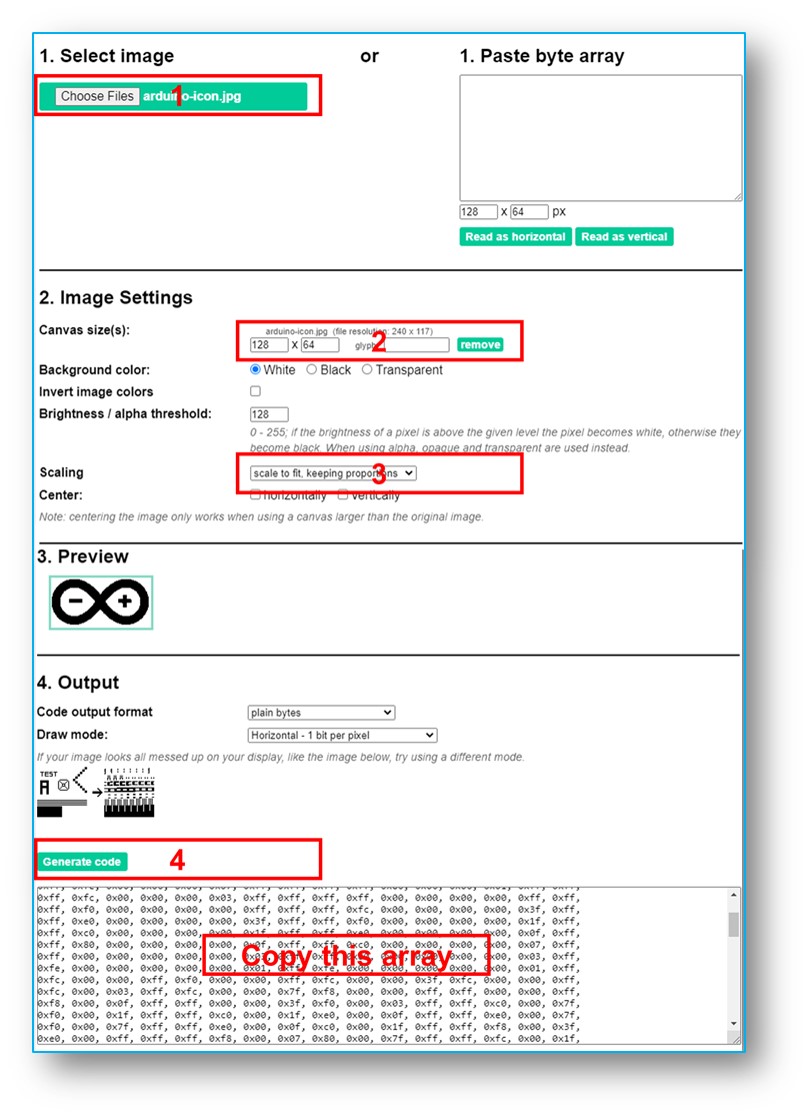
image en tableau bitmap

Une fois la conversion terminée, prenez le code du tableau et remplacez le code du tableau ArduinoIcon existant dans l'extrait suivant.

# Ce code Raspberry Pi a été développé par newbiely.fr # Ce code Raspberry Pi est mis à disposition du public sans aucune restriction. # Pour des instructions complètes et des schémas de câblage, veuillez visiter: # https://newbiely.fr/tutorials/raspberry-pi/raspberry-pi-oled import time import Adafruit_SSD1306 from PIL import Image # GPIO pin configuration for the OLED display OLED_RESET_PIN = None # Set to GPIO pin if your display has a reset pin DISP = Adafruit_SSD1306.SSD1306_128_64(rst=OLED_RESET_PIN) # Bitmap of DIYable-icon image bitmap_width = 128 # MUST match the bitmap image size bitmap_height = 57 # MUST match the bitmap image size bitmap_DIYables = [ # 'DIYables Icon', 128x57px 0x00, 0x00, 0x03, 0xff, 0xff, 0xff, 0xff, 0xc0, 0xff, 0xfe, 0x00, 0x03, 0xf1, 0xf8, 0x00, 0x3e, 0x00, 0x00, 0x03, 0xff, 0xff, 0xff, 0xff, 0xc0, 0xff, 0xff, 0xc0, 0x03, 0xf1, 0xf8, 0x00, 0x7e, 0x00, 0x00, 0x03, 0xff, 0xff, 0xff, 0xff, 0xc0, 0xff, 0xff, 0xf0, 0x03, 0xf0, 0xfc, 0x00, 0x7c, 0x00, 0x00, 0x03, 0xff, 0xff, 0xff, 0xff, 0xc0, 0xff, 0xff, 0xf8, 0x03, 0xf0, 0xfc, 0x00, 0xfc, 0x00, 0x00, 0x03, 0xff, 0xff, 0xff, 0xff, 0xc0, 0xff, 0xff, 0xfc, 0x03, 0xf0, 0x7e, 0x00, 0xf8, 0x00, 0x00, 0x03, 0xff, 0xff, 0xff, 0xff, 0xc0, 0xf8, 0x01, 0xfe, 0x03, 0xf0, 0x3f, 0x01, 0xf8, 0x00, 0x00, 0x03, 0xff, 0xff, 0xff, 0xff, 0xc0, 0xf8, 0x00, 0x7f, 0x03, 0xf0, 0x3f, 0x03, 0xf0, 0x00, 0x00, 0x03, 0xff, 0xff, 0xff, 0xff, 0xc0, 0xf8, 0x00, 0x3f, 0x03, 0xf0, 0x1f, 0x83, 0xe0, 0x00, 0x00, 0x03, 0xff, 0xff, 0xff, 0xff, 0xc0, 0xf8, 0x00, 0x3f, 0x83, 0xf0, 0x1f, 0x87, 0xe0, 0x00, 0x00, 0x03, 0xff, 0xff, 0xff, 0xff, 0xc0, 0xf8, 0x00, 0x1f, 0x83, 0xf0, 0x0f, 0xc7, 0xc0, 0x00, 0x00, 0x03, 0xff, 0xff, 0xff, 0xff, 0xc0, 0xf8, 0x00, 0x1f, 0x83, 0xf0, 0x07, 0xef, 0xc0, 0x00, 0x00, 0x03, 0xff, 0xff, 0xff, 0xff, 0xc0, 0xf8, 0x00, 0x1f, 0x83, 0xf0, 0x07, 0xff, 0x80, 0xf0, 0x00, 0x03, 0xff, 0xff, 0xff, 0xff, 0xc0, 0xf8, 0x00, 0x1f, 0x83, 0xf0, 0x03, 0xff, 0x00, 0xfe, 0x00, 0x03, 0xff, 0xff, 0xff, 0xff, 0xc0, 0xf8, 0x00, 0x1f, 0x83, 0xf0, 0x03, 0xff, 0x00, 0xff, 0xc0, 0x03, 0xff, 0xff, 0xff, 0xff, 0xc0, 0xf8, 0x00, 0x1f, 0x83, 0xf0, 0x01, 0xfe, 0x00, 0xff, 0xe0, 0x03, 0xff, 0xff, 0xff, 0xff, 0xc0, 0xf8, 0x00, 0x1f, 0x83, 0xf0, 0x00, 0xfe, 0x00, 0xff, 0xf8, 0x03, 0xff, 0xff, 0xff, 0xff, 0xc0, 0xf8, 0x00, 0x1f, 0x83, 0xf0, 0x00, 0xfc, 0x00, 0xff, 0xfc, 0x03, 0xff, 0xff, 0xff, 0xff, 0xc0, 0xf8, 0x00, 0x3f, 0x03, 0xf0, 0x00, 0xfc, 0x00, 0xff, 0xfe, 0x03, 0xff, 0xff, 0xff, 0xff, 0xc0, 0xf8, 0x00, 0x7f, 0x03, 0xf0, 0x00, 0xfc, 0x00, 0xff, 0xff, 0x03, 0xff, 0xff, 0xff, 0xff, 0xc0, 0xf8, 0x00, 0xff, 0x03, 0xf0, 0x00, 0xfc, 0x00, 0xff, 0xff, 0x83, 0xff, 0xff, 0xff, 0xff, 0xc0, 0xf8, 0x03, 0xfe, 0x03, 0xf0, 0x00, 0xfc, 0x00, 0xff, 0xff, 0xc3, 0xff, 0xff, 0xff, 0xff, 0xc0, 0xff, 0xff, 0xfc, 0x03, 0xf0, 0x00, 0xfc, 0x00, 0xff, 0xff, 0xc3, 0xff, 0xff, 0xff, 0xff, 0xc0, 0xff, 0xff, 0xf8, 0x03, 0xf0, 0x00, 0xfc, 0x00, 0xff, 0xff, 0xe3, 0xff, 0xff, 0xff, 0xff, 0xc0, 0xff, 0xff, 0xe0, 0x03, 0xf0, 0x00, 0xfc, 0x00, 0xff, 0xff, 0xe3, 0xff, 0xff, 0xff, 0xff, 0xc0, 0xff, 0xff, 0x80, 0x03, 0xf0, 0x00, 0xfc, 0x00, 0xff, 0xff, 0xf3, 0xff, 0xff, 0xff, 0xff, 0xc0, 0xff, 0xf8, 0x00, 0x03, 0xe0, 0x00, 0xfc, 0x00, 0xff, 0xff, 0xf3, 0xff, 0xff, 0xff, 0xff, 0xc0, 0x00, 0x00, 0x00, 0x00, 0x00, 0x00, 0x00, 0x00, 0xff, 0xff, 0xfb, 0xff, 0xff, 0xff, 0xff, 0xc0, 0x00, 0x00, 0x00, 0x00, 0x00, 0x00, 0x00, 0x00, 0xff, 0xff, 0xfb, 0xff, 0xff, 0xff, 0xff, 0xc0, 0x00, 0x00, 0x00, 0x00, 0x00, 0x00, 0x00, 0x00, 0xff, 0xff, 0xfb, 0xff, 0xff, 0xff, 0xff, 0xc0, 0x00, 0x00, 0x00, 0x00, 0x00, 0x00, 0x00, 0x00, 0xff, 0xff, 0xfb, 0xff, 0xff, 0xff, 0xff, 0xc0, 0x00, 0x00, 0x00, 0x00, 0x00, 0x00, 0x00, 0x00, 0xff, 0xff, 0xff, 0xff, 0xff, 0xff, 0xff, 0xc0, 0xff, 0xff, 0xff, 0xff, 0xff, 0xff, 0xff, 0xff, 0xff, 0xff, 0xff, 0xff, 0xff, 0xff, 0xff, 0xc0, 0xff, 0xff, 0xff, 0xff, 0xff, 0xff, 0xff, 0xff, 0xff, 0xff, 0xff, 0xff, 0xff, 0xff, 0xff, 0xc0, 0xff, 0xff, 0xff, 0xff, 0xff, 0xff, 0xff, 0xff, 0xff, 0xff, 0xff, 0xff, 0xff, 0xff, 0xff, 0xc0, 0xff, 0xff, 0xff, 0xff, 0xff, 0xff, 0xff, 0xff, 0xff, 0xff, 0xff, 0xff, 0xff, 0xff, 0xff, 0xc0, 0xff, 0xff, 0xff, 0xff, 0xff, 0xff, 0xff, 0xff, 0xff, 0xff, 0xff, 0xff, 0xff, 0xff, 0xff, 0xc0, 0xff, 0xff, 0xc7, 0xff, 0x1f, 0xff, 0xff, 0xff, 0xff, 0xff, 0xff, 0xff, 0xff, 0xff, 0xff, 0xc0, 0xff, 0xff, 0xc7, 0xff, 0x1f, 0xff, 0xff, 0xff, 0xff, 0xff, 0xfb, 0xff, 0xff, 0xff, 0xff, 0x80, 0xff, 0xff, 0xc7, 0xff, 0x1f, 0xff, 0xff, 0xff, 0xff, 0xff, 0xfb, 0xff, 0xff, 0xff, 0xff, 0x80, 0xff, 0xff, 0xc7, 0xff, 0x1f, 0xff, 0xff, 0xff, 0xff, 0xff, 0xfb, 0xff, 0xff, 0xff, 0xff, 0x80, 0xff, 0x9f, 0xc6, 0x7f, 0x1f, 0xdf, 0xf9, 0xff, 0xff, 0xff, 0xfb, 0xff, 0xff, 0xff, 0xff, 0x00, 0xfc, 0x03, 0xc0, 0x0f, 0x1e, 0x03, 0xe0, 0x3f, 0xff, 0xff, 0xf3, 0xff, 0xff, 0xff, 0xff, 0x00, 0xfc, 0x03, 0xc0, 0x07, 0x1c, 0x01, 0xc0, 0x3f, 0xff, 0xff, 0xf3, 0xff, 0xff, 0xff, 0xfe, 0x00, 0xfd, 0xf1, 0xc3, 0xc7, 0x18, 0xf8, 0x8f, 0xff, 0xff, 0xff, 0xe3, 0xff, 0xff, 0xff, 0xfe, 0x00, 0xff, 0xf1, 0xc7, 0xe3, 0x18, 0xf8, 0x8f, 0xff, 0xff, 0xff, 0xe3, 0xff, 0xff, 0xff, 0xfc, 0x00, 0xfe, 0x01, 0xc7, 0xe3, 0x18, 0x00, 0xc0, 0xff, 0xff, 0xff, 0xc3, 0xff, 0xff, 0xff, 0xfc, 0x00, 0xfc, 0x01, 0xc7, 0xe3, 0x18, 0x00, 0xe0, 0x3f, 0xff, 0xff, 0xc3, 0xff, 0xff, 0xff, 0xf8, 0x00, 0xf8, 0xf1, 0xc7, 0xe3, 0x18, 0xff, 0xfe, 0x1f, 0xff, 0xff, 0x83, 0xff, 0xff, 0xff, 0xf0, 0x00, 0xf8, 0xf1, 0xc3, 0xc7, 0x18, 0xff, 0xff, 0x1f, 0xff, 0xff, 0x03, 0xff, 0xff, 0xff, 0xe0, 0x00, 0xf8, 0x61, 0xc0, 0x07, 0x1c, 0x01, 0xc0, 0x3f, 0xff, 0xfe, 0x03, 0xff, 0xff, 0xff, 0xc0, 0x00, 0xfc, 0x01, 0xc0, 0x0f, 0x1e, 0x01, 0x80, 0x3f, 0xff, 0xfc, 0x03, 0xff, 0xff, 0xff, 0x80, 0x00, 0xfe, 0x19, 0xc4, 0x3f, 0x1f, 0x87, 0xe0, 0xff, 0xff, 0xf8, 0x03, 0xff, 0xff, 0xff, 0x00, 0x00, 0xff, 0xff, 0xff, 0xff, 0xff, 0xff, 0xff, 0xff, 0xff, 0xe0, 0x03, 0xff, 0xff, 0xfc, 0x00, 0x00, 0xff, 0xff, 0xff, 0xff, 0xff, 0xff, 0xff, 0xff, 0xff, 0xc0, 0x03, 0xff, 0xff, 0xf0, 0x00, 0x00, 0xff, 0xff, 0xff, 0xff, 0xff, 0xff, 0xff, 0xff, 0xff, 0x00, 0x03, 0xff, 0xff, 0xc0, 0x00, 0x00, 0xff, 0xff, 0xff, 0xff, 0xff, 0xff, 0xff, 0xff, 0xf0, 0x00, 0x03, 0xff, 0xfc, 0x00, 0x00, 0x00, 0xff, 0xff, 0xff, 0xff, 0xff, 0xff, 0xff, 0xff ] def draw_bitmap(image, bitmap_data, width, height): image.putdata(bitmap_data) return image try: DISP.begin() DISP.clear() DISP.display() # Create a blank image with mode '1' for 1-bit pixels (bitmap) image = Image.new('1', (bitmap_width, bitmap_height)) while True: DISP.clear() # Display bitmap to the center x = (DISP.width - bitmap_width) // 2 y = (DISP.height - bitmap_height) // 2 # Draw the bitmap on the image image = draw_bitmap(image, bitmap_DIYables, bitmap_width, bitmap_height) # Paste the image on the OLED display DISP.image(image) DISP.display() time.sleep(2) except KeyboardInterrupt: print("Program terminated by user.") finally: DISP.clear() DISP.display()

※ Note:

  • La taille de l'image ne doit pas dépasser la taille de l'écran.
  • Si vous souhaitez utiliser le code pour un OLED 128x32, vous devez redimensionner l'image et modifier les paramètres de largeur et de hauteur dans la fonction oled.drawBitmap();.

※ OUR MESSAGES

  • Please feel free to share the link of this tutorial. However, Please do not use our content on any other websites. We invested a lot of effort and time to create the content, please respect our work!