Raspberry Pi - Potentiomètre Piézo Buzzer

Ce tutoriel vous explique comment utiliser un Raspberry Pi et un potentiomètre pour contrôler un buzzer piézoélectrique. En détail :

Préparation du matériel

1×Raspberry Pi 5
1×Potentiometer
1×Alternativement: 10k Ohm Trimmer Potentiometer
1×Alternativement: Potentiometer Kit
1×Alternativement: Potentiometer Module with Knob
1×Module ADC ADS1115
1×Buzzer piézo actif 3-24V
1×Module buzzer piézo actif
1×Module buzzer piézo passif
1×Plaque d'essai
1×Fils de connexion
1×Recommandé: Shield à bornier à vis pour Raspberry Pi
1×Recommandé: Kit plaque de base prototypage et plaque d'essai pour Raspberry Pi
1×Recommandé: Écran tactile HDMI pour Raspberry Pi

Ou vous pouvez acheter les kits suivants:

1×Kit de Capteurs DIYables (30 capteurs/écrans)
1×Kit de Capteurs DIYables (18 capteurs/écrans)
Divulgation : Certains des liens fournis dans cette section sont des liens affiliés Amazon. Nous pouvons recevoir une commission pour tout achat effectué via ces liens, sans coût supplémentaire pour vous. Nous vous remercions de votre soutien.

À propos du buzzer piézoélectrique et du potentiomètre

Si vous ne connaissez pas le buzzer piézo et le potentiomètre (y compris le brochage, le fonctionnement et la programmation), les tutoriels suivants peuvent vous aider :

Diagramme de câblage

Diagramme de câblage du potentiomètre Raspberry Pi avec buzzer piézo-électrique

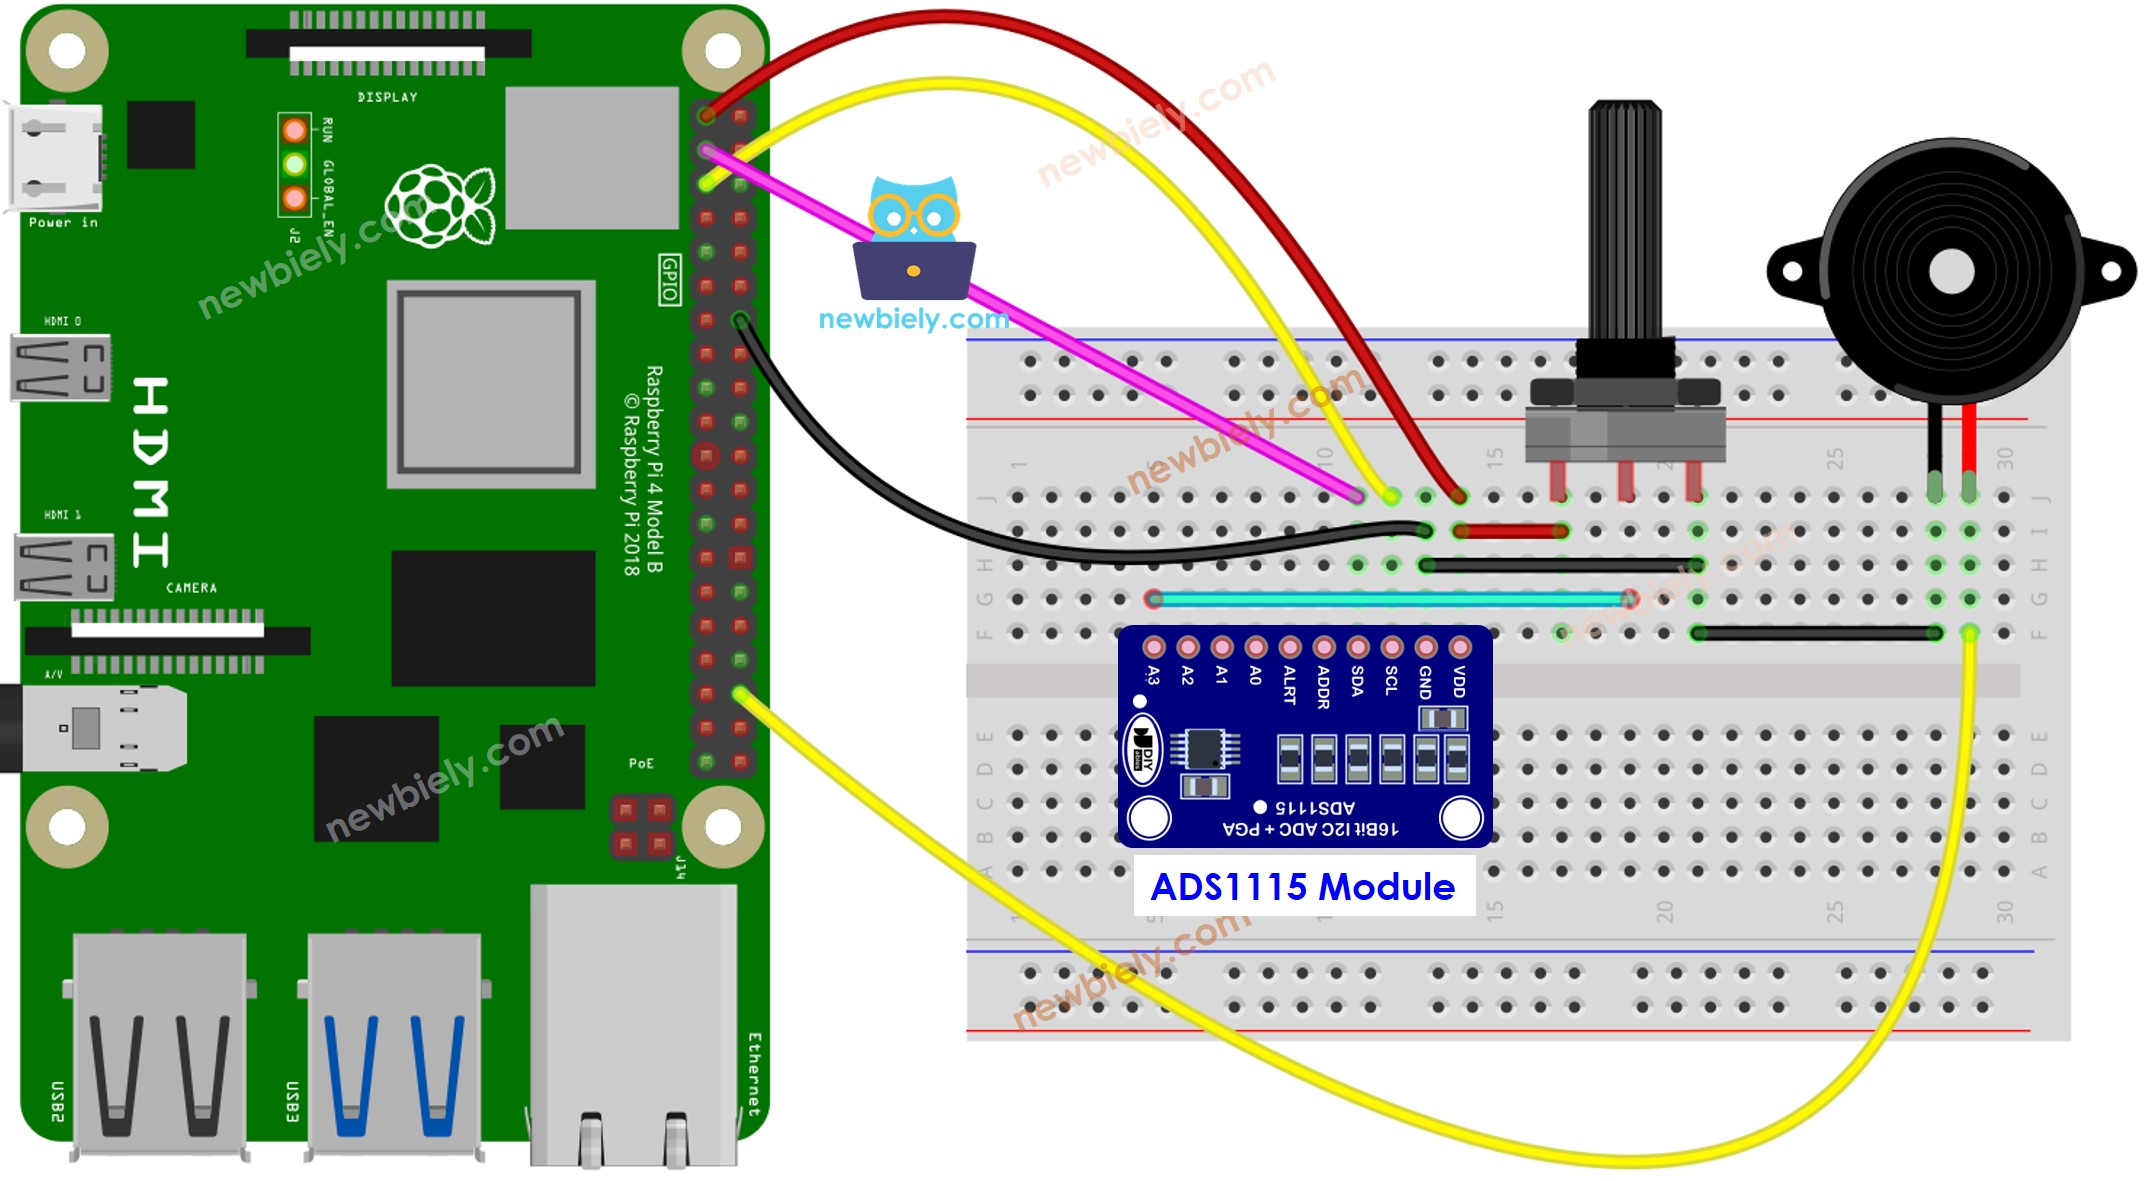
Cette image a été créée avec Fritzing. Cliquez pour agrandir l'image.

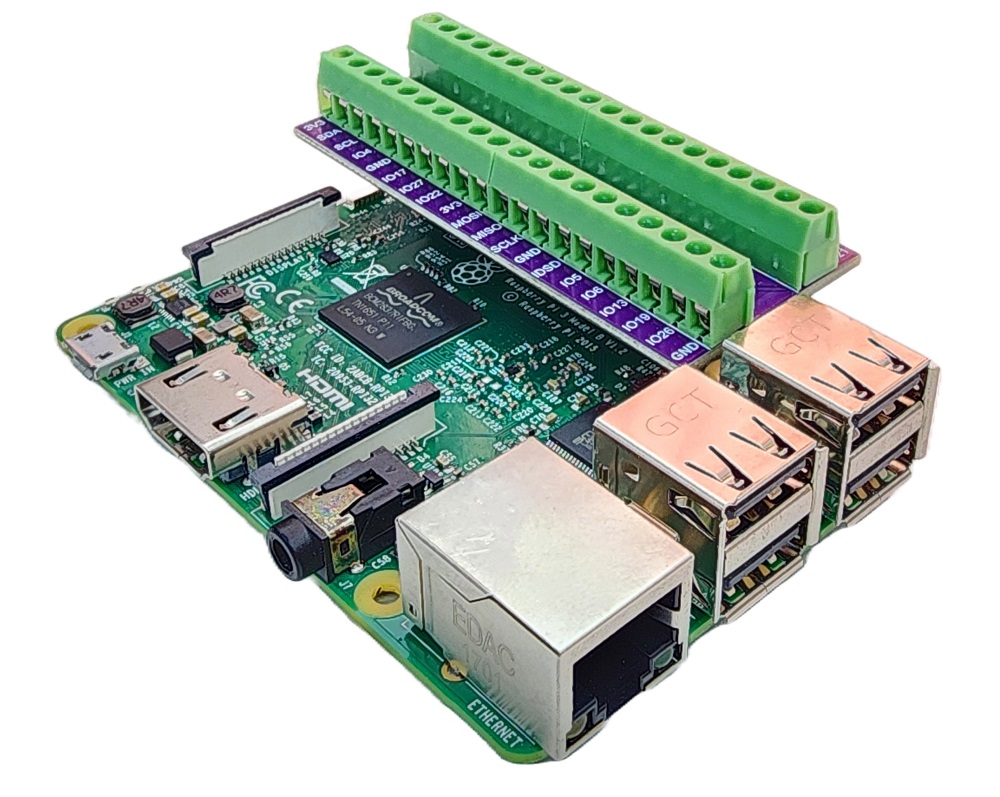
Pour simplifier et organiser votre montage de câblage, nous recommandons l'utilisation d'un shield à bornier à vis pour Raspberry Pi. Ce shield assure des connexions plus sûres et mieux gérées, comme illustré ci-dessous :

Shield à bornier à vis pour Raspberry Pi

Code Raspberry Pi - Son Simple

Étapes rapides

  • Assurez-vous d'avoir Raspbian ou tout autre système d'exploitation compatible avec Raspberry Pi installé sur votre Pi.
  • Assurez-vous que votre Raspberry Pi est connecté au même réseau local que votre PC.
  • Assurez-vous que votre Raspberry Pi est connecté à Internet si vous devez installer des bibliothèques.
  • Si c'est la première fois que vous utilisez Raspberry Pi, voir Installation du logiciel - Raspberry Pi.
  • Connectez votre PC au Raspberry Pi via SSH en utilisant le client SSH intégré sur Linux et macOS ou PuTTY sur Windows. Voir comment connecter votre PC au Raspberry Pi via SSH.
  • Assurez-vous que la bibliothèque RPi.GPIO est installée. Sinon, installez-la en utilisant la commande suivante :
sudo apt-get update sudo apt-get install python3-rpi.gpio
  • Installez la bibliothèque Adafruit_ADS1x15 en exécutant les commandes suivantes sur le terminal de votre Raspberry Pi :
sudo pip install Adafruit-ADS1x15
  • Créez un fichier de script Python potentiometer_buzzer.py et ajoutez le code suivant :
# Ce code Raspberry Pi a été développé par newbiely.fr # Ce code Raspberry Pi est mis à disposition du public sans aucune restriction. # Pour des instructions complètes et des schémas de câblage, veuillez visiter: # https://newbiely.fr/tutorials/raspberry-pi/raspberry-pi-potentiometer-piezo-buzzer import time import RPi.GPIO as GPIO import Adafruit_ADS1x15 # Constants ADC_CHANNEL = 0 # Analog channel on ADS1015 GAIN = 1 # Gain (1, 2/3, 1, 2, 4, 8, 16) BUZZER_PIN = 23 # Raspberry Pi GPIO pin connected to the piezo buzzer # Threshold for triggering the buzzer THRESHOLD = 700 # Adjust this value based on your requirement # Setup GPIO GPIO.setmode(GPIO.BCM) GPIO.setup(BUZZER_PIN, GPIO.OUT) # Create ADS1x15 instance ads = Adafruit_ADS1x15.ADS1015() try: while True: # Read the raw ADC value from the potentiometer pot_value = ads.read_adc(ADC_CHANNEL, gain=GAIN) # Trigger the buzzer if the analog value is greater than the threshold if pot_value > THRESHOLD: GPIO.output(BUZZER_PIN, GPIO.HIGH) else: GPIO.output(BUZZER_PIN, GPIO.LOW) print(f"Potentiometer Value: {pot_value}") time.sleep(0.1) except KeyboardInterrupt: GPIO.output(BUZZER_PIN, GPIO.LOW) # Turn off the buzzer before cleanup GPIO.cleanup()
  • Enregistrez le fichier et exécutez le script Python en tapant la commande suivante dans le terminal :
python3 potentiometer_buzzer.py
  • Tournez le bouton du potentiomètre.
  • Écoutez le son provenant du buzzer piézoélectrique.

Le script s'exécute en boucle infinie jusqu'à ce que vous appuyiez sur Ctrl + C dans le terminal.

Explication du code

Consultez l'explication ligne par ligne contenue dans les commentaires du code source !

Le Raspberry Pi joue la mélodie de la chanson.

Jouons la mélodie de "Jingle Bells" lorsque le potentiomètre atteint une valeur seuil.

Étapes rapides

  • Créez un fichier script Python potentiometer_buzzer_song.py et ajoutez le code suivant :
# Ce code Raspberry Pi a été développé par newbiely.fr # Ce code Raspberry Pi est mis à disposition du public sans aucune restriction. # Pour des instructions complètes et des schémas de câblage, veuillez visiter: # https://newbiely.fr/tutorials/raspberry-pi/raspberry-pi-potentiometer-piezo-buzzer import time import RPi.GPIO as GPIO import Adafruit_ADS1x15 # Constants ADC_CHANNEL = 0 # Analog channel on ADS1015 GAIN = 1 # Gain (1, 2/3, 1, 2, 4, 8, 16) BUZZER_PIN = 23 # Raspberry Pi GPIO pin connected to the piezo buzzer # Threshold for triggering the buzzer THRESHOLD = 700 # Adjust this value based on your requirement # Setup GPIO GPIO.setmode(GPIO.BCM) GPIO.setup(BUZZER_PIN, GPIO.OUT) # Create ADS1x15 instance ads = Adafruit_ADS1x15.ADS1015() # Constants for note names and their corresponding frequencies C4 = 261 D4 = 293 E4 = 329 F4 = 349 G4 = 392 A4 = 440 B4 = 493 # Dictionary to map numeric values to note names note_names = { C4: "C4", D4: "D4", E4: "E4", F4: "F4", G4: "G4", A4: "A4", B4: "B4", } # List of notes in the "Jingle Bells" melody melody = [ E4, E4, E4, E4, E4, E4, E4, G4, C4, D4, E4, F4, F4, F4, F4, F4, E4, E4, E4, E4, E4, D4, D4, E4, D4, G4 ] # List of note durations (in milliseconds) note_durations = [ 200, 200, 400, 200, 200, 400, 200, 200, 200, 200, 200, 200, 200, 400, 200, 200, 200, 200, 200, 200, 200, 200, 200, 400, 200, 200 ] # Pause duration between notes (in milliseconds) pause_duration = 300 def play_tone(pin, frequency, duration): # Calculate the period based on the frequency period = 1.0 / frequency # Calculate the time for half of the period half_period = period / 2.0 # Calculate the number of cycles for the given duration cycles = int(duration / period) for _ in range(cycles): # Set the GPIO pin to HIGH GPIO.output(pin, GPIO.HIGH) # Wait for half of the period time.sleep(half_period) # Set the GPIO pin to LOW GPIO.output(pin, GPIO.LOW) # Wait for the other half of the period time.sleep(half_period) def play_jingle_bells(): for i in range(len(melody)): note_duration = note_durations[i] / 1000.0 note_freq = melody[i] note_name = note_names.get(note_freq, "Pause") print(f"Playing {note_name} (Frequency: {note_freq} Hz) for {note_duration} seconds") play_tone(BUZZER_PIN, note_freq, note_duration) time.sleep(pause_duration / 1000.0) GPIO.output(BUZZER_PIN, GPIO.LOW) try: while True: # Read the raw ADC value from the potentiometer pot_value = ads.read_adc(ADC_CHANNEL, gain=GAIN) # Trigger the buzzer if the analog value is greater than the threshold if pot_value > THRESHOLD: GPIO.output(BUZZER_PIN, GPIO.HIGH) else: GPIO.output(BUZZER_PIN, GPIO.LOW) print(f"Potentiometer Value: {pot_value}") time.sleep(0.1) except KeyboardInterrupt: GPIO.output(BUZZER_PIN, GPIO.LOW) # Turn off the buzzer before cleanup GPIO.cleanup()
  • Enregistrez le fichier et exécutez le script Python en exécutant la commande suivante dans le terminal :
python3 potentiometer_buzzer_song.py
  • Tourner le potentiomètre.
  • Écouter la chanson du buzzer piézo.

Explication du code

Consultez l'explication ligne par ligne contenue dans les commentaires du code source !

Vidéo

※ NOS MESSAGES

  • N'hésitez pas à partager le lien de ce tutoriel. Cependant, veuillez ne pas utiliser notre contenu sur d'autres sites web. Nous avons investi beaucoup d'efforts et de temps pour créer ce contenu, veuillez respecter notre travail !