Horloge OLED Arduino Nano

Ce tutoriel vous explique comment créer une horloge OLED en utilisant un Arduino Nano, un module RTC et un afficheur OLED. Le tutoriel fournit des instructions pour les modules RTC DS3231 et DS1307. En détail :

Vous pouvez choisir l'un des deux modules RTC : DS3231 ou DS1307. Pour plus d'informations, veuillez consulter DS3231 vs DS1307.

À propos de l'OLED, des modules RTC DS3231 et DS1307

Si vous n'êtes pas familier avec les OLED, DS3231 et DS1307 (brochage, fonctionnement, programmation...), les tutoriels suivants peuvent vous aider :

Installez les bibliothèques OLED et RTC

  • Cliquez sur l'icône Libraries dans la barre latérale gauche de l'IDE Arduino.
  • Recherchez "SSD1306" et localisez la bibliothèque SSD1306 par Adafruit.
  • Appuyez sur le bouton Install pour compléter l'installation.
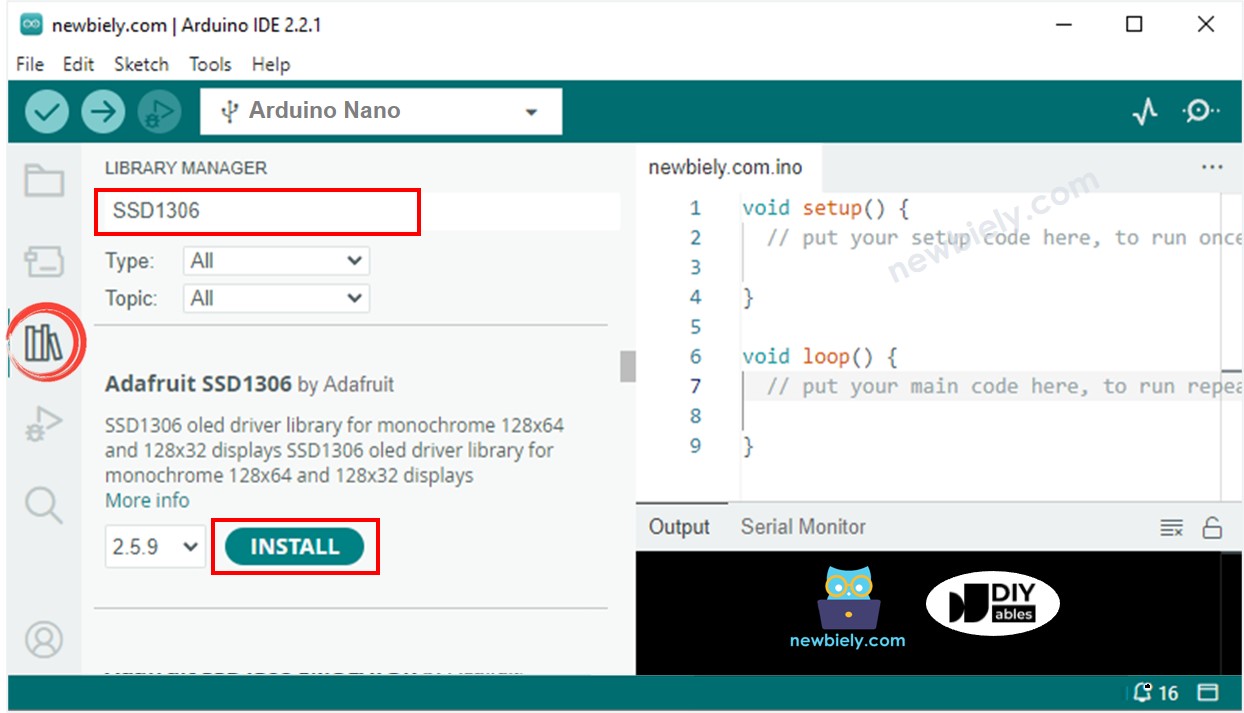
Bibliothèque OLED Arduino Nano
  • Vous serez invité à installer d'autres dépendances de bibliothèque.
  • Pour installer toutes celles-ci, cliquez sur le bouton Installer Tout.
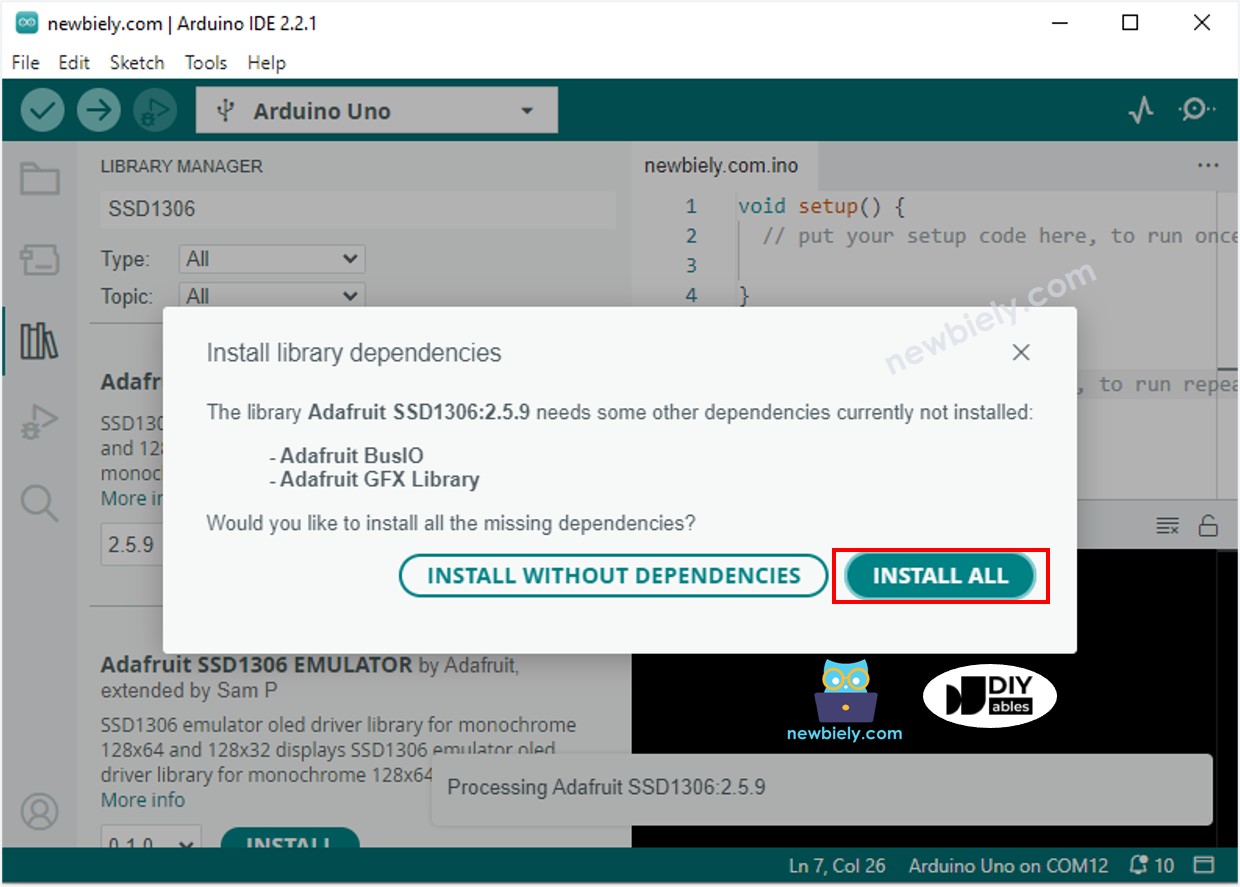
Bibliothèque de capteurs Arduino Nano Adafruit GFX
  • Recherchez « RTClib » et localisez la bibliothèque RTC créée par Adafruit. Cette bibliothèque est compatible avec les DS3231 et DS1307.
  • Appuyez sur le bouton Install pour installer la bibliothèque RTC.
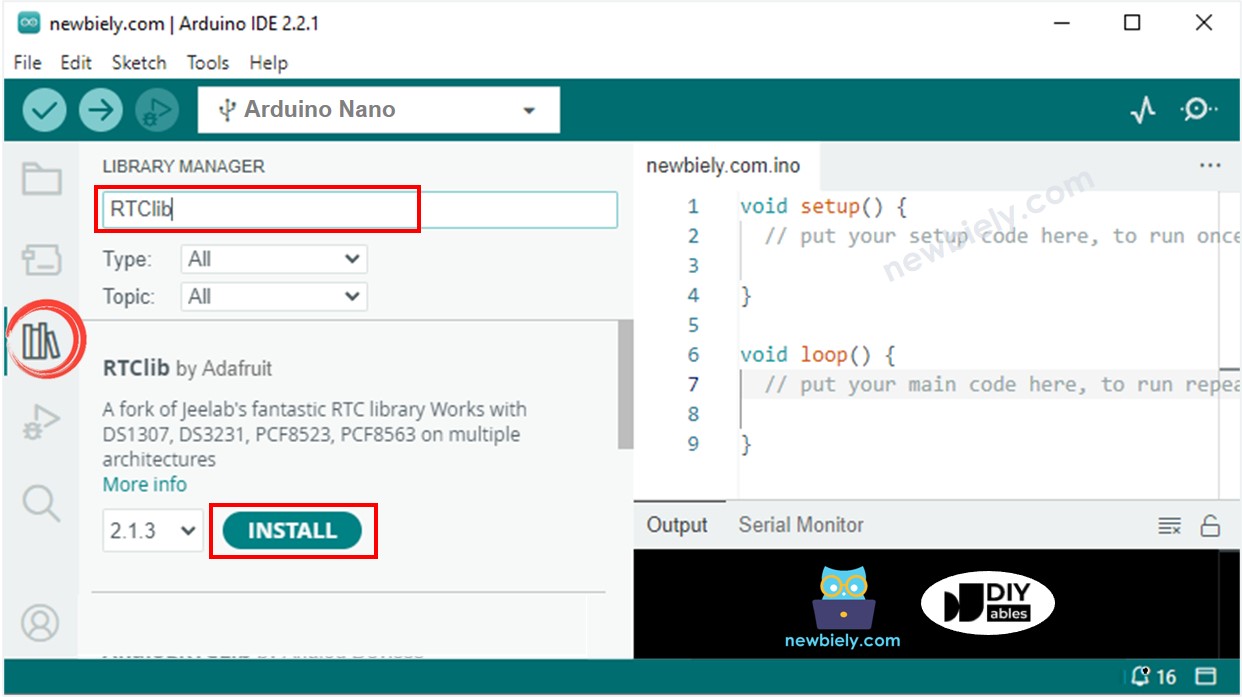
Bibliothèque RTC Arduino Nano

Lire l'heure depuis le module RTC DS3231 et l'afficher sur l'OLED

Schéma de câblage
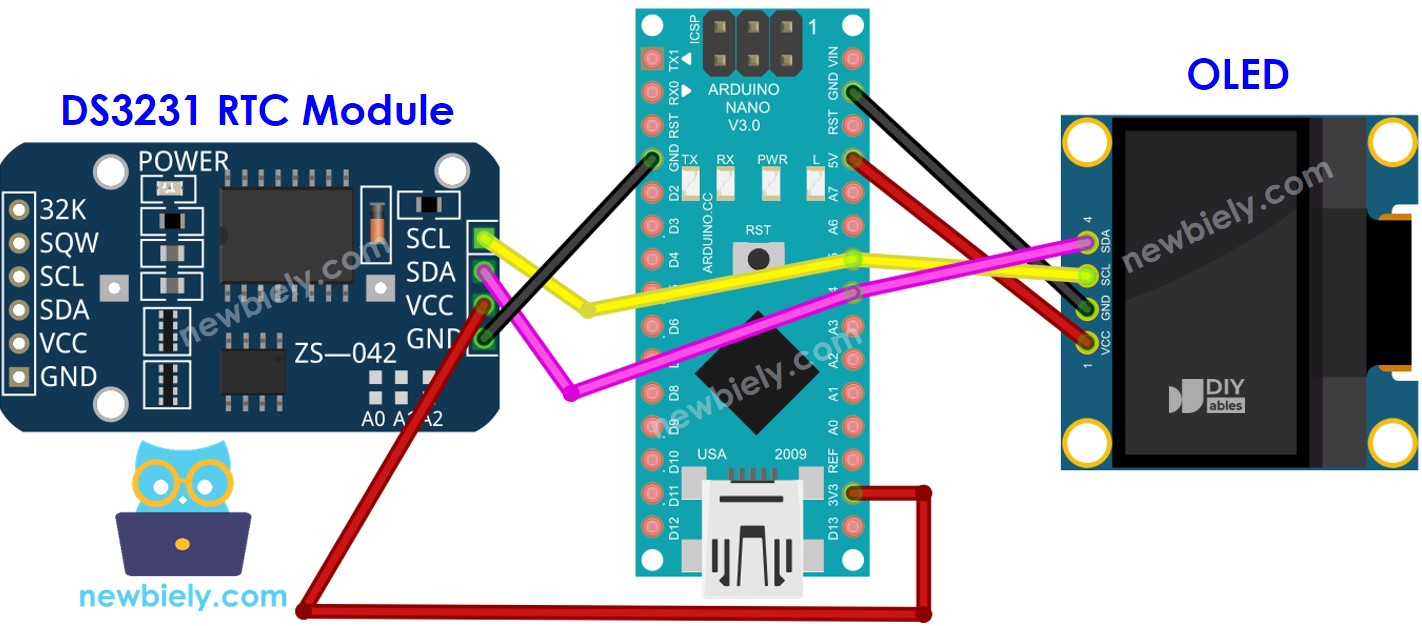
Schéma de câblage Arduino Nano DS3231 OLED

Cette image a été créée avec Fritzing. Cliquez pour agrandir l'image.

Code Arduino Nano - DS3231 et OLED

/* * Ce code Arduino Nano a été développé par newbiely.fr * Ce code Arduino Nano est mis à disposition du public sans aucune restriction. * Pour des instructions complètes et des schémas de câblage, veuillez visiter: * https://newbiely.fr/tutorials/arduino-nano/arduino-nano-oled-clock */ #include <Wire.h> #include <Adafruit_GFX.h> #include <Adafruit_SSD1306.h> #include <RTClib.h> #define OLED_WIDTH 128 // OLED display width, in pixels #define OLED_HEIGHT 64 // OLED display height, in pixels Adafruit_SSD1306 oled(OLED_WIDTH, OLED_HEIGHT, &Wire, -1); // // create SSD1306 display object connected to I2C RTC_DS3231 rtc; String time; void setup() { Serial.begin(9600); // initialize OLED display with address 0x3C for 128x64 if (!oled.begin(SSD1306_SWITCHCAPVCC, 0x3C)) { Serial.println(F("SSD1306 allocation failed")); while (true); } delay(2000); // wait for initializing oled.clearDisplay(); // clear display oled.setTextSize(1); // text size oled.setTextColor(WHITE); // text color oled.setCursor(0, 10); // position to display // SETUP RTC MODULE if (! rtc.begin()) { Serial.println("Couldn't find RTC"); Serial.flush(); while (true); } // automatically sets the RTC to the date & time on PC this sketch was compiled rtc.adjust(DateTime(F(__DATE__), F(__TIME__))); time.reserve(10); // to avoid fragmenting memory when using String } void loop() { DateTime now = rtc.now(); time = ""; time += now.hour(); time += ':'; time += now.minute(); time += ':'; time += now.second(); oled_display_center(time); } void oled_display_center(String text) { int16_t x1; int16_t y1; uint16_t width; uint16_t height; oled.getTextBounds(text, 0, 0, &x1, &y1, &width, &height); // center the display both horizontally and vertically oled.clearDisplay(); // clear display oled.setCursor((OLED_WIDTH - width) / 2, (OLED_HEIGHT - height) / 2); oled.println(text); // text to display oled.display(); }

Étapes rapides

  • Copiez le code et ouvrez-le avec l'IDE Arduino.
  • Cliquez sur le bouton Upload dans l'IDE Arduino pour envoyer le code à l'Arduino Nano.
  • Placez le capteur dans de l'eau chaude et froide ou tenez-le dans votre main.
  • Consultez les résultats sur l'OLED.

Lire l'heure depuis le module RTC DS1307 et l'afficher sur un OLED

Schéma de câblage
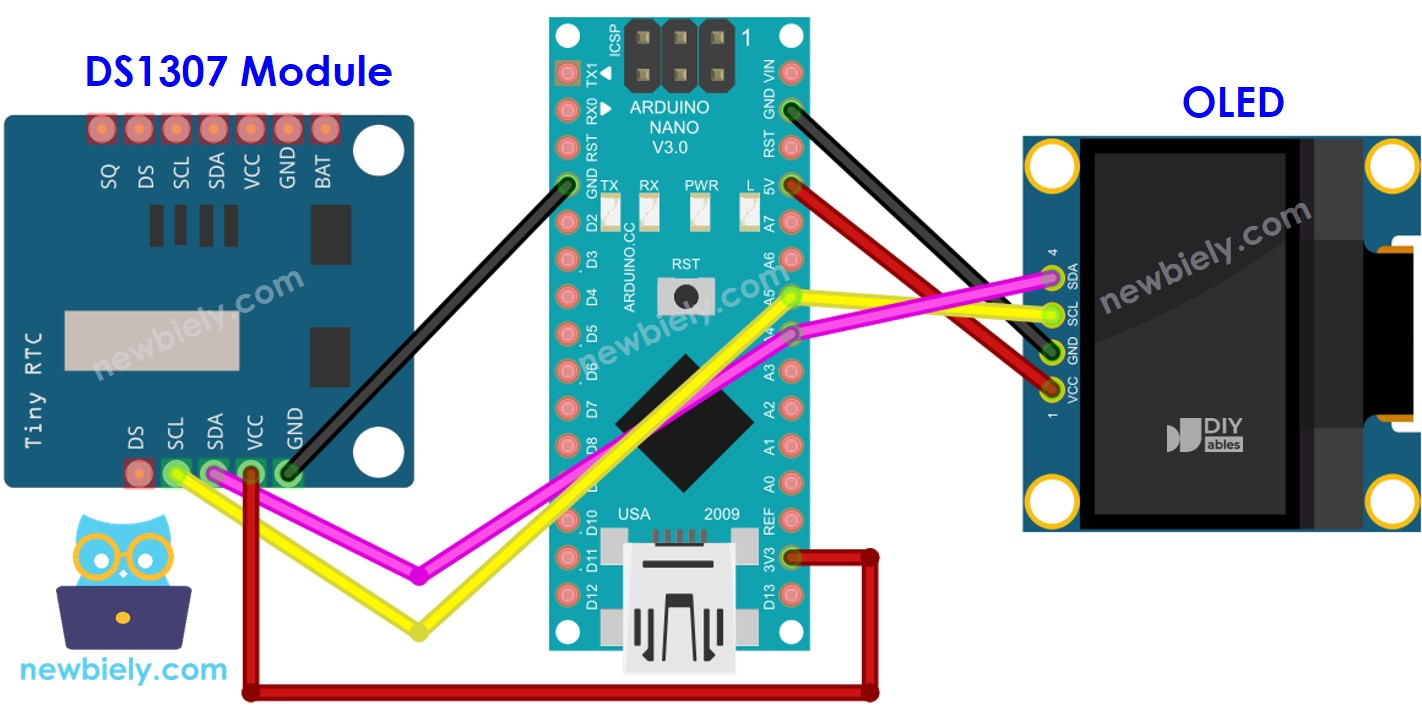
Schéma de câblage Arduino Nano DS1307 OLED

Cette image a été créée avec Fritzing. Cliquez pour agrandir l'image.

Voir Comment alimenter un Arduino Nano..

Code Arduino Nano - DS1307 et OLED

/* * Ce code Arduino Nano a été développé par newbiely.fr * Ce code Arduino Nano est mis à disposition du public sans aucune restriction. * Pour des instructions complètes et des schémas de câblage, veuillez visiter: * https://newbiely.fr/tutorials/arduino-nano/arduino-nano-oled-clock */ #include <Wire.h> #include <Adafruit_GFX.h> #include <Adafruit_SSD1306.h> #include <RTClib.h> #define OLED_WIDTH 128 // OLED display width, in pixels #define OLED_HEIGHT 64 // OLED display height, in pixels Adafruit_SSD1306 oled(OLED_WIDTH, OLED_HEIGHT, &Wire, -1); // // create SSD1306 display object connected to I2C RTC_DS1307 rtc; String time; void setup() { Serial.begin(9600); // initialize OLED display with address 0x3C for 128x64 if (!oled.begin(SSD1306_SWITCHCAPVCC, 0x3C)) { Serial.println(F("SSD1306 allocation failed")); while (true); } delay(2000); // wait for initializing oled.clearDisplay(); // clear display oled.setTextSize(1); // text size oled.setTextColor(WHITE); // text color oled.setCursor(0, 10); // position to display // SETUP RTC MODULE if (! rtc.begin()) { Serial.println("Couldn't find RTC"); Serial.flush(); while (true); } // automatically sets the RTC to the date & time on PC this sketch was compiled rtc.adjust(DateTime(F(__DATE__), F(__TIME__))); time.reserve(10); // to avoid fragmenting memory when using String } void loop() { DateTime now = rtc.now(); time = ""; time += now.hour(); time += ':'; time += now.minute(); time += ':'; time += now.second(); oled_display_center(time); } void oled_display_center(String text) { int16_t x1; int16_t y1; uint16_t width; uint16_t height; oled.getTextBounds(text, 0, 0, &x1, &y1, &width, &height); // center the display both horizontally and vertically oled.clearDisplay(); // clear display oled.setCursor((OLED_WIDTH - width) / 2, (OLED_HEIGHT - height) / 2); oled.println(text); // text to display oled.display(); }

Étapes rapides

  • Copiez le code et ouvrez-le dans l'IDE Arduino.
  • Cliquez sur le bouton Upload dans l'IDE Arduino pour envoyer le code à l'Arduino Nano.
  • Placez le capteur dans de l'eau chaude et froide, ou tenez-le dans votre main.
  • Consultez le résultat sur l'OLED.

Vidéo

※ NOS MESSAGES

  • N'hésitez pas à partager le lien de ce tutoriel. Cependant, veuillez ne pas utiliser notre contenu sur d'autres sites web. Nous avons investi beaucoup d'efforts et de temps pour créer ce contenu, veuillez respecter notre travail !