Arduino Nano - LED - Clignotement Sans Délai

Imaginons que l'Arduino Nano ait deux tâches à accomplir : faire clignoter une LED et surveiller l'état d'un bouton qui peut être pressé à tout moment. Si nous utilisons la fonction delay() (comme discuté dans un tutoriel précédent), l'Arduino Nano pourrait ignorer certaines des pressions sur le bouton. En d'autres termes, l'Arduino Nano n'est pas capable de mener à bien la deuxième tâche.

Ce tutoriel vous explique comment faire clignoter une LED avec un Arduino Nano et détecter l'état d'un bouton sans manquer aucun événement de pression.

Nous passerons en revue trois exemples et comparerons les différences entre eux :

Cette méthode ne se limite pas seulement à faire clignoter une LED et à vérifier l'état du bouton. En général, elle permet à l'Arduino Nano d'exécuter plusieurs tâches simultanément sans se bloquer mutuellement.

Préparation du matériel

1×Arduino Nano
1×USB A to Mini-B USB cable
1×LED
1×220 ohm resistor
1×Push Button
1×(Optional) Panel-mount Push Button
1×Breadboard
1×Jumper Wires
1×(Optional) 9V Power Adapter for Arduino Nano
1×(Recommended) Screw Terminal Adapter for Arduino Nano

Or you can buy the following sensor kits:

1×DIYables Sensor Kit (30 sensors/displays)
1×DIYables Sensor Kit (18 sensors/displays)
Divulgation : Certains des liens fournis dans cette section sont des liens affiliés Amazon. Nous pouvons recevoir une commission pour tout achat effectué via ces liens, sans coût supplémentaire pour vous. Nous vous remercions de votre soutien.

À propos des LED et des boutons

Si vous ne connaissez pas les LED et les boutons (y compris le brochage, les fonctionnalités et la programmation), les tutoriels suivants peuvent vous aider :

Diagramme de câblage
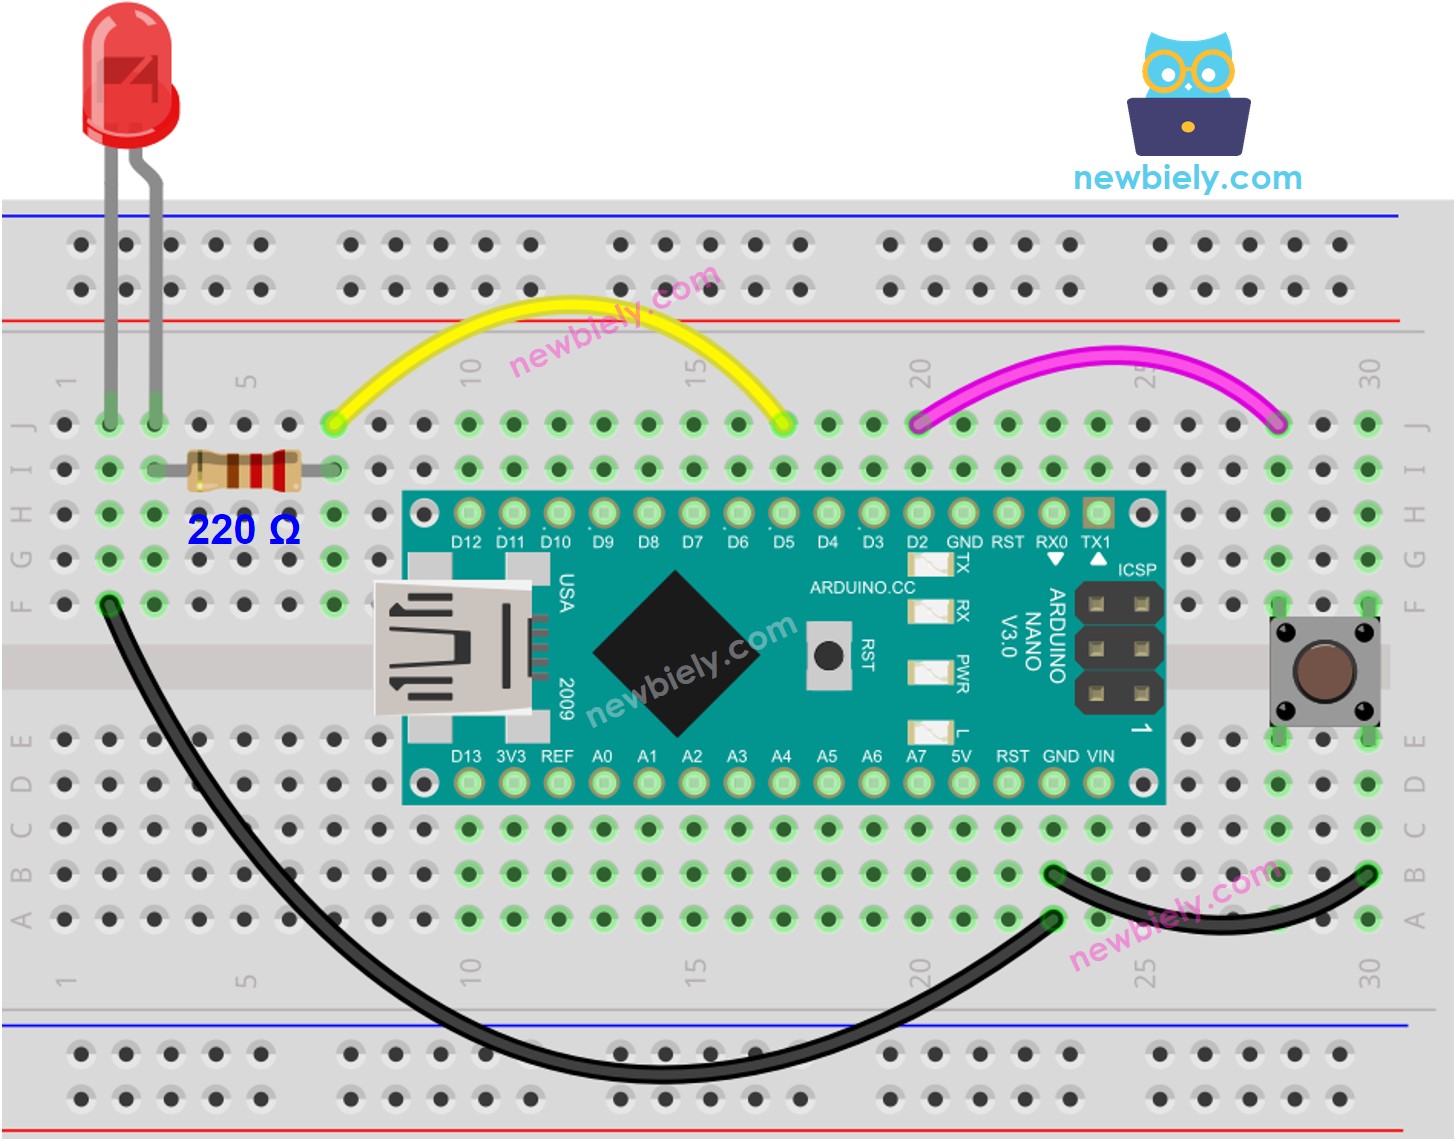
Schéma de câblage de la LED pour Arduino Nano

This image is created using Fritzing. Click to enlarge image

Code Arduino Nano - Avec Délai

/* * Ce code Arduino Nano a été développé par newbiely.fr * Ce code Arduino Nano est mis à disposition du public sans aucune restriction. * Pour des instructions complètes et des schémas de câblage, veuillez visiter: * https://newbiely.fr/tutorials/arduino-nano/arduino-nano-led-blink-without-delay */ const int LED_PIN = 5; // The number of the LED pin const int BUTTON_PIN = 2; // The number of the button pin const long BLINK_INTERVAL = 1000; // interval at which to blink LED (milliseconds) int led_state = LOW; // led_state used to set the LED int prev_button_state = LOW; // will store last time button was updated void setup() { Serial.begin(9600); // set the digital pin as output: pinMode(LED_PIN, OUTPUT); // set the digital pin as an input: pinMode(BUTTON_PIN, INPUT); } void loop() { // if the LED is off turn it on and vice-versa: led_state = (led_state == LOW) ? HIGH : LOW; // set the LED with the led_state of the variable: digitalWrite(LED_PIN, led_state); delay(BLINK_INTERVAL); // If button is pressed during this time, Arduino CANNOT detect int button_state = digitalRead(BUTTON_PIN); if(button_state != prev_button_state) { // print out the state of the button: Serial.println(button_state); // save the last state of button prev_button_state = button_state; } // DO OTHER WORKS HERE }

Étapes rapides

  • Connectez votre Arduino Nano à votre ordinateur via un câble USB.
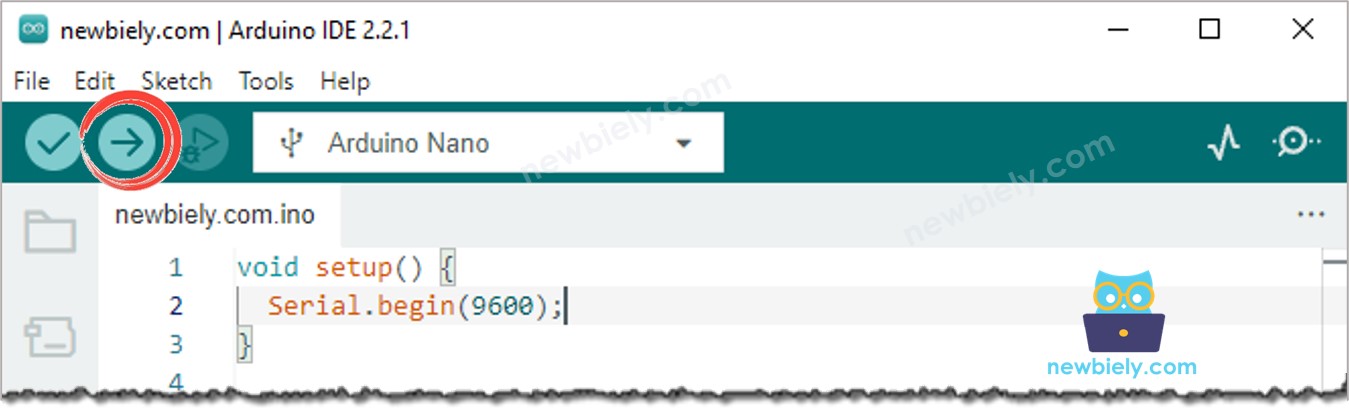
  • Lancez l'IDE Arduino, sélectionnez la carte et le port appropriés.
  • Copiez le code et ouvrez-le dans l'IDE Arduino.
  • Cliquez sur le bouton Upload dans l'IDE Arduino pour compiler et téléverser le code sur l'Arduino Nano.
Comment télécharger du code sur Arduino Nano
  • Ouvrez le moniteur série.
  • Appuyez quatre fois sur le bouton.
  • Observez la LED ; elle alternera entre être allumée et éteinte toutes les secondes.
  • Vérifiez la sortie dans le moniteur série.
COM6
Send
1 0
Autoscroll Show timestamp
Clear output
9600 baud  
Newline  
  • Sur le moniteur série, certains temps de pression n'ont pas été enregistrés. Cela est dû au fait que pendant le temps de délai, l'Arduino Nano est incapable d'effectuer des actions. En conséquence, il ne peut pas détecter l'événement de pression.

Code Arduino Nano - Sans Délai

/* * Ce code Arduino Nano a été développé par newbiely.fr * Ce code Arduino Nano est mis à disposition du public sans aucune restriction. * Pour des instructions complètes et des schémas de câblage, veuillez visiter: * https://newbiely.fr/tutorials/arduino-nano/arduino-nano-led-blink-without-delay */ const int LED_PIN = 5; // The number of the LED pin const int BUTTON_PIN = 2; // The number of the button pin const long BLINK_INTERVAL = 1000; // interval at which to blink LED (milliseconds) int led_state = LOW; // led_state used to set the LED int prev_button_state = LOW; // will store last time button was updated unsigned long prev_time_ms = 0; // will store last time LED was updated void setup() { Serial.begin(9600); // set the digital pin as output: pinMode(LED_PIN, OUTPUT); // set the digital pin as an input: pinMode(BUTTON_PIN, INPUT); } void loop() { // check to see if it's time to blink the LED; that is, if the difference // between the current time and last time you blinked the LED is bigger than // The interval at which you want to blink the LED. unsigned long time_ms = millis(); if (time_ms - prev_time_ms >= BLINK_INTERVAL) { // if the LED is off turn it on and vice-versa: led_state = (led_state == LOW) ? HIGH : LOW; // set the LED with the led_state of the variable: digitalWrite(LED_PIN, led_state); // save the last time you blinked the LED prev_time_ms = time_ms; } // check button state's change int button_state = digitalRead(BUTTON_PIN); if(button_state != prev_button_state) { // print out the state of the button: Serial.println(button_state); // save the last state of button prev_button_state = button_state; } // DO OTHER WORKS HERE }

Étapes rapides

  • Exécutez le code et appuyez sur le bouton quatre fois.
  • Observez la LED ; elle basculera entre ON et OFF à des intervalles d'une seconde.
  • Vérifiez la sortie dans le moniteur série.
COM6
Send
1 0 1 0 1 0 1 0
Autoscroll Show timestamp
Clear output
9600 baud  
Newline  
  • Tous les cas de situations urgentes ont été identifiés.

Explication du code

Découvrez l'explication ligne par ligne contenue dans les commentaires du code source !

Ajout de tâches supplémentaires

Le code Arduino Nano ci-dessous fait :

  • Fait clignoter deux LED à des intervalles différents.
  • Vérifie l'état du bouton.
/* * Ce code Arduino Nano a été développé par newbiely.fr * Ce code Arduino Nano est mis à disposition du public sans aucune restriction. * Pour des instructions complètes et des schémas de câblage, veuillez visiter: * https://newbiely.fr/tutorials/arduino-nano/arduino-nano-led-blink-without-delay */ const int LED_PIN_1 = 5; // The number of the LED 1 pin const int LED_PIN_2 = LED_BUILTIN; // The number of the LED 2 pin const int BUTTON_PIN = 2; // The number of the button pin const long BLINK_INTERVAL_1 = 1000; // interval at which to blink LED 1 (milliseconds) const long BLINK_INTERVAL_2 = 500; // interval at which to blink LED 2 (milliseconds) int led_state_1 = LOW; // led_state used to set the LED 1 int led_state_2 = LOW; // led_state used to set the LED 2 int prev_button_state = LOW; // will store last time button was updated unsigned long prev_time_ms_1 = 0; // will store last time LED 1 was updated unsigned long prev_time_ms_2 = 0; // will store last time LED 2 was updated void setup() { Serial.begin(9600); // set the digital pin as output: pinMode(LED_PIN_1, OUTPUT); pinMode(LED_PIN_2, OUTPUT); // set the digital pin as an input: pinMode(BUTTON_PIN, INPUT); } void loop() { unsigned long time_ms = millis(); // check to see if it's time to blink the LED 1 if (time_ms - prev_time_ms_1 >= BLINK_INTERVAL_1) { // if the LED is off turn it on and vice-versa: led_state_1 = (led_state_1 == LOW) ? HIGH : LOW; // set the LED with the led_state of the variable: digitalWrite(LED_PIN_1, led_state_1); // save the last time you blinked the LED prev_time_ms_1 = time_ms; } // check to see if it's time to blink the LED 2 if (time_ms - prev_time_ms_2 >= BLINK_INTERVAL_2) { // if the LED is off turn it on and vice-versa: led_state_2 = (led_state_2 == LOW) ? HIGH : LOW; // set the LED with the led_state of the variable: digitalWrite(LED_PIN_2, led_state_2); // save the last time you blinked the LED prev_time_ms_2 = time_ms; } // check button state's change int button_state = digitalRead(BUTTON_PIN); if(button_state != prev_button_state) { // print out the state of the button: Serial.println(button_state); // save the last state of button prev_button_state = button_state; } // DO OTHER WORKS HERE }

Vidéo

Extensibilité

Cette méthode peut être utilisée pour permettre à l'Arduino Nano d'exécuter plusieurs tâches simultanément, sans qu'une tâche n'empêche la progression des autres. Par exemple, envoyer une requête sur Internet et attendre la réponse, tout en faisant clignoter simultanément quelques indicateurs LED et en surveillant le bouton d'annulation.

Références de fonction

※ OUR MESSAGES

  • Please feel free to share the link of this tutorial. However, Please do not use our content on any other websites. We invested a lot of effort and time to create the content, please respect our work!