Arduino Mega - OLED

Ce guide vous montre comment utiliser un Arduino Mega avec un écran OLED I2C 128x64. Nous allons apprendre en détail :

Arduino Mega écran OLED I2C

Matériel requis

1×Arduino Mega
1×Câble USB 2.0 type A/B
1×Écran OLED SSD1306 I2C 128x64
1×Câbles de connexion
1×Recommandé: Screw Terminal Block Shield for Arduino Uno/Mega
1×Recommandé: Breadboard Shield for Arduino Mega
1×Recommandé: Enclosure for Arduino Mega

Ou vous pouvez acheter les kits suivants:

1×Kit de Capteurs DIYables (30 capteurs/écrans)
1×Kit de Capteurs DIYables (18 capteurs/écrans)
Divulgation : Certains des liens fournis dans cette section sont des liens affiliés Amazon. Nous pouvons recevoir une commission pour tout achat effectué via ces liens, sans coût supplémentaire pour vous. Nous vous remercions de votre soutien.

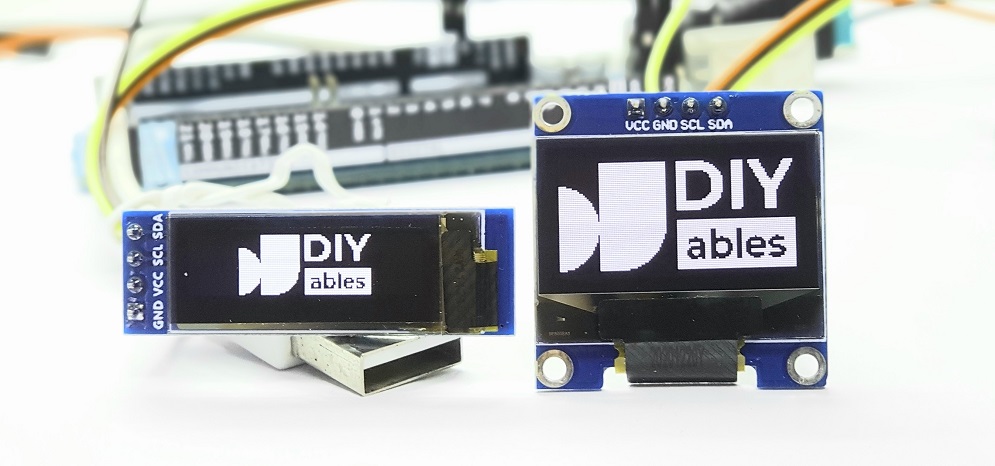
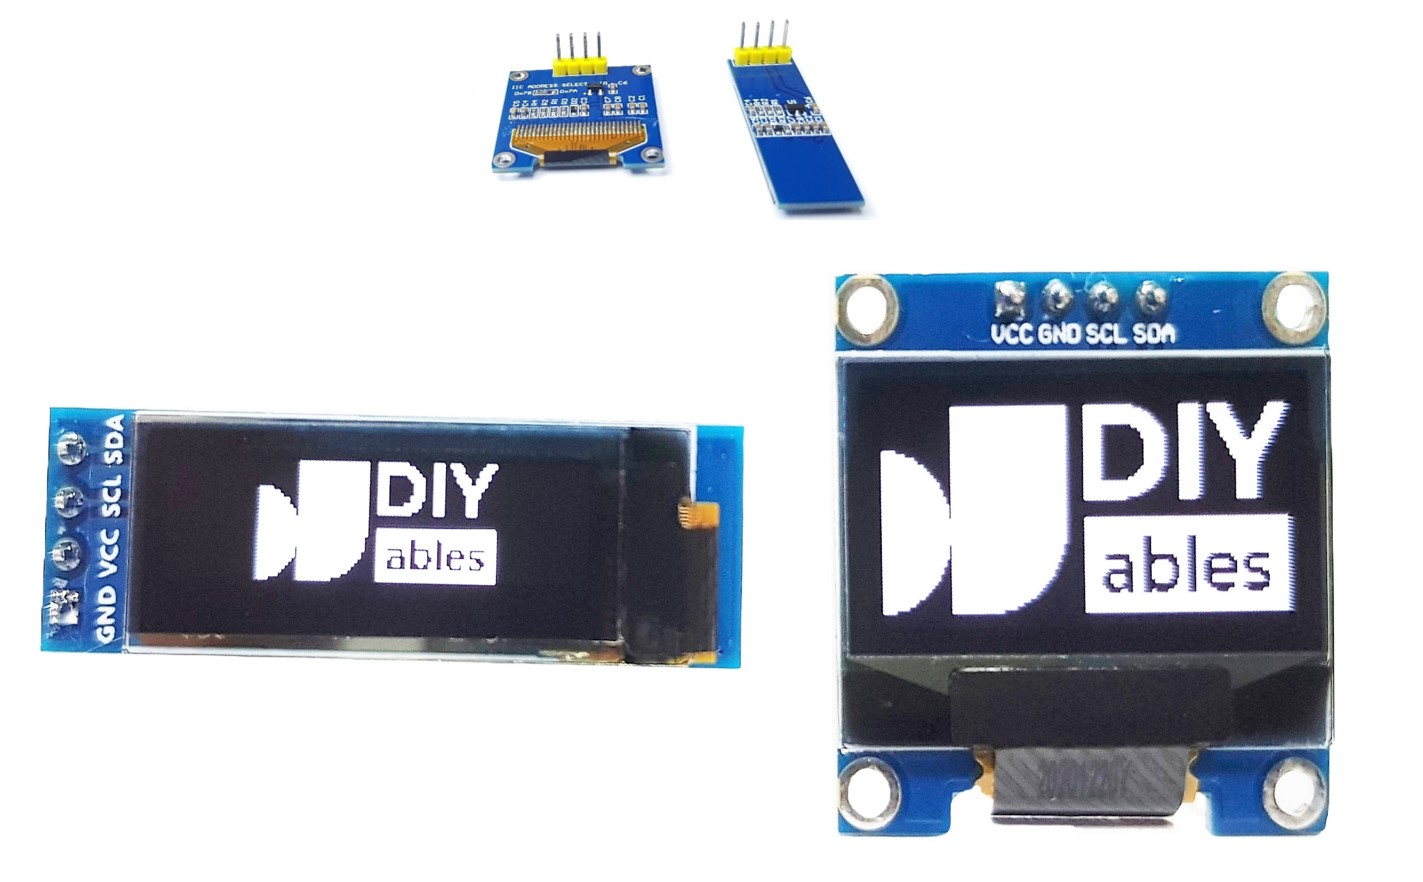
À propos de l'écran OLED

Il existe de nombreux types d'écrans OLED. Ils diffèrent par leur fonctionnement, leurs tailles et leurs couleurs.

  • Modes de connexion : I2C, SPI
  • Taille : 128 par 64, 128 par 32
  • Couleurs : blanc, bleu, deux tons
Arduino Mega OLED

Le SPI est généralement plus rapide que l'I2C, mais il nécessite plus de broches sur l'Arduino Mega. L'I2C, en revanche, n'utilise que deux broches et ces broches peuvent se connecter à plusieurs appareils I2C. Vous devez donc choisir : moins de broches ou une communication plus rapide. Pour les écrans OLED I2C, il existe différents pilotes comme SSD1306 et SH1106. Ce guide utilise l'écran OLED I2C SSD1306 128x64.

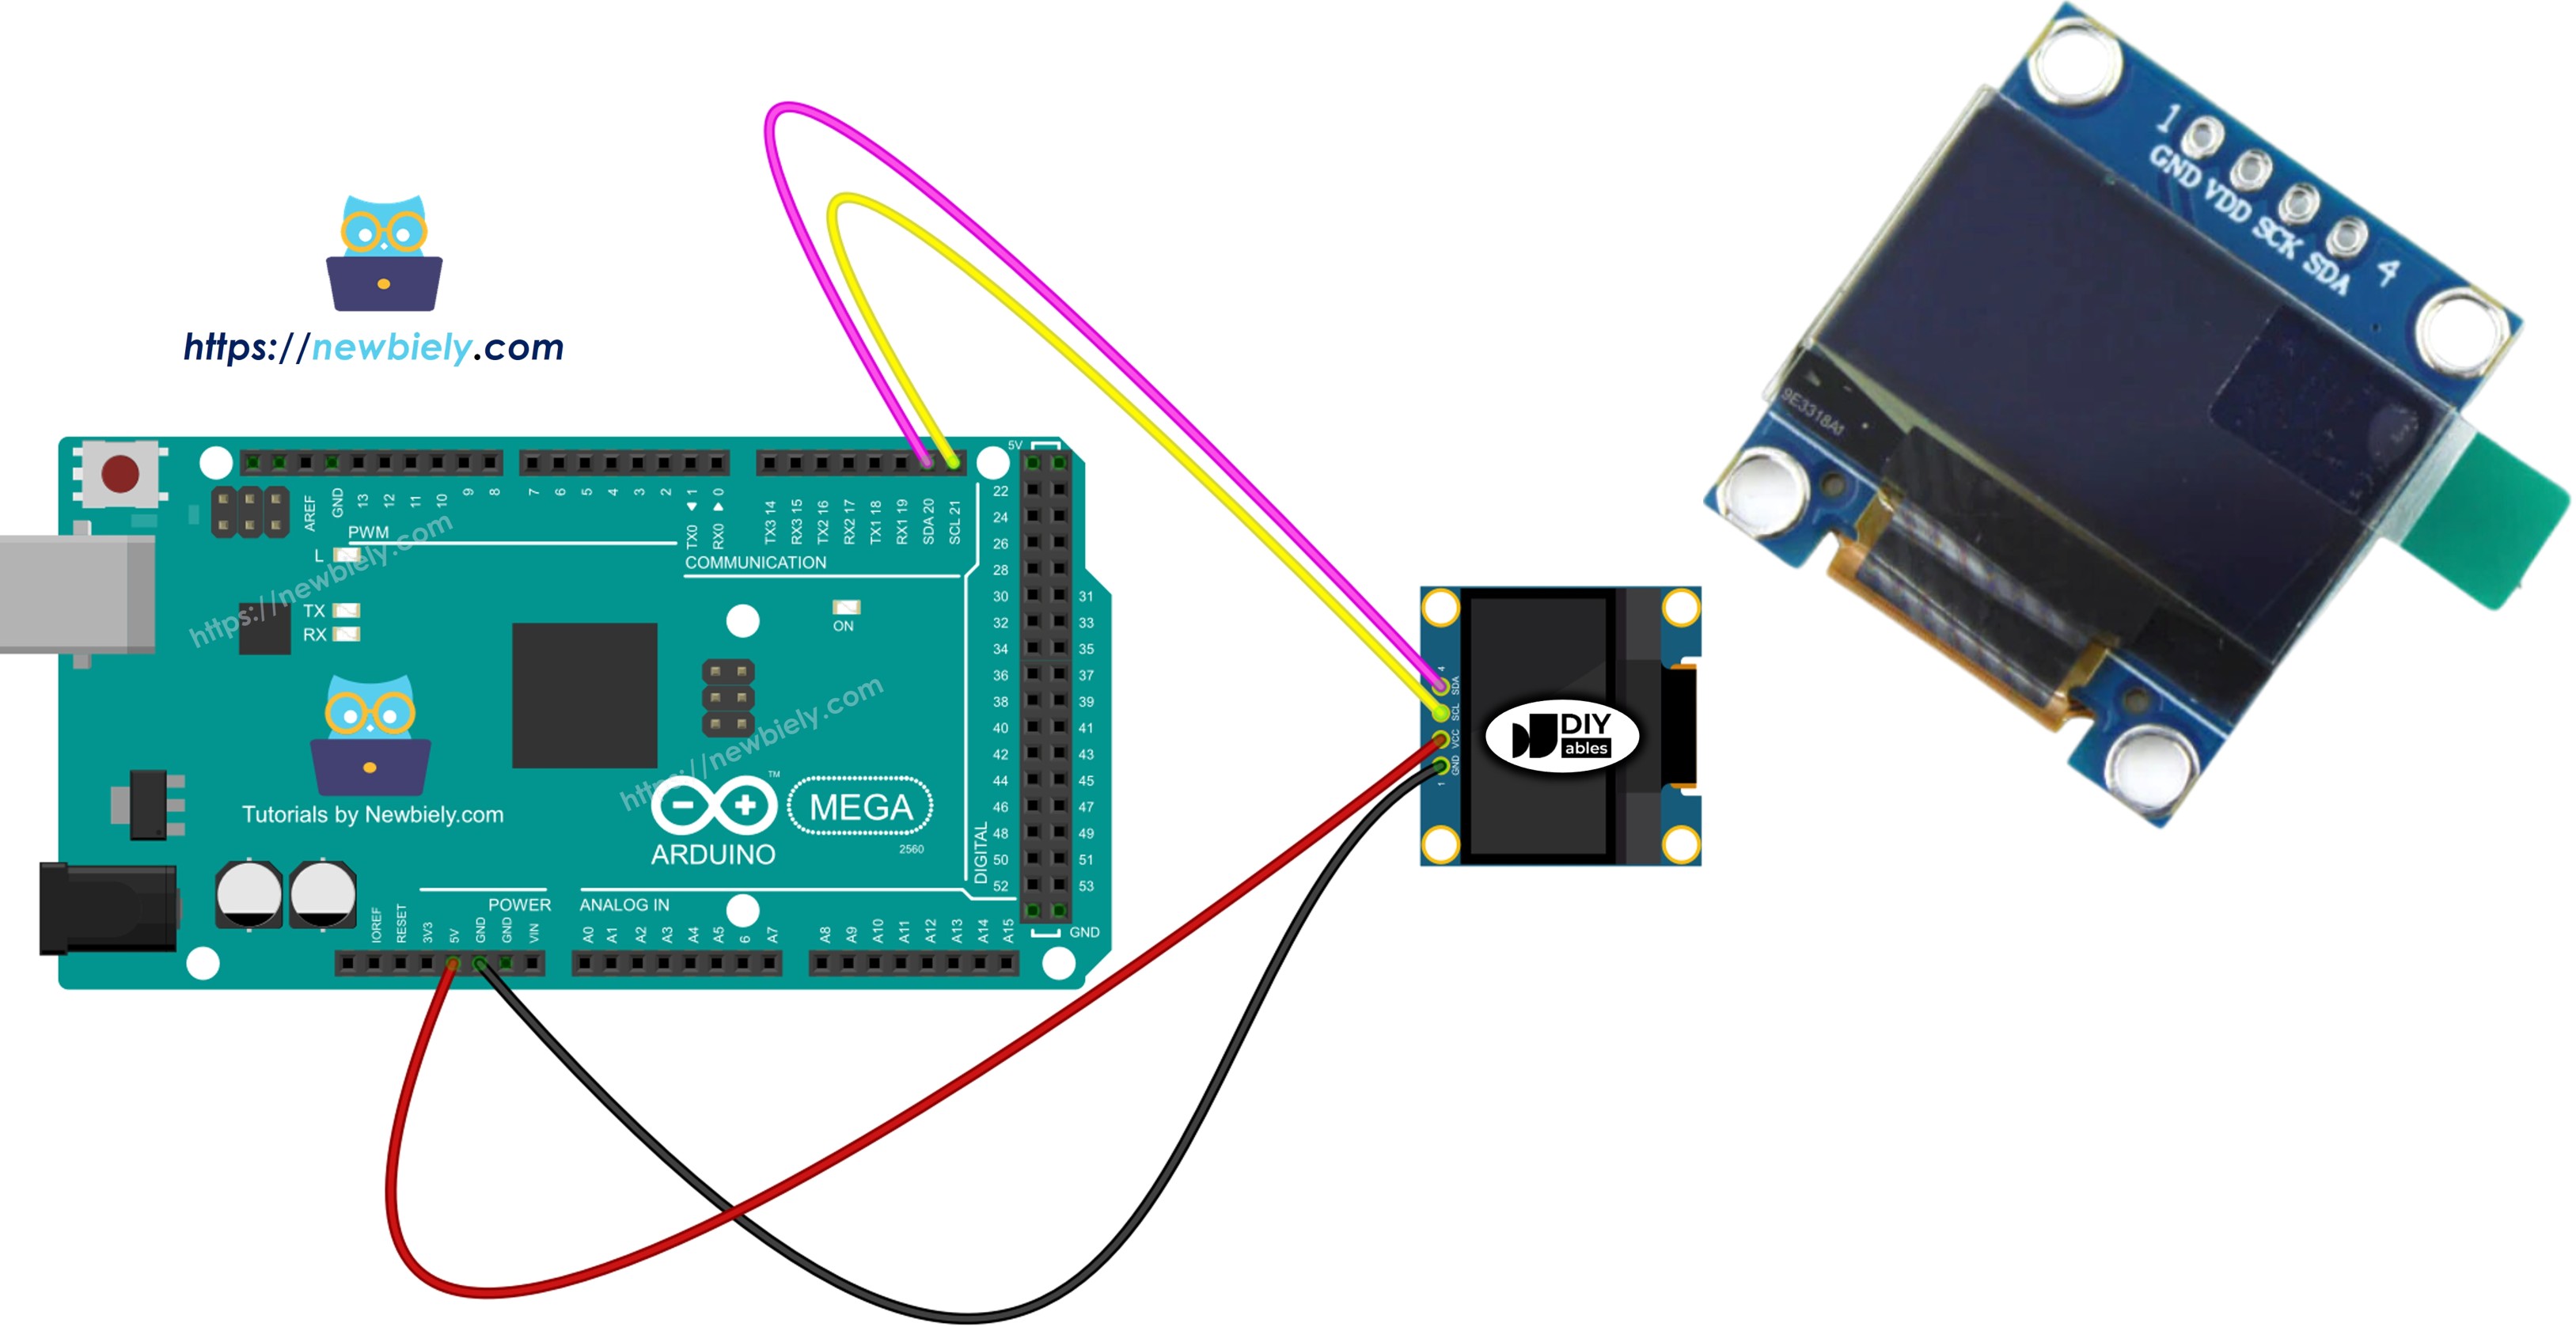
Brochage de l'écran OLED I2C

  • Broche GND : connecter à la masse de l'Arduino Mega.
  • Broche VCC : alimentation pour l'écran ; connecter à la broche 5V de l'Arduino Mega.
  • Broche SCL : ligne d'horloge I2C.
  • Broche SDA : ligne de données I2C.
Brochage OLED

※ Note:

La disposition des broches sur un module OLED peut être différente selon le fabricant et le modèle que vous avez. Vérifiez toujours et suivez les étiquettes sur le module OLED. Attention !

Ce guide est pour un écran OLED qui utilise le pilote SSD1306 I2C. Nous l'avons testé avec un écran OLED de DIYables. Il fonctionne bien, sans problème.

Schéma de câblage

  • Schéma de câblage pour Arduino Mega avec un écran OLED 128x64
Schéma de câblage Arduino Mega OLED 128x64

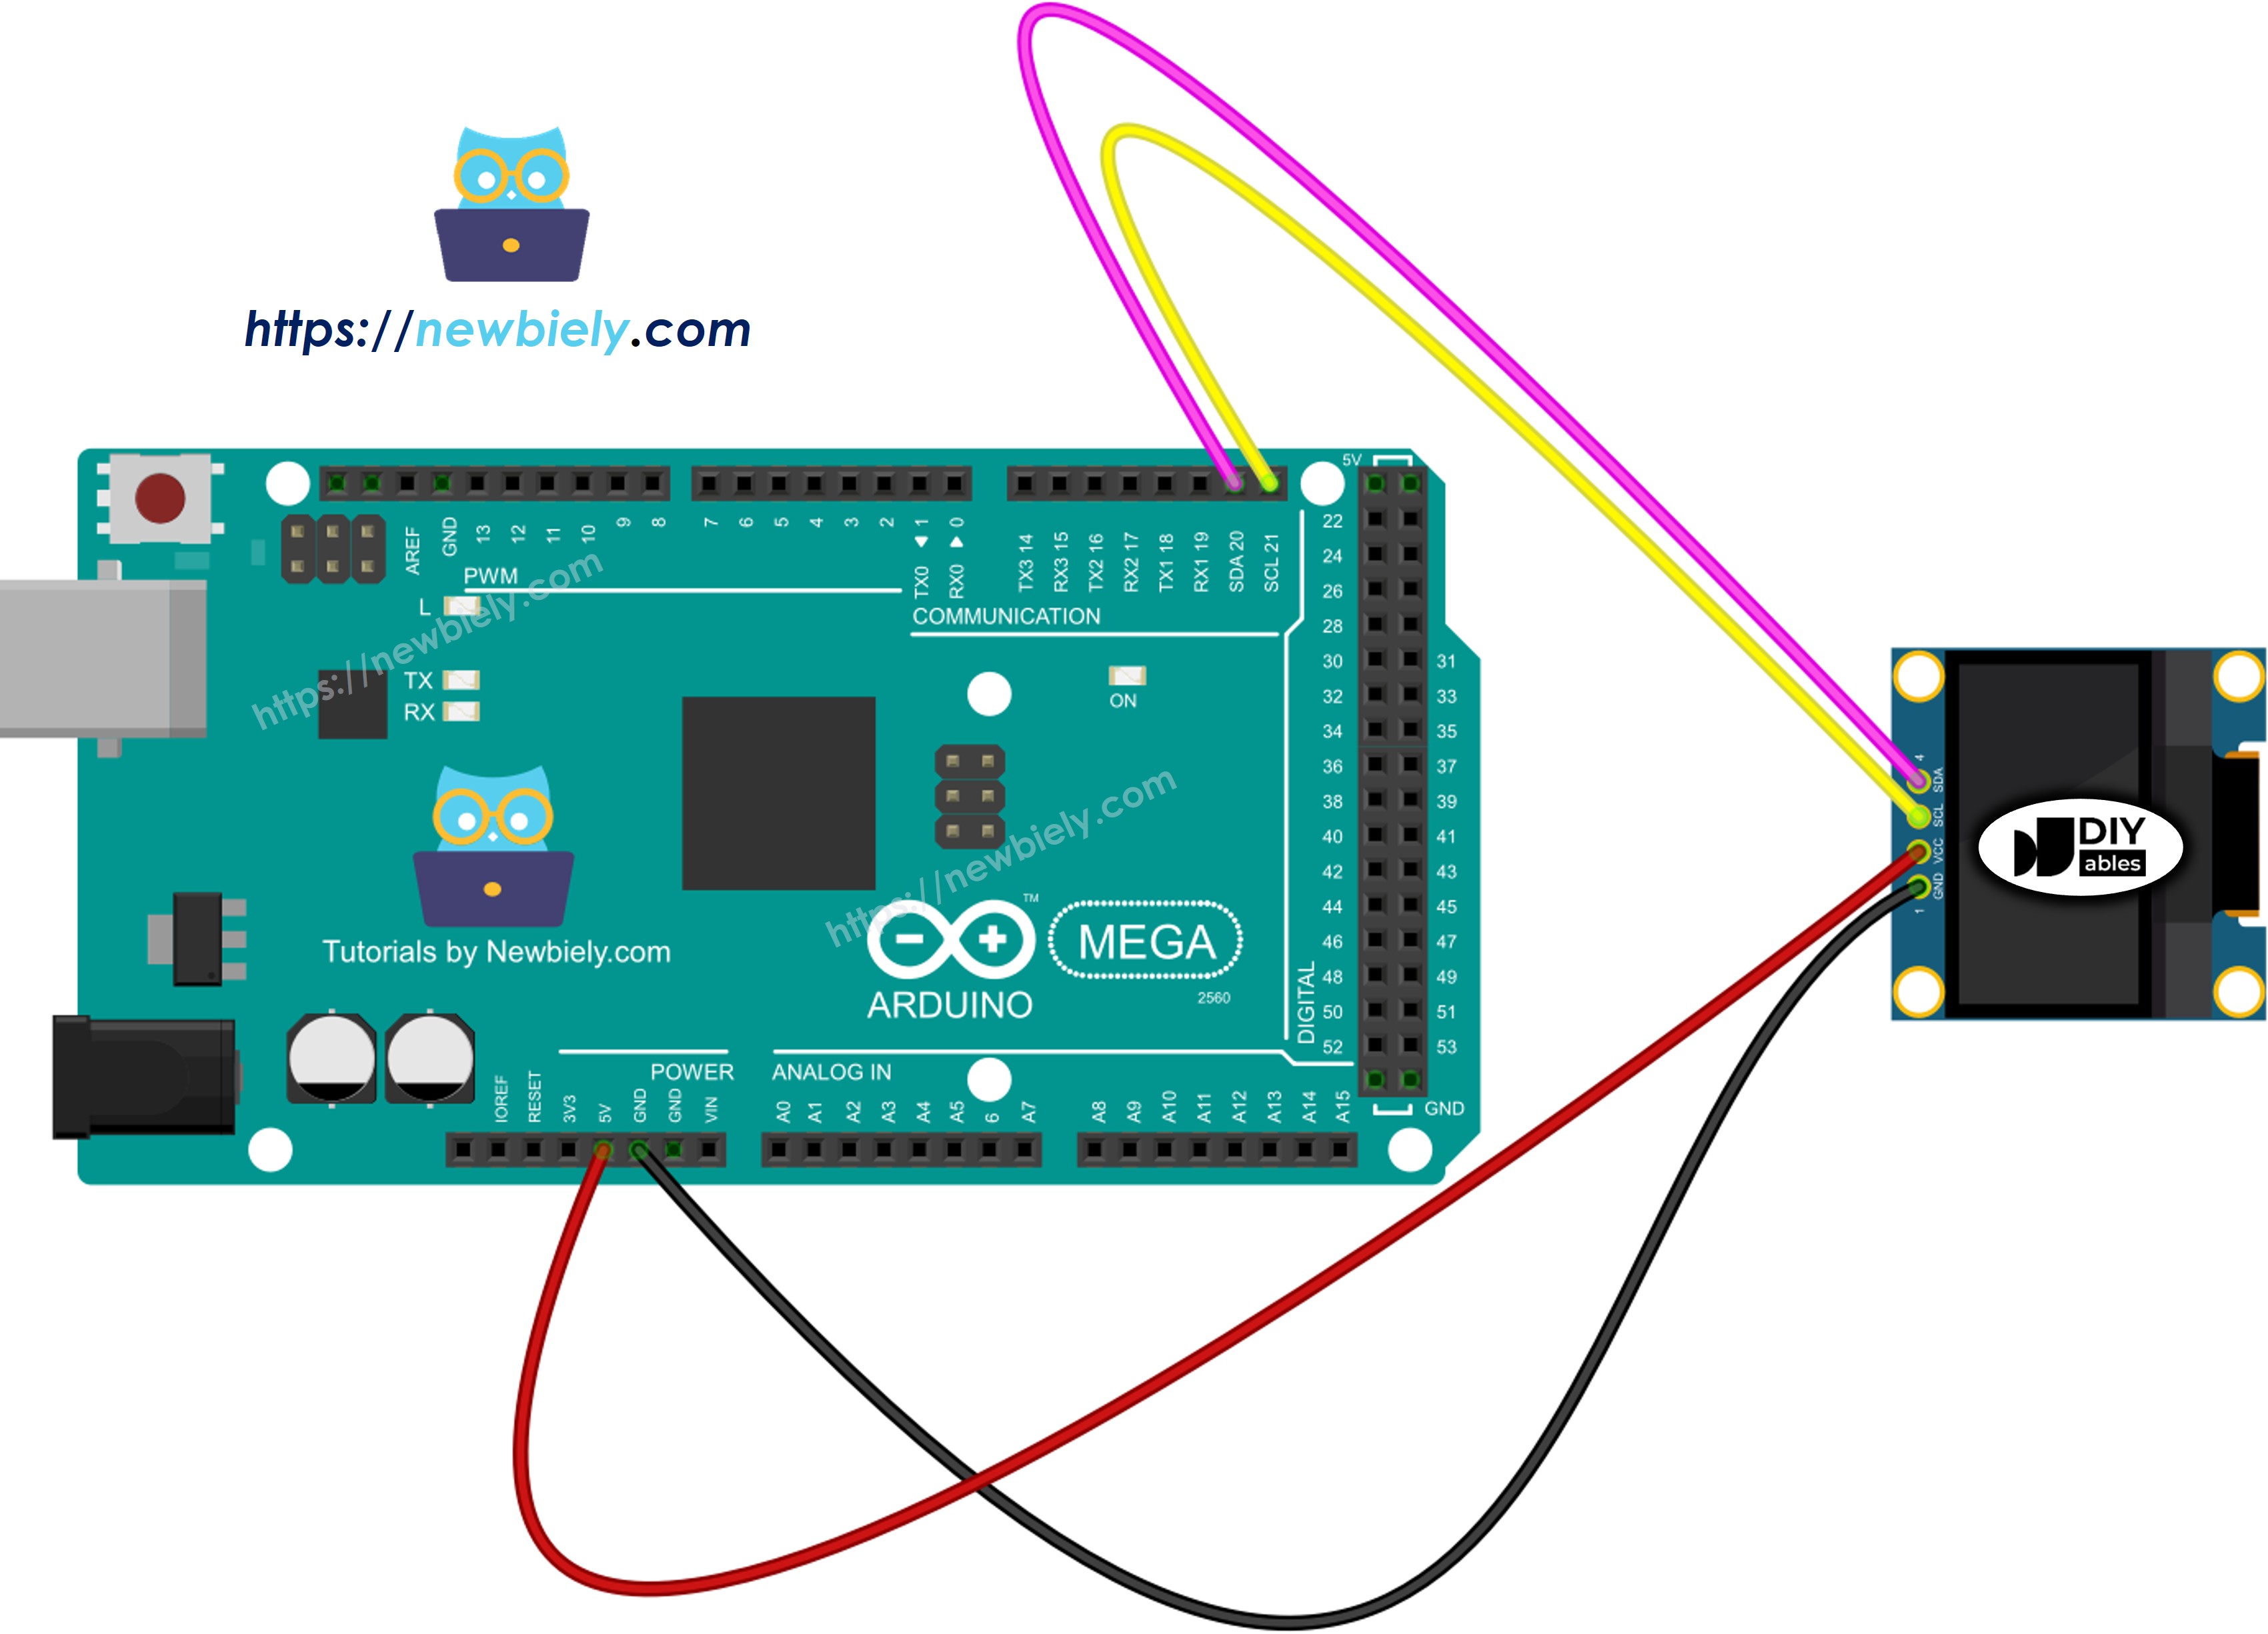
Cette image a été créée avec Fritzing. Cliquez pour agrandir l'image.

Si vous utilisez un Arduino Mega différent, la disposition des broches ne sera pas la même que l'Uno. Consultez le tableau ci-dessous pour des informations sur d'autres modèles d'Arduino Mega.

Module OLED Arduino Mega
Vin 5V
GND GND
SDA A4
SCL A5

Comment utiliser l'OLED avec Arduino Mega

Installer la bibliothèque OLED SSD1306

  • Allez à l'icône Bibliothèques sur le côté gauche de l'IDE Arduino.
  • Tapez SSD1306 dans la zone de recherche et cherchez la bibliothèque SSD1306 d'Adafruit.
  • Cliquez sur le bouton Installer pour ajouter la bibliothèque.
Bibliothèque Arduino Mega OLED
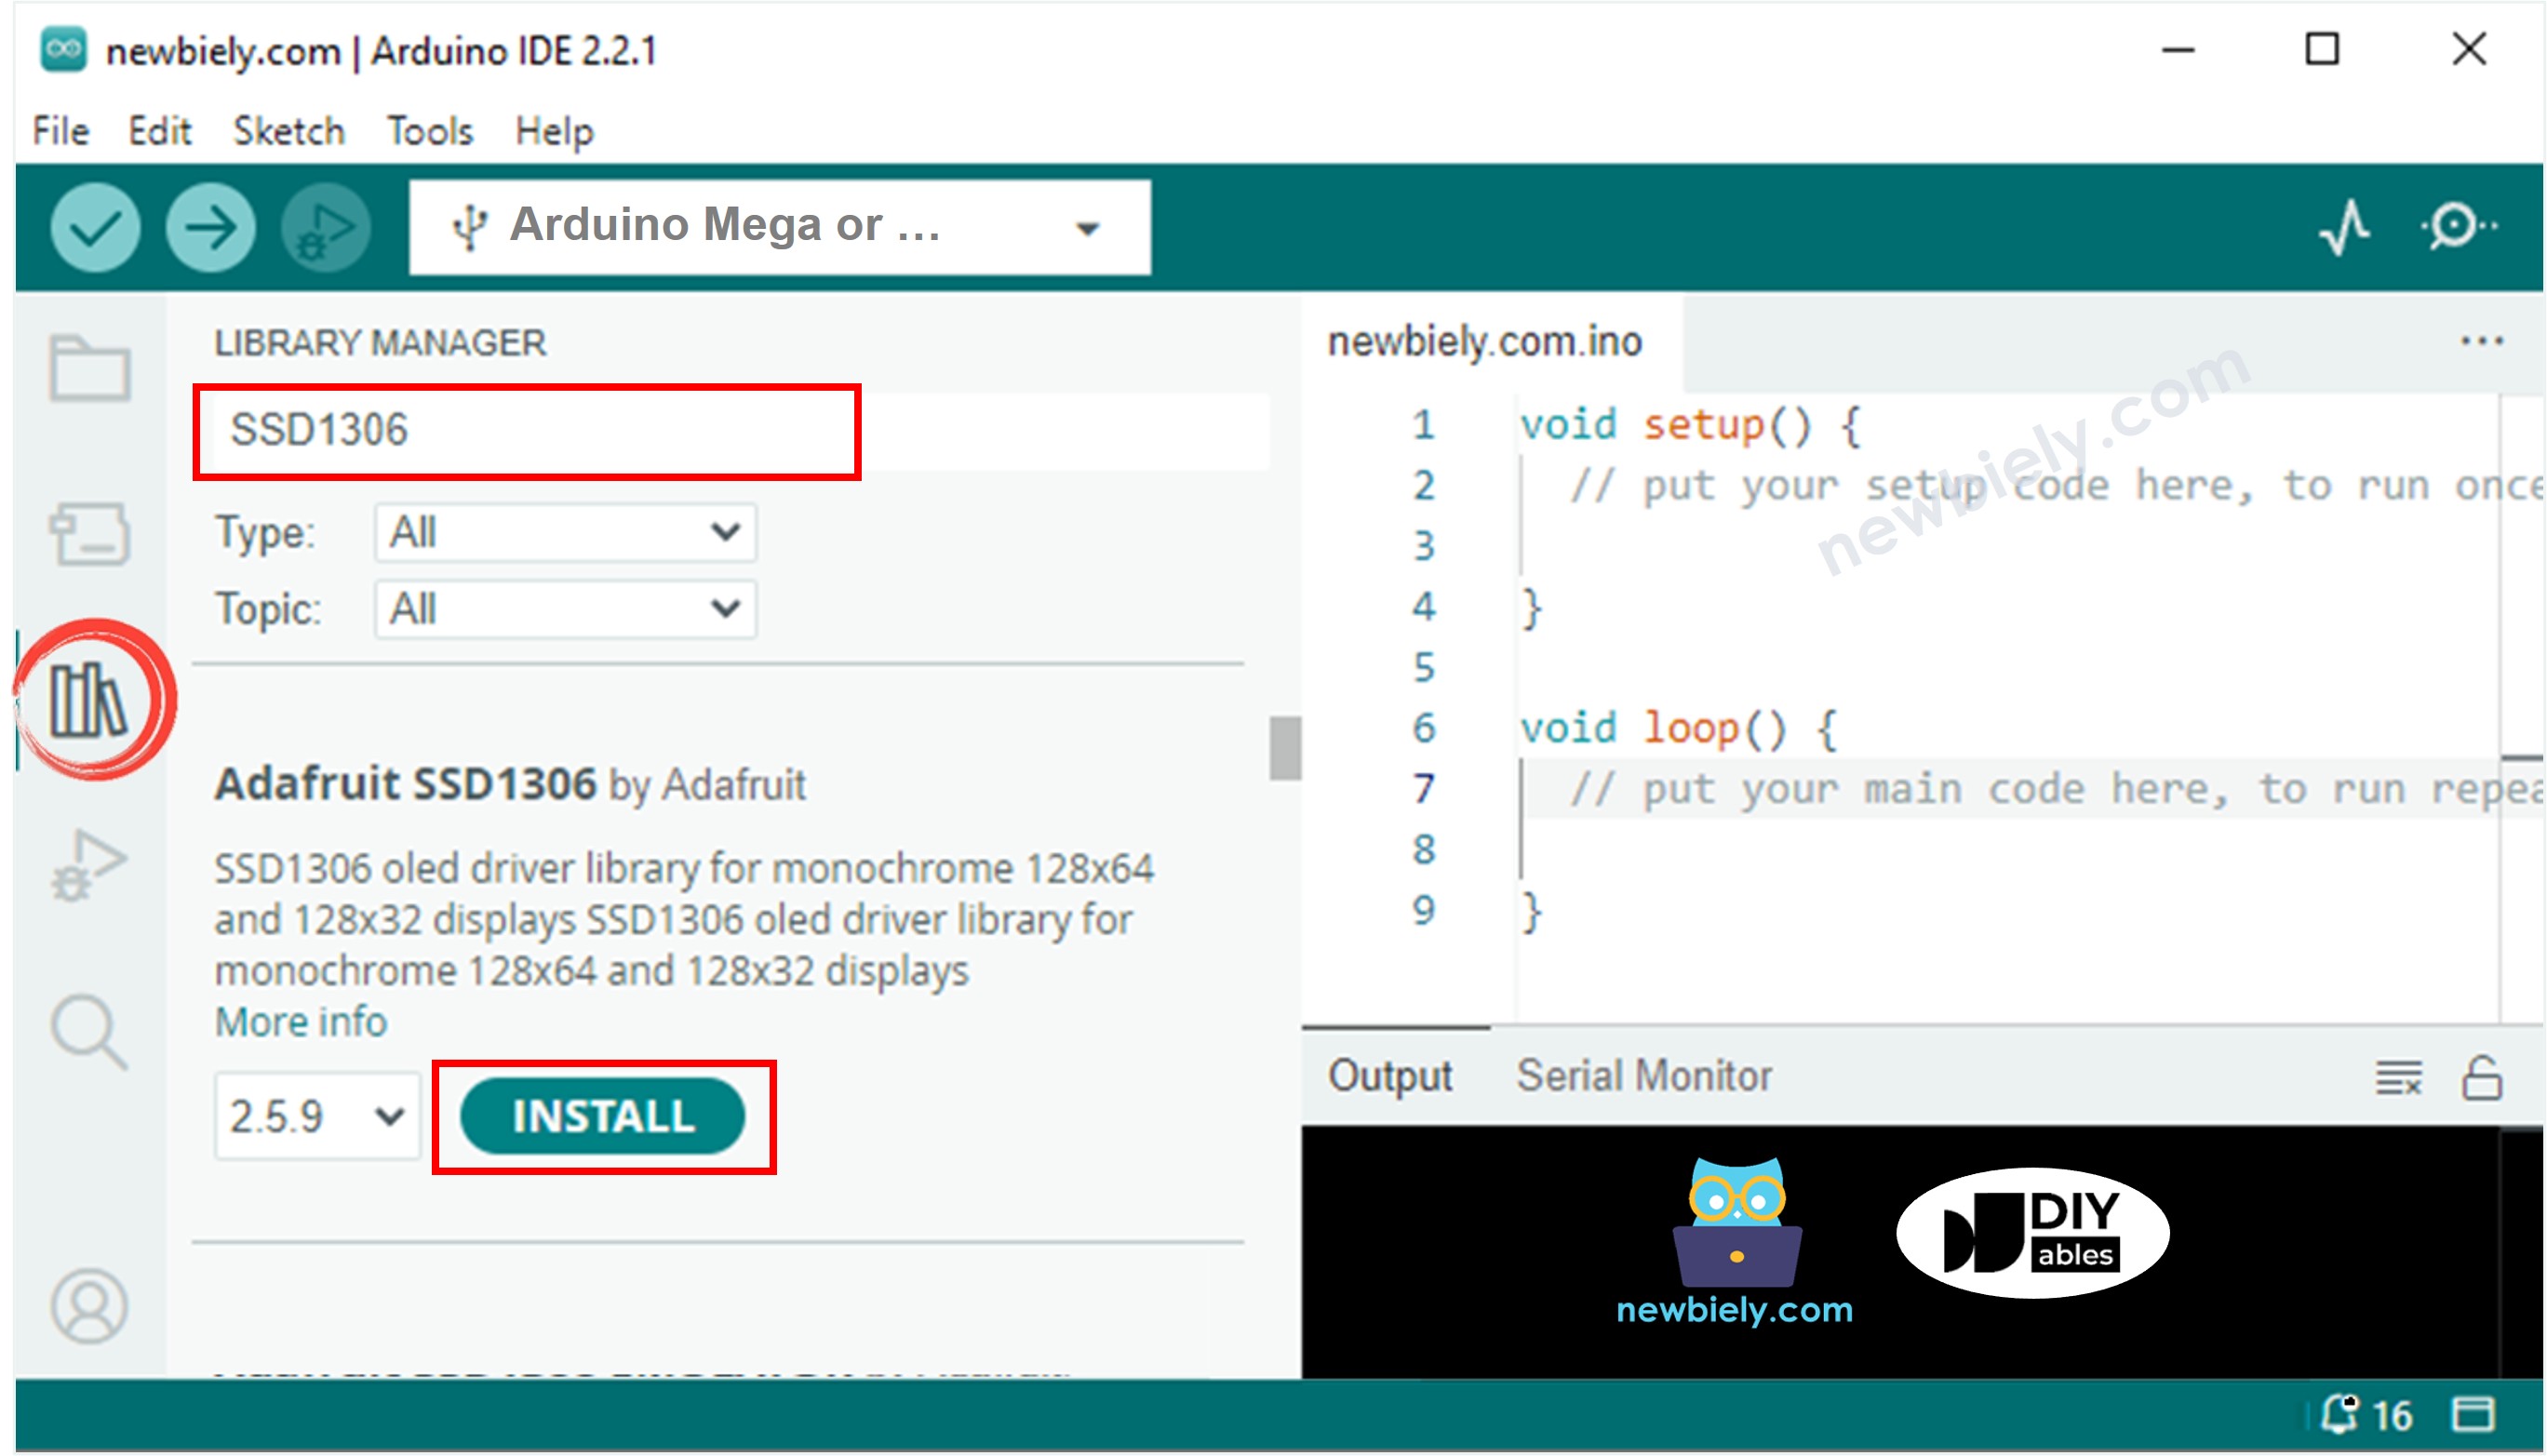
  • Vous devez installer quelques bibliothèques supplémentaires.
  • Cliquez sur le bouton Tout installer pour installer toutes les bibliothèques nécessaires.
Bibliothèque capteur Arduino Mega Adafruit GFX

Comment programmer pour l'OLED

  • Ajouter une bibliothèque.
#include <Wire.h> #include <Adafruit_GFX.h> #include <Adafruit_SSD1306.h>
  • Définir la taille de l'écran OLED 128 par 64 pixels.
#define SCREEN_WIDTH 128 // Sets the width of the OLED display in pixels #define SCREEN_HEIGHT 64 // Sets the height of the OLED display in pixels
  • Créer un écran OLED SSD1306.
// Instantiate Adafruit SSD1306 for I2C communication via the Wire library Adafruit_SSD1306 oled(SCREEN_WIDTH, SCREEN_HEIGHT, &Wire, -1);
  • Dans la fonction setup(), préparer l'écran OLED.
// Initialize OLED over I2C with address 0x3C for 128x64 display if (!oled.begin(SSD1306_SWITCHCAPVCC, 0x3C)) { Serial.println(F("SSD1306 allocation failed")); // Log error when initialization fails while (true); // Halt execution by looping indefinitely }
  • Vous pouvez ensuite afficher du texte, des images et dessiner des lignes.

Code Arduino Mega - Afficher du texte sur l'OLED

/* * Ce code Arduino Mega a été développé par newbiely.fr * Ce code Arduino Mega est mis à disposition du public sans aucune restriction. * Pour des instructions complètes et des schémas de câblage, veuillez visiter: * https://newbiely.fr/tutorials/arduino-mega/arduino-mega-oled-128x64-display */ #include <Wire.h> #include <Adafruit_GFX.h> #include <Adafruit_SSD1306.h> #define SCREEN_WIDTH 128 // OLED display width, in pixels #define SCREEN_HEIGHT 64 // OLED display height, in pixels // declare an SSD1306 display object connected to I2C Adafruit_SSD1306 oled(SCREEN_WIDTH, SCREEN_HEIGHT, &Wire, -1); void setup() { Serial.begin(9600); // initialize OLED display with address 0x3C for 128x64 if (!oled.begin(SSD1306_SWITCHCAPVCC, 0x3C)) { Serial.println(F("SSD1306 allocation failed")); while (true); } delay(2000); // wait for initializing oled.clearDisplay(); // clear display oled.setTextSize(1); // text size oled.setTextColor(WHITE); // text color oled.setCursor(0, 10); // position to display oled.println("Hello World!"); // text to display oled.display(); // show on OLED } void loop() { }

Voici quelques fonctions simples que vous pouvez utiliser pour afficher du texte sur l'écran OLED :

  • Oled.clearDisplay() : éteint tous les pixels sur l'écran.
  • Oled.drawPixel(x, y, color) : dessine un petit point à la position x, y.
  • Oled.setTextSize(n) : définit la taille du texte de 1 (petit) à 8 (grand).
  • Oled.setCursor(x, y) : définit où le texte commence, à x, y.
  • Oled.setTextColor(WHITE) : le texte devient blanc.
  • Oled.setTextColor(BLACK, WHITE) : le texte est noir et l'arrière-plan est blanc.
  • Oled.println("message") : afficher le texte.
  • Oled.println(number) : afficher un nombre.
  • Oled.println(number, HEX) : afficher le nombre en hexadécimal.
  • Oled.display() : afficher les changements sur l'écran.
  • Oled.startscrollright(start, stop) : commencer à déplacer le texte de gauche à droite.
  • Oled.startscrollleft(start, stop) : commencer à déplacer le texte de droite à gauche.
  • Oled.startscrolldiagright(start, stop) : déplacer le texte en diagonale de bas-gauche à haut-droite.
  • Oled.startscrolldiagleft(start, stop) : déplacer le texte en diagonale de bas-droite à haut-gauche.
  • Oled.stopscroll() : arrêter tout défilement de texte.

Comment centrer verticalement et horizontalement le texte/nombre sur l'OLED

/* * Ce code Arduino Mega a été développé par newbiely.fr * Ce code Arduino Mega est mis à disposition du public sans aucune restriction. * Pour des instructions complètes et des schémas de câblage, veuillez visiter: * https://newbiely.fr/tutorials/arduino-mega/arduino-mega-oled-128x64-display */ #include <Wire.h> #include <Adafruit_GFX.h> #include <Adafruit_SSD1306.h> #define SCREEN_WIDTH 128 // OLED display width, in pixels #define SCREEN_HEIGHT 64 // OLED display height, in pixels Adafruit_SSD1306 oled(SCREEN_WIDTH, SCREEN_HEIGHT, &Wire, -1); // // create SSD1306 display object connected to I2C void setup() { Serial.begin(9600); // initialize OLED display with address 0x3C for 128x64 if (!oled.begin(SSD1306_SWITCHCAPVCC, 0x3C)) { Serial.println(F("SSD1306 allocation failed")); while (true); } delay(2000); // wait for initializing oled.clearDisplay(); // clear display oled.setTextSize(2); // text size oled.setTextColor(WHITE); // text color oled.setCursor(0, 10); // position to display } void loop() { // display string String text = "DIYables"; oledDisplayCenter(text); delay(2000); // display number int number = 21; String str = String(number); oledDisplayCenter(str); delay(2000); } void oledDisplayCenter(String text) { int16_t x1; int16_t y1; uint16_t width; uint16_t height; oled.getTextBounds(text, 0, 0, &x1, &y1, &width, &height); // display on horizontal and vertical center oled.clearDisplay(); // clear display oled.setCursor((SCREEN_WIDTH - width) / 2, (SCREEN_HEIGHT - height) / 2); oled.println(text); // text to display oled.display(); }

Code Arduino Mega - Dessiner sur l'OLED

/* * Ce code Arduino Mega a été développé par newbiely.fr * Ce code Arduino Mega est mis à disposition du public sans aucune restriction. * Pour des instructions complètes et des schémas de câblage, veuillez visiter: * https://newbiely.fr/tutorials/arduino-mega/arduino-mega-oled-128x64-display */ #include <Wire.h> #include <Adafruit_GFX.h> #include <Adafruit_SSD1306.h> #define SCREEN_WIDTH 128 // OLED display width, in pixels #define SCREEN_HEIGHT 64 // OLED display height, in pixels // declare an SSD1306 display object connected to I2C Adafruit_SSD1306 oled(SCREEN_WIDTH, SCREEN_HEIGHT, &Wire, -1); void setup() { Serial.begin(9600); // initialize OLED display with address 0x3C for 128x64 if (!oled.begin(SSD1306_SWITCHCAPVCC, 0x3C)) { Serial.println(F("SSD1306 allocation failed")); while (true); } delay(2000); // wait for initializing oled.setCursor(0, 0); } void loop() { // draw rectangle oled.clearDisplay(); oled.drawRect(0, 15, 60, 40, WHITE); oled.display(); delay(2000); // fill rectangle oled.clearDisplay(); oled.fillRect(0, 15, 60, 40, WHITE); oled.display(); delay(2000); // draw the round rectangle oled.clearDisplay(); oled.drawRoundRect(0, 15, 60, 40, 8, WHITE); oled.display(); delay(2000); // fill the round rectangle oled.clearDisplay(); oled.fillRoundRect(0, 15, 60, 40, 8, WHITE); oled.display(); delay(2000); // draw circle oled.clearDisplay(); oled.drawCircle(20, 35, 20, WHITE); oled.display(); delay(2000); // fill circle oled.clearDisplay(); oled.fillCircle(20, 35, 20, WHITE); oled.display(); delay(2000); // draw triangle oled.clearDisplay(); oled.drawTriangle(30, 15, 0, 60, 60, 60, WHITE); oled.display(); delay(2000); // fill triangle oled.clearDisplay(); oled.fillTriangle(30, 15, 0, 60, 60, 60, WHITE); oled.display(); delay(2000); }

Code Arduino Mega - Afficher une image

Pour afficher une image sur un écran OLED, transformez d'abord l'image (n'importe quel format) en tableau bitmap. Vous pouvez utiliser cet outil Convertisseur d'image en bitmap. Regardez l'image ci-dessous pour voir comment transformer une image en tableau bitmap. J'ai transformé l'icône Arduino en tableau bitmap.

image en tableau bitmap

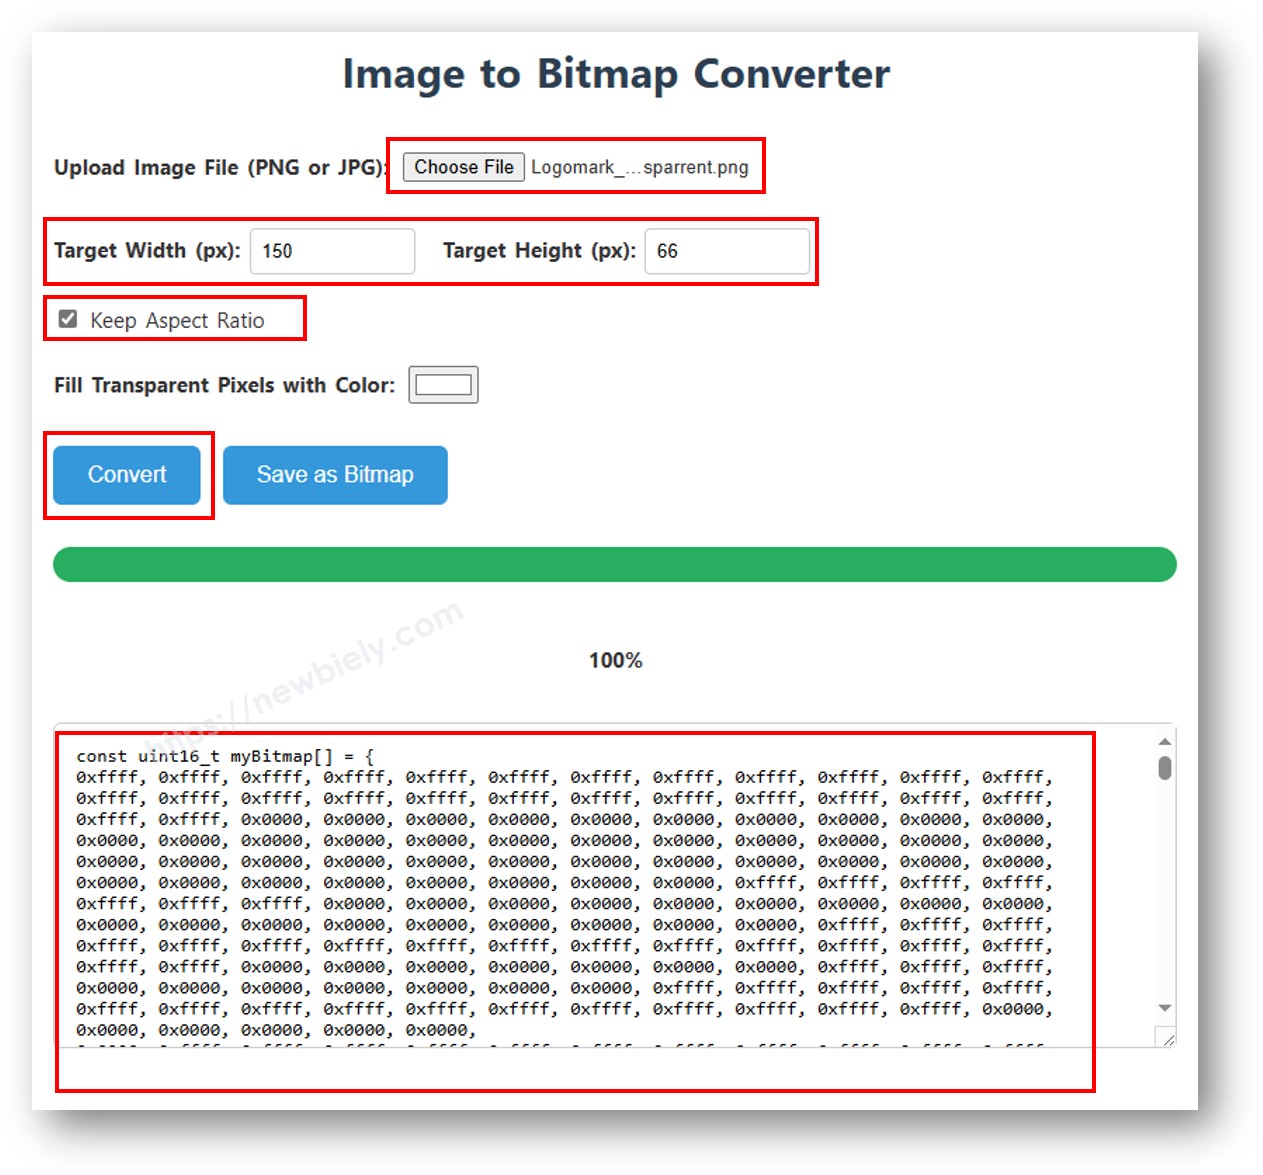
Copiez le nouveau code de tableau et collez-le dans le tableau d'icône Arduino dans le code ci-dessous.

/* * Ce code Arduino Mega a été développé par newbiely.fr * Ce code Arduino Mega est mis à disposition du public sans aucune restriction. * Pour des instructions complètes et des schémas de câblage, veuillez visiter: * https://newbiely.fr/tutorials/arduino-mega/arduino-mega-oled-128x64-display */ #include <Wire.h> #include <Adafruit_GFX.h> #include <Adafruit_SSD1306.h> #define SCREEN_WIDTH 128 // OLED display width, in pixels #define SCREEN_HEIGHT 64 // OLED display height, in pixels // declare an SSD1306 display object connected to I2C Adafruit_SSD1306 oled(SCREEN_WIDTH, SCREEN_HEIGHT, &Wire, -1); // bitmap of arduino-icon image const unsigned char ArduinoIcon [] PROGMEM = { // 'arduino-icon', 128x64px 0xff, 0xff, 0xff, 0xff, 0xff, 0xff, 0xff, 0xff, 0xff, 0xff, 0xff, 0xff, 0xff, 0xff, 0xff, 0xff, 0xff, 0xff, 0xff, 0xff, 0xff, 0xff, 0xff, 0xff, 0xff, 0xff, 0xff, 0xff, 0xff, 0xff, 0xff, 0xff, 0xff, 0xff, 0xfe, 0x00, 0x07, 0xff, 0xff, 0xff, 0xff, 0xff, 0xff, 0x80, 0x01, 0xff, 0xff, 0xff, 0xff, 0xff, 0xe0, 0x00, 0x00, 0xff, 0xff, 0xff, 0xff, 0xff, 0xfc, 0x00, 0x00, 0x3f, 0xff, 0xff, 0xff, 0xff, 0x80, 0x00, 0x00, 0x1f, 0xff, 0xff, 0xff, 0xff, 0xe0, 0x00, 0x00, 0x07, 0xff, 0xff, 0xff, 0xfe, 0x00, 0x00, 0x00, 0x07, 0xff, 0xff, 0xff, 0xff, 0x80, 0x00, 0x00, 0x01, 0xff, 0xff, 0xff, 0xfc, 0x00, 0x00, 0x00, 0x03, 0xff, 0xff, 0xff, 0xff, 0x00, 0x00, 0x00, 0x00, 0xff, 0xff, 0xff, 0xf0, 0x00, 0x00, 0x00, 0x00, 0xff, 0xff, 0xff, 0xfc, 0x00, 0x00, 0x00, 0x00, 0x3f, 0xff, 0xff, 0xe0, 0x00, 0x00, 0x00, 0x00, 0x3f, 0xff, 0xff, 0xf0, 0x00, 0x00, 0x00, 0x00, 0x1f, 0xff, 0xff, 0xc0, 0x00, 0x00, 0x00, 0x00, 0x1f, 0xff, 0xff, 0xe0, 0x00, 0x00, 0x00, 0x00, 0x0f, 0xff, 0xff, 0x80, 0x00, 0x00, 0x00, 0x00, 0x0f, 0xff, 0xff, 0xc0, 0x00, 0x00, 0x00, 0x00, 0x07, 0xff, 0xff, 0x00, 0x00, 0x00, 0x00, 0x00, 0x03, 0xff, 0xff, 0x80, 0x00, 0x00, 0x00, 0x00, 0x03, 0xff, 0xfe, 0x00, 0x00, 0x00, 0x00, 0x00, 0x01, 0xff, 0xfe, 0x00, 0x00, 0x00, 0x00, 0x00, 0x01, 0xff, 0xfc, 0x00, 0x00, 0xff, 0xf0, 0x00, 0x00, 0xff, 0xfc, 0x00, 0x00, 0x3f, 0xfc, 0x00, 0x00, 0xff, 0xfc, 0x00, 0x03, 0xff, 0xfc, 0x00, 0x00, 0x7f, 0xf8, 0x00, 0x00, 0xff, 0xff, 0x00, 0x00, 0xff, 0xf8, 0x00, 0x0f, 0xff, 0xff, 0x00, 0x00, 0x3f, 0xf0, 0x00, 0x03, 0xff, 0xff, 0xc0, 0x00, 0x7f, 0xf0, 0x00, 0x1f, 0xff, 0xff, 0xc0, 0x00, 0x1f, 0xe0, 0x00, 0x0f, 0xff, 0xff, 0xe0, 0x00, 0x7f, 0xf0, 0x00, 0x7f, 0xff, 0xff, 0xe0, 0x00, 0x0f, 0xc0, 0x00, 0x1f, 0xff, 0xff, 0xf8, 0x00, 0x3f, 0xe0, 0x00, 0xff, 0xff, 0xff, 0xf8, 0x00, 0x07, 0x80, 0x00, 0x7f, 0xff, 0xff, 0xfc, 0x00, 0x1f, 0xe0, 0x00, 0xff, 0xff, 0xff, 0xfc, 0x00, 0x03, 0x80, 0x00, 0xff, 0xff, 0xff, 0xfc, 0x00, 0x1f, 0xc0, 0x01, 0xff, 0xff, 0xff, 0xfe, 0x00, 0x03, 0x00, 0x01, 0xff, 0xff, 0xff, 0xfe, 0x00, 0x1f, 0xc0, 0x03, 0xff, 0xff, 0xff, 0xff, 0x00, 0x00, 0x00, 0x03, 0xff, 0xff, 0xff, 0xff, 0x00, 0x0f, 0xc0, 0x03, 0xff, 0xff, 0xff, 0xff, 0x80, 0x00, 0x00, 0x07, 0xff, 0xf0, 0x7f, 0xff, 0x00, 0x0f, 0xc0, 0x07, 0xff, 0xff, 0xff, 0xff, 0xc0, 0x00, 0x00, 0x0f, 0xff, 0xf0, 0x7f, 0xff, 0x80, 0x0f, 0x80, 0x07, 0xff, 0xff, 0xff, 0xff, 0xe0, 0x00, 0x00, 0x1f, 0xff, 0xf0, 0x7f, 0xff, 0x80, 0x07, 0x80, 0x0f, 0xff, 0xff, 0xff, 0xff, 0xf0, 0x00, 0x00, 0x3f, 0xff, 0xf0, 0x7f, 0xff, 0xc0, 0x07, 0x80, 0x0f, 0xff, 0xff, 0xff, 0xff, 0xf8, 0x00, 0x00, 0x7f, 0xff, 0xf0, 0x7f, 0xff, 0xc0, 0x07, 0x80, 0x0f, 0xfe, 0x00, 0x00, 0xff, 0xfc, 0x00, 0x00, 0xff, 0xfc, 0x00, 0x03, 0xff, 0xc0, 0x07, 0x80, 0x0f, 0xfe, 0x00, 0x00, 0xff, 0xfe, 0x00, 0x01, 0xff, 0xfc, 0x00, 0x01, 0xff, 0xc0, 0x07, 0x80, 0x0f, 0xfe, 0x00, 0x00, 0xff, 0xff, 0x00, 0x03, 0xff, 0xfc, 0x00, 0x01, 0xff, 0xc0, 0x07, 0x80, 0x0f, 0xfe, 0x00, 0x00, 0xff, 0xff, 0x00, 0x03, 0xff, 0xfc, 0x00, 0x01, 0xff, 0xc0, 0x07, 0x80, 0x0f, 0xfe, 0x00, 0x00, 0xff, 0xff, 0x00, 0x03, 0xff, 0xfc, 0x00, 0x01, 0xff, 0xc0, 0x07, 0x80, 0x0f, 0xff, 0xff, 0xff, 0xff, 0xfe, 0x00, 0x01, 0xff, 0xff, 0xe0, 0x7f, 0xff, 0xc0, 0x07, 0x80, 0x0f, 0xff, 0xff, 0xff, 0xff, 0xfc, 0x00, 0x00, 0xff, 0xff, 0xf0, 0x7f, 0xff, 0xc0, 0x07, 0x80, 0x0f, 0xff, 0xff, 0xff, 0xff, 0xfc, 0x00, 0x00, 0xff, 0xff, 0xf0, 0x7f, 0xff, 0xc0, 0x07, 0x80, 0x0f, 0xff, 0xff, 0xff, 0xff, 0xf8, 0x00, 0x00, 0x7f, 0xff, 0xf0, 0x7f, 0xff, 0xc0, 0x07, 0x80, 0x0f, 0xff, 0xff, 0xff, 0xff, 0xf0, 0x00, 0x00, 0x3f, 0xff, 0xf0, 0x7f, 0xff, 0x80, 0x07, 0x80, 0x07, 0xff, 0xff, 0xff, 0xff, 0xe0, 0x00, 0x00, 0x1f, 0xff, 0xf0, 0x7f, 0xff, 0x80, 0x07, 0xc0, 0x07, 0xff, 0xff, 0xff, 0xff, 0xc0, 0x00, 0x00, 0x0f, 0xff, 0xff, 0xff, 0xff, 0x80, 0x0f, 0xc0, 0x03, 0xff, 0xff, 0xff, 0xff, 0x80, 0x00, 0x00, 0x07, 0xff, 0xff, 0xff, 0xff, 0x00, 0x0f, 0xc0, 0x03, 0xff, 0xff, 0xff, 0xff, 0x00, 0x00, 0x00, 0x03, 0xff, 0xff, 0xff, 0xff, 0x00, 0x0f, 0xe0, 0x01, 0xff, 0xff, 0xff, 0xfe, 0x00, 0x03, 0x00, 0x01, 0xff, 0xff, 0xff, 0xfe, 0x00, 0x1f, 0xe0, 0x00, 0xff, 0xff, 0xff, 0xfc, 0x00, 0x07, 0x80, 0x00, 0xff, 0xff, 0xff, 0xfc, 0x00, 0x1f, 0xe0, 0x00, 0x7f, 0xff, 0xff, 0xf0, 0x00, 0x0f, 0xc0, 0x00, 0x3f, 0xff, 0xff, 0xf8, 0x00, 0x3f, 0xf0, 0x00, 0x3f, 0xff, 0xff, 0xe0, 0x00, 0x1f, 0xe0, 0x00, 0x1f, 0xff, 0xff, 0xf0, 0x00, 0x3f, 0xf8, 0x00, 0x1f, 0xff, 0xff, 0x80, 0x00, 0x3f, 0xe0, 0x00, 0x07, 0xff, 0xff, 0xe0, 0x00, 0x7f, 0xf8, 0x00, 0x0f, 0xff, 0xff, 0x00, 0x00, 0x7f, 0xf8, 0x00, 0x03, 0xff, 0xff, 0xc0, 0x00, 0x7f, 0xfc, 0x00, 0x03, 0xff, 0xf8, 0x00, 0x00, 0xff, 0xfc, 0x00, 0x00, 0xff, 0xff, 0x00, 0x00, 0xff, 0xfe, 0x00, 0x00, 0x7f, 0xe0, 0x00, 0x01, 0xff, 0xfe, 0x00, 0x00, 0x1f, 0xf8, 0x00, 0x01, 0xff, 0xfe, 0x00, 0x00, 0x00, 0x00, 0x00, 0x03, 0xff, 0xff, 0x00, 0x00, 0x00, 0x00, 0x00, 0x03, 0xff, 0xff, 0x00, 0x00, 0x00, 0x00, 0x00, 0x07, 0xff, 0xff, 0x80, 0x00, 0x00, 0x00, 0x00, 0x03, 0xff, 0xff, 0x80, 0x00, 0x00, 0x00, 0x00, 0x0f, 0xff, 0xff, 0xc0, 0x00, 0x00, 0x00, 0x00, 0x07, 0xff, 0xff, 0xc0, 0x00, 0x00, 0x00, 0x00, 0x1f, 0xff, 0xff, 0xe0, 0x00, 0x00, 0x00, 0x00, 0x0f, 0xff, 0xff, 0xe0, 0x00, 0x00, 0x00, 0x00, 0x7f, 0xff, 0xff, 0xf8, 0x00, 0x00, 0x00, 0x00, 0x3f, 0xff, 0xff, 0xf8, 0x00, 0x00, 0x00, 0x01, 0xff, 0xff, 0xff, 0xfe, 0x00, 0x00, 0x00, 0x00, 0x7f, 0xff, 0xff, 0xfc, 0x00, 0x00, 0x00, 0x03, 0xff, 0xff, 0xff, 0xff, 0x00, 0x00, 0x00, 0x00, 0xff, 0xff, 0xff, 0xff, 0x00, 0x00, 0x00, 0x0f, 0xff, 0xff, 0xff, 0xff, 0xc0, 0x00, 0x00, 0x03, 0xff, 0xff, 0xff, 0xff, 0xc0, 0x00, 0x00, 0x3f, 0xff, 0xff, 0xff, 0xff, 0xf0, 0x00, 0x00, 0x0f, 0xff, 0xff, 0xff, 0xff, 0xf0, 0x00, 0x01, 0xff, 0xff, 0xff, 0xff, 0xff, 0xfe, 0x00, 0x00, 0x3f, 0xff, 0xff, 0xff, 0xff, 0xff, 0x00, 0x0f, 0xff, 0xff, 0xff, 0xff, 0xff, 0xff, 0xc0, 0x03, 0xff, 0xff, 0xff, 0xff, 0xff, 0xff, 0xff, 0xff, 0xff, 0xff, 0xff, 0xff, 0xff, 0xff, 0xff, 0xff, 0xff, 0xff, 0xff, 0xff, 0xff, 0xff, 0xff, 0xff, 0xff, 0xff, 0xff, 0xff, 0xff, 0xff, 0xff, 0xff, 0xff, 0xff, 0xff, 0xff, 0xff, 0xff, 0xff, 0xff, 0xff, 0xff, 0xff, 0xff, 0xff, 0xff, 0xff, 0xff, 0xff, 0xff, 0xff, 0xff, 0xff, 0xff, 0xff, 0xff, 0xff, 0xff, 0xff, 0xff, 0xff, 0xff, 0xff, 0xff, 0xff, 0xff, 0xff }; void setup() { Serial.begin(9600); // initialize OLED display with address 0x3C for 128x64 if (!oled.begin(SSD1306_SWITCHCAPVCC, 0x3C)) { Serial.println(F("SSD1306 allocation failed")); while (true); } delay(2000); // wait for initializing oled.setCursor(0, 0); } void loop() { oled.clearDisplay(); // display bitmap oled.drawBitmap(0, 0, ArduinoIcon, 128, 64, WHITE); oled.display(); delay(2000); // invert display oled.invertDisplay(1); delay(2000); }

※ Note:

  • L'image ne doit pas être plus grande que l'écran.
  • Pour utiliser le code avec un OLED 128x32, redimensionnez l'image et définissez la largeur et la hauteur dans la fonction oled.drawBitmap();.

Dépannage OLED

Si l'écran OLED est vide, veuillez suivre ces étapes :

  • Assurez-vous que le câblage est correct.
  • Vérifiez que votre OLED I2C utilise un pilote SSD1306.
  • Trouvez l'adresse I2C de votre OLED en utilisant le code Scanner d'adresse I2C pour Arduino Mega.
// I2C address scanner program #include <Wire.h> void setup() { Wire.begin(); Serial.begin(9600); Serial.println("I2C Scanner"); } void loop() { byte error, address; int nDevices; Serial.println("Scanning..."); nDevices = 0; for(address = 1; address < 127; address++ ) { Wire.beginTransmission(address); error = Wire.endTransmission(); if (error == 0) { Serial.print("I2C device found at address 0x"); if (address < 16) Serial.print("0"); Serial.print(address,HEX); Serial.println(" !"); nDevices++; } else if (error==4) { Serial.print("Unknown error at address 0x"); if (address < 16) Serial.print("0"); Serial.println(address,HEX); } } if (nDevices == 0) Serial.println("No I2C devices found"); else Serial.println("done"); delay(5000); // wait 5 seconds for next scan }

Ce que vous voyez dans le Moniteur série :

COM6
Send
Scanning... I2C device found at address 0x3C ! done Scanning... I2C device found at address 0x3C ! done
Autoscroll Show timestamp
Clear output
9600 baud  
Newline  

※ NOS MESSAGES

  • N'hésitez pas à partager le lien de ce tutoriel. Cependant, veuillez ne pas utiliser notre contenu sur d'autres sites web. Nous avons investi beaucoup d'efforts et de temps pour créer ce contenu, veuillez respecter notre travail !