ESP32 - Feu de circulation
Ce tutoriel vous explique comment contrôler le module de feux de circulation avec l'ESP32 et MicroPython. Nous aborderons :
- Comment connecter un module de feux de signalisation à l'ESP32
- Comment écrire du code MicroPython pour l'ESP32 afin de contrôler un module de feux de signalisation

Préparation du matériel
Ou vous pouvez acheter les kits suivants:
| 1 | × | Kit de Démarrage DIYables ESP32 (ESP32 inclus) | |
| 1 | × | Kit de Capteurs DIYables (18 capteurs/écrans) |
Divulgation : Certains des liens fournis dans cette section sont des liens affiliés Amazon. Nous pouvons recevoir une commission pour tout achat effectué via ces liens, sans coût supplémentaire pour vous. Nous vous remercions de votre soutien.
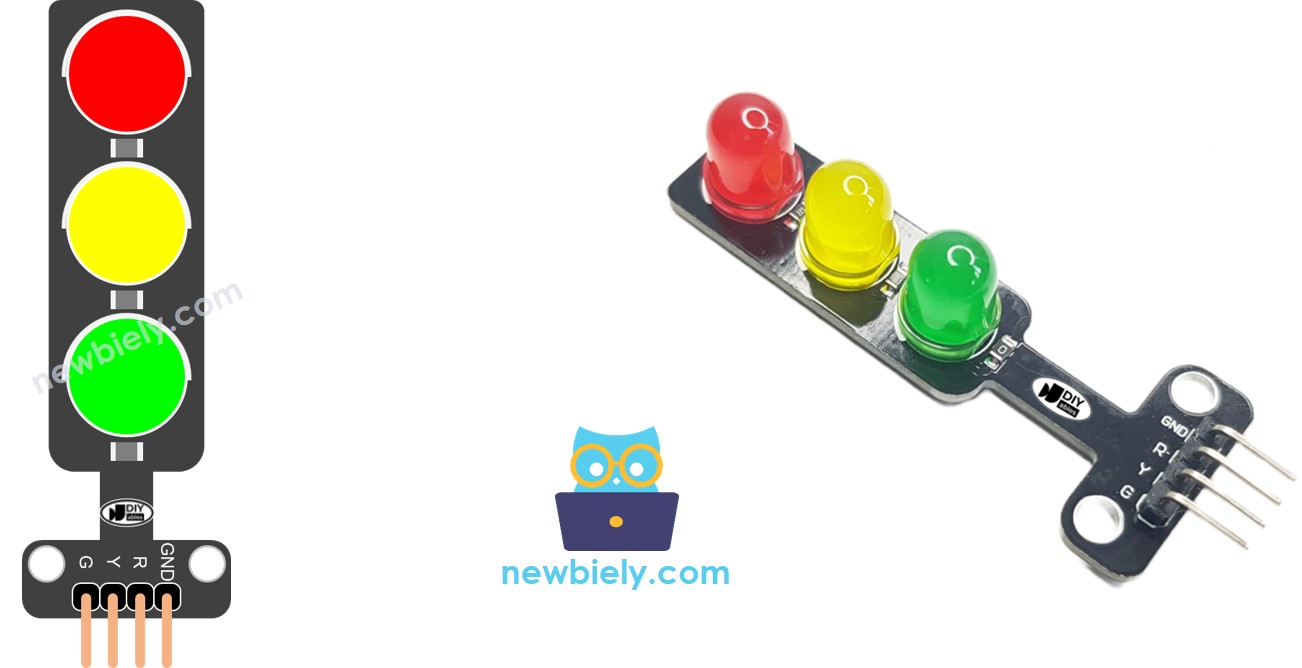
À propos du module de feux de circulation
Schéma de brochage
Le module de feux de circulation a quatre broches.
- Broche GND : Connectez cette broche de masse à la masse de l'ESP32.
- Broche R : Cette broche actionne la lumière rouge. Connectez-la à une sortie numérique de l'ESP32.
- Broche Y : Cette broche actionne la lumière jaune. Connectez-la à une sortie numérique de l'ESP32.
- Broche G : Cette broche actionne la lumière verte. Connectez-la à une sortie numérique de l'ESP32.
Comment cela fonctionne
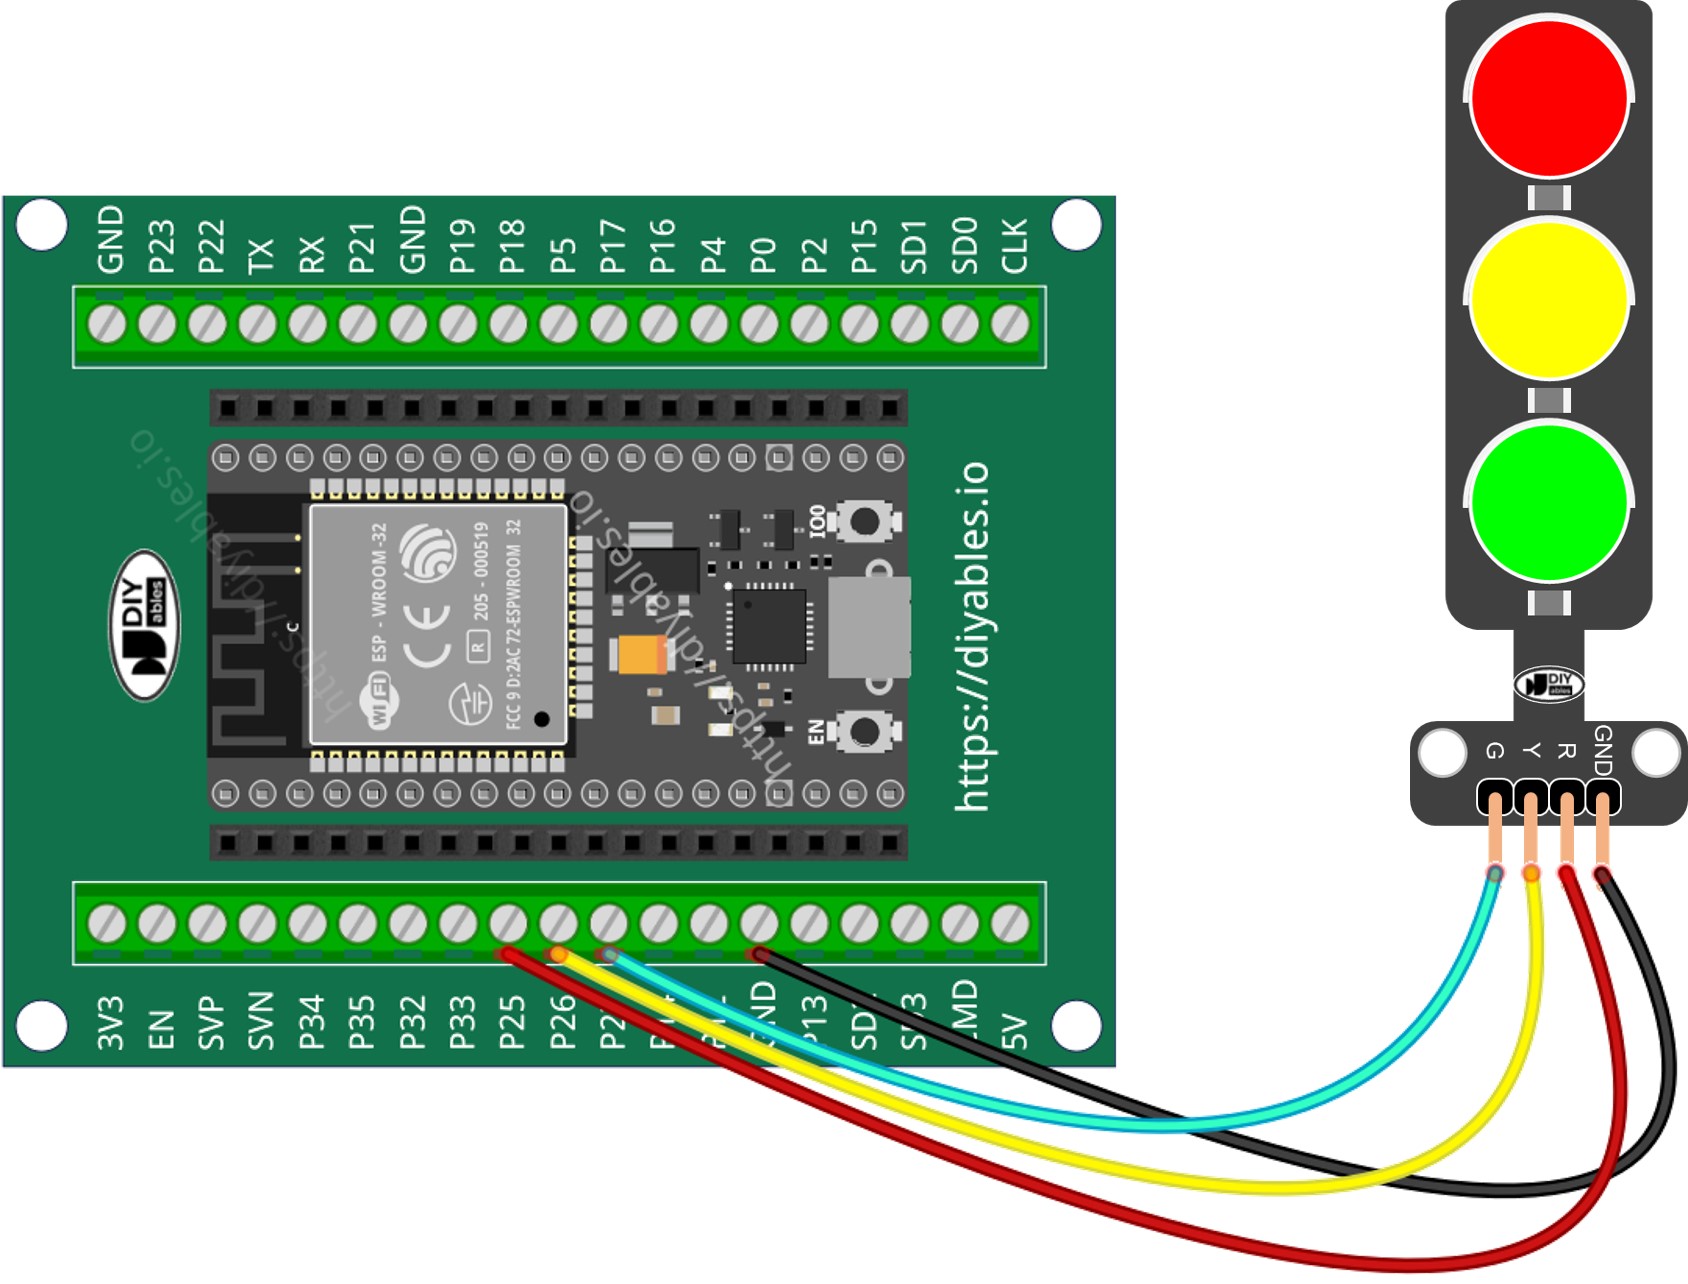
Diagramme de câblage
- Comment connecter l'ESP32 et le feu de circulation en utilisant planche de prototypage
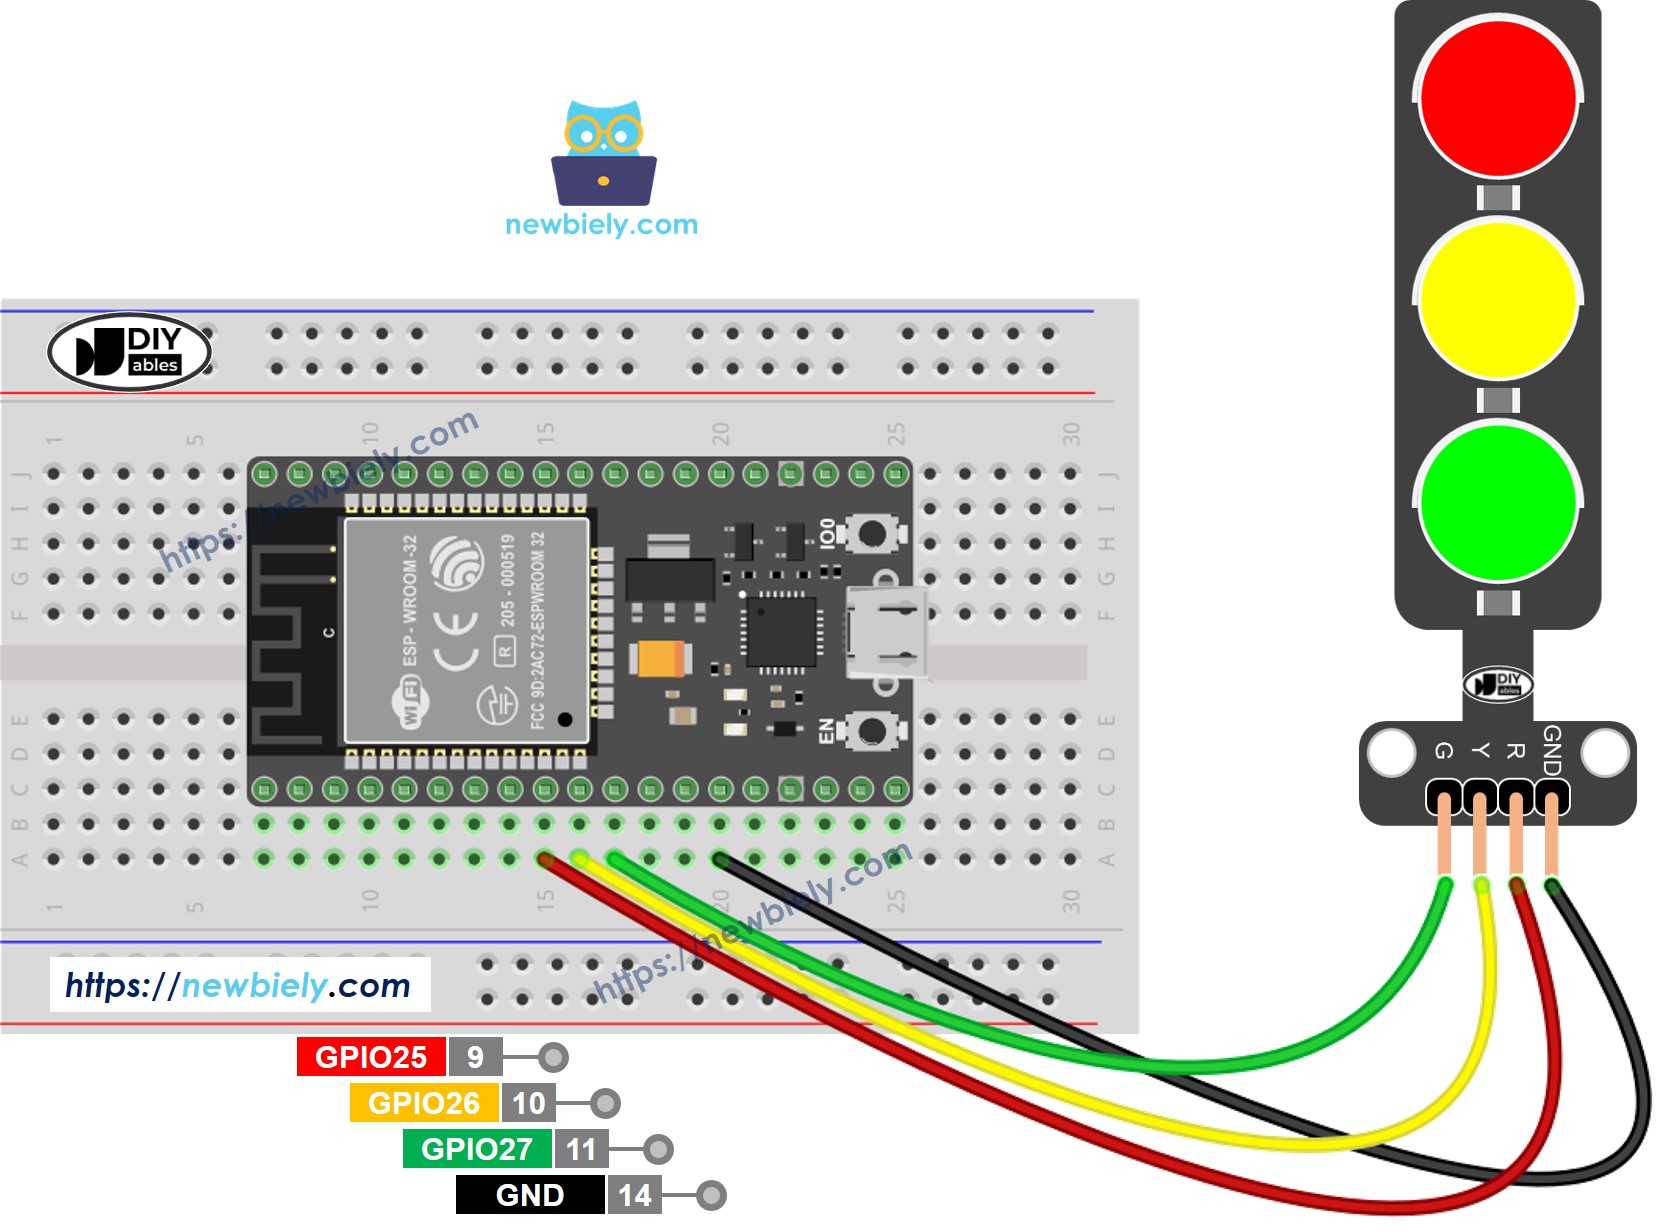
Cette image a été créée avec Fritzing. Cliquez pour agrandir l'image.
- Comment connecter l'ESP32 et le feu de circulation en utilisant la carte d'extension à borniers à vis.
Code MicroPython ESP32
/*
* Ce code ESP32 MicroPython a été développé par newbiely.fr
* Ce code ESP32 MicroPython est mis à disposition du public sans aucune restriction.
* Pour des instructions complètes et des schémas de câblage, veuillez visiter:
* https://newbiely.fr/tutorials/esp32-micropython/esp32-micropython-traffic-light
*/
import machine
import time
# Define pin numbers (you can change these to match your wiring)
PIN_RED = 25 # The ESP32 pin GPIO25 connected to the traffic light module's red pin
PIN_YELLOW = 26 # The ESP32 pin GPIO26 connected to the traffic light module's yellow pin
PIN_GREEN = 27 # The ESP32 pin GPIO27 connected to the traffic light module's green pin
# Define times in seconds (MicroPython uses seconds for time.sleep)
RED_TIME = 4 # RED time in seconds
YELLOW_TIME = 4 # YELLOW time in seconds
GREEN_TIME = 4 # GREEN time in seconds
# Setup pins as output
red = machine.Pin(PIN_RED, machine.Pin.OUT)
yellow = machine.Pin(PIN_YELLOW, machine.Pin.OUT)
green = machine.Pin(PIN_GREEN, machine.Pin.OUT)
# Main loop
while True:
# Red light on
red.value(1) # turn on red
yellow.value(0) # turn off yellow
green.value(0) # turn off green
time.sleep(RED_TIME) # keep red light on for the defined period
# Yellow light on
red.value(0) # turn off red
yellow.value(1) # turn on yellow
green.value(0) # turn off green
time.sleep(YELLOW_TIME) # keep yellow light on for the defined period
# Green light on
red.value(0) # turn off red
yellow.value(0) # turn off yellow
green.value(1) # turn on green
time.sleep(GREEN_TIME) # keep green light on for the defined period
Étapes rapides
Voici les instructions pour configurer et exécuter votre code MicroPython sur l'ESP32 en utilisant l'IDE Thonny :
- Assurez-vous que Thonny IDE est installé sur votre ordinateur.
- Vérifiez que le firmware MicroPython est chargé sur votre carte ESP32.
- Si c'est votre première utilisation d'un ESP32 avec MicroPython, consultez le guide ESP32 - Premiers pas. pour des instructions étape par étape.
- Connectez la carte ESP32 au module de feux de circulation selon le diagramme fourni.
- Connectez la carte ESP32 à votre ordinateur avec un câble USB.
- Ouvrez l'IDE Thonny sur votre ordinateur.
- Dans l'IDE Thonny, allez dans Outils Options.
- Sous l'onglet Interpréteur, choisissez MicroPython (ESP32) dans le menu déroulant.
- Assurez-vous que le port correct est sélectionné. L'IDE Thonny le détecte généralement automatiquement, mais vous devrez peut-être le sélectionner manuellement (comme COM12 sur Windows ou /dev/ttyACM0 sur Linux).
- Copiez le code MicroPython fourni et collez-le dans l'éditeur de Thonny.
- Enregistrez le code sur votre ESP32 en:
- Cliquer sur le bouton Enregistrer ou appuyer sur Ctrl+S.
- Dans la boîte de dialogue d'enregistrement, choisissez périphérique MicroPython.
- Nommez le fichier main.py.
- Cliquez sur le bouton vert Exécuter (ou appuyez sur F5) pour exécuter le script.
- Vérifiez l'état du feu de circulation.
Les feux de circulation fonctionnent de différentes manières, selon leur conception dans chaque endroit. Voici une explication simple de la façon dont les feux de circulation régulent le trafic.
Le code ci-dessus vous permet de contrôler chaque lumière l'une après l'autre. Maintenant, nous allons améliorer le code pour qu'il fonctionne mieux.
Optimisation du code MicroPython pour ESP32
- Améliorons le code en créant une fonction pour gérer la lumière.
/*
* Ce code ESP32 MicroPython a été développé par newbiely.fr
* Ce code ESP32 MicroPython est mis à disposition du public sans aucune restriction.
* Pour des instructions complètes et des schémas de câblage, veuillez visiter:
* https://newbiely.fr/tutorials/esp32-micropython/esp32-micropython-traffic-light
*/
import machine
import time
# Define pin numbers (you can change these to match your wiring)
PIN_RED = 25 # The ESP32 pin GPIO25 connected to the traffic light module's red pin
PIN_YELLOW = 26 # The ESP32 pin GPIO26 connected to the traffic light module's yellow pin
PIN_GREEN = 27 # The ESP32 pin GPIO27 connected to the traffic light module's green pin
# Define times in seconds (MicroPython uses seconds for time.sleep)
RED_TIME = 2 # RED time in seconds
YELLOW_TIME = 1 # YELLOW time in seconds
GREEN_TIME = 2 # GREEN time in seconds
# Define indexes
RED = 0
YELLOW = 1
GREEN = 2
# Setup pins as output and store them in a list
pins = [
machine.Pin(PIN_RED, machine.Pin.OUT),
machine.Pin(PIN_YELLOW, machine.Pin.OUT),
machine.Pin(PIN_GREEN, machine.Pin.OUT)
]
# Define the times array
times = [RED_TIME, YELLOW_TIME, GREEN_TIME]
def trafic_light_on(light):
for i in range(RED, GREEN + 1):
if i == light:
pins[i].value(1) # turn on
else:
pins[i].value(0) # turn off
# Main loop
while True:
# Red light on
trafic_light_on(RED)
time.sleep(times[RED]) # keep red light on during a period of time
# Yellow light on
trafic_light_on(YELLOW)
time.sleep(times[YELLOW]) # keep yellow light on during a period of time
# Green light on
trafic_light_on(GREEN)
time.sleep(times[GREEN]) # keep green light on during a period of time
- Nous pouvons améliorer le code en utilisant une boucle for.
/*
* Ce code ESP32 MicroPython a été développé par newbiely.fr
* Ce code ESP32 MicroPython est mis à disposition du public sans aucune restriction.
* Pour des instructions complètes et des schémas de câblage, veuillez visiter:
* https://newbiely.fr/tutorials/esp32-micropython/esp32-micropython-traffic-light
*/
import machine
import time
# Define pin numbers (you can change these to match your wiring)
PIN_RED = 25 # The ESP32 pin GPIO25 connected to the traffic light module's red pin
PIN_YELLOW = 26 # The ESP32 pin GPIO26 connected to the traffic light module's yellow pin
PIN_GREEN = 27 # The ESP32 pin GPIO27 connected to the traffic light module's green pin
# Define times in milliseconds (MicroPython can handle time in milliseconds with time.sleep_ms)
RED_TIME = 2000 # RED time in milliseconds
YELLOW_TIME = 1000 # YELLOW time in milliseconds
GREEN_TIME = 2000 # GREEN time in milliseconds
# Define indexes
RED = 0
YELLOW = 1
GREEN = 2
# Setup pins as output and store them in a list
pins = [
machine.Pin(PIN_RED, machine.Pin.OUT),
machine.Pin(PIN_YELLOW, machine.Pin.OUT),
machine.Pin(PIN_GREEN, machine.Pin.OUT)
]
# Define the times array
times = [RED_TIME, YELLOW_TIME, GREEN_TIME]
def trafic_light_on(light):
for i in range(RED, GREEN + 1):
if i == light:
pins[i].value(1) # turn on
else:
pins[i].value(0) # turn off
# Main loop
while True:
for light in range(RED, GREEN + 1):
trafic_light_on(light)
time.sleep_ms(times[light]) # keep light on during a period of time
- Améliorons le code en utilisant la fonction millis() au lieu de time.sleep().
/*
* Ce code ESP32 MicroPython a été développé par newbiely.fr
* Ce code ESP32 MicroPython est mis à disposition du public sans aucune restriction.
* Pour des instructions complètes et des schémas de câblage, veuillez visiter:
* https://newbiely.fr/tutorials/esp32-micropython/esp32-micropython-traffic-light
*/
import machine
import time
# Define pin numbers (you can change these to match your wiring)
PIN_RED = 25 # The ESP32 pin GPIO25 connected to the traffic light module's red pin
PIN_YELLOW = 26 # The ESP32 pin GPIO26 connected to the traffic light module's yellow pin
PIN_GREEN = 27 # The ESP32 pin GPIO27 connected to the traffic light module's green pin
# Define times in milliseconds (MicroPython can handle time in milliseconds with time.sleep_ms)
RED_TIME = 2000 # RED time in milliseconds
YELLOW_TIME = 1000 # YELLOW time in milliseconds
GREEN_TIME = 2000 # GREEN time in milliseconds
# Define indexes
RED = 0
YELLOW = 1
GREEN = 2
# Setup pins as output and store them in a list
pins = [
machine.Pin(PIN_RED, machine.Pin.OUT),
machine.Pin(PIN_YELLOW, machine.Pin.OUT),
machine.Pin(PIN_GREEN, machine.Pin.OUT)
]
# Define the times array
times = [RED_TIME, YELLOW_TIME, GREEN_TIME]
# Initialize variables
last_time = time.ticks_ms()
light = RED # start with RED light
def trafic_light_on(light):
for i in range(RED, GREEN + 1):
if i == light:
pins[i].value(1) # turn on
else:
pins[i].value(0) # turn off
# Initialize the first light
trafic_light_on(light)
# Main loop
while True:
current_time = time.ticks_ms()
if time.ticks_diff(current_time, last_time) > times[light]:
light += 1
if light >= 3:
light = RED # reset to RED for a new cycle
trafic_light_on(light)
last_time = current_time
# TO DO: your other code