ESP32 C3 Super Mini - Affichage SSD1309 OLED 128x64 | Tutoriel OLED 2.42 pouces I2C

Apprenez à utiliser l'affichage SSD1309 OLED 128×64 (2.42 pouces) avec votre ESP32 C3 Super Mini en utilisant l'interface I2C. Ce guide convivial pour les débutants couvre tout, du câblage de base aux fonctionnalités avancées comme les images bitmap et les polices personnalisées.

Dans ce tutoriel, vous apprendrez:

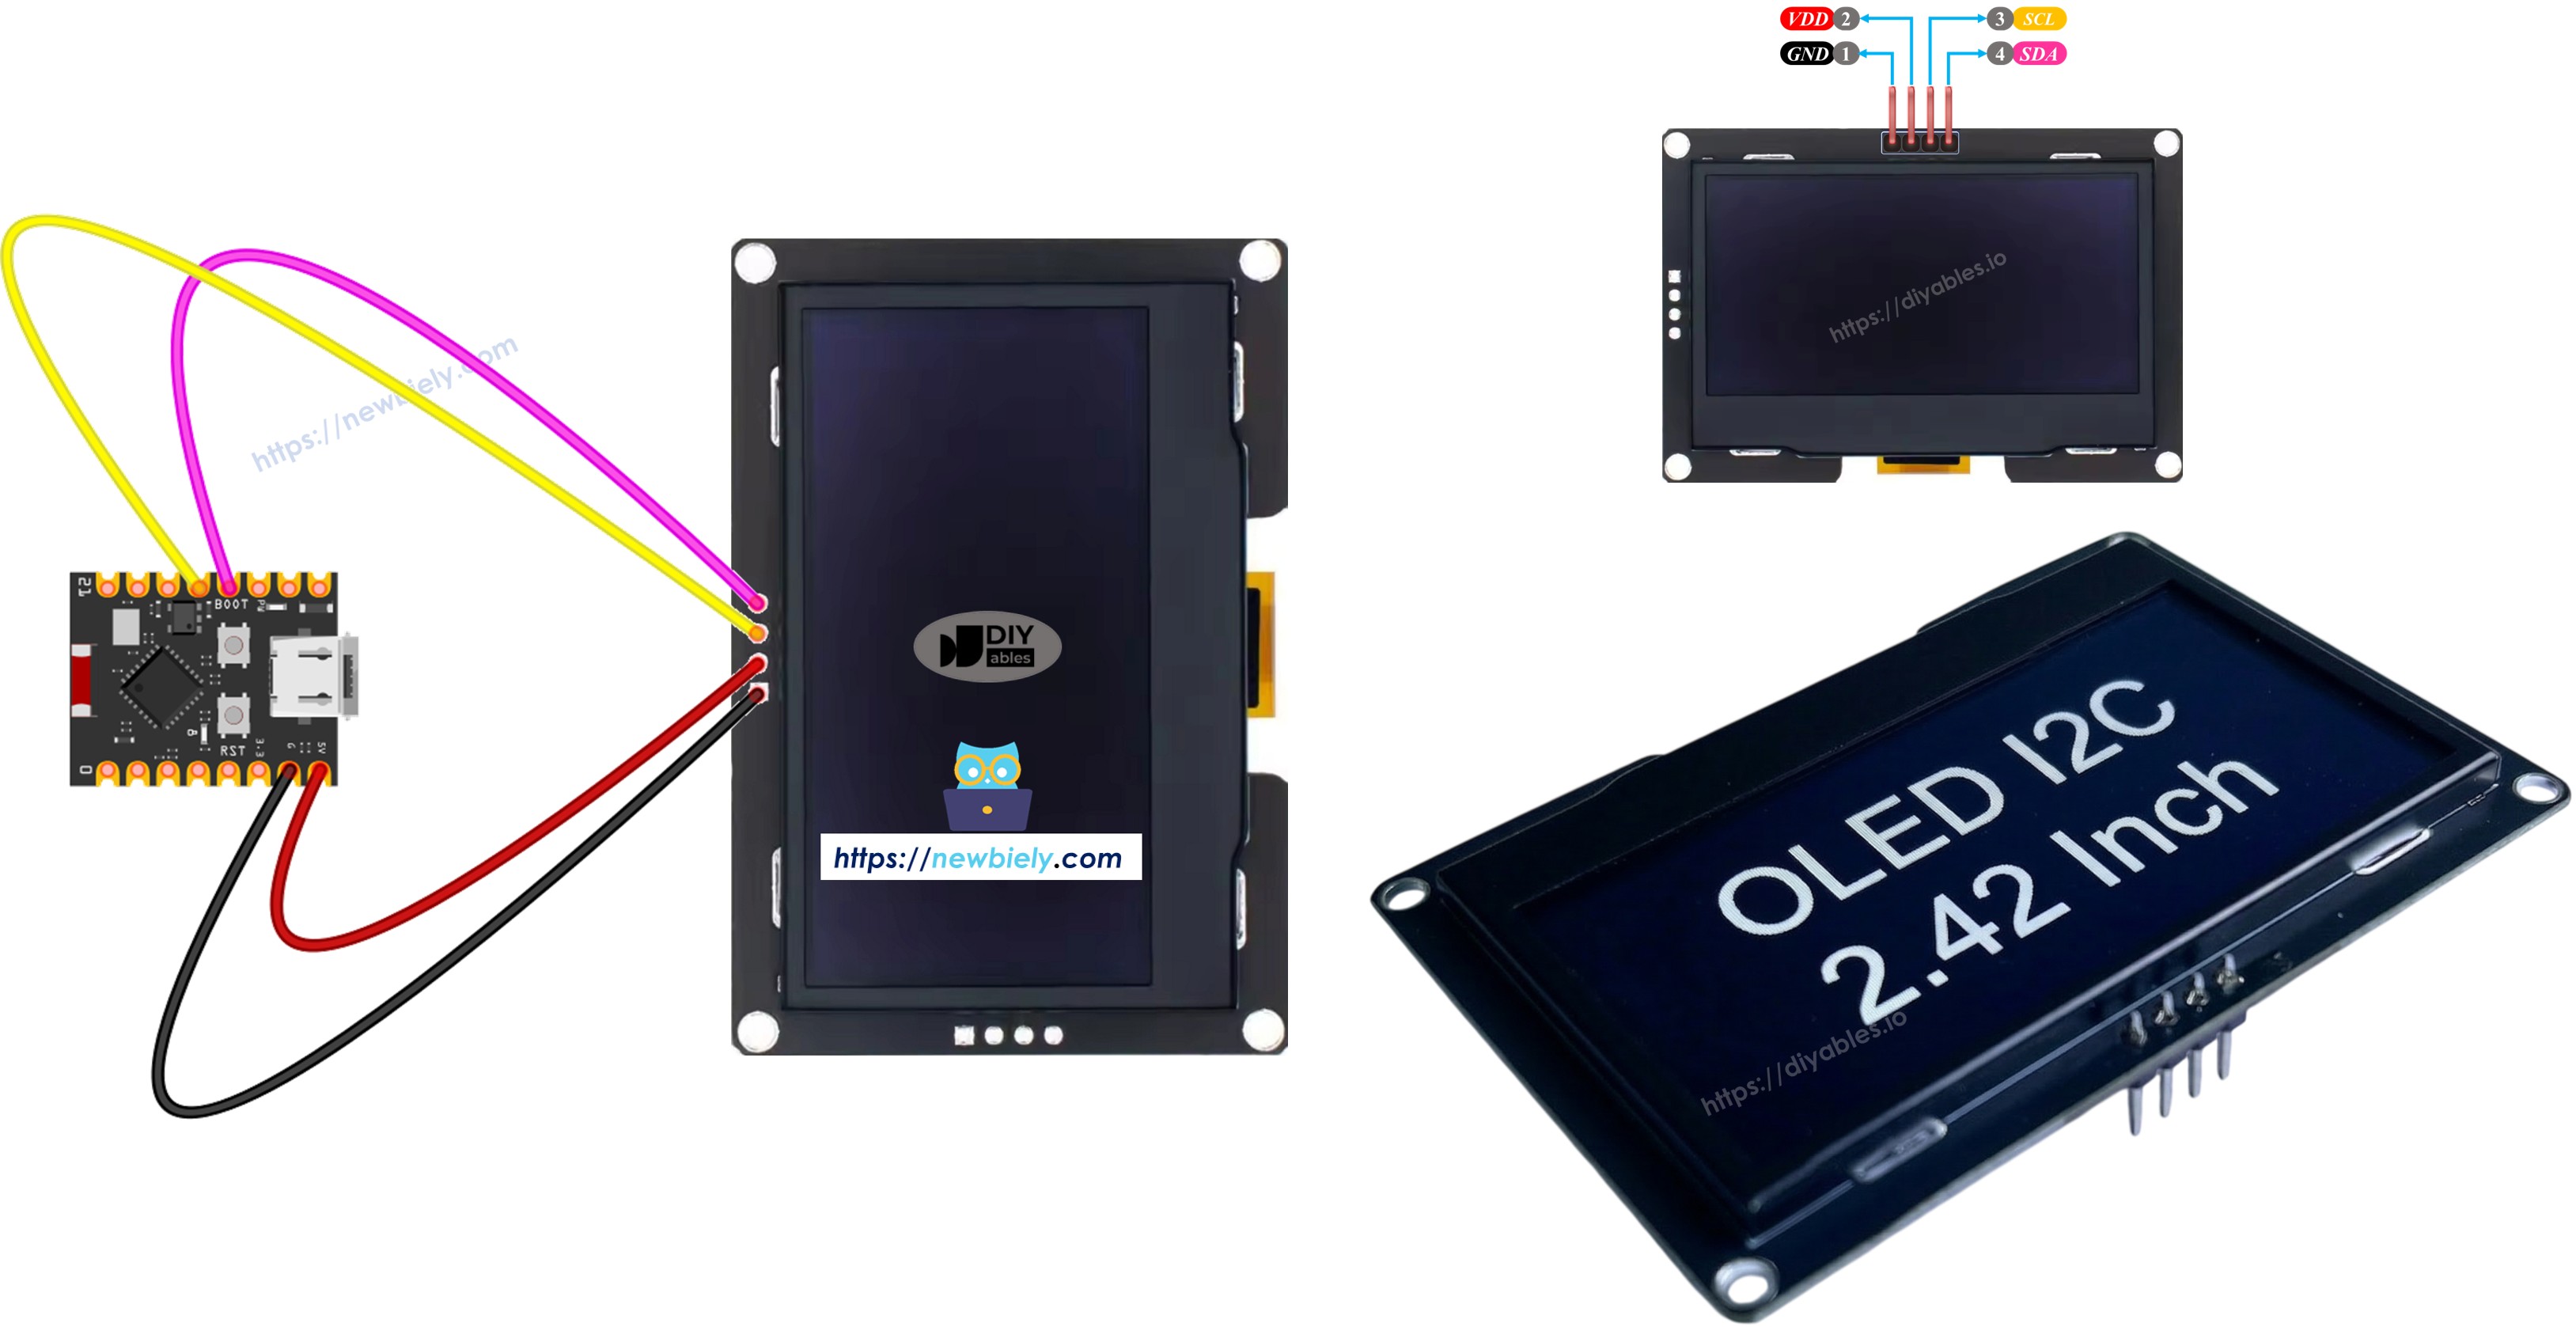
ESP32 C3 Super Mini SSD1309 OLED 128x64 display

Matériel Requis

1×ESP32 C3 Super Mini
1×Câble USB Type-A vers Type-C (pour PC USB-A)
1×Câble USB Type-C vers Type-C (pour PC USB-C)
1×SSD1309 I2C OLED Display 128x64 (2.42 inch)
1×Fils de connexion

Ou vous pouvez acheter les kits suivants:

1×Kit de Capteurs DIYables (18 capteurs/écrans)
Divulgation : Certains des liens fournis dans cette section sont des liens affiliés Amazon. Nous pouvons recevoir une commission pour tout achat effectué via ces liens, sans coût supplémentaire pour vous. Nous vous remercions de votre soutien.

À Propos de l'Affichage SSD1309 2.42 Pouces OLED

Le SSD1309 est une puce pilote CMOS OLED pour les affichages à matrice de points 128×64 qui communiquent via I2C.

Caractéristiques clés:

  • Résolution: pixels 128×64 (diagonale 2.42 pouces)
  • Interface: I2C (seulement 2 fils nécessaires - SDA et SCL)
  • Compatibilité: Compatible au niveau des registres avec SSD1306
  • Tolérance de tension: Accepte jusqu'à 16V VCC (plus élevé que SSD1306)
  • Convertisseur boost intégré: La plupart des modules incluent une régulation d'alimentation intégrée
  • Consommation d'énergie faible: 20-40 mA à pleine luminosité
  • Monochrome: Pixels blancs sur fond noir
  • Pourquoi c'est excellent pour les débutants: Câblage I2C simple, bibliothèque facile à utiliser et partage du bus I2C avec d'autres appareils

Brochage SSD1309 OLED (Module I2C)

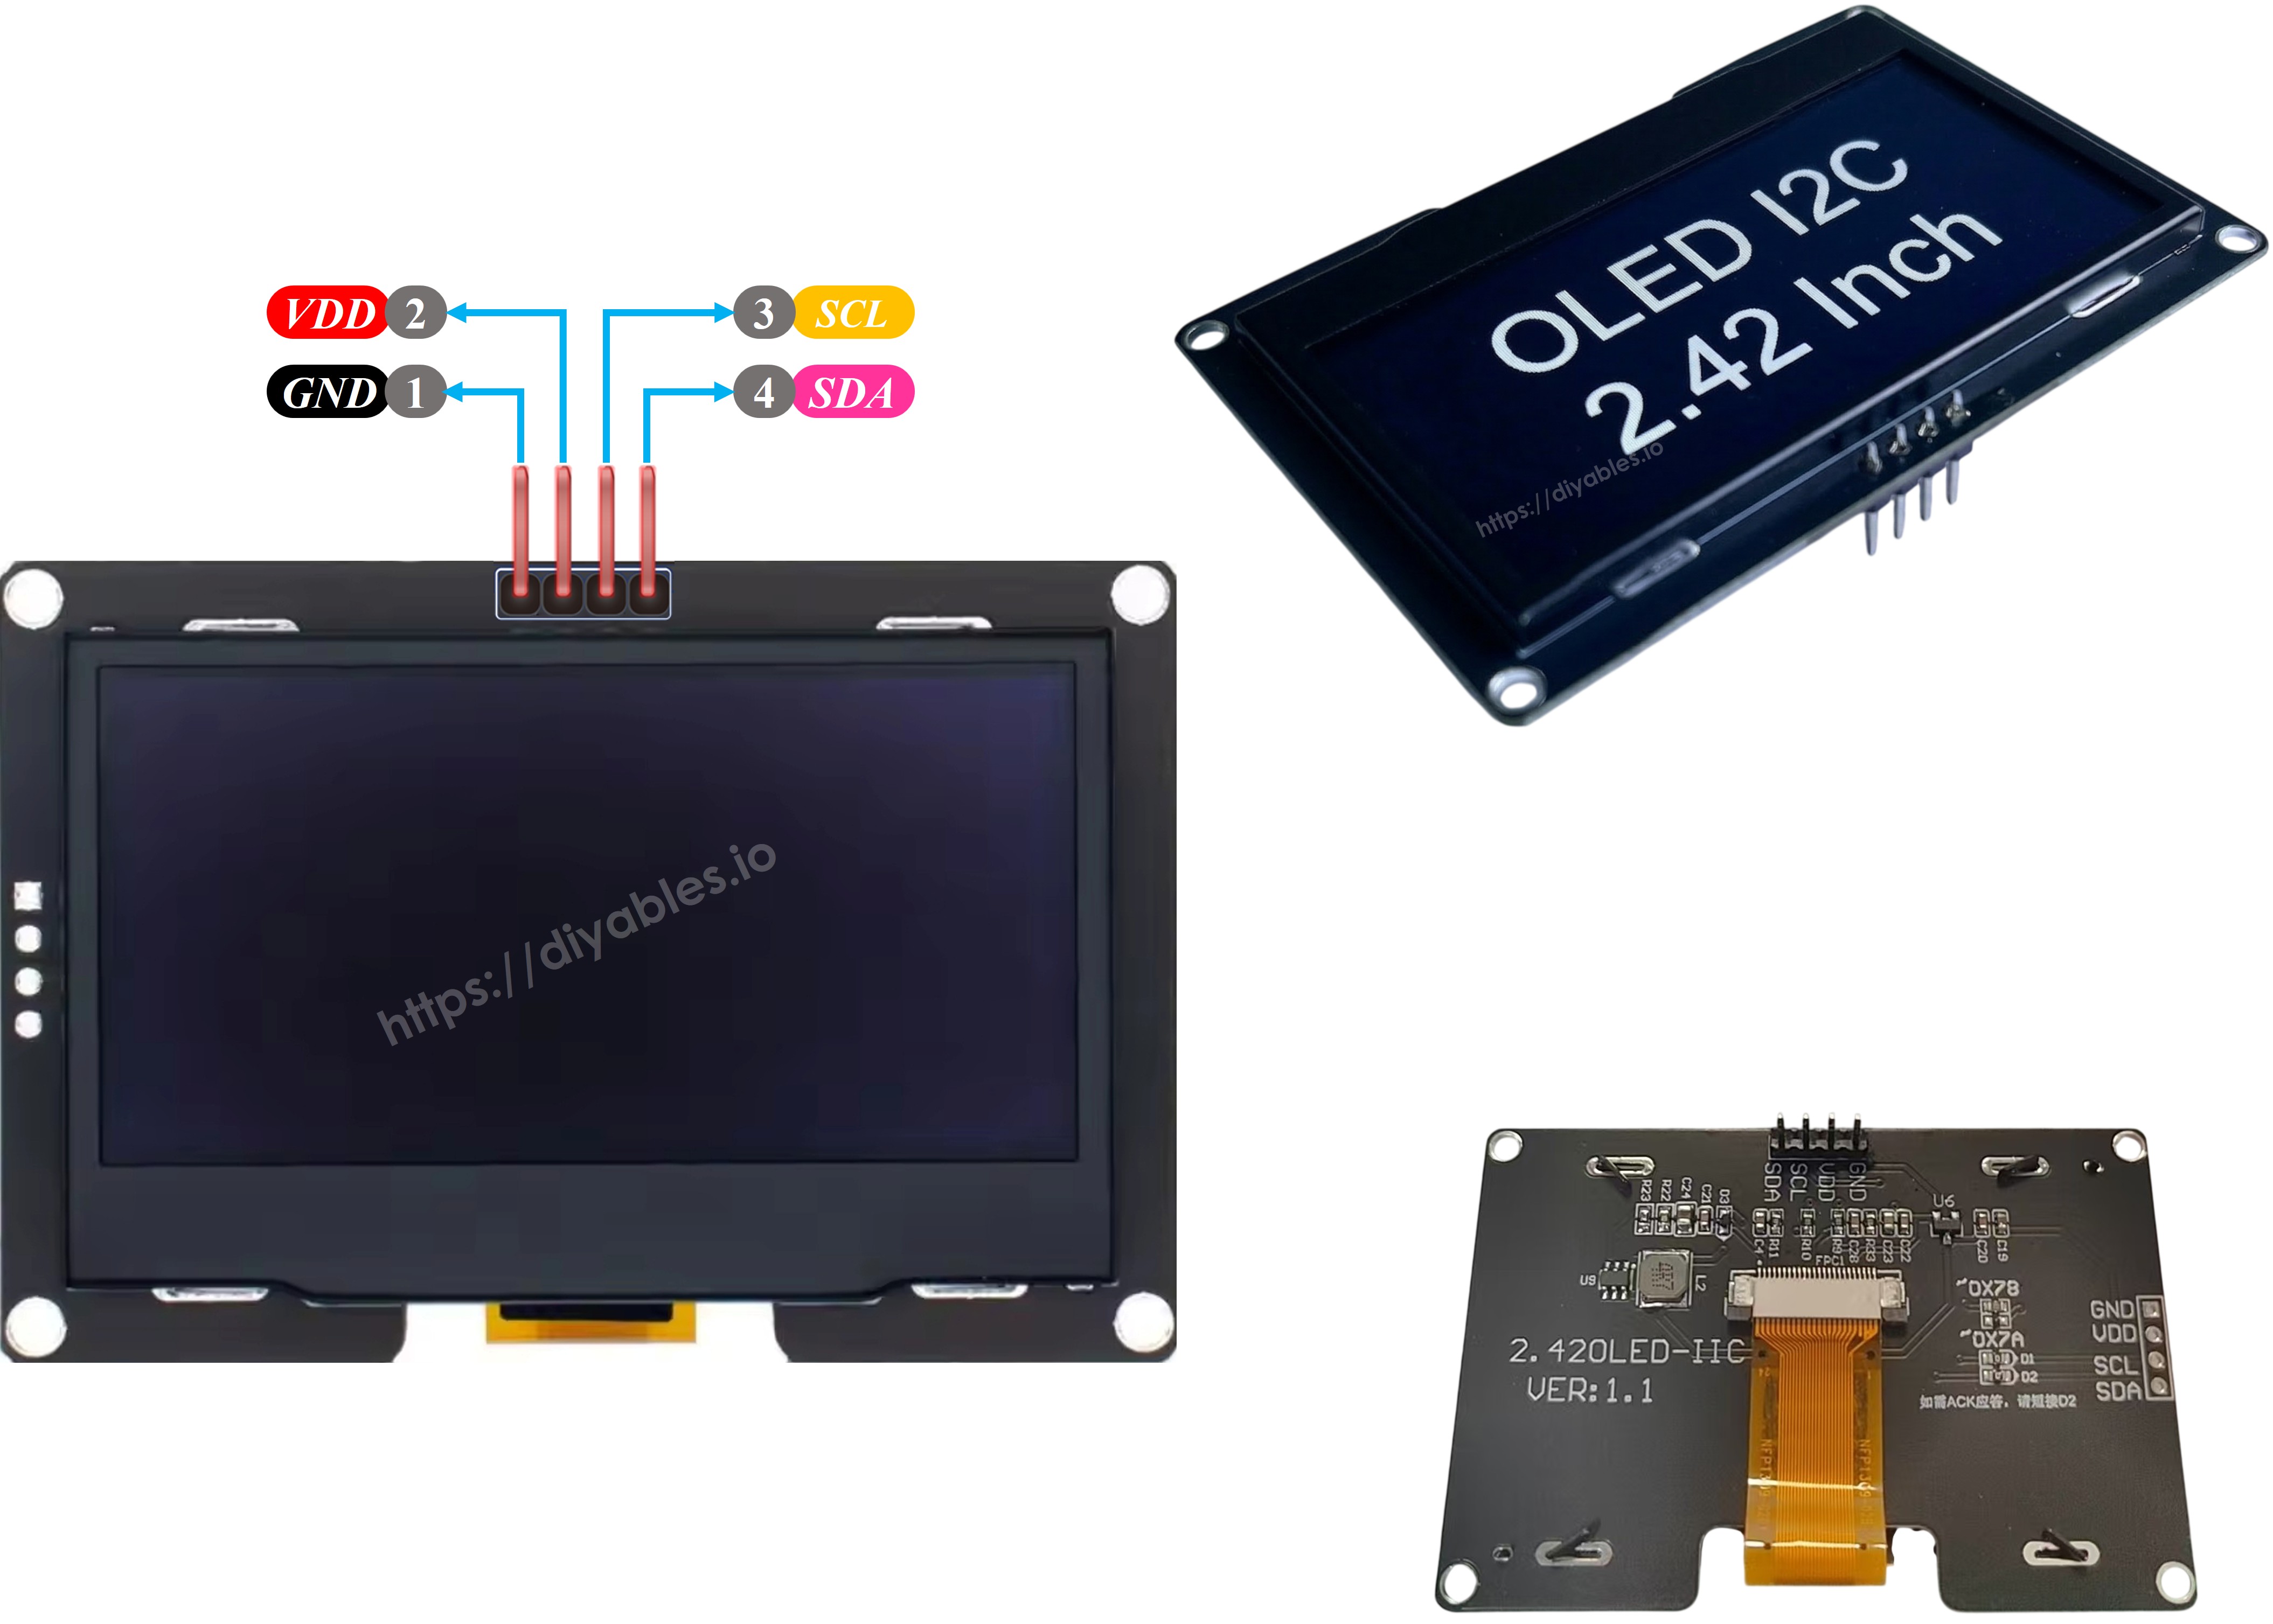
Le module SSD1309 OLED 2.42 pouces a quatre broches:

  • GND: Connexion à la masse
  • VCC: Alimentation (3.3V)
  • SCL: Ligne d'horloge I2C
  • SDA: Ligne de données I2C
SSD1309 OLED Pinout

※ Note:

  • La disposition des broches du module OLED peut différer selon le fabricant. Utilisez toujours les étiquettes imprimées sur le module lui-même.
  • Ce tutoriel utilise le SSD1309 I2C OLED de DIYables, qui a été testé et confirmé pour fonctionner.

Schéma de Câblage

Connectez l'affichage SSD1309 OLED 128x64 à votre ESP32 C3 Super Mini en suivant ce schéma:
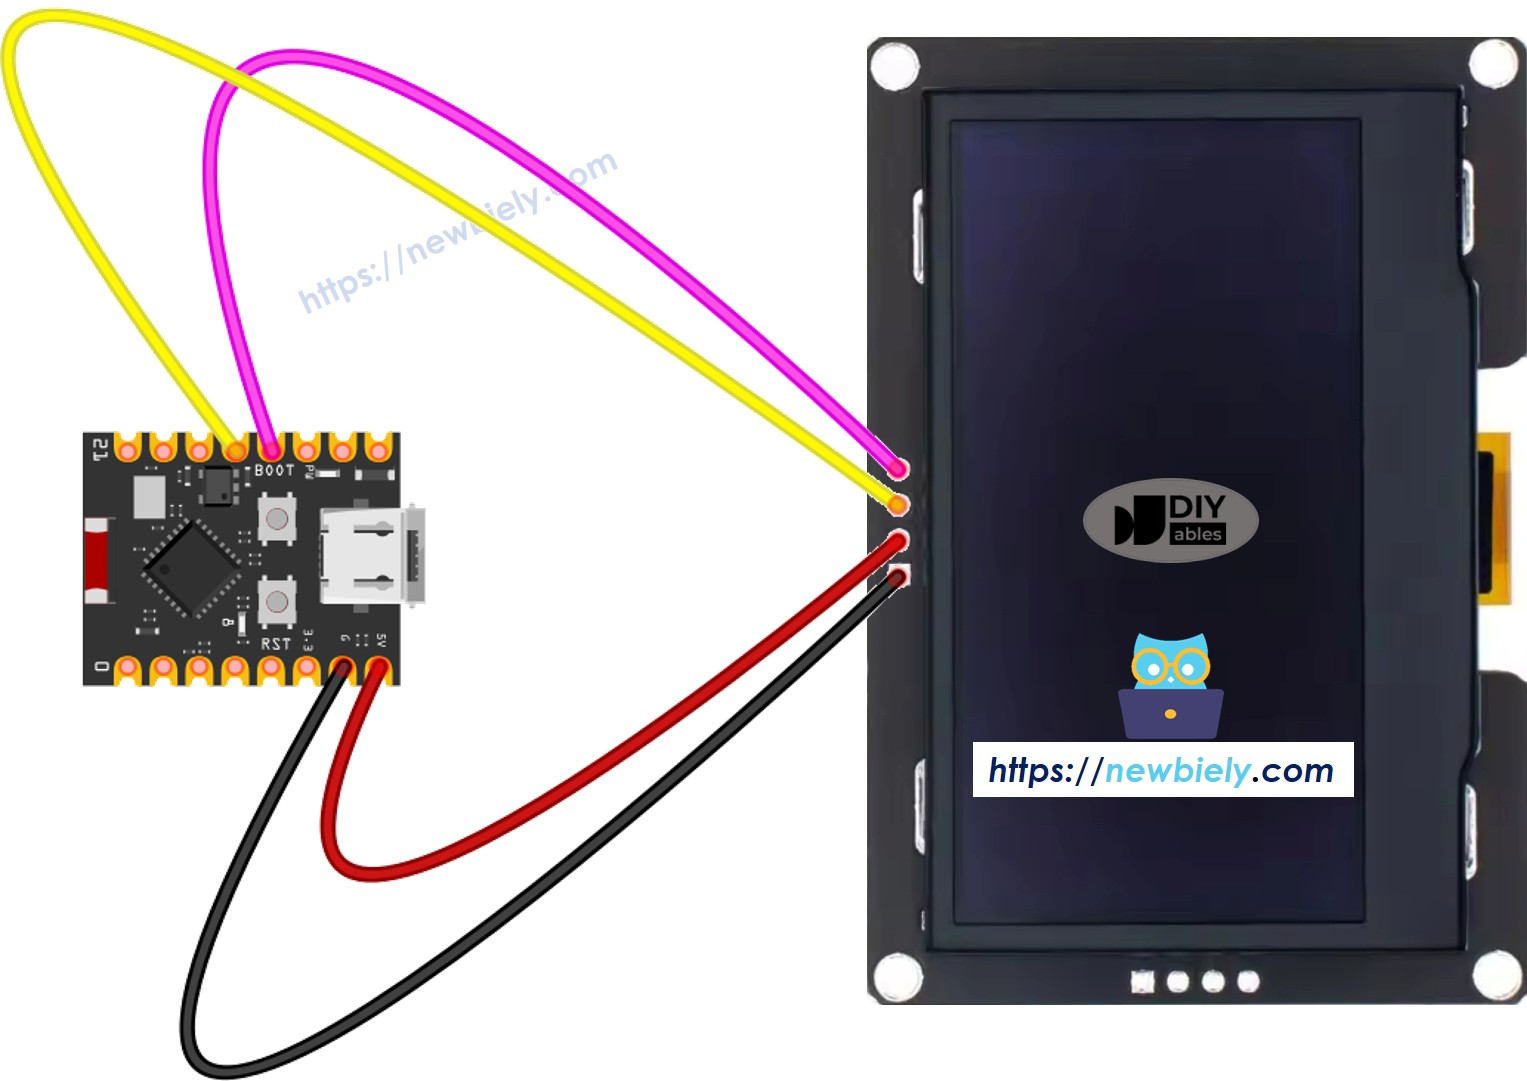
ESP32 C3 Super Mini SSD1309 OLED wiring diagram

Cette image a été créée avec Fritzing. Cliquez pour agrandir l'image.

Tableau de connexion:

Module OLED ESP32 C3 Super Mini
VCC 3.3V
GND GND
SDA A4
SCL A5

※ Note:

  • Remarque: Assurez-vous que les connexions sont sécurisées avant de mettre sous tension
  • Remarque: Les broches I2C (A4/A5) peuvent être partagées avec d'autres appareils I2C

Comment Programmer l'ESP32 C3 Super Mini pour SSD1309 OLED

Cette section vous montre comment installer la bibliothèque requise et écrire du code pour votre affichage SSD1309 OLED ESP32 C3 Super Mini.

Ce que vous ferez:

  • Installez la bibliothèque DIYables_OLED_SSD1309 et les dépendances
  • Initialisez l'affichage OLED I2C dans votre code
  • Affichez du texte, des nombres et des graphiques
  • Utilisez les fonctionnalités avancées comme le défilement et les polices personnalisées

Installez la Bibliothèque DIYables_OLED_SSD1309

  • Cliquez sur l'icône Bibliothèques dans la barre de gauche de l'Arduino IDE.
  • Recherchez DIYables_OLED_SSD1309, puis trouvez la bibliothèque DIYables OLED SSD1309 par DIYables.
  • Cliquez sur Installer pour installer la bibliothèque DIYables_OLED_SSD1309.
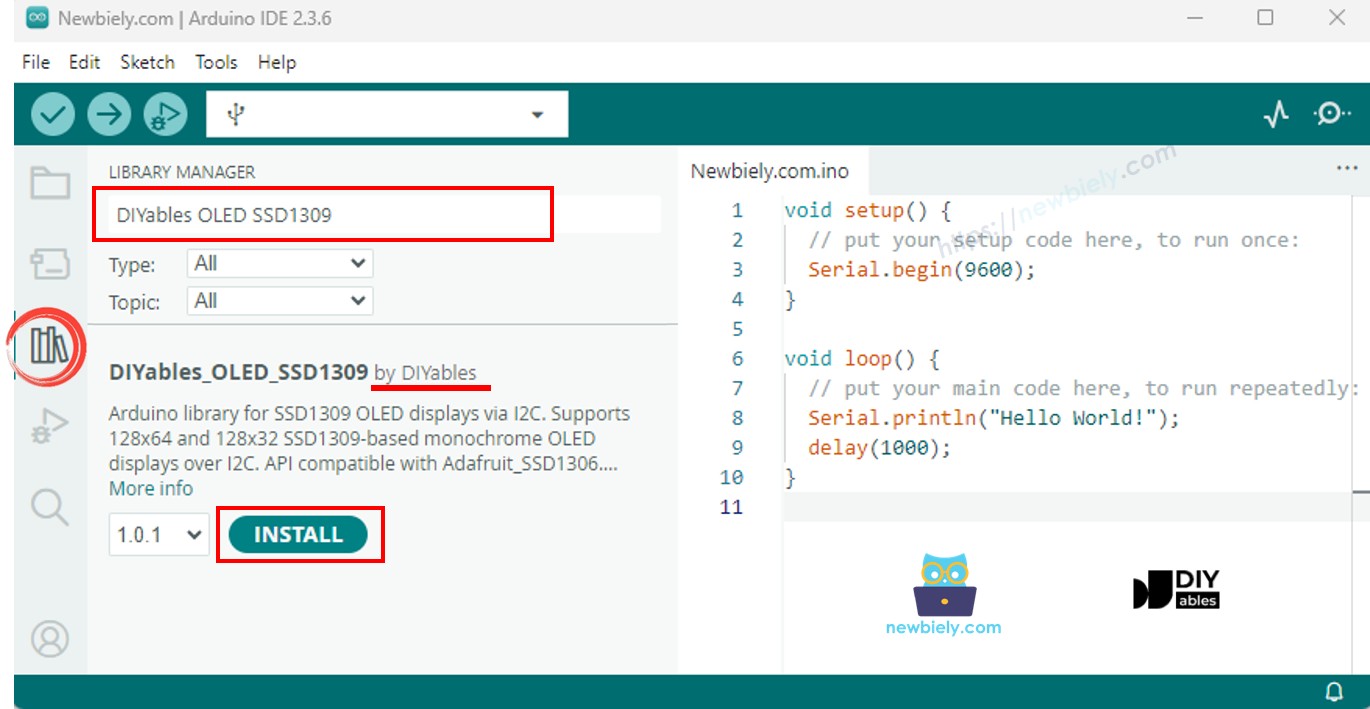
ESP32 C3 Super Mini SSD1309 OLED library
  • Vous serez invité à installer les dépendances de la bibliothèque.
  • Cliquez sur Installer Tout pour installer toutes les dépendances requises.
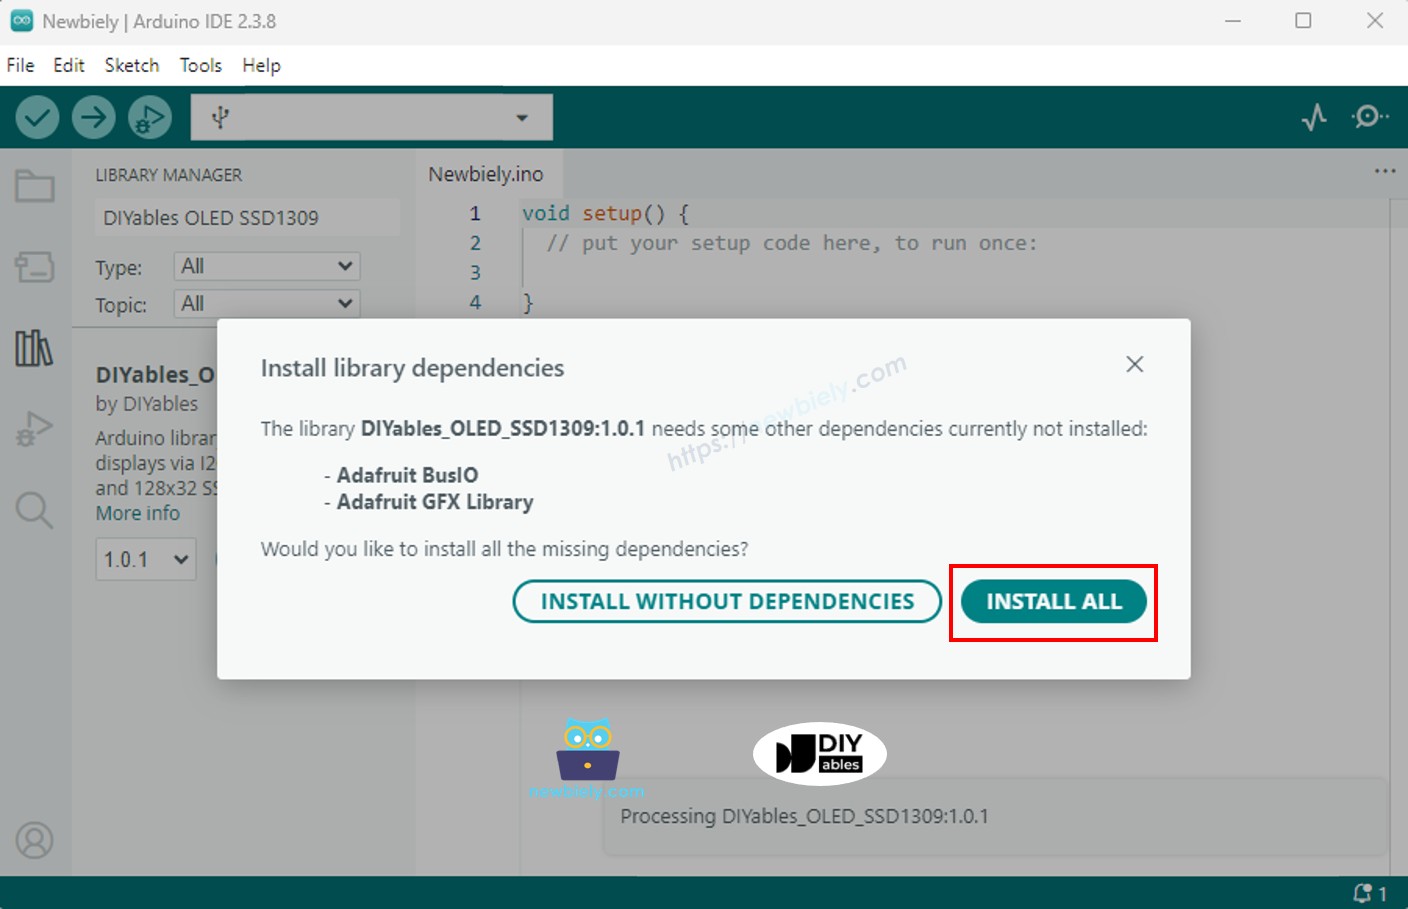
ESP32 C3 Super Mini Adafruit GFX library

Étapes de Programmation

1. Incluez les bibliothèques requises

#include <Wire.h> #include <Adafruit_GFX.h> #include <DIYables_OLED_SSD1309.h>

2. Définissez les dimensions de l'écran

#define SCREEN_WIDTH 128 #define SCREEN_HEIGHT 64

3. Déclarez l'objet d'affichage

#define OLED_RESET -1 // Reset pin not used on most I2C modules #define SCREEN_ADDRESS 0x3C DIYables_OLED_SSD1309 display(SCREEN_WIDTH, SCREEN_HEIGHT, &Wire, OLED_RESET);

4. Initialisez l'OLED dans setup()

if (!display.begin(SSD1309_SWITCHCAPVCC, SCREEN_ADDRESS)) { Serial.println(F("SSD1309 allocation failed")); for (;;); // halt }

5. Affichez du contenu

display.clearDisplay(); display.setTextSize(2); display.setTextColor(SSD1309_PIXEL_ON); display.setCursor(0, 20); display.println(F("Hello ESP32")); display.display(); // push buffer to screen

Code ESP32 C3 Super Mini — Hello World sur SSD1309 OLED

Cet exemple simple affiche le texte "Hello World" sur votre affichage SSD1309 OLED.

Ce que ce code fait:

  • Initialise l'affichage OLED I2C
  • Efface le tampon d'écran
  • Définit la taille et la position du texte
  • Affiche le texte "Hello World"
  • Envoie le tampon à l'écran physique
/* * Ce code ESP32 C3 Super Mini a été développé par newbiely.fr * Ce code ESP32 C3 Super Mini est mis à disposition du public sans aucune restriction. * Pour des instructions complètes et des schémas de câblage, veuillez visiter: * https://newbiely.fr/tutorials/esp32-c3/esp32-c3-super-mini-ssd1309-oled-display */ /* * DIYables OLED SSD1309 – Hello World * Prints text in two sizes on the 2.42 inch 128x64 I2C OLED with Arduino Nano. */ #include <Wire.h> #include <Adafruit_GFX.h> #include <DIYables_OLED_SSD1309.h> #define SCREEN_WIDTH 128 #define SCREEN_HEIGHT 64 #define OLED_RESET -1 #define SCREEN_ADDRESS 0x3C DIYables_OLED_SSD1309 display(SCREEN_WIDTH, SCREEN_HEIGHT, &Wire, OLED_RESET); void setup() { Serial.begin(115200); if (!display.begin(SSD1309_SWITCHCAPVCC, SCREEN_ADDRESS)) { Serial.println(F("SSD1309 allocation failed")); for (;;); } display.clearDisplay(); display.setTextSize(1); // 6x8 pixels per character display.setTextColor(SSD1309_PIXEL_ON); // turn pixels on display.setCursor(0, 0); display.println(F("Hello, World!")); display.println(); display.setTextSize(2); // 12x16 pixels per character display.println(F("DIYables")); display.setTextSize(1); display.println(); display.println(F("SSD1309 OLED 128x64")); display.display(); // push buffer to screen } void loop() { }

Code ESP32 C3 Super Mini — Afficher du Texte sur SSD1309 OLED

Cet exemple montre les fonctionnalités de texte avancées, y compris plusieurs tailles de texte, formatage des nombres et utilisation efficace de la RAM.

Ce que ce code fait:

  • Affiche le texte à différentes tailles
  • Affiche les entiers et les nombres en virgule flottante
  • Utilise la macro F() pour économiser la RAM
  • Formate les nombres en décimal et en hexadécimal
  • Démontre le positionnement correct du curseur
/* * Ce code ESP32 C3 Super Mini a été développé par newbiely.fr * Ce code ESP32 C3 Super Mini est mis à disposition du public sans aucune restriction. * Pour des instructions complètes et des schémas de câblage, veuillez visiter: * https://newbiely.fr/tutorials/esp32-c3/esp32-c3-super-mini-ssd1309-oled-display */ /* * DIYables OLED SSD1309 – Display Text * Displays text in various sizes and formats on the 2.42" SSD1309 OLED with Arduino Nano. */ #include <Wire.h> #include <Adafruit_GFX.h> #include <DIYables_OLED_SSD1309.h> #define SCREEN_WIDTH 128 #define SCREEN_HEIGHT 64 #define OLED_RESET -1 #define SCREEN_ADDRESS 0x3C DIYables_OLED_SSD1309 display(SCREEN_WIDTH, SCREEN_HEIGHT, &Wire, OLED_RESET); void setup() { Serial.begin(115200); if (!display.begin(SSD1309_SWITCHCAPVCC, SCREEN_ADDRESS)) { Serial.println(F("SSD1309 allocation failed")); for (;;); } display.clearDisplay(); // Various text sizes display.setTextSize(1); display.setTextColor(SSD1309_PIXEL_ON); display.setCursor(0, 0); display.println(F("Size 1 - DIYables")); display.setTextSize(2); display.println(F("Size 2")); display.setTextSize(3); display.println(F("Sz3")); display.display(); delay(3000); // Number formatting display.clearDisplay(); display.setTextSize(1); display.setCursor(0, 0); int value = 42; float pi = 3.14159; display.print(F("Integer: ")); display.println(value); display.print(F("Float: ")); display.println(pi, 2); // 2 decimal places display.print(F("Hex: 0x")); display.println(value, HEX); display.print(F("Binary: 0b")); display.println(value, BIN); display.display(); } void loop() { }

Référence des Fonctions d'Affichage Utiles

Contrôle d'affichage de base:

  • oled.clearDisplay() — effacez le tampon de cadre (tous les pixels éteints)
  • oled.display() — transférez le tampon à l'OLED pour que les modifications deviennent visibles
  • oled.drawPixel(x, y, color) — définissez ou effacez un pixel individuel

Fonctions de texte:

  • oled.setTextSize(n) — mettez à l'échelle la police par le facteur *n* (1 = 6×8, 2 = 12×16, etc.)
  • oled.setCursor(x, y) — déplacez le curseur de texte aux coordonnées de pixel *(x, y)*
  • oled.setTextColor(SSD1309_PIXEL_ON) — texte de premier plan uniquement (arrière-plan transparent)
  • oled.setTextColor(SSD1309_PIXEL_OFF, SSD1309_PIXEL_ON) — texte avec couleur d'arrière-plan explicite
  • oled.println("message") — imprimez une chaîne et avancez à la ligne suivante
  • oled.println(number) — imprimez un entier en décimal
  • oled.println(number, HEX) — imprimez un entier en hexadécimal

Défilement matériel:

  • oled.startscrollright(start, stop) — défilement matériel à droite entre la page *start* et *stop*
  • oled.startscrollleft(start, stop) — défilement matériel à gauche
  • oled.startscrolldiagright(start, stop) — défilement matériel en diagonale à droite
  • oled.startscrolldiagleft(start, stop) — défilement matériel en diagonale à gauche
  • oled.stopscroll() — arrêtez tout défilement matériel actif

Paramètres d'affichage:

  • oled.setContrast(value) — ajustez la luminosité de l'affichage (0–255)
  • oled.dim(true/false) — assombrissez ou restaurez rapidement l'affichage
  • oled.invertDisplay(true/false) — inversion de couleur au niveau matériel

Comment Centrer Verticalement et Horizontalement le Texte sur l'OLED SSD1309

Centrer le texte sur votre affichage ESP32 C3 Super Mini OLED crée des interfaces d'aspect professionnel.

Voir How to vertical/horizontal center on OLED

Code ESP32 C3 Super Mini — Dessiner des Formes sur SSD1309 OLED

La bibliothèque DIYables_OLED_SSD1309 vous permet de dessiner des formes géométriques sur votre affichage OLED 128x64.

Ce que ce code fait:

  • Dessine des pixels, des lignes et des rectangles
  • Crée des cercles et des triangles
  • Affiche les formes remplies et en contour
  • Démontre les rectangles arrondis
  • Utilise les fonctions graphiques Adafruit GFX
/* * Ce code ESP32 C3 Super Mini a été développé par newbiely.fr * Ce code ESP32 C3 Super Mini est mis à disposition du public sans aucune restriction. * Pour des instructions complètes et des schémas de câblage, veuillez visiter: * https://newbiely.fr/tutorials/esp32-c3/esp32-c3-super-mini-ssd1309-oled-display */ /* * DIYables OLED SSD1309 – Draw Shapes * Demonstrates drawing pixels, lines, rectangles, circles, and triangles on the 2.42" OLED with Arduino Nano. */ #include <Wire.h> #include <Adafruit_GFX.h> #include <DIYables_OLED_SSD1309.h> #define SCREEN_WIDTH 128 #define SCREEN_HEIGHT 64 #define OLED_RESET -1 #define SCREEN_ADDRESS 0x3C DIYables_OLED_SSD1309 display(SCREEN_WIDTH, SCREEN_HEIGHT, &Wire, OLED_RESET); void setup() { Serial.begin(115200); if (!display.begin(SSD1309_SWITCHCAPVCC, SCREEN_ADDRESS)) { Serial.println(F("SSD1309 allocation failed")); for (;;); } display.clearDisplay(); display.display(); } void loop() { // Draw pixels display.clearDisplay(); for (int i = 0; i < 20; i++) { display.drawPixel(random(SCREEN_WIDTH), random(SCREEN_HEIGHT), SSD1309_PIXEL_ON); } display.display(); delay(2000); // Draw lines display.clearDisplay(); for (int y = 0; y < SCREEN_HEIGHT; y += 8) { display.drawLine(0, 0, SCREEN_WIDTH - 1, y, SSD1309_PIXEL_ON); } display.display(); delay(2000); // Draw rectangles display.clearDisplay(); display.drawRect(10, 10, 40, 30, SSD1309_PIXEL_ON); // outline display.fillRect(60, 10, 40, 30, SSD1309_PIXEL_ON); // filled display.drawRoundRect(10, 45, 40, 15, 5, SSD1309_PIXEL_ON); // rounded corners display.display(); delay(2000); // Draw circles display.clearDisplay(); display.drawCircle(32, 32, 20, SSD1309_PIXEL_ON); // outline display.fillCircle(96, 32, 20, SSD1309_PIXEL_ON); // filled display.display(); delay(2000); // Draw triangles display.clearDisplay(); display.drawTriangle(20, 10, 10, 50, 30, 50, SSD1309_PIXEL_ON); // outline display.fillTriangle(90, 10, 70, 50, 110, 50, SSD1309_PIXEL_ON); // filled display.display(); delay(2000); }

Code ESP32 C3 Super Mini — Défilement Matériel sur SSD1309 OLED

L'OLED SSD1309 inclut un défilement matériel intégré qui déplace le contenu sans utiliser les ressources CPU.

Ce que ce code fait:

  • Démontre les quatre directions de défilement (droite, gauche, diagonale-droite, diagonale-gauche)
  • Utilise l'accélération matérielle pour un défilement fluide
  • Montre comment démarrer et arrêter le défilement
  • Fonctionne avec les numéros de page (0-7 pour les bandes hautes de 8 pixels)

※ Note:

Appelez display() pour pousser votre contenu à l'OLED avant de commencer un défilement. Arrêtez le défilement avec stopscroll() avant de dessiner du nouveau contenu.

/* * Ce code ESP32 C3 Super Mini a été développé par newbiely.fr * Ce code ESP32 C3 Super Mini est mis à disposition du public sans aucune restriction. * Pour des instructions complètes et des schémas de câblage, veuillez visiter: * https://newbiely.fr/tutorials/esp32-c3/esp32-c3-super-mini-ssd1309-oled-display */ /* * DIYables OLED SSD1309 – Scroll Text * Demonstrates all four hardware scroll directions on the 2.42" OLED with Arduino Nano. */ #include <Wire.h> #include <Adafruit_GFX.h> #include <DIYables_OLED_SSD1309.h> #define SCREEN_WIDTH 128 #define SCREEN_HEIGHT 64 #define OLED_RESET -1 #define SCREEN_ADDRESS 0x3C DIYables_OLED_SSD1309 display(SCREEN_WIDTH, SCREEN_HEIGHT, &Wire, OLED_RESET); void setup() { Serial.begin(115200); if (!display.begin(SSD1309_SWITCHCAPVCC, SCREEN_ADDRESS)) { Serial.println(F("SSD1309 allocation failed")); for (;;); } display.clearDisplay(); display.setTextSize(2); display.setTextColor(SSD1309_PIXEL_ON); display.setCursor(10, 24); display.println(F("DIYables")); display.display(); delay(2000); } void loop() { // Scroll right across all pages display.startscrollright(0x00, 0x07); delay(3000); display.stopscroll(); delay(500); // Scroll left display.startscrollleft(0x00, 0x07); delay(3000); display.stopscroll(); delay(500); // Diagonal scroll right display.startscrolldiagright(0x00, 0x07); delay(3000); display.stopscroll(); delay(500); // Diagonal scroll left display.startscrolldiagleft(0x00, 0x07); delay(3000); display.stopscroll(); delay(500); }

Code ESP32 C3 Super Mini — Afficher une Image Bitmap sur SSD1309 OLED

Affichez des images personnalisées sur votre SSD1309 OLED en les convertissant en tableaux d'octets.

Comment convertir les images:

  1. Téléchargez votre image (PNG, JPG, BMP, etc.)
  2. Définissez la taille du canevas à 128×64 (ou plus petit)
  3. Choisissez Arduino code comme format de sortie
  4. Copiez le tableau généré dans votre sketch
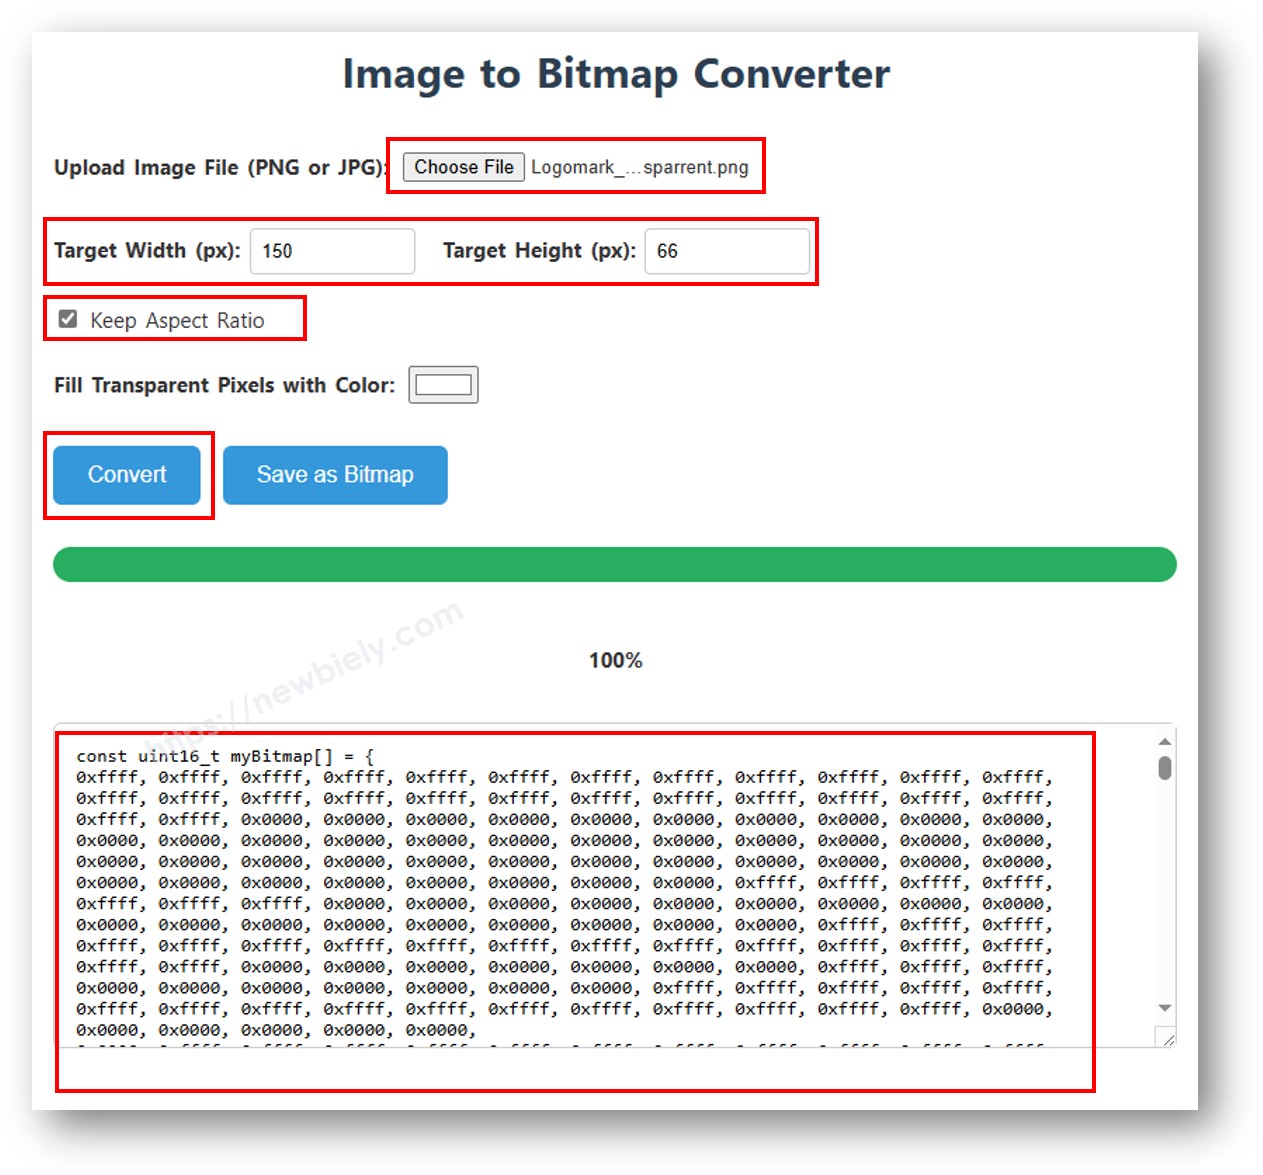
image to bitmap array

Ce que ce code fait:

  • Convertit les images en bitmaps monochromes
  • Stocke les données bitmap en PROGMEM pour économiser la RAM
  • Affiche le bitmap sur l'OLED 128x64
  • Montre le positionnement correct des bitmaps
/* * Ce code ESP32 C3 Super Mini a été développé par newbiely.fr * Ce code ESP32 C3 Super Mini est mis à disposition du public sans aucune restriction. * Pour des instructions complètes et des schémas de câblage, veuillez visiter: * https://newbiely.fr/tutorials/esp32-c3/esp32-c3-super-mini-ssd1309-oled-display */ /* * DIYables OLED SSD1309 – Display Bitmap Image * Shows a 16x16 heart icon and 128x64 DIYables logo on the 2.42" OLED with Arduino Nano. */ #include <Wire.h> #include <Adafruit_GFX.h> #include <DIYables_OLED_SSD1309.h> #define SCREEN_WIDTH 128 #define SCREEN_HEIGHT 64 #define OLED_RESET -1 #define SCREEN_ADDRESS 0x3C DIYables_OLED_SSD1309 display(SCREEN_WIDTH, SCREEN_HEIGHT, &Wire, OLED_RESET); // 16x16 heart icon bitmap const unsigned char heart_icon[] PROGMEM = { 0x00, 0x00, 0x0c, 0x30, 0x1e, 0x78, 0x3f, 0xfc, 0x7f, 0xfe, 0xff, 0xff, 0xff, 0xff, 0xff, 0xff, 0xff, 0xff, 0xff, 0xff, 0x7f, 0xfe, 0x3f, 0xfc, 0x1f, 0xf8, 0x0f, 0xf0, 0x03, 0xc0, 0x00, 0x00 }; // 128x64 DIYables logo bitmap const unsigned char diyables_logo[] PROGMEM = { 0xff, 0xff, 0xff, 0xff, 0xff, 0xff, 0xff, 0xff, 0xff, 0xff, 0xff, 0xff, 0xff, 0xff, 0xff, 0xff, 0xff, 0xff, 0xff, 0xff, 0xff, 0xff, 0xff, 0xff, 0xff, 0xff, 0xff, 0xff, 0xff, 0xff, 0xff, 0xff, 0xff, 0xff, 0xff, 0xff, 0xff, 0xff, 0xff, 0xff, 0xff, 0xff, 0xff, 0xff, 0xff, 0xff, 0xff, 0xff, 0xff, 0xff, 0xff, 0xff, 0xff, 0xff, 0xff, 0xff, 0xff, 0xff, 0xff, 0xff, 0xff, 0xff, 0xff, 0xff, 0xff, 0xff, 0xff, 0xff, 0xff, 0xff, 0xff, 0xff, 0xff, 0xff, 0xff, 0xff, 0xff, 0xff, 0xff, 0xff, 0xff, 0xff, 0xff, 0xff, 0xff, 0xff, 0xff, 0xff, 0xff, 0xff, 0xff, 0xff, 0xff, 0xff, 0xff, 0xff, 0xff, 0xff, 0xff, 0xff, 0xff, 0xff, 0xff, 0xff, 0xff, 0xff, 0xff, 0xff, 0xff, 0xff, 0xff, 0xff, 0xff, 0xff, 0xff, 0xff, 0xff, 0xff, 0xff, 0xff, 0xff, 0xff, 0xff, 0xff, 0xff, 0xff, 0xff, 0xff, 0xff, 0xff, 0xff, 0xff, 0xff, 0xff, 0xff, 0xff, 0xff, 0xff, 0xff, 0xff, 0xff, 0xff, 0xff, 0xff, 0xff, 0xff, 0xff, 0xff, 0xff, 0xff, 0xff, 0xff, 0xff, 0xff, 0xff, 0xff, 0xff, 0xff, 0xff, 0xff, 0xff, 0xff, 0xff, 0xff, 0xff, 0xff, 0xff, 0xff, 0xff, 0xff, 0xff, 0xff, 0xff, 0xff, 0xff, 0xff, 0xff, 0xff, 0xff, 0xff, 0xff, 0xff, 0xff, 0xff, 0xff, 0xff, 0xff, 0xff, 0xff, 0xff, 0xff, 0xff, 0xff, 0xff, 0xff, 0xff, 0xff, 0xff, 0xff, 0xff, 0xff, 0xff, 0xff, 0xff, 0xff, 0xff, 0xff, 0xff, 0xff, 0xff, 0xff, 0xff, 0xff, 0xff, 0xff, 0xff, 0xff, 0xff, 0xff, 0xff, 0xff, 0xff, 0xff, 0xff, 0xff, 0xff, 0xff, 0xff, 0xff, 0xff, 0xff, 0xff, 0xff, 0xff, 0xff, 0xff, 0xff, 0xff, 0xff, 0xff, 0xff, 0xff, 0xff, 0xff, 0xff, 0xff, 0xff, 0xff, 0xff, 0xff, 0xff, 0xff, 0xff, 0xff, 0xff, 0xff, 0xff, 0xff, 0xff, 0xf0, 0x00, 0x00, 0x00, 0x00, 0x00, 0x00, 0x00, 0x00, 0x00, 0x00, 0x0f, 0xff, 0xff, 0xff, 0xff, 0x80, 0x00, 0x00, 0x00, 0x00, 0x00, 0x00, 0x00, 0x00, 0x00, 0x00, 0x01, 0xff, 0xff, 0xff, 0xff, 0x00, 0x00, 0x00, 0x00, 0x00, 0x00, 0x00, 0x00, 0x00, 0x00, 0x00, 0x00, 0xff, 0xff, 0xff, 0xfe, 0x00, 0x07, 0xff, 0xc1, 0xff, 0xe0, 0x7f, 0xf0, 0x1f, 0xfc, 0x03, 0x00, 0x7f, 0xff, 0xff, 0xfc, 0x00, 0x1f, 0xff, 0xf7, 0xff, 0xf9, 0xff, 0xfc, 0x7f, 0xff, 0x0f, 0x80, 0x3f, 0xff, 0xff, 0xf8, 0x00, 0x3f, 0xff, 0xff, 0xff, 0xfd, 0xff, 0xfe, 0xff, 0xff, 0x9f, 0xc0, 0x1f, 0xff, 0xff, 0xf8, 0x00, 0x7f, 0x80, 0xff, 0x00, 0x7f, 0xc0, 0x3f, 0xf0, 0x0f, 0xfc, 0x00, 0x1f, 0xff, 0xff, 0xf0, 0x00, 0xfe, 0x00, 0x7f, 0x00, 0x3f, 0x80, 0x1f, 0xe0, 0x07, 0xf8, 0x00, 0x0f, 0xff, 0xff, 0xe0, 0x01, 0xfc, 0x00, 0x3e, 0x00, 0x1f, 0x00, 0x0f, 0xc0, 0x03, 0xf0, 0x00, 0x0f, 0xff, 0xff, 0xe0, 0x03, 0xf8, 0x00, 0x3e, 0x00, 0x1f, 0x00, 0x0f, 0xc0, 0x03, 0xf0, 0x00, 0x07, 0xff, 0xff, 0xc0, 0x07, 0xf8, 0x00, 0x3e, 0x00, 0x1f, 0x00, 0x0f, 0xc0, 0x03, 0xf0, 0x00, 0x03, 0xff, 0xff, 0xc0, 0x0f, 0xf8, 0x00, 0x3e, 0x00, 0x1f, 0x00, 0x0f, 0xc0, 0x03, 0xf0, 0x00, 0x03, 0xff, 0xff, 0x80, 0x0f, 0xf8, 0x00, 0x3e, 0x00, 0x1f, 0x00, 0x0f, 0xc0, 0x03, 0xf0, 0x00, 0x01, 0xff, 0xff, 0x80, 0x1f, 0xf8, 0x00, 0x3e, 0x00, 0x1f, 0x00, 0x0f, 0xc0, 0x03, 0xf0, 0x00, 0x01, 0xff, 0xff, 0x00, 0x3f, 0xf8, 0x00, 0x3e, 0x00, 0x1f, 0x00, 0x0f, 0xc0, 0x03, 0xf0, 0x00, 0x00, 0xff, 0xff, 0x00, 0x3f, 0xf8, 0x00, 0x3e, 0x00, 0x1f, 0x00, 0x0f, 0xc0, 0x03, 0xf0, 0x00, 0x00, 0xff, 0xfe, 0x00, 0x7f, 0xf8, 0x00, 0x3e, 0x00, 0x1f, 0x00, 0x0f, 0xc0, 0x03, 0xf0, 0x00, 0x00, 0xff, 0xfe, 0x00, 0x7f, 0xf8, 0x00, 0x3e, 0x00, 0x1f, 0x00, 0x0f, 0xc0, 0x03, 0xf0, 0x00, 0x00, 0xff, 0xfc, 0x00, 0xff, 0xf8, 0x00, 0x3e, 0x00, 0x1f, 0x00, 0x0f, 0xc0, 0x03, 0xf0, 0x00, 0x00, 0xff, 0xfc, 0x00, 0xff, 0xf8, 0x00, 0x3e, 0x00, 0x1f, 0x00, 0x0f, 0xc0, 0x03, 0xf0, 0x00, 0x00, 0xff, 0xfc, 0x01, 0xff, 0xf8, 0x00, 0x3e, 0x00, 0x1f, 0x00, 0x0f, 0xc0, 0x03, 0xf0, 0x00, 0x00, 0xff, 0xf8, 0x01, 0xff, 0xf8, 0x00, 0x3e, 0x00, 0x1f, 0x00, 0x0f, 0xc0, 0x03, 0xf0, 0x00, 0x00, 0xff, 0xf8, 0x03, 0xff, 0xf8, 0x00, 0x3e, 0x00, 0x1f, 0x00, 0x0f, 0xc0, 0x03, 0xf0, 0x00, 0x00, 0xff, 0xf0, 0x03, 0xff, 0xfc, 0x00, 0x7e, 0x00, 0x1f, 0x80, 0x1f, 0xe0, 0x07, 0xf8, 0x00, 0x00, 0xff, 0xf0, 0x07, 0xff, 0x7f, 0x80, 0xff, 0x00, 0x7f, 0xc0, 0x3f, 0xf0, 0x0f, 0xfc, 0x00, 0x00, 0xff, 0xf0, 0x07, 0xfe, 0x3f, 0xff, 0xff, 0xff, 0xfd, 0xff, 0xfe, 0xff, 0xff, 0x9f, 0xc0, 0x00, 0xff, 0xe0, 0x0f, 0xfc, 0x1f, 0xff, 0xf7, 0xff, 0xf9, 0xff, 0xfc, 0x7f, 0xff, 0x0f, 0x80, 0x00, 0xff, 0xe0, 0x0f, 0xf8, 0x07, 0xff, 0xc1, 0xff, 0xe0, 0x7f, 0xf0, 0x1f, 0xfc, 0x03, 0x00, 0x00, 0xff, 0xe0, 0x1f, 0xf0, 0x00, 0x00, 0x00, 0x00, 0x00, 0x00, 0x00, 0x00, 0x00, 0x00, 0x00, 0x00, 0xff, 0xc0, 0x1f, 0xe0, 0x00, 0x00, 0x00, 0x00, 0x00, 0x00, 0x00, 0x00, 0x00, 0x00, 0x00, 0x00, 0xff, 0xc0, 0x3f, 0xc0, 0x00, 0x00, 0x00, 0x00, 0x00, 0x00, 0x00, 0x00, 0x00, 0x00, 0x00, 0x00, 0xff, 0xc0, 0x3f, 0x80, 0x00, 0x00, 0x00, 0x00, 0x00, 0x00, 0x00, 0x00, 0x00, 0x00, 0x00, 0x00, 0xff, 0x80, 0x7f, 0x00, 0xff, 0xff, 0xff, 0xff, 0xff, 0xff, 0xff, 0xff, 0xff, 0xff, 0xff, 0xff, 0xff, 0x80, 0x7f, 0x00, 0xff, 0xff, 0xff, 0xff, 0xff, 0xff, 0xff, 0xff, 0xff, 0xff, 0xff, 0xff, 0xff, 0x80, 0xfe, 0x00, 0xff, 0xff, 0xff, 0xff, 0xff, 0xff, 0xff, 0xff, 0xff, 0xff, 0xff, 0xff, 0xff, 0x00, 0xfc, 0x00, 0xff, 0xff, 0xff, 0xff, 0xff, 0xff, 0xff, 0xff, 0xff, 0xff, 0xff, 0xff, 0xff, 0x01, 0xf8, 0x00, 0xff, 0xff, 0xff, 0xff, 0xff, 0xff, 0xff, 0xff, 0xff, 0xff, 0xff, 0xff, 0xff, 0x01, 0xf0, 0x00, 0xff, 0xff, 0xff, 0xff, 0xff, 0xff, 0xff, 0xff, 0xff, 0xff, 0xff, 0xff, 0xfe, 0x03, 0xe0, 0x00, 0xff, 0xff, 0xff, 0xff, 0xff, 0xff, 0xff, 0xff, 0xff, 0xff, 0xff, 0xff, 0xfe, 0x07, 0xc0, 0x00, 0xff, 0xff, 0xff, 0xff, 0xff, 0xff, 0xff, 0xff, 0xff, 0xff, 0xff, 0xff, 0xfc, 0x0f, 0x80, 0x00, 0xff, 0xff, 0xff, 0xff, 0xff, 0xff, 0xff, 0xff, 0xff, 0xff, 0xff, 0xff, 0xf8, 0x1f, 0x00, 0x00, 0xff, 0xff, 0xff, 0xff, 0xff, 0xff, 0xff, 0xff, 0xff, 0xff, 0xff, 0xff, 0xf0, 0x3e, 0x00, 0x00, 0xff, 0xff, 0xff, 0xff, 0xff, 0xff, 0xff, 0xff, 0xff, 0xff, 0xff, 0xff, 0xe0, 0x7c, 0x00, 0x00, 0xff, 0xff, 0xff, 0xff, 0xff, 0xff, 0xff, 0xff, 0xff, 0xff, 0xff, 0xff, 0xc0, 0xf8, 0x00, 0x00, 0xff, 0xff, 0xff, 0xff, 0xff, 0xff, 0xff, 0xff, 0xff, 0xff, 0xff, 0xff, 0x81, 0xf0, 0x00, 0x00, 0xff, 0xff, 0xff, 0xff, 0xff, 0xff, 0xff, 0xff, 0xff, 0xff, 0xff, 0xff, 0x03, 0xe0, 0x00, 0x00, 0xff, 0xff, 0xff, 0xff, 0xff, 0xff, 0xff, 0xff, 0xff, 0xff, 0xff, 0xff }; void setup() { Serial.begin(115200); if (!display.begin(SSD1309_SWITCHCAPVCC, SCREEN_ADDRESS)) { Serial.println(F("SSD1309 allocation failed")); for (;;); } display.clearDisplay(); display.display(); } void loop() { // Display small heart icon centered display.clearDisplay(); display.drawBitmap((SCREEN_WIDTH - 16) / 2, (SCREEN_HEIGHT - 16) / 2, heart_icon, 16, 16, SSD1309_PIXEL_ON); display.display(); delay(3000); // Display full-screen DIYables logo display.clearDisplay(); display.drawBitmap(0, 0, diyables_logo, SCREEN_WIDTH, SCREEN_HEIGHT, SSD1309_PIXEL_ON); display.display(); delay(3000); // Invert display display.invertDisplay(true); delay(2000); display.invertDisplay(false); delay(1000); }

※ Note:

  • Les dimensions des bitmaps ne doivent pas dépasser 128×64 pour ce module
  • Les images sont automatiquement converties en monochrome (noir et blanc)

Code ESP32 C3 Super Mini — Contraste et Assombrissement sur SSD1309 OLED

Contrôlez la luminosité de votre affichage SSD1309 ESP32 C3 Super Mini avec les fonctions de contraste et d'assombrissement.

Ce que ce code fait:

  • Ajuste le contraste de 0 (minimum) à 255 (maximum)
  • Utilise setContrast() pour un contrôle de luminosité précis
  • Utilise dim() pour une commutation de luminosité rapide
  • Démontre les transitions de luminosité fluides
/* * Ce code ESP32 C3 Super Mini a été développé par newbiely.fr * Ce code ESP32 C3 Super Mini est mis à disposition du public sans aucune restriction. * Pour des instructions complètes et des schémas de câblage, veuillez visiter: * https://newbiely.fr/tutorials/esp32-c3/esp32-c3-super-mini-ssd1309-oled-display */ /* * DIYables OLED SSD1309 – Contrast & Dim * Sweeps contrast from 0→255→0 then toggles dim mode on the 2.42" OLED with Arduino Nano. */ #include <Wire.h> #include <Adafruit_GFX.h> #include <DIYables_OLED_SSD1309.h> #define SCREEN_WIDTH 128 #define SCREEN_HEIGHT 64 #define OLED_RESET -1 #define SCREEN_ADDRESS 0x3C DIYables_OLED_SSD1309 display(SCREEN_WIDTH, SCREEN_HEIGHT, &Wire, OLED_RESET); void setup() { Serial.begin(115200); if (!display.begin(SSD1309_SWITCHCAPVCC, SCREEN_ADDRESS)) { Serial.println(F("SSD1309 allocation failed")); for (;;); } // Draw a test pattern so the contrast changes are visible display.clearDisplay(); display.fillRect(0, 0, 64, 32, SSD1309_PIXEL_ON); display.fillRect(64, 32, 64, 32, SSD1309_PIXEL_ON); display.setTextSize(1); display.setTextColor(SSD1309_PIXEL_INVERSE); display.setCursor(16, 28); display.println(F("Contrast Demo")); display.display(); delay(2000); } void loop() { // Ramp up for (int c = 0; c <= 255; c += 5) { display.setContrast((uint8_t)c); delay(30); } delay(1000); // Ramp down for (int c = 255; c >= 0; c -= 5) { display.setContrast((uint8_t)c); delay(30); } delay(1000); // Quick dim toggle display.dim(true); // minimum brightness delay(2000); display.dim(false); // restore delay(2000); }

Code ESP32 C3 Super Mini — Polices Externes Personnalisées sur SSD1309 OLED

La bibliothèque Adafruit GFX inclut des dizaines de polices typefaces FreeFont professionnelles pour votre affichage SSD1309 OLED.

Familles de polices disponibles:

  • Polices Serif (aspect classique)
  • Polices Sans (aspect moderne et propre)
  • Polices Mono (largeur fixe)
  • Chacune en styles Regular, Bold, Italic
  • Quatre tailles pour chaque police

Ce que ce code fait:

  • Montre comment inclure les en-têtes de polices personnalisées
  • Démontre setFont() pour la commutation de police
  • Affiche le texte dans plusieurs styles de police
  • Utilise PROGMEM pour un stockage flash efficace

※ Note:

  • Lorsqu'une police externe est active, la coordonnée Y du curseur fait référence à la baseline du texte, pas au coin supérieur gauche
  • Les polices externes sont stockées en flash (PROGMEM). Utilisez-les judicieusement pour rester dans le budget flash du ESP32 C3 Super Mini
/* * Ce code ESP32 C3 Super Mini a été développé par newbiely.fr * Ce code ESP32 C3 Super Mini est mis à disposition du public sans aucune restriction. * Pour des instructions complètes et des schémas de câblage, veuillez visiter: * https://newbiely.fr/tutorials/esp32-c3/esp32-c3-super-mini-ssd1309-oled-display */ /* * DIYables OLED SSD1309 – External Fonts * Cycles through three FreeFont typefaces on the 2.42" SSD1309 OLED with Arduino Nano. */ #include <Wire.h> #include <Adafruit_GFX.h> #include <DIYables_OLED_SSD1309.h> #include <Fonts/FreeSerif9pt7b.h> #include <Fonts/FreeSansBold12pt7b.h> #include <Fonts/FreeMono9pt7b.h> #define SCREEN_WIDTH 128 #define SCREEN_HEIGHT 64 #define OLED_RESET -1 #define SCREEN_ADDRESS 0x3C DIYables_OLED_SSD1309 display(SCREEN_WIDTH, SCREEN_HEIGHT, &Wire, OLED_RESET); void setup() { Serial.begin(115200); if (!display.begin(SSD1309_SWITCHCAPVCC, SCREEN_ADDRESS)) { Serial.println(F("SSD1309 allocation failed")); for (;;); } display.clearDisplay(); display.display(); } void loop() { // ── Built-in 5×7 font ── display.clearDisplay(); display.setFont(NULL); display.setTextSize(1); display.setTextColor(SSD1309_PIXEL_ON); display.setCursor(0, 0); display.println(F("Built-in 5x7 font")); display.println(); display.setTextSize(2); display.println(F("DIYables")); display.display(); delay(3000); // ── FreeSerif 9pt ── display.clearDisplay(); display.setFont(&FreeSerif9pt7b); display.setTextSize(1); display.setTextColor(SSD1309_PIXEL_ON); display.setCursor(0, 14); // Y = baseline display.println(F("FreeSerif 9pt")); display.setCursor(0, 38); display.println(F("DIYables OLED")); display.setCursor(0, 58); display.println(F("Hello World!")); display.display(); delay(3000); // ── FreeSansBold 12pt ── display.clearDisplay(); display.setFont(&FreeSansBold12pt7b); display.setTextSize(1); display.setTextColor(SSD1309_PIXEL_ON); display.setCursor(0, 20); display.println(F("SansBold")); display.setCursor(0, 52); display.println(F("DIYables")); display.display(); delay(3000); // ── FreeMono 9pt ── display.clearDisplay(); display.setFont(&FreeMono9pt7b); display.setTextSize(1); display.setTextColor(SSD1309_PIXEL_ON); display.setCursor(0, 14); display.println(F("FreeMono 9pt")); display.setCursor(0, 34); display.println(F("0123456789")); display.setCursor(0, 54); display.println(F("!@#$%^&*()")); display.display(); delay(3000); }

Étapes Rapides

  • Nouveau sur ESP32 C3 Super Mini? Complétez d'abord notre tutoriel ESP32 C3 Super Mini - Premiers pas pour configurer votre environnement de développement.
  • Câblez l'affichage: Connectez SSD1309 OLED à l'ESP32 C3 Super Mini en utilisant le tableau de câblage ci-dessus
  • Installez la bibliothèque: Ouvrez le gestionnaire de bibliothèque Arduino IDE et installez DIYables_OLED_SSD1309 et toutes les dépendances
  • Ouvrez l'exemple: Chargez l'un des sketches d'exemple des sections de code ci-dessus
  • Sélectionnez la carte: Choisissez ESP32C3 Dev Module dans le menu Outils > Carte
  • Téléchargez le code: Connectez votre ESP32 C3 Super Mini et cliquez sur Télécharger
  • Vérifiez l'affichage: L'OLED SSD1309 doit afficher immédiatement la sortie de l'exemple
  • Expérimentez: Essayez de modifier le texte, les couleurs ou les coordonnées pour voir comment l'affichage répond
  • Conseil Pro: Appelez toujours display.display() après le dessin pour mettre à jour l'écran - le SSD1309 utilise un tampon de cadre qui doit être poussé à l'affichage physique

Dépannage SSD1309 OLED avec ESP32 C3 Super Mini

Si rien ne s'affiche sur votre affichage SSD1309 OLED 2.42 pouces, suivez ces étapes de dépannage:

Problèmes courants et solutions:

  • Vérifiez le câblage: Confirmez que SDA→A4, SCL→A5, VCC→3.3V et GNDGND sont tous correctement connectés
  • Confirmez le puce pilote: Cette bibliothèque cible le contrôleur SSD1309 - les modules avec SH1106 ou d'autres puces ne fonctionneront pas
  • Vérifiez l'adresse I2C: La plupart des modules SSD1309 utilisent 0x3C, mais certains utilisent 0x3D - exécutez le scanner ci-dessous pour trouver la vôtre
  • Appelez display(): Le SSD1309 utilise un tampon de cadre - rien n'apparaît jusqu'à ce que vous appeliez oled.display()
  • Vérifiez l'alimentation: L'OLED 2.42 pouces consomme 20-40 mA - assurez-vous que 3.3V peut fournir suffisamment de courant
  • Testez les connexions: Essayez de bouger doucement les fils pour vérifier les connexions lâches
  • Utilisez le scanner I2C: Téléchargez le code ci-dessous pour détecter l'adresse I2C de votre OLED

Code du scanner I2C:

// I2C address scanner — prints every detected device to the Serial Monitor #include <Wire.h> void setup() { Wire.begin(); Serial.begin(115200); Serial.println("I2C Scanner"); } void loop() { byte error, address; int nDevices = 0; Serial.println("Scanning..."); for (address = 1; address < 127; address++) { Wire.beginTransmission(address); error = Wire.endTransmission(); if (error == 0) { Serial.print("I2C device found at address 0x"); if (address < 16) Serial.print("0"); Serial.print(address, HEX); Serial.println(" !"); nDevices++; } else if (error == 4) { Serial.print("Unknown error at address 0x"); if (address < 16) Serial.print("0"); Serial.println(address, HEX); } } if (nDevices == 0) Serial.println("No I2C devices found"); else Serial.println("done"); delay(5000); }

Sortie attendue du Moniteur Série quand le SSD1309 est détecté:

Newbiely | Arduino IDE 2.3.8
──
File
Edit
Sketch
Tools
Help
ESP32C3 Dev Module
Newbiely.ino
···
8 Serial.println("Hello World!");
Output
Serial Monitor
Message (Enter to send message to 'ESP32C3 Dev Module' on 'COM15')
New Line
9600 baud
I2C Scanner Scanning... I2C device found at address 0x3C ! done Scanning... I2C device found at address 0x3C ! done Scanning... I2C device found at address 0x3C ! done
Ln 11, Col 1
ESP32C3 Dev Module on COM15
2

Idées d'Application et de Projets

Voici quelques projets pratiques que vous pouvez construire avec votre ESP32 C3 Super Mini et l'affichage SSD1309 OLED:

  • Station météo affichant la température, l'humidité et les icônes de prévision
  • Horloge en temps réel avec date, heure et indicateurs d'alarme personnalisés
  • Moniteur de force du signal WiFi avec graphiques à barres visuels
  • Tableau de bord de capteurs IoT affichant plusieurs lectures de capteur
  • Interface du lecteur de musique avec titre de la chanson, artiste et contrôles de lecture
  • Moniteur système affichant l'utilisation du CPU, la mémoire et l'état du réseau
  • Console de jeu pour les jeux simples basés sur les pixels comme Snake ou Pong
  • Panneau de messages à défilement pour les notifications et les alertes

Tutoriel Vidéo

Regardez la vidéo ci-dessous pour une présentation visuelle de ce projet.

...VIDEO 5yFyA1jrNuk

...VIDEO

Testez Vos Connaissances

Poussez vos compétences en matière de SSD1309 OLED ESP32 C3 Super Mini au niveau suivant avec ces défis:

  • Facile: Modifiez l'exemple Hello World pour afficher votre nom et votre emoji préféré avec différentes tailles de texte
  • Facile: Créez une horloge numérique simple qui affiche les heures, les minutes et les secondes en gros texte
  • Moyen: Construisez un affichage de température qui affiche les lectures d'un capteur DHT11 avec un thermomètre graphique
  • Moyen: Concevez une barre de chargement animée qui se remplit de gauche à droite à l'aide de rectangles
  • Avancé: Créez un système de menu avec plusieurs pages que vous pouvez parcourir à l'aide de boutons
  • Avancé: Construisez un graphique en temps réel qui fait défiler les données du capteur sur l'écran 128x64
  • Avancé: Concevez une animation bitmap qui alterne entre plusieurs cadres pour créer du mouvement

※ NOS MESSAGES

  • N'hésitez pas à partager le lien de ce tutoriel. Cependant, veuillez ne pas utiliser notre contenu sur d'autres sites web. Nous avons investi beaucoup d'efforts et de temps pour créer ce contenu, veuillez respecter notre travail !