ESP32 C3 Super Mini - Affichage OLED 128x64

Introduction

Voulez-vous afficher les lectures des capteurs, l'état du système ou des graphiques personnalisés dans vos projets ESP32 C3 Super Mini ? Ce tutoriel vous montre comment connecter et programmer un affichage OLED 128x64 avec votre ESP32 C3 Super Mini - parfait pour les débutants !

Dans ce tutoriel, vous apprendrez :

Affichage OLED 128x64 ESP32 C3 Super Mini

Matériel Requis

1×ESP32 C3 Super Mini
1×Câble Micro USB
1×Affichage OLED I2C SSD1306 128x64
1×Fils Jumper

Ou vous pouvez acheter les kits suivants:

1×Kit de Capteurs DIYables (18 capteurs/écrans)
Divulgation : Certains des liens fournis dans cette section sont des liens affiliés Amazon. Nous pouvons recevoir une commission pour tout achat effectué via ces liens, sans coût supplémentaire pour vous. Nous vous remercions de votre soutien.

À Propos des Affichages OLED

Un affichage OLED (Diode Électroluminescente Organique) est un écran où chaque pixel produit sa propre lumière.

Caractéristiques clés des affichages OLED :

  • Noirs parfaits - les pixels s'éteignent complètement quand ils ne sont pas nécessaires
  • Contraste élevé - visuels nets et clairs
  • Larges angles de vision - lisible de n'importe quelle direction
  • Aucun rétroéclairage requis - consommation d'énergie inférieure
  • Fin et léger - design compact

Types OLED populaires pour l'ESP32 C3 Super Mini :

  • OLED I2C SSD1306 128x64 - Taille la plus courante, idéale pour le texte et les graphiques simples
  • OLED I2C SSD1306 128x32 - Version plus petite pour les projets compacts
  • Interface I2C - Nécessite seulement deux fils pour la communication avec l'ESP32 C3 Super Mini
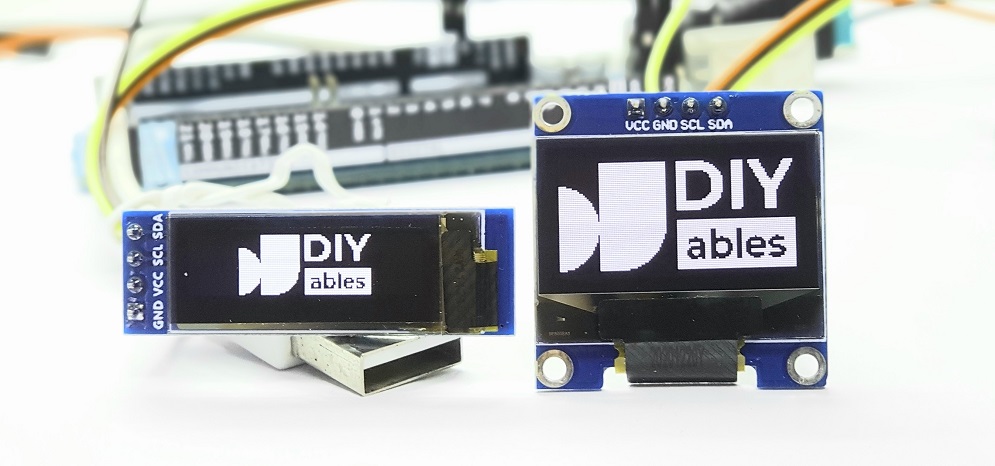
Affichage OLED

Brochage de l'Affichage OLED I2C

L'affichage OLED SSD1306 a généralement quatre broches pour une connexion facile à votre ESP32 C3 Super Mini :

  • Broche GND : Connectez à la terre (GND) sur l'ESP32 C3 Super Mini
  • Broche VCC : Alimentation électrique - connectez à 3.3V sur l'ESP32 C3 Super Mini (certains modules acceptent 5V)
  • Broche SCL : Ligne d'Horloge Série pour la communication I2C avec l'ESP32 C3 Super Mini
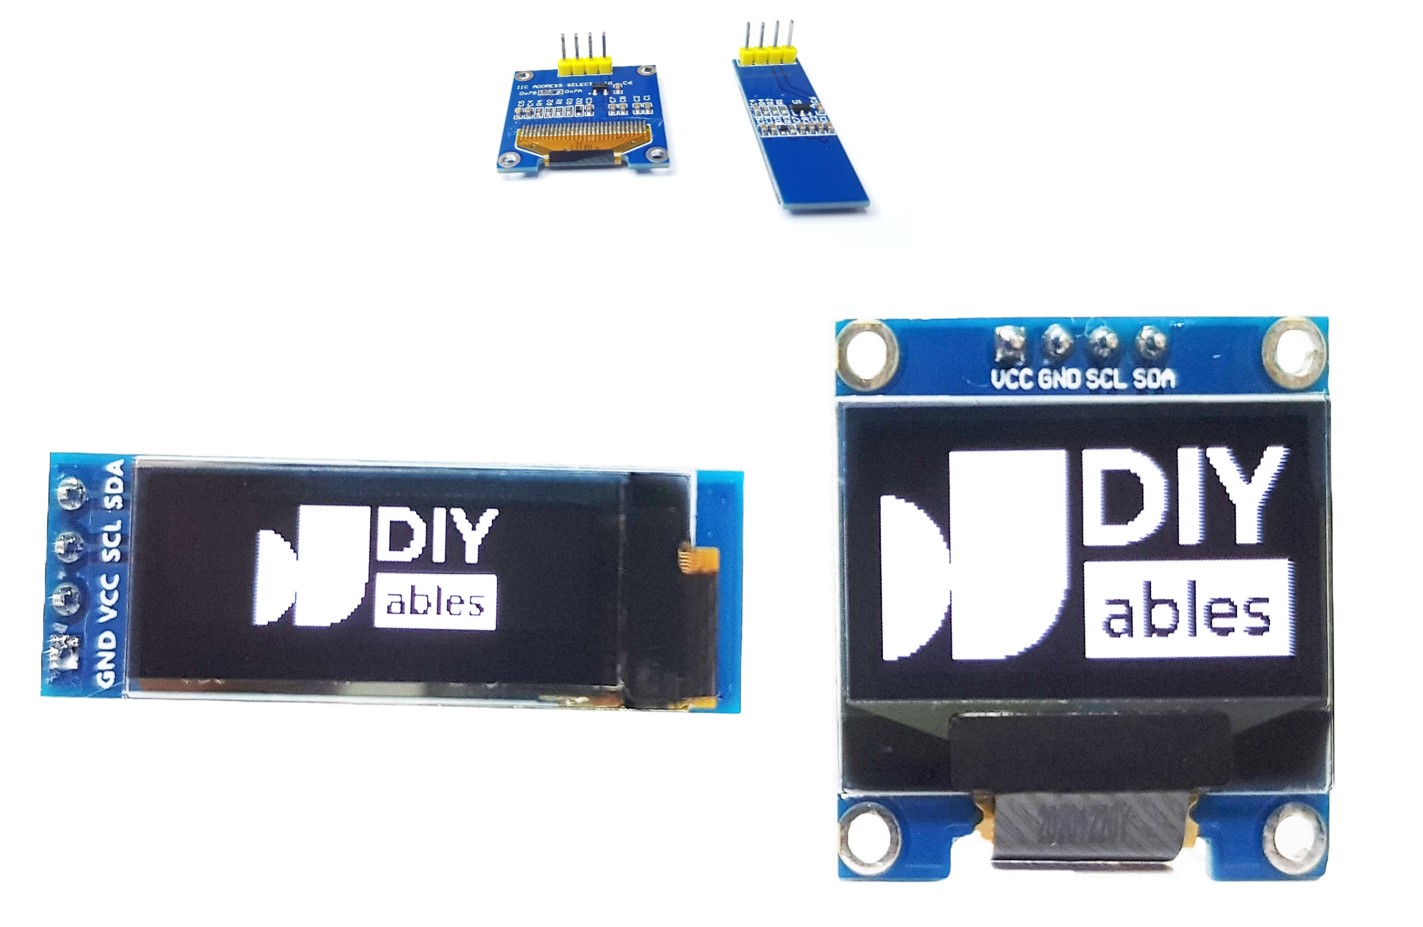
  • Broche SDA : Ligne de Données Série pour la communication I2C avec l'ESP32 C3 Super Mini
Brochage OLED

※ Note:

  • Les étiquettes des broches peuvent varier selon le fabricant - vérifiez toujours les marquages sur votre module OLED spécifique
  • Ce tutoriel utilise un affichage OLED I2C SSD1306 - testé avec le module OLED DIYables

Schéma de Câblage

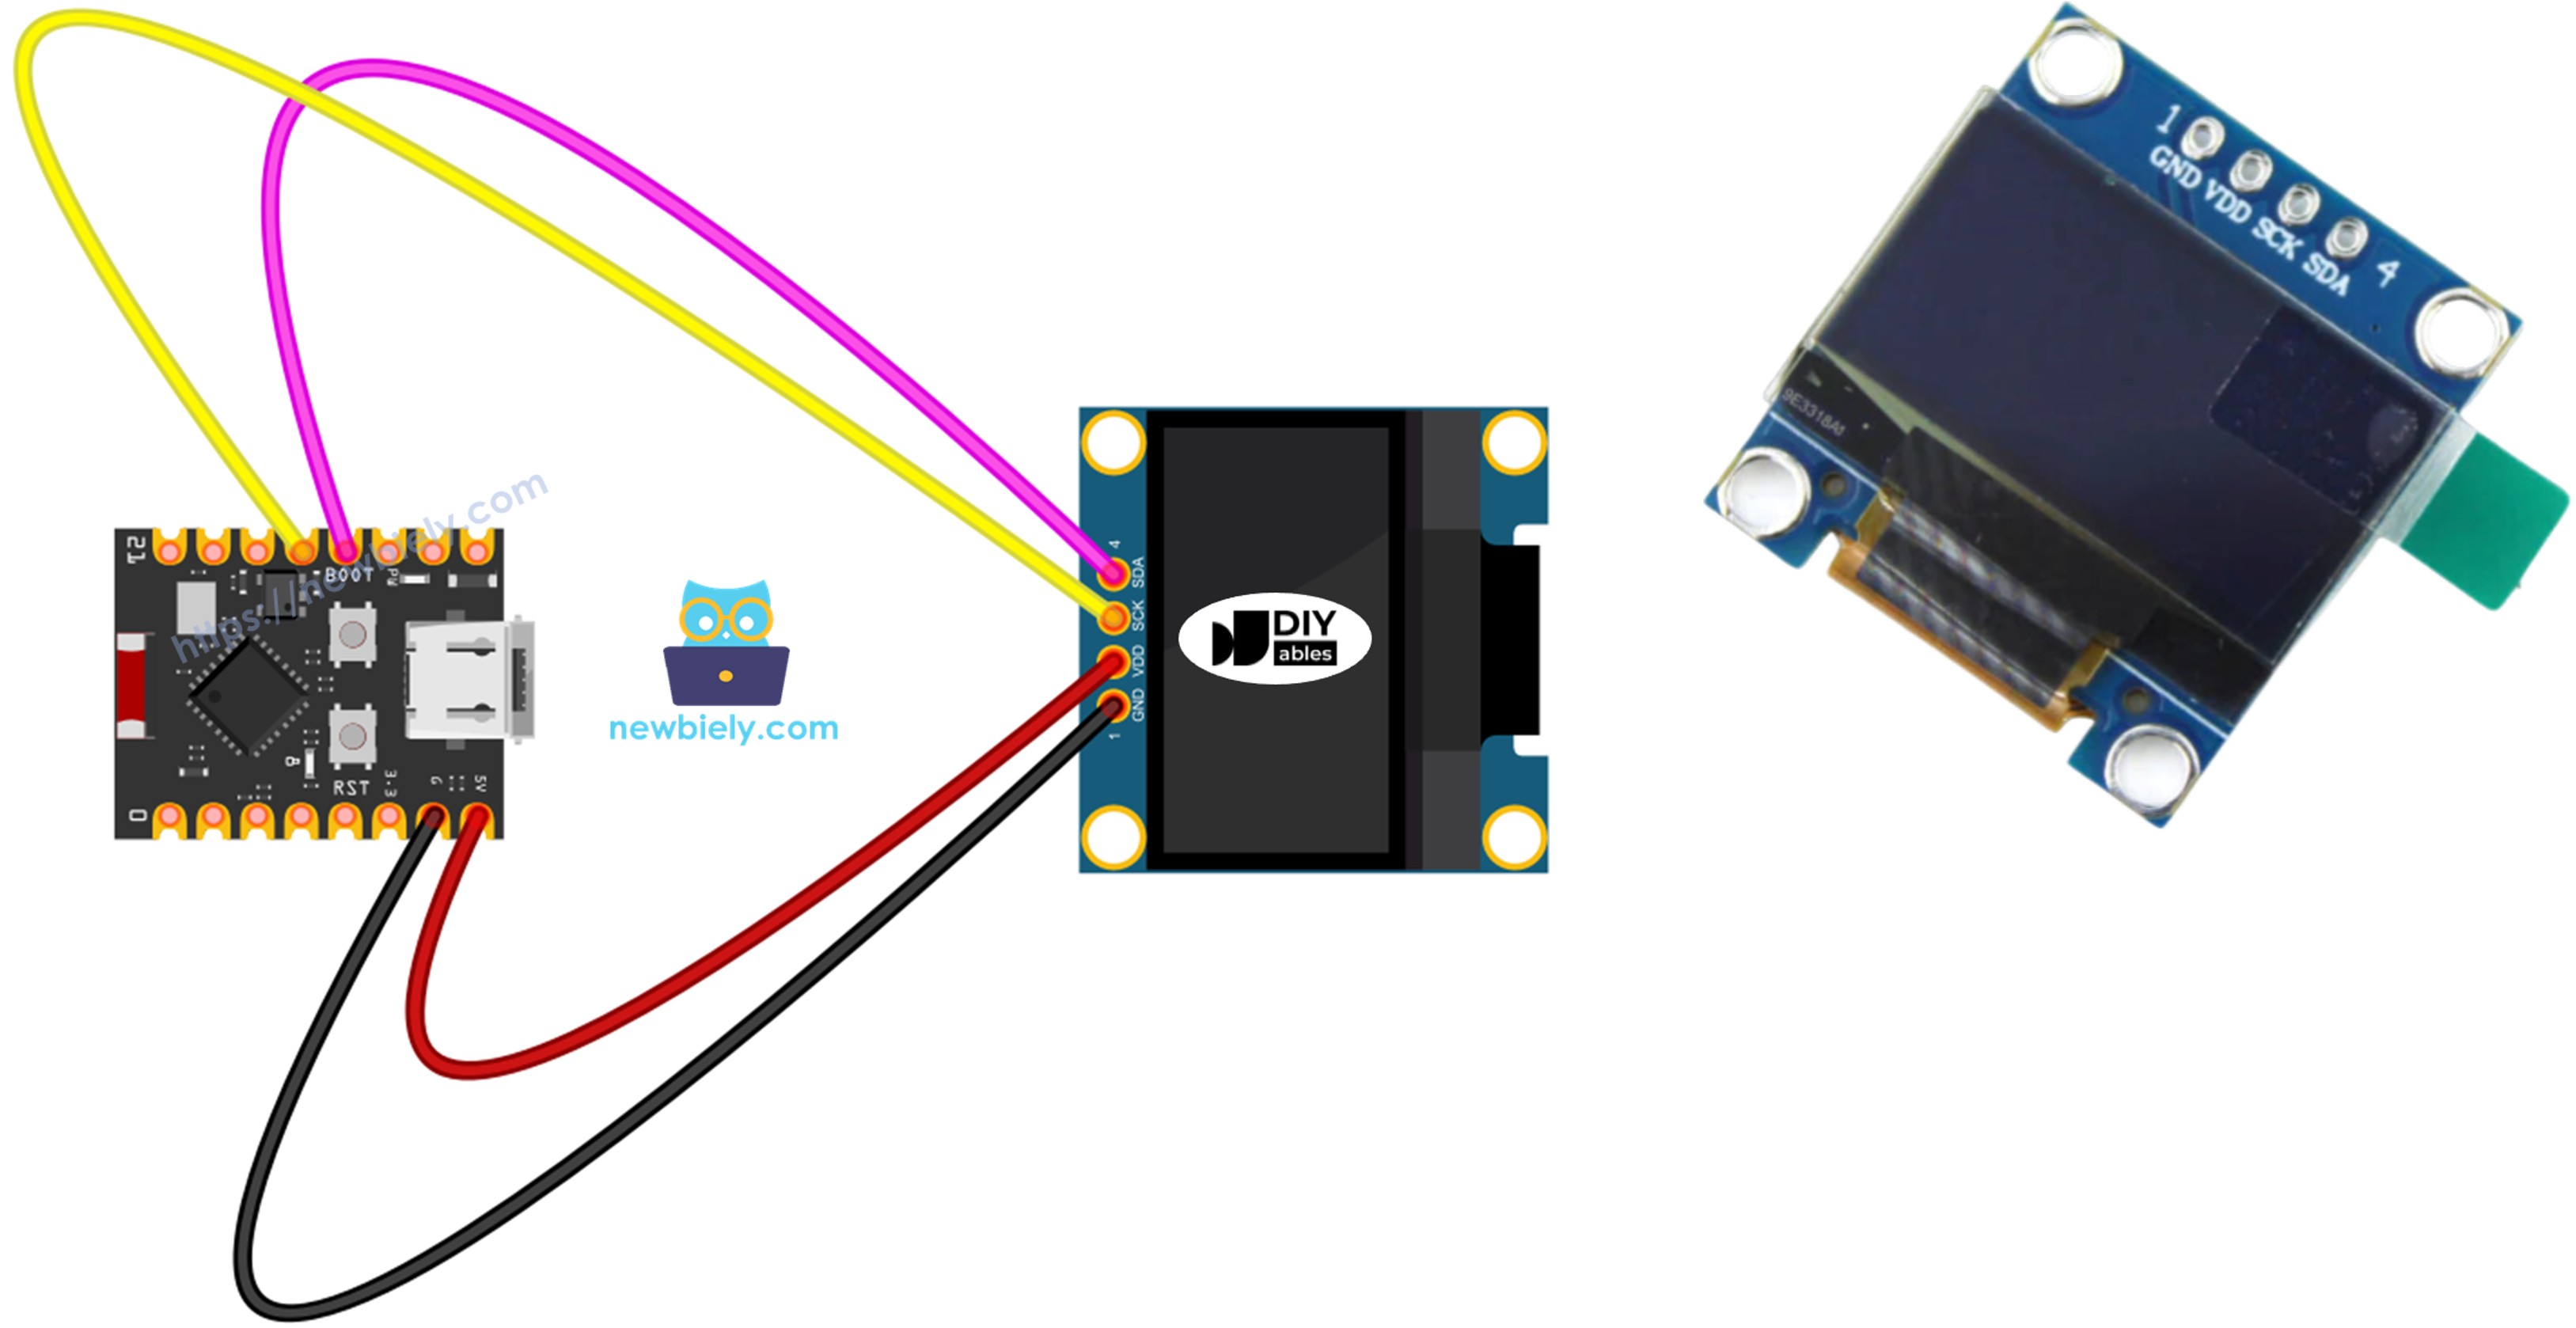
Voici comment connecter votre affichage OLED 128x64 à l'ESP32 C3 Super Mini en utilisant l'interface I2C :

  • Schéma de câblage entre l'ESP32 C3 Super Mini et l'affichage OLED utilisant la breadboard
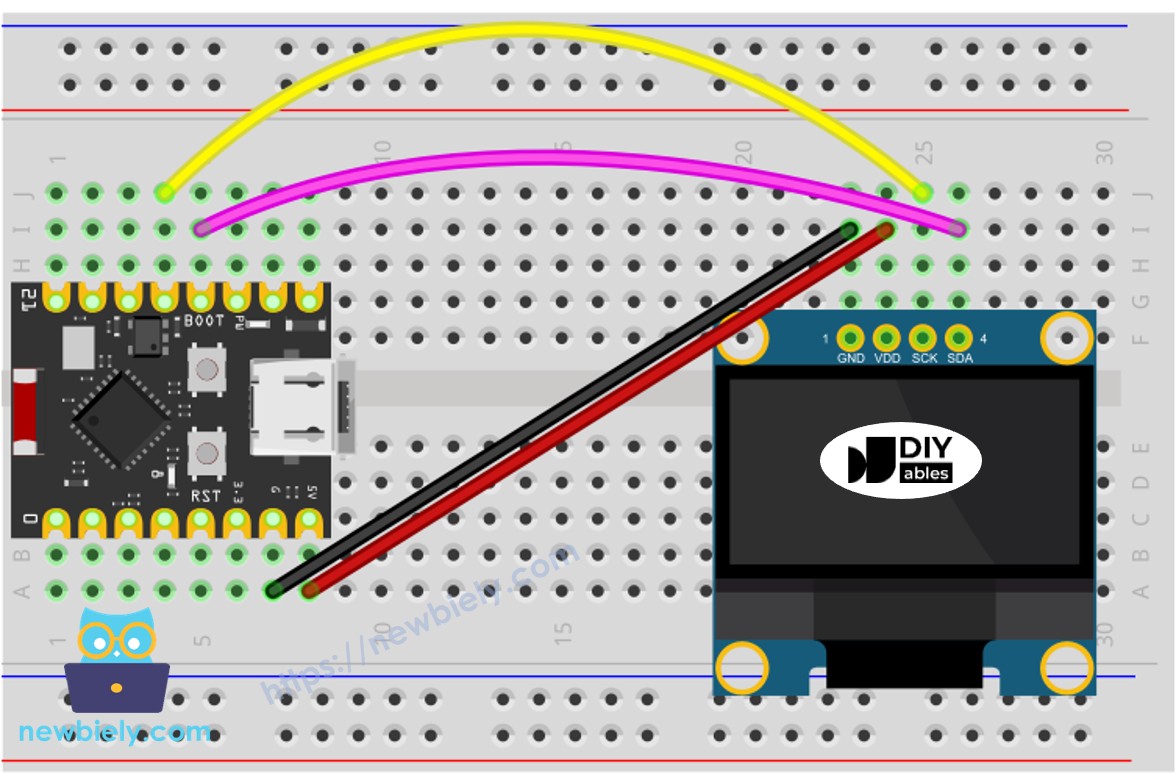
Schéma de câblage OLED ESP32 C3 Super Mini

Cette image a été créée avec Fritzing. Cliquez pour agrandir l'image.

  • Schéma de câblage entre l'ESP32 C3 Super Mini et l'affichage OLED directement
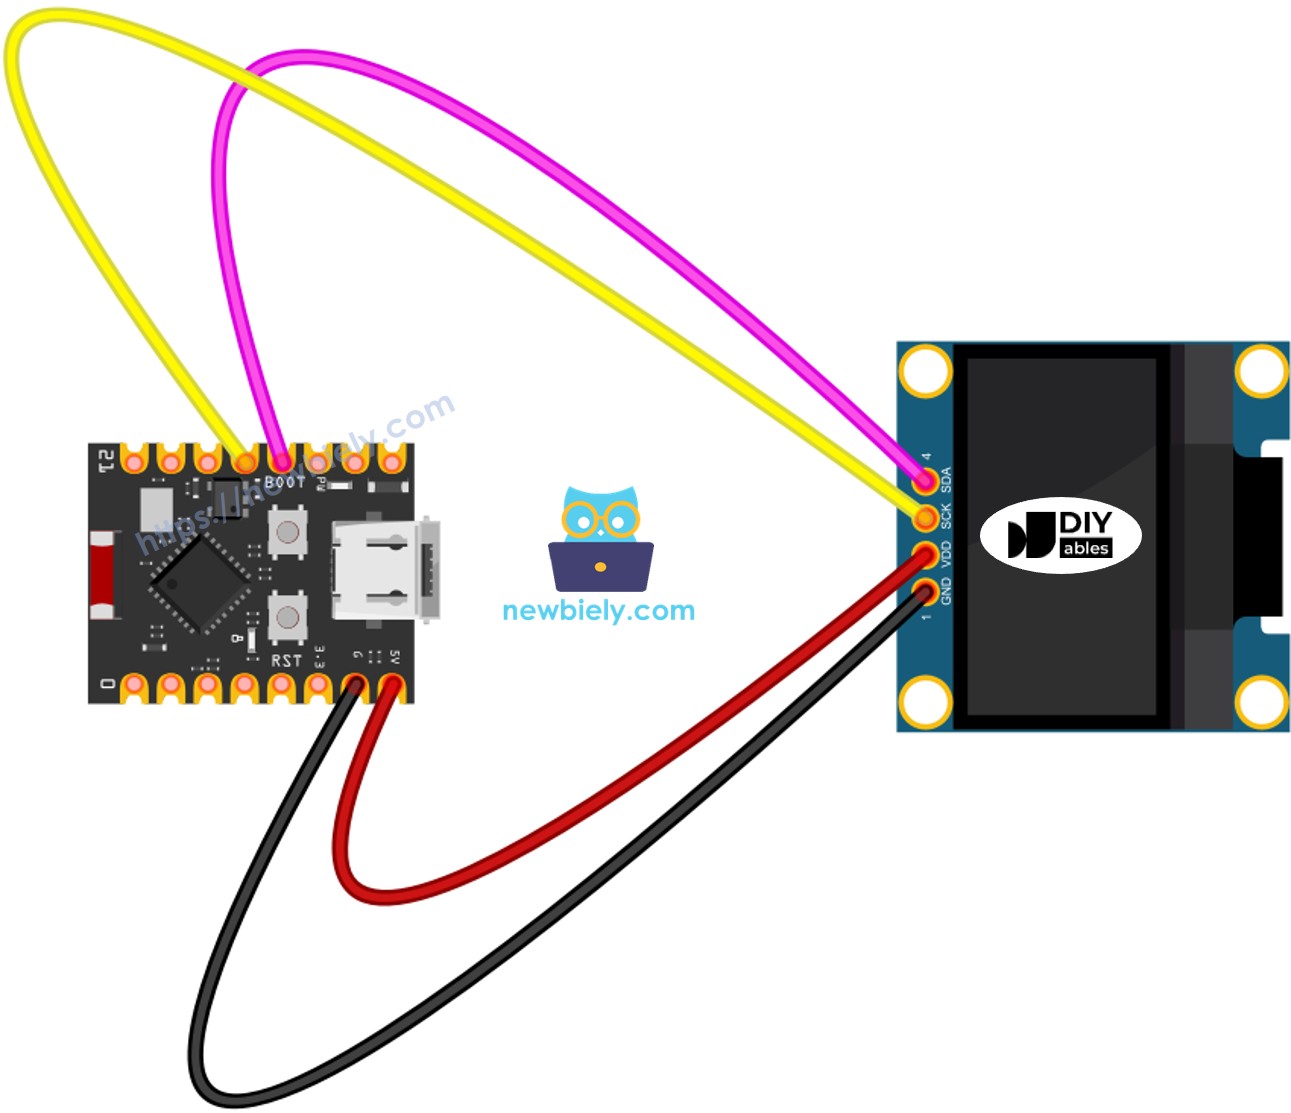
Schéma de câblage OLED ESP32 C3 Super Mini

Cette image a été créée avec Fritzing. Cliquez pour agrandir l'image.

Tableau de connexion pour l'ESP32 C3 Super Mini et l'affichage OLED :

Module OLED ESP32 C3 Super Mini
Vin 3.3V
GND GND
SDA SDA (broche 11)
SCL SCL (broche 12)

Comment Utiliser l'OLED avec l'ESP32 C3 Super Mini

Installer la Bibliothèque SSD1306 OLED

Avant de programmer votre affichage OLED avec l'ESP32 C3 Super Mini, installez les bibliothèques requises :

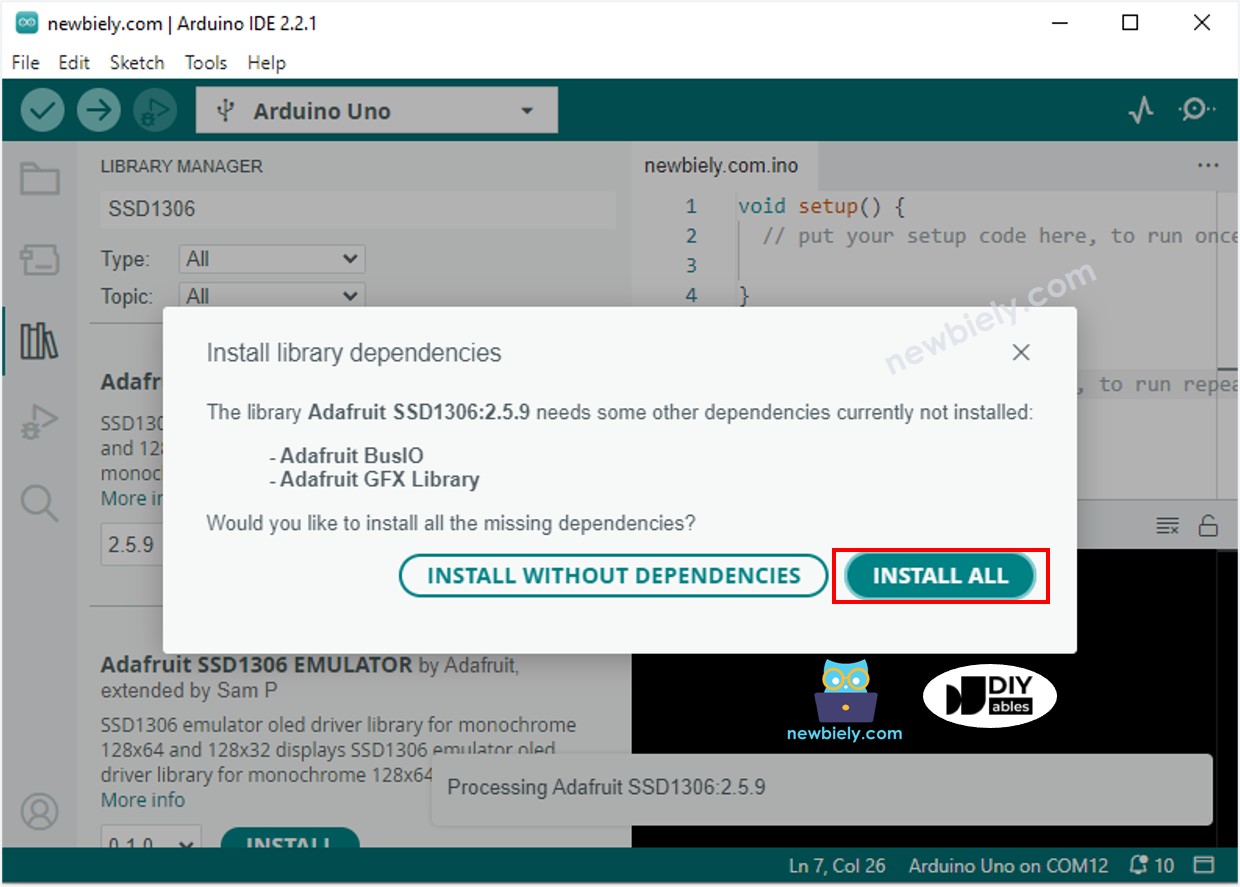
  • Ouvrez le Gestionnaire de Bibliothèques : Cliquez sur l'icône Bibliothèques dans la barre latérale gauche de l'Arduino IDE
  • Recherchez SSD1306 : Tapez "SSD1306" dans la zone de recherche
  • Installez Adafruit SSD1306 : Cliquez sur Installer à côté de la bibliothèque Adafruit SSD1306
  • Installez les dépendances : Quand on vous le demande, cliquez sur "Installer Tous" pour ajouter la bibliothèque Adafruit GFX
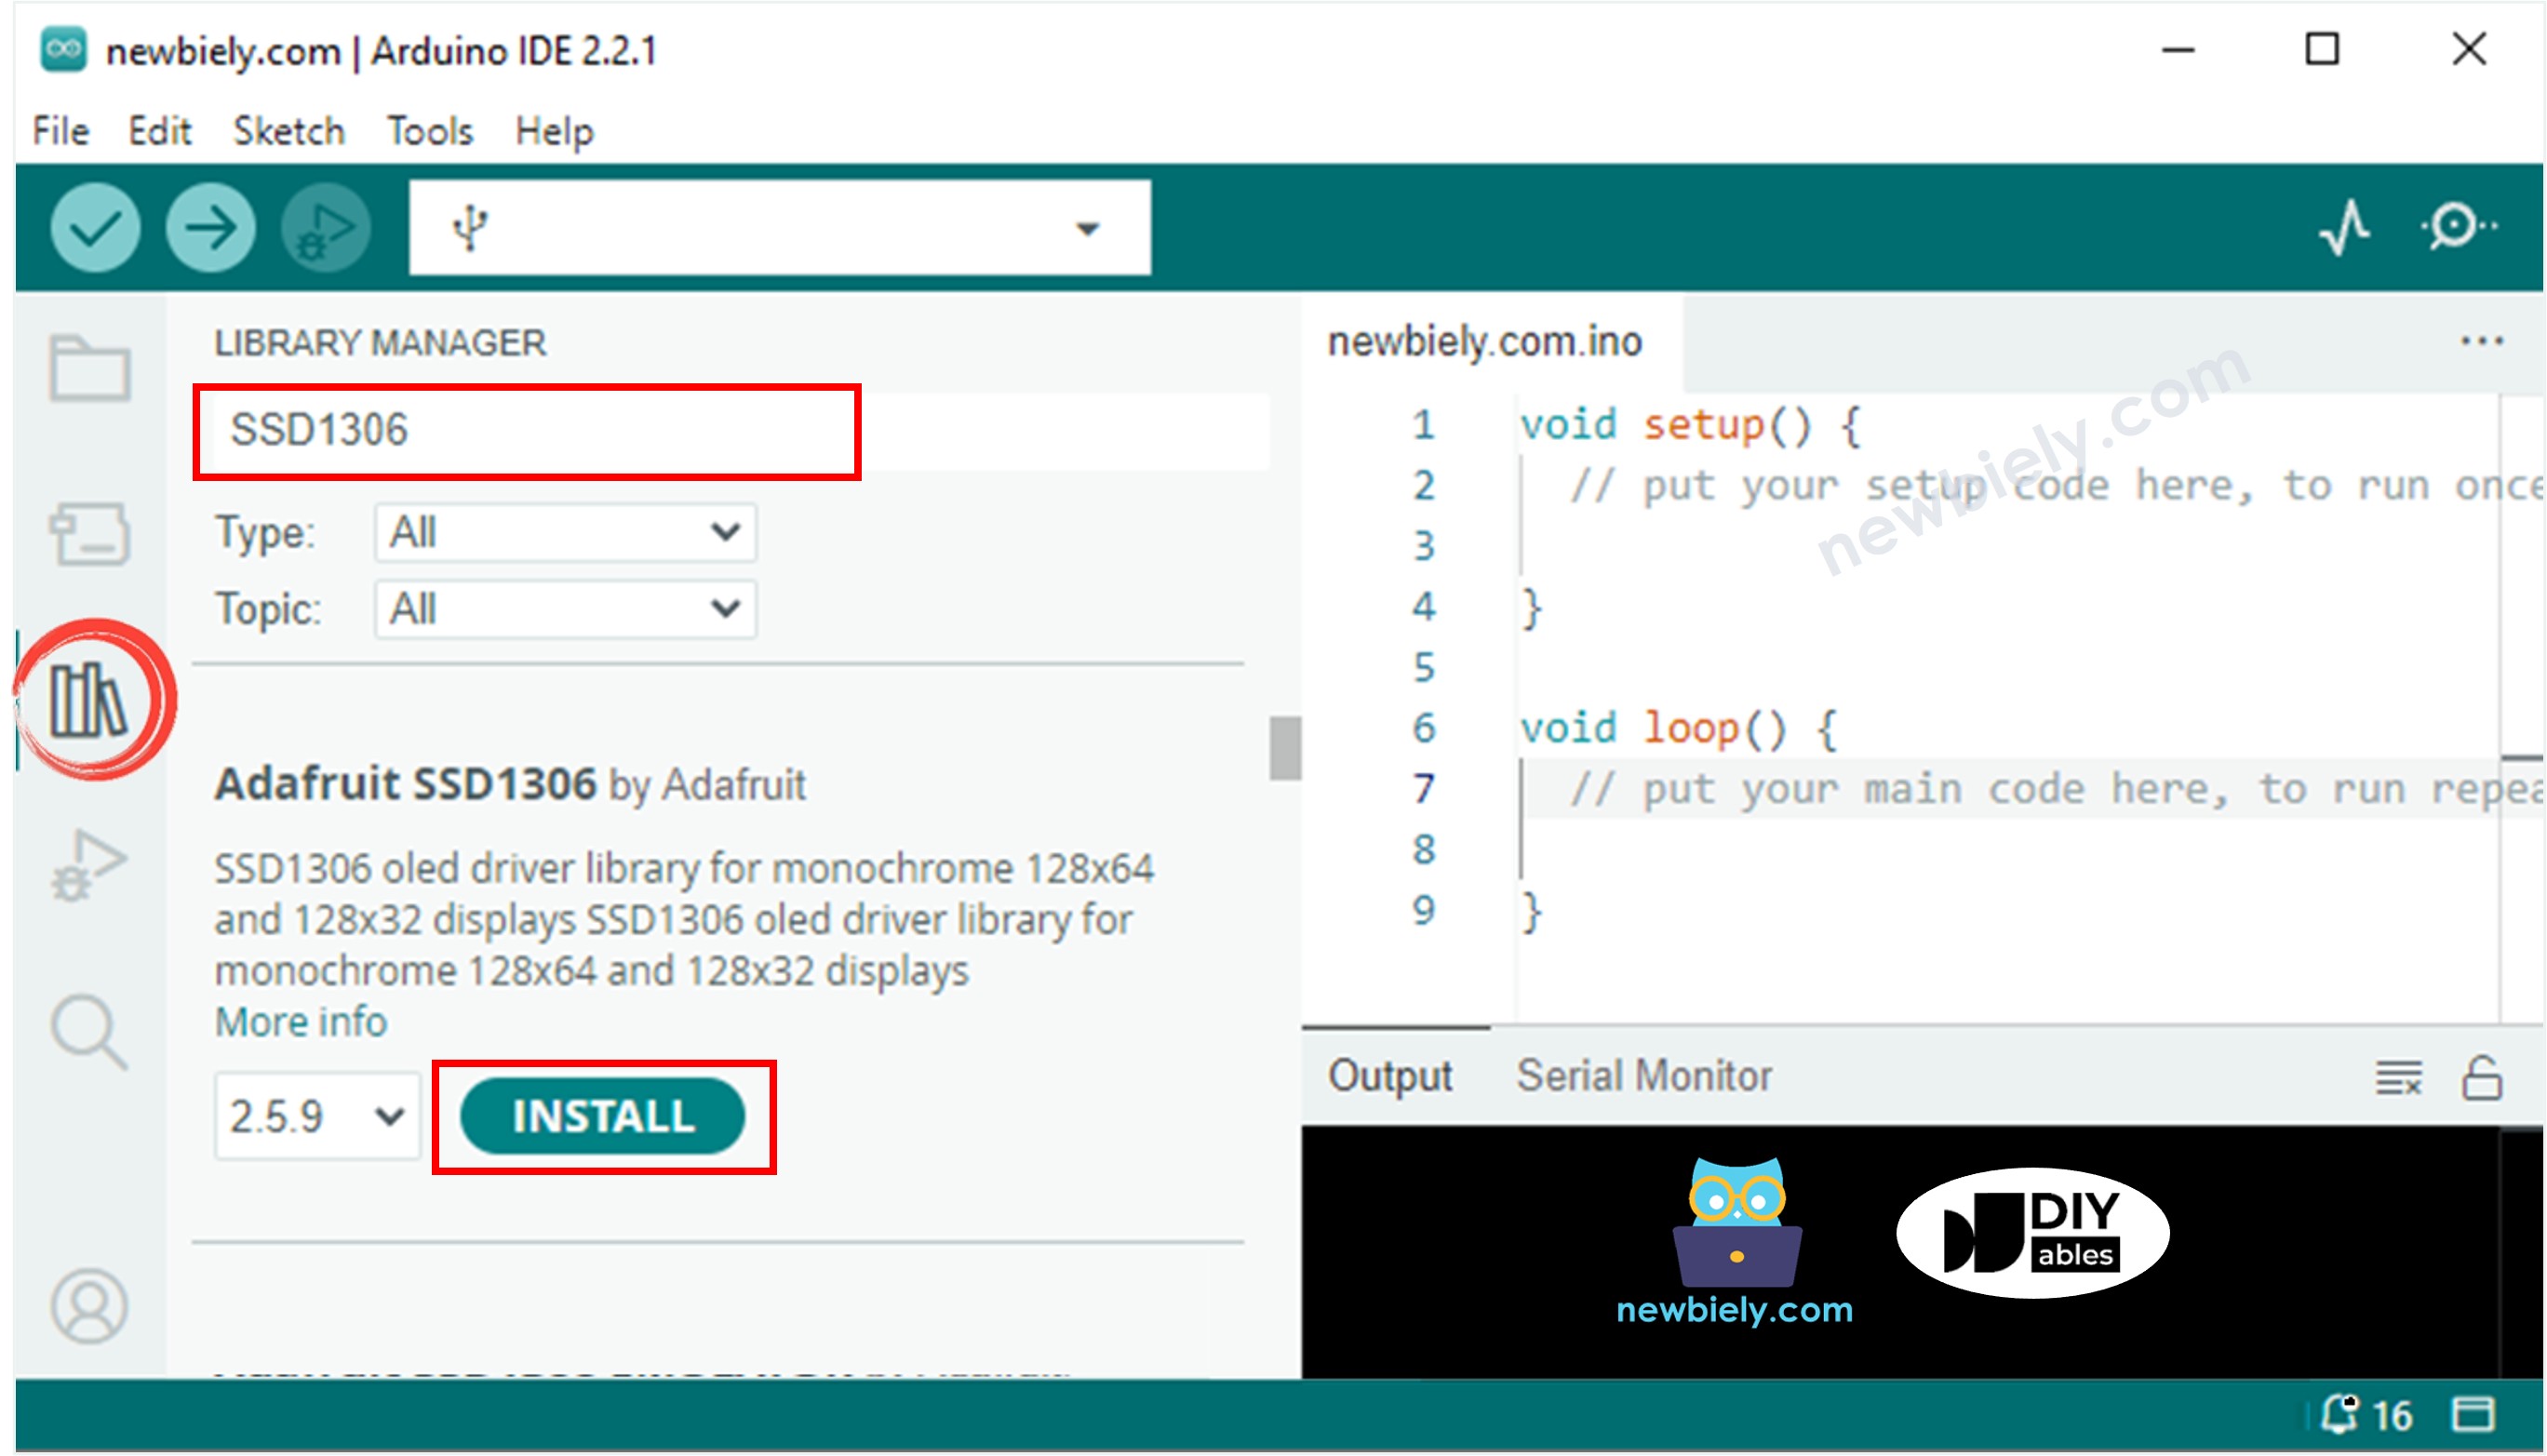
Bibliothèque OLED ESP32 C3 Super Mini
Bibliothèque du capteur Adafruit GFX ESP32 C3 Super Mini

Ce que font ces bibliothèques :

  • Adafruit_SSD1306 - Contrôle le matériel de l'affichage OLED sur l'ESP32 C3 Super Mini
  • Adafruit_GFX - Fournit les fonctions graphiques pour dessiner sur l'OLED

Programmation de votre Affichage OLED ESP32 C3 Super Mini

Voici la structure de code basique pour utiliser un affichage OLED avec l'ESP32 C3 Super Mini :

Incluez les bibliothèques :

#include <Wire.h> #include <Adafruit_GFX.h> #include <Adafruit_SSD1306.h>

Définissez les dimensions OLED :

#define OLED_WIDTH 128 // Largeur de l'affichage OLED en pixels #define OLED_HEIGHT 64 // Hauteur de l'affichage OLED en pixels

Créez un objet OLED :

// Créez un objet d'affichage SSD1306 pour la communication I2C Adafruit_SSD1306 oled(OLED_WIDTH, OLED_HEIGHT, &Wire, -1);

Initialisez l'OLED dans setup() :

// Initialisez l'affichage OLED à l'adresse I2C 0x3C if (!oled.begin(SSD1306_SWITCHCAPVCC, 0x3C)) { Serial.println(F("L'allocation SSD1306 a échoué")); while (true); }

Ce que cela fait :

  • SSD1306_SWITCHCAPVCC - Utilise la génération de tension interne
  • 0x3C - Adresse I2C par défaut pour la plupart des affichages OLED (certains utilisent 0x3D)
  • La gestion des erreurs arrête le programme si l'initialisation OLED échoue

Code ESP32 C3 Super Mini - Afficher du Texte sur l'OLED

Cet exemple montre comment afficher du texte sur votre écran OLED en utilisant l'ESP32 C3 Super Mini :

/* * Ce code ESP32 C3 Super Mini a été développé par newbiely.fr * Ce code ESP32 C3 Super Mini est mis à disposition du public sans aucune restriction. * Pour des instructions complètes et des schémas de câblage, veuillez visiter: * https://newbiely.fr/tutorials/esp32-c3/esp32-c3-super-mini-oled-128x64-display */ #include <Wire.h> #include <Adafruit_GFX.h> #include <Adafruit_SSD1306.h> #define OLED_WIDTH 128 // OLED width, in pixels #define OLED_HEIGHT 64 // OLED height, in pixels // create an OLED display object connected to I2C Adafruit_SSD1306 oled(OLED_WIDTH, OLED_HEIGHT, &Wire, -1); void setup() { Serial.begin(115200); // initialize OLED display with I2C address 0x3C if (!oled.begin(SSD1306_SWITCHCAPVCC, 0x3C)) { Serial.println(F("failed to start SSD1306 OLED")); while (1); } delay(2000); // wait two seconds for initializing oled.clearDisplay(); // clear display oled.setTextSize(1); // set text size oled.setTextColor(WHITE); // set text color oled.setCursor(0, 10); // set position to display oled.println("esp32io.com"); // set text oled.display(); // display on OLED } void loop() { }

Fonctions Essentielles de Texte OLED

Fonctions clés pour afficher du texte sur l'OLED avec l'ESP32 C3 Super Mini :

  • oled.clearDisplay() - Efface tous les pixels de l'écran OLED
  • oled.drawPixel(x, y, color) - Dessine un seul pixel aux coordonnées x, y
  • oled.setTextSize(n) - Définit la taille du texte (1-8, où 1 est le plus petit)
  • oled.setCursor(x, y) - Définit la position de départ pour le texte
  • oled.setTextColor(WHITE) - Définit la couleur du texte en blanc
  • oled.setTextColor(BLACK, WHITE) - Définit la couleur du texte en noir avec fond blanc
  • oled.println("message") - Imprime le message texte sur l'OLED
  • oled.println(number) - Imprime un nombre sur l'OLED
  • oled.println(number, HEX) - Imprime un nombre au format hexadécimal
  • oled.display() - Met à jour l'écran OLED avec les modifications
  • oled.startscrollright(start, stop) - Défile le texte de gauche à droite
  • oled.startscrollleft(start, stop) - Défile le texte de droite à gauche
  • oled.startscrolldiagright(start, stop) - Défile en diagonale bas-gauche vers haut-droit
  • oled.startscrolldiagleft(start, stop) - Défile en diagonale bas-droit vers haut-gauche
  • oled.stopscroll() - Arrête l'animation de défilement

Centrer le Texte sur votre Affichage OLED

Voulez-vous centrer le texte sur votre affichage OLED 128x64 ? Cela nécessite de calculer les dimensions du texte.

Pour des instructions détaillées sur le centrage du texte (horizontal et vertical) :

Méthode de centrage rapide :

  • Utilisez getTextBounds() pour calculer la largeur et la hauteur du texte
  • Centre horizontal : x = (OLED_WIDTH - textWidth) / 2
  • Centre vertical : y = (OLED_HEIGHT - textHeight) / 2

Code ESP32 C3 Super Mini - Dessiner des Formes sur l'OLED

Créez des lignes, des cercles, des rectangles et d'autres formes sur votre affichage OLED avec l'ESP32 C3 Super Mini :

/* * Ce code ESP32 C3 Super Mini a été développé par newbiely.fr * Ce code ESP32 C3 Super Mini est mis à disposition du public sans aucune restriction. * Pour des instructions complètes et des schémas de câblage, veuillez visiter: * https://newbiely.fr/tutorials/esp32-c3/esp32-c3-super-mini-oled-128x64-display */ #include <Wire.h> #include <Adafruit_GFX.h> #include <Adafruit_SSD1306.h> #define OLED_WIDTH 128 // OLED width, in pixels #define OLED_HEIGHT 64 // OLED height, in pixels // create an OLED display object connected to I2C Adafruit_SSD1306 oled(OLED_WIDTH, OLED_HEIGHT, &Wire, -1); void setup() { Serial.begin(115200); // initialize OLED display with I2C address 0x3C if (!oled.begin(SSD1306_SWITCHCAPVCC, 0x3C)) { Serial.println(F("failed to start SSD1306 OLED")); while (1); } delay(2000); // wait two seconds for initializing oled.setCursor(0, 0); } void loop() { // draw a circle oled.clearDisplay(); oled.drawCircle(20, 35, 20, WHITE); oled.display(); delay(1000); // fill a circle oled.clearDisplay(); oled.fillCircle(20, 35, 20, WHITE); oled.display(); delay(1000); // draw a triangle oled.clearDisplay(); oled.drawTriangle(30, 15, 0, 60, 60, 60, WHITE); oled.display(); delay(1000); // fill a triangle oled.clearDisplay(); oled.fillTriangle(30, 15, 0, 60, 60, 60, WHITE); oled.display(); delay(1000); // draw a rectangle oled.clearDisplay(); oled.drawRect(0, 15, 60, 40, WHITE); oled.display(); delay(1000); // fill a rectangle oled.clearDisplay(); oled.fillRect(0, 15, 60, 40, WHITE); oled.display(); delay(1000); // draw a round rectangle oled.clearDisplay(); oled.drawRoundRect(0, 15, 60, 40, 8, WHITE); oled.display(); delay(1000); // fill a round rectangle oled.clearDisplay(); oled.fillRoundRect(0, 15, 60, 40, 8, WHITE); oled.display(); delay(1000); }

Fonctions de dessin courantes pour l'OLED ESP32 C3 Super Mini :

  • drawLine(x1, y1, x2, y2, color) - Dessine une ligne entre deux points
  • drawRect(x, y, width, height, color) - Dessine le contour d'un rectangle
  • fillRect(x, y, width, height, color) - Dessine un rectangle rempli
  • drawCircle(x, y, radius, color) - Dessine le contour d'un cercle
  • fillCircle(x, y, radius, color) - Dessine un cercle rempli
  • drawTriangle(x1, y1, x2, y2, x3, y3, color) - Dessine le contour d'un triangle
  • fillTriangle(x1, y1, x2, y2, x3, y3, color) - Dessine un triangle rempli
  • drawRoundRect(x, y, width, height, radius, color) - Dessine un rectangle arrondi

Code ESP32 C3 Super Mini - Afficher les Images sur l'OLED

Affichage des images personnalisées, des logos ou des icônes sur votre OLED en les convertissant en tableaux de bitmap.

Conversion d'Images en Tableaux de Bitmap

Étapes pour convertir les images pour l'OLED ESP32 C3 Super Mini :

  • Choisissez votre fichier image (JPG, PNG, GIF, etc.)
  • Ouvrez le convertisseur en ligne : image2cpp
  • Définissez la taille du canevas à 128x64 (correspondant à la résolution de votre OLED)
  • Sélectionnez "Code Arduino" comme format de sortie
  • Choisissez "Vertical - 1 bit par pixel" pour le mode de dessin
  • Cliquez sur générer et copiez le tableau de bitmap

Processus de conversion d'exemple :
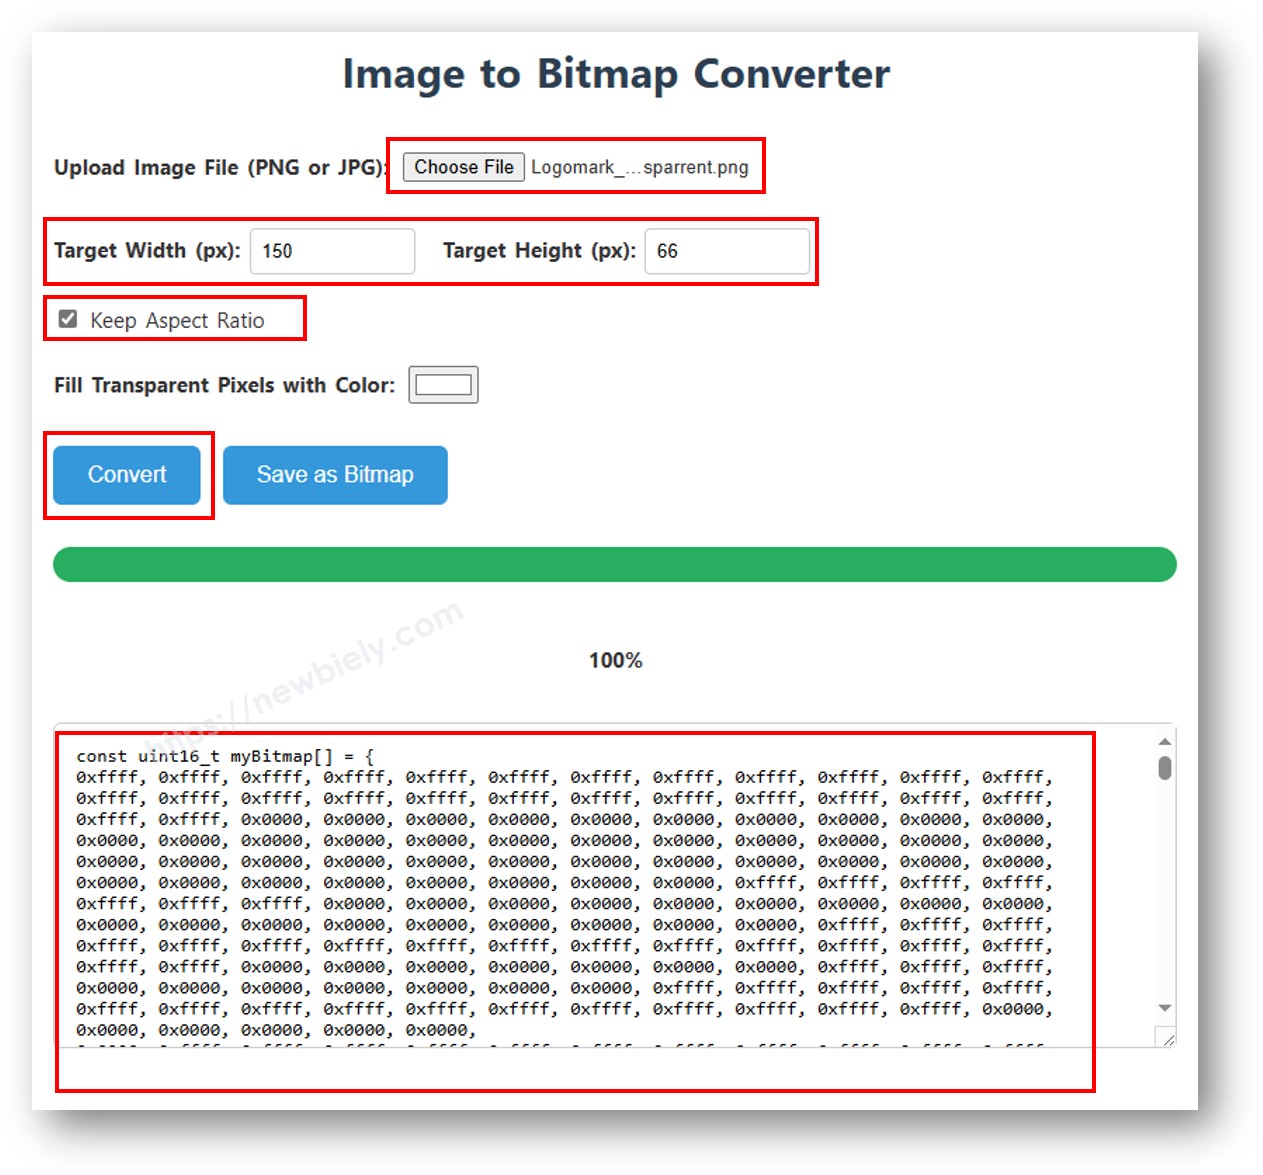
tableau de bitmap d'image

Utilisation du Bitmap dans le Code ESP32 C3 Super Mini

Remplacez le tableau ArduinoIcon dans ce code par votre bitmap généré :

/* * Ce code ESP32 C3 Super Mini a été développé par newbiely.fr * Ce code ESP32 C3 Super Mini est mis à disposition du public sans aucune restriction. * Pour des instructions complètes et des schémas de câblage, veuillez visiter: * https://newbiely.fr/tutorials/esp32-c3/esp32-c3-super-mini-oled-128x64-display */ #include <Wire.h> #include <Adafruit_GFX.h> #include <Adafruit_SSD1306.h> #define OLED_WIDTH 128 // OLED width, in pixels #define OLED_HEIGHT 64 // OLED height, in pixels // create an OLED display object connected to I2C Adafruit_SSD1306 oled(OLED_WIDTH, OLED_HEIGHT, &Wire, -1); // bitmap of arduino-icon image const unsigned char arduino_icon [] PROGMEM = { // 'arduino-icon', 128x64px 0xff, 0xff, 0xff, 0xff, 0xff, 0xff, 0xff, 0xff, 0xff, 0xff, 0xff, 0xff, 0xff, 0xff, 0xff, 0xff, 0xff, 0xff, 0xff, 0xff, 0xff, 0xff, 0xff, 0xff, 0xff, 0xff, 0xff, 0xff, 0xff, 0xff, 0xff, 0xff, 0xff, 0xff, 0xfe, 0x00, 0x07, 0xff, 0xff, 0xff, 0xff, 0xff, 0xff, 0x80, 0x01, 0xff, 0xff, 0xff, 0xff, 0xff, 0xe0, 0x00, 0x00, 0xff, 0xff, 0xff, 0xff, 0xff, 0xfc, 0x00, 0x00, 0x3f, 0xff, 0xff, 0xff, 0xff, 0x80, 0x00, 0x00, 0x1f, 0xff, 0xff, 0xff, 0xff, 0xe0, 0x00, 0x00, 0x07, 0xff, 0xff, 0xff, 0xfe, 0x00, 0x00, 0x00, 0x07, 0xff, 0xff, 0xff, 0xff, 0x80, 0x00, 0x00, 0x01, 0xff, 0xff, 0xff, 0xfc, 0x00, 0x00, 0x00, 0x03, 0xff, 0xff, 0xff, 0xff, 0x00, 0x00, 0x00, 0x00, 0xff, 0xff, 0xff, 0xf0, 0x00, 0x00, 0x00, 0x00, 0xff, 0xff, 0xff, 0xfc, 0x00, 0x00, 0x00, 0x00, 0x3f, 0xff, 0xff, 0xe0, 0x00, 0x00, 0x00, 0x00, 0x3f, 0xff, 0xff, 0xf0, 0x00, 0x00, 0x00, 0x00, 0x1f, 0xff, 0xff, 0xc0, 0x00, 0x00, 0x00, 0x00, 0x1f, 0xff, 0xff, 0xe0, 0x00, 0x00, 0x00, 0x00, 0x0f, 0xff, 0xff, 0x80, 0x00, 0x00, 0x00, 0x00, 0x0f, 0xff, 0xff, 0xc0, 0x00, 0x00, 0x00, 0x00, 0x07, 0xff, 0xff, 0x00, 0x00, 0x00, 0x00, 0x00, 0x03, 0xff, 0xff, 0x80, 0x00, 0x00, 0x00, 0x00, 0x03, 0xff, 0xfe, 0x00, 0x00, 0x00, 0x00, 0x00, 0x01, 0xff, 0xfe, 0x00, 0x00, 0x00, 0x00, 0x00, 0x01, 0xff, 0xfc, 0x00, 0x00, 0xff, 0xf0, 0x00, 0x00, 0xff, 0xfc, 0x00, 0x00, 0x3f, 0xfc, 0x00, 0x00, 0xff, 0xfc, 0x00, 0x03, 0xff, 0xfc, 0x00, 0x00, 0x7f, 0xf8, 0x00, 0x00, 0xff, 0xff, 0x00, 0x00, 0xff, 0xf8, 0x00, 0x0f, 0xff, 0xff, 0x00, 0x00, 0x3f, 0xf0, 0x00, 0x03, 0xff, 0xff, 0xc0, 0x00, 0x7f, 0xf0, 0x00, 0x1f, 0xff, 0xff, 0xc0, 0x00, 0x1f, 0xe0, 0x00, 0x0f, 0xff, 0xff, 0xe0, 0x00, 0x7f, 0xf0, 0x00, 0x7f, 0xff, 0xff, 0xe0, 0x00, 0x0f, 0xc0, 0x00, 0x1f, 0xff, 0xff, 0xf8, 0x00, 0x3f, 0xe0, 0x00, 0xff, 0xff, 0xff, 0xf8, 0x00, 0x07, 0x80, 0x00, 0x7f, 0xff, 0xff, 0xfc, 0x00, 0x1f, 0xe0, 0x00, 0xff, 0xff, 0xff, 0xfc, 0x00, 0x03, 0x80, 0x00, 0xff, 0xff, 0xff, 0xfc, 0x00, 0x1f, 0xc0, 0x01, 0xff, 0xff, 0xff, 0xfe, 0x00, 0x03, 0x00, 0x01, 0xff, 0xff, 0xff, 0xfe, 0x00, 0x1f, 0xc0, 0x03, 0xff, 0xff, 0xff, 0xff, 0x00, 0x00, 0x00, 0x03, 0xff, 0xff, 0xff, 0xff, 0x00, 0x0f, 0xc0, 0x03, 0xff, 0xff, 0xff, 0xff, 0x80, 0x00, 0x00, 0x07, 0xff, 0xf0, 0x7f, 0xff, 0x00, 0x0f, 0xc0, 0x07, 0xff, 0xff, 0xff, 0xff, 0xc0, 0x00, 0x00, 0x0f, 0xff, 0xf0, 0x7f, 0xff, 0x80, 0x0f, 0x80, 0x07, 0xff, 0xff, 0xff, 0xff, 0xe0, 0x00, 0x00, 0x1f, 0xff, 0xf0, 0x7f, 0xff, 0x80, 0x07, 0x80, 0x0f, 0xff, 0xff, 0xff, 0xff, 0xf0, 0x00, 0x00, 0x3f, 0xff, 0xf0, 0x7f, 0xff, 0xc0, 0x07, 0x80, 0x0f, 0xff, 0xff, 0xff, 0xff, 0xf8, 0x00, 0x00, 0x7f, 0xff, 0xf0, 0x7f, 0xff, 0xc0, 0x07, 0x80, 0x0f, 0xfe, 0x00, 0x00, 0xff, 0xfc, 0x00, 0x00, 0xff, 0xfc, 0x00, 0x03, 0xff, 0xc0, 0x07, 0x80, 0x0f, 0xfe, 0x00, 0x00, 0xff, 0xfe, 0x00, 0x01, 0xff, 0xfc, 0x00, 0x01, 0xff, 0xc0, 0x07, 0x80, 0x0f, 0xfe, 0x00, 0x00, 0xff, 0xff, 0x00, 0x03, 0xff, 0xfc, 0x00, 0x01, 0xff, 0xc0, 0x07, 0x80, 0x0f, 0xfe, 0x00, 0x00, 0xff, 0xff, 0x00, 0x03, 0xff, 0xfc, 0x00, 0x01, 0xff, 0xc0, 0x07, 0x80, 0x0f, 0xfe, 0x00, 0x00, 0xff, 0xff, 0x00, 0x03, 0xff, 0xfc, 0x00, 0x01, 0xff, 0xc0, 0x07, 0x80, 0x0f, 0xff, 0xff, 0xff, 0xff, 0xfe, 0x00, 0x01, 0xff, 0xff, 0xe0, 0x7f, 0xff, 0xc0, 0x07, 0x80, 0x0f, 0xff, 0xff, 0xff, 0xff, 0xfc, 0x00, 0x00, 0xff, 0xff, 0xf0, 0x7f, 0xff, 0xc0, 0x07, 0x80, 0x0f, 0xff, 0xff, 0xff, 0xff, 0xfc, 0x00, 0x00, 0xff, 0xff, 0xf0, 0x7f, 0xff, 0xc0, 0x07, 0x80, 0x0f, 0xff, 0xff, 0xff, 0xff, 0xf8, 0x00, 0x00, 0x7f, 0xff, 0xf0, 0x7f, 0xff, 0xc0, 0x07, 0x80, 0x0f, 0xff, 0xff, 0xff, 0xff, 0xf0, 0x00, 0x00, 0x3f, 0xff, 0xf0, 0x7f, 0xff, 0x80, 0x07, 0x80, 0x07, 0xff, 0xff, 0xff, 0xff, 0xe0, 0x00, 0x00, 0x1f, 0xff, 0xf0, 0x7f, 0xff, 0x80, 0x07, 0xc0, 0x07, 0xff, 0xff, 0xff, 0xff, 0xc0, 0x00, 0x00, 0x0f, 0xff, 0xff, 0xff, 0xff, 0x80, 0x0f, 0xc0, 0x03, 0xff, 0xff, 0xff, 0xff, 0x80, 0x00, 0x00, 0x07, 0xff, 0xff, 0xff, 0xff, 0x00, 0x0f, 0xc0, 0x03, 0xff, 0xff, 0xff, 0xff, 0x00, 0x00, 0x00, 0x03, 0xff, 0xff, 0xff, 0xff, 0x00, 0x0f, 0xe0, 0x01, 0xff, 0xff, 0xff, 0xfe, 0x00, 0x03, 0x00, 0x01, 0xff, 0xff, 0xff, 0xfe, 0x00, 0x1f, 0xe0, 0x00, 0xff, 0xff, 0xff, 0xfc, 0x00, 0x07, 0x80, 0x00, 0xff, 0xff, 0xff, 0xfc, 0x00, 0x1f, 0xe0, 0x00, 0x7f, 0xff, 0xff, 0xf0, 0x00, 0x0f, 0xc0, 0x00, 0x3f, 0xff, 0xff, 0xf8, 0x00, 0x3f, 0xf0, 0x00, 0x3f, 0xff, 0xff, 0xe0, 0x00, 0x1f, 0xe0, 0x00, 0x1f, 0xff, 0xff, 0xf0, 0x00, 0x3f, 0xf8, 0x00, 0x1f, 0xff, 0xff, 0x80, 0x00, 0x3f, 0xe0, 0x00, 0x07, 0xff, 0xff, 0xe0, 0x00, 0x7f, 0xf8, 0x00, 0x0f, 0xff, 0xff, 0x00, 0x00, 0x7f, 0xf8, 0x00, 0x03, 0xff, 0xff, 0xc0, 0x00, 0x7f, 0xfc, 0x00, 0x03, 0xff, 0xf8, 0x00, 0x00, 0xff, 0xfc, 0x00, 0x00, 0xff, 0xff, 0x00, 0x00, 0xff, 0xfe, 0x00, 0x00, 0x7f, 0xe0, 0x00, 0x01, 0xff, 0xfe, 0x00, 0x00, 0x1f, 0xf8, 0x00, 0x01, 0xff, 0xfe, 0x00, 0x00, 0x00, 0x00, 0x00, 0x03, 0xff, 0xff, 0x00, 0x00, 0x00, 0x00, 0x00, 0x03, 0xff, 0xff, 0x00, 0x00, 0x00, 0x00, 0x00, 0x07, 0xff, 0xff, 0x80, 0x00, 0x00, 0x00, 0x00, 0x03, 0xff, 0xff, 0x80, 0x00, 0x00, 0x00, 0x00, 0x0f, 0xff, 0xff, 0xc0, 0x00, 0x00, 0x00, 0x00, 0x07, 0xff, 0xff, 0xc0, 0x00, 0x00, 0x00, 0x00, 0x1f, 0xff, 0xff, 0xe0, 0x00, 0x00, 0x00, 0x00, 0x0f, 0xff, 0xff, 0xe0, 0x00, 0x00, 0x00, 0x00, 0x7f, 0xff, 0xff, 0xf8, 0x00, 0x00, 0x00, 0x00, 0x3f, 0xff, 0xff, 0xf8, 0x00, 0x00, 0x00, 0x01, 0xff, 0xff, 0xff, 0xfe, 0x00, 0x00, 0x00, 0x00, 0x7f, 0xff, 0xff, 0xfc, 0x00, 0x00, 0x00, 0x03, 0xff, 0xff, 0xff, 0xff, 0x00, 0x00, 0x00, 0x00, 0xff, 0xff, 0xff, 0xff, 0x00, 0x00, 0x00, 0x0f, 0xff, 0xff, 0xff, 0xff, 0xc0, 0x00, 0x00, 0x03, 0xff, 0xff, 0xff, 0xff, 0xc0, 0x00, 0x00, 0x3f, 0xff, 0xff, 0xff, 0xff, 0xf0, 0x00, 0x00, 0x0f, 0xff, 0xff, 0xff, 0xff, 0xf0, 0x00, 0x01, 0xff, 0xff, 0xff, 0xff, 0xff, 0xfe, 0x00, 0x00, 0x3f, 0xff, 0xff, 0xff, 0xff, 0xff, 0x00, 0x0f, 0xff, 0xff, 0xff, 0xff, 0xff, 0xff, 0xc0, 0x03, 0xff, 0xff, 0xff, 0xff, 0xff, 0xff, 0xff, 0xff, 0xff, 0xff, 0xff, 0xff, 0xff, 0xff, 0xff, 0xff, 0xff, 0xff, 0xff, 0xff, 0xff, 0xff, 0xff, 0xff, 0xff, 0xff, 0xff, 0xff, 0xff, 0xff, 0xff, 0xff, 0xff, 0xff, 0xff, 0xff, 0xff, 0xff, 0xff, 0xff, 0xff, 0xff, 0xff, 0xff, 0xff, 0xff, 0xff, 0xff, 0xff, 0xff, 0xff, 0xff, 0xff, 0xff, 0xff, 0xff, 0xff, 0xff, 0xff, 0xff, 0xff, 0xff, 0xff, 0xff, 0xff, 0xff, 0xff }; void setup() { Serial.begin(115200); // initialize OLED display with I2C address 0x3C if (!oled.begin(SSD1306_SWITCHCAPVCC, 0x3C)) { Serial.println(F("failed to start SSD1306 OLED")); while (1); } delay(2000); // wait two seconds for initializing oled.setCursor(0, 0); } void loop() { oled.clearDisplay(); // display bitmap oled.drawBitmap(0, 0, arduino_icon, 128, 64, WHITE); oled.display(); delay(1000); // invert display oled.invertDisplay(1); delay(1000); }

Conseils pour les meilleurs résultats d'image sur l'OLED :

  • Utilisez des images noir et blanc à contraste élevé
  • Redimensionnez les images à 128x64 avant la conversion
  • Les graphiques simples fonctionnent mieux que les photos complexes
  • Les images plus petites utilisent moins de mémoire ESP32 C3 Super Mini
  • Testez différents paramètres de tramage pour la qualité des photos

※ NOS MESSAGES

  • N'hésitez pas à partager le lien de ce tutoriel. Cependant, veuillez ne pas utiliser notre contenu sur d'autres sites web. Nous avons investi beaucoup d'efforts et de temps pour créer ce contenu, veuillez respecter notre travail !